
Table of Contents
This tutorial was written by Mdu Sibisi, a software developer and blogger with over ten years of experience, primarily in object-orientated languages. Visit Mdu's website to see more of his work!
Next.js 16 marks a significant shift for the framework. What started as a simple SSR helper is now a comprehensive full-stack React engine.
This release brings major changes: Turbopack replaces Webpack as the default bundler, Cache Components introduces Partial Pre-Rendering (PPR), and middleware.ts becomes proxy.ts. The performance improvements are substantial, but you still may not be ready to switch over. You might be concerned about bugs, don't have time for migration work, or simply aren't ready to abandon Webpack yet.
This article breaks down what's actually different between Next.js 15 and 16, so you can decide whether to upgrade now or wait until v15's LTS support expires. If you do decide to switch over, we've included a short migration guide at the end to help ease your transition.
Next.js 15 vs. 16 at a glance
Feature | Next.js 15 | Next.js 16 |
|---|---|---|
Bundler | Webpack as the default bundler, with Turbopack as an optional/experimental alternative. | Turbopack replaces Webpack, offering up to 10× faster Fast Refresh and 5× faster builds. |
Caching Model | Fetch requests are cached by default with limited Partial Pre‑Rendering (PPR). | Cache Components with Partial Pre‑Rendering (PPR) for instant navigation and predictable caching defaults. |
Middleware Architecture | Middleware API for routing and edge logic. | Middleware replaced by proxy.ts for clearer network boundaries. |
React Version & Compiler | Introduced React 19 support along with the Speedy Web Compiler (SWC) for transpilation. | Offers full React 19.2 support and uses SWC with Turbopack integration for faster builds. |
Image Optimization | Next.js Image component with built‑in optimization (WebP, AVIF). | Continued Image optimization and tighter integration with Turbopack for faster builds. |
AMP Support Status | AMP is deprecated, but legacy support is still available. | AMP is fully deprecated and no longer supported in v16. |
Performance and bundling
When deciding whether you should move from Next.js 15 to 16, performance is often the most important consideration.
The bundler plays a big role in the framework's performance. Next.js has used Webpack as the default bundler since the first version of the framework was released in 2016. Vercel's full move to Turbopack is one of the reasons Next.js 16 was such a pivotal release.
Next.js 15: Webpack default, Turbopack opt-in
As with the three previous iterations (v14, v13, and v12), Next.js 15 uses version 5 of Webpack. It offered improved disk caching, optimized Fast Refresh, more stable long-term caching of assets, and enhanced tree shaking over its predecessors.
In addition to the default implementation of WebPack, Next.js 15 also allowed developers to opt into an alpha version of Turbopack (using the --turbopack flag), a feature that had been present since Next.js 13. This inclusion allowed developers to experiment with and acclimate themselves to the bundler. It also allowed them to influence development by testing, reporting bugs, and sharing their ideas on how it could be improved.
Despite being in alpha, Turbopack was already showcasing boosts in build speed and hot reload times compared to Webpack; improvements that stemmed from its rewrite in Rust.
Next.js 16: Turbopack as default bundler
Next.js 16 fully replaced Webpack with Turbopack, much to the chagrin of developers who had an affinity for Webpack and disliked the fact that everything was being rewritten in Rust. However, Turbopack's use of Rust is precisely why it can outperform its JavaScript-based predecessor so easily.
Turbopack uses Rust's low-level control, fearless concurrency, and persistent caching to deliver incremental bundling where only changed files are rebuilt as opposed to the entire dependency graph. This also makes Hot Module Replacement (HMR) more efficient, since faster builds allow HMR to inject updated modules into the browser runtime more quickly.
Since Rust avoids unpredictable pauses (like garbage collection in JavaScript), it allows for incremental updates to be applied consistently and quickly, which also makes cold builds faster.
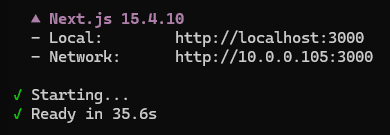
Let's use MySocials to showcase this. The Next.js 15 dev server took 35.6 seconds to initiate and run:
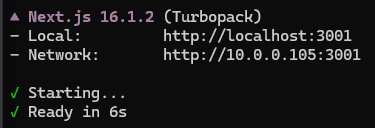
After upgrading the project to Next.js 16, the dev server launch time was cut down to 6 seconds:
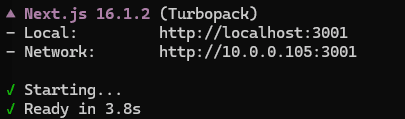
A warm build was even quicker at 3.8 seconds:
We also found that compilation in development mode took Next.js 15.1 seconds to complete, while its v16 counterpart was done in 21 seconds. After editing the footer and reloading, v15 recompilation in Dev mode took 10.6 seconds, compared to 4.6 seconds in Next.js 16. In both instances, the changes were made available to the browser almost immediately thanks to HMR. Following additional rounds of testing and benchmarking, we found that a full Next.js 15 build took 251.67 seconds, whereas the v16 build took 36.25 seconds.
Here's a side-by-side breakdown:
Aspect | Next.js 15 (WebPack) | Next.js 16 (Turbopack) |
|---|---|---|
Cold Startup Time | 35.6s | 6s (Nearly 6x faster) |
Warm Startup Time | 8.6s | 3.8s (2.2x faster) |
Dev Compilation Speed | 121.7s | 21.5s (5~x faster) |
HMR / Fast Refresh Latency | 10.6s | 4.6s (2~x faster) |
Full production build | 251.67s | 36.25s (7~x faster) |
Why this matters
Next.js 16's new optimizations and features let you rapidly apply and test hot fixes. These are meaningful performance boosts that have short and long-term implications on the productivity of your team. Turbopack's incremental compilation is particularly favorable in monorepos and large apps with hundreds of packages. Next.js 16 only recompiles files that have new changes (along with their direct dependencies), saving you time and improving your project's ability to scale.
With that being said, it's important to note that Turbopack is still maturing, and several bugs have been reported and still persist. Contrastingly, Webpack is stable, reliable, and extremely well-supported with a thriving ecosystem of plugins and loaders. You could also always use Turbopack as an alternative bundler in Next.js 15.
However, Next.js 15 uses an alpha version of Turbopack. This means it's less stable and can only be run in dev mode. Features like Cache Components and React 19.2 support are also missing. Upgrading to Next.js 16 would allow you to take full advantage of Turbopack's capabilities. Although Turbopack is the default bundler, Next.js 16 still has full Webpack support. This means you can revert to it at any time after upgrading.
Cache components and use cache
v16 changes how caching is handled in Next.js. Where its predecessor used implicit caching as a default, Next.js 16 introduces a new explicit caching model.
The problem with implicit caching in Next.js 15
Next.js automatically decides what to cache and for how long, based on the APIs you use and where you use them. For example, data returned from fetch requests is uncached unless you explicitly opt in, but rendering work and certain data requests are cached per request lifecycle to improve performance.
Because earlier versions of Next.js leaned heavily on implicit caching, many developers assumed that repeated calls to the same endpoint would be cached automatically. However, if you didn't explicitly set options like force-cache or next:{ revalidate: 60 }, every request would hit the API fresh. This led to unexpected performance issues, especially when developers thought they were benefiting from caching but weren’t.
Route segment caching was as confusing (if not more) because of how extensively caching behavior relied on the data-fetching API used in the segment. This meant that each route segment, whether a page, layout, or nested child, would be cached non-uniformly. For example, a segment using getStaticProps would be cached at build time, while one using getServerSideProps would fetch fresh data on every request. This implicit link between API choice and caching made it difficult to reason about how segments behaved without carefully tracking which API was in play.
It could also lead to accidental over-caching. If developers used getStaticProps without a revalidate interval, pages would remain cached indefinitely, even if the underlying data changed. This led to stale content being served to users until a new build was triggered.
How Next.js 16 improves caching
Next.js 16 makes caching explicit, granular, and predictable through Cache Components. This feature addresses the pitfalls of fetch caching by letting you wrap expensive components and functions in a cache boundary that you specify through the "use cache" directive. It essentially allows you to control how these elements should be cached and revalidated.
This goes for route segment caching, too. Cache Components provide each segment or component with its own cache boundary. Because caching is opt-in and configurable, the risk of over-caching reduces.
Code example: before vs. after
Here's an example showing implicit caching in v15:
 // pages/products.js (Next.js 15)

 export async function getStaticProps() {
   const res = await fetch("https://api.example.com/products");
   const products = await res.json();

   return {
     props: { products },
     revalidate: 60, // refresh every 60 seconds
   };
 }

 export default function ProductsPage({ products }) {
   return (
     <ul>
       {products.map(p => <li key={p.id}>{p.name}</li>)}
     </ul>
   );
 }
The getStaticProps function automatically caches the page at build time as static HTML until the next build is initiated. You'll notice the inclusion of revalidate in the return. Without it, you risk accidental overcaching (stale data until a rebuild).
v16 uses explicit caching:
// app/products/page.js (Next.js 16)

export async function getProducts() {
    "use cache"; // Explicit directive: cache this function’s result
    const res = await fetch("https://api.example.com/products");
    return res.json();
}

export default async function ProductsPage() {
    const products = await getProducts();
	"use cache"
    return (
        <ul>
        {products.map(p => <li key={p.id}>{p.name}</li>)}
        </ul>
    );
}
In this example, the "use cache" directive is called on both the function (getProducts) and the component level (<ul>). The getProducts function result is cached, while the rendered UI fragments are refreshed (revalidated) based on the default profile revalidation rules. You can also place the "use case" on the file-level (instead of on each function/component), essentially caching the entire page.
While the v16 example uses time-based intervals in its current form, you can explicitly set it to use tag-based invalidation or manual refresh. This lets you set clear revalidation rules, making updates predictable and easier to manage, instead of relying on implicit Incremental Static Regeneration (ISR) rules.
By moving from implicit, API‑driven caching in v15 to explicit cache boundaries in v16, developers gain a simpler, more consistent mental model. You no longer have to guess how caching interacts with route segments or fetch calls; it’s declared in code and easy to reason about.
Routing and edge changes
Next.js 16 replaces middleware.ts with proxy.ts. This change was mainly to clarify the layer's role. Many developers found the name misleading or confusing (and for good reason). It was never a catch-all "middleware" layer, but instead a proxy that intercepts and forwards requests at the network boundary.
The Problem with Next.js 15's middleware.ts
Before the change, many teams used the middleware (now proxy) layer for complex logic (authentication, database queries, heavy transformations), which was not its intended purpose. Developers would confuse it with Express.js middleware, which encouraged developers to treat it as a general logic layer rather than a lightweight routing tool.
Next.js 16's introduction of proxy.ts
With proxy.ts, routing rules are explicit and separated from caching. Proxy runs at the edge by default, which aligns with Vercel's push toward edge‑first architecture for Next.js 16 and future iterations of the framework. This ensures rewrites and redirects happen close to the user (edge side), improving latency.
Developers should think of the proxy as a network gatekeeper, not a hidden logic layer. This reduces confusion around where to put caching, revalidation, or authentication logic.
Migration considerations
When migrating from middleware.ts/middleware.js in Next.js 15 to proxy.ts/proxy.js in Next.js 16, you need to consider how your existing middleware logic maps to proxy rules. Simple routing logic from middleware maps cleanly to proxy rules, but heavier business logic should be moved into route handlers or server actions. In practice, if your middleware only rewrote /old-route to /new-route or redirected unauthenticated users to /login, those rules migrate directly into proxy.ts without much change.
The second consideration is identifying what breaks and what doesn’t. What breaks are cases where the original middleware layer was overloaded with responsibilities it wasn’t designed for, like database queries, complex authentication flows, or caching logic. You’ll need to refactor those into server components, API routes, or dedicated backend services. The core routing behaviors, like rewrites, redirects, and header manipulation, are safe.
Let's say your middleware.js file looks like this:
// middleware.js (Next.js 15)
import { NextResponse } from "next/server";

export function middleware(req) {
  const url = req.nextUrl;

  // Redirect unauthenticated users
  if (!req.cookies.get("auth")) {
    return NextResponse.redirect(new URL("/login", req.url));
  }

  // Rewrite /old-route to /new-route
  if (url.pathname === "/old-route") {
    return NextResponse.rewrite(new URL("/new-route", req.url));
  }

  return NextResponse.next();
}
Your migrated proxy.js will look like this:
// proxy.js (Next.js 16)
import { proxy } from "next/server";

export default proxy((req) => {
  const url = req.nextUrl;

  // Redirect unauthenticated users
  if (!req.cookies.get("auth")) {
    return Response.redirect(new URL("/login", req.url));
  }

  // Rewrite /old-route to /new-route
  if (url.pathname === "/old-route") {
    return Response.rewrite(new URL("/new-route", req.url));
  }

  // Forward all other requests
  return Response.next();
});
You'll notice that redirects and rewrites migrate directly. The logic is almost identical. Any mention of "middleware" is replaced with "proxy".
React 19.2 integration
Next.js 16 integrates React 19.2 (where Next.js 15 was built on React 18) as its default React runtime, bringing stable support for Server Components, Actions, and the React Compiler. This tight integration makes caching, async server APIs, and edge execution more predictable and efficient.
React 19.2 View Transitions
View Transitions uses the browser’s native View Transitions API to create smooth, animated changes between pages or UI states. It eliminates the need for complex animation libraries as the browser handles transitions. View Transitions also allows for seamless page‑to‑page animations, reducing the “hard cut” feel of traditional navigation.
useEffectEvent
Another notable feature introduced in React 19.2 is useEffectEvent. It lets you extract non‑reactive logic from your effects into a reusable function called an Effect Event, ultimately solving the stale closure problem. useEffectEvent ensures your effects always have access to the latest props and state without unnecessary re‑renders.
Imagine you’re building a chat app. When a user connects to a chat room, you want to show a notification styled with the current theme (light or dark). Your code in Next.js 15 (without useEffectEvent) would look like this:
import { useEffect } from "react";

function ChatRoom({ roomId, theme }) {
  useEffect(() => {
    const connection = createConnection("https://example.com", roomId);

    connection.on("connected", () => {
      showNotification("Connected!", theme); // captures theme
    });

    connection.connect();
    return () => connection.disconnect();
  }, [roomId, theme]); // re-runs whenever theme changes
}
The notification logic is placed directly inside useEffect. If the theme changes, the effect re‑runs unnecessarily, tearing down and reconnecting the chat. The Next.js 16 rewrite would look something like this:
import { useEffect, useEffectEvent } from "react";

function ChatRoom({ roomId, theme }) {
  const onConnected = useEffectEvent(() => {
    showNotification("Connected!", theme); // always uses latest theme
  });

  useEffect(() => {
    const connection = createConnection("https://example.com", roomId);

    connection.on("connected", () => {
      onConnected(); // stable, no stale closure
    });

    connection.connect();
    return () => connection.disconnect();
  }, [roomId]); // only re-runs when roomId changes
}
The use of useEffectEvent keeps the connection stable while still using the latest theme for notifications. Dependencies are simpler, the chat connection isn't torn down unnecessarily, and notifications reflect the current theme.
The implications for Next.js apps
View Transitions and useEffectEvent both reduce the reliance on custom. In React 18 and earlier, developers often wrote hooks to manage stale closures in effects or to synchronize state with subscriptions. useEffectEvent provides a stable callback that always sees the latest props and state. Similarly, View Transitions removes the need for custom hooks or context providers to manage navigation animations. Together, these features cut down on boilerplate and make Next.js apps leaner and easier to maintain.
These features also contribute to more predictable rendering behavior. useEffectEvent ensures effects don’t re‑run unnecessarily, keeping connections or listeners stable while still reflecting fresh state. View Transitions integrates directly with the App Router, so transitions happen consistently across route changes without unexpected flickers or mismatched states. For developers, this means fewer surprises in how React and Next.js handle updates, and for users, it means smoother, more reliable interactions.
Stable support for the React Compiler
Next.js 16 ships with React 19.2, and that includes the React Compiler as a first‑class integration. In practice, this means Next.js developers no longer need to scatter useMemo, useCallback, or React.memo throughout their codebase to prevent unnecessary re‑renders.
The compiler analyzes your components at build time and automatically applies memoization optimizations. For Next.js apps, this is especially impactful because of the App Router and Server Components model. Server Components already reduce client‑side JavaScript, and the compiler ensures that the remaining client components render efficiently without developer micromanagement. Combined with Next.js 16’s explicit caching, you get predictable performance both on the server and client.
Developers can now write straightforward React code in Next.js without wrapping everything in memoization hooks. The compiler handles performance tuning automatically, so users experience smoother interactions.
Breaking changes and deprecations
The move from middleware to proxy wasn't the only potential project-breaking change that was introduced with Next.js 16. The next/image component shifted toward native browser features and simpler defaults.
Lazy‑loading is now applied automatically, responsive sizing no longer requires the layout prop, and styling props like objectFit and objectPosition have been deprecated in favor of plain CSS. These changes reduce abstractions but require migration if you relied on older defaults.
Audit and migration considerations
You'll need to remove deprecated props like layout, objectFit, and objectPosition, then add loading=eager or priority to prevent lazy-loading delays. Use fill for full‑width images or explicit dimensions for fixed sizing. This provides more responsive control.
For styling, move image fit/position logic into CSS classes for consistency. This helps manage the Cumulative Layout Shift (CLS). Tools like Lighthouse or WebPageTest can help you verify if images are causing layout shifts. To optimize the delivery of your images, use modern formats like WebP and AVIF. Next.js 16 automatically serves optimized versions, but it's always a good idea to confirm that your source assets are high-quality.
Remember to check file sizes. Large hero images should be compressed without visible quality loss. In addition to this, ensure images are cached at the edge for fast delivery.
AMP support Is deprecated
In Next.js 16, AMP support is fully deprecated and removed. You can no longer configure pages with amp: true or amp: 'hybrid', and the AMP optimizer is gone. Teams and organizations that had invested in building AMP‑specific pages for mobile performance or SEO will be the most impacted by this change.
AMP support deprecation also affects developers who built workflows around AMP’s restrictions, such as limiting JavaScript usage, relying on AMP‑specific components, or configuring hybrid AMP pages. Those patterns are no longer supported, so developers need to migrate to Next.js’s unified rendering model.
Instead of AMP’s strict markup, they’ll lean on Server Components, Actions, Turbopack, and explicit caching to achieve performance goals. This requires some refactoring, but ultimately simplifies codebases by removing the need for parallel AMP templates.
Migrating from AMP
SEO has shifted over the last few years. Google no longer gives AMP pages preferential treatment. Instead, Core Web Vitals (CLS, LCP, INP) are the ranking signals. A well‑optimized Next.js page can perform just as well as AMP. AMP required separate templates and restrictions. Next.js 16 lets you build a single React app with consistent tooling, reducing complexity.
When migrating from AMP, you first need to audit your project's AMP pages. This means identifying any pages using amp: true or amp: 'hybrid'. Next, remove all AMP configs and consolidate into standard Next.js routes.
Implement Server Component to minimize client JS, then move styling into CSS instead of AMP-specific markup. Replace AMP-restricted forms with Actions for mutations.
Migration strategy: how to upgrade safely
First, consider whether you should upgrade. For greenfield projects, upgrading to Next.js 16 makes sense. Starting fresh means you can adopt the new primitives we've discussed without worrying about legacy code. You’ll be building on the latest architecture from day one, which reduces technical debt and ensures your app is aligned with the direction Next.js is heading.
For mature production apps, the decision requires more caution. Migrating from Next.js 15 involves rethinking middleware, auditing caching behavior, and replacing unstable APIs with their stable equivalents. If your app is business‑critical, you’ll want to plan a phased migration, starting with staging environments and regression testing before rolling out to production. The payoff is significant. You'll get better performance and more predictable caching. However, the risk of breaking existing flows means you should approach the upgrade deliberately rather than rushing.
Team size and risk tolerance also play a big role. Smaller teams with limited resources may prefer to wait until the ecosystem stabilizes further, since they may not have the bandwidth to troubleshoot regressions. Larger teams, or those with higher risk tolerance, can benefit from adopting Next.js 16 earlier, especially if they have the capacity to run performance regression tests, audit caching, and adjust CI/CD pipelines.
The right timing depends on your context, but once you’ve weighed those factors, the next step is to define a clear upgrade path.
Recommended upgrade path
The quickest way to upgrade your Next.js project from version 15 to 16 is by using the upgrade codemod. Open a terminal, navigate to your project's root folder, and run the following command:
npx @next/codemod@canary upgrade latestNote: Ensure that Node.js is installed before running the above command.
The upgrade codemod is interactive. So once it's done downloading the necessary packages, it will present you with a set of upgrade options that are relevant to your project. These include:
Adding the new Turbopack configuration to your next config file.
Migrating from
next lintto the ESLint CLI.Switching over to proxy from the middleware convention.
Remove
experimental_pprRoute Segment config from App Router pages and layouts.Drop all
unstable_prefixes from stabilized APIs.
You may not see some of these options if they're already up-to-date in your project. For instance, if your project is already using the latest ESLint CLI, it won't appear in the list:
![Screenshot of a terminal showing the Next.js upgrade codemod process. The command npx @next/codemod@canary upgrade latest is displayed at the top. The output shows Need to install the following packages: @next/codemod@16.1.1-canary.29 followed by Ok to proceed? (y) y. Several npm WARN deprecated messages appear in yellow highlighting for packages including inflight@1.0.6 with a note about memory leaks and recommending lru-cache, rimraf@2.6.3 stating versions prior to v4 are no longer supported, glob@7.2.3 stating versions prior to v9 are no longer supported, and cross-spawn-async@2.2.5 stating cross-spawn no longer requires a build toolchain. The detected installed versions show React: v19.2.3 and Next.js: v15.4.10. Two identical yellow question prompts read The following codemods are recommended for your upgrade. Select the ones to apply. with arrows indicating expandable options. An Instructions section lists keyboard controls: up/down arrows for Highlight option, left/right/[space] for Toggle selection, a for Toggle all, and enter/return for Complete answer. Three codemod options are listed with asterisks indicating selection: (v16.0.0-canary.11) remove-experimental-ppr with description Remove 'experimental_ppr' Route Segment Config from App Router pages and layouts, (v16.0.0-canary.10) remove-unstable-prefix, and (v15.6.0-canary.54) middleware-to-proxy.](/_next/image?url=https%3A%2F%2Fimages.ctfassets.net%2Fxqb1f63q68s1%2F15PMpBC0fwiUqeu2Ev3Lt1%2Fef886f030cbd424deffc240c8ef5870d%2FSpIMsy5.png&w=3840&q=75)
By default, all update options are toggled on. Once you're ready, you can hit the Enter key to perform the updates.
Alternatively, you can upgrade your project manually, especially if the upgrade codemod fails.
Manually upgrading Next.js 15 to 16
Run the following command to upgrade Next.js to the latest version:
npm install next@latestYou can then upgrade React using the following command:
npm install react@latest react-dom@latestNote: If you're using TypeScript, you'll need to update @types/react and @types/react-dom.
Some libraries may not yet support React 19. Fortunately, Next.js 16 supports React 18.2.0+. That means, if you find version mismatches or peer dependency conflicts, the best way to get around this is by upgrading or downgrading to React 18 (which Next.js 16 still supports), like this:
npm install react@18 react-dom@18Next, you'll need to migrate from the middleware to proxy. First, find the middleware file in your root folder (middleware.js or middleware.ts) and rename it to proxy (proxy.js if you're using JavaScript, or proxy.ts if you're using TypeScript).
Next, open your freshly renamed proxy file and replace the middleware export function to proxy (if available):
export function proxy(request: Request) {}You'll also need to replace any configuration flags that contain middleware as part of their name. For example, you'll need to change skipMiddlewareUrlNormalize to skipProxyUrlNormalize.
Alternatively, you can run the migration codemod from your terminal, which will perform all the migration steps for you:
npx @next/codemod@canary middleware-to-proxy .If your Next.js 15 project uses experimental Partial Pre-Rendering (PPR), you'll need to remove every instance of it (flags, configuration options, and route-level segments). Vercel provides another helpful codemod to perform this action. Run the following command from your terminal:
npx @next/codemod@latest remove-experimental-ppr .You can then opt into PPR by adding the cacheComponents option to your next.config.js file:
/** @type {import('next').NextConfig} */
const nextConfig = {
  cacheComponents: true,
}

module.exports = nextConfig
Next.js 16 stabilized a large number of plugins that were marked unstable in version 15. To ensure that your Next.js 16 project isn't calling deprecated APIs, you'll need to remove every mention of the unstable_ prefix from all stabilized APIs. You can do this manually or use the codemod:
npx @next/codemod@latest remove-unstable-prefix .Enabling Webpack as a fallback
If your project relies on WebPack loaders, plugins, or has a custom configuration, you can opt out of Turbopack. You can run Dev with the Webpack flag:
npx next dev --webpackAlternatively, you can edit the script section of your package:
"scripts": {
    "dev": "next dev --webpack",
    "build": "next build --webpack",
    "start": "next start",
    "lint": "next lint"
  },
This will force your project to use WebPack in both the production and development builds. If you need to use Turbopack for one of these builds (for instance, dev), you can simply remove the --webpack flag.
Post-upgrade tooling and testing tips
Developers looking for the latest bug fixes and feature updates may be tempted to opt into canary releases. Canary releases aren't guaranteed to be stable, as they may contain unfinished APIs, regressions, or performance issues.
How to approach canary releases
For most teams, the safer approach is to test canary builds in local development or staging environments, where you can evaluate new features without exposing end users to potential instability.
You can run the following command to pin your project to the latest Next.js canary build:
npm install next@canaryOpting into canary releases is most beneficial for developers who maintain libraries, frameworks, or large applications that need to anticipate changes. Canary builds are best for local development, staging, or feature branches. Avoid deploying them to production unless you’re comfortable with instability.
Whether you're running the Canary or official stable release, you'll want to combine Next.js 16's tooling upgrades with a set of targeted testing practices. The first tool you should acquaint yourself with is the Next.js DevTools MCP Server.
Using the Next.js DevTools MCP server
The Next.js DevTools MCP Server is designed to give developers deep visibility into how their application is behaving at runtime, especially around caching and rendering. Prior to its introduction, developers often had to rely on logs, headers, or trial‑and‑error to understand what was cached, when it would revalidate, and why certain components were re‑rendering.
Use it to inspect cache boundaries, to see exactly where cache() is being applied to your code. This is crucial because caching in Next.js 16 is explicit.
For revalidation timings, DevTools provide a clear view of how long cached data is valid and when it will be refreshed. Instead of guessing whether a component will revalidate after 30 seconds or only on demand, you can see the exact timing in the DevTools panel. This helps you audit your ISR or Cache Component settings and ensures that your content stays fresh without overloading your backend.
DevTools can also show you whether a component was served from cache, revalidated, or freshly rendered. This is especially important in Next.js 16 because PPR means parts of a page may be cached while others are dynamic.
In addition to the above, you'll also need to audit the Turbopack's cache behavior.
Auditing Turbopack's cache behavior
Turbopack now writes build artifacts into a persistent cache directory .next/cache. It's important to inspect the size and contents of this folder from time-to-time, especially if you're experiencing performance dips or build issues. Delete the contents of this folder to force Turbopack to rebuild everything from scratch. You can then measure how fast your rebuilds are against previous builds.
To measure how long builds take on Linux/macOS machines, you can use:
time npm run buildOr the following for Windows machines:
Measure-Command { npm run build }Conclusion
Next.js 16 introduces proxy.js, Cache Components, and Turbopack’s file cache to give developers clearer boundaries and faster builds.
Migrating from 15 to 16 requires teams to adapt to a new philosophy. Routing logic is now separated cleanly from authentication, caching is transparent and auditable through DevTools MCP, and build performance benefits from persistent caching. These changes reduce guesswork, improve scalability, and align Next.js more closely with modern React practices.
Ultimately, Next.js 16 is less of an incremental update and more of a re‑architecture. It challenges developers to rethink how they structure applications, but rewards that effort with faster builds, clearer caching strategies, and a more stable foundation for future growth.
Authentication, access control, and user management are critical components of any Next.js app. Use Descope's no / low code workflows to easily add natively embedded auth to your Next.js app without worrying about custom code or keeping up with breaking changes. You can also use Descope integrations on the Vercel Marketplace to add auth for your users and MCP servers in a few clicks. Sign up for a free Descope account to get started.