
Table of Contents
Don't have the time to read the entire post? Our human writers will be sad, but we understand. Summarize the post with your preferred LLM here instead.
This tutorial was written by Cameron Pavey, a full-stack developer living and working in Melbourne. You can connect with them on X to see more of their work!
Open Authorization (OAuth) 2.0 is an industry-standard authorization framework designed to allow one application to access the resources of another application on behalf of a user. OAuth 2.0 replaced OAuth 1.0 in 2012, becoming the gold standard for online authorization. Because it's intended to be adopted by a wide array of applications, OAuth 2.0 supports several flows—different ways of performing the authorization process—each of which is suitable for different use cases, such as the authorization code flow for web applications and the client credentials flow for server-to-server communications.
OAuth 2.0 flows can be complex to implement if you haven't done them before, especially if you are used to consuming APIs through API tokens or basic authentication. This complexity stems from OAuth's multiple interconnected components that must work together seamlessly. When any component is misconfigured, the entire process can fail, with frustrating errors often caused by issues like incorrect redirect URIs and invalid client credentials.
This guide will help you understand how OAuth 2.0 works, common issues developers run into while working with OAuth 2.0, and how you can troubleshoot and overcome these issues.
Authorization code flow
Two common OAuth flows are authorization code and client credentials. While not the only OAuth 2.0 flows, these illustrate how the various flows are suitable for different use cases. The authorization code flow is typically used for web applications where the user is present when a session starts. The client credentials flow, on the other hand, is more suitable for server-to-server communications and systems-level integrations where no specific user is present.
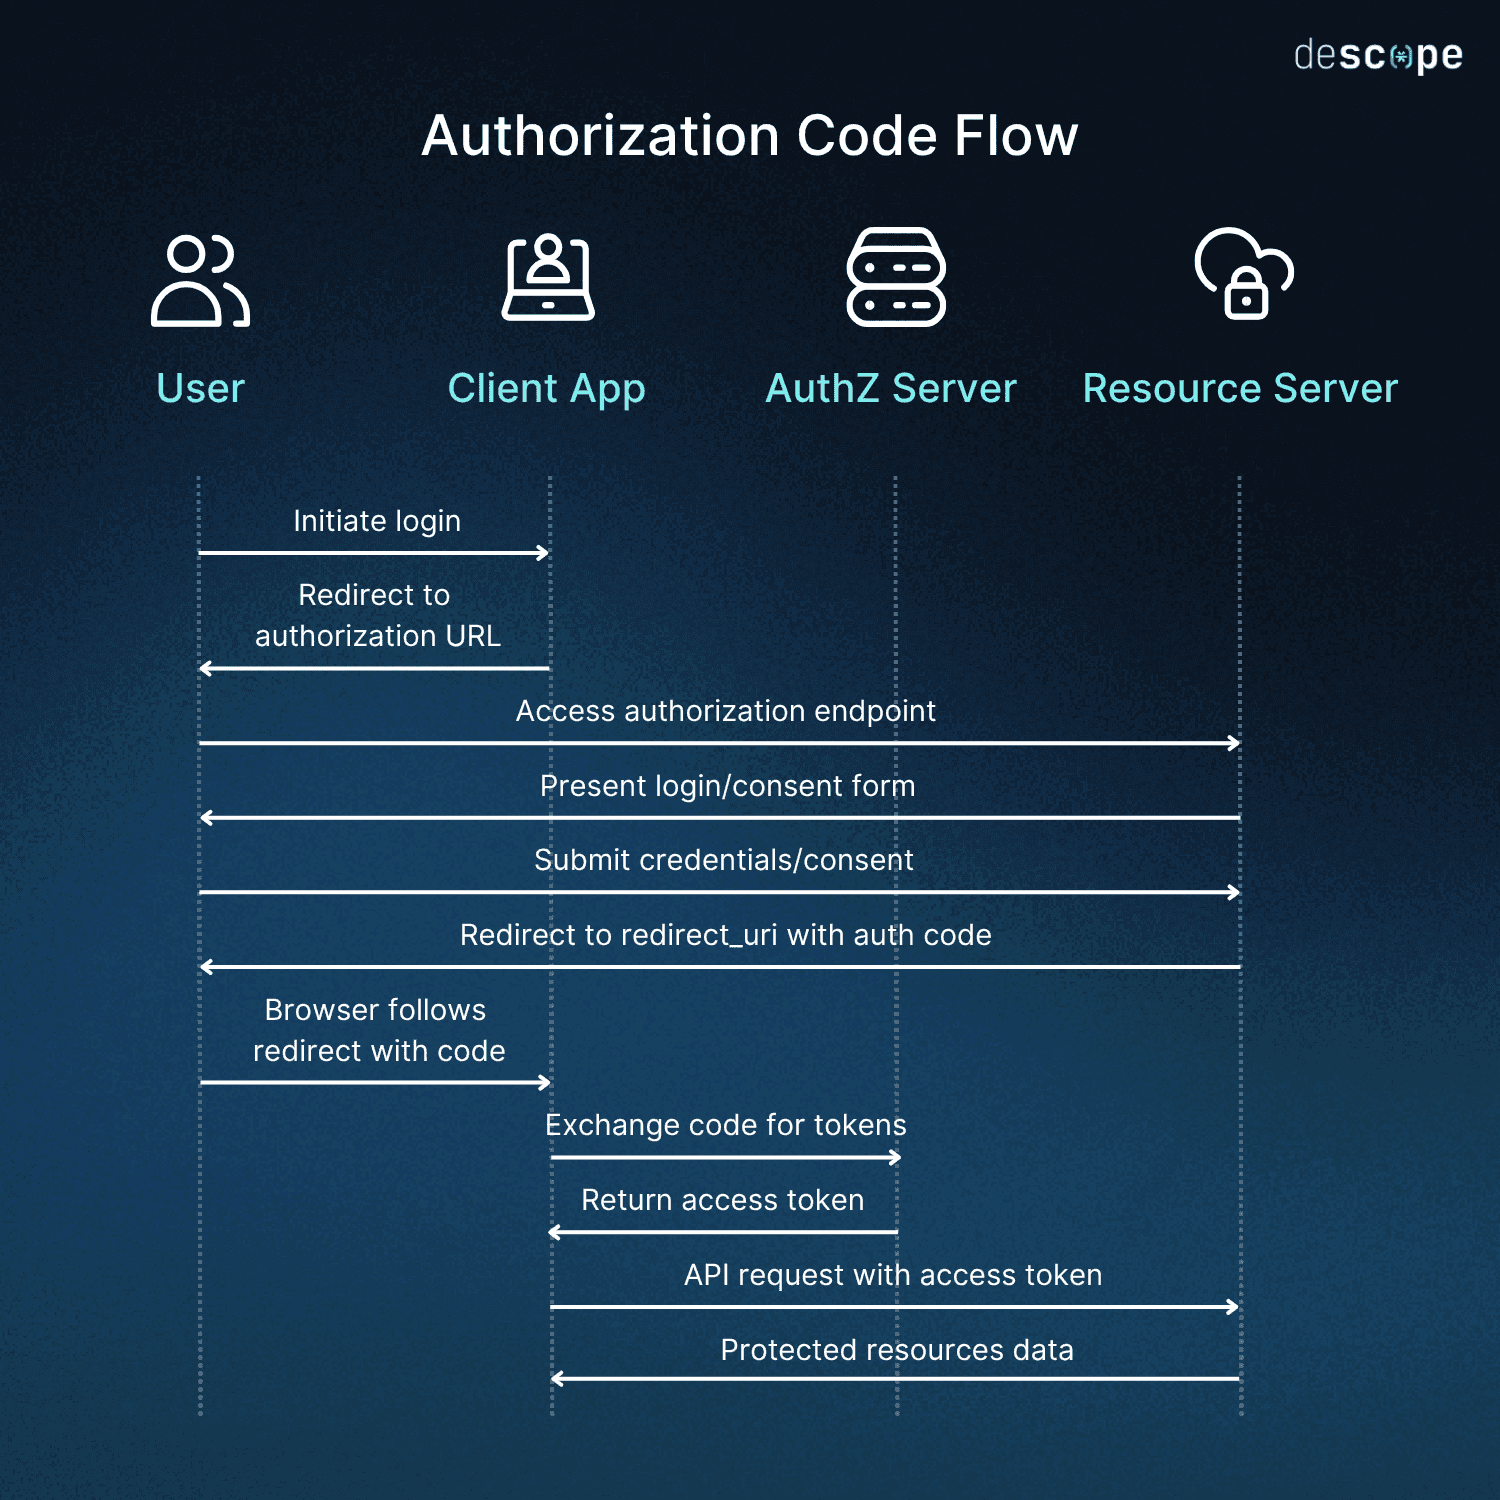
In the authorization code flow, a user will be redirected from your client app to the OAuth provider and prompted to provide consent, granting your application permission to access resources on behalf of that user. When the user provides consent, they are redirected back to your site with an authorization code, which can then be exchanged for an API access token. This redirect is one of the pivotal parts of this flow that can easily cause problems for developers.
For security reasons, you cannot just provide any redirect URI when you perform the OAuth flow. You must provide a URI that the OAuth provider knows and approves. You typically do this through the provider's online console when setting up the integration. The console will prompt you to provide callback URIs that you intend to use, and if you attempt to use one that you have not added to this configuration, the OAuth flow will fail.
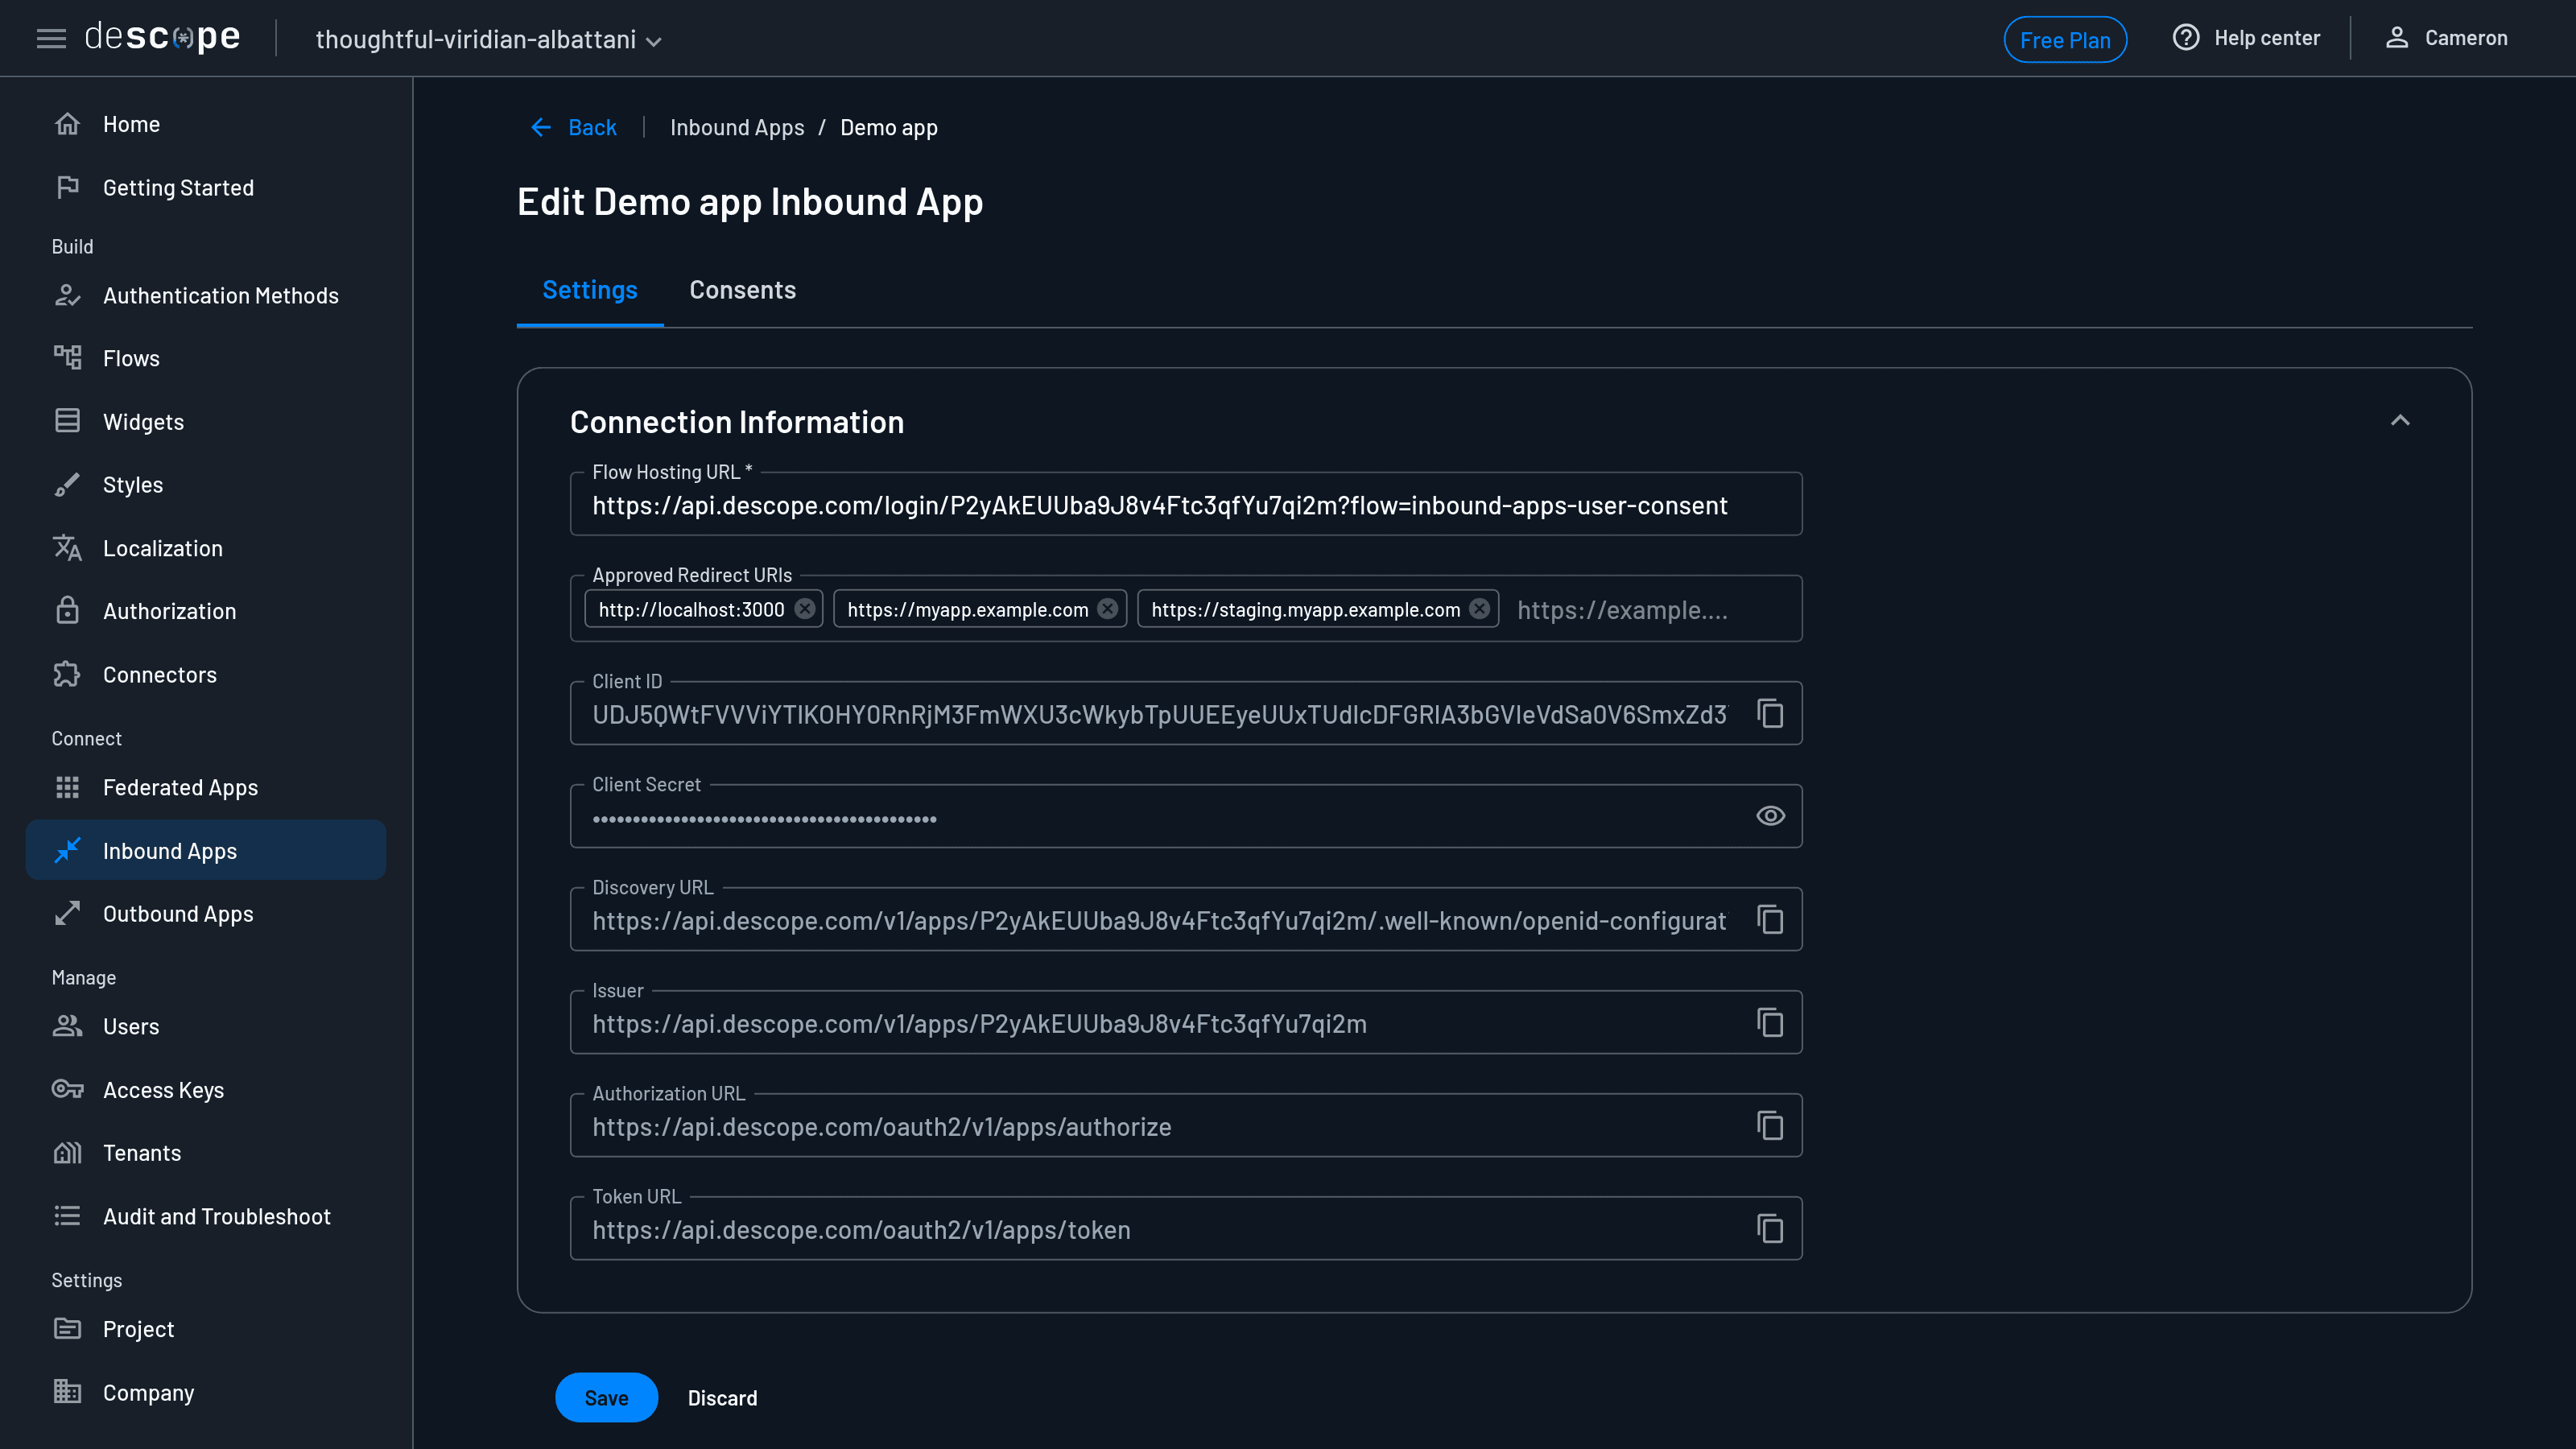
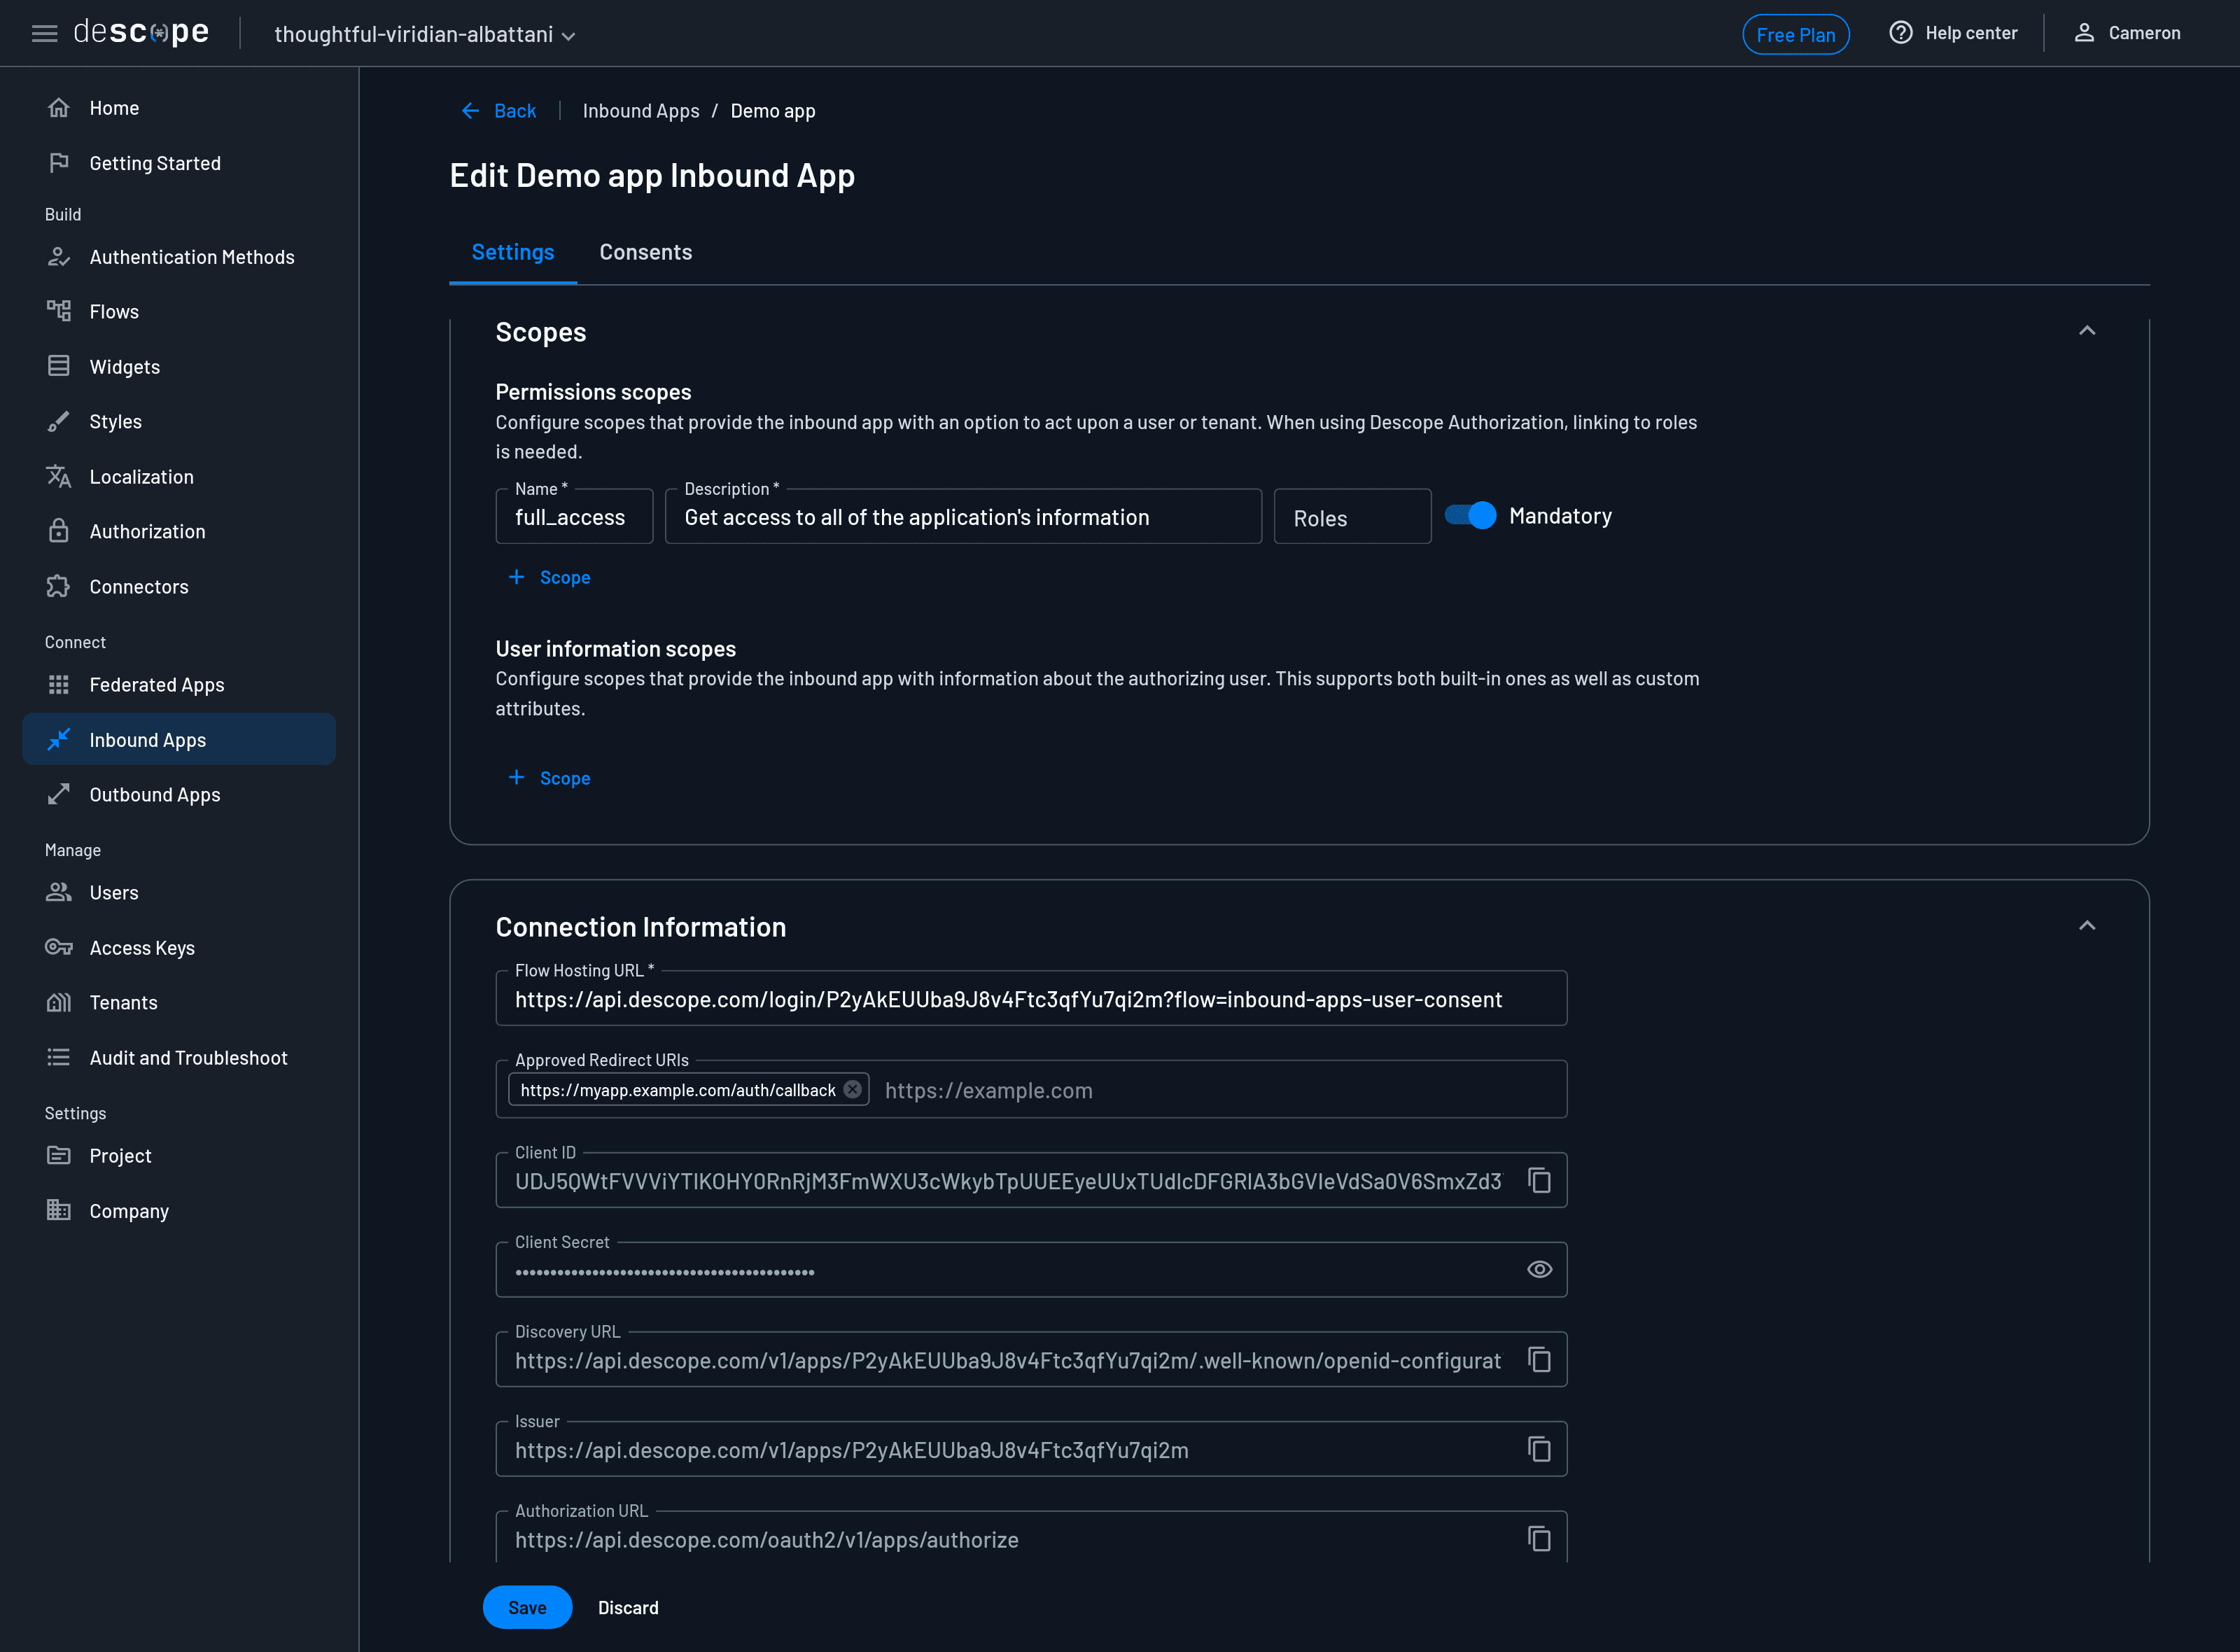
For instance, when configuring an inbound app through Descope Console, you have an opportunity to provide multiple approved redirect URIs. You should add one for each address that will serve your application and use a given OAuth provider, including local development and staging environments:
Altogether, the authorization code flow looks something like this:
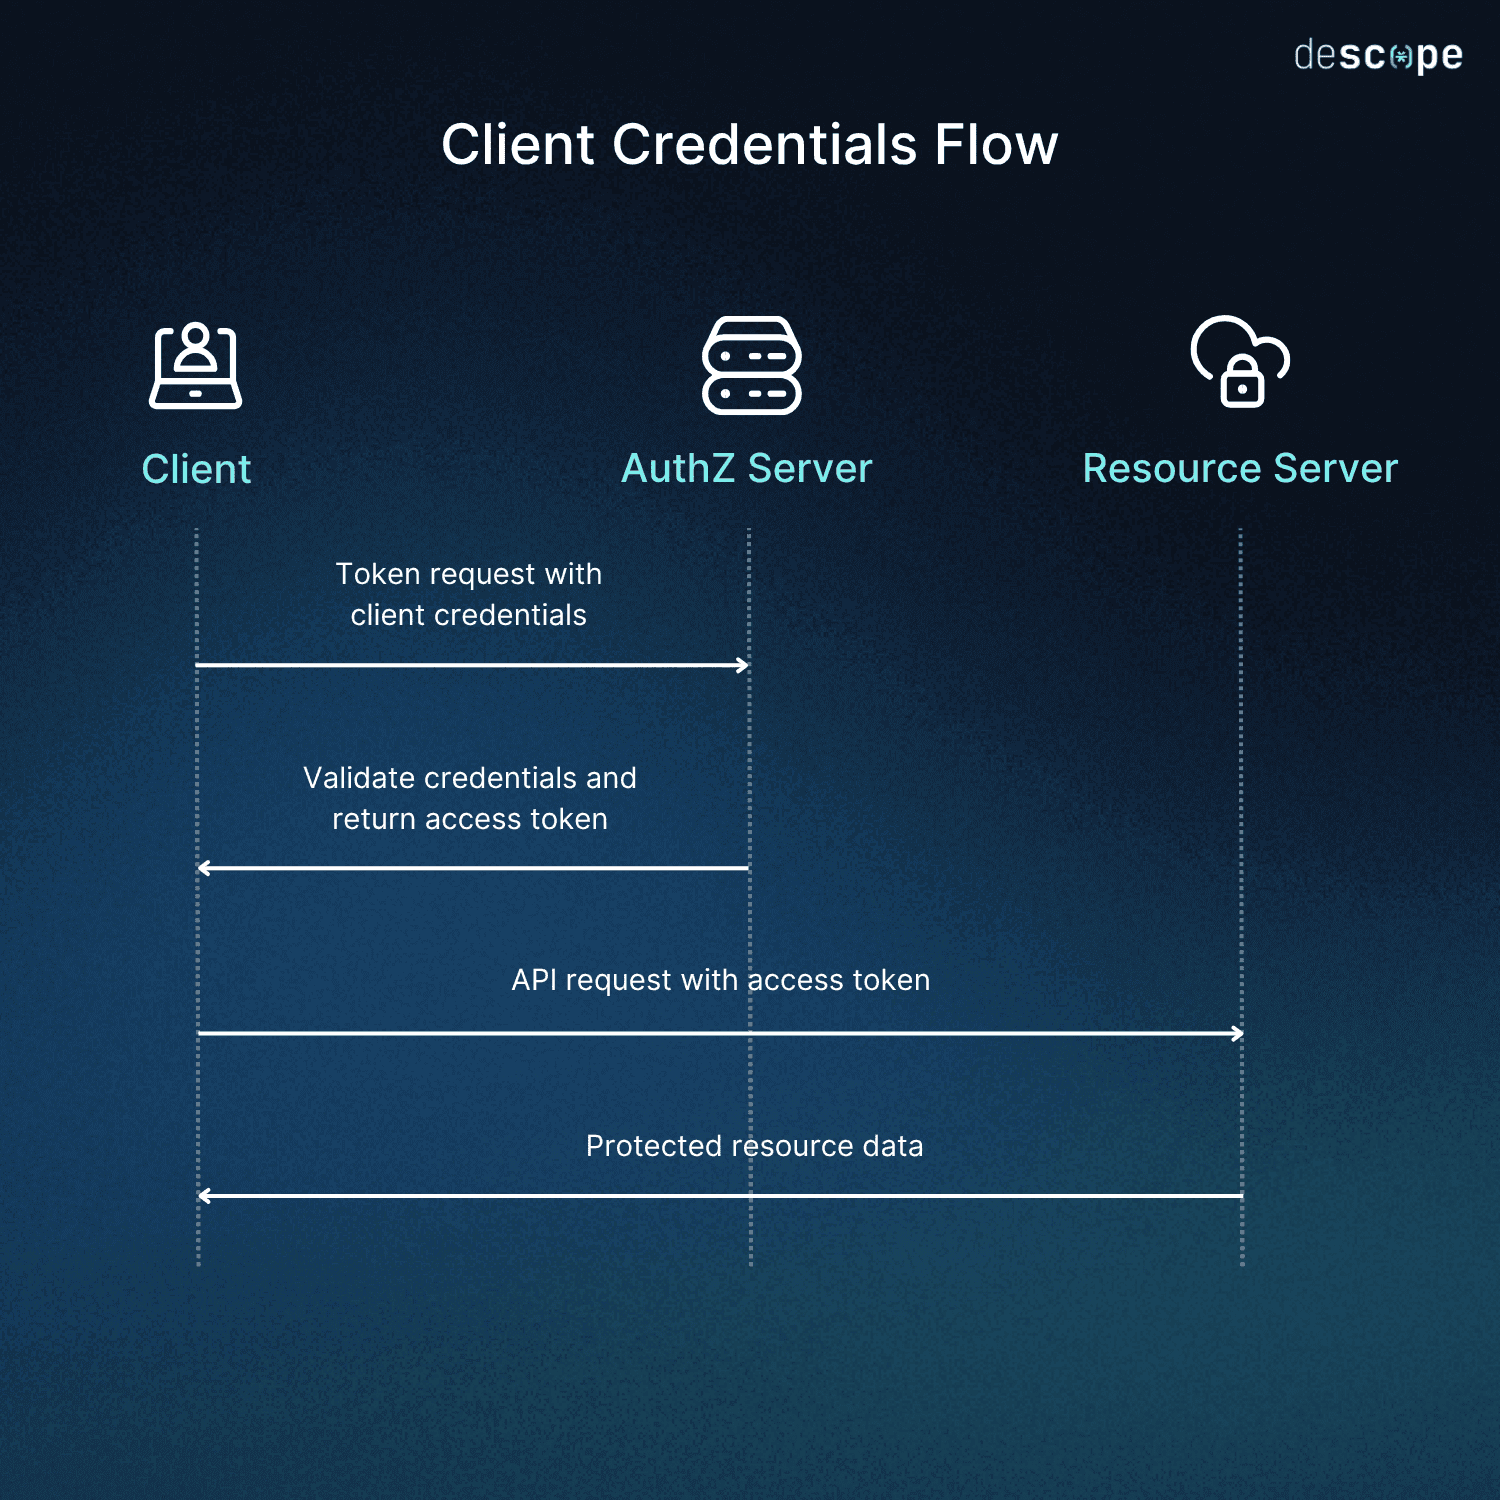
Client credentials flow
Where the authorization code flow allows your application access another server's resources on behalf of a user, the client credentials flow allows your application to use its own credentials instead of impersonating a user. When you register your application with the OAuth provider, you will receive a client ID and a client secret. With these two pieces of data as your credentials, you can perform the client credentials flow like so:
Regardless of which flow you use, you need to ensure that you configure it correctly. Misconfiguration will likely cause issues, typically involving redirect URIs or client credentials.
Redirect URIs
The redirect URI is an essential piece of various OAuth 2 flows, including the authorization code flow. After a user has submitted credentials to the OAuth provider or provided consent, there needs to be a way for your application to receive information from the provider. When you make a request to the OAuth provider, you provide a redirect URI in your payload. Consider an OAuth request like this:
curl -X GET "https://auth.example.com/oauth2/authorize?response_type=code&client_id=your_client_id_12345&redirect_uri=https%3A%2F%2Fmyapp.example.com%2Fauth%2Fcallback&scope=read%20write&state=xyz123abc"The components of this URL are as follows:
Base URL:
https://auth.example.com/oauth2/authorizeresponse_type: code(for authorization code flow)client_id: your_client_id_12345(your registered application ID)redirect_uri: https://myapp.example.com/auth/callback(URL-encoded)scope: read write(space-separated permissions)state: xyz123abc(CSRF protection token)
The redirect_uri is where the user will be sent with the authorization code if the request is successful. However, you cannot put just any value here. The value you use must be one that the provider knows and is on the list of approved URIs. This is an important security measure to help prevent redirection attacks. If this hasn't been set up properly, you might run into issues.
Common redirect URI errors
The majority of redirect URI issues will boil down to the fact that the URI you're trying to redirect to is not registered with the provider in exactly the same way that you are using it. The URI must be present in the list of approved redirect URIs, and all components of the URI must match. Suppose you register the URI https://myapp.example.com/auth/callback:
Scheme: The registered URI uses
https, so you cannot usehttpwhen invoking it.Subdomains: It is registered with
myappas the subdomain. You cannot use another subdomain or omit this.Domains: The registered domain is
example.com. If your app runs on multiple domains—such as for multiregion deployments, local development, or staging—you need to register redirect URIs for each of these cases.Path: The registered path is
/auth/callback. Note that the path must match exactly. If you register it as shown here and make a request to the OAuth provider with a trailing slash /, this will result in a mismatch.Port numbers: The above example does not include a port number. However, local development servers will often run on a port such as
3000or8080. In these cases, you must register a redirect URI with the appropriate port number, and you must continue to use that port number and not change to a different one without updating your OAuth configuration.Case sensitivity: Some providers may evaluate your redirect URI with case sensitivity. To be safe, you should ensure that you register and invoke your redirect URI with the same casing.
To understand how all these pieces work together, consider the following example. Suppose you have an OAuth provider with this configuration:
The key details here are as follows:
Authorization URL:
https://api.descope.com/oauth2/v1/apps/authorizeClient ID:
UDJ5QWtFVVViYTlKOHY0RnRjM3FmWXU3cWkybTpUUEEyeUUxTUdlcDFGRlA3bGVIeVdSa0V6SmxZd3Y=Approved redirect URI:
https://myapp.example.com/auth/callbackScopes:
full_access
In this case, the code you use to interact with the provider would look something like this. Note the exactly matching redirectUri:
function initiateOAuthLogin() {
    // OAuth configuration
    const config = {
        authUrl: 'https://api.descope.com/oauth2/v1/apps/authorize',
        clientId: 'UDJ5QWtFVVViYTlKOHY0RnRjM3FmWXU3cWkybTpUUEEyeUUxTUdlcDFGRlA3bGVIeVdSa0V6SmxZd3Y=',
        redirectUri: 'https://myapp.example.com/auth/callback',
        scope: 'full_access',
        responseType: 'code'
    };

    // Generate random state for CSRF protection
    const state = generateRandomString(32);
    sessionStorage.setItem('oauth_state', state);

    // Build authorization URL
    const params = new URLSearchParams({
        response_type: config.responseType,
        client_id: config.clientId,
        redirect_uri: config.redirectUri,
        scope: config.scope,
        state: state
    });

    const authUrl = `${config.authUrl}?${params.toString()}`;

    // Redirect user to OAuth provider
    window.location.href = authUrl;
}

// This generates a random nonce for us to use as a CSRF token.
function generateRandomString(length) {
    const chars = 'ABCDEFGHIJKLMNOPQRSTUVWXYZabcdefghijklmnopqrstuvwxyz0123456789';
    let result = '';
    for (let i = 0; i < length; i++) {
        result += chars.charAt(Math.floor(Math.random() * chars.length));
    }
    return result;
}

// Usage. Send the user to the OAuth provider on click.
document.getElementById('login-button').addEventListener('click', initiateOAuthLogin);
Client credentials
The authorization code flow that you've seen so far relies heavily on the redirect URI being correct, but it also requires a valid client ID so that the OAuth provider knows for which application you are contacting it. All OAuth flows will require this client ID, but some flows, like the client credentials flow, also require a secondary credential—a client secret. Despite the similar names, these two credentials have some key differences:
Client ID:
Conceptually similar to a username for your application
Safe to expose publicly via your frontend
Used to identify which app is making requests to the OAuth provider
Unique per OAuth provider registration
Not considered sensitive information
Client secret:
Conceptually similar to a password for your application
Must be kept confidential at all times, so cannot be included in frontend code
Proves application identity to the authorization server
Considered sensitive information
These credentials are used whenever your application needs to identify itself to an OAuth provider. All OAuth requests will require the client ID, but in some cases, you may not need to include the client secret. For example, if you are using the authorization code flow, where your application acts on behalf of a user, the user's credentials are validated and exchanged for the authorization code, which can then be used to fetch an access token.
In cases where your application server is acting on its own behalf, without a user present, you will need to provide a client secret as well to prove your application's identity. Such is the case for the client credentials flow, and providing invalid credentials will cause your authorization to be rejected. Many situations can lead to the wrong credentials being used:
Incorrect client ID or secret, such as a typo
Expired, rotated, or revoked credentials, which may have worked previously
Accidentally using valid credentials from a different environment (staging vs. prod)
Incorrect grant type specified in token requests
Scope mismatches between registration and requests
With the previous cases in mind, the client credentials flow with the OAuth provider from a Node.js application might look something like this:
const axios = require('axios');


class OAuthClientCredentials {
    constructor() {
        this.clientId = process.env.OAUTH_CLIENT_ID;
        this.clientSecret = process.env.OAUTH_CLIENT_SECRET;
        this.tokenUrl = process.env.OAUTH_TOKEN_URL || 'https://api.descope.com/oauth2/v1/apps/token';
        this.accessToken = null;
        this.tokenExpiry = null;
    }


    async getAccessToken() {
        // Return cached token if still valid
        if (this.accessToken && this.tokenExpiry && Date.now() < this.tokenExpiry) {
            return this.accessToken;
        }


        try {
            // Prepare credentials for Basic Auth
            const credentials = Buffer.from(`${this.clientId}:${this.clientSecret}`).toString('base64');


            const response = await axios.post(this.tokenUrl,
                new URLSearchParams({
                    grant_type: 'client_credentials',
                    scope: 'full_access'
                }),
                {
                    headers: {
                        'Authorization': `Basic ${credentials}`,
                        'Content-Type': 'application/x-www-form-urlencoded'
                    }
                }
            );


            const { access_token, expires_in, token_type } = response.data;


            // Cache the token with expiry buffer (subtract 60 seconds)
            this.accessToken = access_token;
            this.tokenExpiry = Date.now() + ((expires_in - 60) * 1000);


            console.log(`Token acquired, expires in ${expires_in} seconds`);
            return access_token;


        } catch (error) {
            console.error('Failed to obtain access token:', error.response?.data || error.message);
            throw new Error('Client credentials authentication failed');
        }
    }


    async makeAuthenticatedRequest(url, options = {}) {
        const token = await this.getAccessToken();


        return axios({
            url,
            ...options,
            headers: {
                'Authorization': `Bearer ${token}`,
                ...options.headers
            }
        });
    }
}


// Usage example
async function example() {
    const oauth = new OAuthClientCredentials();


    try {
        // Make authenticated API call
        const response = await oauth.makeAuthenticatedRequest('https://api.example.com/data', {
            method: 'GET'
        });


        console.log('API Response:', response.data);
    } catch (error) {
        console.error('API call failed:', error.message);
    }
}


module.exports = OAuthClientCredentials;
As with redirect URI mismatches, most client credential issues can be eliminated by double-checking carefully that the config in your provider matches the values used in your application.
Client credential storage
Client credentials present an additional challenge in that the secret should be kept confidential. Accidentally exposing this value will not stop your application from working, but it may open you up to security risks that are best avoided. To mitigate this risk, you need to ensure you are handling and storing client credentials with proper care. Consider the following factors:
Environment variables: If your application is containerized, a standard and secure way to handle sensitive values is by injecting the values into the containers as environment variables.
Secret managers: Your secrets likely need to be stored somewhere. There are several offerings available specifically for this purpose, such as GCP Secret Manager, AWS Secrets Manager, HashiCorp Vault, and others. Most large cloud providers have their own offering.
Never include secrets in source code: Avoid committing secrets to source code, as this can open you up to security risks down the line. Use one of the above methods to inject your sensitive information into your application instead.
Do not expose secrets to the frontend: All frontend code, whether web apps or mobile apps, should be considered public. Any user who is running your application is able to extract any values that are handled by frontend code. For this reason, you must never pass sensitive values to frontend code. Instead, your backend servers should be the only code that handles sensitive values, like your client secret.
Consider secret rotation strategies: Sensitive values need to be kept private, but there is always the risk of them getting exposed. To mitigate this risk, it is advisable to routinely rotate these values, destroy the old ones, and generate and use new ones. If your values are pulled from a secret manager and injected into containers, this can be a fairly automated process. However, if you have a more manual deployment process, rotating your secrets might also be quite manual.
Troubleshooting guide
Though the process for resolving redirect URI and client credential issues is usually simple once you know what the issue is, troubleshooting and debugging problematic integrations is a necessary first step in order to know what needs to change.
If you find yourself working on an OAuth integration but can't seem to get it working, here are some things you can try:
Check your error logs, either where you are making the failed requests or your provider logs, if available. Look for distinctive error messages that might indicate what class of issue you are dealing with:
invalid_request: This is a vague message that indicates that the request is generally malformed.invalid_client: Confirm that your client ID (and client secret, if applicable) are correct.invalid_grant: Check that your grant type is correct (such as the client_credentials or code, or another provider-supported grant type).invalid_redirect_uri: Your redirect URI is mismatched or unregistered.unauthorized_client: You have the wrong grant type or client configuration.access_denied: This refers to a user's rejected authorization or insufficient permissions.server_error: This refers to provider-side issues or rate limiting.
If the errors indicate that your redirect URI or client credentials are not right, double-check with your provider that you are using them exactly as they appear in your registration configuration. For redirect URIs, this includes the leading protocol (HTTP vs. HTTPS) and the trailing slash, which may or may not be present but should match either way.
If you continue to have issues in your application, remove some points of failure by testing the OAuth flow directly with Postman's OAuth functionality or curl to make the requests directly. If you get success responses here, the issue may lie with your application. If these requests fail, it might be an issue with the provider or your configuration.
Finally, it pays to be familiar with the quirks of whichever provider you are using. While providers should implement the OAuth 2 specification, there are invariably minor quirks in implementations. Some common ones include the following:
Less strict matching requirements for localhost URLs, such as allowing any port number
Multiple, conflicting implementations, such as a V1 and V2 identity API from the same provider, that are not fully compatible
Additional requirements, such as meaningful User-Agent headers
It's impossible to account for all the variations of every provider, especially when they are liable to change over time. The best way to avoid this kind of surprise is to familiarize yourself with the documentation of your specific provider before diving in and writing code. Documentation for some common OAuth providers can be found here:
Google OAuth: Google Identity platform documentation
Microsoft identity platform: Microsoft identity platform documentation
GitHub OAuth: GitHub OAuth documentation
Conclusion
OAuth is a powerful and useful web standard that allows applications to integrate with and use the resources of other services, either on behalf of users or in their own right. However, in order for the specification to be robust and flexible enough to suit the majority of use cases, it is somewhat complex by necessity.
This complexity can lead to frustrating issues during implementation, especially if you haven't worked with OAuth before. However, most issues will boil down to mismatched details between what was registered and what your application is trying to use. Through careful debugging and attention to detail, you can identify and resolve such issues without it becoming a huge headache.
If you are building identity management capabilities into your application, you should consider using Descope. Descope is a drag-and-drop customer authentication and identity management platform that allows you to create and customize relevant user journeys through visual workflows. Learn more by visiting the Descope website or developer documentation.