
Table of Contents
Don't have the time to read the entire post? Our human writers will be sad, but we understand. Summarize the post with your preferred LLM here instead.
This tutorial was written by Aestimo Njuguna, a full-stack developer and technical author. Visit Aestimo's website to see more of his work!
Almost every year, thousands of user records are exposed in data breaches across the world, mainly due to compromised passwords. Multifactor authentication (MFA), which requires users to verify their identity through multiple methods, can help mitigate this risk.
However, implementing MFA presents its own challenges, including manually building secure authentication flows and ensuring a smooth user experience. If you'd prefer not to build MFA flows from scratch, you can use a third-party provider like Descope. Descope provides visual workflows, SDKs, and APIs to build custom user authentication journeys for your app.
In this tutorial, you'll learn what MFA is, why it's important, and how to build an MFA user authentication flow using Descope's no-code builder, including how to integrate this flow into a Svelte 5 application.
What is MFA and why is it important?
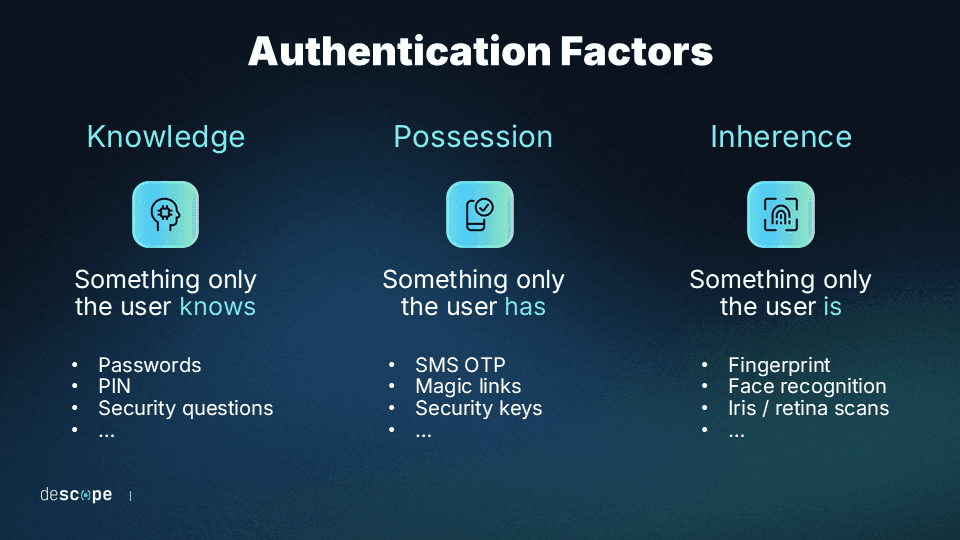
MFA is an authentication method that uses two or more different types of proof, or "factors," to confirm your identity. The core principle is that relying on just one type of proof, especially just a password, is too risky.
These authentication factors can be the following:
Something you know: like your password or a PIN
Something you have: like your smartphone receiving a code
Something you are: such as a fingerprint or facial recognition
In traditional single-factor authentication relying solely on passwords, your application becomes vulnerable to various password-based attacks, like brute-force attempts, credential stuffing, and others. But with MFA, even if one factor is compromised, other factors will still provide protection.
Best practices for implementing MFA
To ensure an MFA implementation is both secure and user-friendly, consider the following best practices:
Let users choose from a variety of MFA methods: Provide users with various options—like SMS codes, use of authenticator apps, email verification, and push notifications—to accommodate different preferences and situations.
Use graceful fallbacks: MFA methods may not always work at any given time, so ensure you give your users backup authentication methods they can use should the primary MFA method fail or be unavailable.
Use time-based codes: Implement time-limited verification codes to reduce the window of opportunity for attackers.
Secure code delivery: Use encrypted channels for delivering verification codes and avoid sending sensitive information in plain text.
Provide clear user instructions: Include step-by-step instructions and troubleshooting help to minimize user confusion during the MFA process.
Remember trusted devices: Allow users to mark trusted devices to reduce friction for frequent logins while maintaining security for new or suspicious login attempts.
These best practices will help you create an MFA system that users will actually want to use. Now that you understand what makes MFA effective, let's put these concepts into practice.
Implementing MFA for a Svelte application
In this tutorial, you'll build a personal finance application with secure MFA authentication from scratch. By the end, you'll have a working SvelteKit app that uses Descope's no-code authentication flows to protect user login with MFA.
Here's what you'll build:
A SvelteKit personal finance app with login/dashboard pages
A multifactor authentication flow using email magic links and SMS OTP
Protected routes that require MFA verification
User session management across the application
You'll use the following tools:
SvelteKit 5: The web framework for building the application
Descope: No-code authentication platform for MFA flows
SvelteKit Auth: An authentication library built specifically for SvelteKit applications that offers server-side session management, automatic CSRF protection, and seamless integration with external authentication providers, like Descope
Tailwind CSS: For styling the interface
Prerequisites
Before continuing, ensure you have the following:
Node.js (version 18+) installed on your local computer.
A Descope account (sign up for a free-foreverforever-free account if you don't have one).
The latest version of Svelte (version 5 as of now) and the new Svelte CLI installed on your development machine.
pnpm as the Node package manager (though npm or Bun will work just fine).
Watch the video below to follow along with the tutorial.
Creating a new Descope project
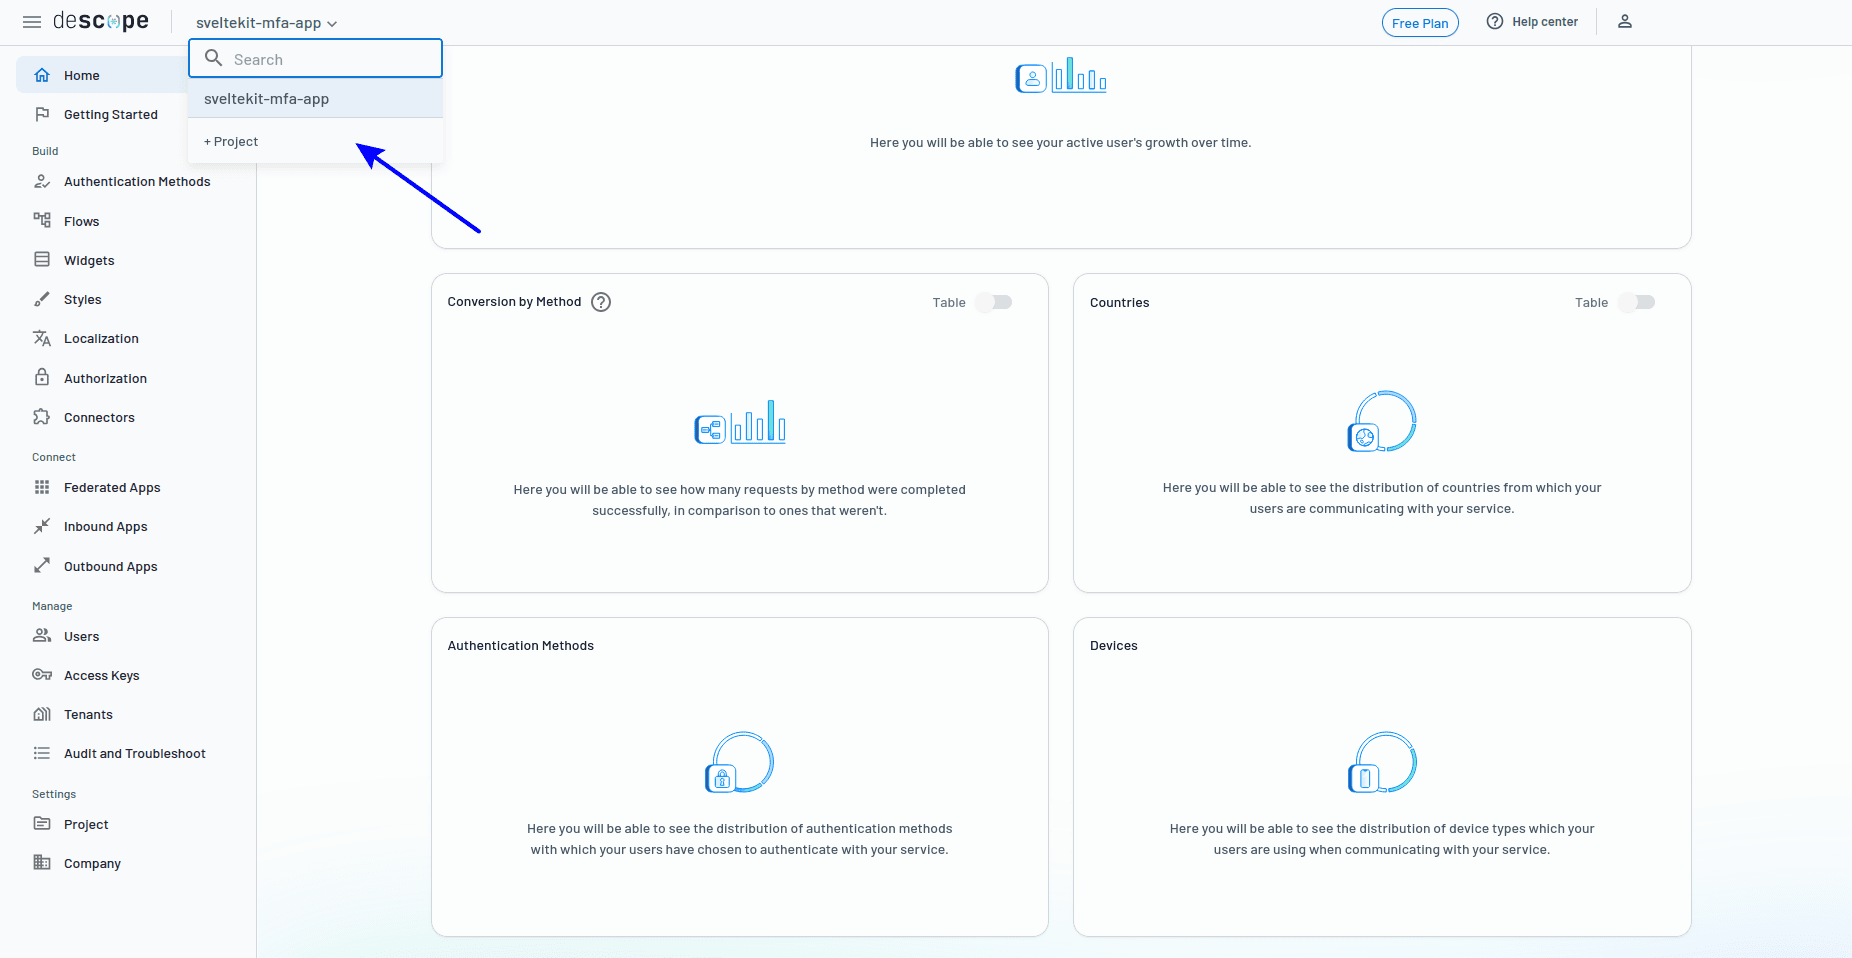
Before initializing a SvelteKit app, you need to create a new Descope project as it includes some settings like environment variables that you'll need when creating the app.
Begin by creating a new project in your Descope dashboard. Click the + Project button, as shown below:
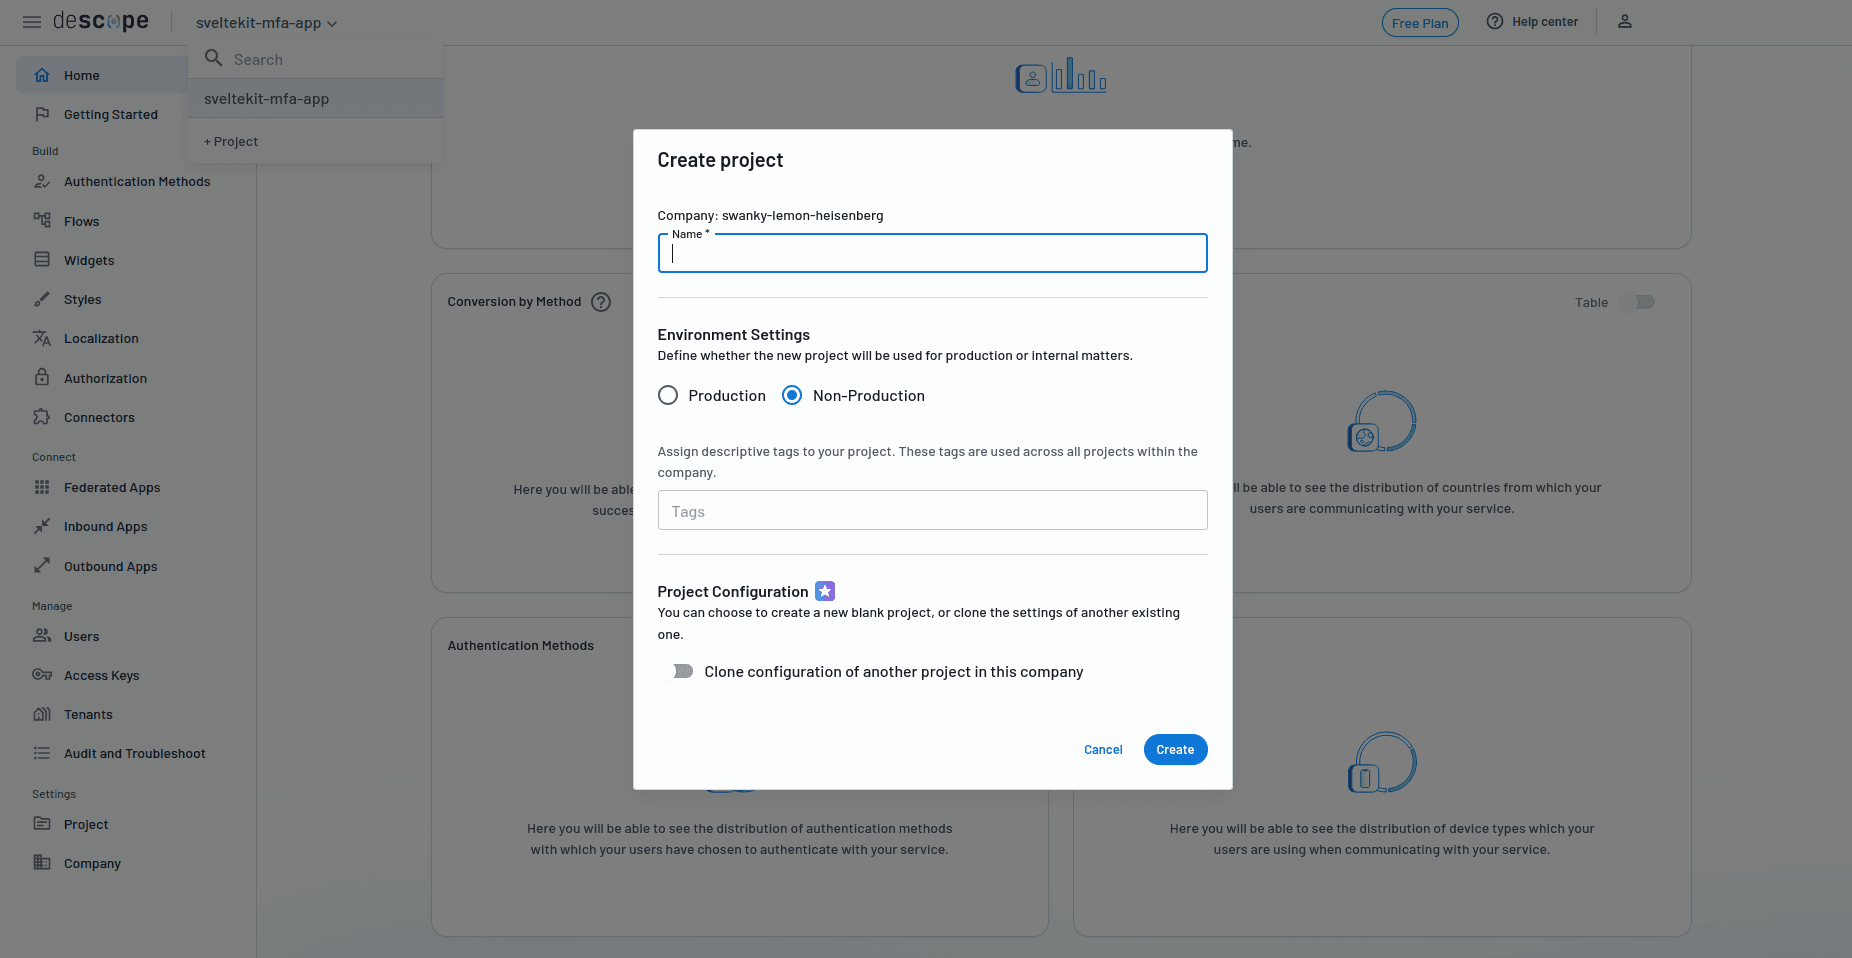
Give the project a name, choose whether it's a Production or Non-Production app, and click Create.
With the project ready, you can now move on to creating the SvelteKit app.
Initializing a new SvelteKit app and installing SvelteKit auth
To initialize a new SvelteKit app, run the command below:
npx sv create personal-finance-appRunning this command will present you with a couple of options:
For the template to use, choose minimal.
For type checking, choose TypeScript.
For the add-ons, select Tailwind CSS since this is what you'll use to style the app, but you can also include others, such as prettier or eslint, depending on what you want.
Run the command below to add SvelteKit Auth to your project's dependencies, which will handle authentication workflows instead of building them from scratch:
pnpm add @auth/sveltekitConfiguring SvelteKit auth with Descope using SvelteKit hooks
You also need to add an integration to connect your app and Descope, and you can do this using SvelteKit's hooks.
SvelteKit hooks are powerful functions that allow you to intercept and modify requests and responses at various points in the application lifecycle. They can run server-side (in hooks.server.ts), client-side (in hooks.client.ts), or on both sides (in hooks.ts).
User authentication data is sensitive, so you'll use a server-side only file, hooks.server.ts, which will:
intercept incoming requests to check if users are authenticated via Descope;
add authentication state to every page automatically;
handle authentication errors and redirect users appropriately; and
manage user sessions across your entire application.
Create a new file named src/hooks.server.ts and add the following code to configure it to handle authentication:
// src/hooks.server.ts

import { SvelteKitAuth } from '@auth/sveltekit';
import Descope from '@auth/sveltekit/providers/descope';
import {
    AUTH_DESCOPE_ID,
    AUTH_DESCOPE_SECRET,
} from "$env/static/private";

export const { handle } = SvelteKitAuth({
  providers: [
      Descope({
          clientId: AUTH_DESCOPE_ID,
          clientSecret: AUTH_DESCOPE_SECRET,
      })
  ],
  trustHost: true,
  callbacks: {
    session: async ({ session, token }) => {
      if (session?.user) {
        session.user.mfaVerified = true; // Since MFA will be handled in the Descope flow
      }
      return session;
    }
  }
});
The hooks.server.ts file works like this:
Authentication setup: The code configures SvelteKit Auth with Descope using environment variables
AUTH_DESCOPE_IDandAUTH_DESCOPE_SECRET. You can findAUTH_DESCOPE_IDin your project's settings page. ForAUTH_DESCOPE_SECRET, head over to the project's access keys and create a new key by clicking on the Access Key button, as shown in the screenshot below:
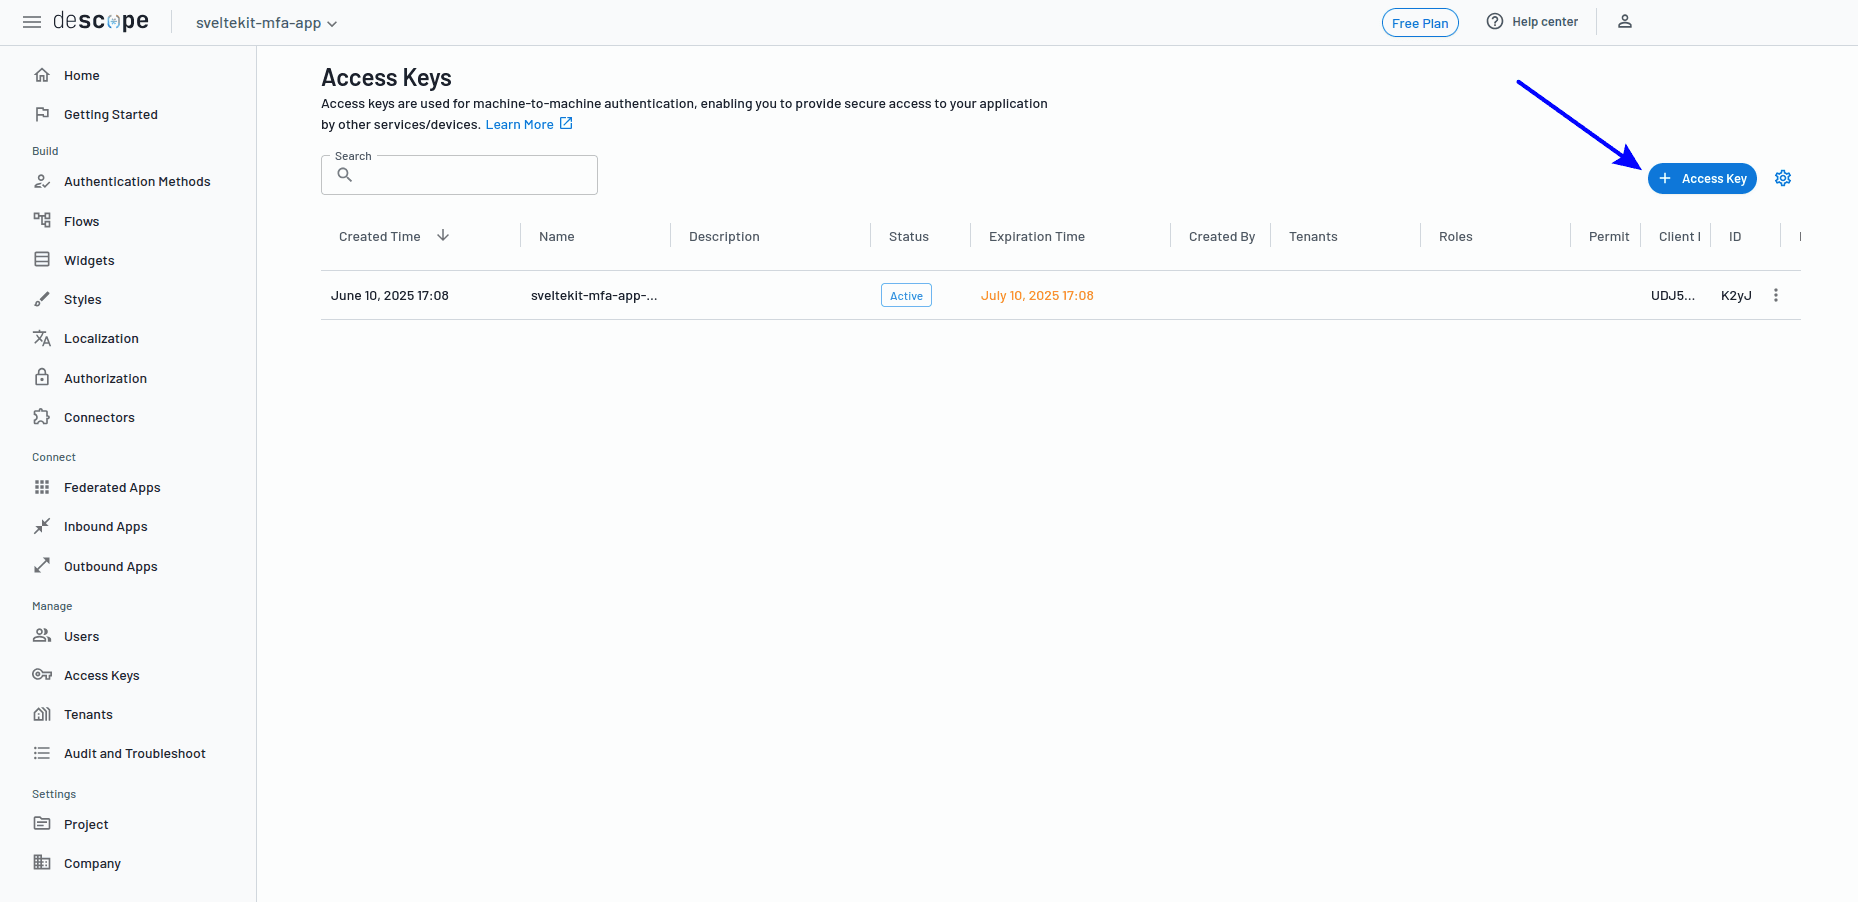
Give the new key a name, choose how long it will be active in the Expiration select box, hit Generate Key, and keep the newly generated key somewhere safe for the time being.
Next, you need to add a non-Descope-specific environment variable, AUTH_SECRET, which SvelteKit Auth uses to sign tokens and make sure they cannot be tampered with. Before generating this key, create a new .env file in your project's root folder. This file will hold the AUTH_DESCOPE_ID, the new access key you've just generated (AUTH_DESCOPE_SECRET), and the AUTH_SECRET, which you can now generate by running the command openssl rand -base64 32 in your terminal to generate a 32-character string.
Then, add the three variables to the .env file, and ensure it's never committed to Git by adding it to the project's gitignore file.
Server hook: The exported handle function becomes a server-side hook that SvelteKit automatically calls for every request, enabling authentication to work across the entire application.
Note: The callbacks.session function modifies the user session to automatically set mfaVerified: true since the multifactor authentication is handled by Descope.
Your app is now configured to work with Descope through the server hook. Next, you'll build the MFA flow in Descope, which will provide the authentication logic for your application.
Building an MFA flow using Descope's no-code builder
The MFA flow you're about to build will handle user login, verification, and registration using Descope's no-code builder, which helps you build the flow using prebuilt components instead of coding the authentication logic yourself.
Each Descope project contains authentication flows that define how users log in. Descope offers various flow types, including basic login, social login, and multifactor authentication.
To start creating your MFA flow, click the Flows link in the left sidebar:
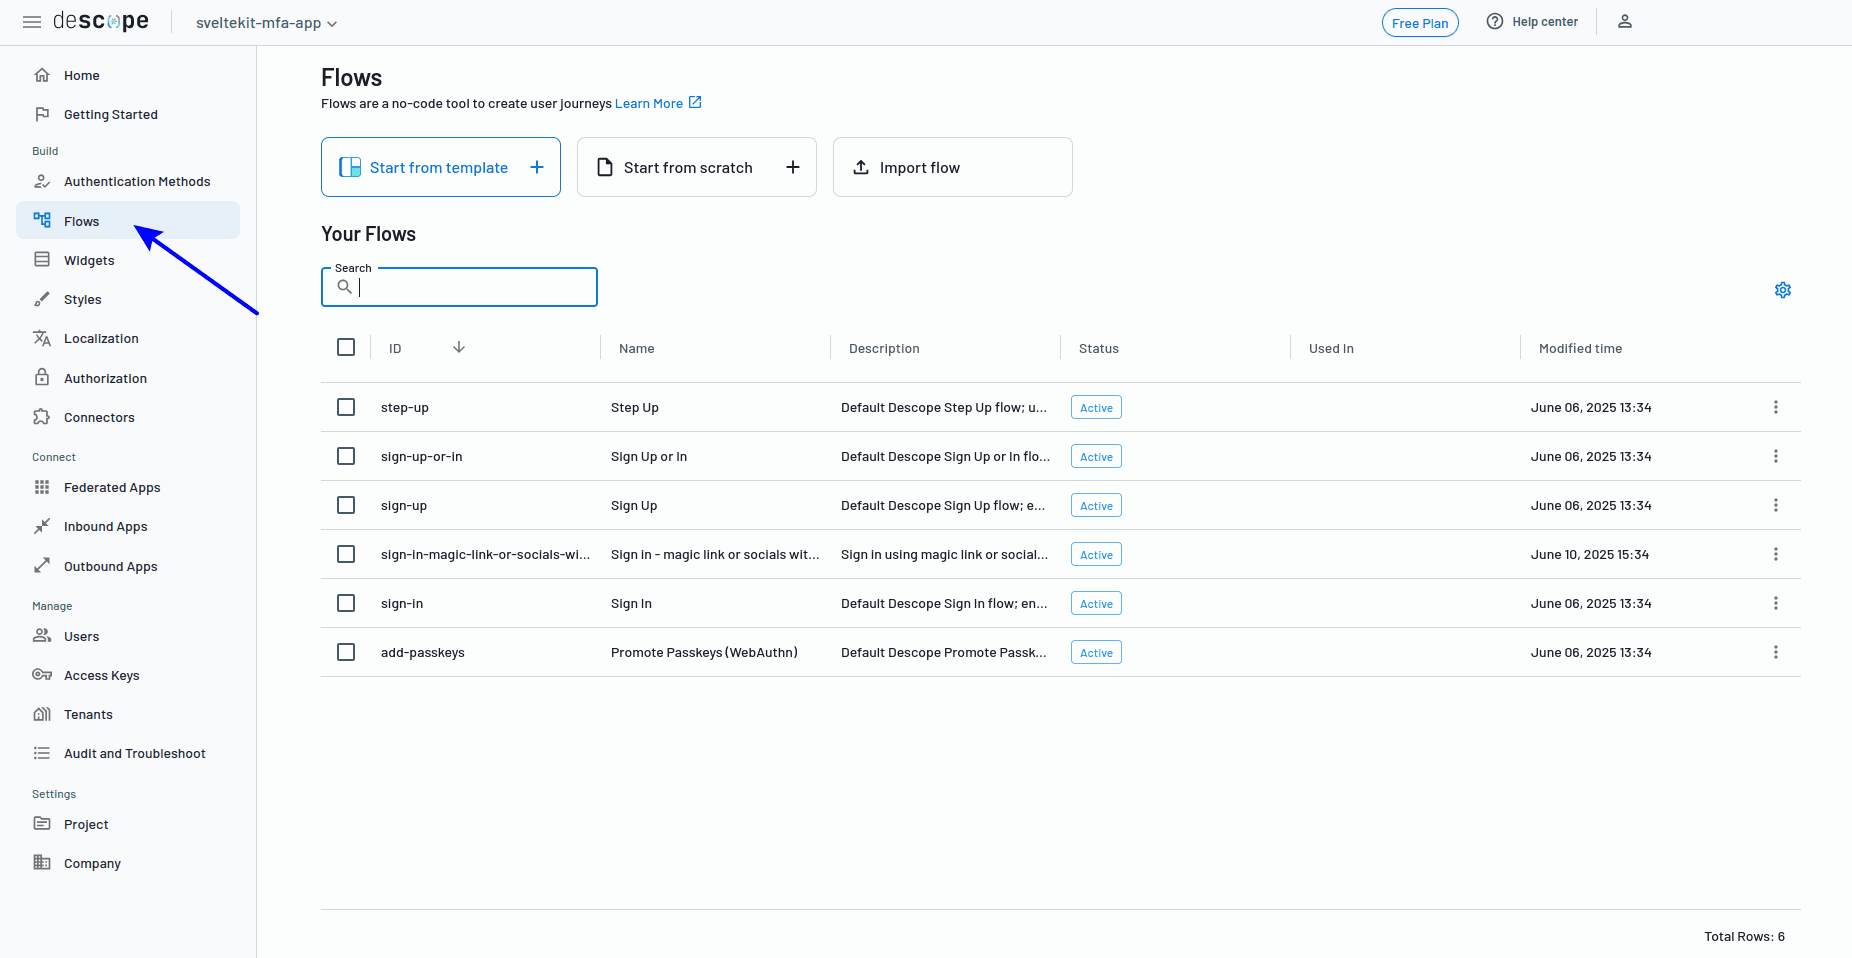
This will show a screen with a list of default flows, on top of which are three buttons to create flows depending on what you want:
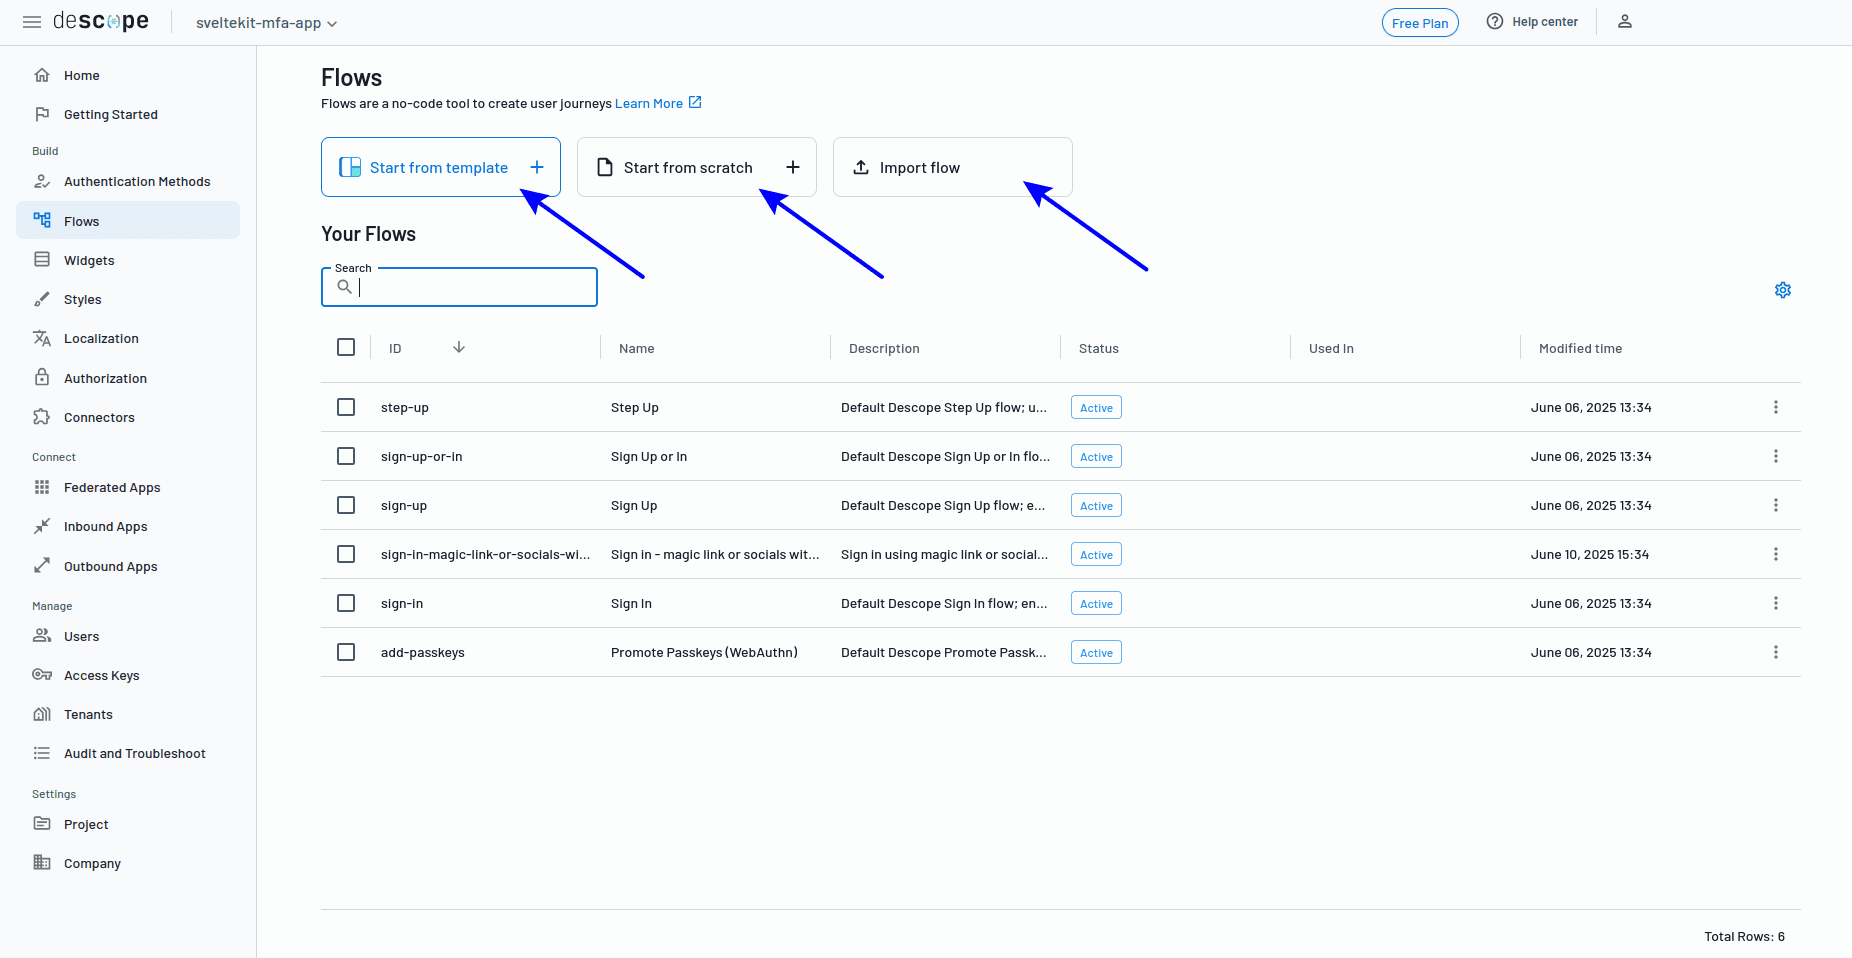
Start from a template: Gives you access to various ready-made authentication flow templates
Start from scratch: Allows you to create your own flow
Import flow: Allows you to import a premade flow
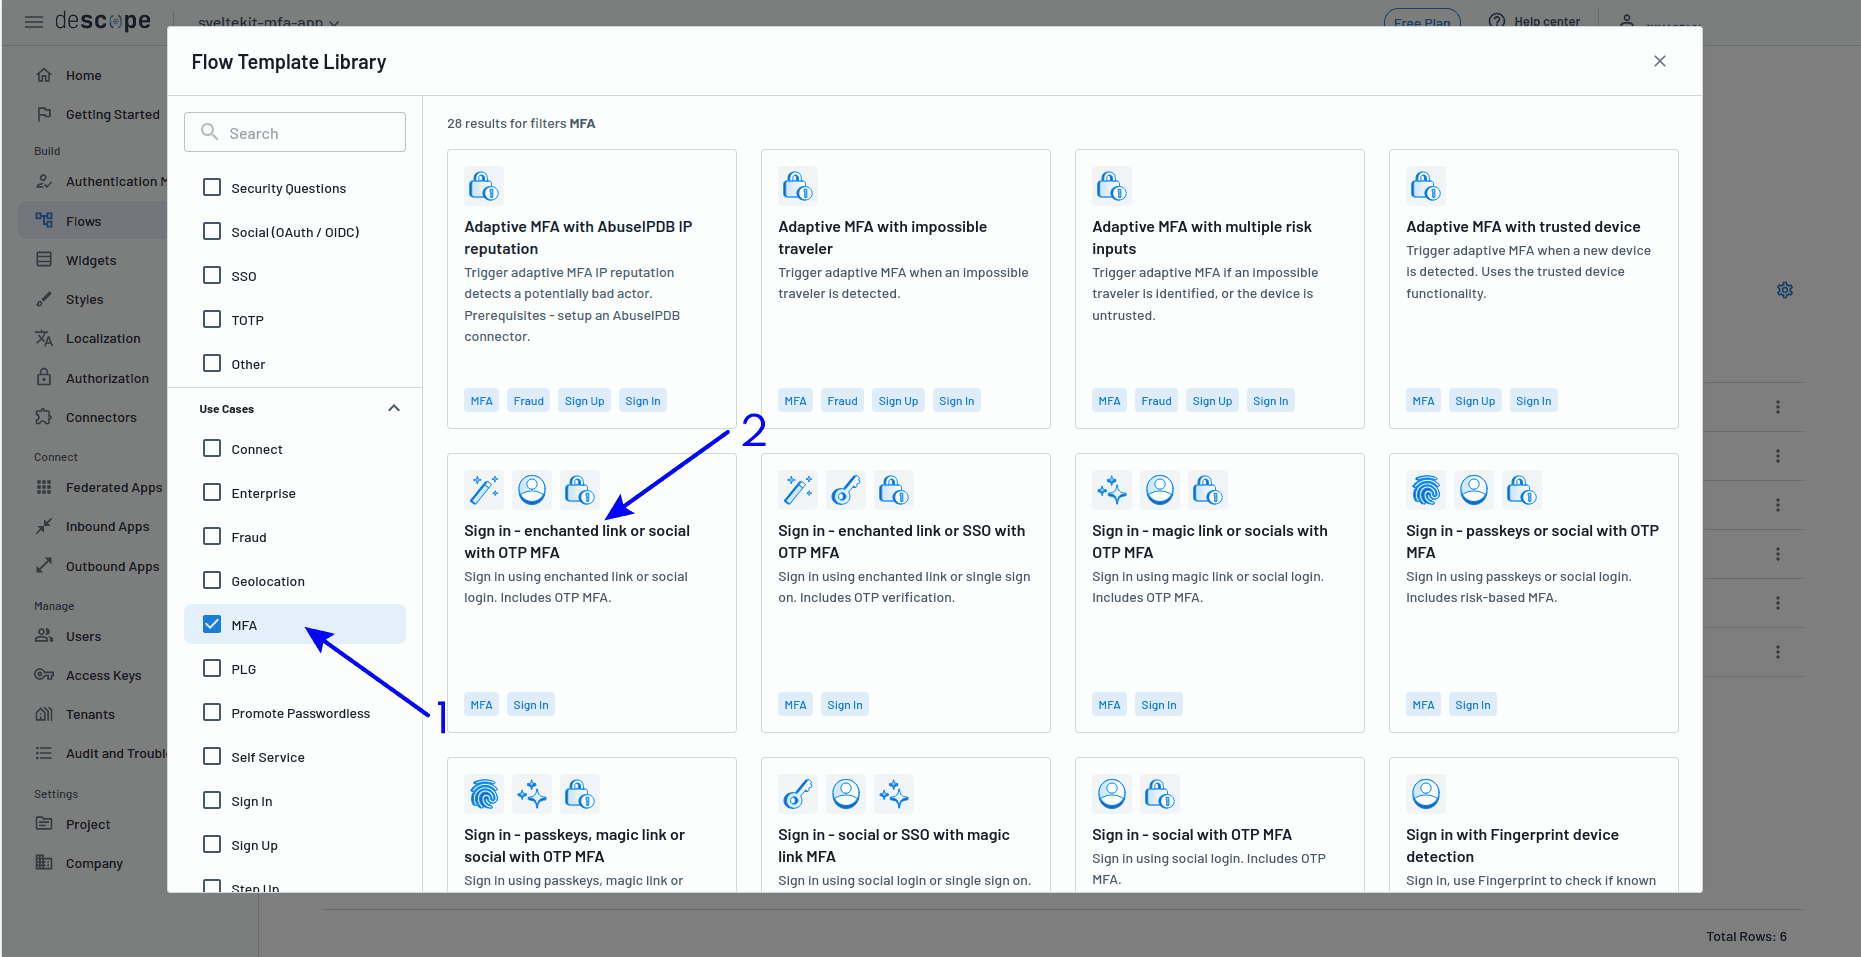
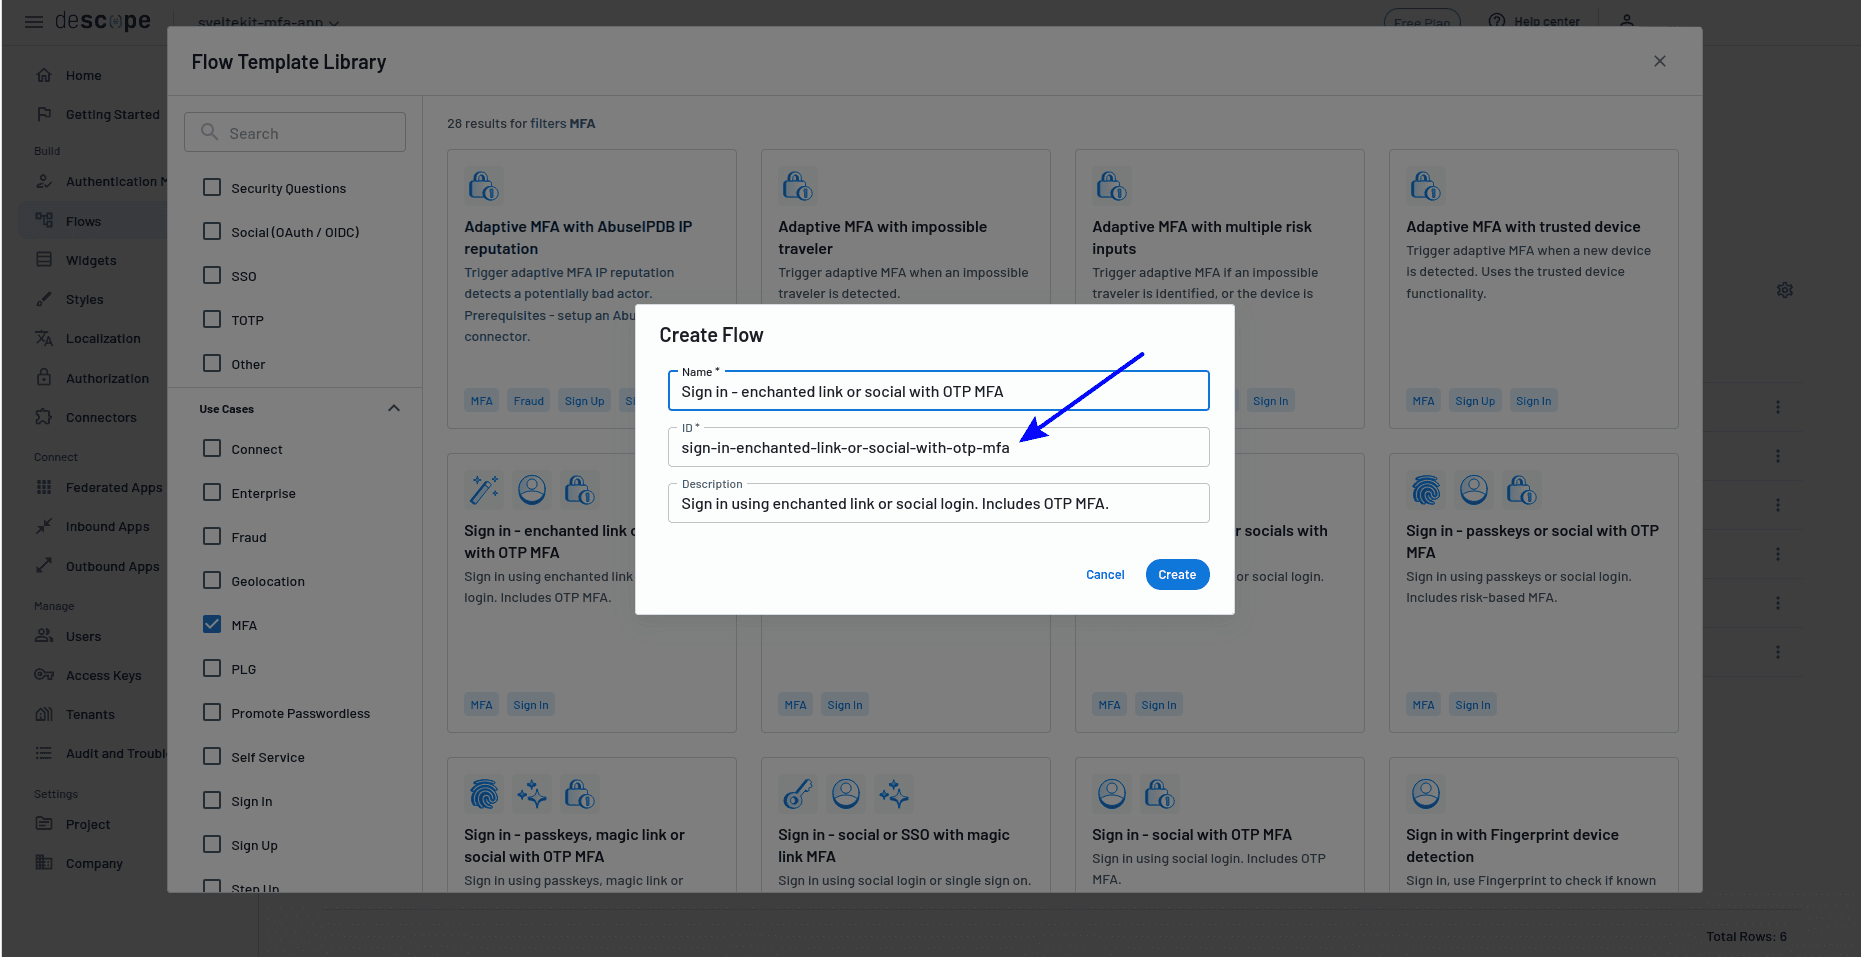
Using a ready-made template will get you up and running in the shortest time possible, so click Start from a template, and for this example, choose Sign in - enchanted link or social with OTP MFA.
Take note of the flow's ID (you'll need it again shortly):
Building the authentication components in the SvelteKit app
Now that your MFA flow is ready in Descope, you'll return to your SvelteKit app to create the components that trigger this flow. You need to build the login page and authentication handlers so that users can actually use the MFA flow you just designed.
Instead of building a separate route to act as the login page, modify the default home page route to handle this functionality as shown below:
<!-- src/routes/+page.svelte -->

<script lang="ts">
  import { signIn } from '@auth/sveltekit/client';
  import { auth } from '$lib/auth.svelte';

  async function handleLogin() {
    auth.setLoading(true);
    try {
      await signIn('descope', {
        flow: '<YOUR_FLOW_ID_HERE>',
        callbackUrl: '/dashboard',
        redirect: true
      });
    } catch (error) {
      console.error('Login failed:', error);
    } finally {
      auth.setLoading(false);
    }
  }
</script>

...
    <button
        onclick={handleLogin}
        disabled={auth.isLoading}
    >
        {#if auth.isLoading}
        Sign in with Email
        {/if}
    </button>
...
Here's a brief outline of the above code and how it works:
Replace
<YOUR_FLOW_ID_HERE>with your actual Descope flow ID.The
$lib/auth.svelteimport provides a custom auth store built with Svelte 5's new runes system ($stateand$derived) to manage authentication state and prevent multiple login attempts. Copysrc/lib/auth.svelte.tsto get the auth store code.The button calls your Descope MFA flow and redirects users to
/dashboardon success.
Note: The ... sections represent additional HTML content you can add for styling and page layout. For this particular case, find the paragraph tag with the text We'll send you a secure link to access your dashboard, and paste the button component code immediately after the div containing this paragraph tag in the sign-in page component.
You'll configure authentication at the layout level rather than creating separate server-side route handlers because this approach automatically protects all routes.
Open the +layout.svelte file and modify it as follows:
<!-- src/routes/+layout.svelte -->

<script lang="ts">
  import { auth } from '$lib/auth.svelte';
  let { data, children } = $props();

  // Initialize the auth store with the session from the server
  auth.setSession(data.session);
</script>

{@render children()}
Add a +layout.server.ts file to load the user's session data from the server and make it available to all pages:
// src/routes/+layout.server.ts

import type { LayoutServerLoad } from './$types';

export const load: LayoutServerLoad = async (event) => {
  const session = await event.locals.auth();

  return {
    session
  };
};
Before testing the complete authentication flow, you need to create the dashboard page that users will be redirected to after successful MFA verification.
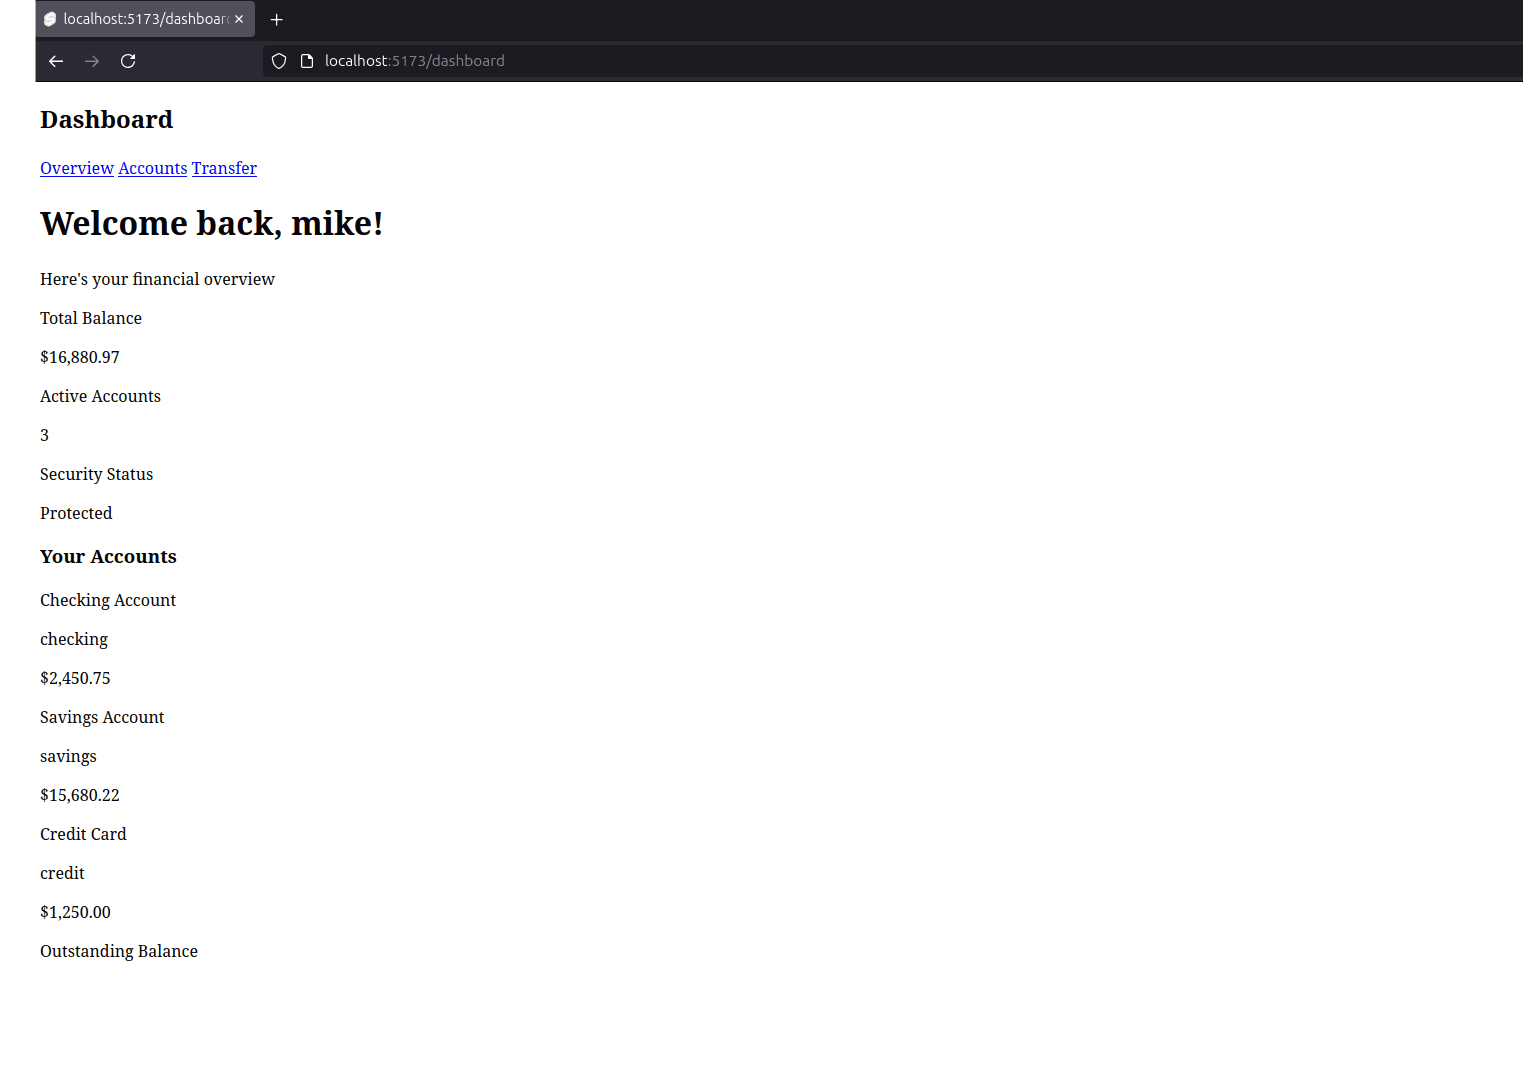
Creating the dashboard page
The final step is creating the dashboard page that users will see after authentication. You can copy the complete dashboard implementation from the GitHub repository of this tutorial's companion app:
Copy
src/routes/dashboard/+page.sveltefor the dashboard interface.Copy
src/routes/dashboard/+layout.svelteandsrc/routes/dashboard/+layout.server.ts, which are used to protect all dashboard routes.
Now that you've configured the authentication components, you can test the authentication flow setup.
Testing the MFA flow
Start your app's development server with the command pnpm run dev, then open your browser and go to http://localhost:5173. You'll see the home page, with the Sign in with Email button.
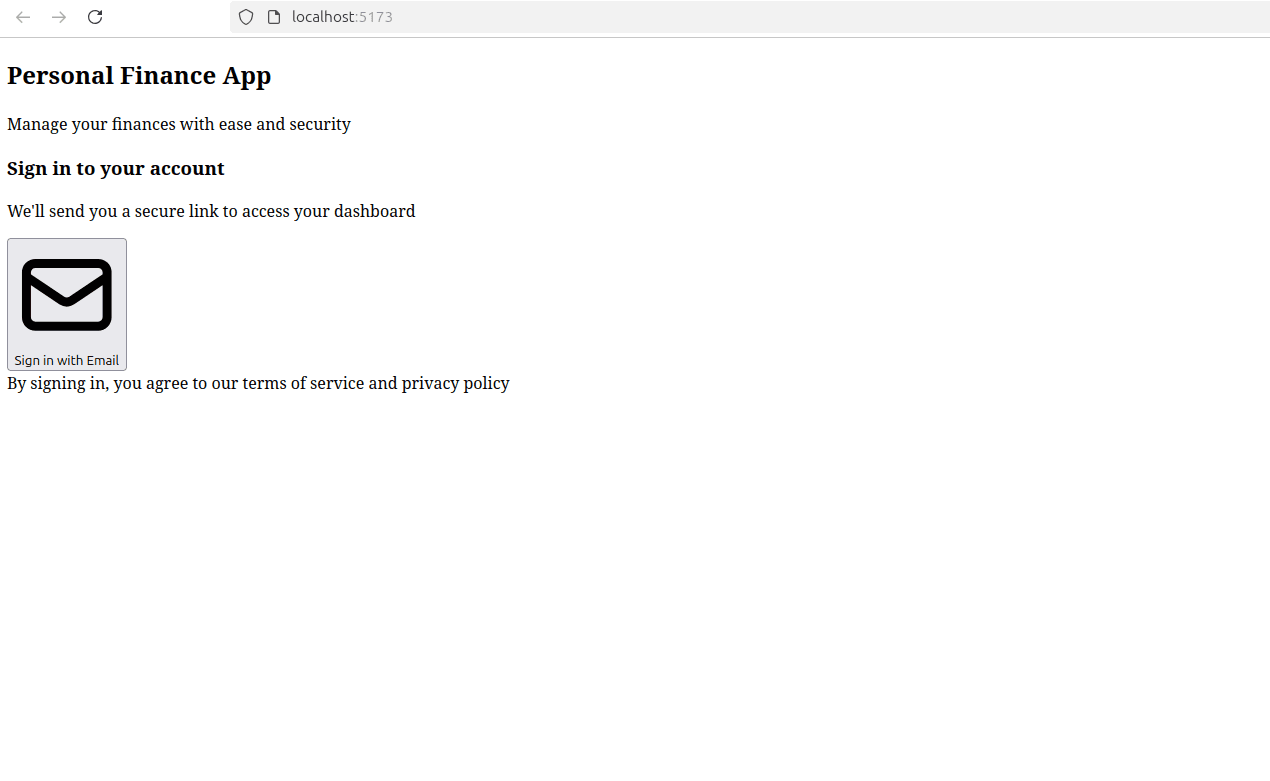
Click Sign in with Email, and you'll be redirected to Descope to enter your email address:

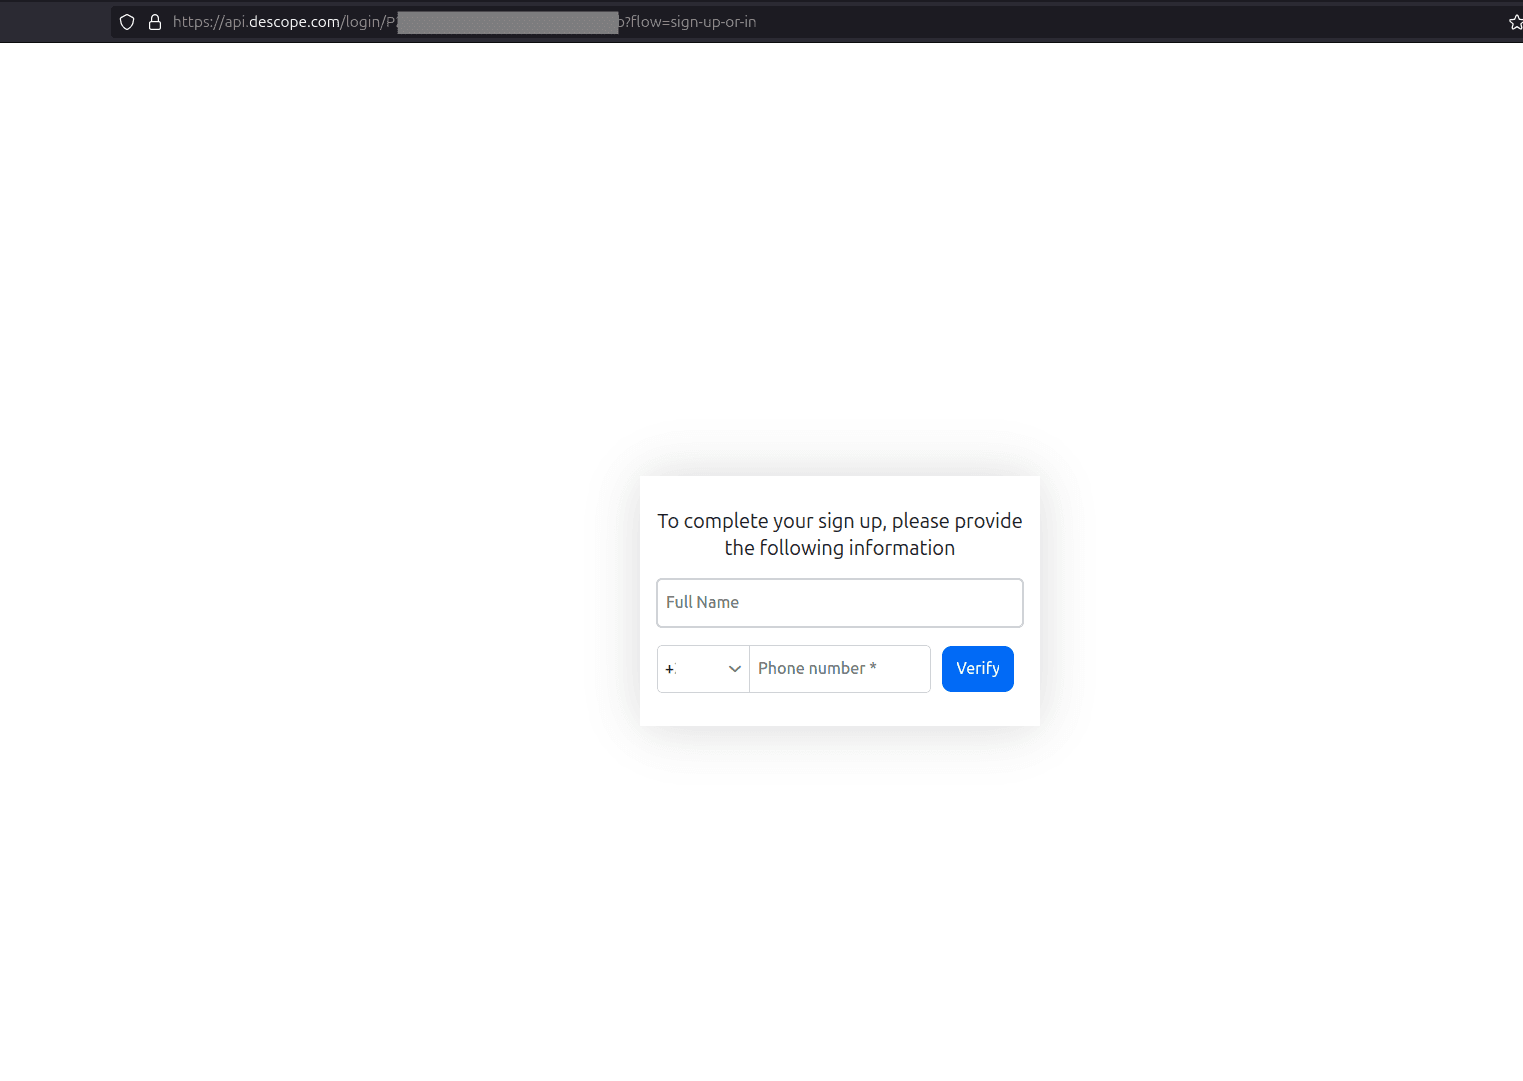
After you submit your email, Descope sends a magic link to the email you submitted. Once you click the magic link, Descope's risk algorithm checks the login attempt, and if it detects any suspicious activity, it will prompt for an additional authentication factor—in this case, SMS verification—by presenting a screen to input your name and a phone number, where you'll receive an SMS OTP:
After you submit your phone number, an SMS OTP is sent and another screen presented to input the OTP code:

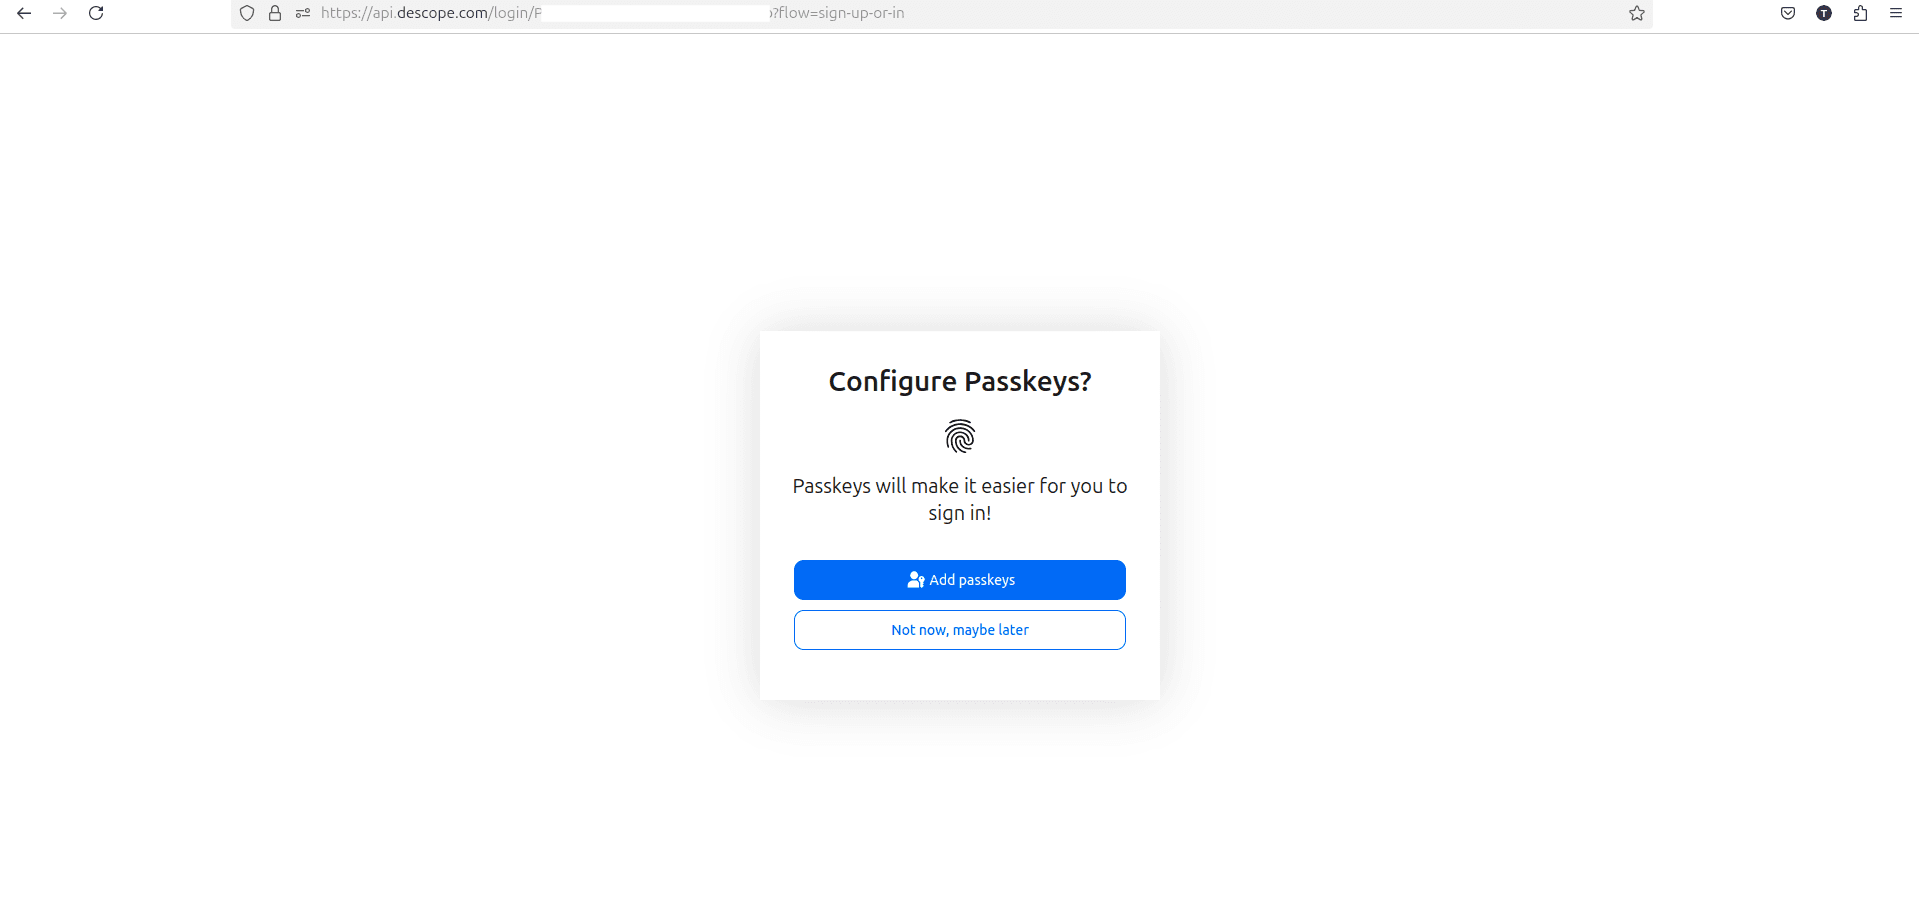
Following a successful multifactor verification, the system may offer you the option to set up passkeys for easier future logins:
After you make your choice, you're then prompted to complete the sign-up process by providing a name:
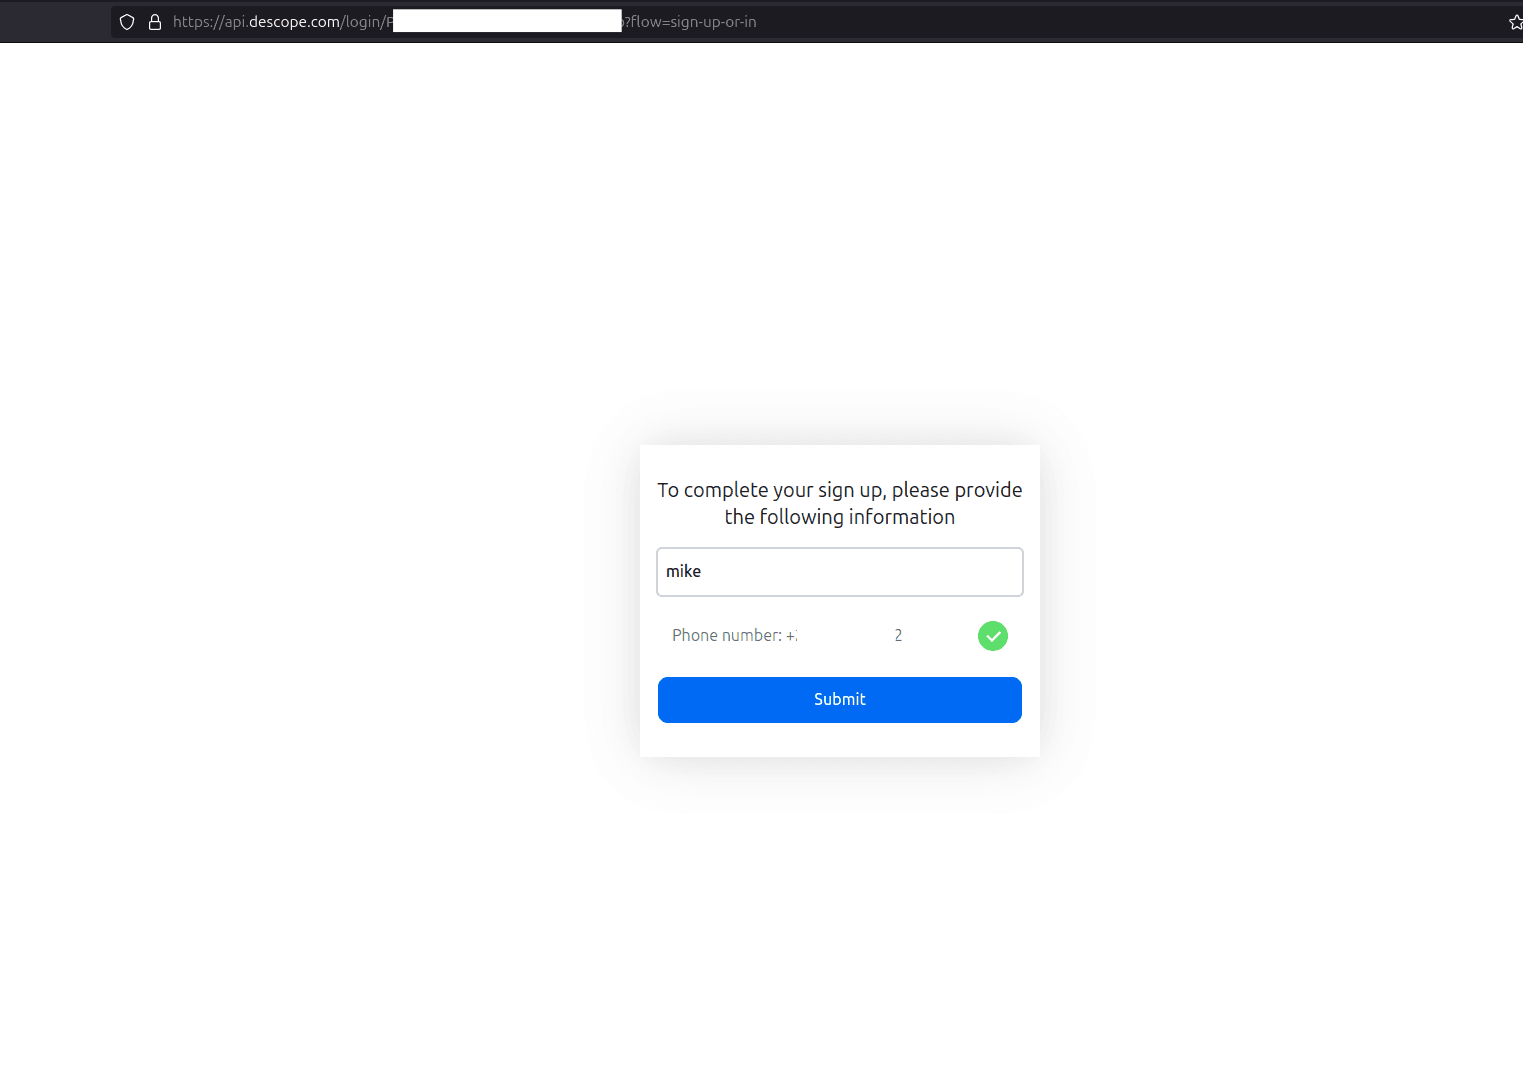
Finally, you'll be prompted to complete your profile by providing your name before being redirected to the app's dashboard:
Wrapping up
This tutorial explored how to enhance the security of a Svelte 5 application by implementing multifactor authentication using Descope's no-code builder. You covered the fundamentals of MFA and its importance in protecting user data and walked through a complete implementation from setting up SvelteKit Auth to configuring Descope flows.
By leveraging Descope's prebuilt authentication flows, you were able to implement a robust MFA system without the complexity of building these security features from scratch. The result is a secure, user-friendly authentication experience that protects sensitive financial data while maintaining a smooth user journey.
To access the finished app code, fork it from here. To explore Descope further, visit the documentation site, sign up for a free account, and join their developer Slack community.