
Table of Contents
Framer has quickly become the go-to tool for building beautiful websites without having to write code. Whether you're creating landing pages, client portals, or internal tools, Framer empowers designers and developers alike to launch polished web experiences at lightning speed.
But there’s always been one thorny issue: authentication.
If you’ve ever tried to gate a page, show content only to signed-in users, or create a members-only area in Framer, you’ve likely run into frustration. Until recently, your only options were workarounds like:
Embedding third-party forms with limited styling control
Hacking together an auth flow with custom code embeds
Using third-party membership platforms that don’t play well with custom designs
These approaches often come with compromises: clunky UX, no flexibility, or needing to manage a separate backend. Now, you can skip the workarounds.
With Descope’s Framer Plugin, you can now add secure, fully customizable authentication flows directly to your Framer site. Using our all-in-one plugin, you won’t need to know backend code or compromise your site’s design to achieve secure, seamless user journeys.
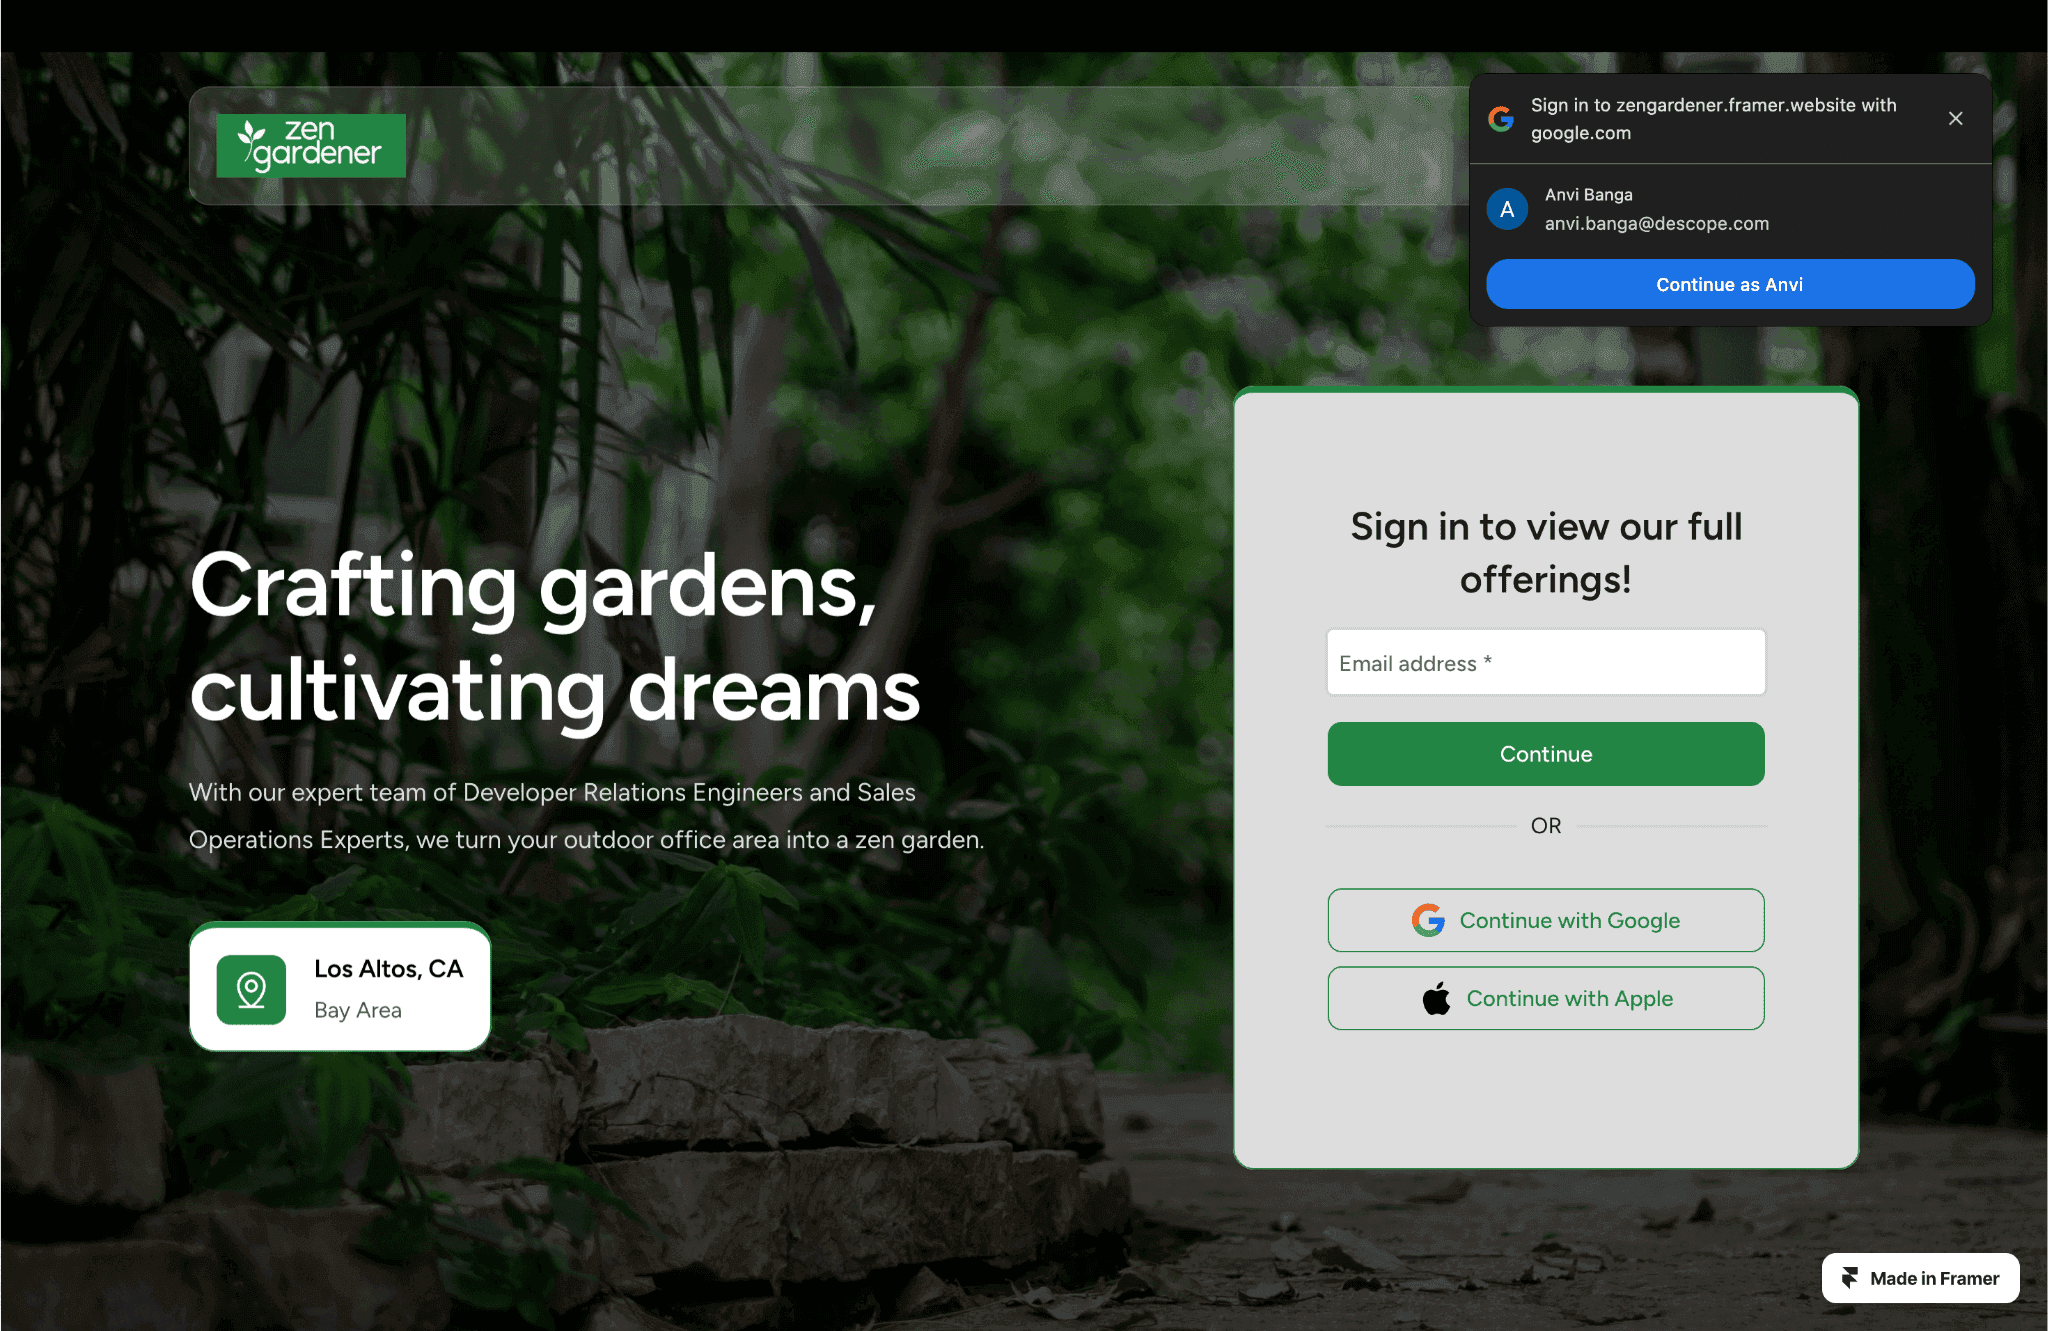
To show you just how easy it is, we’re going to build a website for a fictional gardening business, Zen Gardener, and add authentication to it.
We’ll show you how you can:
Add login flows and Google One Tap with one click
Support passwordless authentication
Customize the style of your flow
Show or hide content based on user authentication state
You can watch the video below or follow along with the rest of this tutorial. Let’s get started.
Implementing Descope authentication flows in Framer
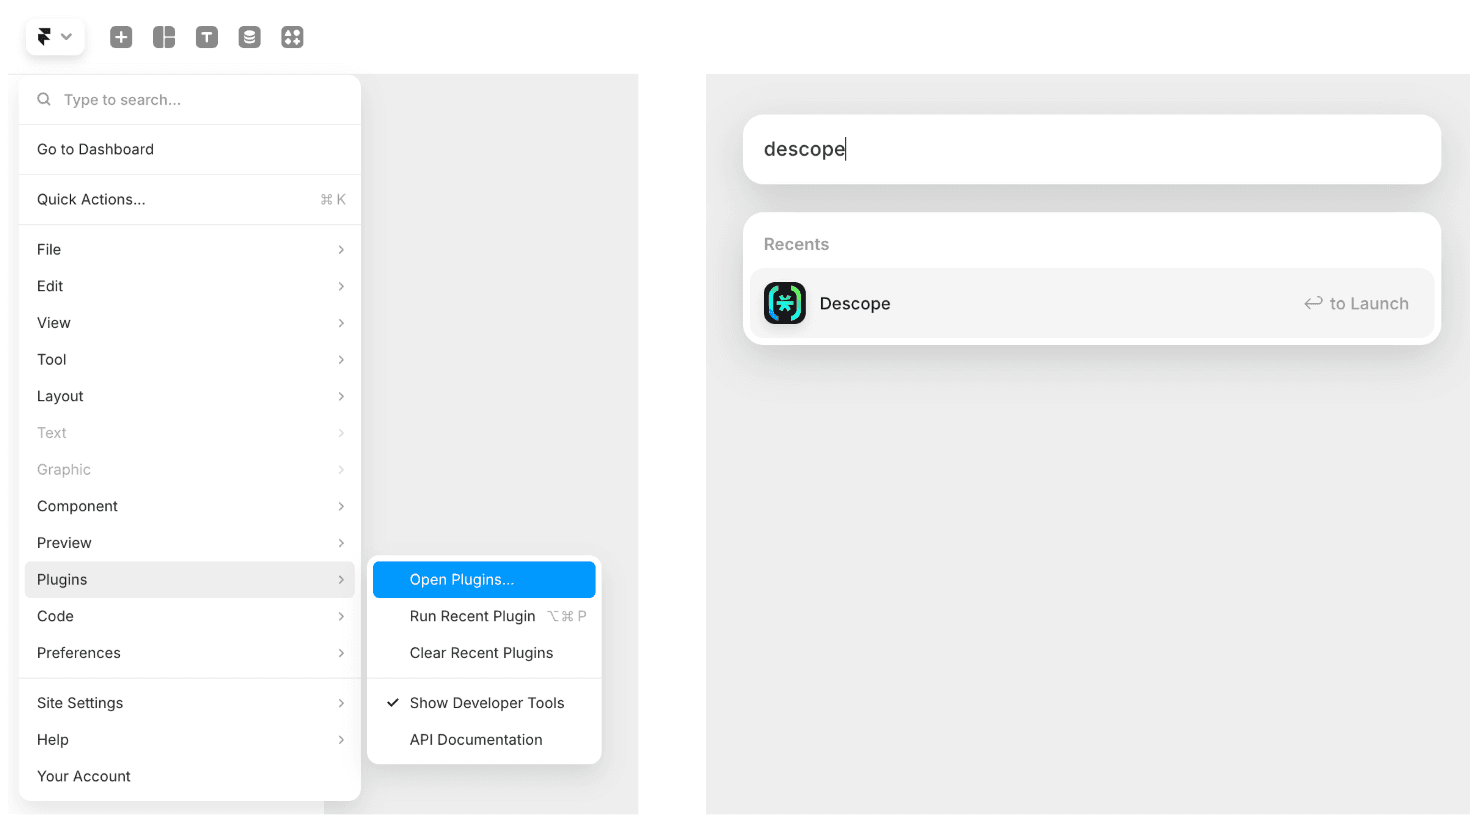
Step 1: Launch the plugin
We’ll start by opening the Descope plugin from the Framer Project Editor by choosing Open Plugins in the Framer menu and searching for Descope.
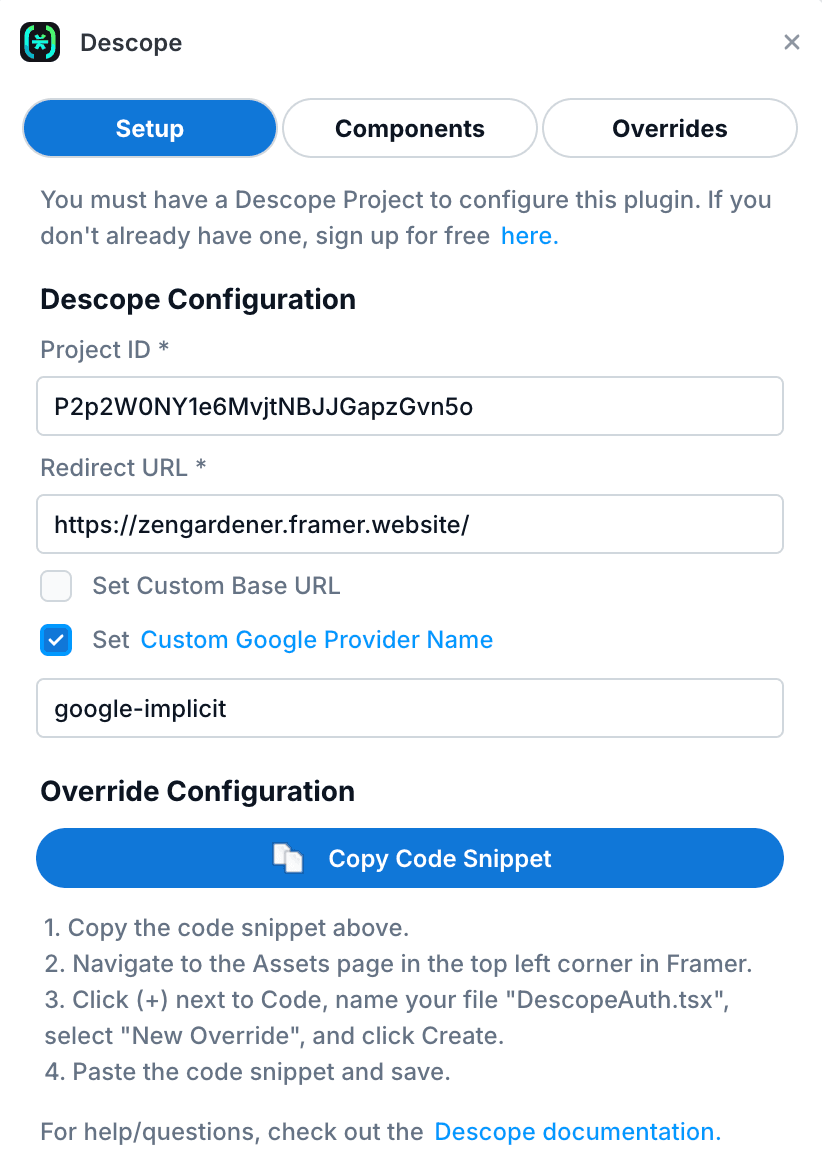
Step 2: Configure Descope settings
In the plugin UI, enter:
Project ID: You can find this in the Descope console under Project Settings.
Redirect URL: The fallback URL for unauthorized access (we’ll use the homepage URL here).
Custom Google Provider Name: The custom Google OAuth provider we will use for adding One Tap to our website
Step 3: Build the Descope authentication flow
Before inserting the user authentication flow to our Framer site, we first have to create it in the Descope console. To keep things simple, we’ll use the “Sign up or in - magic link or social” flow from our Flow Library.
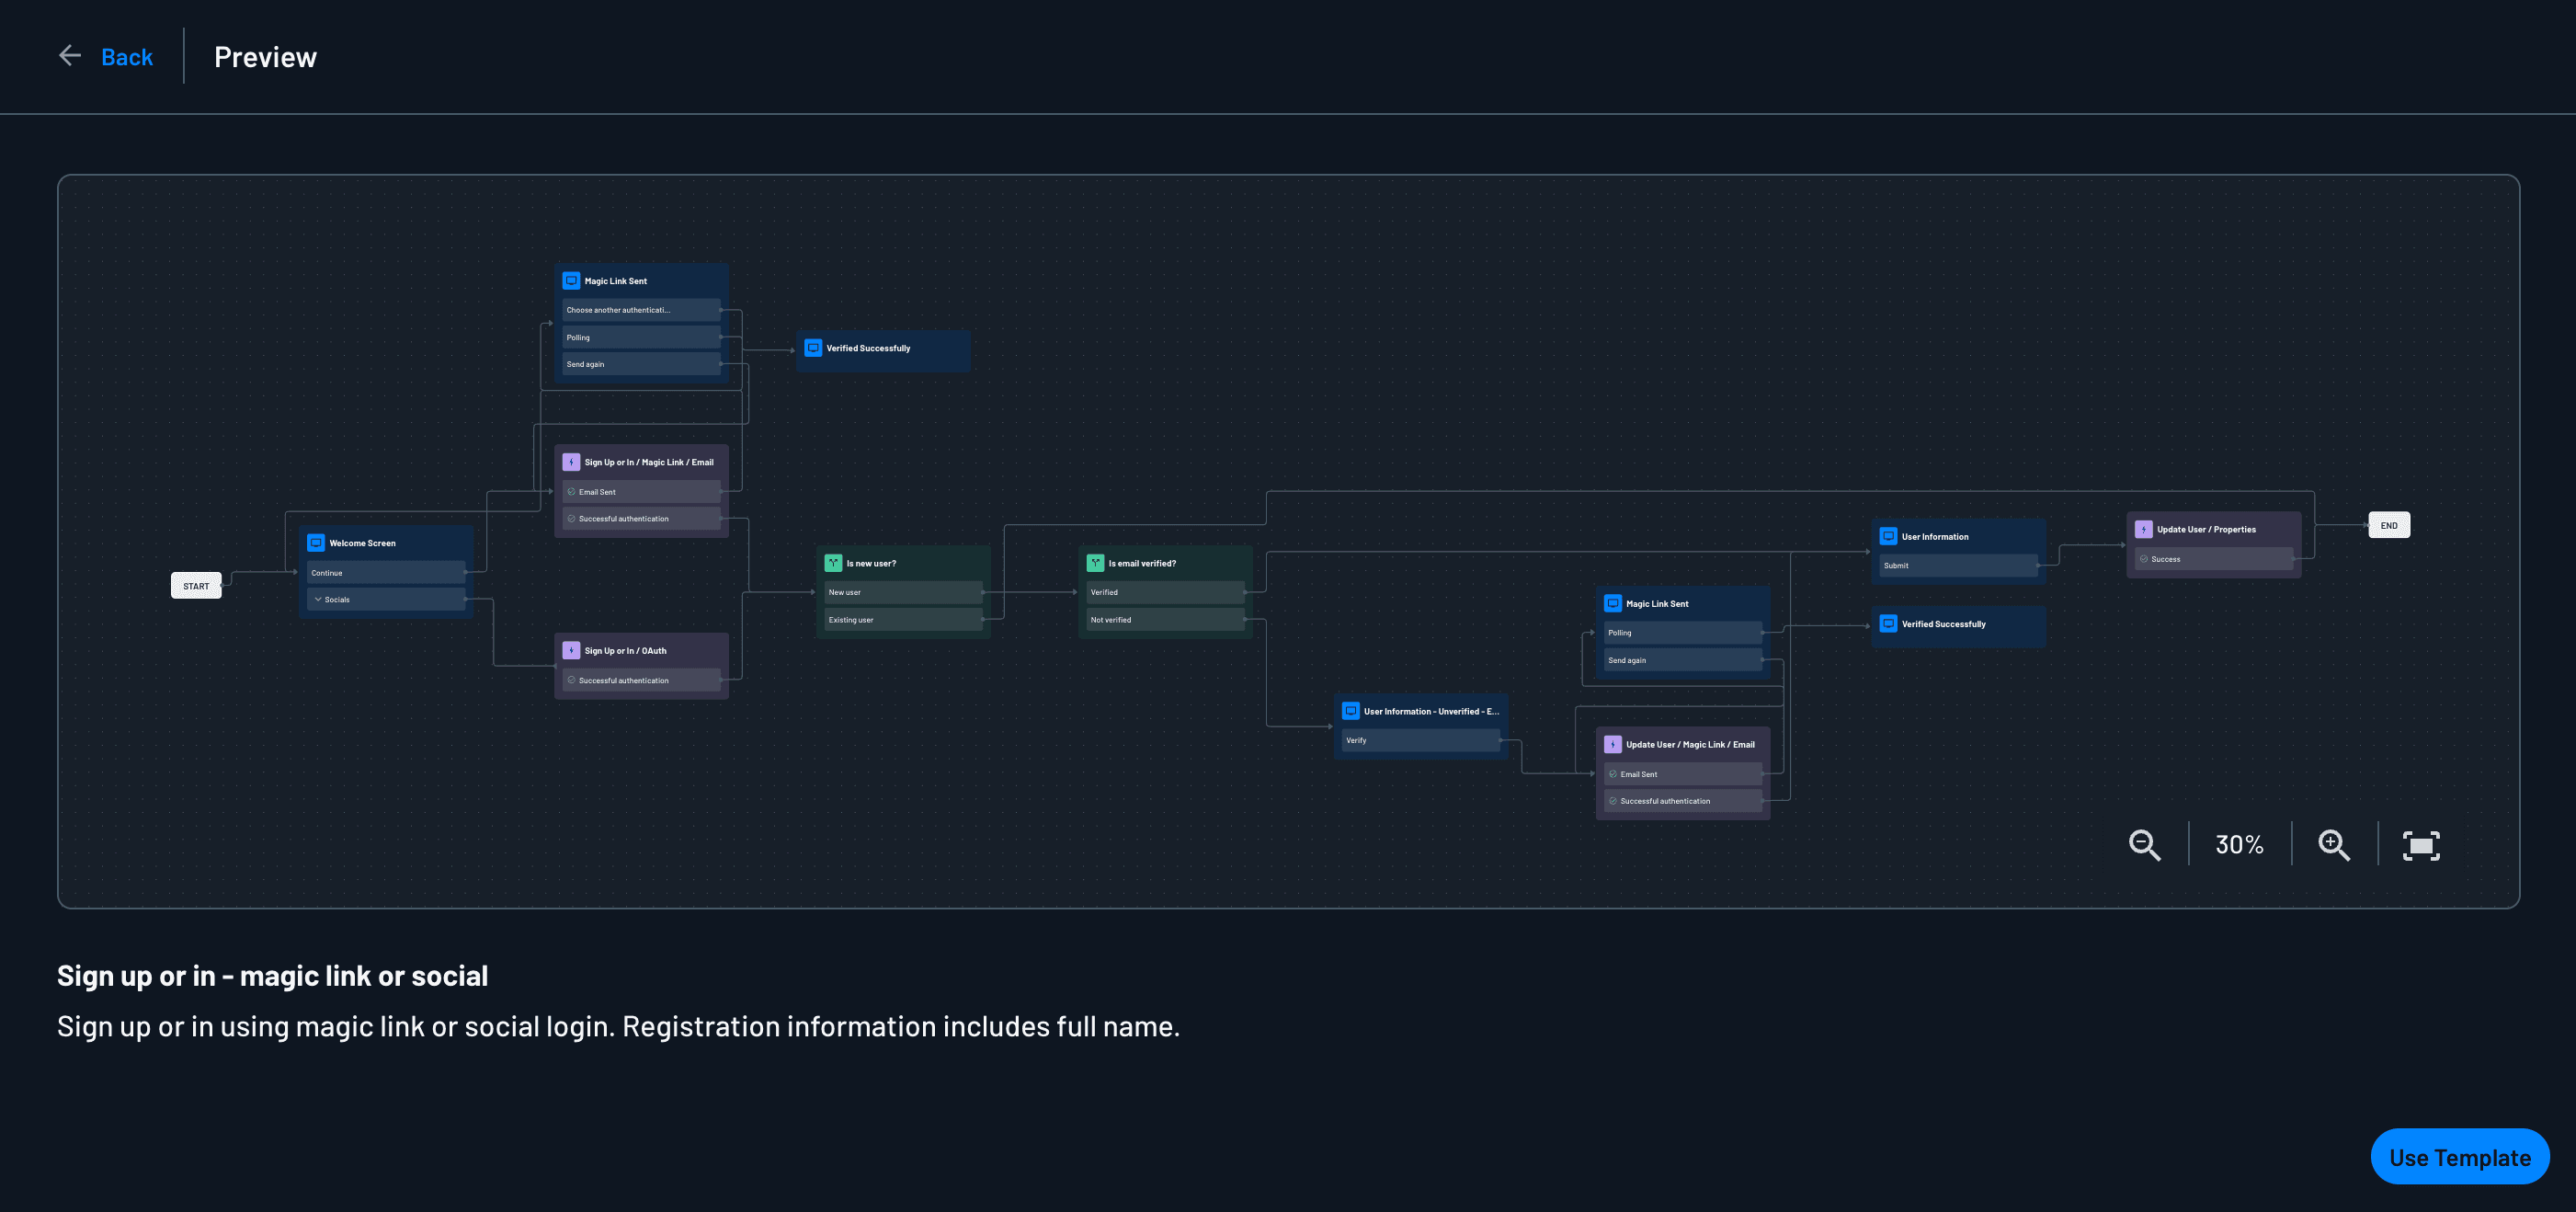
You can customize the flow as needed. For now, we’ll tweak the words on the Welcome Screen to say: “Sign in to view our full offerings!”
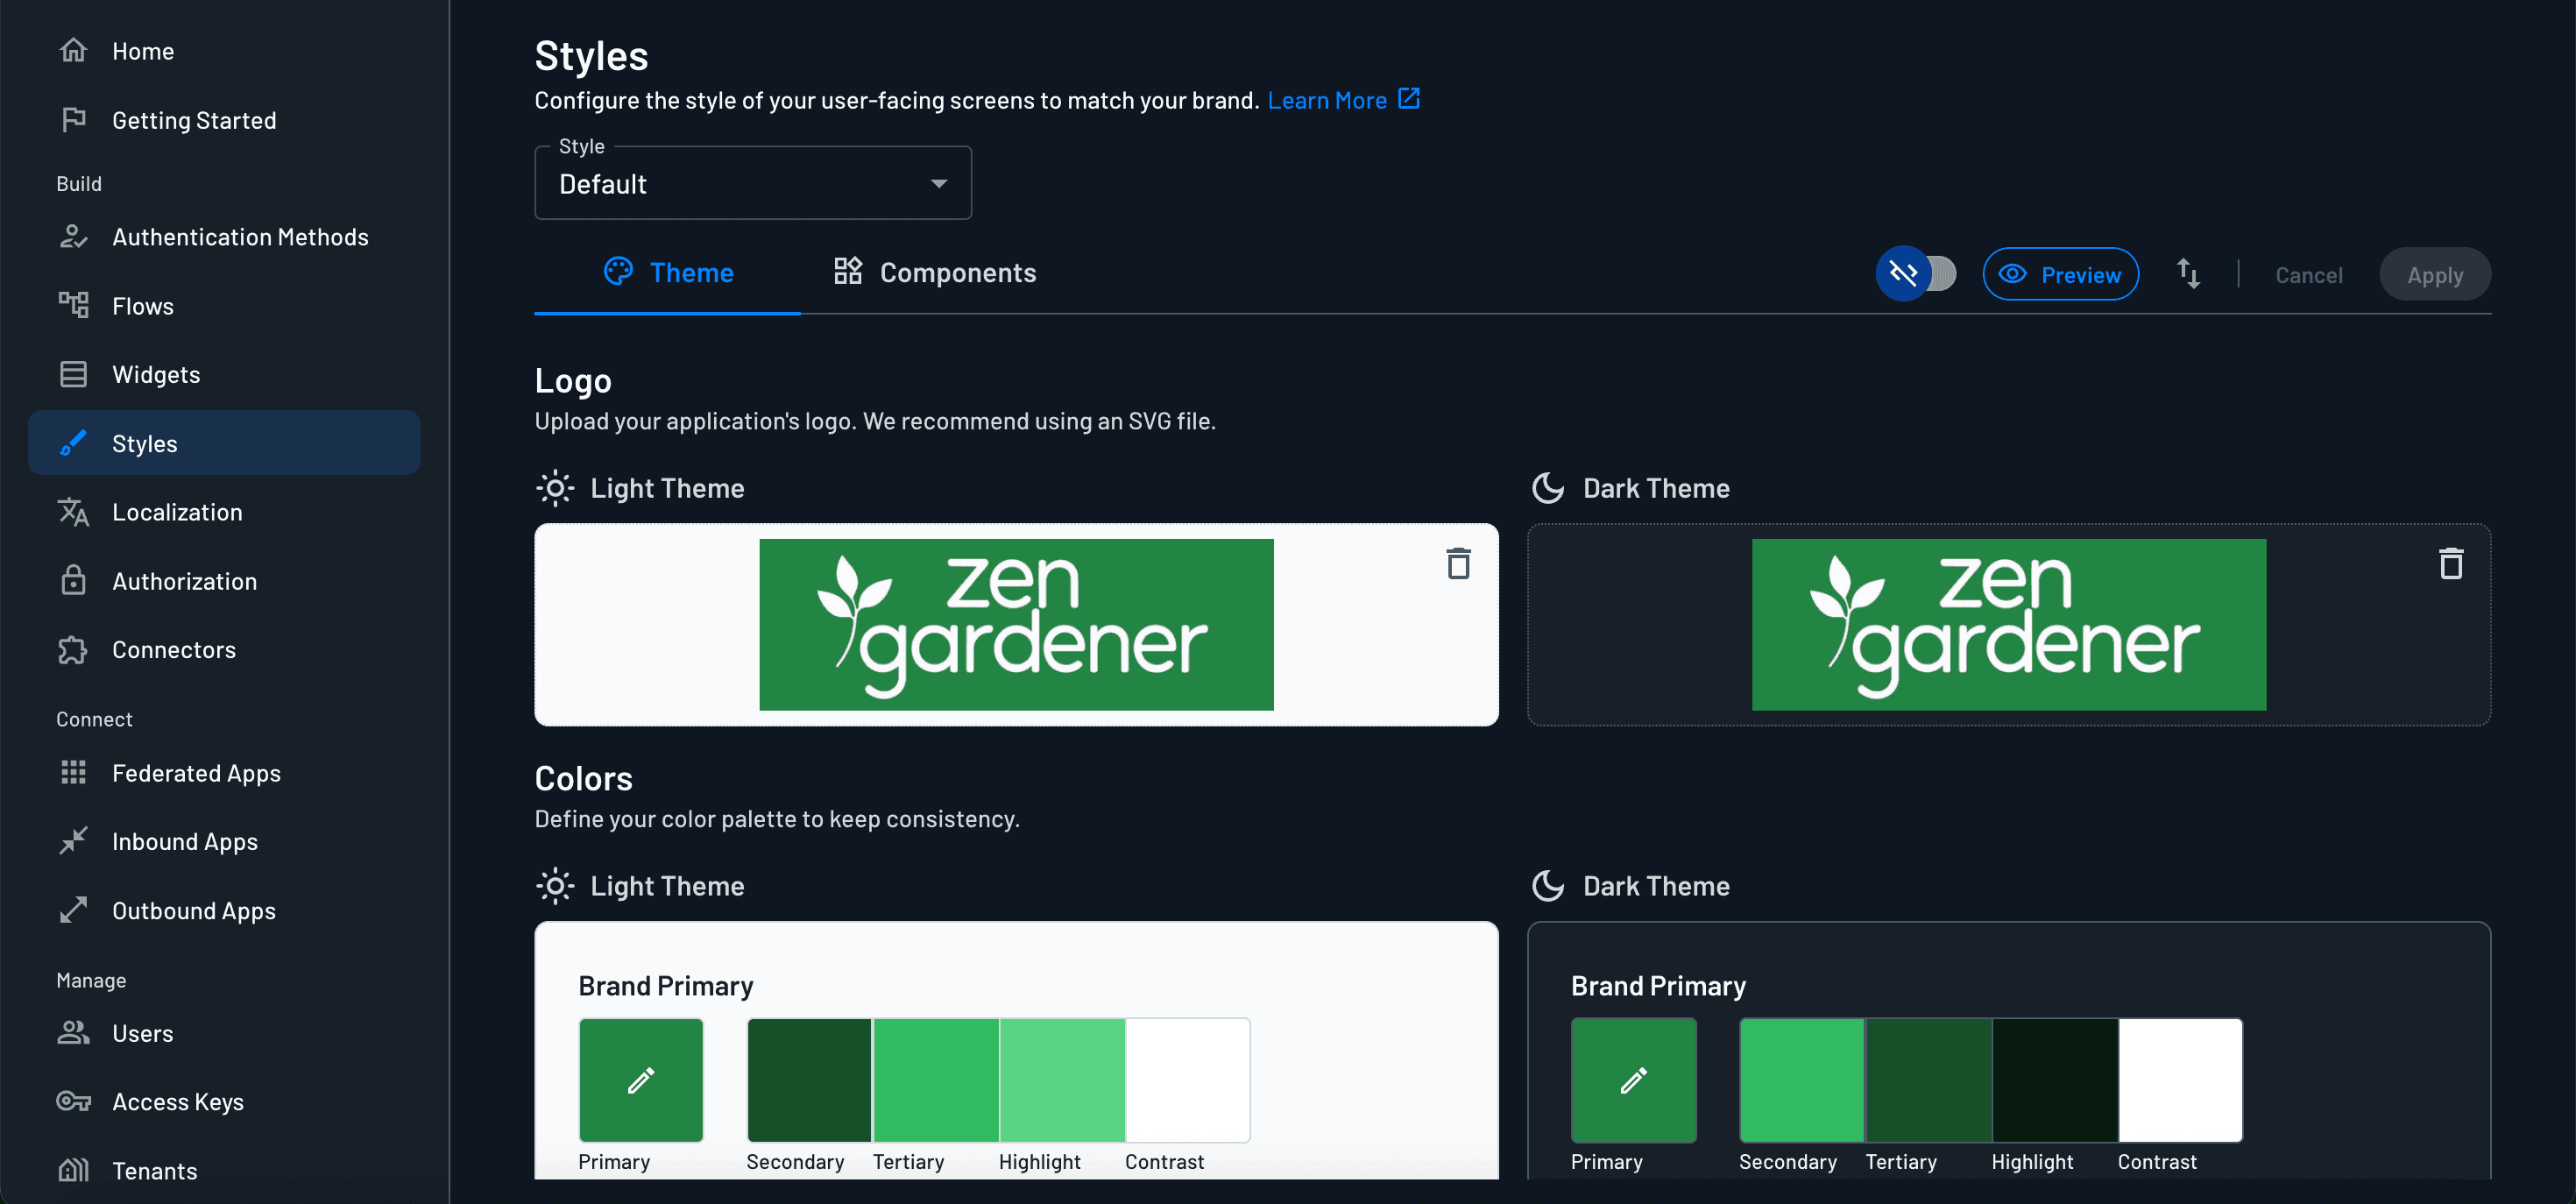
Step 4: Style Descope component
Next we’ll go to the Styles Page of the Descope console to make sure the authentication flow’s look matches the rest of the website. Here we’ll add our Zen Gardener logo and update the colors and fonts to match the website.
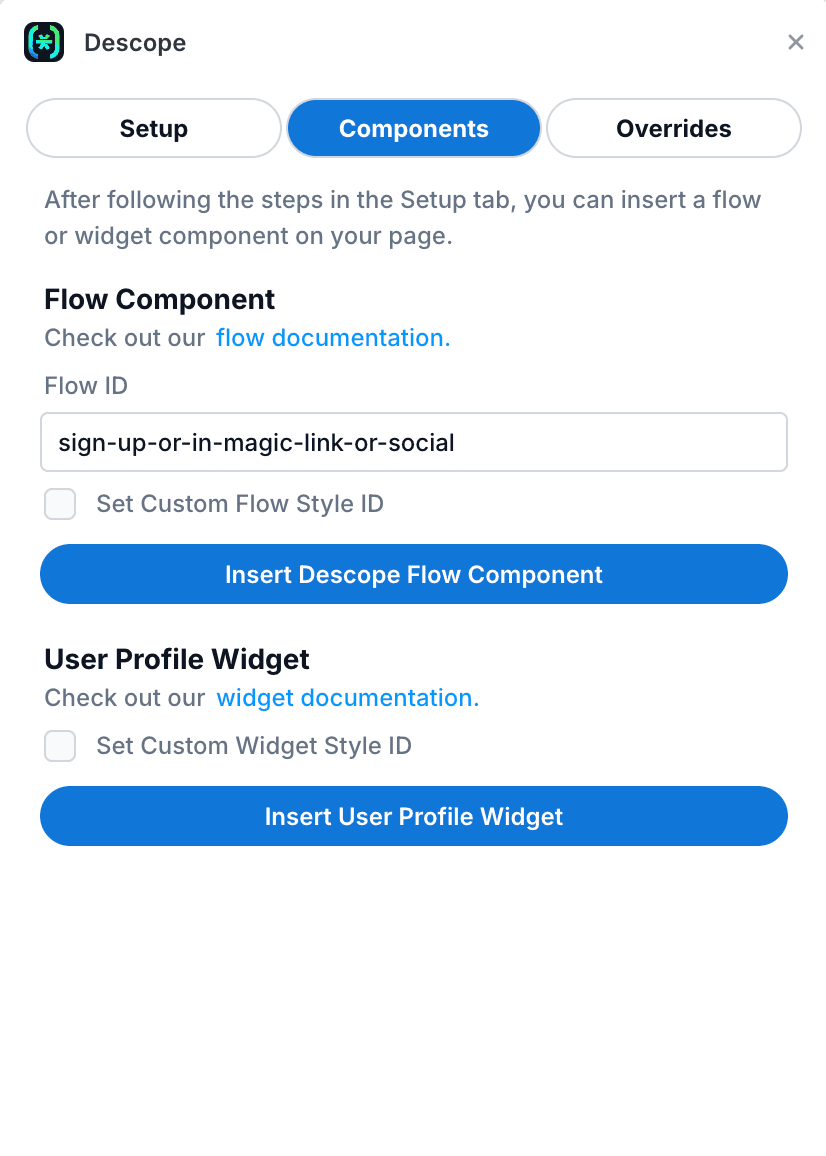
Step 5: Insert Descope flow component
Now it’s time to add our authentication flow to our website! In the Descope Plugin UI, we’ll enter the ID of the Flow we created earlier—in this case, sign-up-or-in-magic-link-or-social. Then we click Insert Flow Component.
Our authentication flow will now show up as a component on our Framer project’s canvas, and we can drag it to the correct spot on the page.
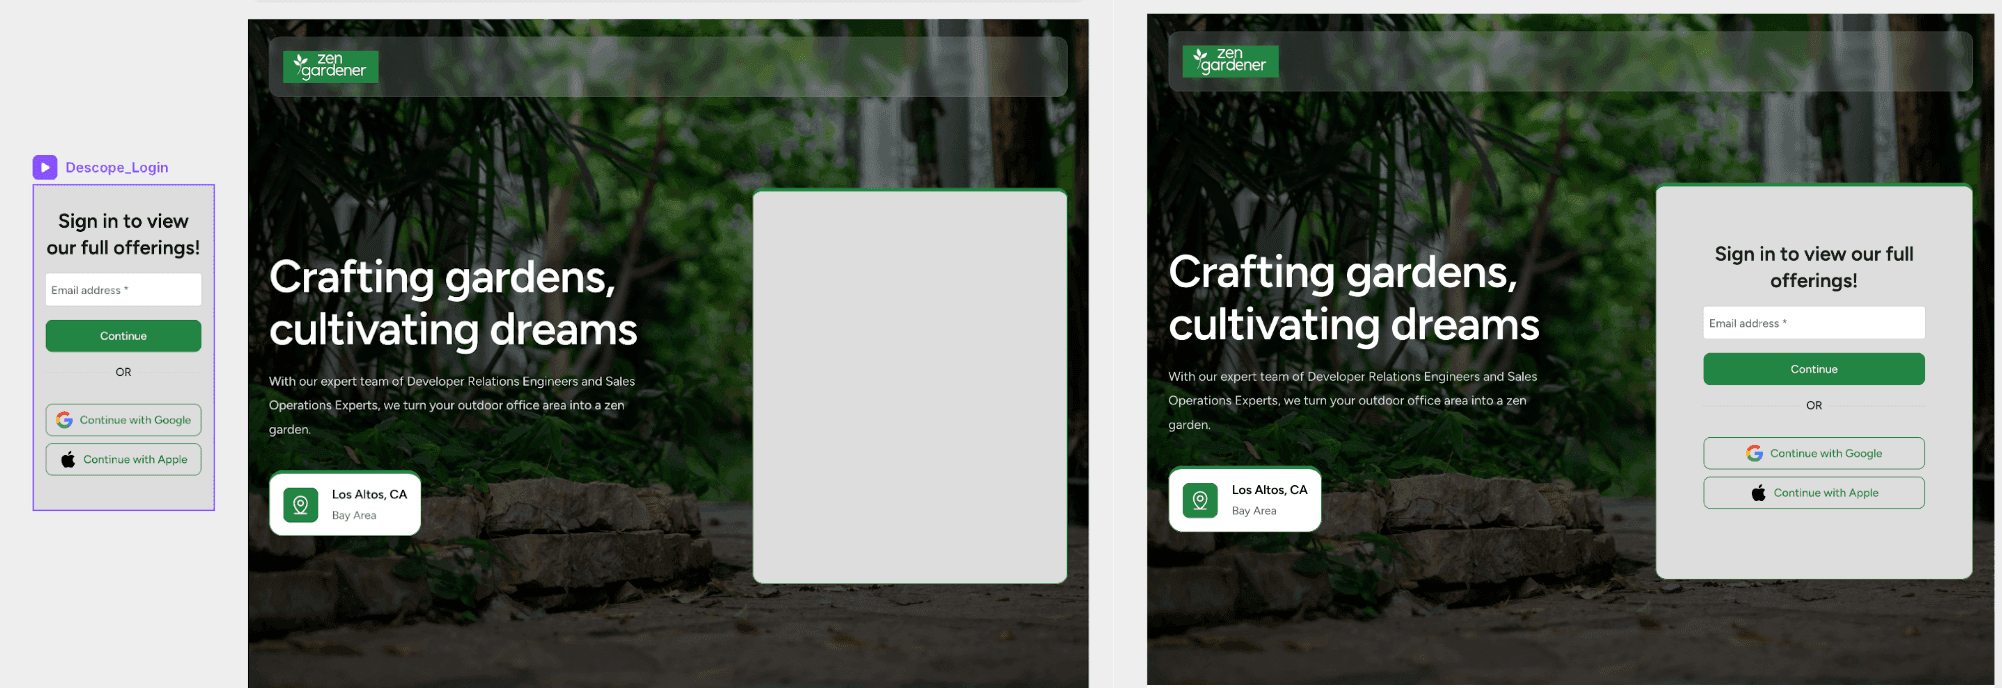
Now our users can sign in to our website using Magic Link or Social Login.
Step 6: Apply overrides
Now let’s use Descope overrides to conditionally show content based on whether the user is authenticated.
To apply an override, select the relevant page or component and navigate to Code Overrides at the bottom of the toolbar on the right. Select DescopeAuth as the file, and the relevant function as the override.
We’ll apply the following overrides:
logoutButton: Applied to the logout button in the headerprotectedPage: Applied to the Botanical Blog so that only logged-in users can access itprotectedComponent: Applied to most of the content on the home page of the website and the logout button in the headerunprotectedComponent: Applied to the login container to hide it for users already signed in
We’re already enabling users to sign into Zen Gardener using Google Social Login with our authentication flow, but we can make it even easier. We can set up our custom Google OAuth Provider and then apply the oneTapPage override to add Google One Tap Authentication to our homepage.
The finished product
And just like that, we’ve successfully added secure, fully customizable authentication to your Framer site. No writing complex code or sacrificing our site’s design, just secure and effortless user journeys.
Our visitors can now easily sign in using Magic Link or Social Login, and only authorized users can access our Botanical Blog. The login experience feels seamless and matches the Zen Gardener brand perfectly.
You can see this in action on our Zen Gardener website, where you can sign in to view the members only content.
But this is just the beginning. With Descope’s plugin powering your Framer site’s authentication, you can unlock all kinds of dynamic, personalized experiences while eliminating backend headaches.
Unlocking more with Descope
While we used Descope to gate a Botanical Blog, that’s just the tip of the iceberg. Because the plugin lets you show or hide any page or component based on a user’s authentication state, you can use it to enhance just about any Framer project.
For any of the following use cases simply use a flow to collect user information and apply the protectedPage or protectedComponent override on the content you want to gate:
Downloadable resources: Protect valuable content like PDFs, templates, or guides by making them available only to signed-in users. It’s a simple way to share premium materials while keeping things secure.
Members-only perks: Add a little something extra for your loyal visitors—like hidden discounts, early access to new products, or exclusive tips—all tucked behind a quick login.
Micro-courses or lessons: Want to offer tutorials or short learning modules? Use authentication to create a lightweight learning area just for your members, no complicated setup required,
Building next-level Framer experiences
Your Framer site deserves authentication that’s as effortless as the rest of your development experience.
In this guide, we walked through how to add authentication to a Framer site using the Descope plugin. With just a few simple steps, we turned our static Zen Gardener site into a dynamic, members-only experience powered by passwordless login.
Whether you're building client portals, premium content areas, or learning centers, Descope makes it easy to add secure, customizable auth flows that blend seamlessly into your Framer projects with no backend work required.