

Table of Contents
Don't have the time to read the entire post? Our human writers will be sad, but we understand. Summarize the post with your preferred LLM here instead.
Reflex is an open-source full-stack web framework written in and for Python, that lets you build both frontend UI and backend logic in pure Python—i.e., you don’t need to manually write JavaScript or separately manage a React/Vue frontend and a separate backend.
By adding Descope to your Reflex application, you can immediately take advantage of a full-fledged identity platform—complete with passwordless authentication, MFA, passkeys, social login, enterprise SSO, and customizable user journeys.
This lets you keep writing your entire Reflex project in Python while relying on Descope to seamlessly deliver the advanced authentication and security capabilities needed for real-world, scalable applications.
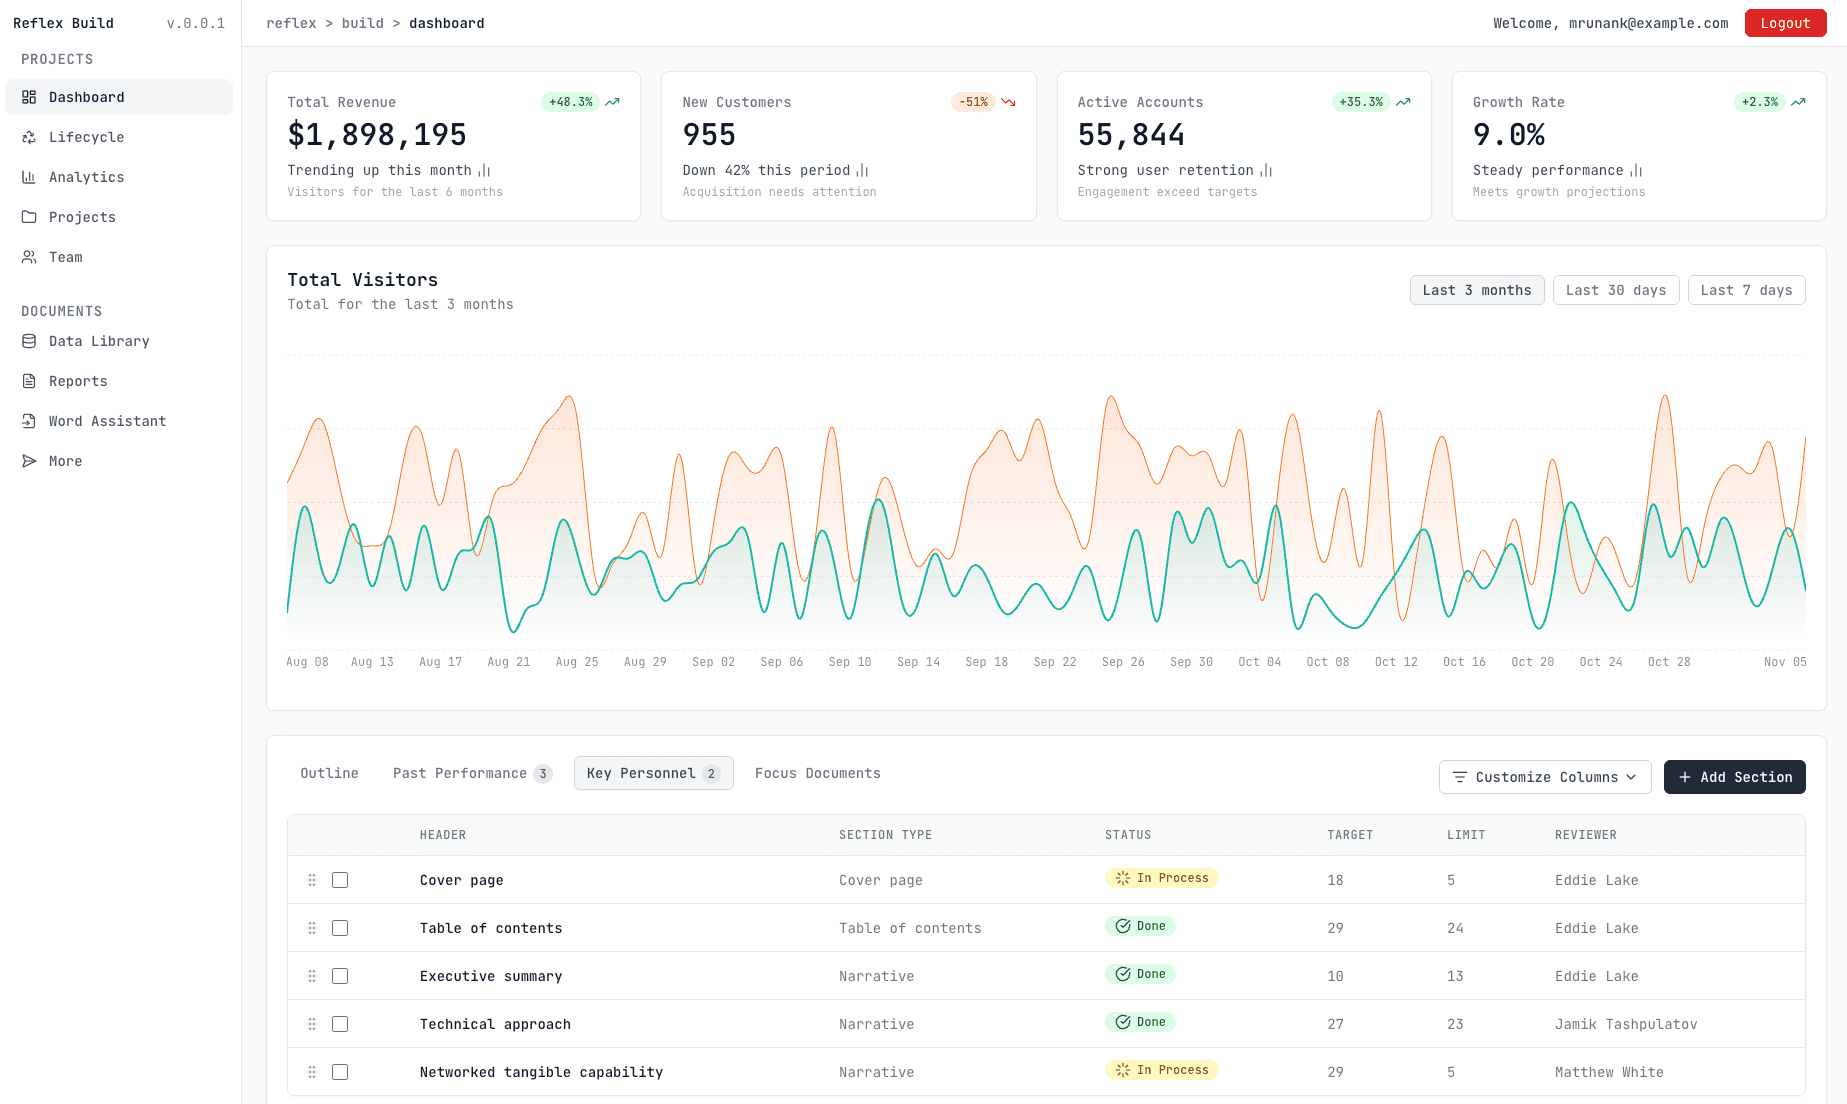
This is the output you’ll get after completing the tutorial:
Let’s begin!
Prerequisites
It’s helpful to familiarize yourself with Python and Reflex. You’ll also need a Descope account, but don’t worry if you don’t have one yet—you’ll learn how to set one up shortly. The free tier will be sufficient for you to follow along.
Create a Descope Project
The first step in connecting your Reflex app to Descope is to create a new Project in the Descope Console.
Go to the Descope sign-up page and register for a free account (or log in if you already have one).
From the top-left menu in the console, click + Project to set up a new project.
In Settings > Project, you’ll find your Project ID, which is a unique identifier used to link your Reflex app to Descope.
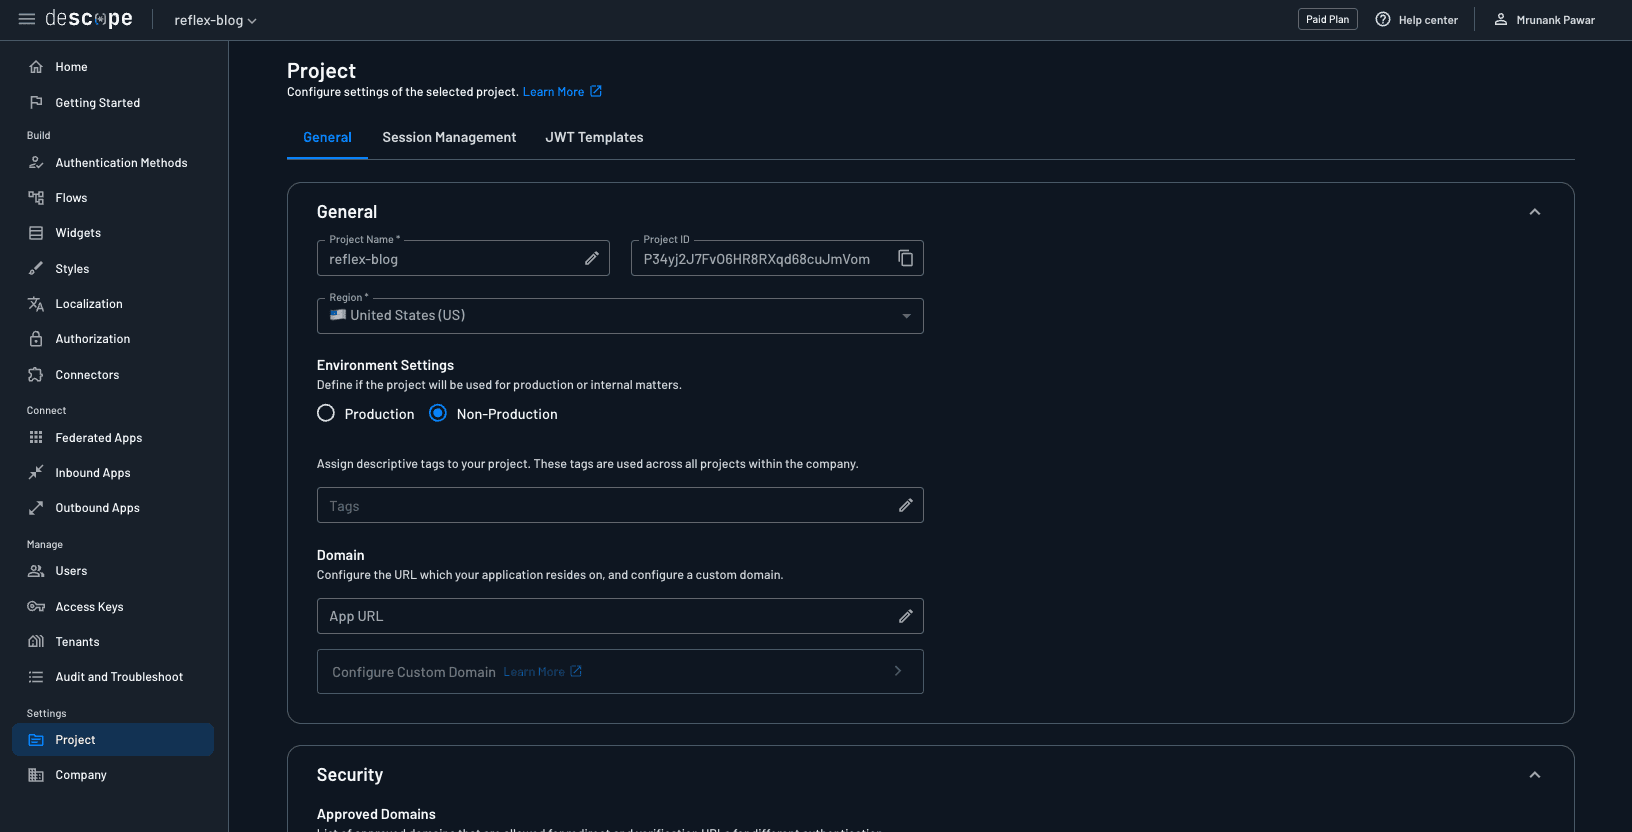
Best practice: Never paste this ID directly into your code. Instead, store it securely as an environment variable in a .env file. We’ll configure this later in the blog.
Create the Reflex app
With your Descope Project set up, let’s move to the Reflex side. We’ll start with a dashboard app template and then integrate authentication step-by-step.
Create a new directory for this app and clone the company dashboard template. Optionally, set up a Python virtual environment inside it.
Add
reflex-descope-authto therequirements.txtfile. Note: This is the Reflex Descope Auth plugin, which uses standard OIDC protocols to handle the login process in a reliable, familiar way.Now run this command to install all the dependencies using the command below:
pip install -r requirements.txtNext, create a
.envfile and set these environment variables in the project.
DESCOPE_PROJECT_ID=<your-descope-project-id>
DESCOPE_FLOW_ID=<your-flow-id>
DESCOPE_LOGOUT_REDIRECT_URI=http://localhost:3000
SESSION_SECRET=<secure-random-secret>
You can generate a secret using Python’s secrets module:
python -c "import secrets; print(secrets.token_hex(32))"This is what your project structure should look like:
.
├── .gitignore
├── app
│   ├── __init__.py
│   ├── app.py
│   ├── components
│   │   ├── __init__.py
│   │   ├── documents_table.py
│   │   ├── header.py
│   │   ├── key_metrics.py
│   │   ├── sidebar.py
│   │   └── visitors_chart.py
│   └── states
│       ├── __init__.py
│       ├── auth_state.py
│       └── dashboard_state.py
├── apt-packages.txt
├── assets/
├── .env
├── requirements.txt
└── rxconfig.py
Log in a user
In the app.py file, we’ll add a button that calls start_login, a built-in method that initiates the login flow and redirects users to the Descope authorization endpoint.
def index() -> rx.Component:
    """The main page, which serves as the login entry point."""
    return rx.el.div(
        rx.el.section(
            rx.el.div(
                rx.el.button(
                    "Login with Descope",
                    on_click=AuthState.start_login,
                    class_name=(
                        "mt-8 px-8 py-3 text-white bg-red-600 rounded-lg font-semibold "
                        "hover:bg-blue-700 transition-colors shadow-md"
                    ),
                ),
                class_name="flex flex-col items-start max-w-xl",
            ),
            class_name="container mx-auto flex flex-col lg:flex-row items-center justify-between gap-12 px-4 py-16",
        ),
        class_name="w-full bg-gray-50",
    )
The dashboard_page function defines the main authenticated dashboard view of the application. It’s registered as a Reflex page using the @rx.page() decorator with the root route (/).
When a user visits this page, the on_load parameter triggers the AuthState.check_login method to verify if the user is authenticated. If the user isn’t logged in, they’ll be redirected to the login flow automatically.
@rx.page(route="/", on_load=AuthState.check_login)
def dashboard_page() -> rx.Component:
    """The main dashboard page."""
    return rx.el.div(
        sidebar(),
        rx.el.main(
            header_bar(),
            rx.el.div(
                key_metrics_section(),
                visitors_chart_section(),
                documents_table_section(),
                class_name="p-6 space-y-6",
            ),
            class_name="w-full h-[100vh] overflow-y-auto",
        ),
        class_name="flex flex-row bg-gray-50 h-[100vh] w-full overflow-hidden",
        on_mount=DashboardState.load_initial_data,
    )
The callback page handles the authentication redirect after a user logs in. It’s defined using the @rx.page() decorator and mapped to the /callback route.
When the user returns to this route after completing authentication, the on_load parameter calls AuthState.auth_redirect. This method processes the login response, typically validating tokens, storing session data, and determining whether the login succeeded or failed.
@rx.page(route="/callback", on_load=AuthState.auth_redirect)
def callback() -> rx.Component:
    return rx.el.div(
        rx.cond(
            AuthState.error_message != "",
            rx.el.div(
                rx.el.h1("Login Failed", class_name="text-red-500"),
                rx.el.p(AuthState.error_message),
                rx.el.button(
                    "Try Again",
                    on_click=AuthState.start_login,
                    class_name="px-4 py-2 text-white bg-blue-600 rounded-md hover:bg-blue-700",
                ),
                class_name="flex flex-col items-center space-y-4",
            ),
            rx.el.div(
                rx.el.p("Processing login..."), class_name="flex items-center space-x-2"
            ),
        ),
        class_name="flex items-center justify-center h-screen",
    )
The auth_error page provides a dedicated route for handling login failures. It’s defined at the /auth-error path and serves as a fallback whenever something goes wrong during the authentication process. For example, if token validation fails, the user denies consent, or the callback flow encounters an unexpected error.
@rx.page(route="/auth-error")
def auth_error() -> rx.Component:
    return rx.el.div(
        rx.el.h1("Login Failed", class_name="text-red-500"),
        rx.el.p(AuthState.error_message),
        rx.el.button(
            "Try Again",
            on_click=AuthState.start_login,
            class_name="px-4 py-2 text-white bg-blue-600 rounded-md hover:bg-blue-700",
        ),
        class_name="flex flex-col items-center space-y-4 h-screen justify-center",
    )
We’ll also add additional routes to this file to handle page protection and move the dashboard to a dedicated page.
app.add_page(dashboard_page, route="/dashboard")
app.add_page(callback, route="/callback")
app.add_page(auth_error, route="/auth-error")
Define AuthState in Reflex
Authentication in Reflex is handled through reactive state classes. The reflex-descope-auth plugin provides a base class called DescopeAuthState, which already implements the full authentication lifecycle for you. By subclassing it, we can customize how our app handles redirects and session checks after a user logs in or out. The reflex-descope-auth plugin validates Descope tokens only once during finalize_auth. After that, Reflex simply stores the session in state and does not re-check the exp or rexp claims in the token automatically.
finalize_auth is a built-in method that completes the authentication process after the redirect from Descope, exchanges the authorization code for tokens, verifies ID token, and creates a session token for the user.
By using yield, Reflex processes each step reactively—first finalizing auth, then deciding the next redirect.
import reflex as rx
from reflex_descope_auth import DescopeAuthState


class AuthState(DescopeAuthState):
    @rx.event
    async def auth_redirect(self):
        yield DescopeAuthState.finalize_auth()
        if getattr(self, "error_message", None):
            yield rx.redirect("/auth-error")
            return
        yield rx.redirect("/dashboard")

    @rx.event
    def check_login(self):
        if not self.logged_in:
            return rx.redirect("/")
check_login() is a custom method that acts as a page guard for any route that should only be accessible to authenticated users. It works by:
Checking the reactive state variable
self.logged_in(which is automatically managed byDescopeAuthState).If the user isn’t authenticated (
self.logged_inis False), it immediately returns a redirect to the homepage (/), which serves as the login page.
This ensures that only valid sessions can access private pages like /dashboard.
Implementing OAuth social logins, magic links, and SSO
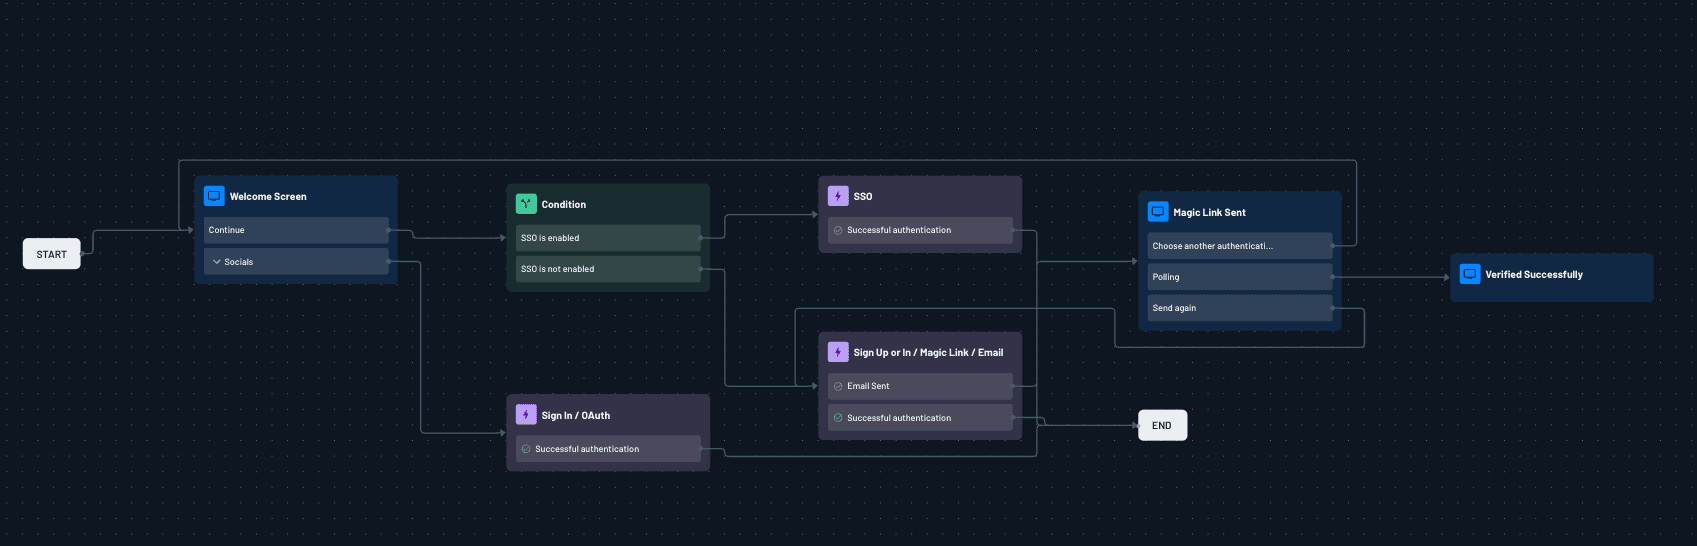
Once your Reflex app is wired up with the Reflex Descope Auth plugin, adding new authentication methods becomes incredibly simple. Descope flows let you drag, drop, and configure options like OAuth social logins, magic links, and SAML/OIDC SSO without changing any of your Reflex code.
If you want users to sign in with Google, GitHub or any other providers, you can configure these OAuth providers in the authentication methods in the console and add the OAuth action in the flow. For passwordless experiences, you can switch to magic link login by adding the built-in magic link action in your flow. And when your app needs enterprise authentication, you can add a SSO action to the same flow.
If you’d like to try SSO end-to-end, you can spin up a tenant and walk through the setup using the Mock SAML Testing guide. And if your organization already uses a SAML IdP such as Okta, ADFS, or PingFederate, you can simply plug in its metadata URL in place of the mock provider.
With everything controlled through Descope’s visual flow editor, your Reflex integration remains the same, with the plugin automatically handling redirects and token exchange. Here’s an example flow that combines the social login, magic link and SSO authentication:
One of the biggest hurdles is enabling each customer to set up Single-Sign-On (SSO) with their own identity provider (IdP). Descope’s SSO Setup Suite simplifies how organizations configure Single Sign-On (SSO) for their tenants. Instead of manually exchanging metadata and troubleshooting IdP configurations, the suite offers a guided, self-service flow that allows tenant admins to set up and test their SSO integration (SAML or OIDC) end-to-end.
With built-in steps for attribute mapping, SCIM provisioning, and domain routing, it significantly reduces setup time and support overhead by empowering customers to get their SSO running smoothly with minimal developer involvement.
Displaying the user name and logging out a user
Once a user successfully signs in, we can use AuthState.userinfo to display the user’s profile details such as their name, while AuthState.logged_in tracks the current authentication status. userinfo comes from the JWT claims inside the session token. The plugin extracts claims from the token and userinfo simply reads from there. To be able to add custom attributes, you can define custom claims in Descope.
In the code snippet below, the header displays a personalized welcome message along with a Logout button when the user is signed in and AuthState.logout will allow the user to log out.
import reflex as rx
from app.states.auth_state import AuthState


def header_bar() -> rx.Component:
    """The header bar component."""
    return rx.el.div(
        rx.el.div(
            rx.cond(
                AuthState.logged_in,
                rx.el.div(
                    rx.el.span(
                        f"Welcome, {AuthState.userinfo.get('name', 'User').to(str).split(' ')[0]}",
                        class_name="text-sm font-medium text-gray-700",
                    ),
                    rx.el.button(
                        "Logout",
                        on_click=AuthState.logout,
                        class_name="px-4 py-1 text-sm text-white bg-red-600 rounded-md hover:bg-red-700",
                    ),
                    class_name="flex items-center space-x-4",
                ),
                rx.fragment(),
            )
        ),
        class_name="flex items-center justify-between h-12 px-6 bg-white border-b border-gray-200",
    )
The dashboard will then look similar to this:
Reflex SSO and authentication with Descope
With Descope, implementing authentication in a Reflex app becomes both simple and highly flexible. Descope’s flows let you design every step of the user journey without managing complex logic yourself. The Reflex Descope Auth plugin then brings these flows directly into your application, handling the redirects and tokens. Together, they give you a powerful, low-code way to add secure, customizable authentication to any Reflex project.
If you have any questions about Descope or a customer identity project we can help with, book a demo with our auth experts.