
Table of Contents
Don't have the time to read the entire post? Our human writers will be sad, but we understand. Summarize the post with your preferred LLM here instead.
This tutorial was written by Thinus Swart, a jack-of-all-trades software developer and cybersecurity specialist. Connect with him on X to see more of his work!
Unreal Engine (UE) is widely known for its ability to create high-fidelity, immersive gaming experiences. Some of the most popular games today have been created with this more-than-capable engine, including games like Fortnite and Rocket League. Its visual scripting, robust C++ foundation, and cross-platform support make it a top choice for game development, from indie developers to AAA studios.
But building a great game isn't just about graphics or gameplay. When you start adding features like multiplayer, player profiles, cross-device syncing, and monetization, secure, seamless authentication becomes nonnegotiable. Making sure that only verified users can access key features or data is essential for both user safety and developer control. Descope is a flexible identity platform that allows developers to embed authentication and multifactor authentication (MFA) flows into their apps with minimal friction. With support for magic links, OTPs, and social logins, Descope makes it easier to build secure login flows that will feel like a natural part of your game.
In this tutorial, you'll learn how to add authentication and MFA to a UE game using Descope. Along the way, we'll cover the different approaches game developers typically consider when implementing authentication, walk through a real-world integration using Descope's OpenID Connect (OIDC) support, and demonstrate how to display user details and handle logouts in game.
Approaches to game authentication
Game developers generally have three options when it comes to implementing authentication. The first is to rely on a storefront's built-in identity system, such as Epic Games or Steam. These systems offer smooth onboarding within their ecosystems and can integrate well with features like matchmaking, achievements, and leaderboards. However, they also come with some trade-offs: limited customization, dependency on a single platform, and constraints around marketing access or monetization outside the store.
The second option is to purchase an authentication plugin from Fab, Epic Games' new unified marketplace for digital assets. While this can help to kickstart development, the quality and reliability of these plugins can vary. Many still require manual setup and ongoing maintenance or lack support for features like MFA. For teams working on production-grade titles, these limitations often become apparent late in development, right when integration changes are most costly.
Finally, you could opt to build your own authentication system from the ground up. This offers the most control but comes at a high cost in terms of engineering time, ongoing security maintenance, and compliance.
However, a custom authentication system does bring some advantages that the other options might not be able to offer:
Maintain consistent player identity across storefronts and devices
Implement subscriptions or microtransactions outside of the game platform
Get better user analytics and tracking
Reduce reliance on third-party platforms
Strengthen overall security with flexible MFA options
Descope helps you to bridge this gap by offering a secure, developer-first approach to authentication and MFA. This approach works across platforms, can be integrated into your game's UX, and doesn't require you to become an authentication expert.
In the following sections, you'll learn how to implement a secure, user-friendly authentication flow in Unreal Engine using Descope: from setting up your Descope project to integrating it with your UE game, configuring authentication flows, and adding multifactor authentication. By the end, you'll have a working login system with MFA, profile fetching, and logout functionality ready to plug into your own game.
Prerequisites
Before you get started, you're going to need a few tools and services downloaded, installed, and ready to go:
Unreal Engine v5.6+ (installed via the Epic Games Store launcher). Instructions for installing the full UE can be found here. The tutorial might work on an older version, but your mileage may vary.
Visual Studio or Visual Studio Community Edition, depending on your licensing needs.
Visual Studio: specific modifications for Unreal Engine
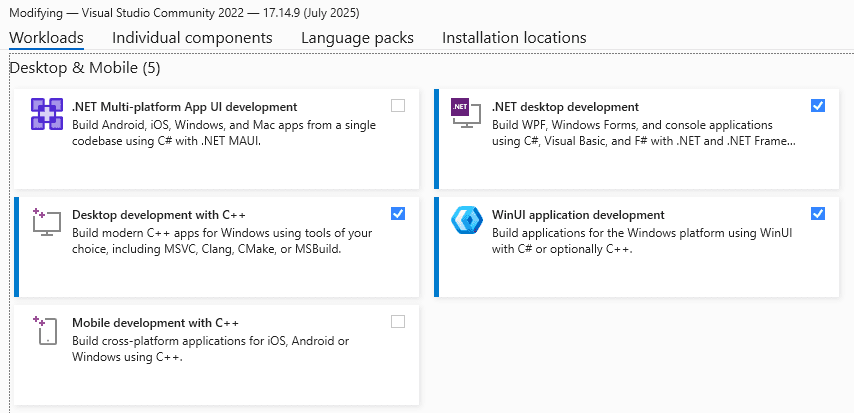
Visual Studio's installer allows you to set up the IDE for different workloads or project types. If you've previously only used VS for Python projects, you'll have it set up in a particular way that won't work with UE, which requires a few specific components for it to fully work.
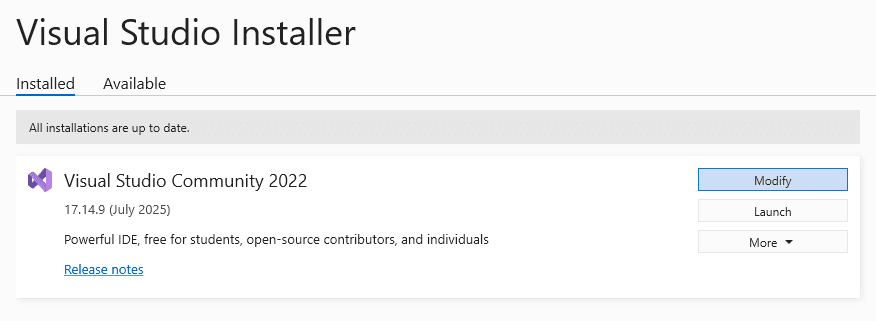
Launch the VS installer and click Modify to modify your installation of Visual Studio:
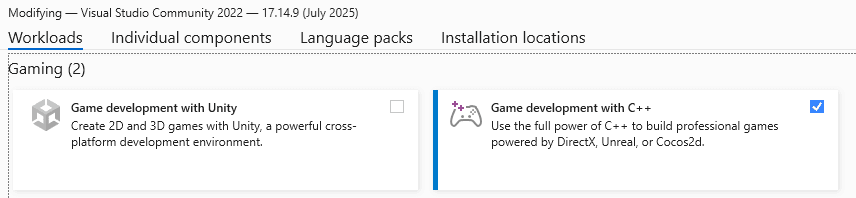
Under the Workloads tab, in the Desktop & Mobile section, you need to make sure that these three components are selected:
.NET desktop development
Desktop development with C++
WinUI application development
Still under Workloads, in the Gaming section, make sure that Game development with C++ is selected:
Once you've downloaded and installed all of the components, your Visual Studio environment is ready to go.
Note: If, for whatever reason, things don't seem to be working, or the installed version of UE is starting up with errors, consult the help pages on Epic Games' website to troubleshoot these errors.
Setting up Descope
Once you've set up your Descope account, you can start designing your authentication workflow.
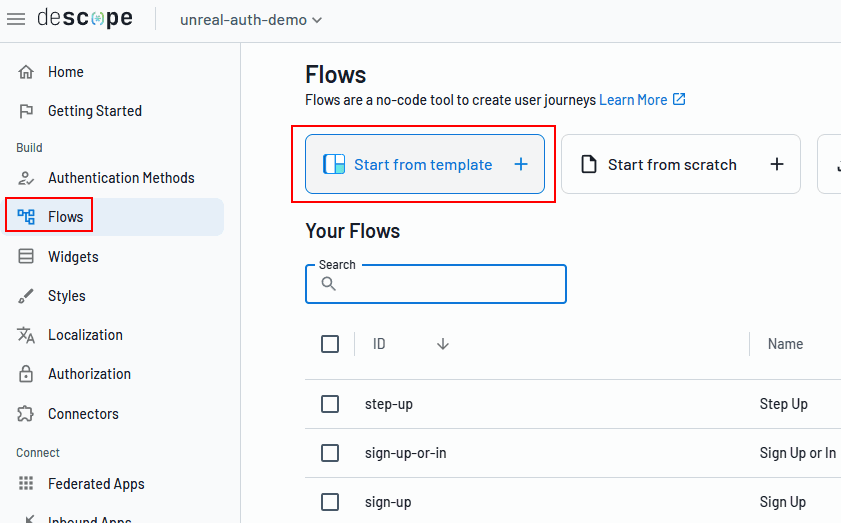
First, log in to your Descope console via this link.
Navigate to Flows and then select Start from template.
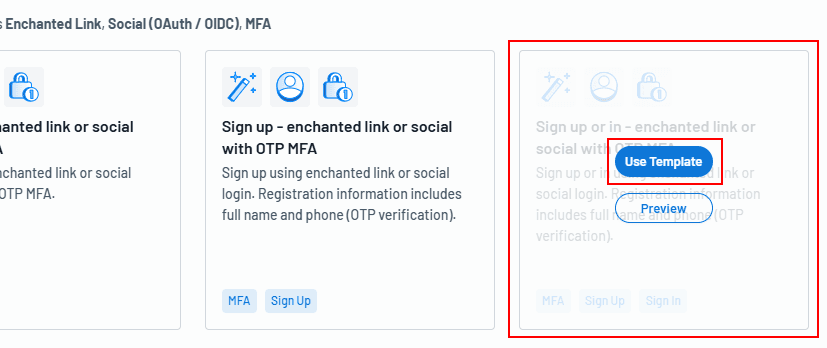
The flow template library allows you to filter by use cases and methods. Select Enchanted Link and Social (OAuth/OIDC) for your methods, and MFA for your use case. Select the Sign up or in version of the templates that matched your selected filters.
You can rename your flow and give it a unique ID if you want. Once you're happy, click Create.
Once your new flow has been created, you can customize the flow to behave the way you want it. In this tutorial, we'll remove the social login buttons for Google and Apple, and add a Discord button instead.
Hover over the Welcome Screen element on the flow and select Edit.
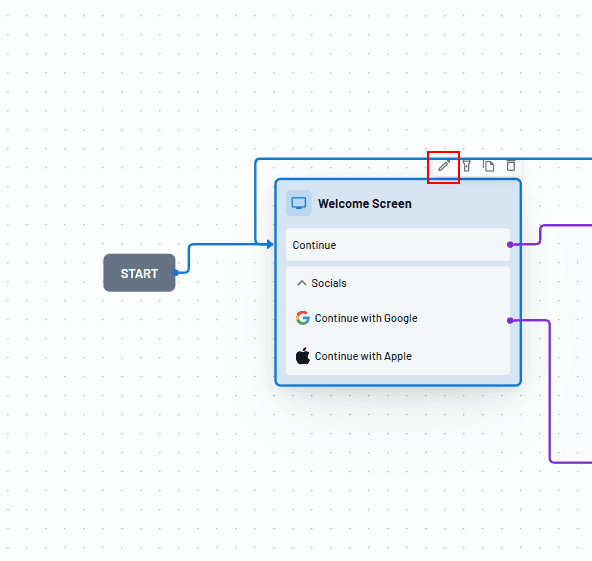
Delete the Google and Apple social buttons, and drag in a Discord button from the sidebar.
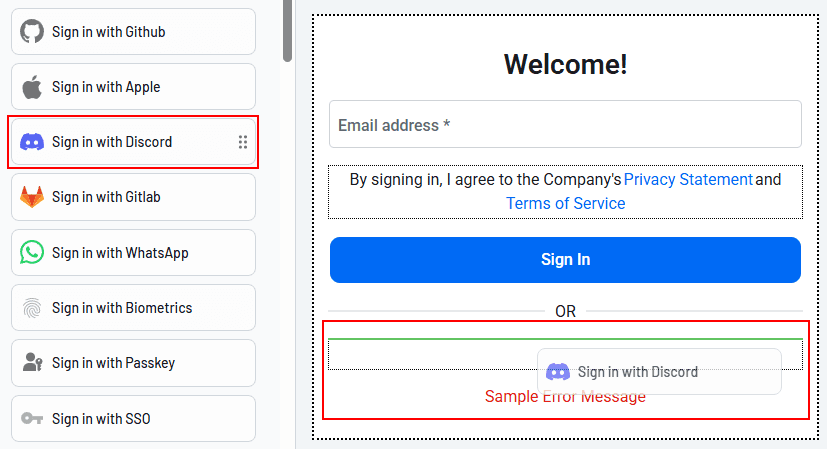
Remember to save your flow once you're happy with the changes you've made.
Your custom authentication flow has now been set up and is ready to be used in your Unreal Engine project.
Creating your Unreal Engine game
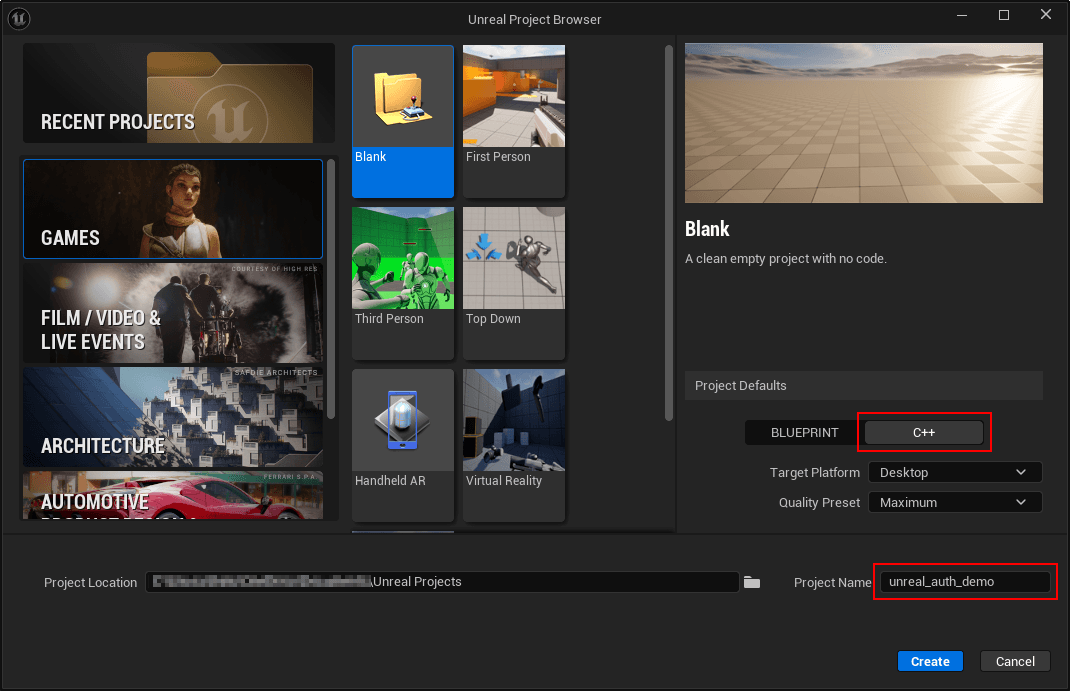
With the prerequisites in place, the first step is to set up the new Unreal Engine project that you will add authentication to. Start off by opening Unreal Engine either from the Epic Games Launcher or from the installed location.
Then, create a blank game project and give it a name. This tutorial will use UNREAL_AUTH_DEMO as the project name. Make sure to select C++ as your project type.
If everything went well, you'll see an empty game world showing up in the editor:

If it didn't go well and your editor refused to start, now would be the time to consult the Setting Up Visual Studio page to see if you're missing any components that need to be installed first.
Otherwise, you're ready to create your menu component that will allow your users to sign up or in.
Create your main menu
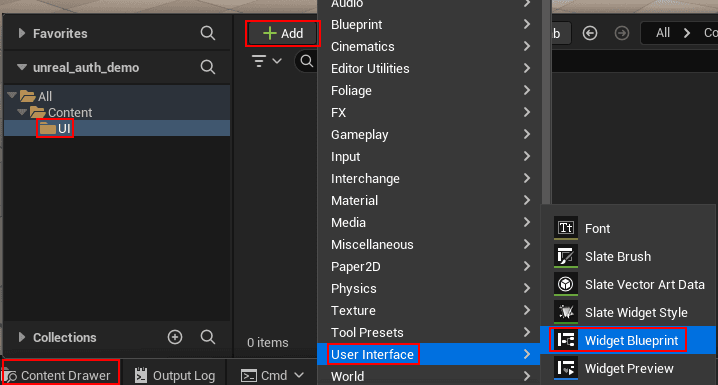
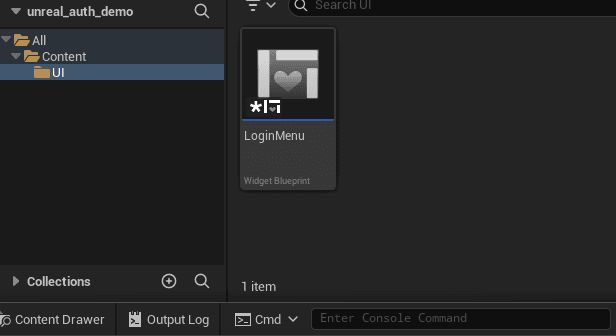
In the UE editor, at the bottom, expand your Content Drawer. Create a UI folder under Content to keep things organized.
Add a User Interface widget blueprint:
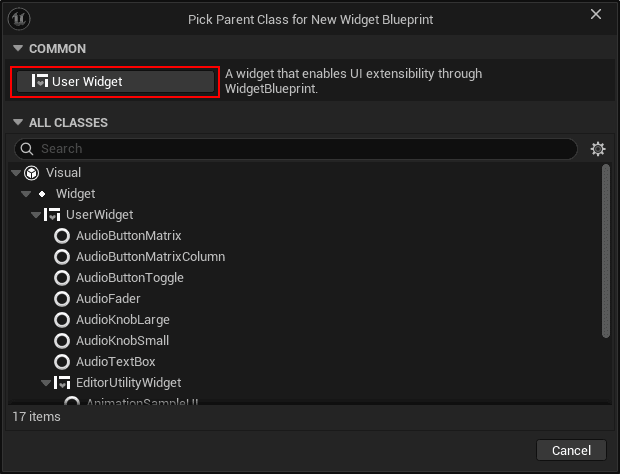
Click User Widget as the parent class when prompted:
Name your widget something practical like LoginMenu:
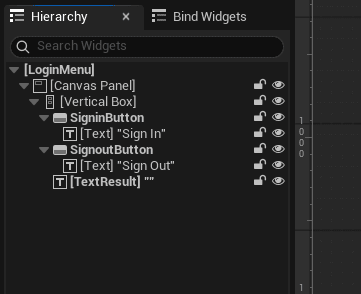
Once you're in the designer, you're going to need the following on your menu blueprint:
Two buttons, one named SigninButton and another named SignoutButton.
Both buttons need to have the Is Variable option enabled.
A textbox named
TextResult, also with Is Variable enabled.
Once your menu has been created, you should have a hierarchy that looks similar to this:
And while your menu might look slightly different, it should look similar to this:
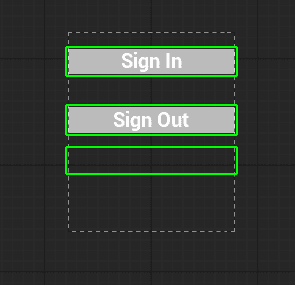
This menu is now ready to be displayed in your UE level.
Display your menu
Now that you have a login menu, you'll want it to appear when your game starts.
In the UE editor:
Create a new empty level (for example, you can name it
MainMenuLevel).Open the level blueprint.
On Begin Play, add a Create Widget node, select your LoginMenu widget, then connect it to an Add to Viewport node.
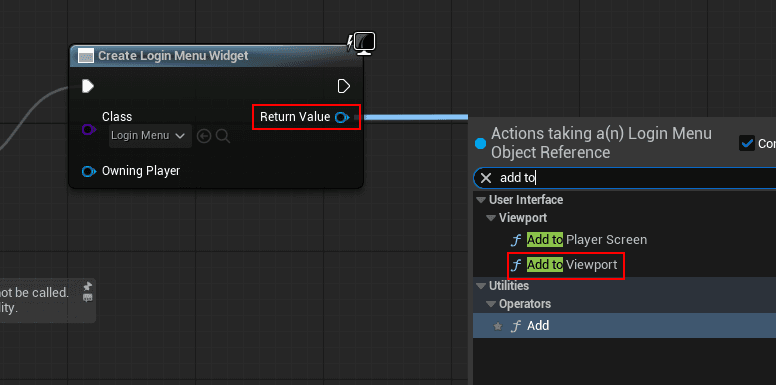
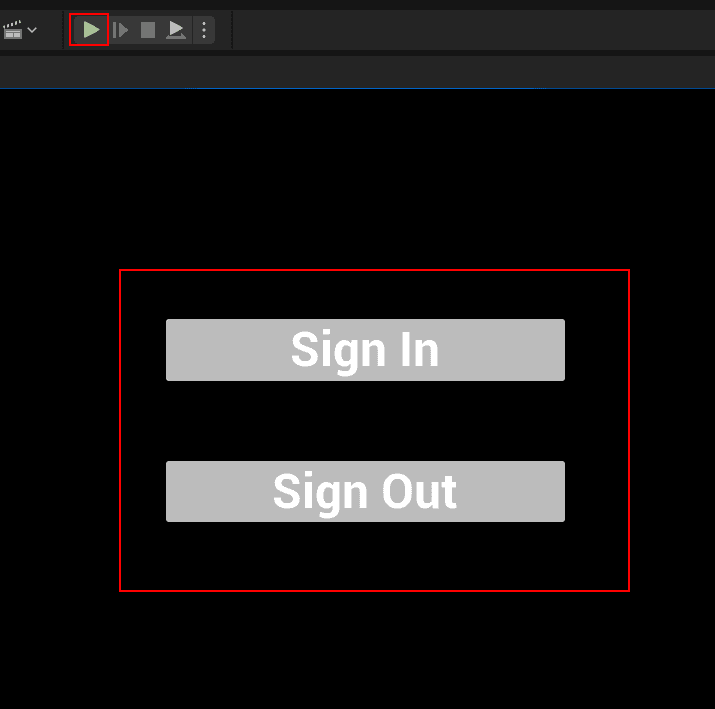
Save your level blueprint, exit the blueprint editor, and click Play from the level editor to see your new menu inside the level:
Create your custom login widget class
Next, you'll add some simple C++ logic to connect to the menu.
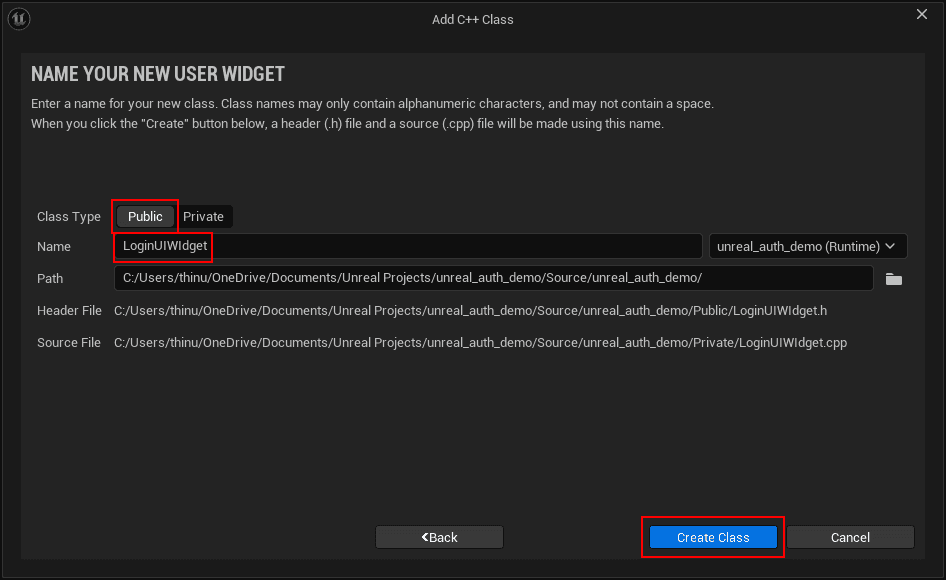
Create a new C++ class (UserWidget parent) and name it LoginUIWidget.
Wire up basic button click events to confirm your UI is responding.
Update LoginUIWidget.h to declare the buttons, text block, and click handlers:
#pragma once

#include "CoreMinimal.h"
#include "Blueprint/UserWidget.h"
#include "LoginUIWidget.generated.h"

UCLASS()
class UNREAL_AUTH_DEMO_API ULoginUIWidget : public UUserWidget
{
    GENERATED_BODY()

    public:
        virtual void NativeConstruct() override;

        UFUNCTION()
        void OnSigninClicked();

        UFUNCTION()
        void OnSignoutClicked();

    protected:
        UPROPERTY(meta = (BindWidget))
        class UButton* SigninButton;

        UPROPERTY(meta = (BindWidget))
        class UButton* SignoutButton;

        UPROPERTY(meta = (BindWidget))
        class UTextBlock* TextResult;
};
Note the following:
Replace
UNREAL_AUTH_DEMO_APIwith your actual project name and API.Ensure the
UButtonandUTextBlocknames match your blueprint widget variables.
Then update LoginUIWidget.cpp to register the button click handlers:
#include "LoginUIWidget.h"
#include "Components/Button.h"
#include "Components/TextBlock.h"

void ULoginUIWidget::NativeConstruct()
{
    Super::NativeConstruct();

    if (SigninButton)
        SigninButton->OnClicked.AddDynamic(this, &ULoginUIWidget::OnSigninClicked);

    if (SignoutButton)
        SignoutButton->OnClicked.AddDynamic(this, &ULoginUIWidget::OnSignoutClicked);
}

void ULoginUIWidget::OnSigninClicked()
{
    UE_LOG(LogTemp, Log, TEXT("Sign in button pressed!"));
    // login logic here
}

void ULoginUIWidget::OnSignoutClicked()
{
    UE_LOG(LogTemp, Log, TEXT("Sign out button pressed!"));
    // logout logic here
}
This test code does two things:
Hooks up the Sign In and Sign Out buttons
Logs a message to the UE output log when either button is pressed
Save these two files. Now, you'll need to reparent your existing login menu blueprint to use this new class's logic.
Reparent your login menu blueprint
Open up the LoginMenu blueprint from the content drawer. Then, select File > Reparent Blueprint. You'll be able to search for LoginUIWidget (the new class you just created) and then select it. This will reparent your blueprint's logic to the custom from earlier.
Note: At this point, you might run into an annoying bug that some people have with UE5 and VS 2022. If you do not see the class listed when you search for it, you'll need to do the following steps:
Close the Unreal Engine editor.
In Visual Studio, select Build > Build unreal_auth_demo or the project name you chose.
Wait for the build process to finish, and open the Unreal editor again.
Sometimes, you can use the build process without having to close the editor, and there are ways to fix it, but that's beyond the scope of this tutorial. In any case, if you've followed the steps, you should be able to reparent the blueprint to your custom class.
Save your blueprint once you've finished the reparent process.
Change your default level and test the button
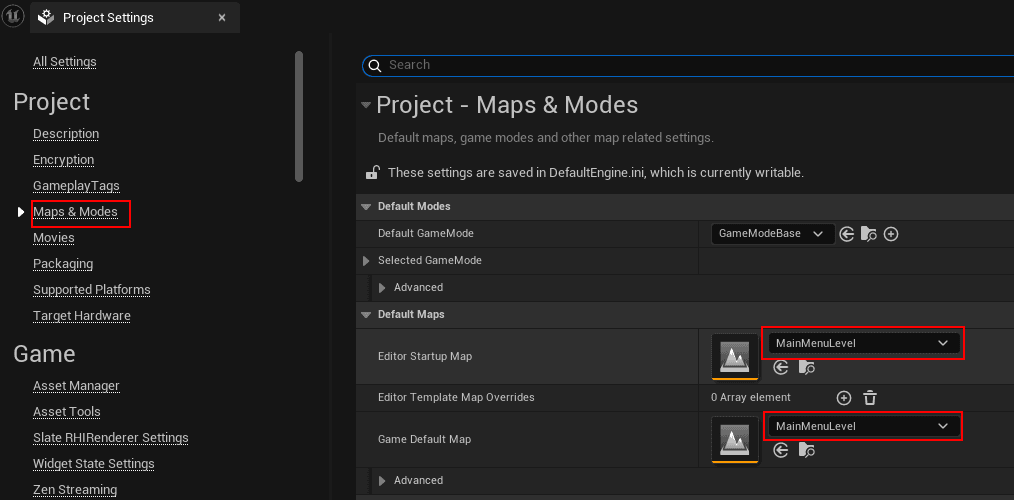
Back in the editor, go to Edit > Project Settings, and then click Maps & Modes on the left sidebar menu. Change your Editor Startup Map and your Game Default Map to point to the MainMenuLevel you created.
Now, you can test your custom button code logic. Play the game using the same green play button from before, and click the Sign in button.
In your editor, you'll see a drawer called Output Log. Expand this drawer, scroll to the bottom, and see if your custom output message is there.
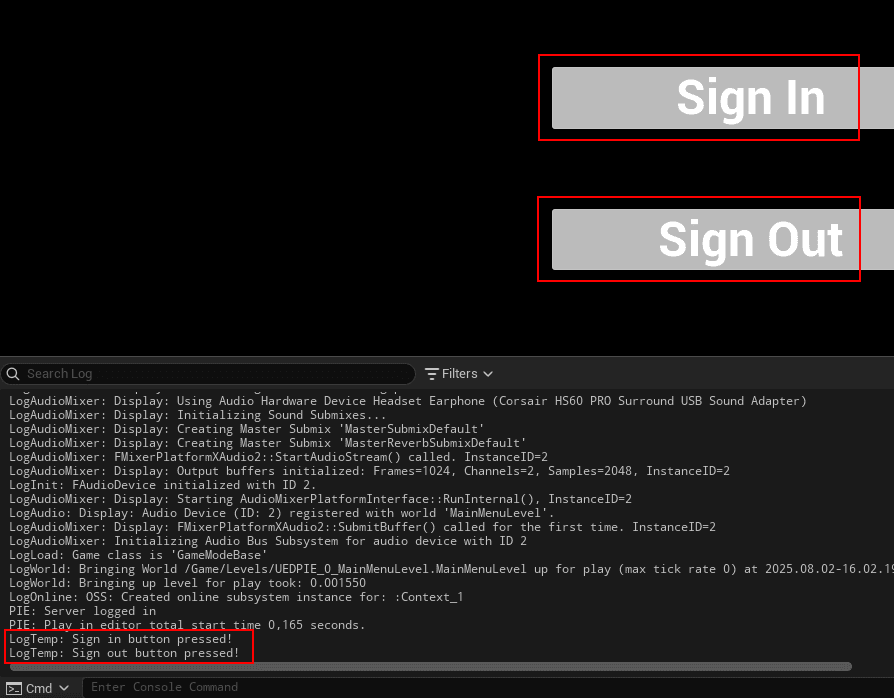
If you see the messages, that means your code is working.
Get some information from Descope
Before you can connect Unreal Engine to Descope, you need to gather some details about how the game will communicate with Descope during the login process. These details come from OAuth 2.0 and OpenID Connect (OIDC), which are the standards we'll use to handle authentication with Descope.
OAuth and OIDC
OAuth 2.0 is a protocol that lets an app (in this case, your game) request authorization for a user through a trusted provider like Descope. Instead of handling passwords directly, your game gets a temporary authorization code that can be exchanged for tokens.
OpenID Connect (OIDC) builds on OAuth 2.0 and adds identity information. That's how your game can get details like the player's username, email, or profile data.
In practice, this means your Unreal Engine project will:
Redirect the player to Descope's login page.
Descope will authenticate the user (e.g., via Discord login + MFA).
Descope will send your game back an authorization code.
Your game exchanges that code for tokens that prove the user is authenticated.
To make this work, your game needs some values from Descope's OIDC configuration.
Getting the OIDC Settings
In your Descope console:
Navigate to Federated Apps.
Click OIDC Default Application. (On the free tier, this is the only one available for editing.)
Scroll down to the SP Configuration section and note the following values:
Client ID: identifies your Unreal Engine app to Descope.
Authorization URL: the endpoint your game uses to start the login flow.
Token URL: the endpoint your game calls to exchange the authorization code for tokens.
Logout URL: the endpoint that clears the user's session when they sign out.
These values form the backbone of the login flow. In the next step, you'll wire them into the Unreal Engine code so the game can start and complete the OAuth process.
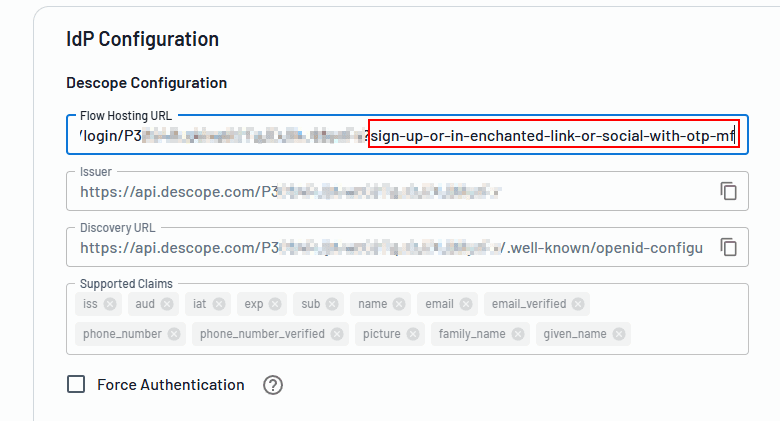
While you're on this screen, update the Flow Hosting URL to point to the custom flow you created earlier:
Modify your custom class
Next, let's update LoginUIWidget.h to declare the functions, variables, and UI bindings that power the authentication flow:
#pragma once

#include "CoreMinimal.h"
#include "Blueprint/UserWidget.h"
#include "LoginUIWidget.generated.h"

/**
 *
 */
UCLASS()
class UNREAL_AUTH_DEMO_API ULoginUIWidget : public UUserWidget
{

    GENERATED_BODY()

    public:
        virtual void NativeConstruct() override;

        UFUNCTION()
            void OnSigninClicked();

        UFUNCTION()
            void OnSignoutClicked();

        UFUNCTION()
            void SetLoginState(bool bNewLoginState);

        UFUNCTION()
            void UpdateUI();

    protected:
        UPROPERTY(meta = (BindWidget))
        class UButton* SigninButton;

        UPROPERTY(meta = (BindWidget))
        class UButton* SignoutButton;

        UPROPERTY(meta = (BindWidget))
        class UTextBlock* TextResult;

        // Login state
        UPROPERTY(BlueprintReadOnly, Category = "Login")
        bool bIsLoggedIn = false;

        // Descope OIDC Parameters
        FString ClientId;
        FString RedirectUri;
        FString RedirectLogoutUri;

        // Descope endpoint URLs
        FString AuthUrl;
        FString TokenUrl;
        FString LogoutUrl;
        FString UserInfoUrl;

        FString CapturedAuthCode;

        // PKCE values
        FString CodeVerifier;
        FString CodeChallenge;
        FString State;

        // Tokens
        FString IdToken;
        FString AccessToken;
        FString RefreshToken;

        void GeneratePKCEParameters();
        void StartOAuthLogin();
        void ListenForAuthCodeInBackground();
        void PerformSignout();
        void RevokeTokens();
        void ClearSessionData();

        // Fetching user data variables and functions
        FString UserEmail;
        FString UserName;

        UFUNCTION()
            void FetchUserProfile(const FString& Token);

        UFUNCTION()
            void ExchangeAuthCodeForTokens(const FString& Code);

};
At a high level, this header sets up:
UI hooks: SigninButton, SignoutButton, TextResult
Authentication state: bIsLoggedIn, tokens, and PKCE parameters
Core functions: StartOAuthLogin, ExchangeAuthCodeForTokens, FetchUserProfile, and PerformSignout
Networking: a socket listener (ListenForAuthCodeInBackground) to receive the redirect from Descope
With the header file in place, you can now implement the functionality in LoginUIWidget.cpp. This is where the actual behavior for our authentication flow lives—handling button clicks, generating PKCE parameters, launching the OAuth login, listening for the redirect from Descope, exchanging the authorization code for tokens, and finally fetching the user's profile information to display in the game.
The next code snippet is large, so it's recommended to copy the code directly from the Github repo, here. Just remember to update the following variables with the values you retrieved from Descope earlier:
ClientIdRedirectUriRedirectLogoutUriAuthUrlTokenUrlLogoutUrlUserInfoUrl
Here are the most important parts of the .cpp:
PKCE support (
GeneratePKCEParameters) for secure OAuth loginsBrowser-based login (
StartOAuthLogin) using the system browserLocal redirect listener (
ListenForAuthCodeInBackground) to capture the authorization code and exchange it for tokensProfile fetching (
FetchUserProfile) to display the user's email and usernameThread safety and timeouts—runs the socket in a background thread, logs any errors to the UE output log
Finally, because this project uses new features like network sockets and HTTP calls, you'll need to enable the corresponding Unreal Engine modules in your project's build configuration. Open your project's build file (ProjectName.Build.cs) and add the required dependencies, as shown below:
using UnrealBuildTool;

public class unreal_auth_demo : ModuleRules
{
    public unreal_auth_demo(ReadOnlyTargetRules Target) : base(Target)
    {
        PCHUsage = PCHUsageMode.UseExplicitOrSharedPCHs;

        // PublicDependencyModuleNames.AddRange(new string[] { "Core", "CoreUObject", "Engine", "InputCore", "EnhancedInput" });
        PublicDependencyModuleNames.AddRange(new string[] { "Core", "CoreUObject", "Engine", "InputCore", "Networking", "HTTP", "Json", "JsonUtilities", "Sockets" });

        PrivateDependencyModuleNames.AddRange(new string[] {  });

        // Uncomment if you are using Slate UI
        // PrivateDependencyModuleNames.AddRange(new string[] { "Slate", "SlateCore" });

        // Uncomment if you are using online features
        // PrivateDependencyModuleNames.Add("OnlineSubsystem");

        // To include OnlineSubsystemSteam, add it to the plugins section in your uproject file with the Enabled attribute set to true
    }
}
Build your code again using Build -> Build unreal_auth_demo. Once it's finished building, you can open up the Unreal editor again.
Testing it all
Once your editor is open, run the game using the green play button again.

Notice that your Sign Out button is not visible. This is because of the changes in the UpdateUI() method to show and hide the different buttons based on your logged-in state.
Click Sign In. A browser window will open with the following login UI:
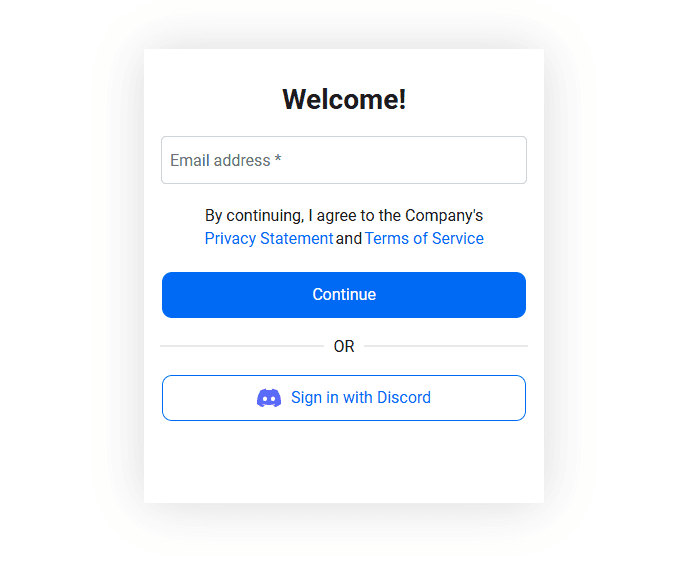
This is the right authentication flow that you set up earlier on Descope's flow designer. Click Sign in with Discord.
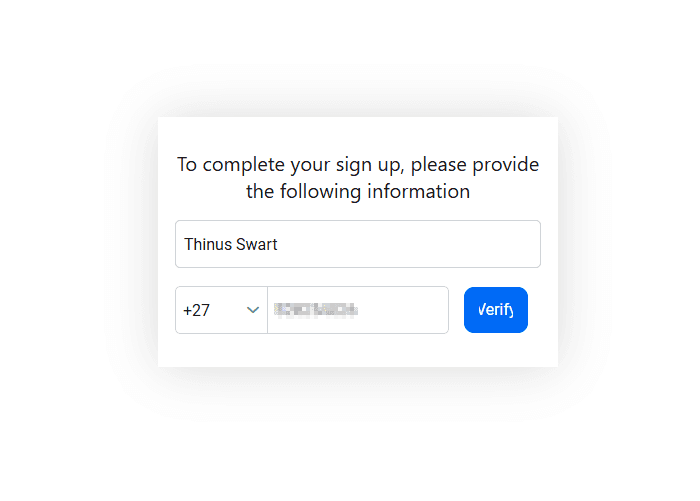
The first time you sign in, Descope will ask for some extra information about you and verify your identity using MFA.
If you entered your number correctly, you should receive a verification code via SMS:
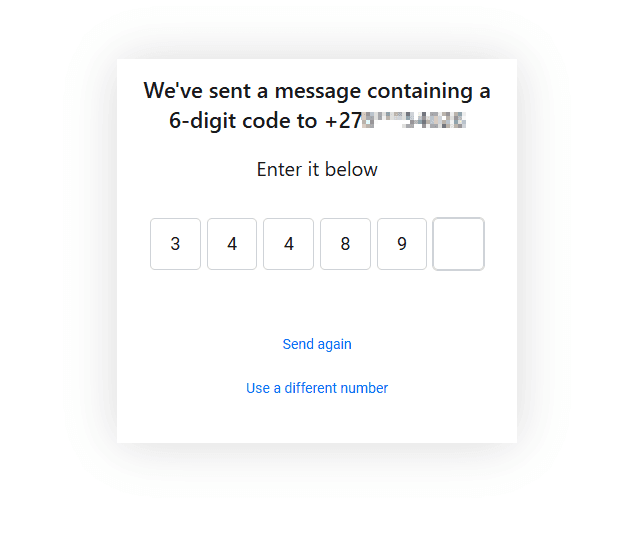
Once you've entered the code, your screen should look like this:
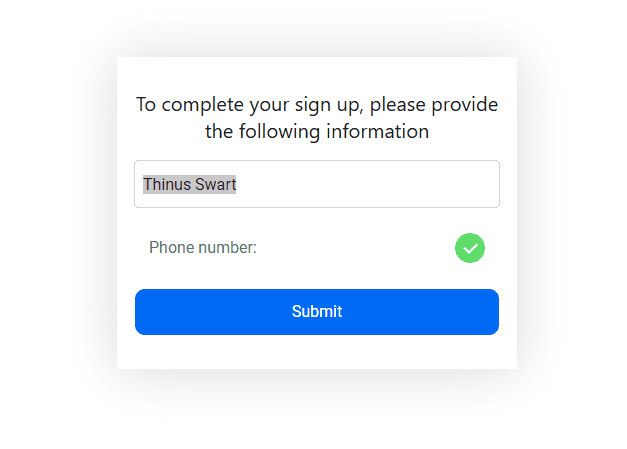
This process should only happen the first time you sign in with a new user. Click Submit to continue.
Discord will open up with the following dialog:
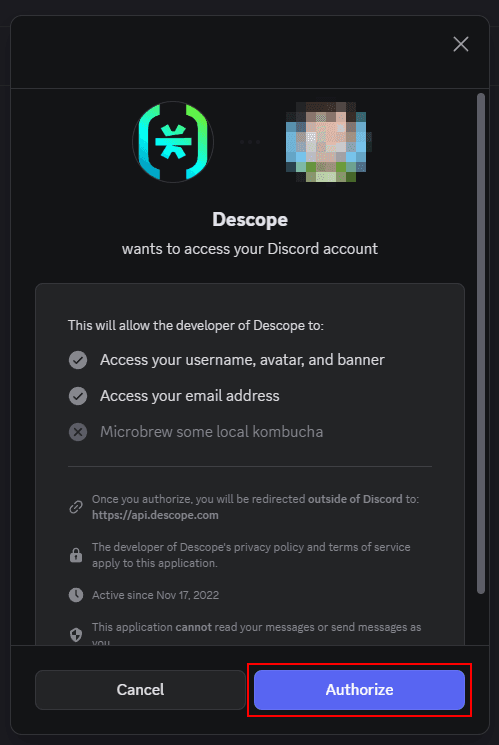
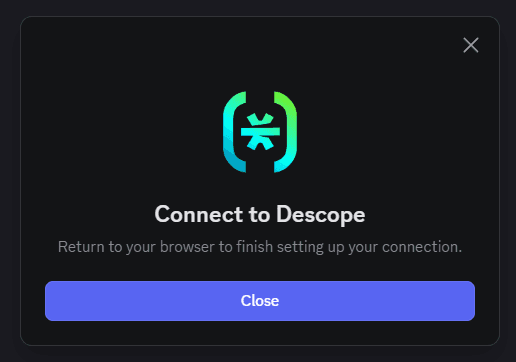
Click Authorize and you should see the following:
Descope will now call the configured callback URL (in your case, http://localhost:3000) to tell your server that the login was successful and to give you an authorization code:
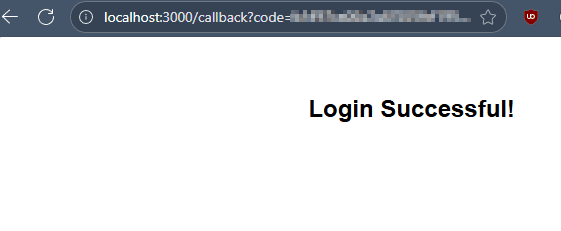
In the background, your code will use the ExchangeAuthCodeForTokens and FetchUserProfile methods to fetch proper authentication tokens and to retrieve user information. Once that's complete, it will update the UI in your game:
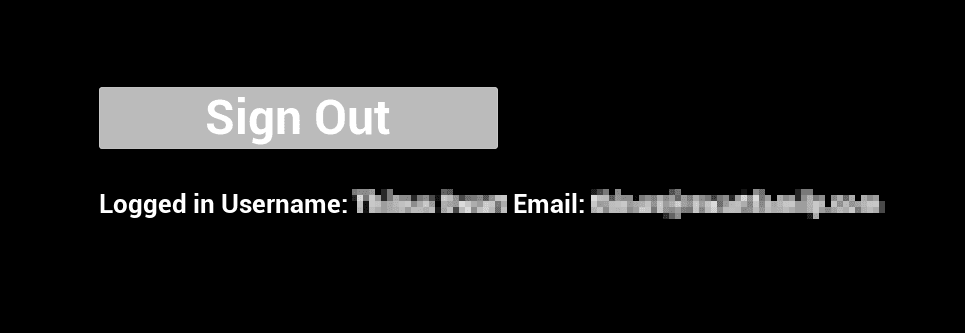
Notice now that the Sign In button has been replaced with a Sign Out button.
Try giving that button a click:
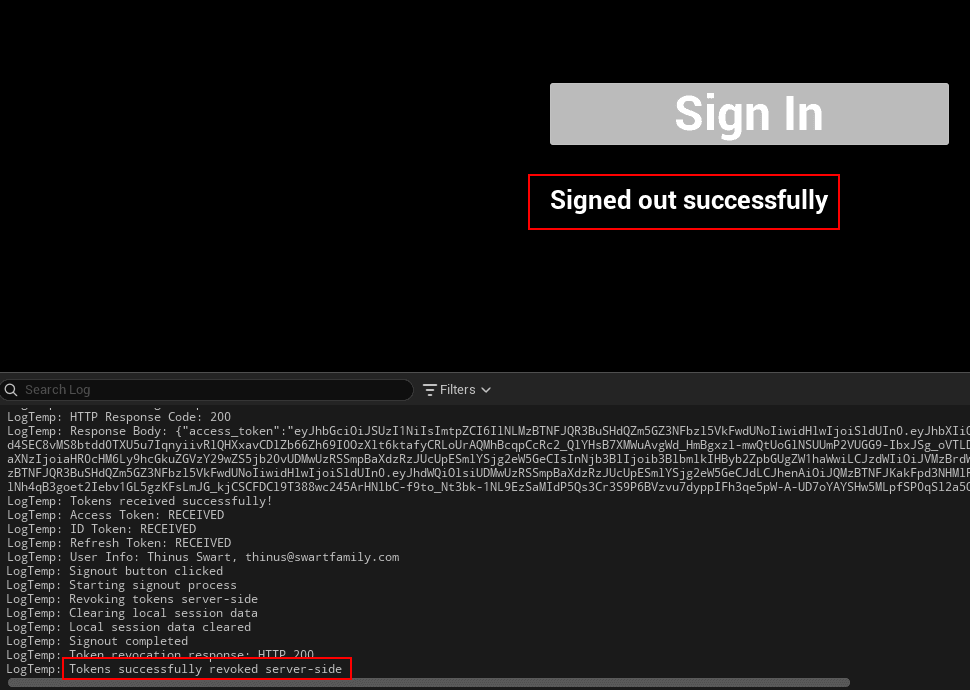
You've now successfully integrated Descope as your auth provider for your Unreal Engine 5 game.
As mentioned before, all of the code used in this tutorial is available here.
Conclusion
Adding authentication and MFA to an Unreal Engine game doesn't necessarily mean writing your own identity system or locking yourself into a single storefront. With Descope, you can implement secure, flexible login flows, including social login and multifactor authentication, using modern standards like OIDC and PKCE.
In this tutorial, you built a working login system in Unreal Engine from the ground up. You integrated Descope with Discord for social login, captured the authorization code using a local socket, exchanged it for tokens, and fetched the authenticated user's profile to update your game's UI. You now have a foundation for cross-platform identity, security, and personalization inside your UE game.
Descope offers even more beyond what was covered here: drag-and-drop flow builders, passwordless authentication, risk-based access policies, and more. If you're building a connected game and want your auth system to scale with you, book a demo with Descope, or check out their documentation and explore how it can fit the identity strategy for your game or website.