
Table of Contents
This tutorial was written by Kumar Harsh, a software developer and technical author based in India. You can visit his website to see more of his work!
Incorporating passkeys into your application's authentication process can significantly improve security and user convenience. This developer’s guide provides you with a comprehensive overview of the steps required to implement passkeys, from initial setup to final deployment. By following these guidelines, you can create a seamless and secure authentication experience for your users, reducing the risk of unauthorized access and enhancing overall trust in your application.
If you'd like to save time on passkey implementation while also autofill and backup capabilities for your customers, go to the "Implementing passkeys using Descope" section of this tutorial.
Passkey authentication TLDR
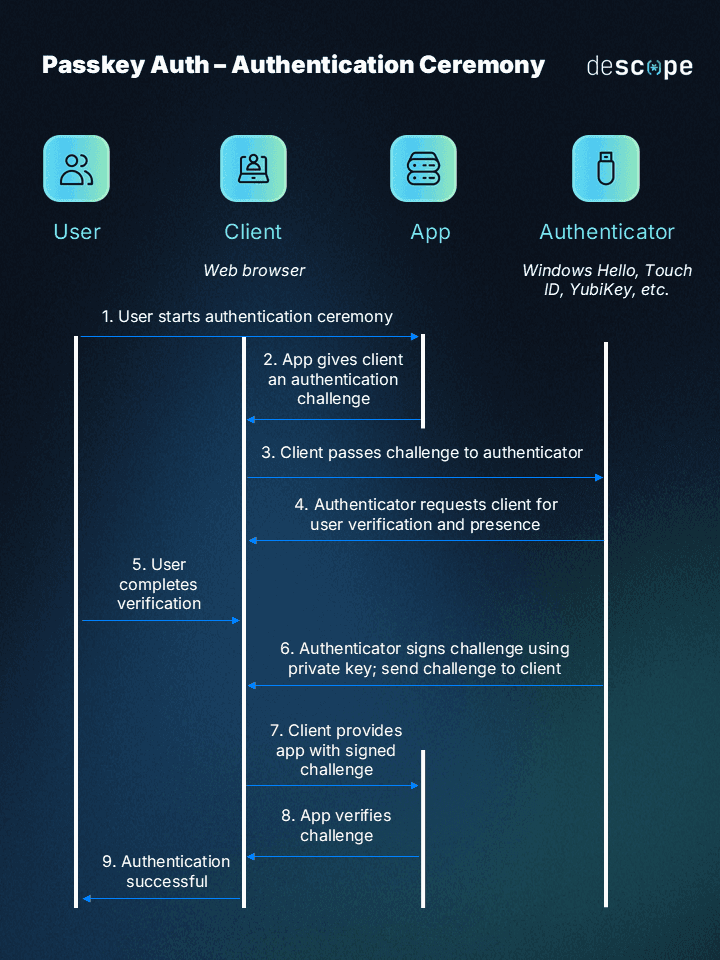
Unlike passwords, which are vulnerable to brute force attacks and phishing scams, passkeys leverage the power of public-key cryptography to improve both UX and security. Imagine a vault where your identity is locked away, accessible only with a unique key pair. Passkeys function similarly to this, with each user possessing a private key, the master key kept securely on their device, and a public key shared with websites.
When logging in, the website sends a challenge, a digital puzzle, to the user's device. The private key then creates a unique signature, a digital fingerprint, proving your identity without revealing the actual key. This ensures your login remains secure even if the website is compromised.
Here's a quick diagram to help you better understand the process:
How to implement passkeys
While the concept of passkeys sounds very exciting, passkeys are quite complex to implement from scratch. In this section, you'll learn how you can implement passkey authentication from scratch and then see how Descope] makes this process much simpler.
Implementing passkeys in an app without using third-party libraries is technically possible. However, it's highly discouraged due to the complexity of the setup and the security risks involved. It's best to pick one of the supported libraries and follow its docs to implement passkeys in your app.
In general, the implementation requires you to do the following:
Server-side setup: You need to implement key generation, signature verification, and attestation handling on the server. You also need to integrate with a database or user management system to store and retrieve user information and passkey credentials.
Frontend integration: Once the server is set up, you can use JavaScript's navigator.credentials.create() and navigator.credentials.get() methods to initiate registration and authentication flows on the client. The client needs to guide users through interactions with their authenticator device (e.g. fingerprint scan, PIN entry, and another device) and send registration and authentication data to your server for processing.
It's best to make use of a trusted library, such as SimpleWebAuthn, to simplify this process. The library takes care of implementing the key generation and handling for you and makes the process a lot simpler than doing it from scratch.
If you're interested in learning how to use SimpleWebAuthn to implement passkeys in your project from scratch, you can take a look at this example project. This project consists of a React-based client and a Node.js + Express–based server.
Server-side setup
The server uses the @simple-webauthn/server package to expose four important endpoints:
/generate-registration-options: This endpoint configures and generates the list of available registration options for the client. It uses the currently logged-in user's details to ensure the same device does not register multiple times. It also generates and sends a challenge that the client can use to register the new device.
/verify-registration: This endpoint verifies if the on-device registration was successful. Upon successful verification, the user's registration details (their public key, credential ID, and device information) are saved in the database.
/generate-authentication-options: This endpoint returns the available authentication options for a user. The server looks up the devices table in this step and retrieves the device ID for the registered device of the user to allow authenticating through that device.
/verify-authentication: This endpoint is used to verify if the on-device authentication was successful. It also verifies if a registered device was used to authenticate.
This server implementation assumes you have carried out a simple initial authentication to identify the user and collected their internal ID (such as a UUID) to trigger the registration and authentication flows. In practical scenarios, you need to implement this step yourself and plug in the user ID in the loggedInUserId variable in this code.
Another point to note is that this implementation currently does not include an integration with a database to store and retrieve user credentials. This is another task for you to take care of when looking to take this to production. The addition of a user authentication database also requires additional maintenance.
Client-side setup
The client-side implementation for this method is relatively simpler. You need to set up two buttons: One to trigger registration for passkeys and the other to trigger authentication.
In the onRegistrationStart event, you need to make a request to the /generate-registration-options endpoint to first fetch the authentication configuration from the backend. Then you use these options to start the registration ceremony on the frontend using the startRegistration() function from the @simple-webauthn/browser package.
Once you have a successful response from the startRegistration() call (i.e. the passkey generation on the device is completed successfully), you then make a request to the /verify-registration endpoint to verify if the registration was successful using the response returned from the startRegistration() call. The server verifies the registration result and stores the device details in the database after a successful registration.
When authenticating, the logic is similar. You make a request to the /generate-authentication-options endpoint and call the startAuthentication() method from the @simple-webauthn/browser package with the response returned from the backend server. This initiates the on-device verification for the user and generates an intermediate response. You then send this response to the /verify-authentication endpoint to complete the authentication process and grant the user access to the application.
As you can see, this method is quite complex and requires additional setup and maintenance for user identification and authentication data storage. Also, if you are looking to deploy this over HTTPS, you need to follow additional steps outlined in the SimpleWebAuthn Docs to ensure security.
So let's now see how to simplify passkey implementation with Descope and save yourself the headache.
Implementing passkeys the simpler way with Descope
Instead of setting up passkeys from scratch or even going through the hassle of learning how a dedicated third-party library for passkeys works, you might be better off with a solution like Descope that can help you implement passkeys along with other modes of authentication all through a simplified no-code interface.
Creating Descope Flows
To try it out, head over to Descope's website and sign up for a free forever account. Once you have access to their developer dashboard, you can start creating your auth flows. Click Getting Started in the left navigation panel:
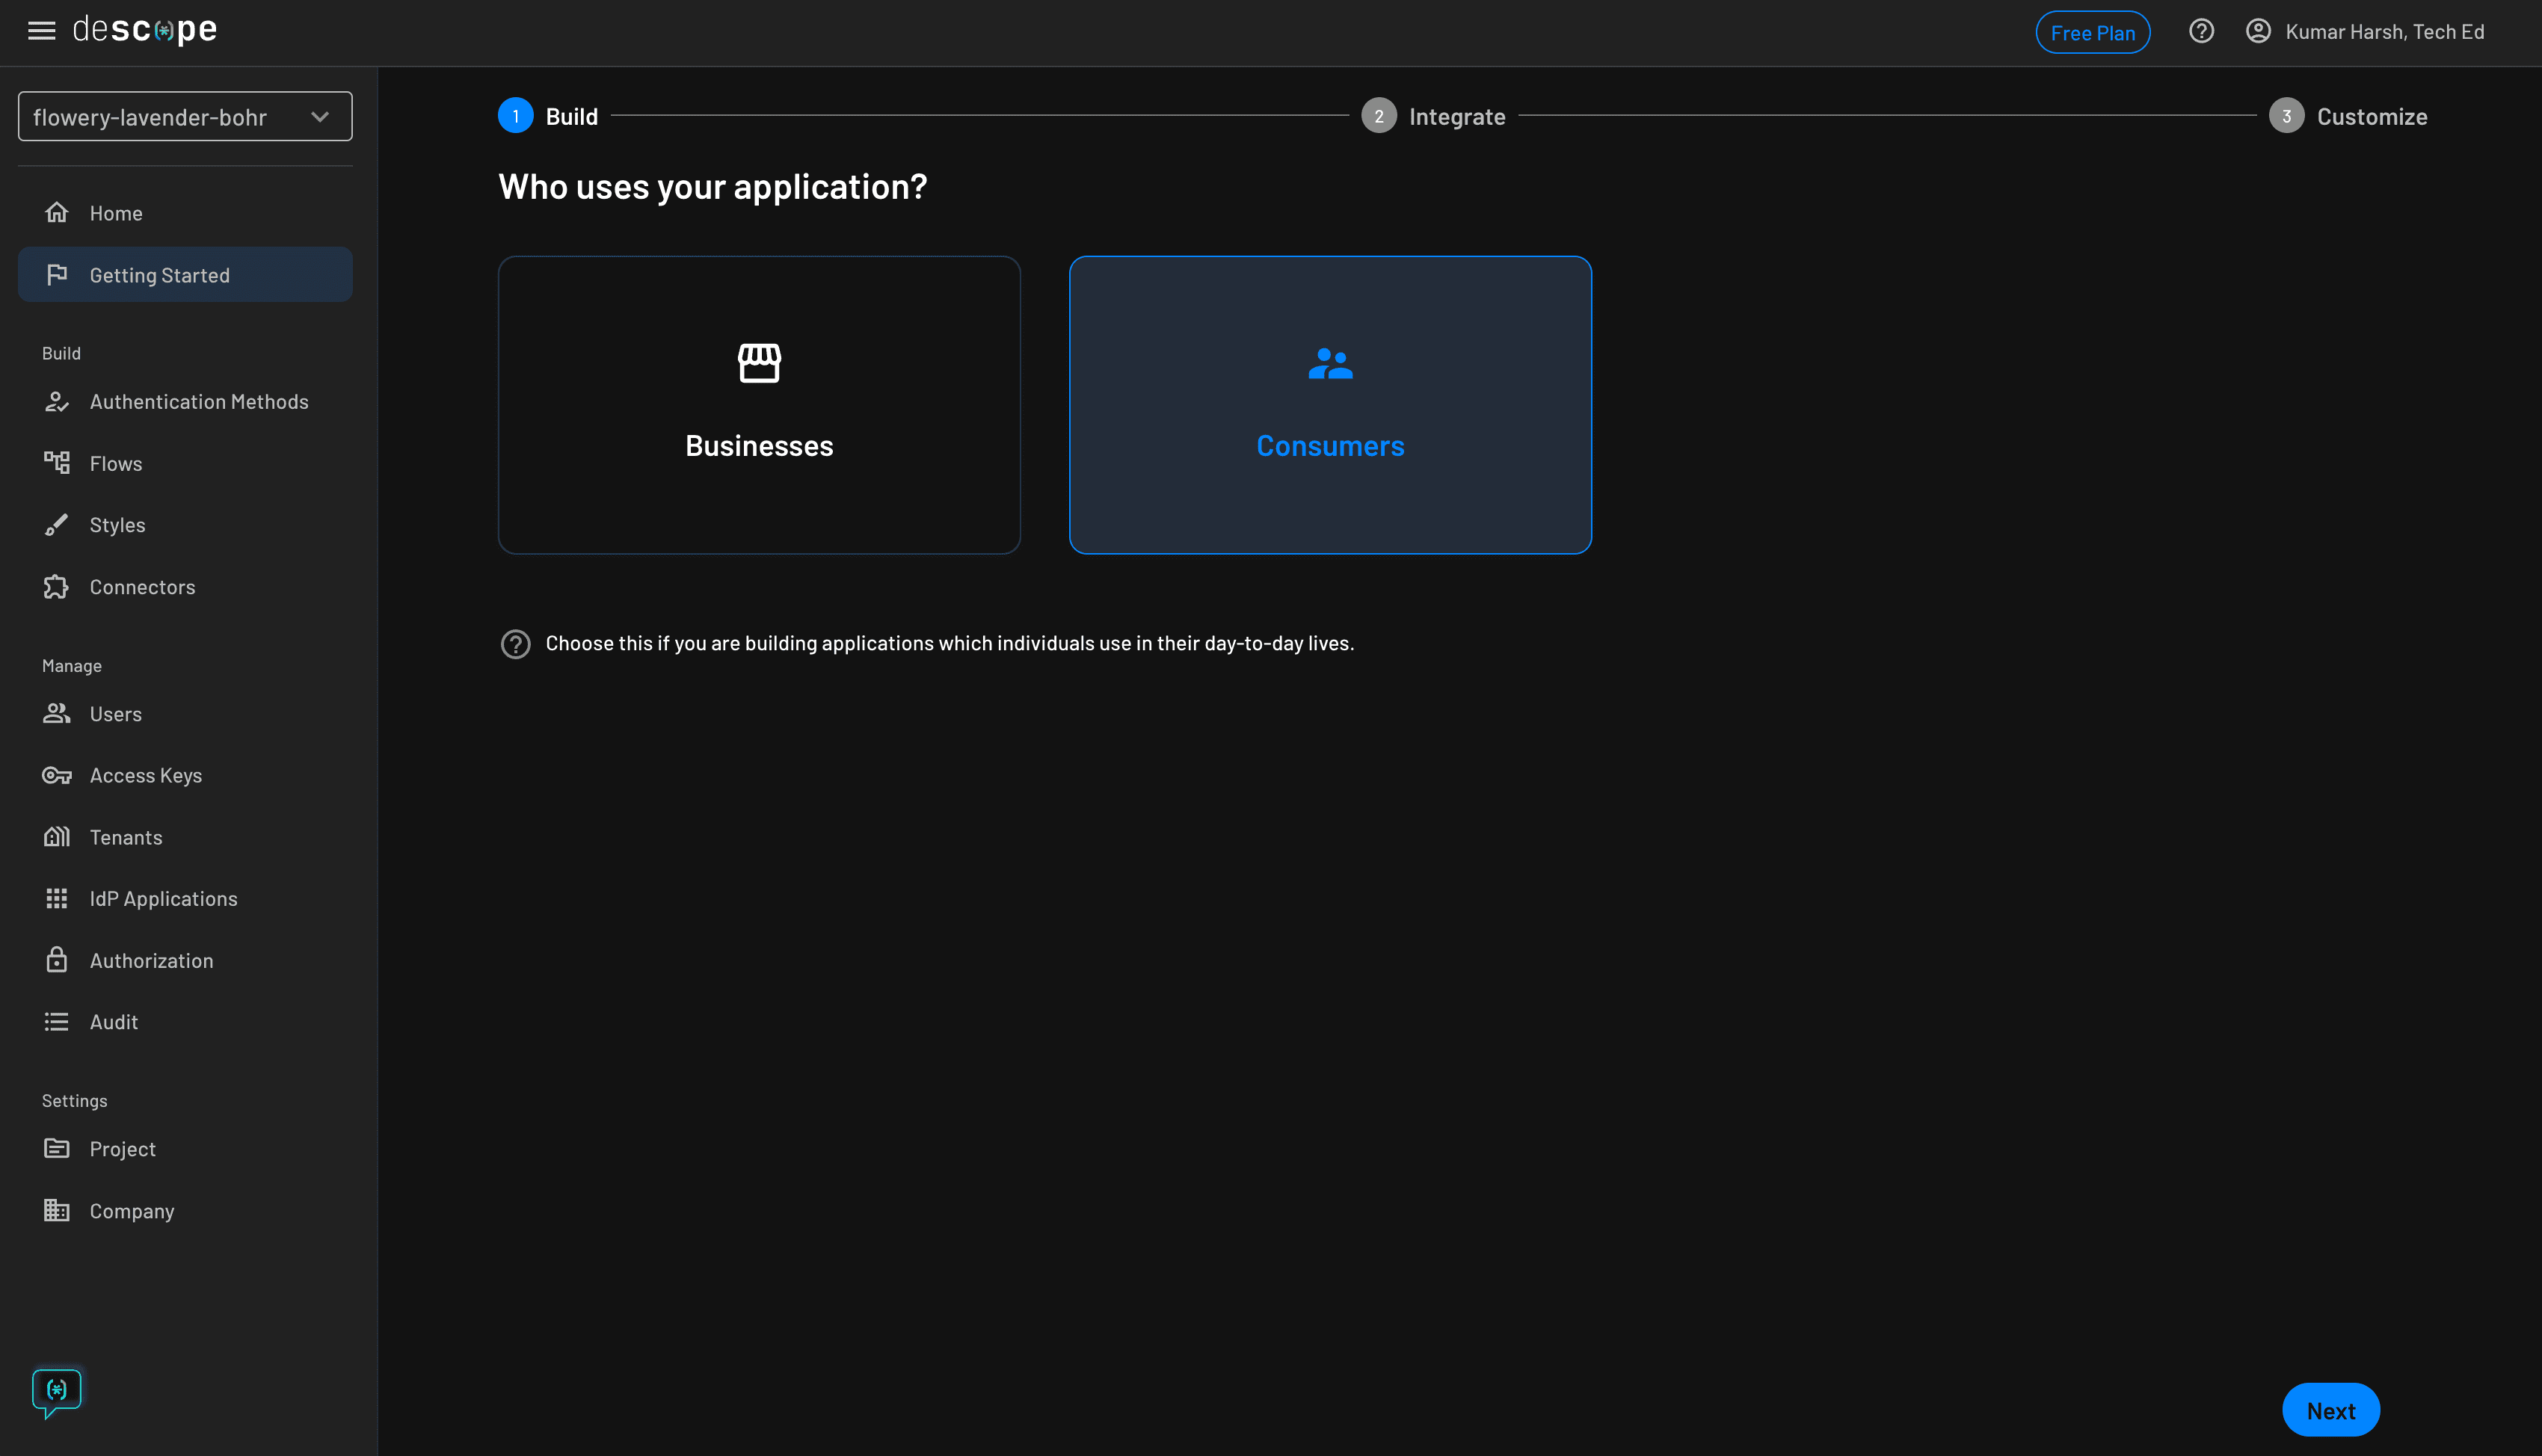
Click Consumers to start building auth flows for user-facing applications. Then click the blue Next button at the bottom right.
On the next screen, choose Passkeys (WebAuthn) as the primary authentication method and click the blue Next button:
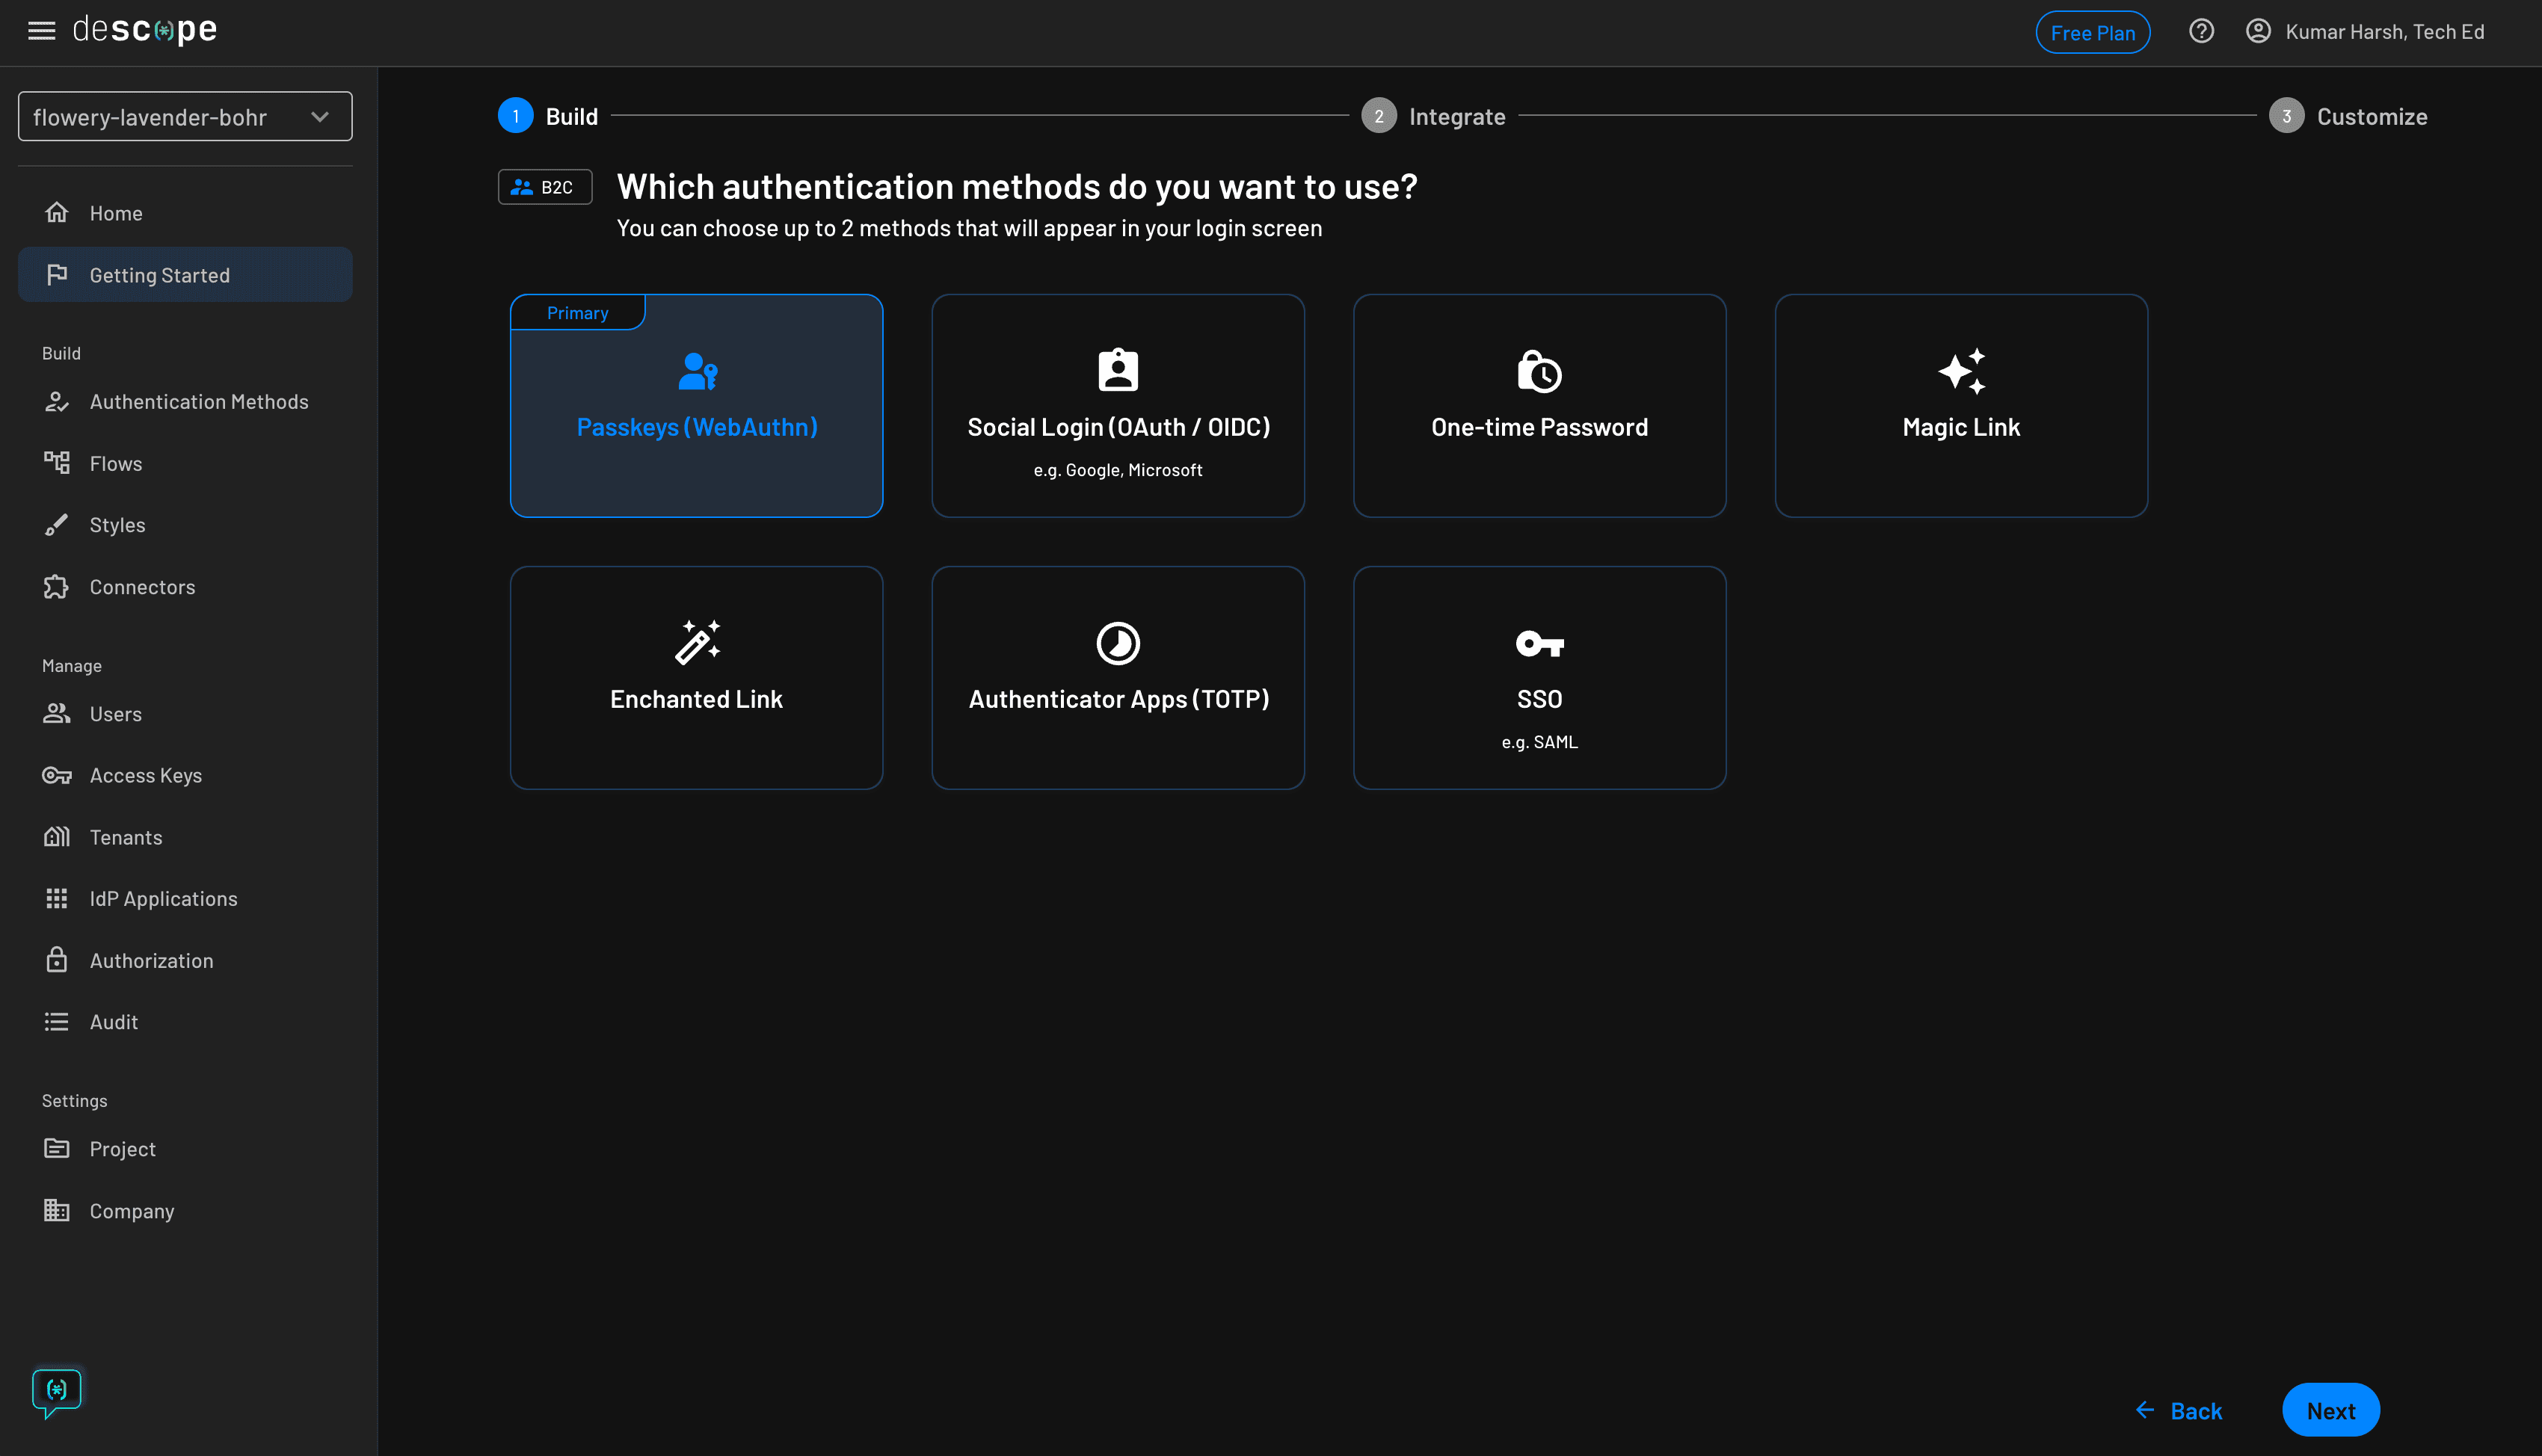
On the next screen, you can choose an additional authentication method to use as part of a 2FA flow:
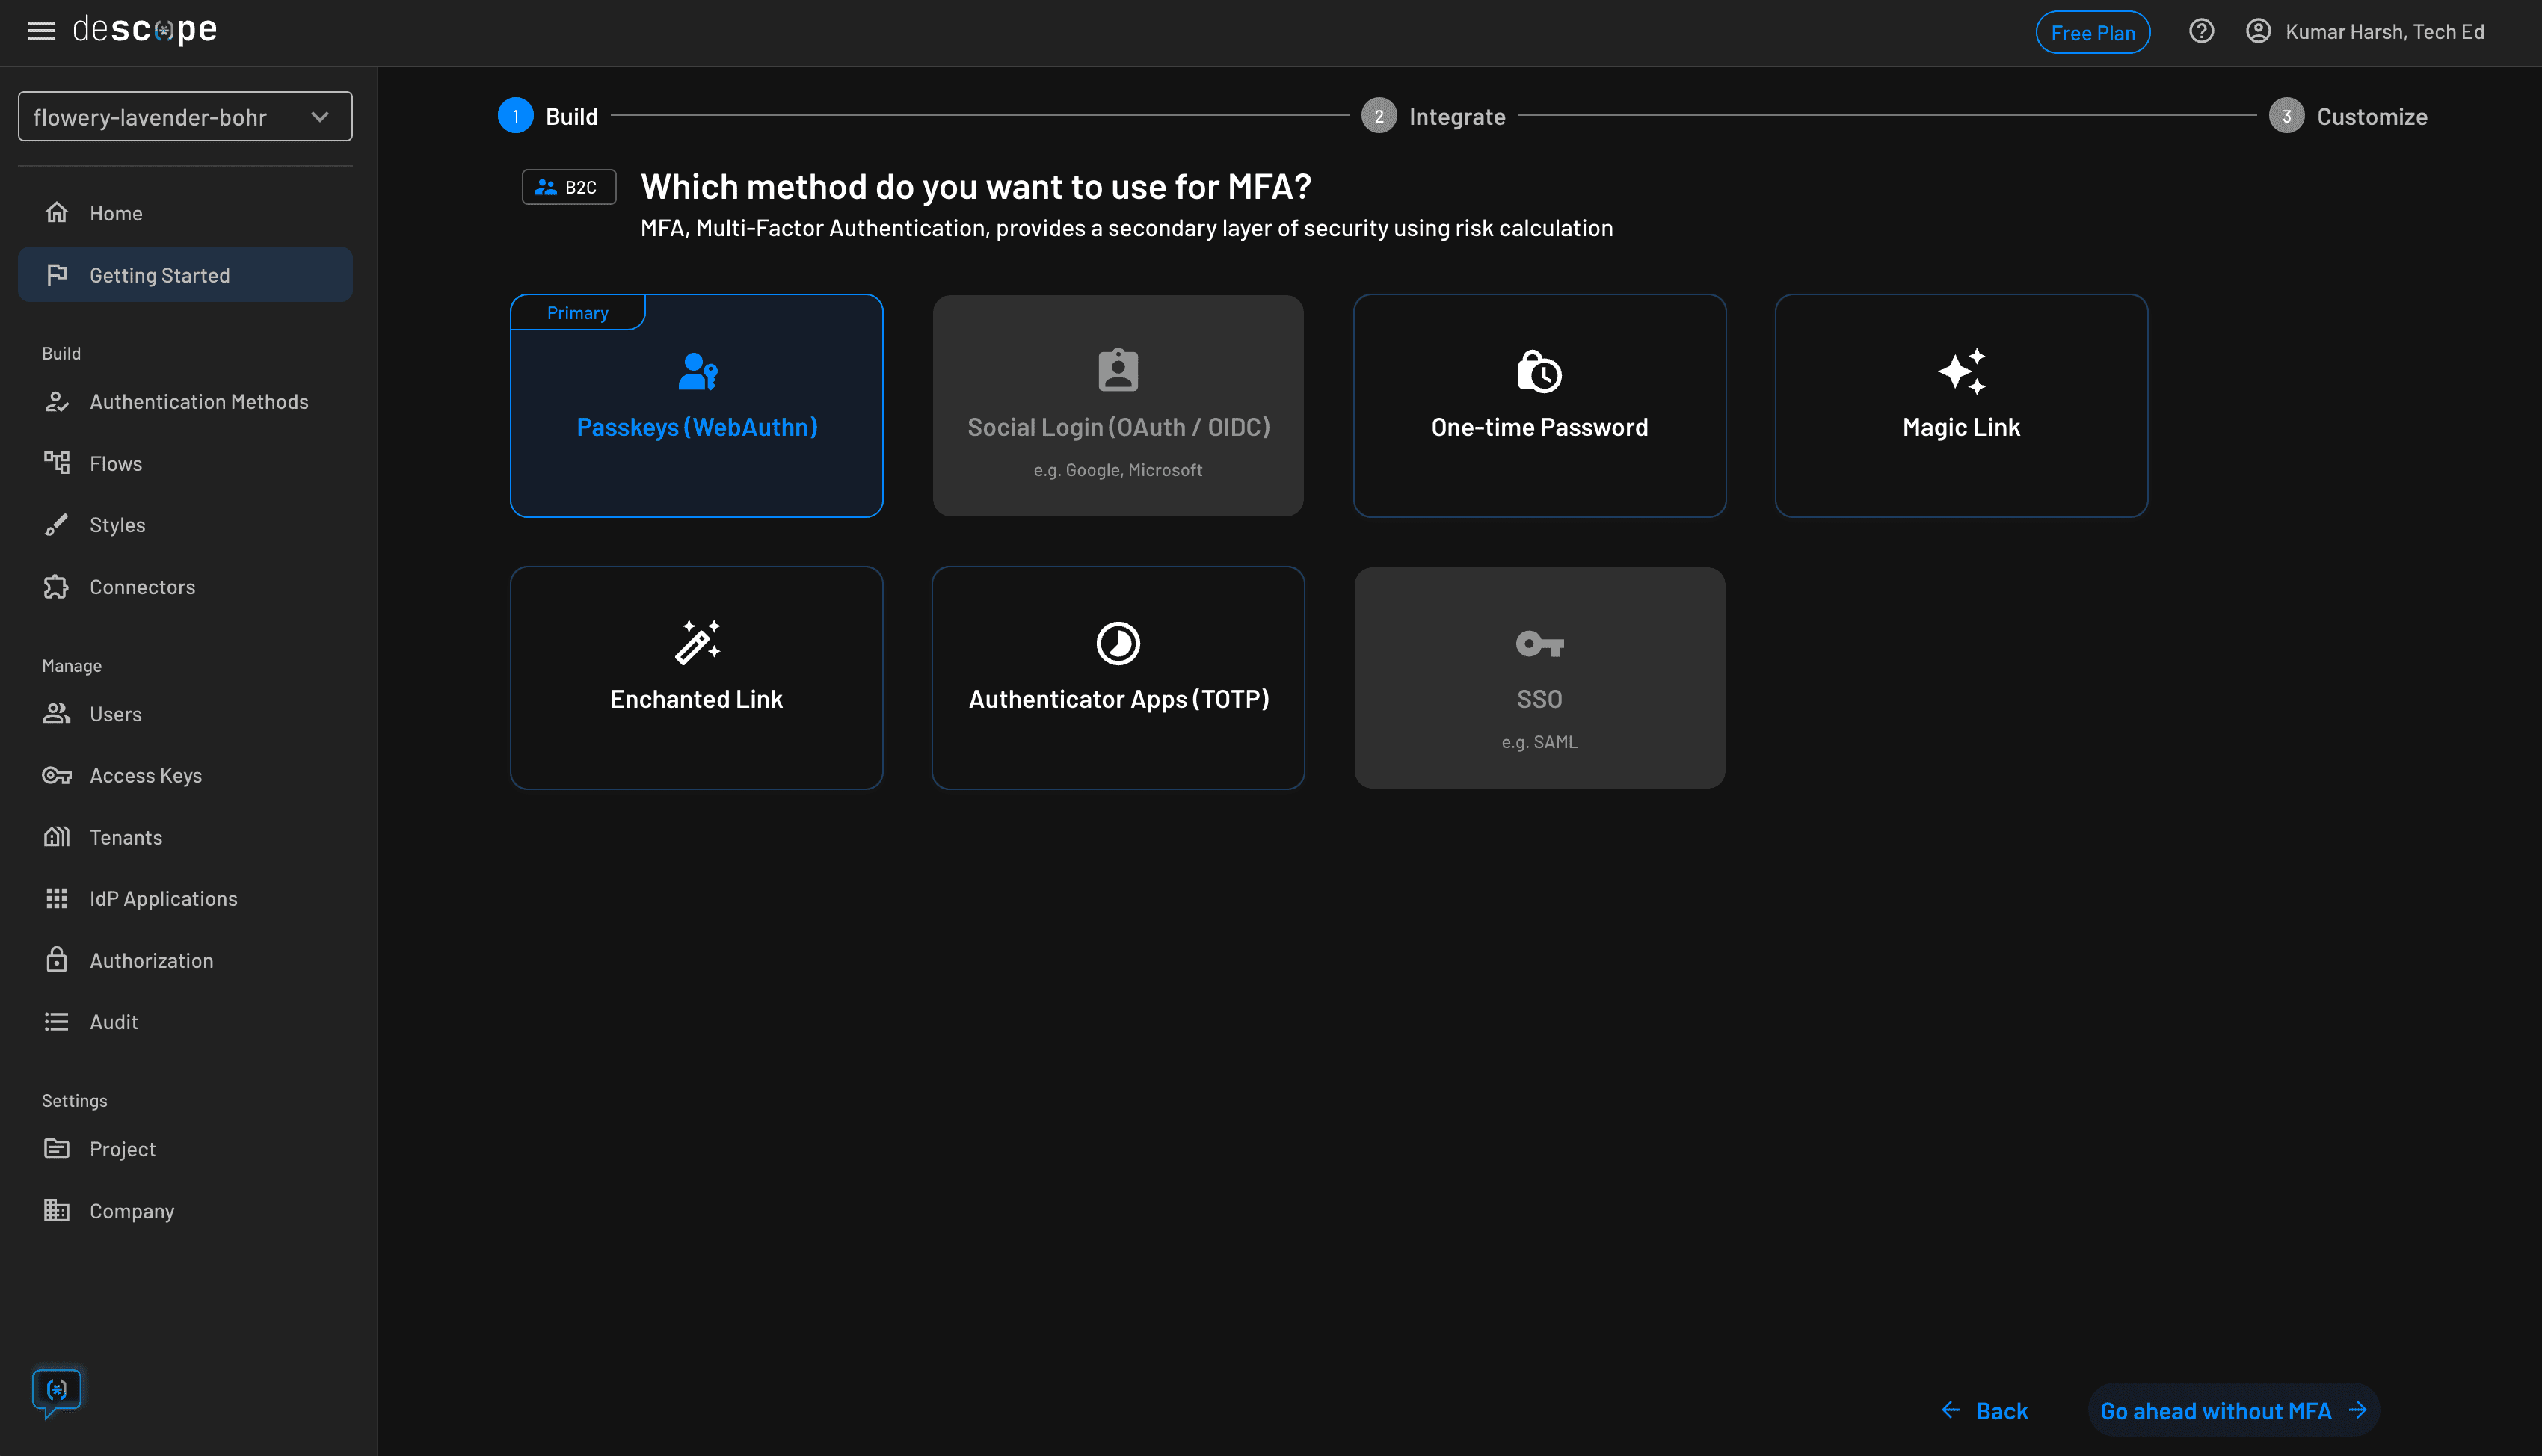
You can skip this step by clicking on the Go ahead without MFA button at the bottom right. Then you need to choose a login screen, which might include an additional method of registration to allow users to sign up and set up passkeys on their device before they can start using them:
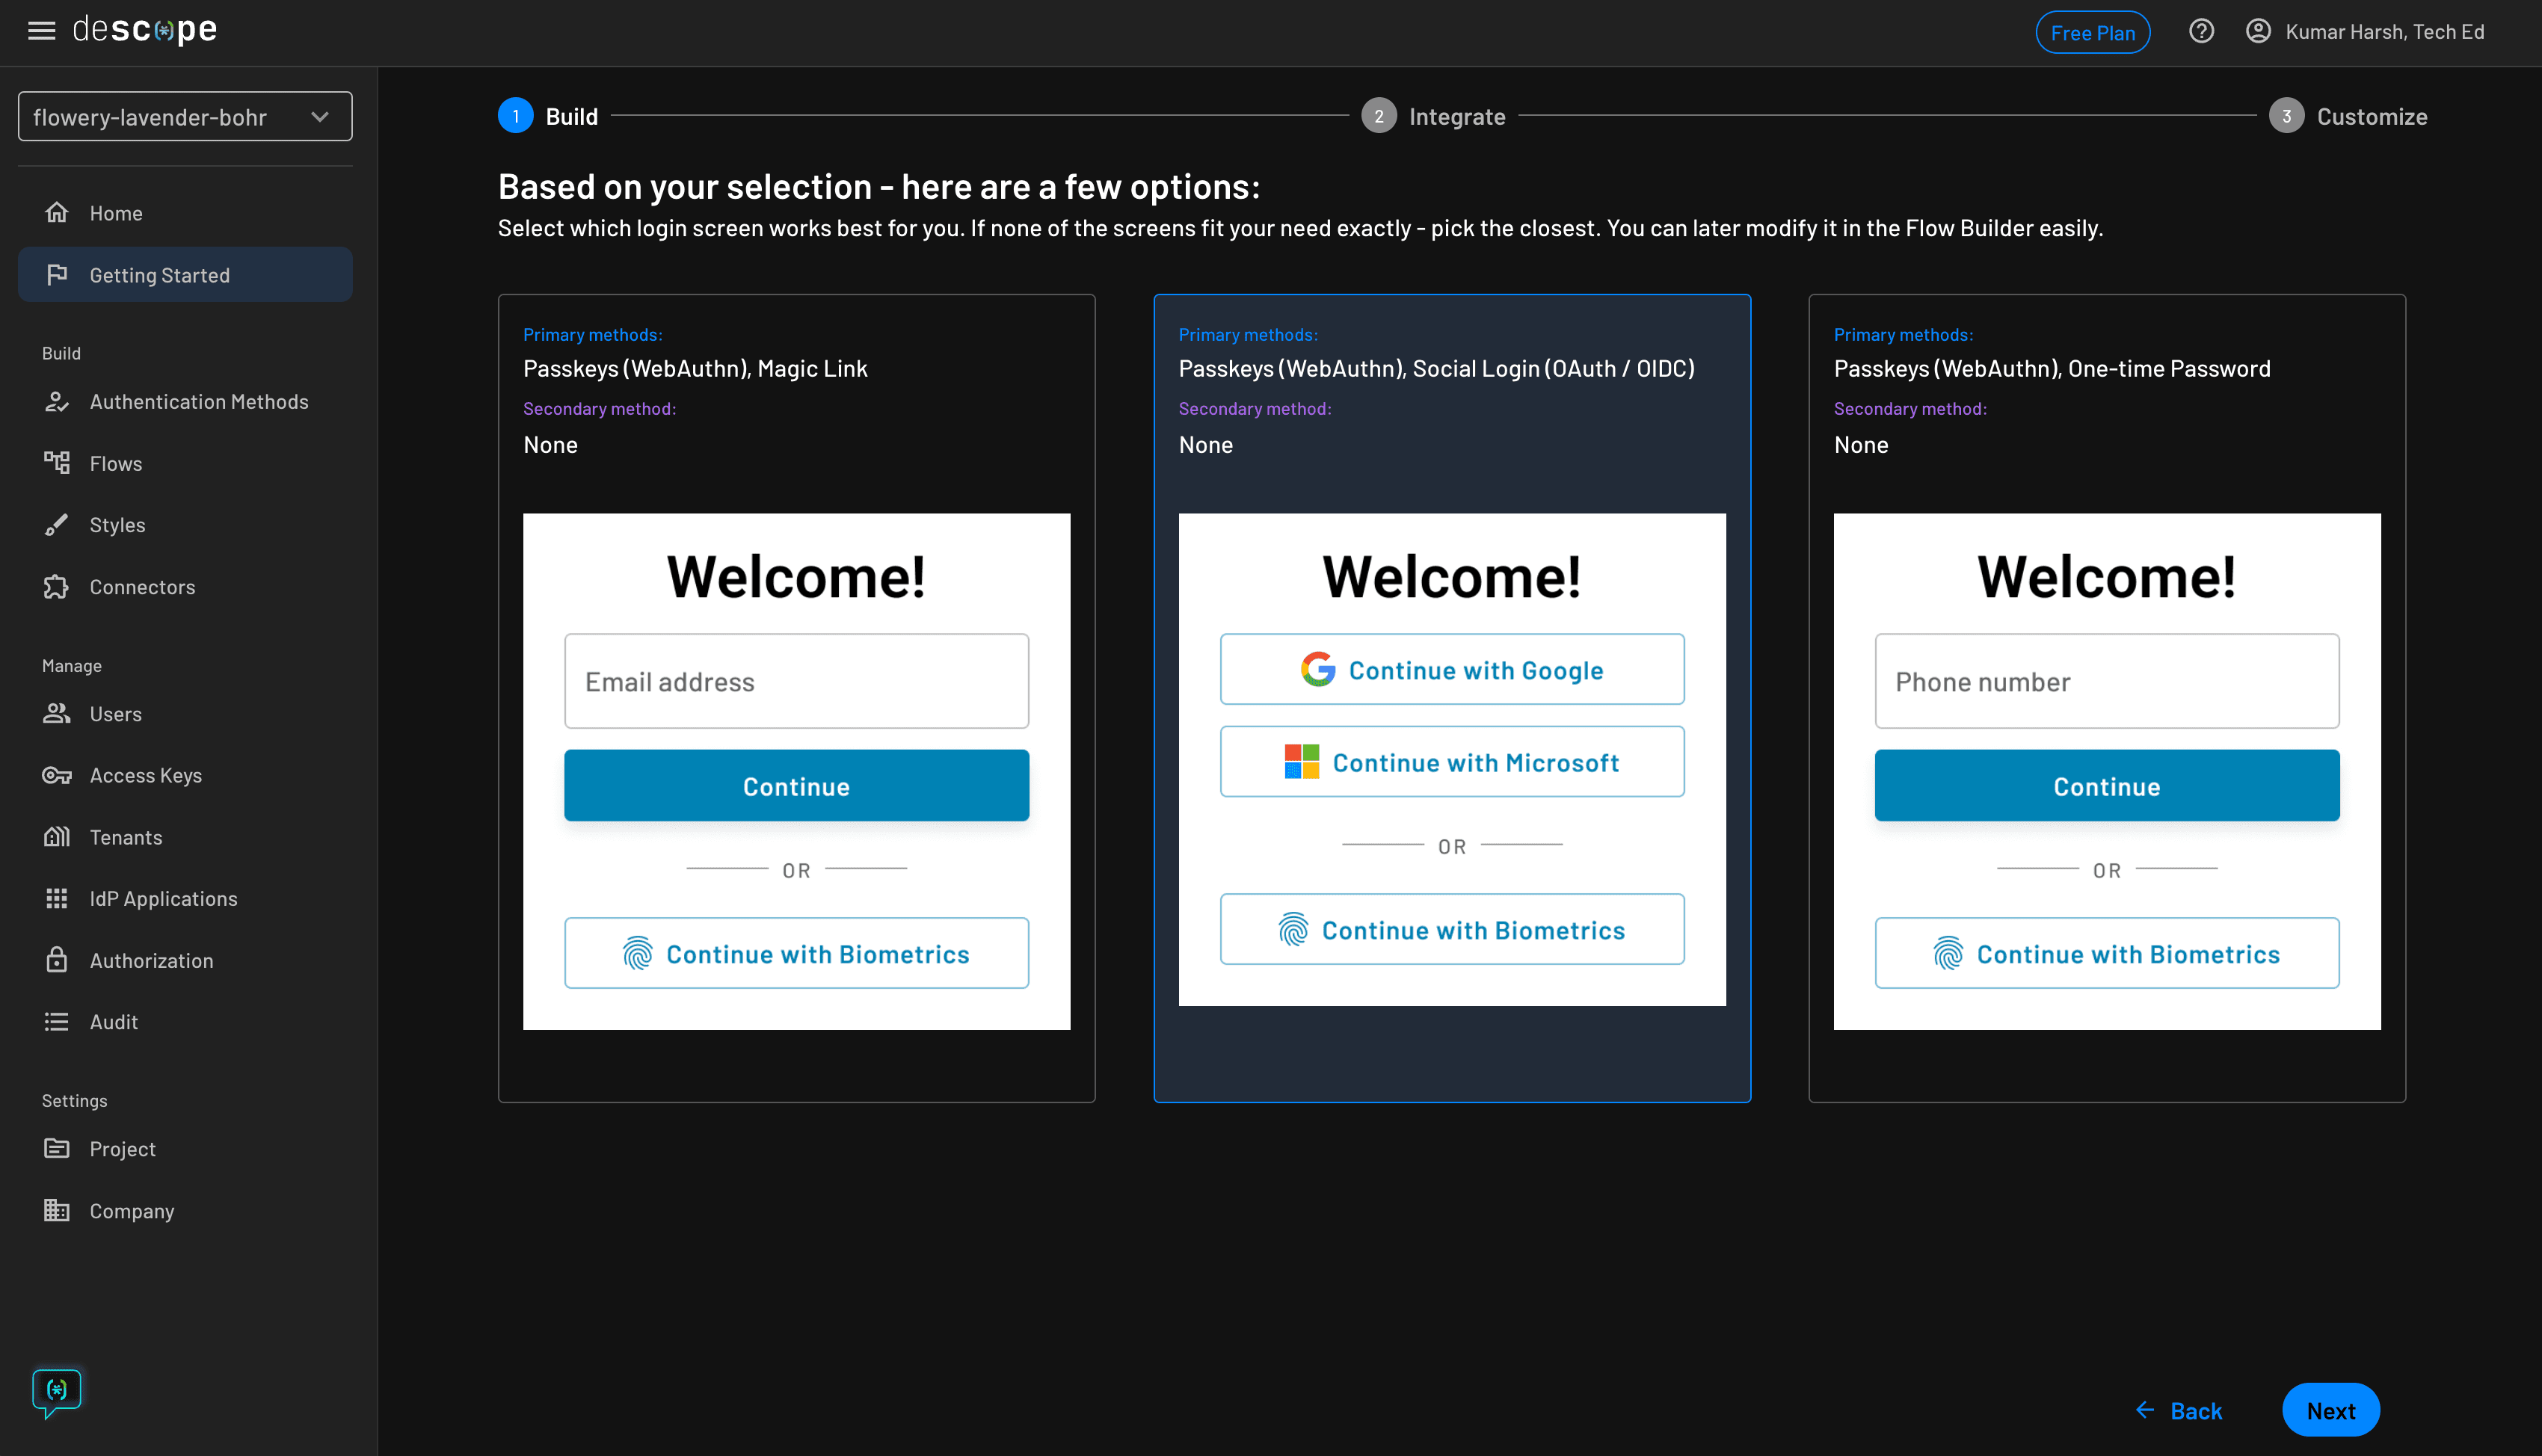
Feel free to choose any login screen on this step. Finally, click the Next button to preview your choices. If everything looks good, click the Next button. Descope will now create your auth flows and provide a sample code snippet to get started with them:
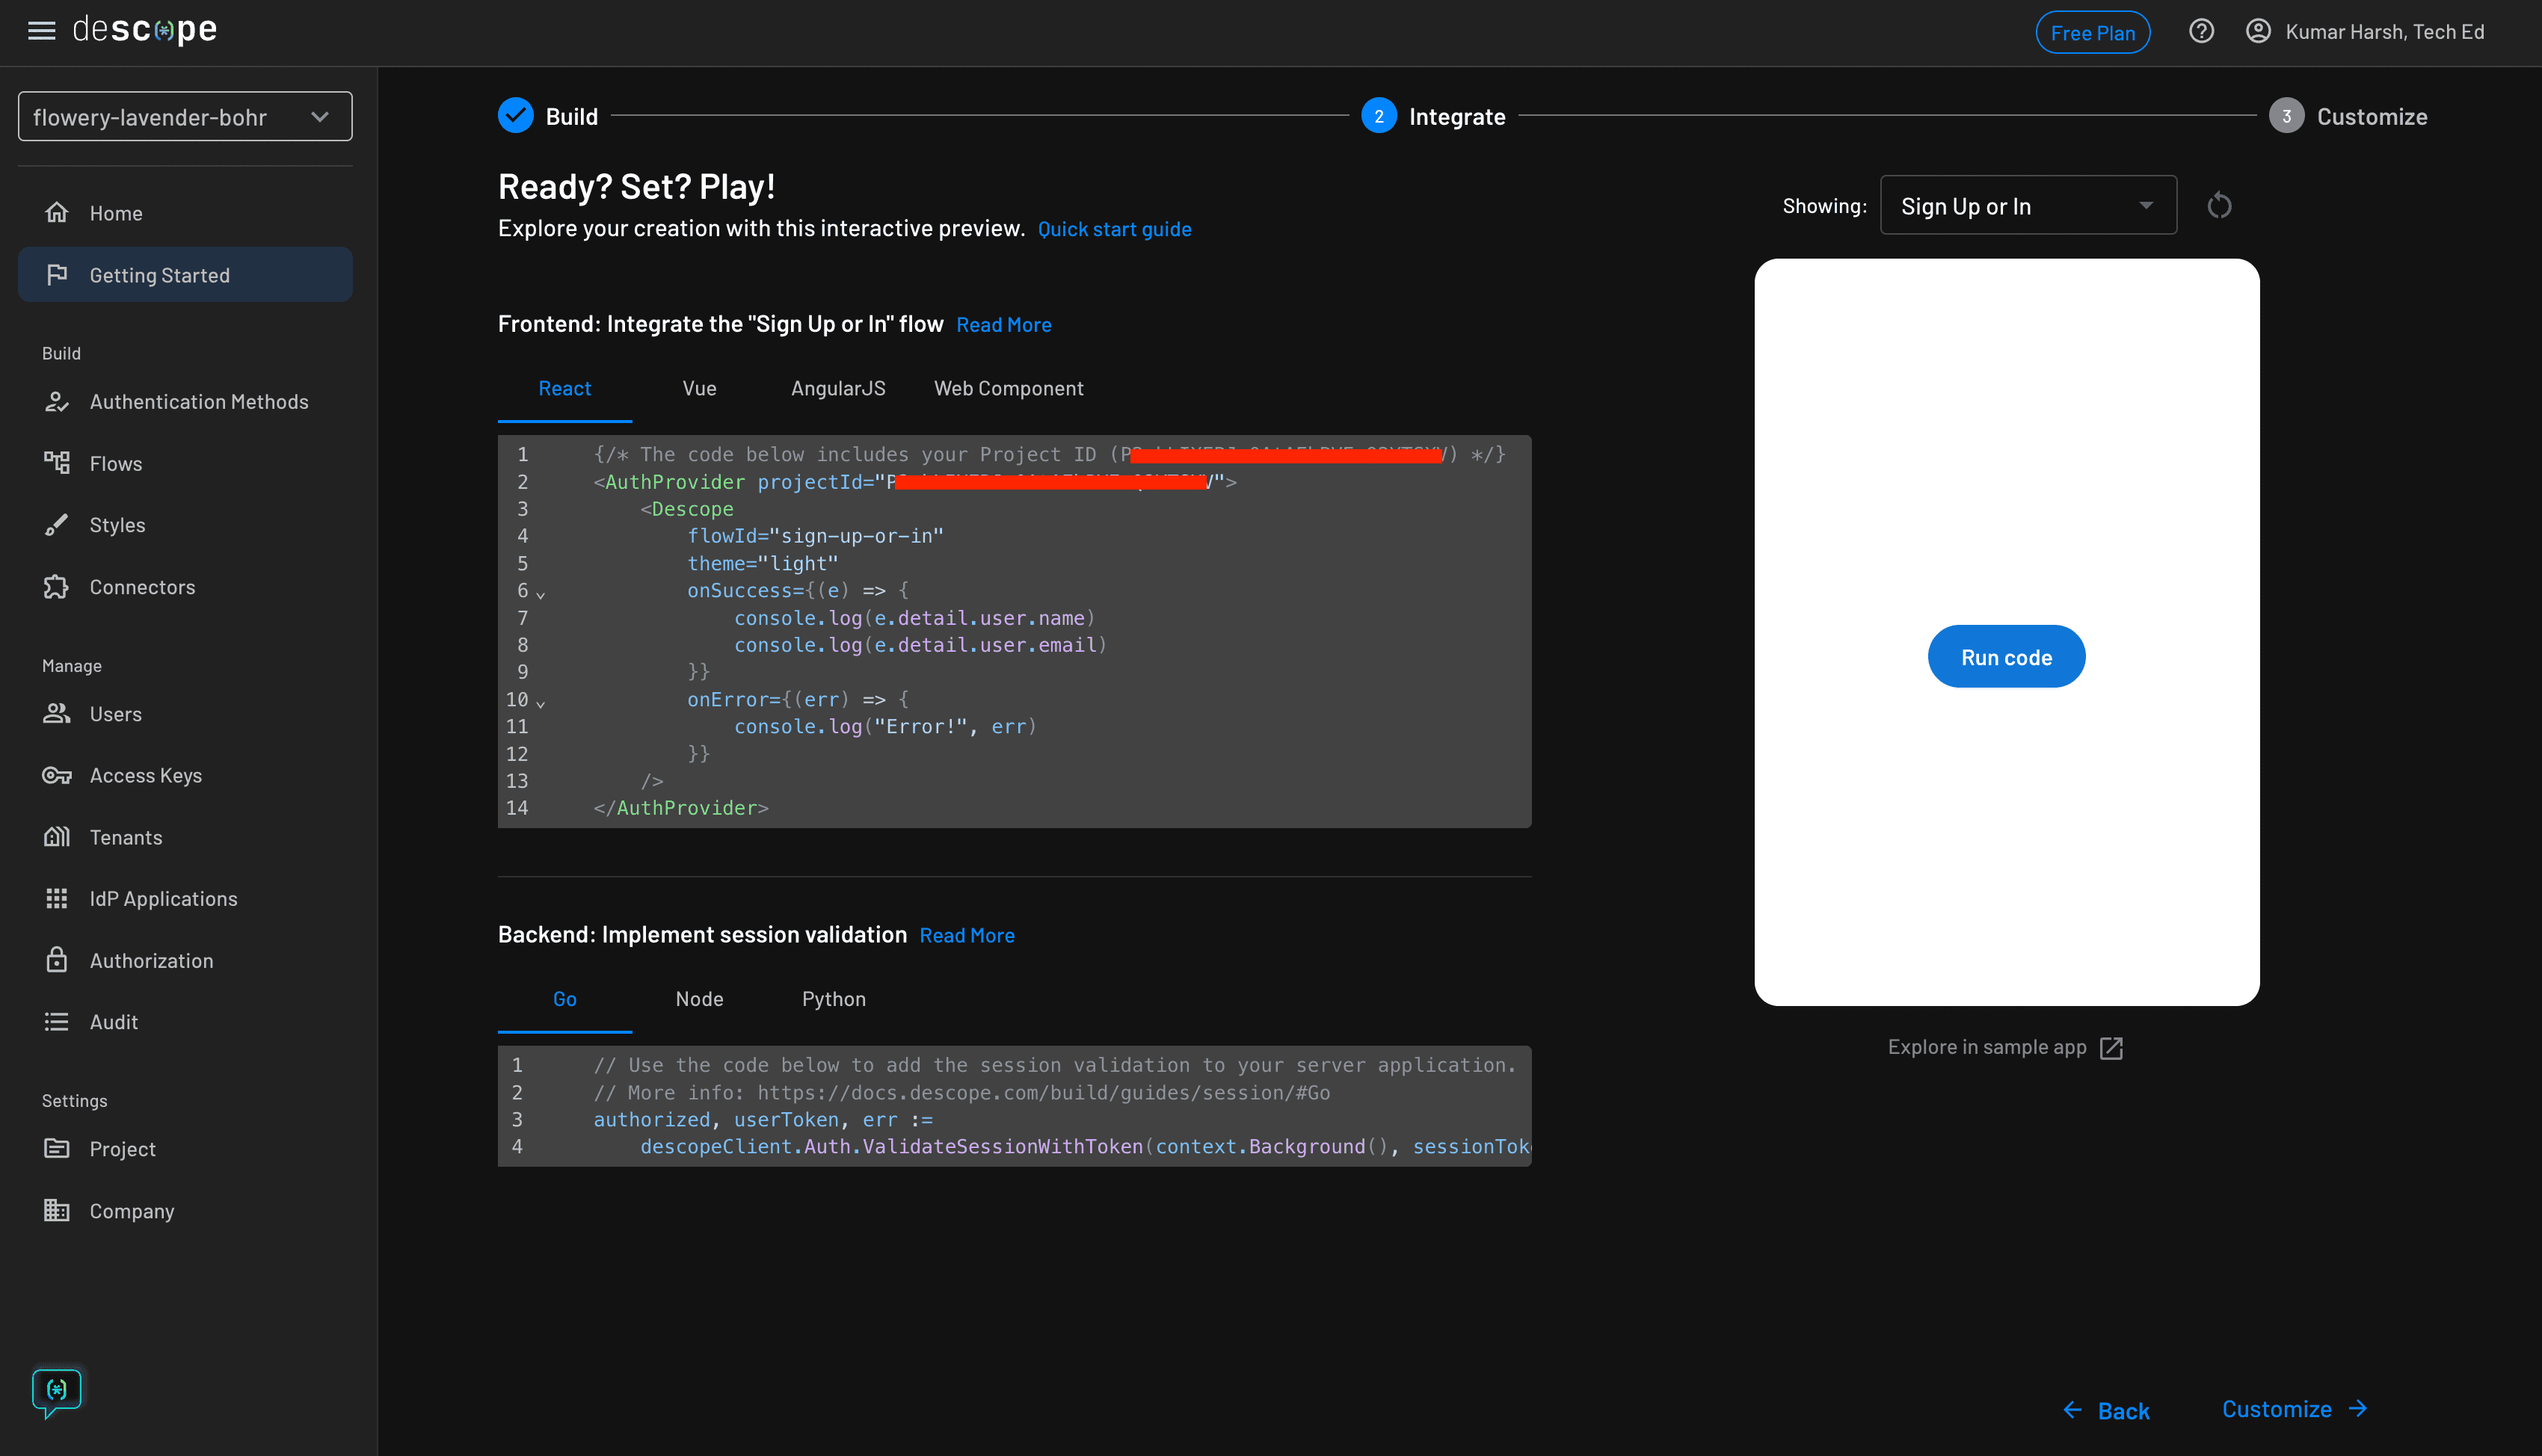
The code snippet contains your project ID. You only need the project ID to configure the Descope client or server SDKs to use your auth flows in your apps.
Setting up a React project
To try out your Descope flows, create a new React project locally by running the following command:
npm create viteChoose React as the framework, choose JavaScript as the language, and name your project (e.g. passkeys-descope).
Once the project is ready, you need to install the React Descope SDK by running the following command:
npm install @descope/react-sdkThat's all the setup you need. Now you can get started with writing the code for integrating your auth flows.
You need to make changes to two files to integrate Descope into your project. Initially, you need to set up the Descope AuthProvider in the main.jsx file to allow accessing the authentication logic throughout the app. To do that, replace the code in main.js with the following:
import React from 'react';
import ReactDOM from 'react-dom/client';
import App from './App';
import { AuthProvider } from '@descope/react-sdk';

const root = ReactDOM.createRoot(document.getElementById('root'));
root.render(
    <React.StrictMode>
        <AuthProvider
            projectId='<your-project-id>'
        >
            <App />
        </AuthProvider>
    </React.StrictMode>
);
You can now use Descope components and hooks to set up authentication in your app as you like. Here's a simple example implementation you can use to try out the passkeys auth flow in your app:
// Replace the contents of your App.js with the following

import { useCallback } from 'react'

import { useDescope, useSession, useUser } from '@descope/react-sdk'
import { Descope } from '@descope/react-sdk'

const App = () => {
  const { isAuthenticated, isSessionLoading } = useSession()
  const { isUserLoading } = useUser()
  const { logout } = useDescope()

  const handleLogout = useCallback(() => {
    logout()
  }, [logout])

  return <>
    {!isAuthenticated &&
      (<div style={{display: "flex", flexDirection: "column", justifyContent: "center", alignItems: "center", height: "100vh"}}>
        <div style={{ maxWidth: "500px" }}>
          <Descope
            flowId="sign-up-or-in"
            onSuccess={(e) => console.log(e.detail.user)}
            onError={(e) => console.log('Could not log in!')}
          />
        </div>
      </div>
      )

    }

    {
      (isSessionLoading || isUserLoading) && <p>Loading...</p>
    }

    {!isUserLoading && isAuthenticated &&
      (
        <>
          <p>Logged in!</p>
          <button onClick={handleLogout}>Logout</button>
        </>
      )
    }
  </>;
}

export default App;
That's it! You can now try out the auth flow with passkeys.
Trying out the app
To try out the app, run the following command:
npm run devHead over to http://localhost:5173 to view the app. When signing up, you need to use a social flow or any other flow to register a new user and set up a passkey on their device. Click on either the Continue with Google or Continue with Microsoft based on your preference and select an account.
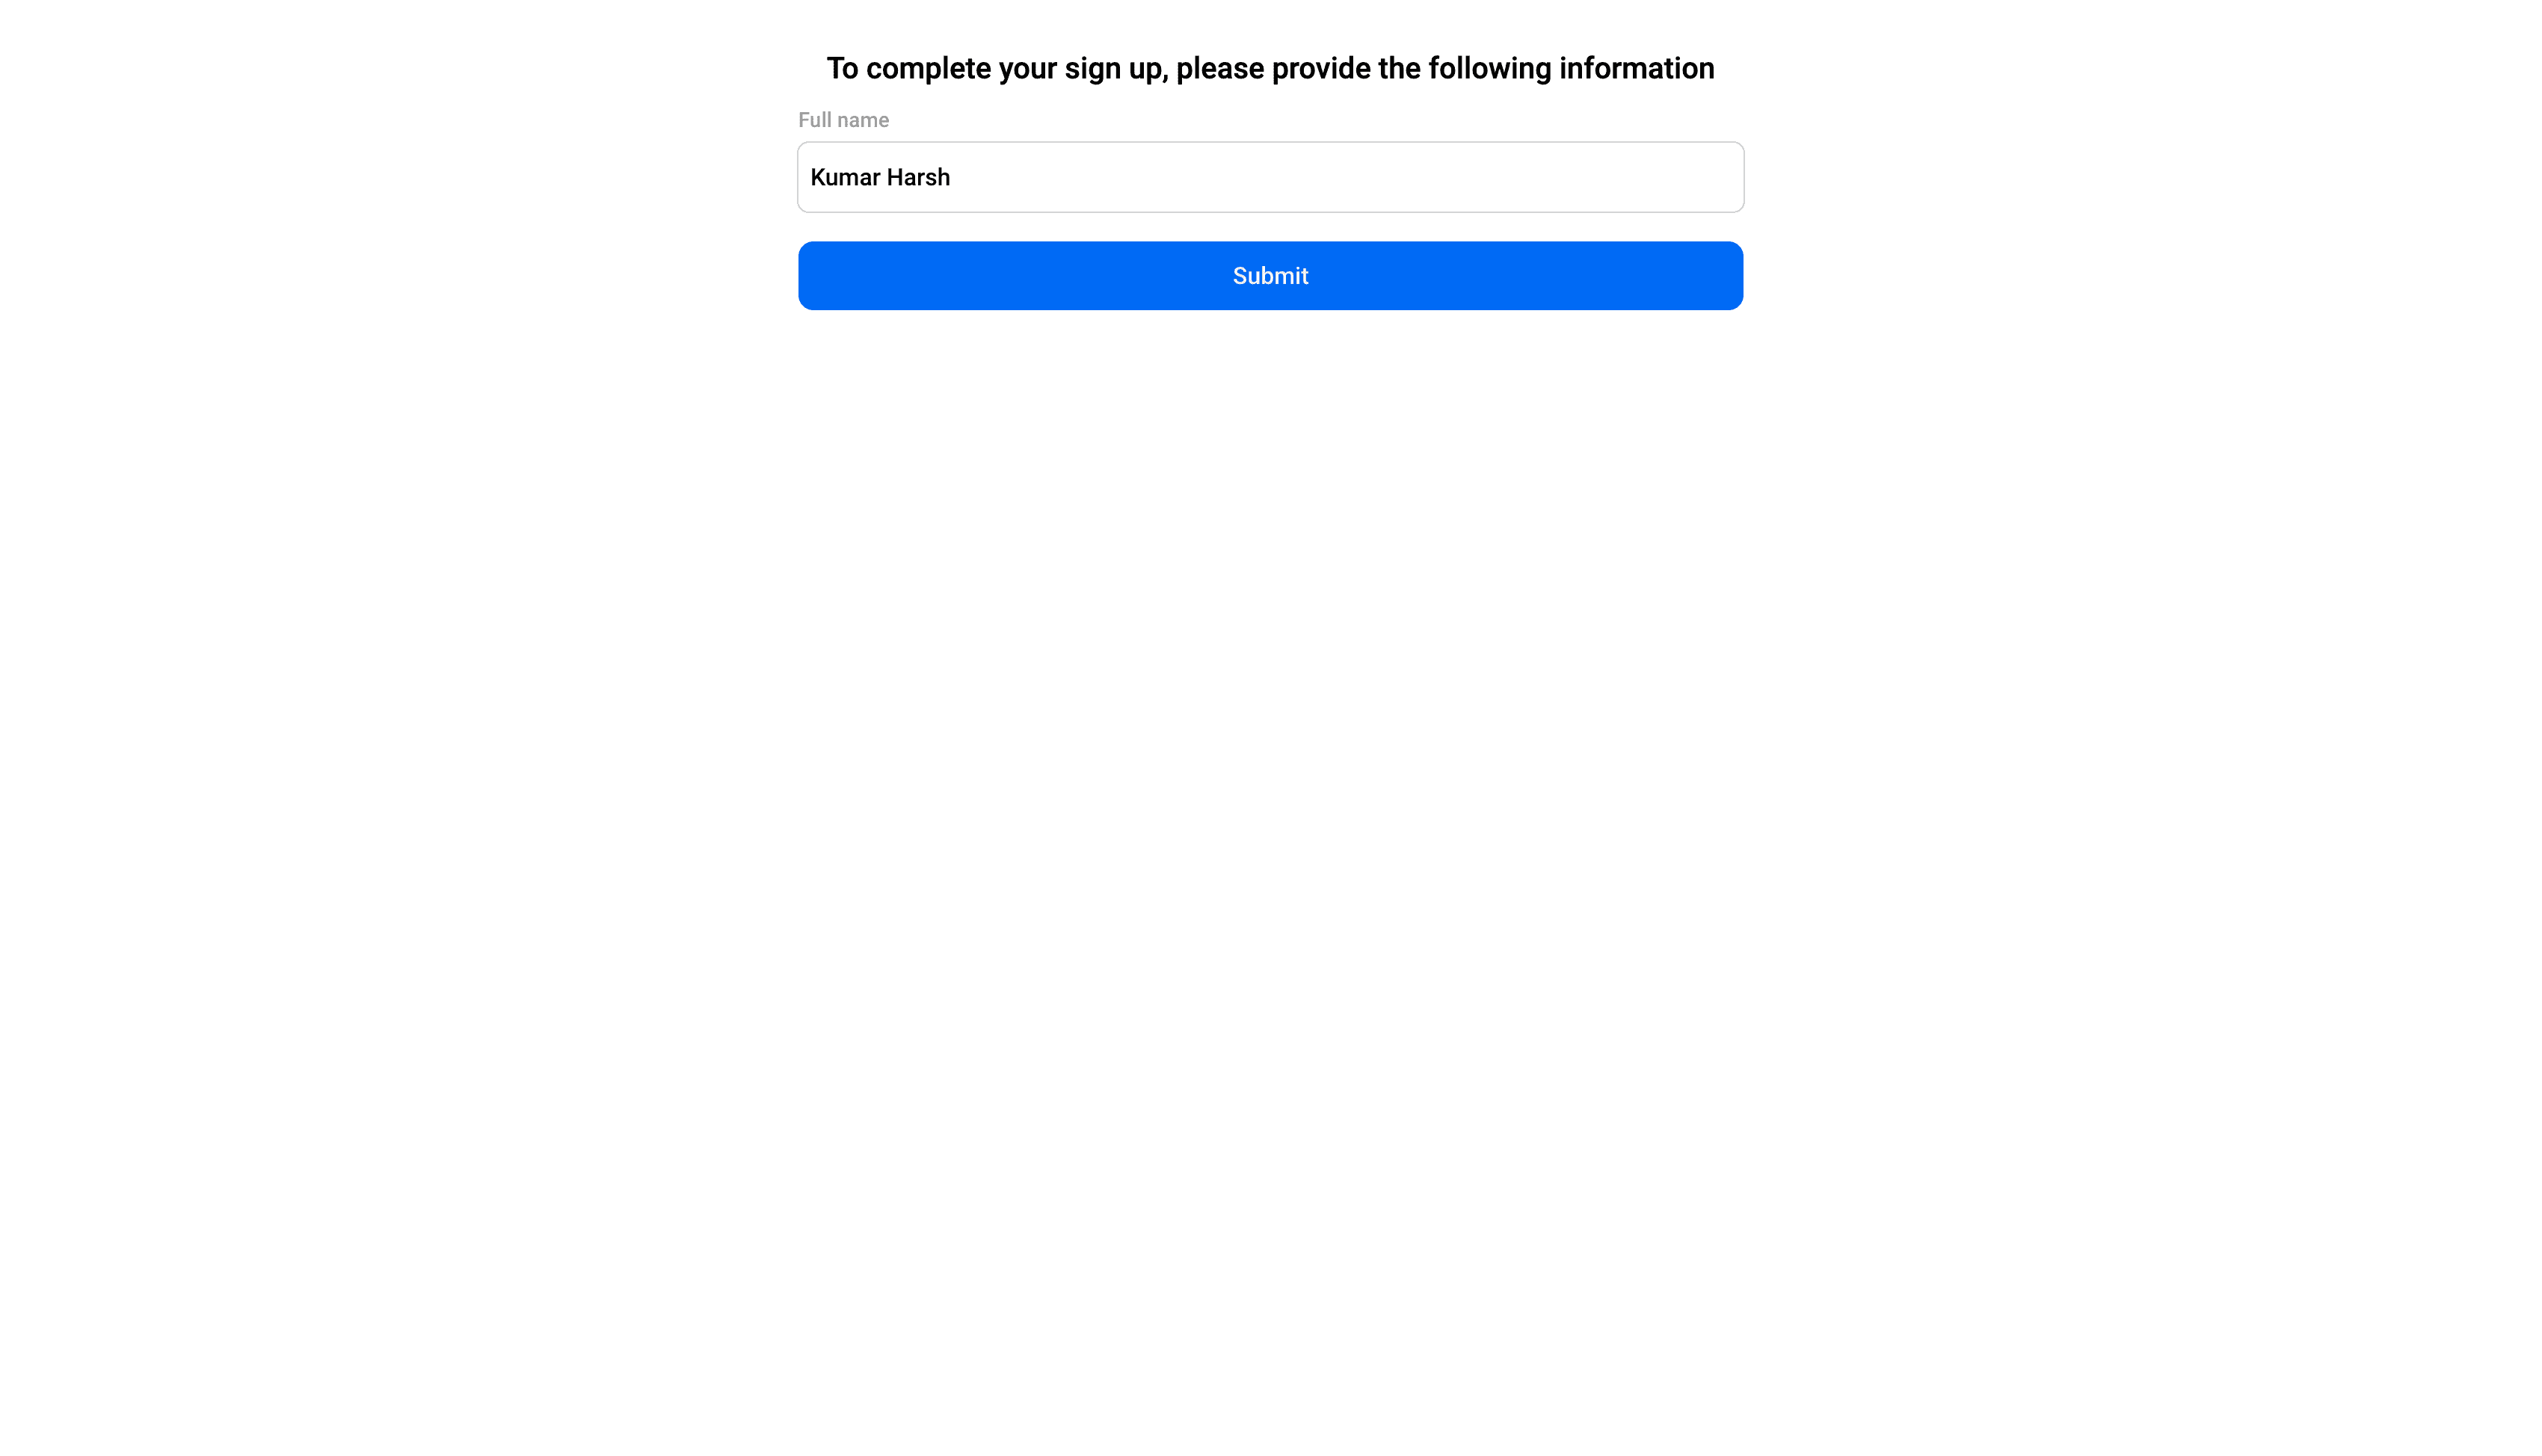
Once you do, you will be asked to provide additional details, such as your name, as part of the registration process:
Next, you'll be asked if you want to set up passkeys for this account:
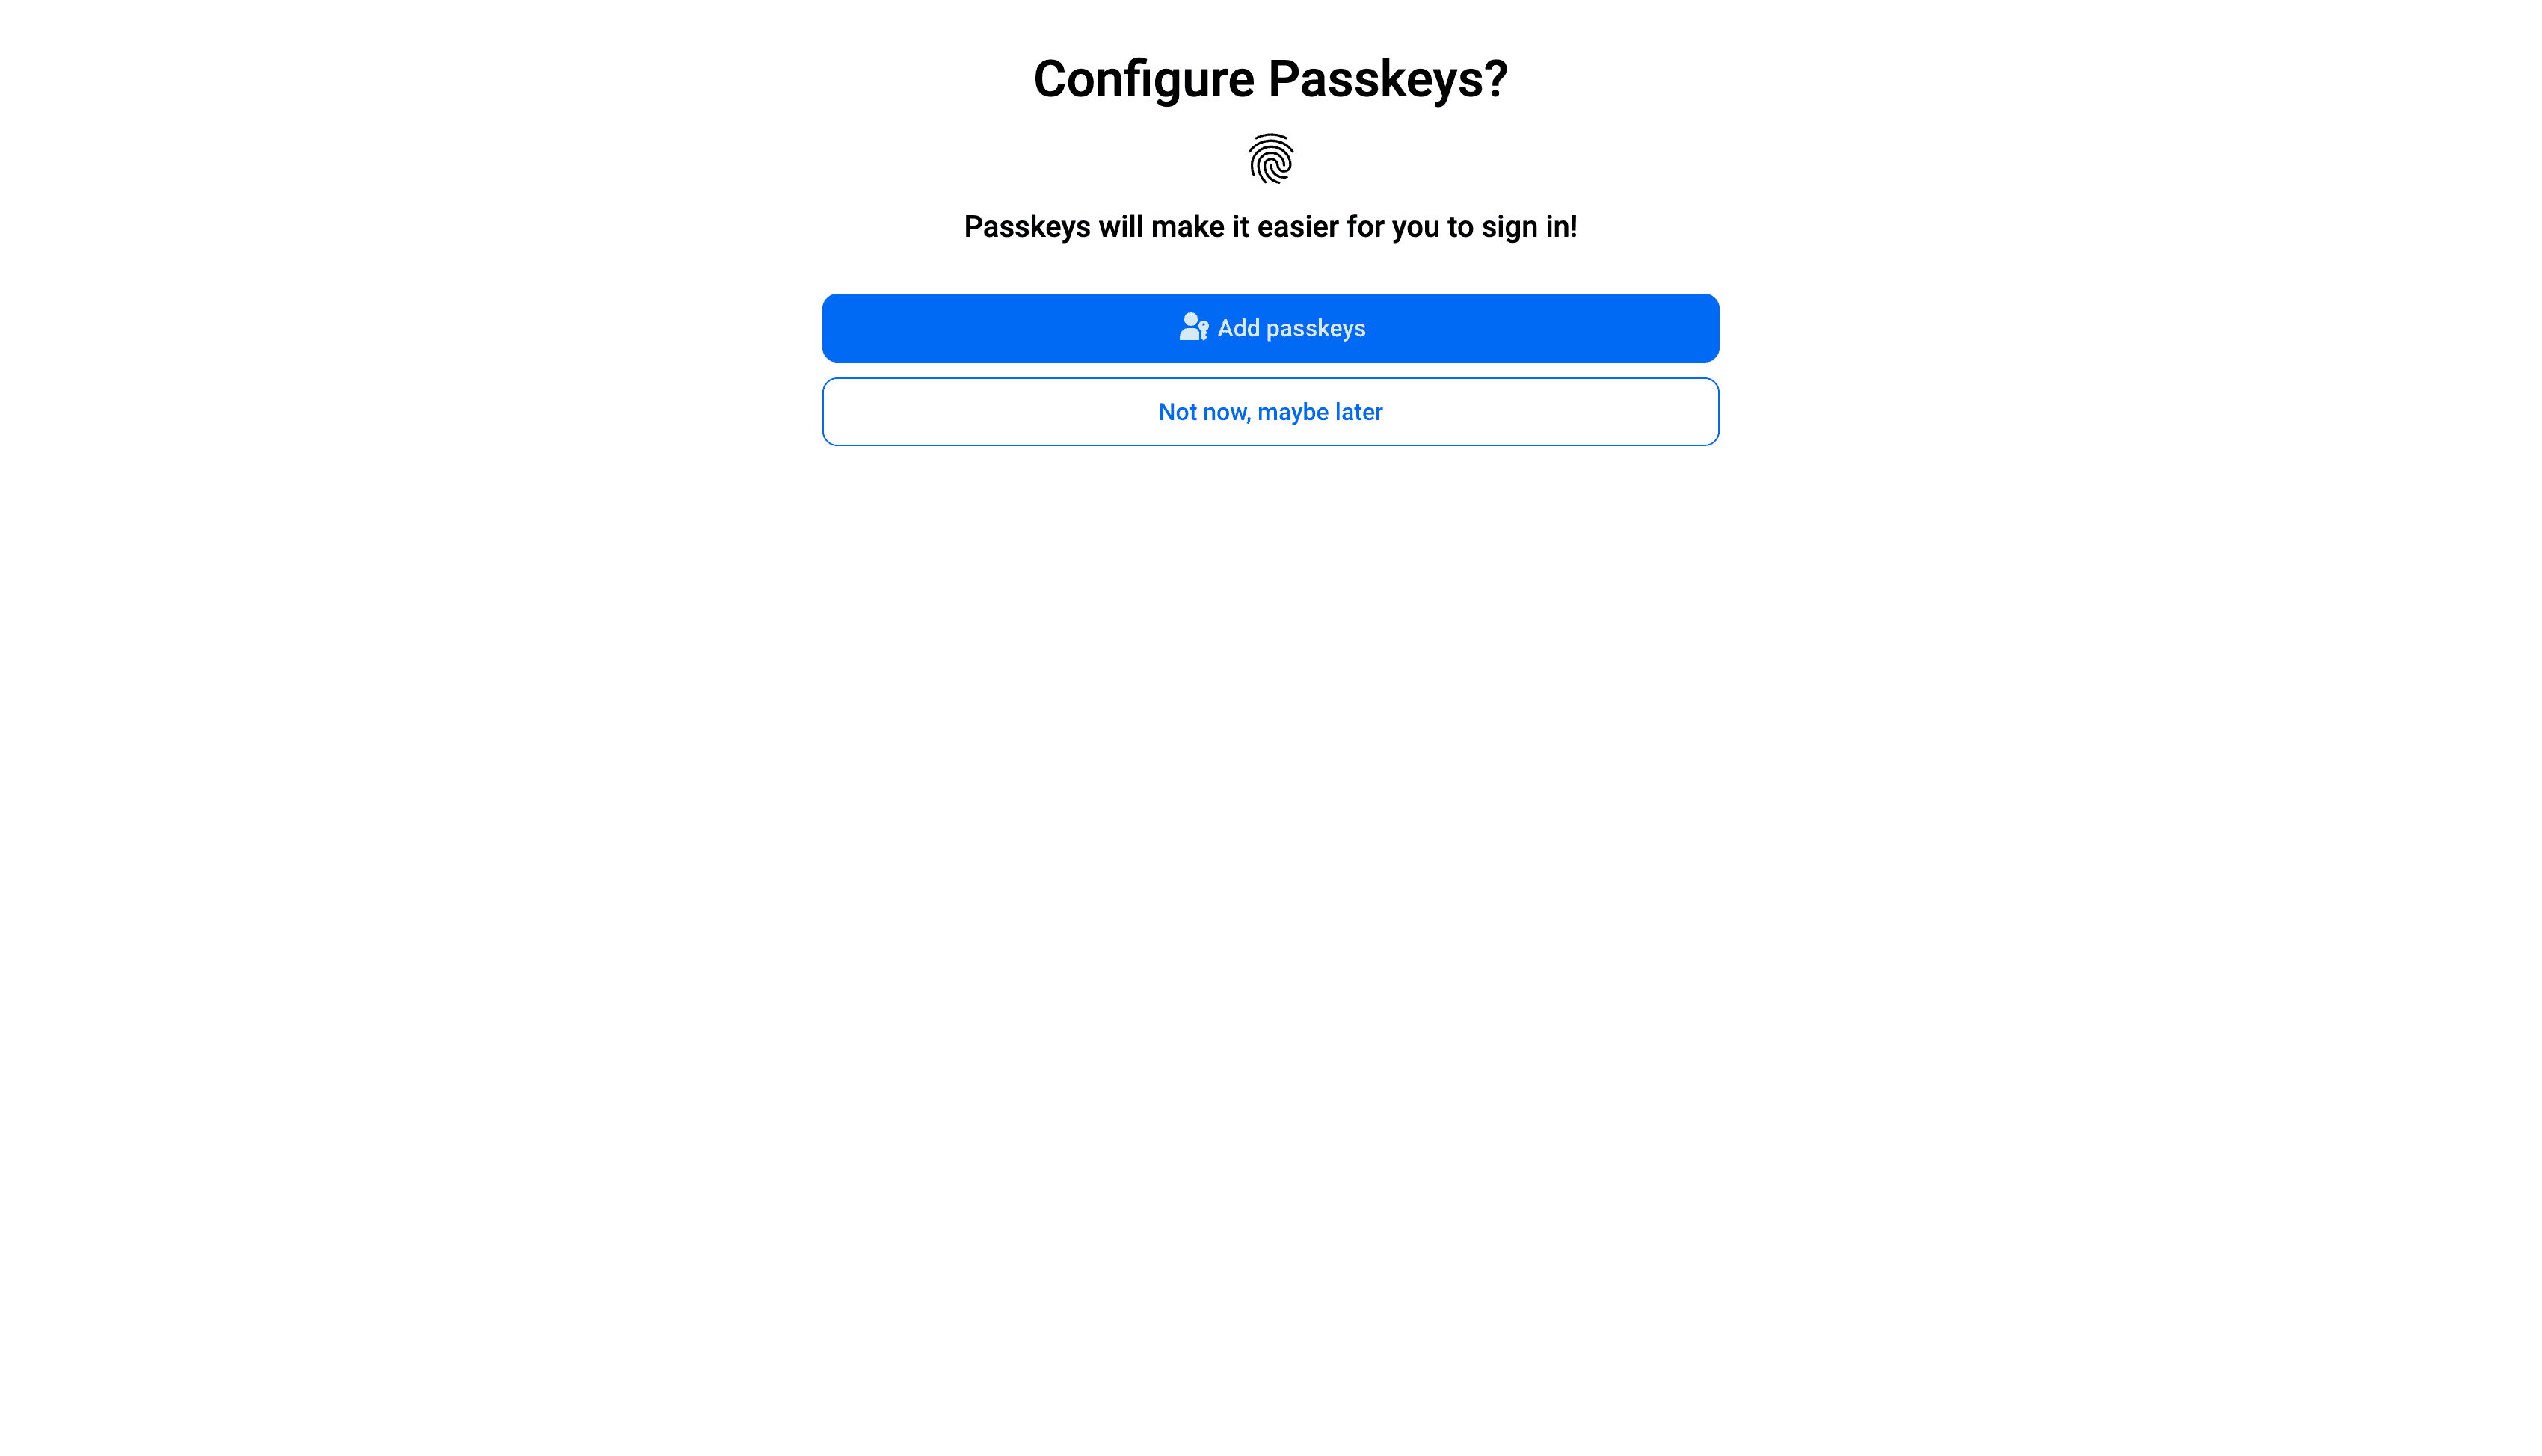
Click the blue Add passkeys button. Chrome will then ask you to confirm the creation of the passkey:
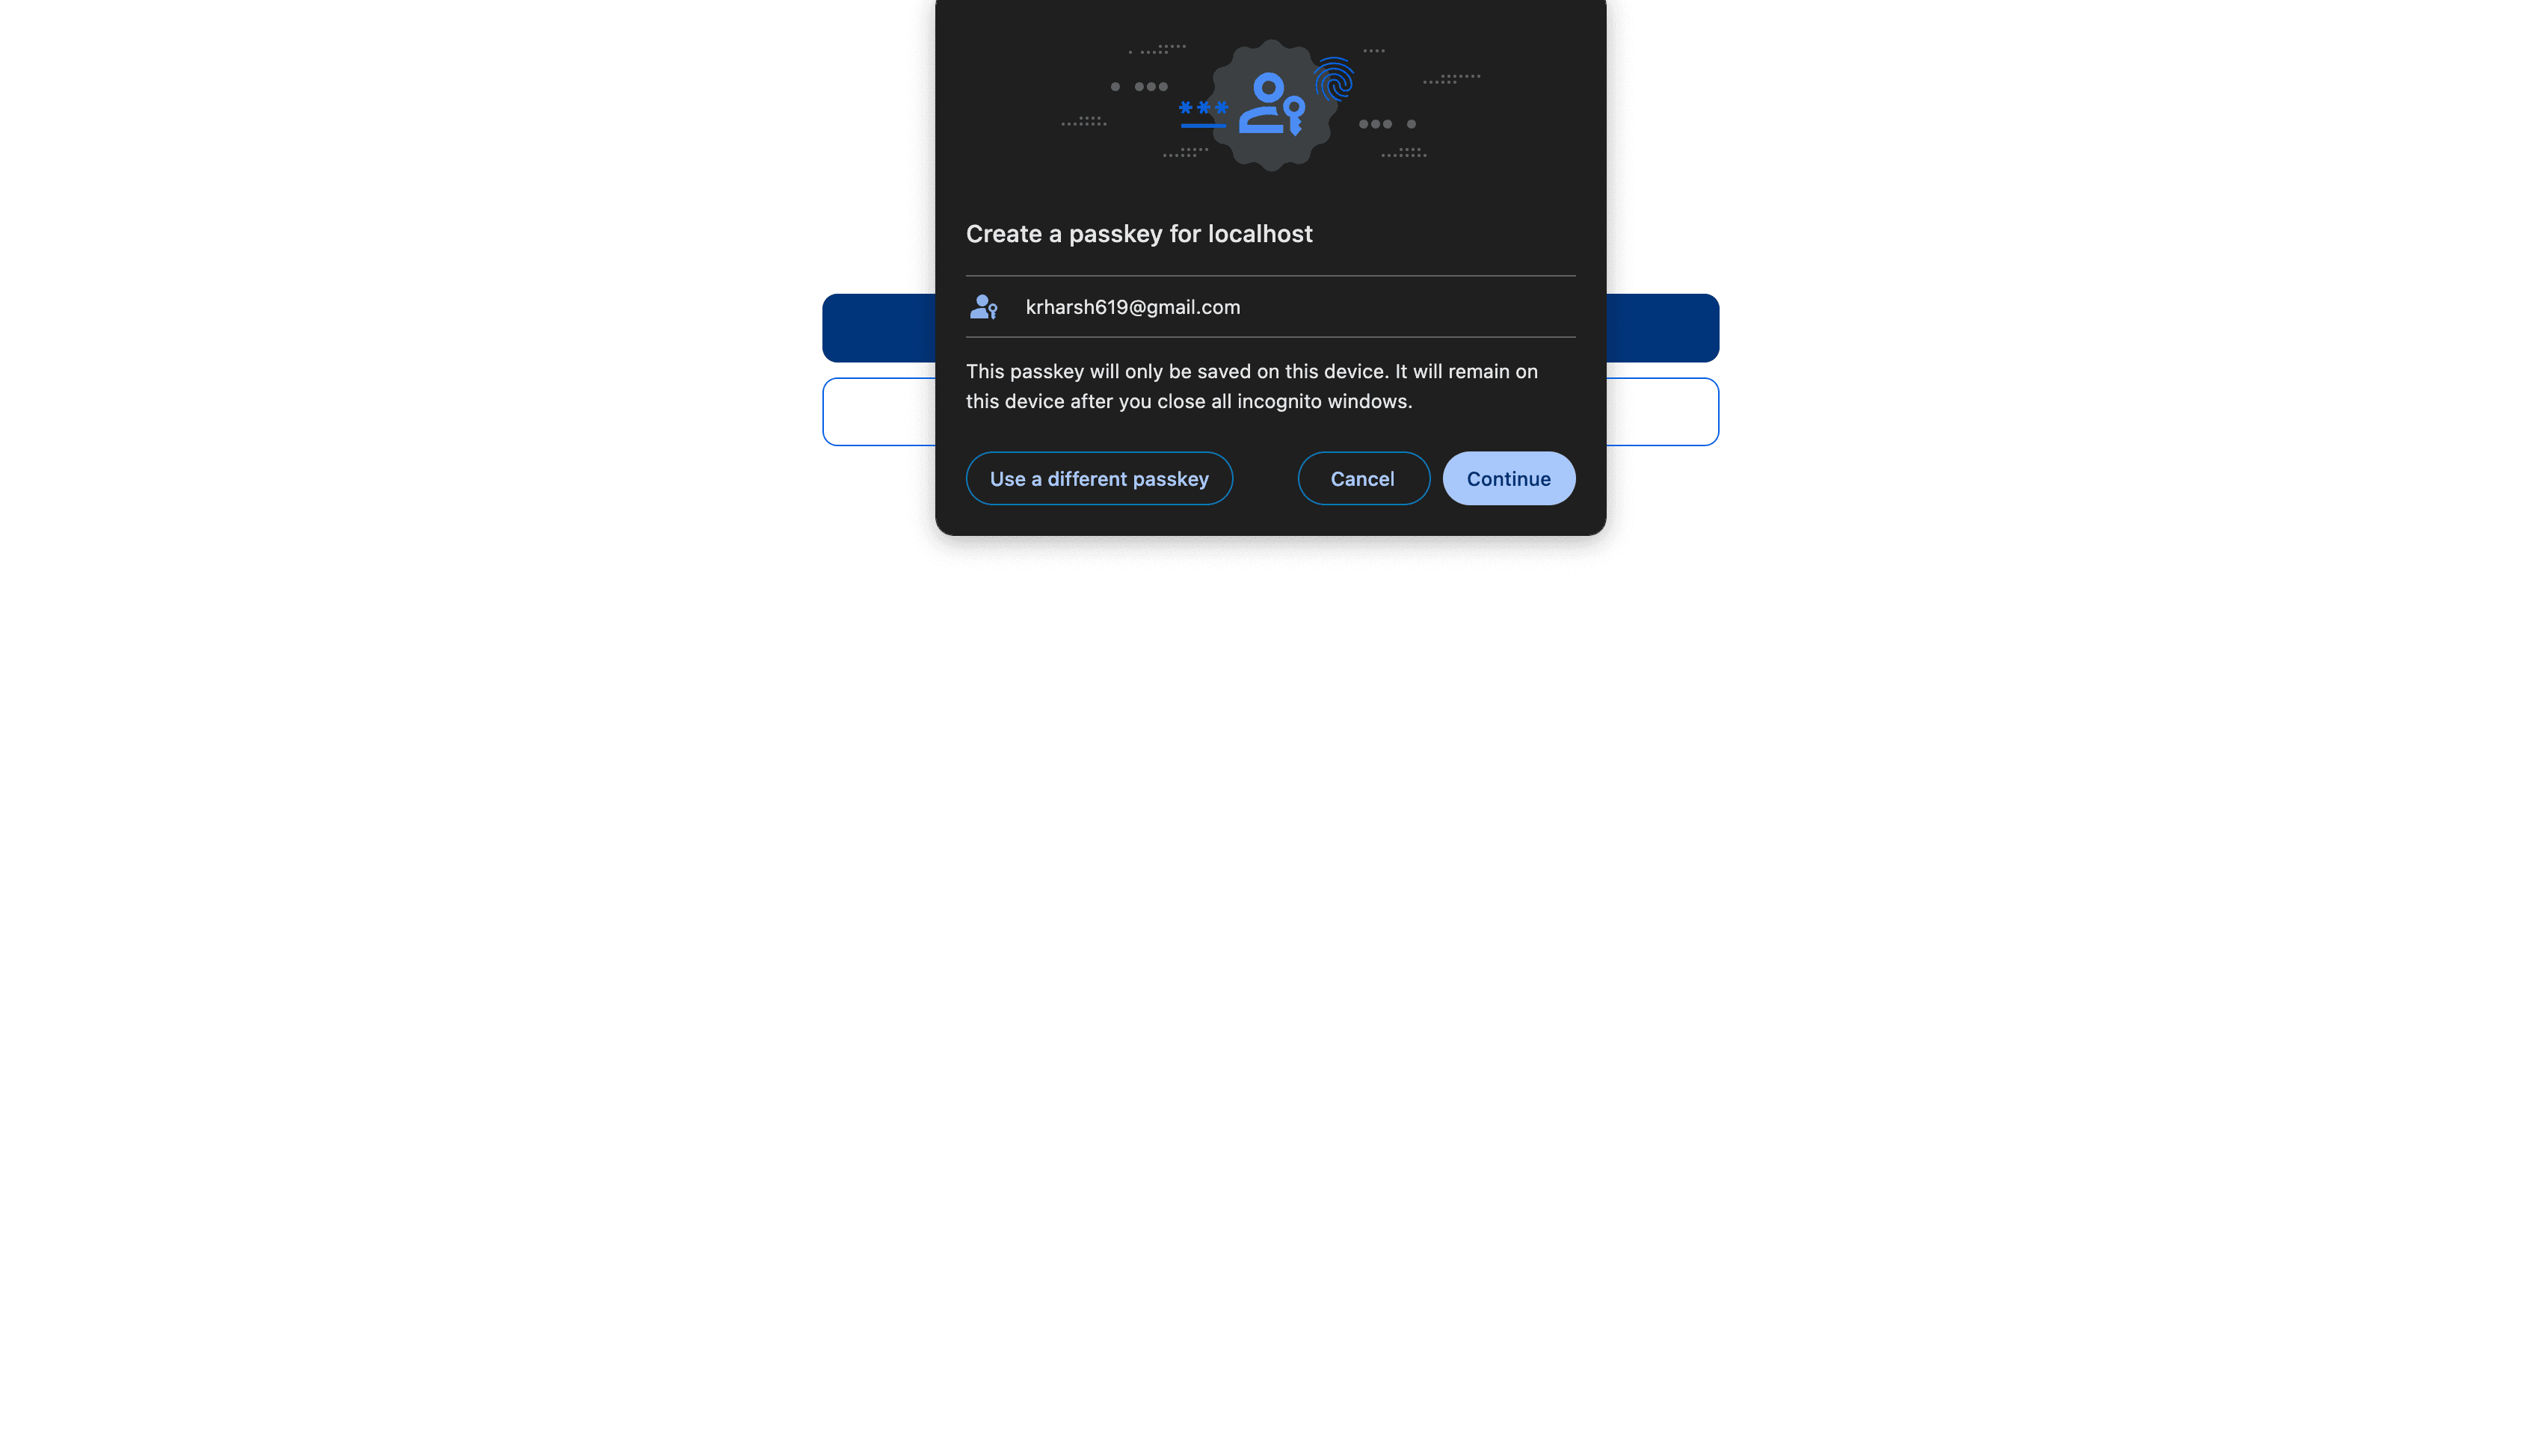
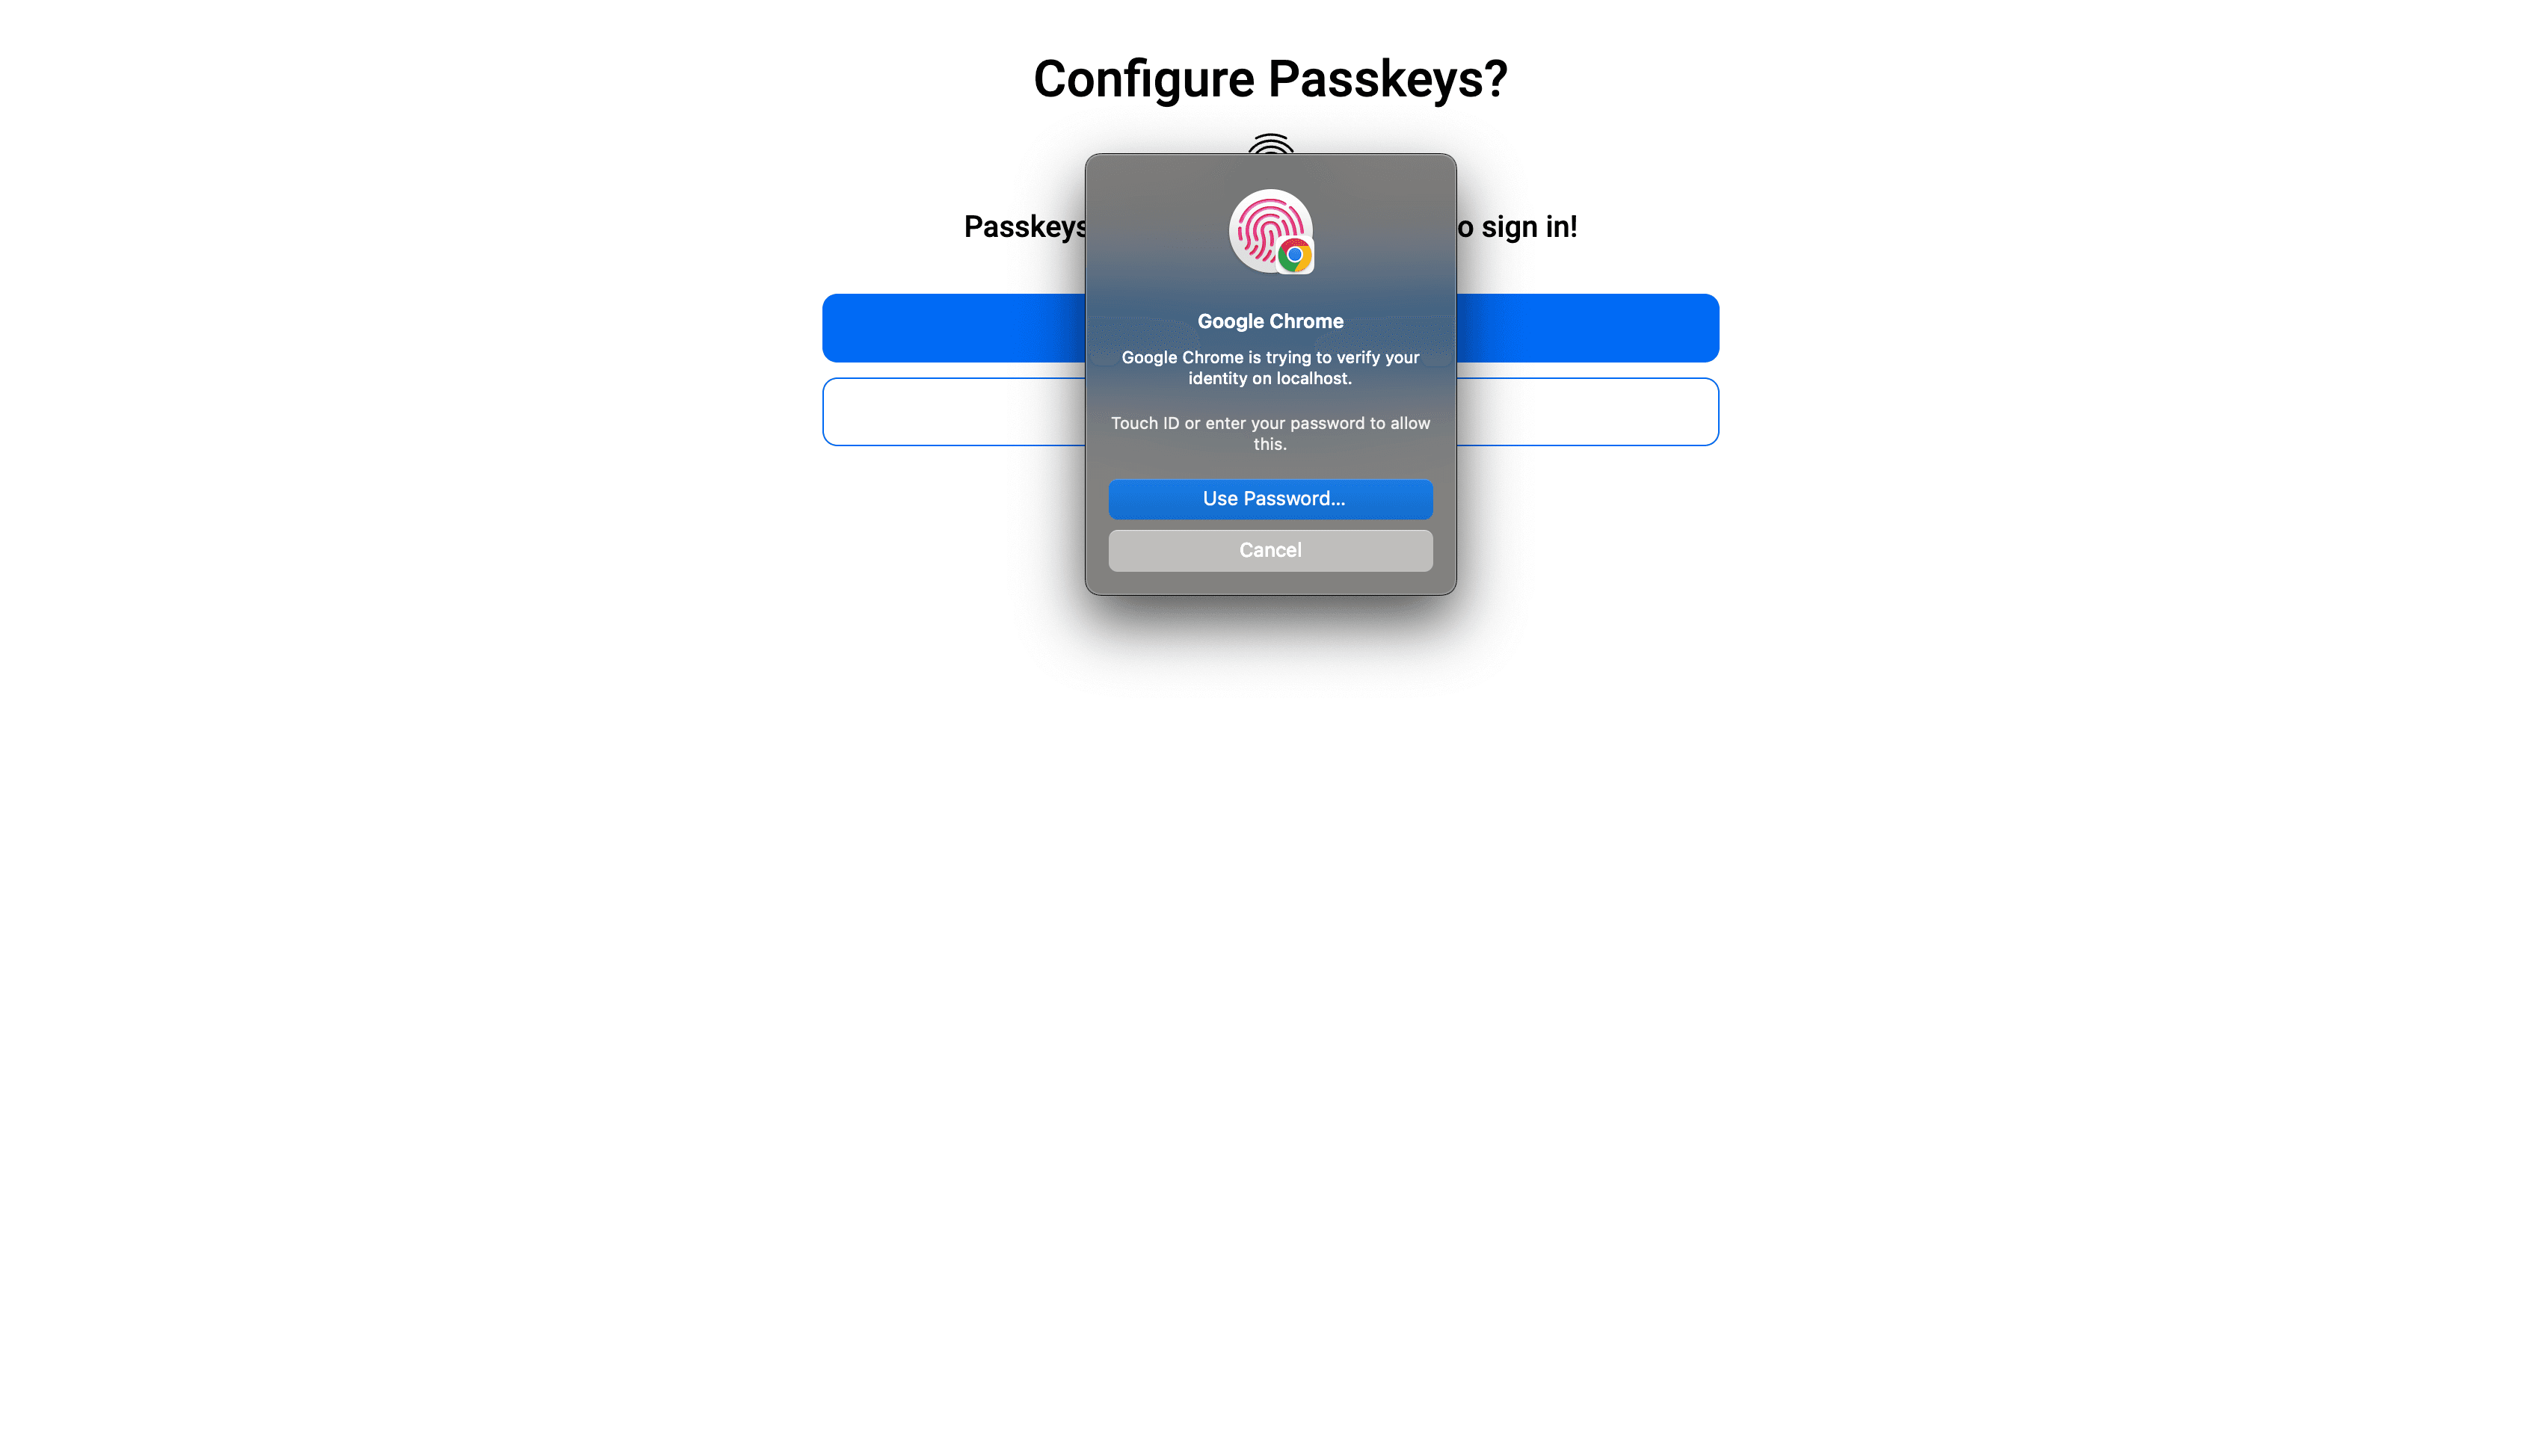
Once you click Continue, you will be asked to verify your identity through device login, such as biometric (Touch ID) or device PIN (if you have set that up):
Once you've verified your account, along with passkeys, will be set up, and you will be logged in:

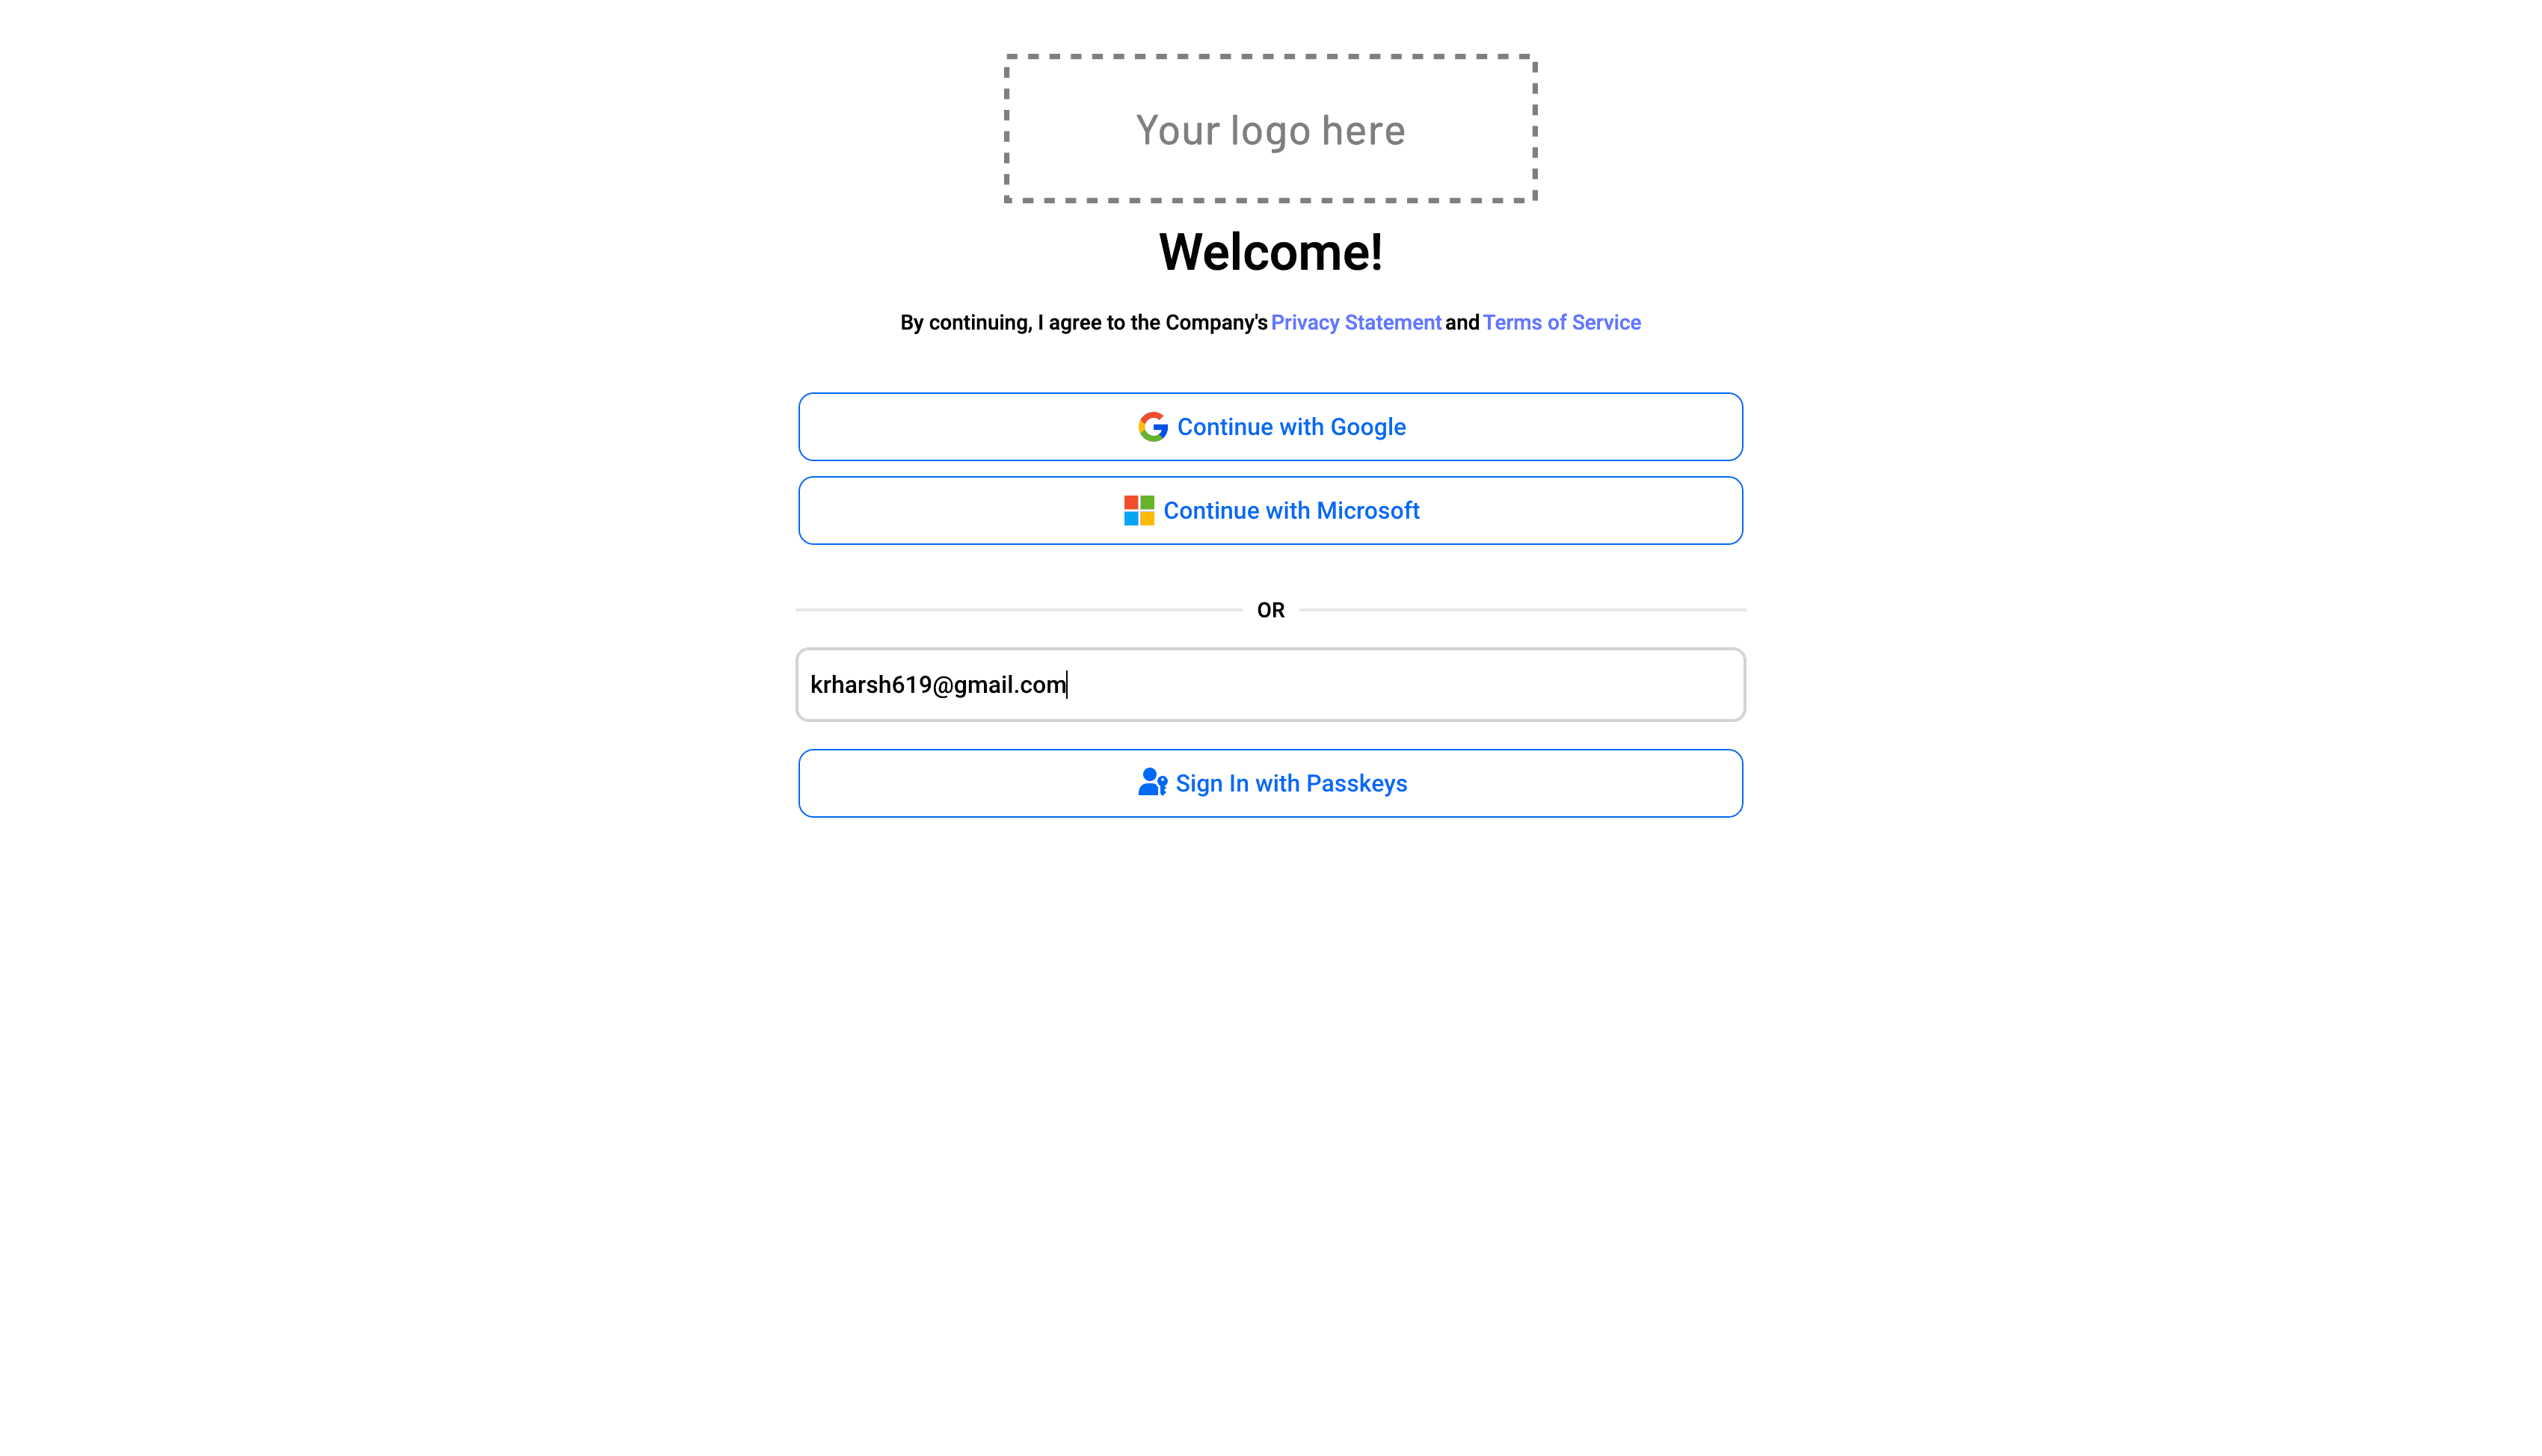
You can now try logging in with passkeys. To do that, click on the Logout button and enter your user ID (which, in this case, is your email) in the passkeys input box:
Once you click the Sign in with Passkeys button, you will be asked to verify your identity on your device to access your locally stored passkeys:

Once you verify your identity, you will be logged in directly without the need to enter any app-specific passwords or PINs!
Additionally, you can also enable autofill with passkeys to provide an even nicer login experience to your users. To do that, navigate to the Sign Up or In flow in your Descope dashboard and navigate to the Welcome Screen page:
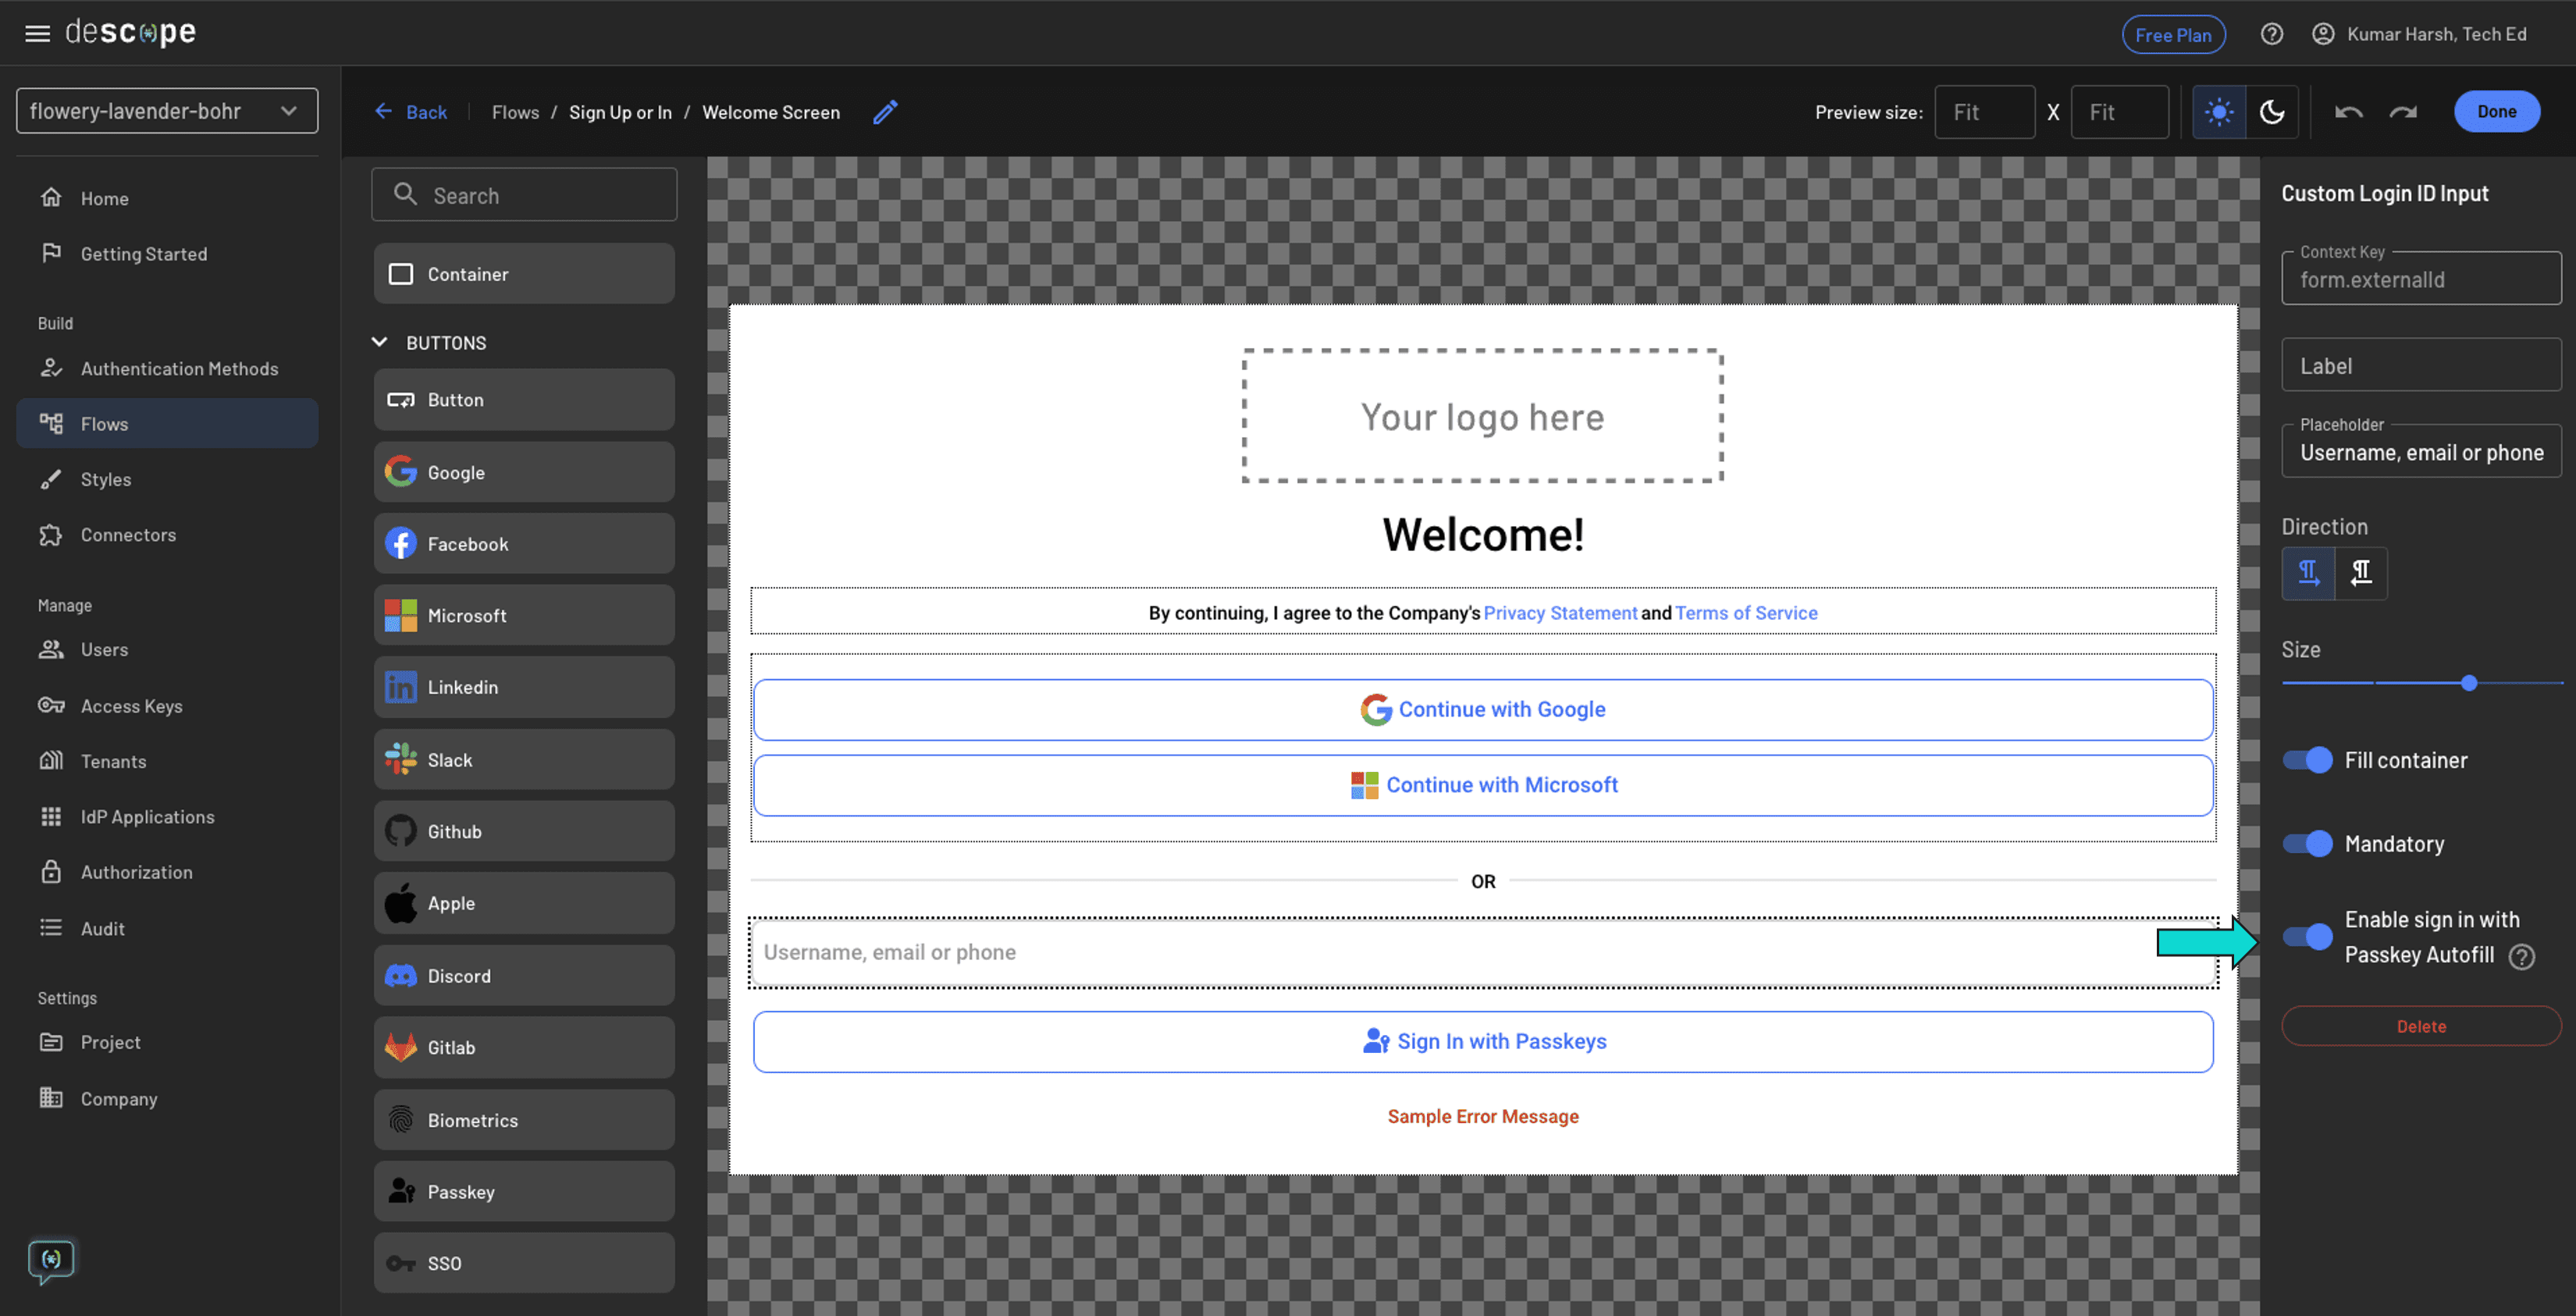
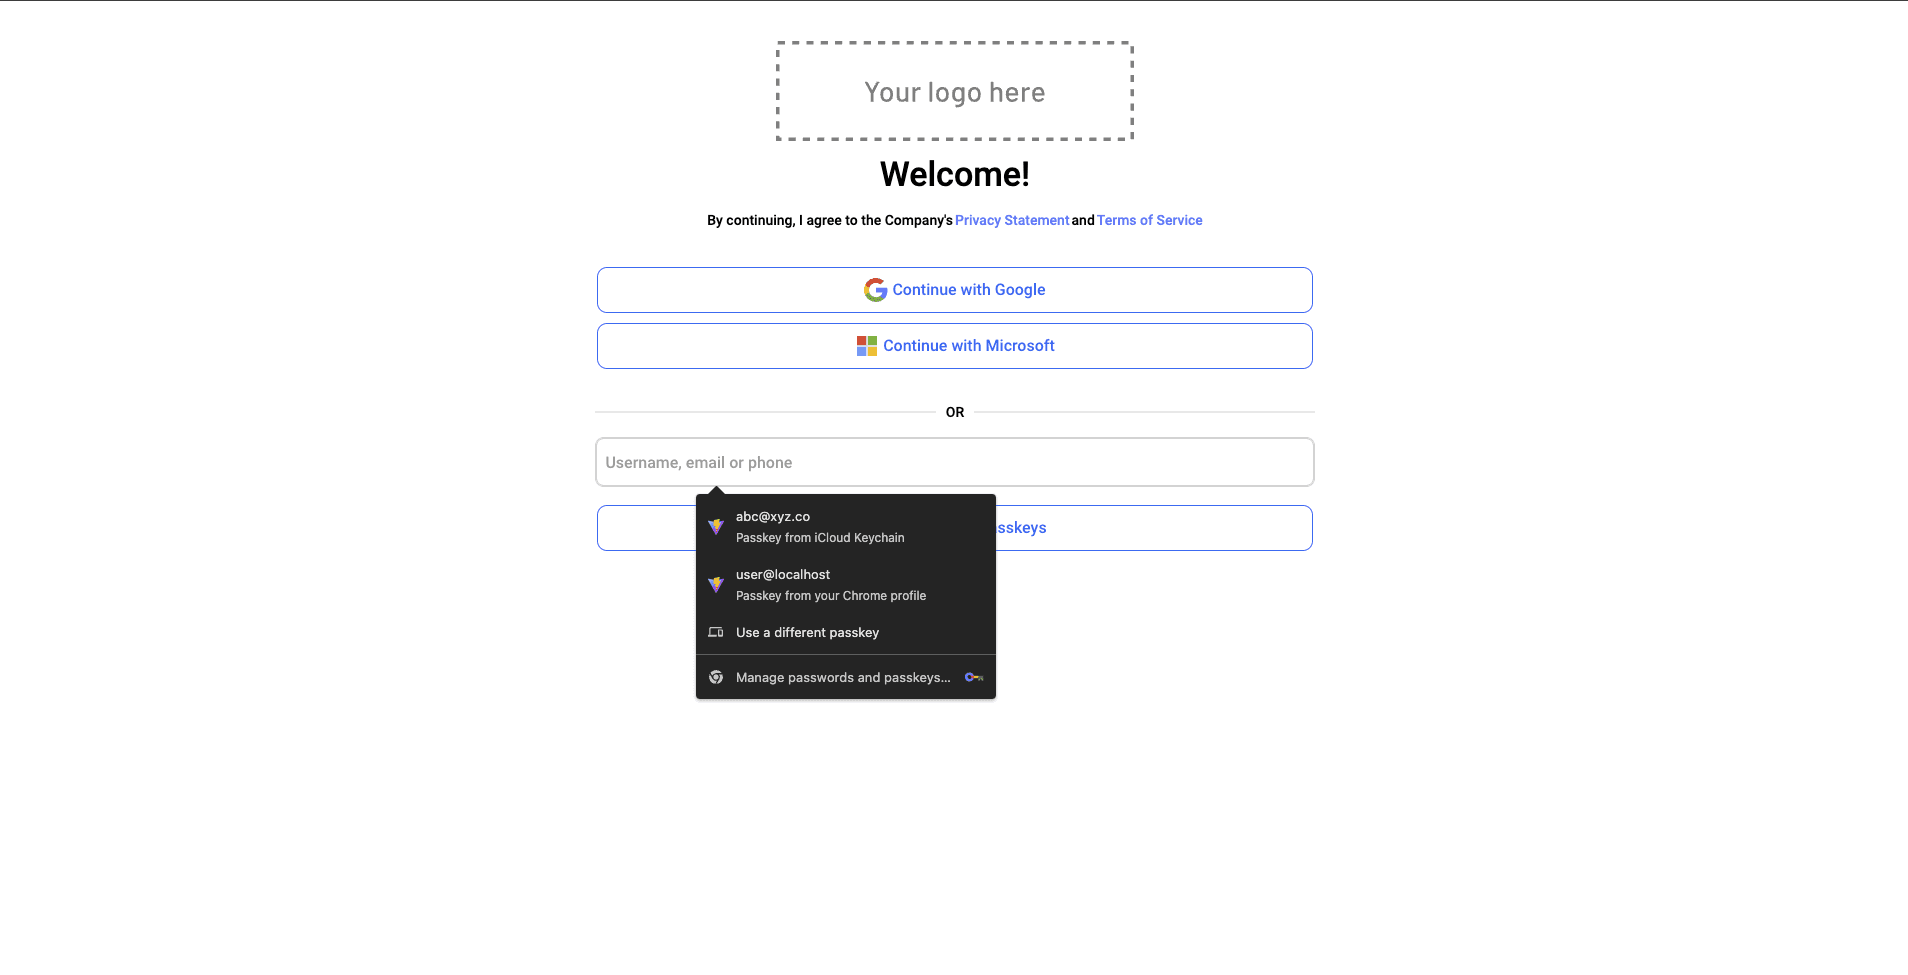
On this page, toggle Enable sign in with Passkey Autofill in the right pane and click on Done > Save at the top right. This will enable autofill options in the Passkey input box. To test it out, navigate to the login screen and click on the passkey input box. You should see an autofill list similar to the following:
You can find the complete code for the app built in this tutorial in this GitHub repo.
Drag-and-drop passkey authentication with Descope
Descope simplifies the implementation of passkeys in your apps, eliminating the need to manually set up complex client- and server-side authentication logic from scratch. It offers a visual workflow for managing user-facing screens for progressive profiling, backend authentication logic, and the merging of user identities across different authentication methods.
This approach not only makes it straightforward to get started but also simplifies the process of modifying your user journeys over time.
Descope offers intuitive tools and clear instructions, empowering developers from all skill levels to integrate secure, seamless login processes into their applications. With drag-and-drop capabilities, even beginners can easily implement authentication flows that enable quicker, simpler, and more accessible logins for users.
Check out Descope by signing up for a Free Forever account. If you have questions, book time with Descope auth experts to learn more.