Table of Contents
This tutorial was written by Kumar Harsh, a software developer and technical author based in India. You can visit his website to see more of his work!
Building robust authentication and authorization for your React app can feel like navigating a password-protected maze. But what if there was a way to simplify this process, leaving you free to focus on building the core functionalities that truly shine (and getting rid of passwords in the process)? Enter Descope, a no-code authentication platform designed to take the pain out of user management.
In this article, you'll learn how to integrate Descope seamlessly into your React app for authentication and authorization. You'll set up passwordless logins and secure access control—all without writing a single line of authentication code. By the end, you'll have a secure, frictionless user experience that leaves your app protected and your coding time preciously intact.
If you're a visual learner, you can watch the video below that goes through the same tutorial:
Implementing authentication and authorization to React
To understand Descope's features and simplicity, you'll implement it in a demo project. The purpose of the demo project is simple: the app allows students to view a list of questions as part of a dummy unit test, and it allows teachers to view the same list of questions along with their answers when grading the tests.
Students and teachers are the two groups of users that can access this tool, so it makes sense to create these two roles in Descope and configure the backend to return the relevant data for each of these two roles.
The tech stack
You'll build the backend in Node.js and the frontend in React. You'll use the Descope React package to authenticate users with one of the passwordless flows and access their roles. Finally, you'll query the prestored questions and answers from a PostgreSQL database based on the user's access levels.
Here's what the internal structure of the app looks like:
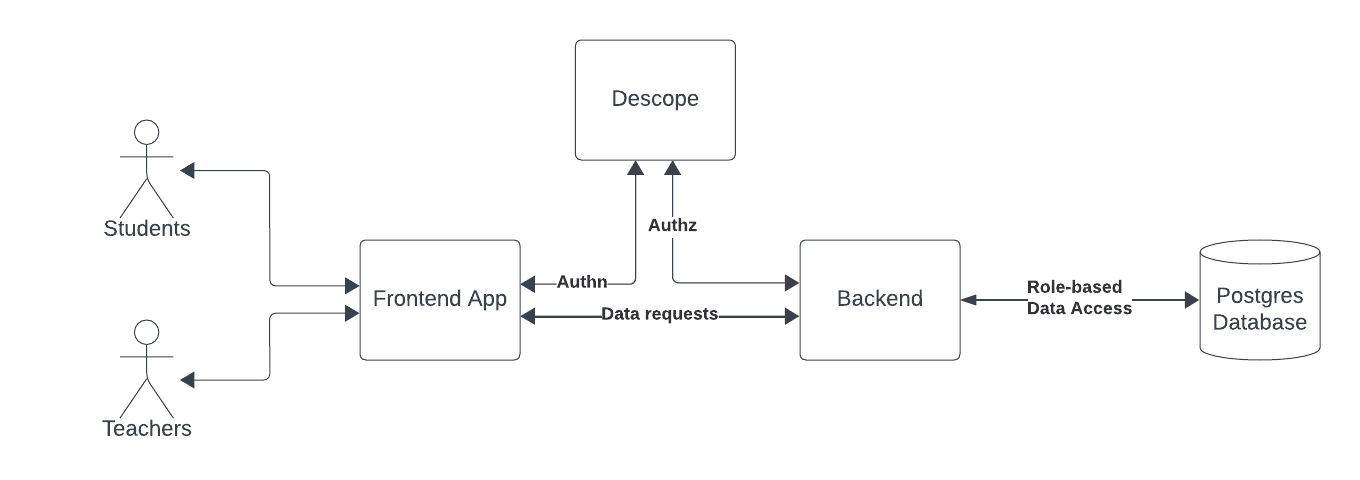
Without further ado, get started!
Create the app
To begin, create a new React app using the following command:
npm create vite@latestName your app something simple, like "descope-qna". Choose React as the framework and JavaScript as the project language for simplicity. Once the project is created, install the Descope package in it by running the following command:
yarn add @descope/react-sdkNow, you're ready to configure an authentication flow on Descope.
Set up Descope auth flows
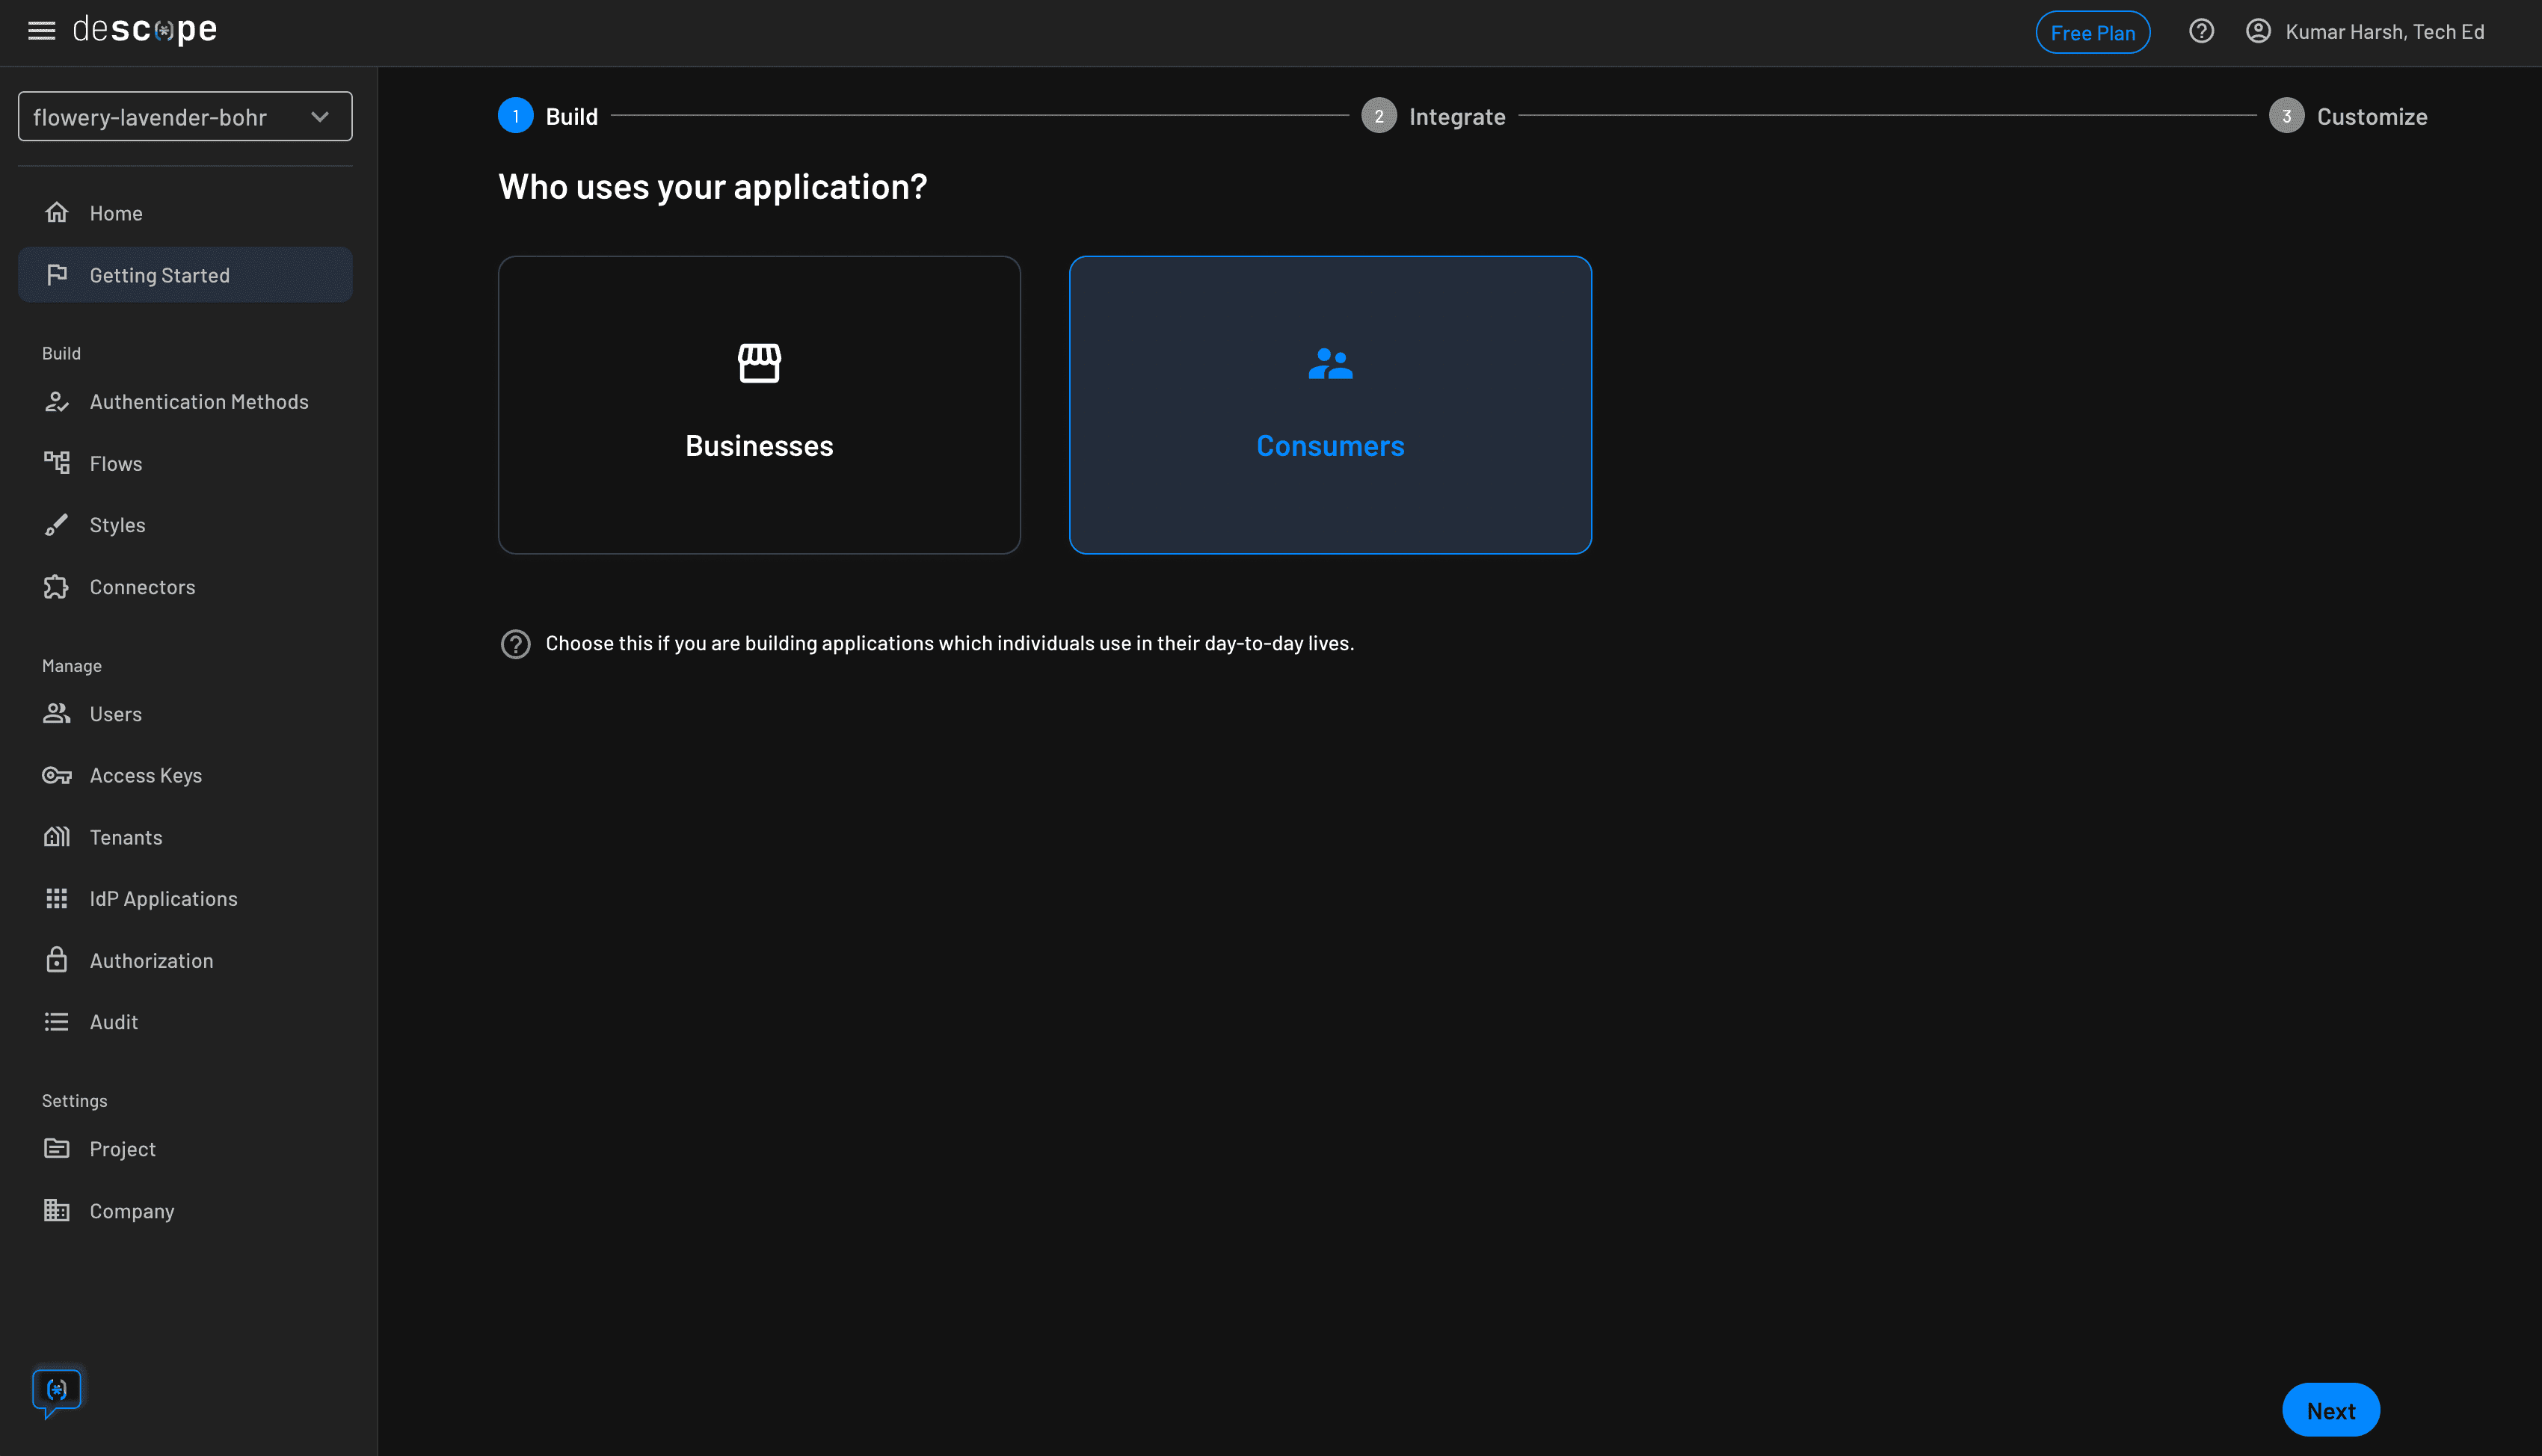
Before you can integrate Descope into your project, you need to configure an authentication flow using its online developer console. To get started, sign up for a new Descope Free Forever account here. Once you've created a new account, log in to your console and follow the getting started guide.
In step 1, choose Consumers as your target users:
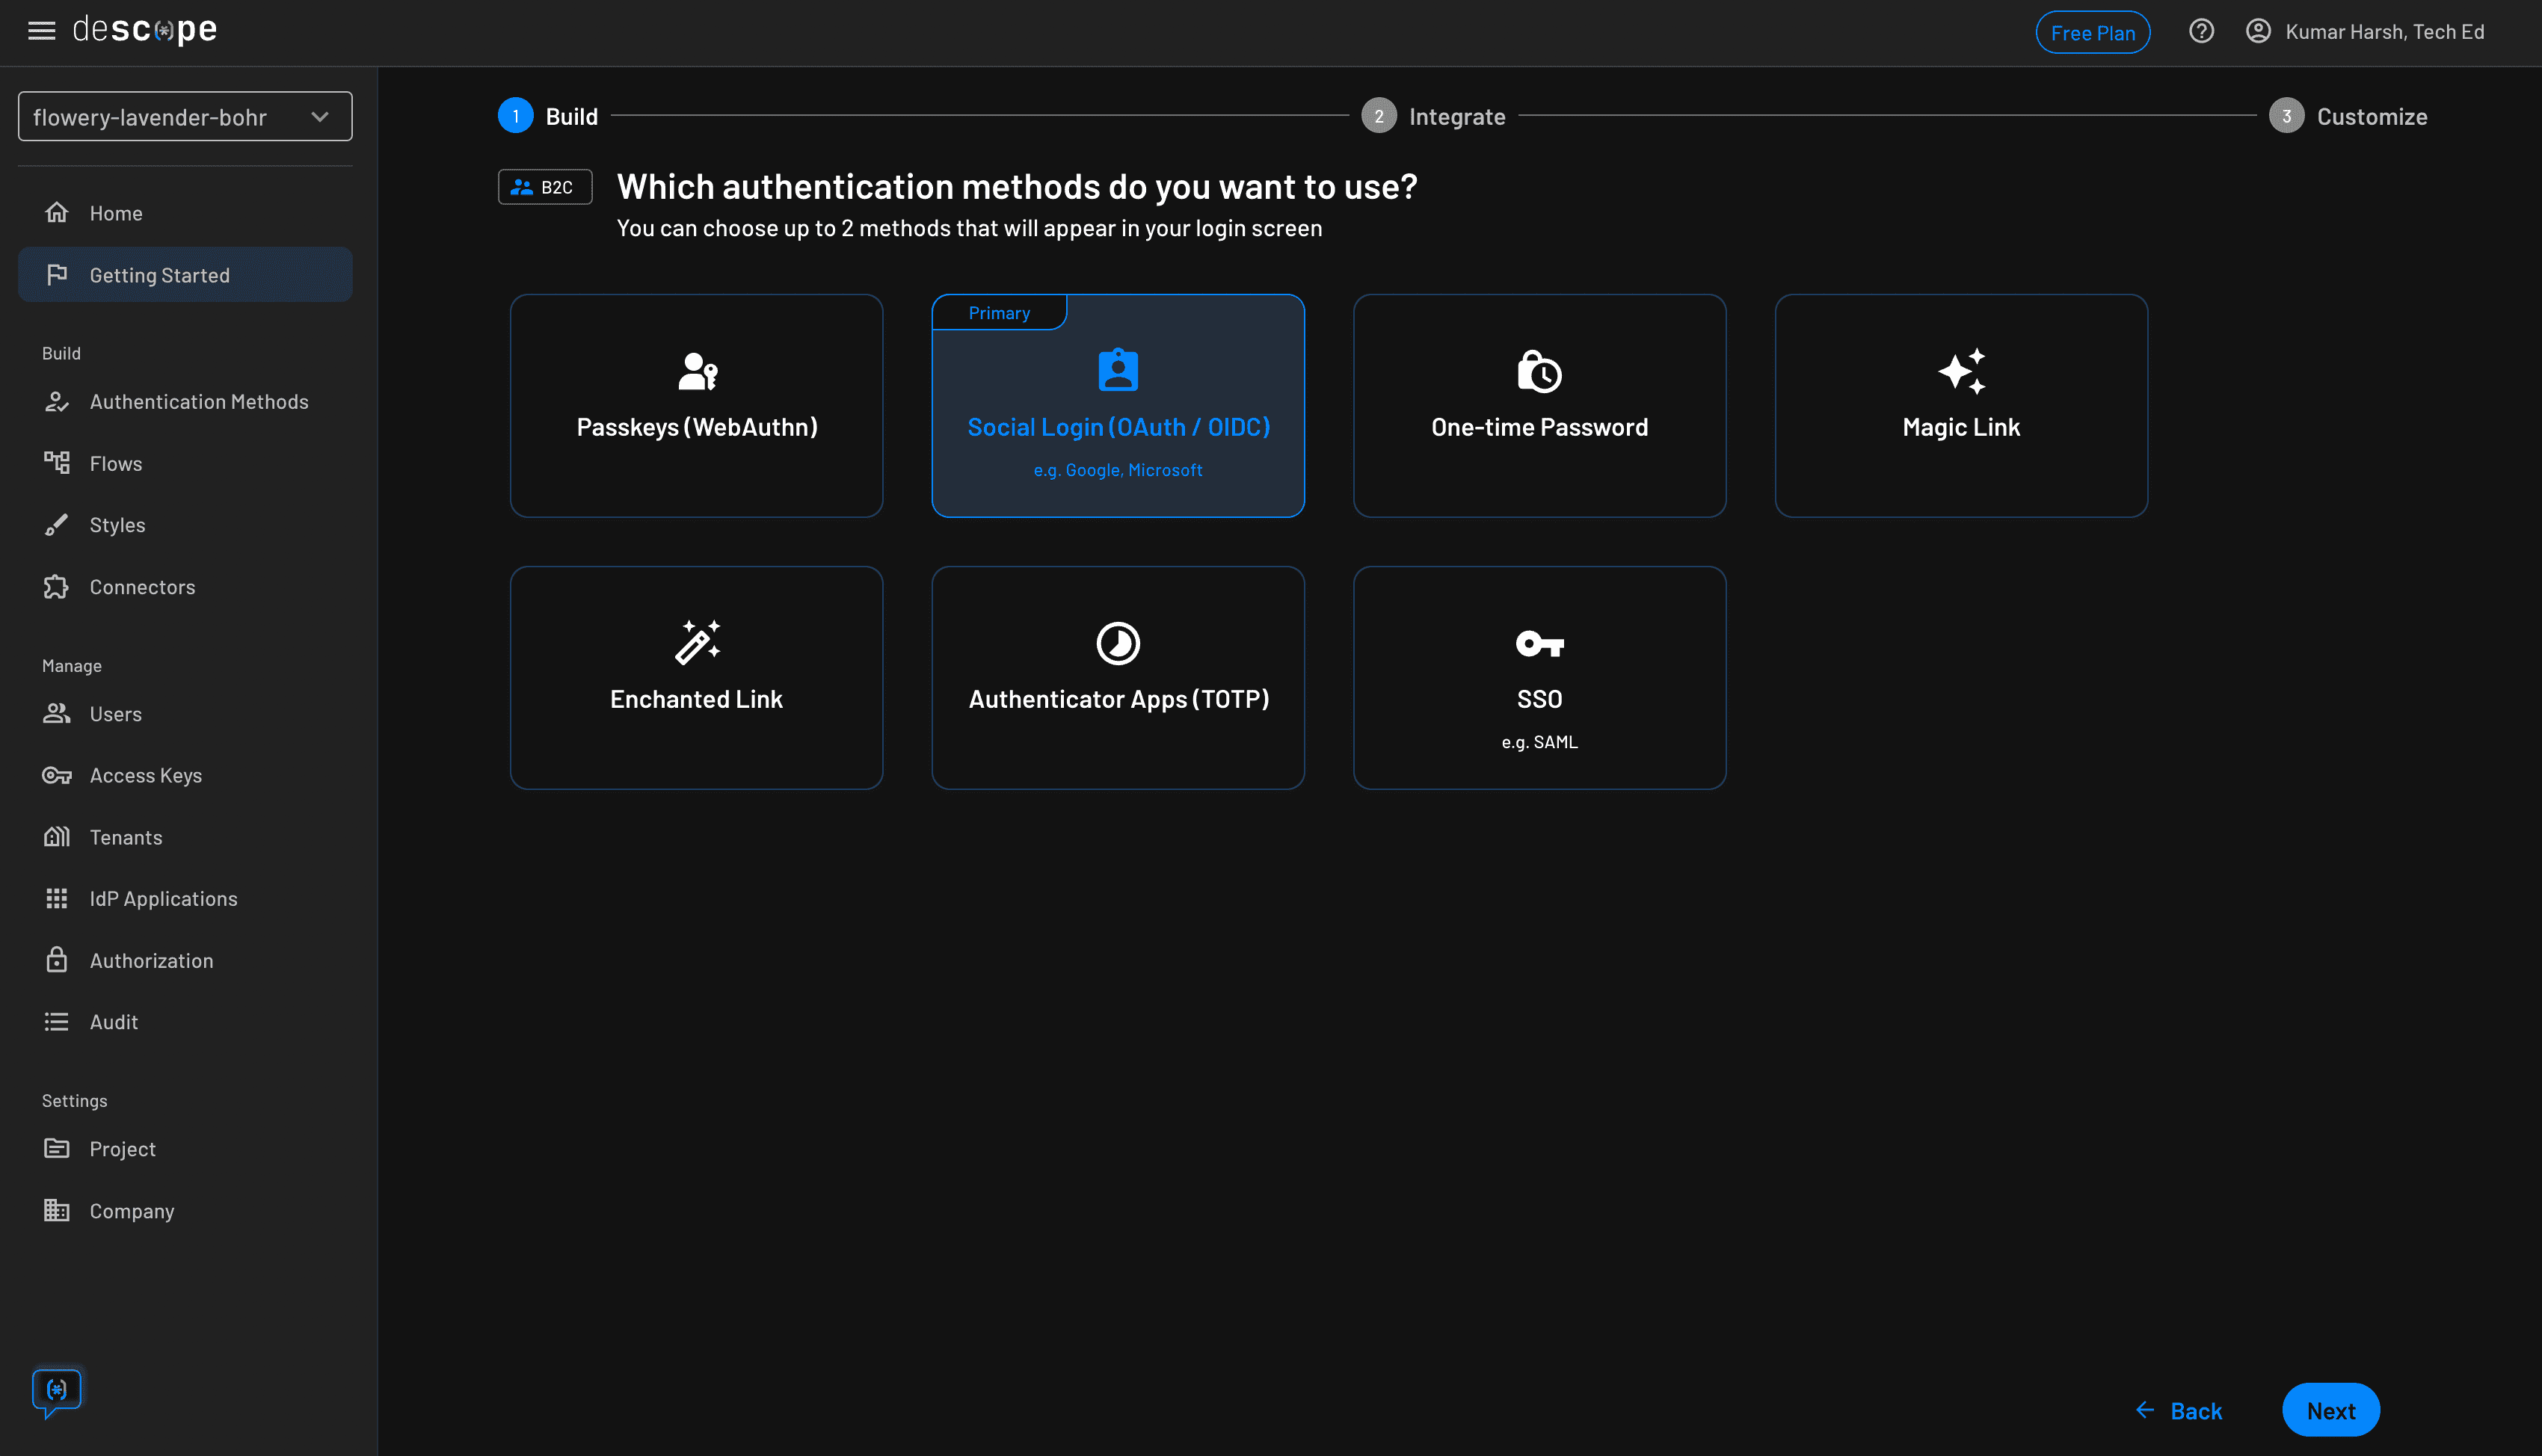
Next, choose the method of authentication that you would like to support in your app. For simplicity, just select Social Login (OAuth / OIDC) in this step. You can always come back later and select more methods to offer your users when authenticating. Click the blue Next button at the bottom:
The next step offers you the option of choosing a second authentication method to use for MFA setup. For this tutorial, you can leave this step and simply click Go ahead without MFA at the bottom right:
You can always come back and update your flows to include MFA in your application. The process is straightforward, similar to how you created a new flow just now.
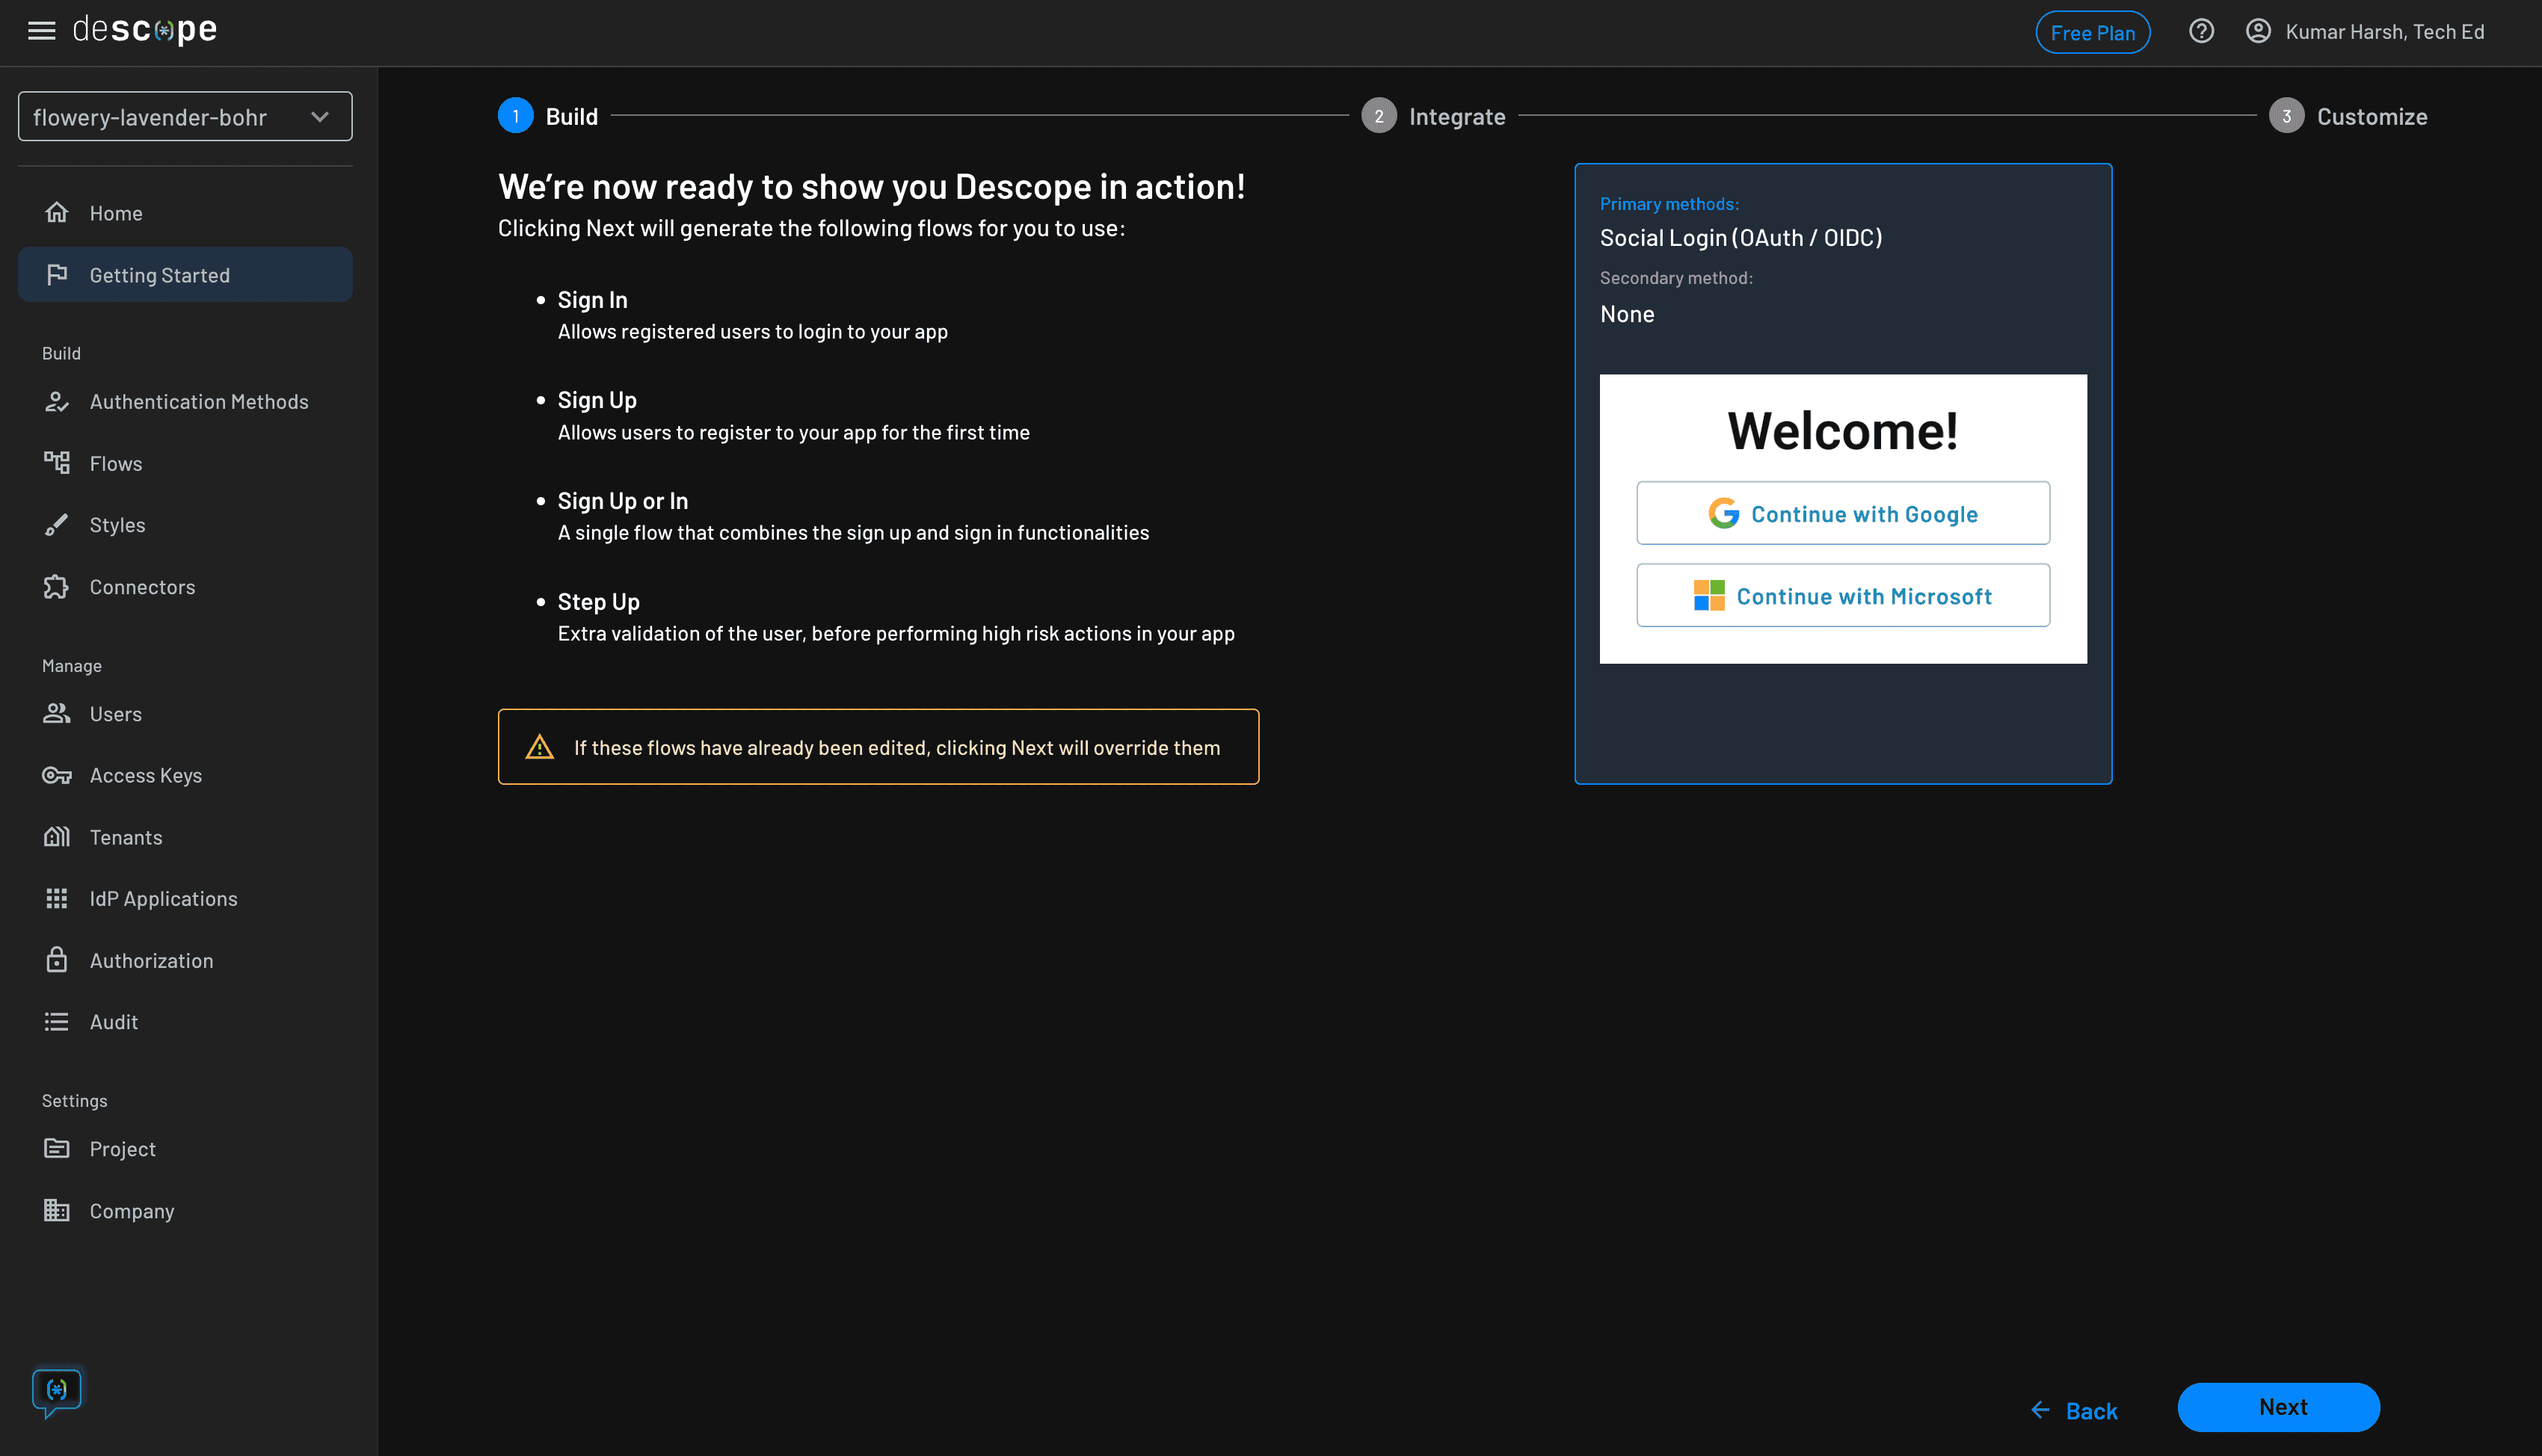
Finally, you can review your selected options and see a preview of the login and sign-up dialog that is generated for you. Once you're happy with your choices, click the blue Next button at the bottom. This generates the chosen authentication flows for you:
Set up roles
The next step would be to integrate these flows into your app. But before you do that, take a quick moment to set up the necessary roles in Descope for students and teachers.
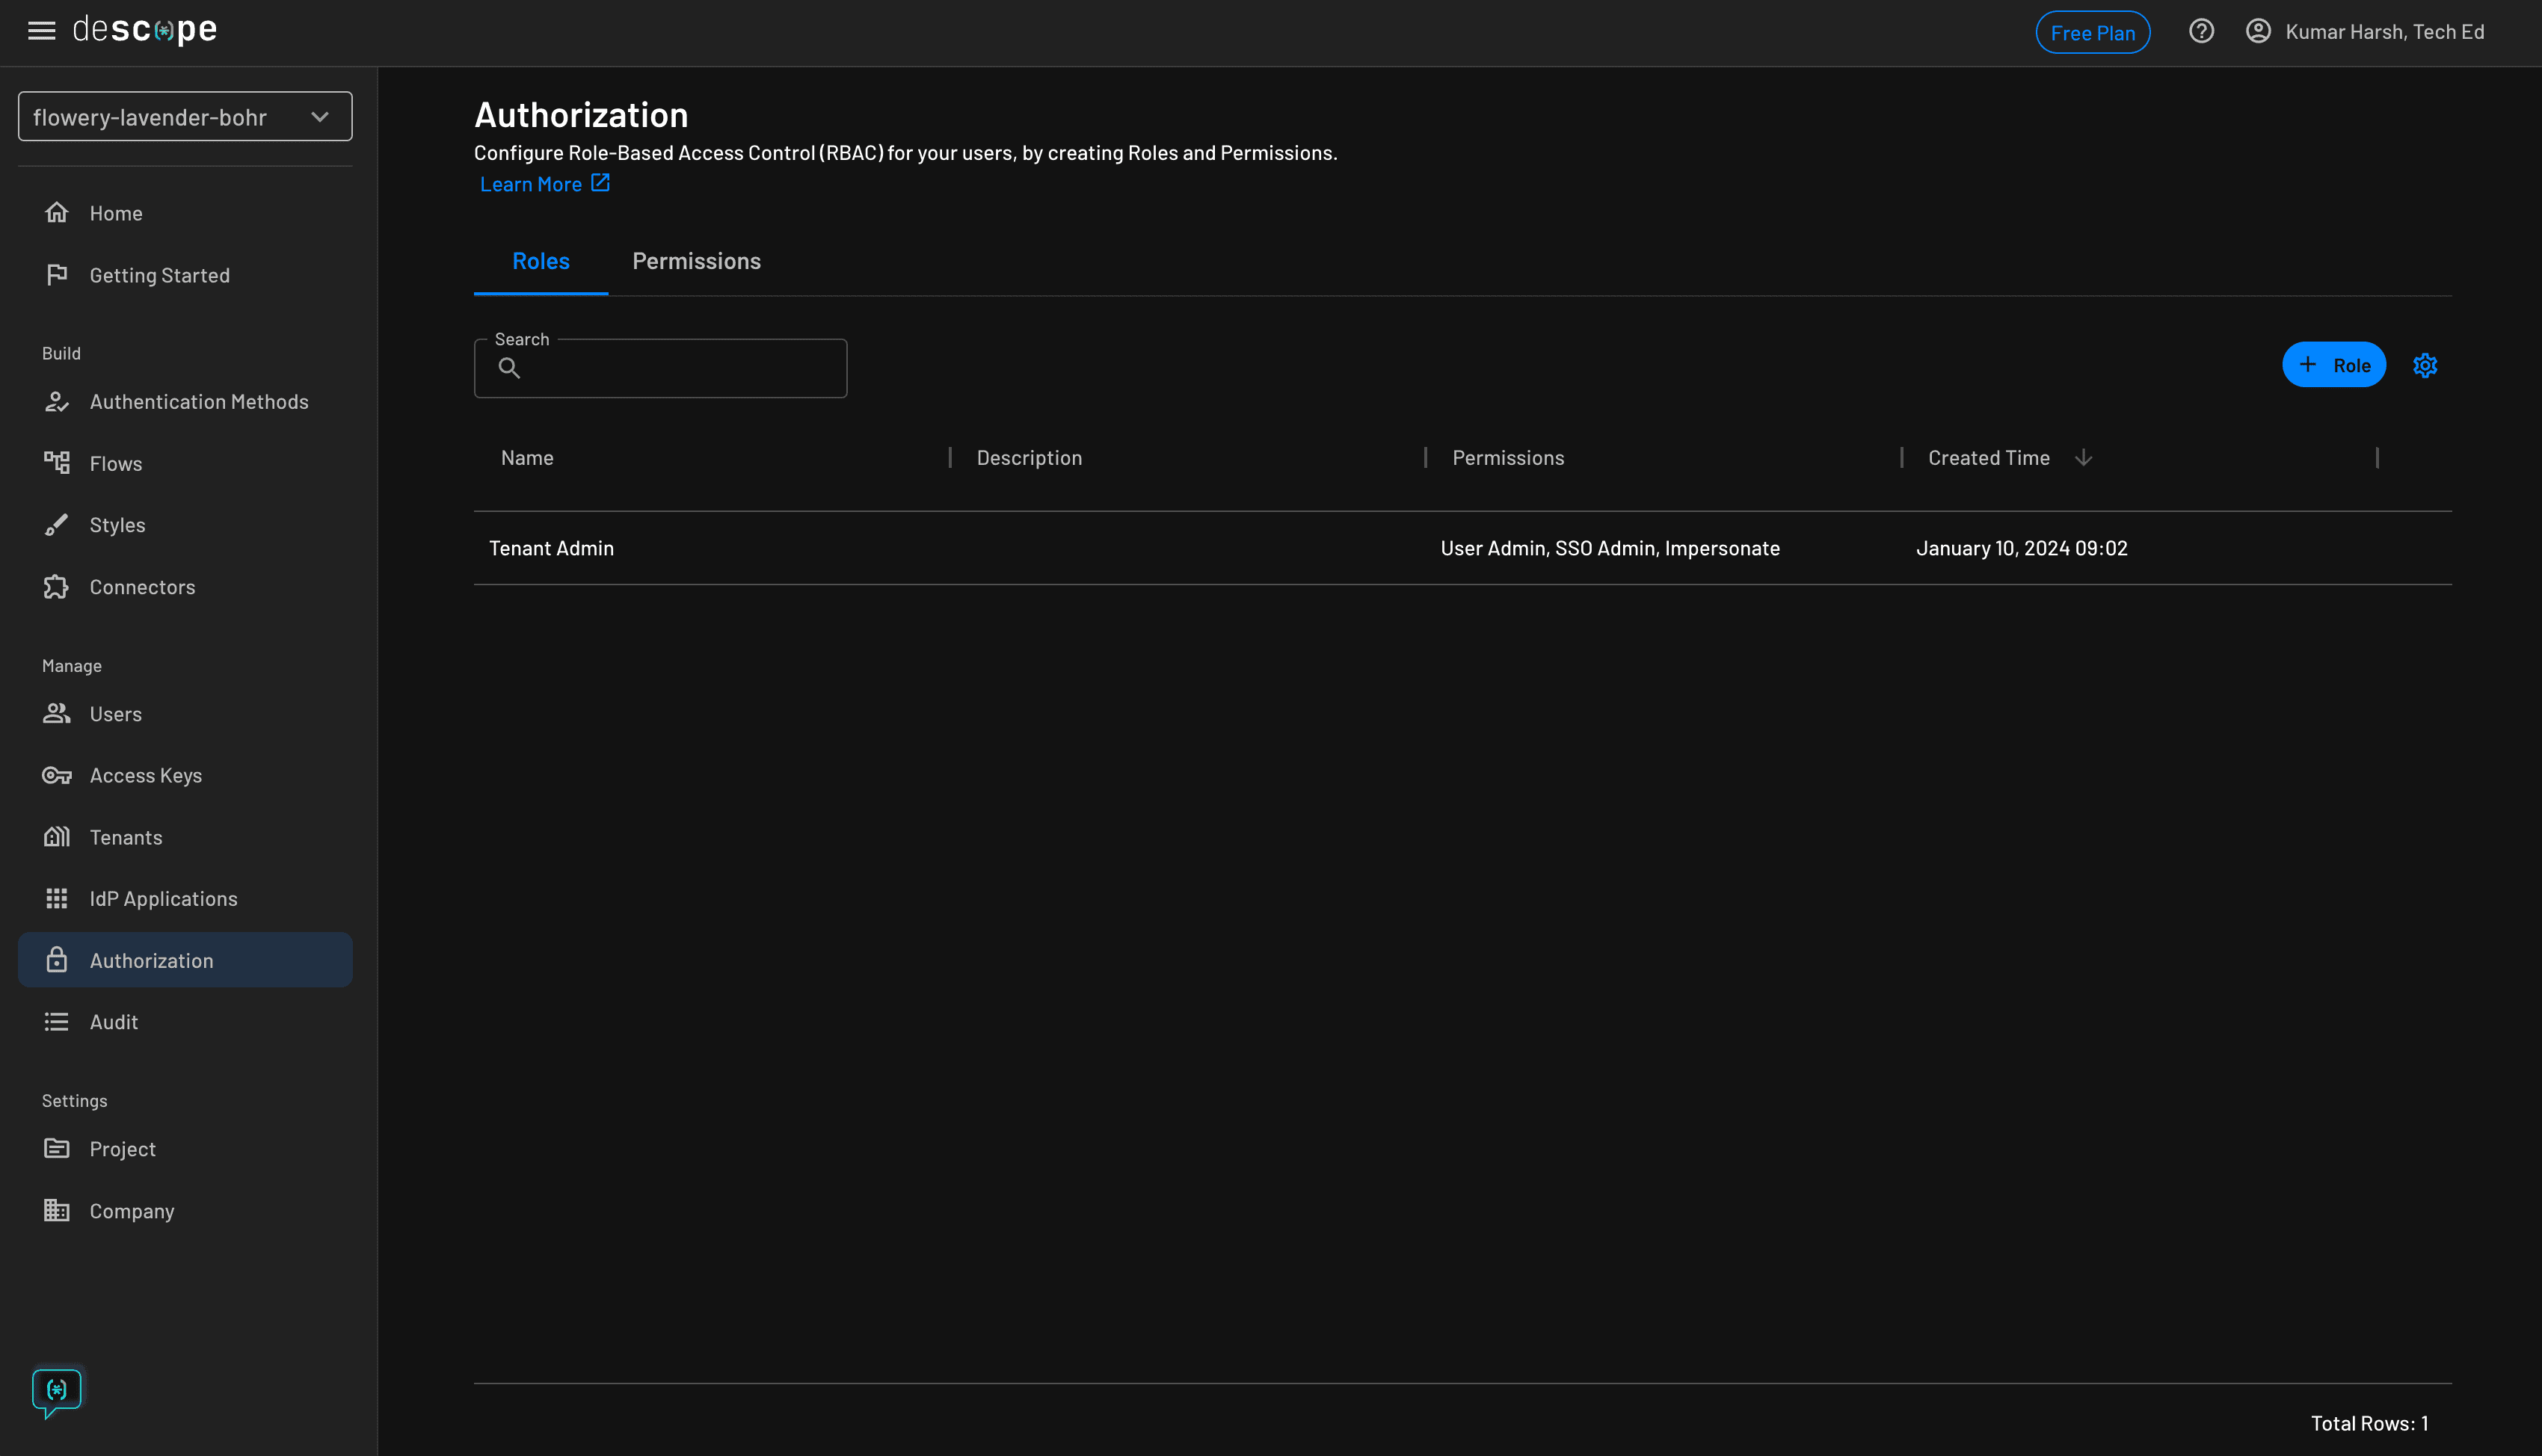
To manage roles in Descope, head over to the Authorization page in your Descope developer console. This is how the page would look like for a fresh Descope project:
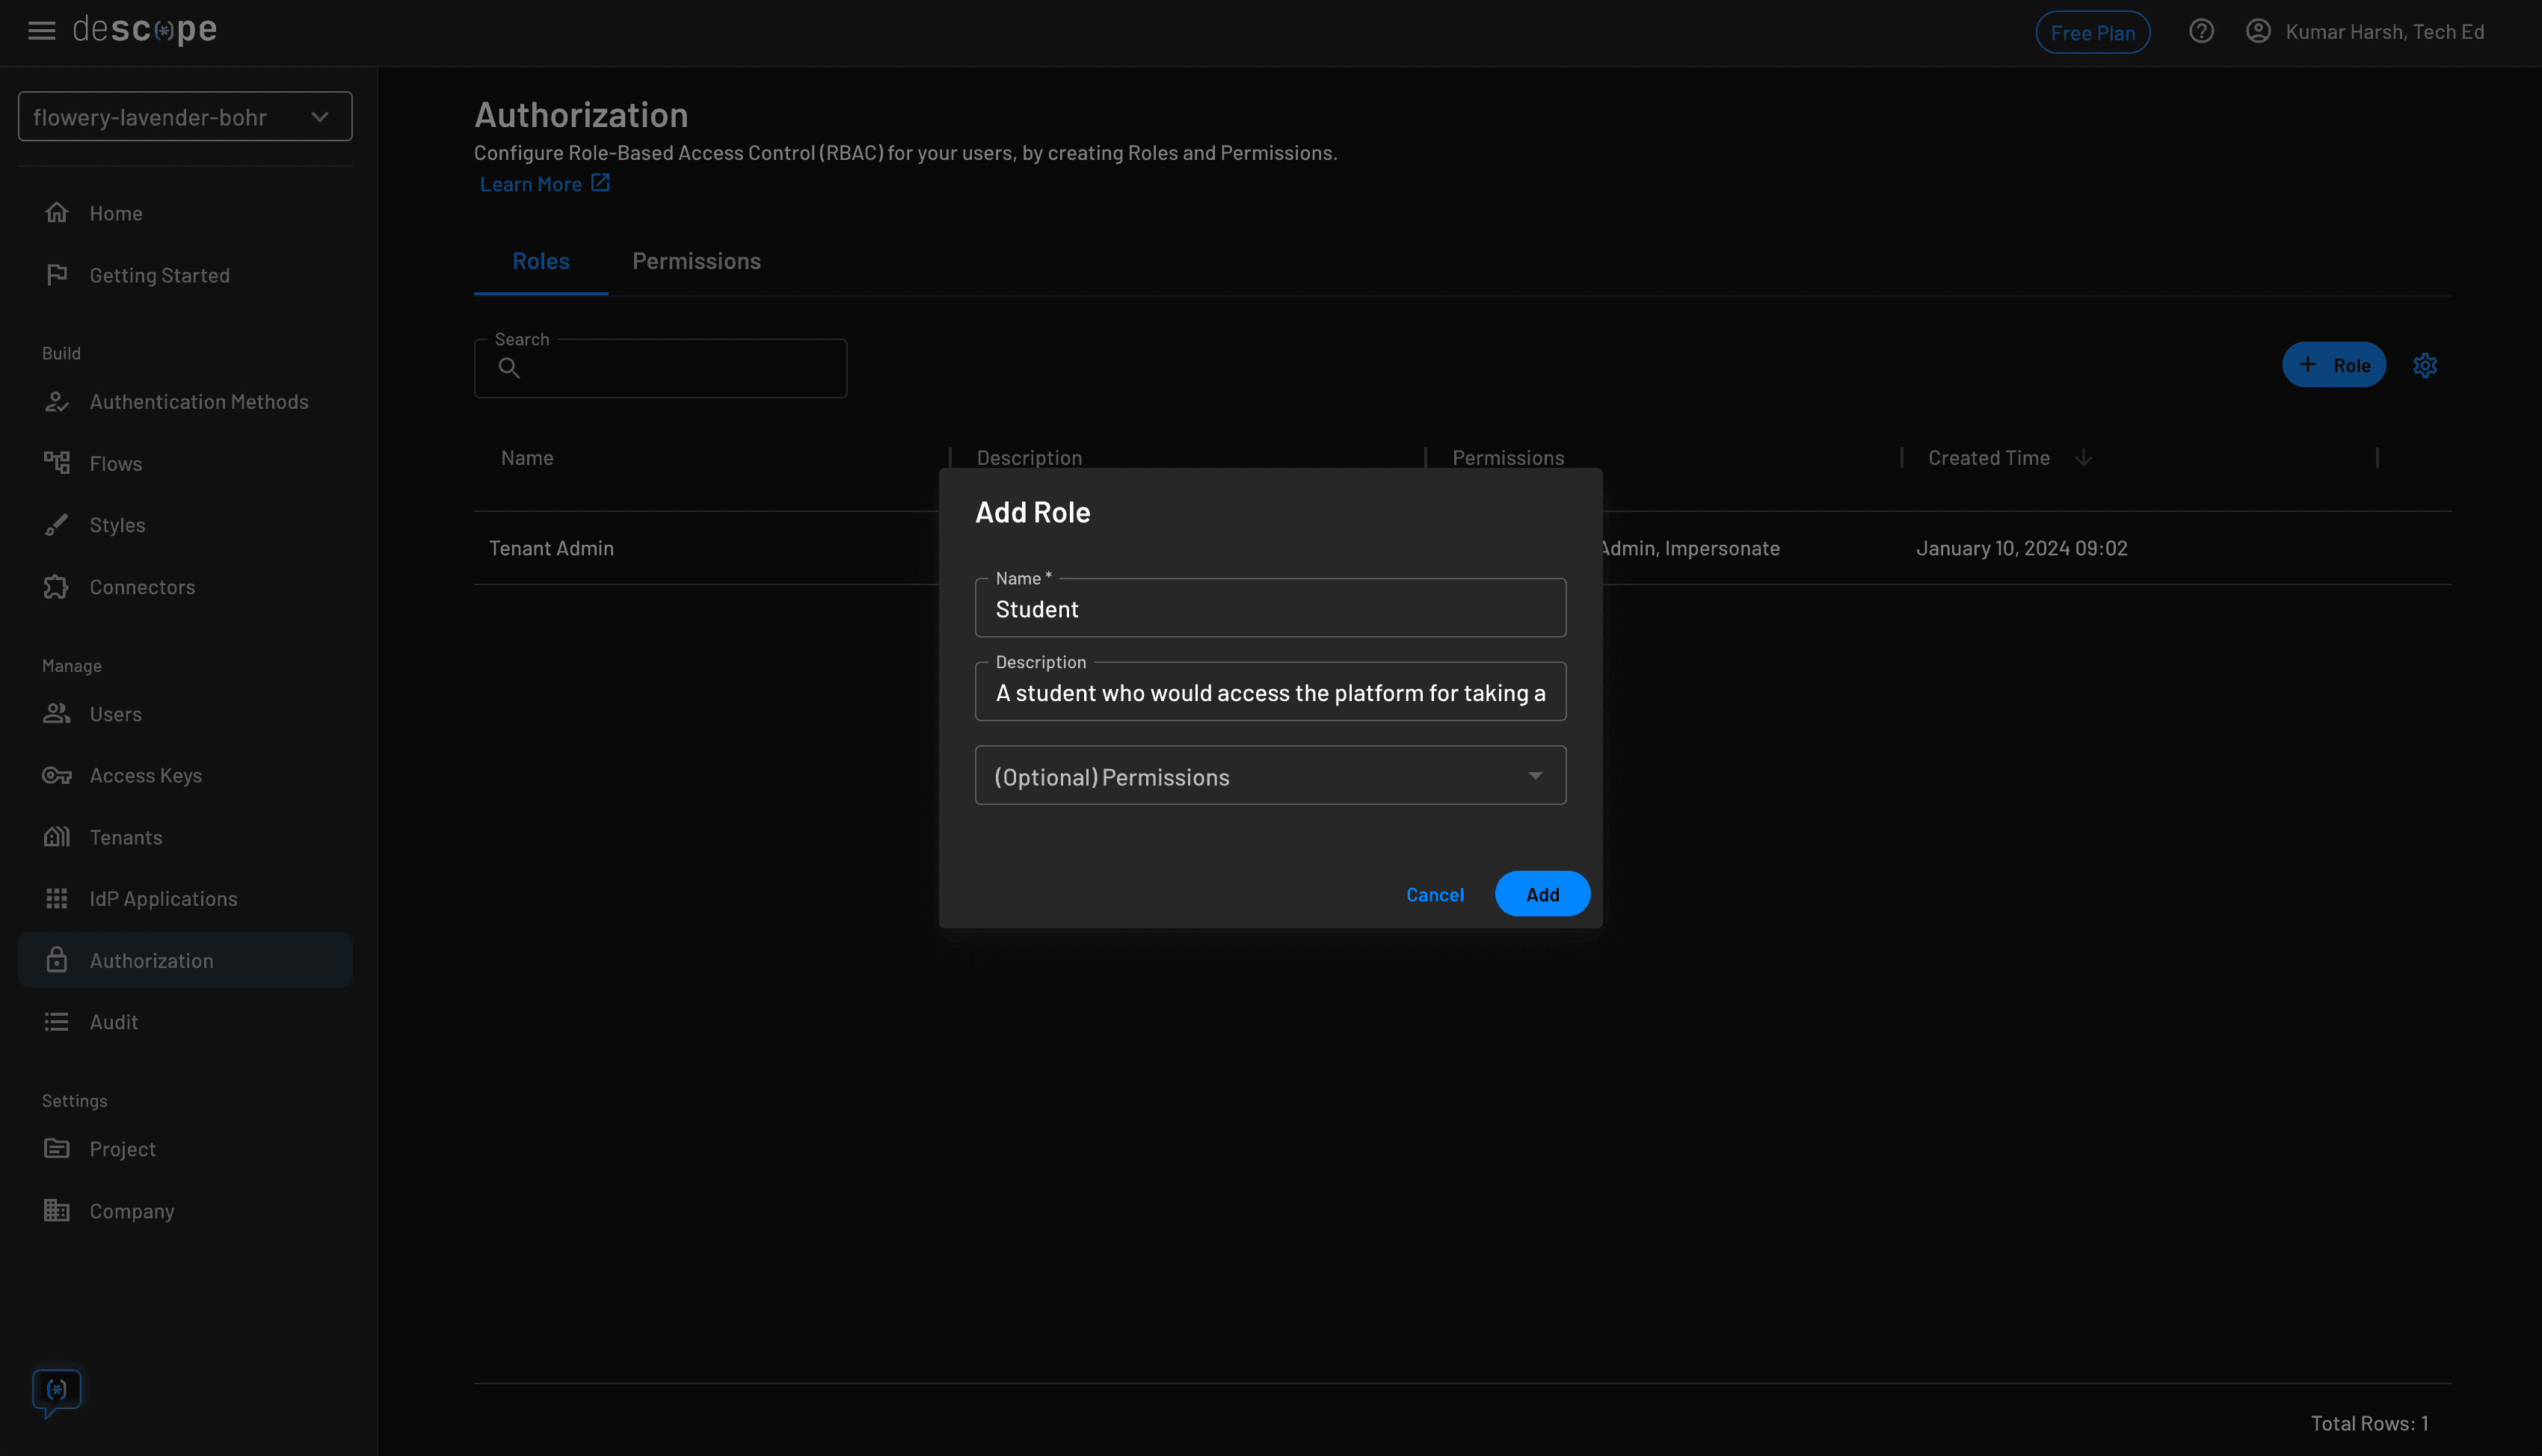
Click the blue + Role button at the top right to create a new role. Start by creating a new role named Student for students:
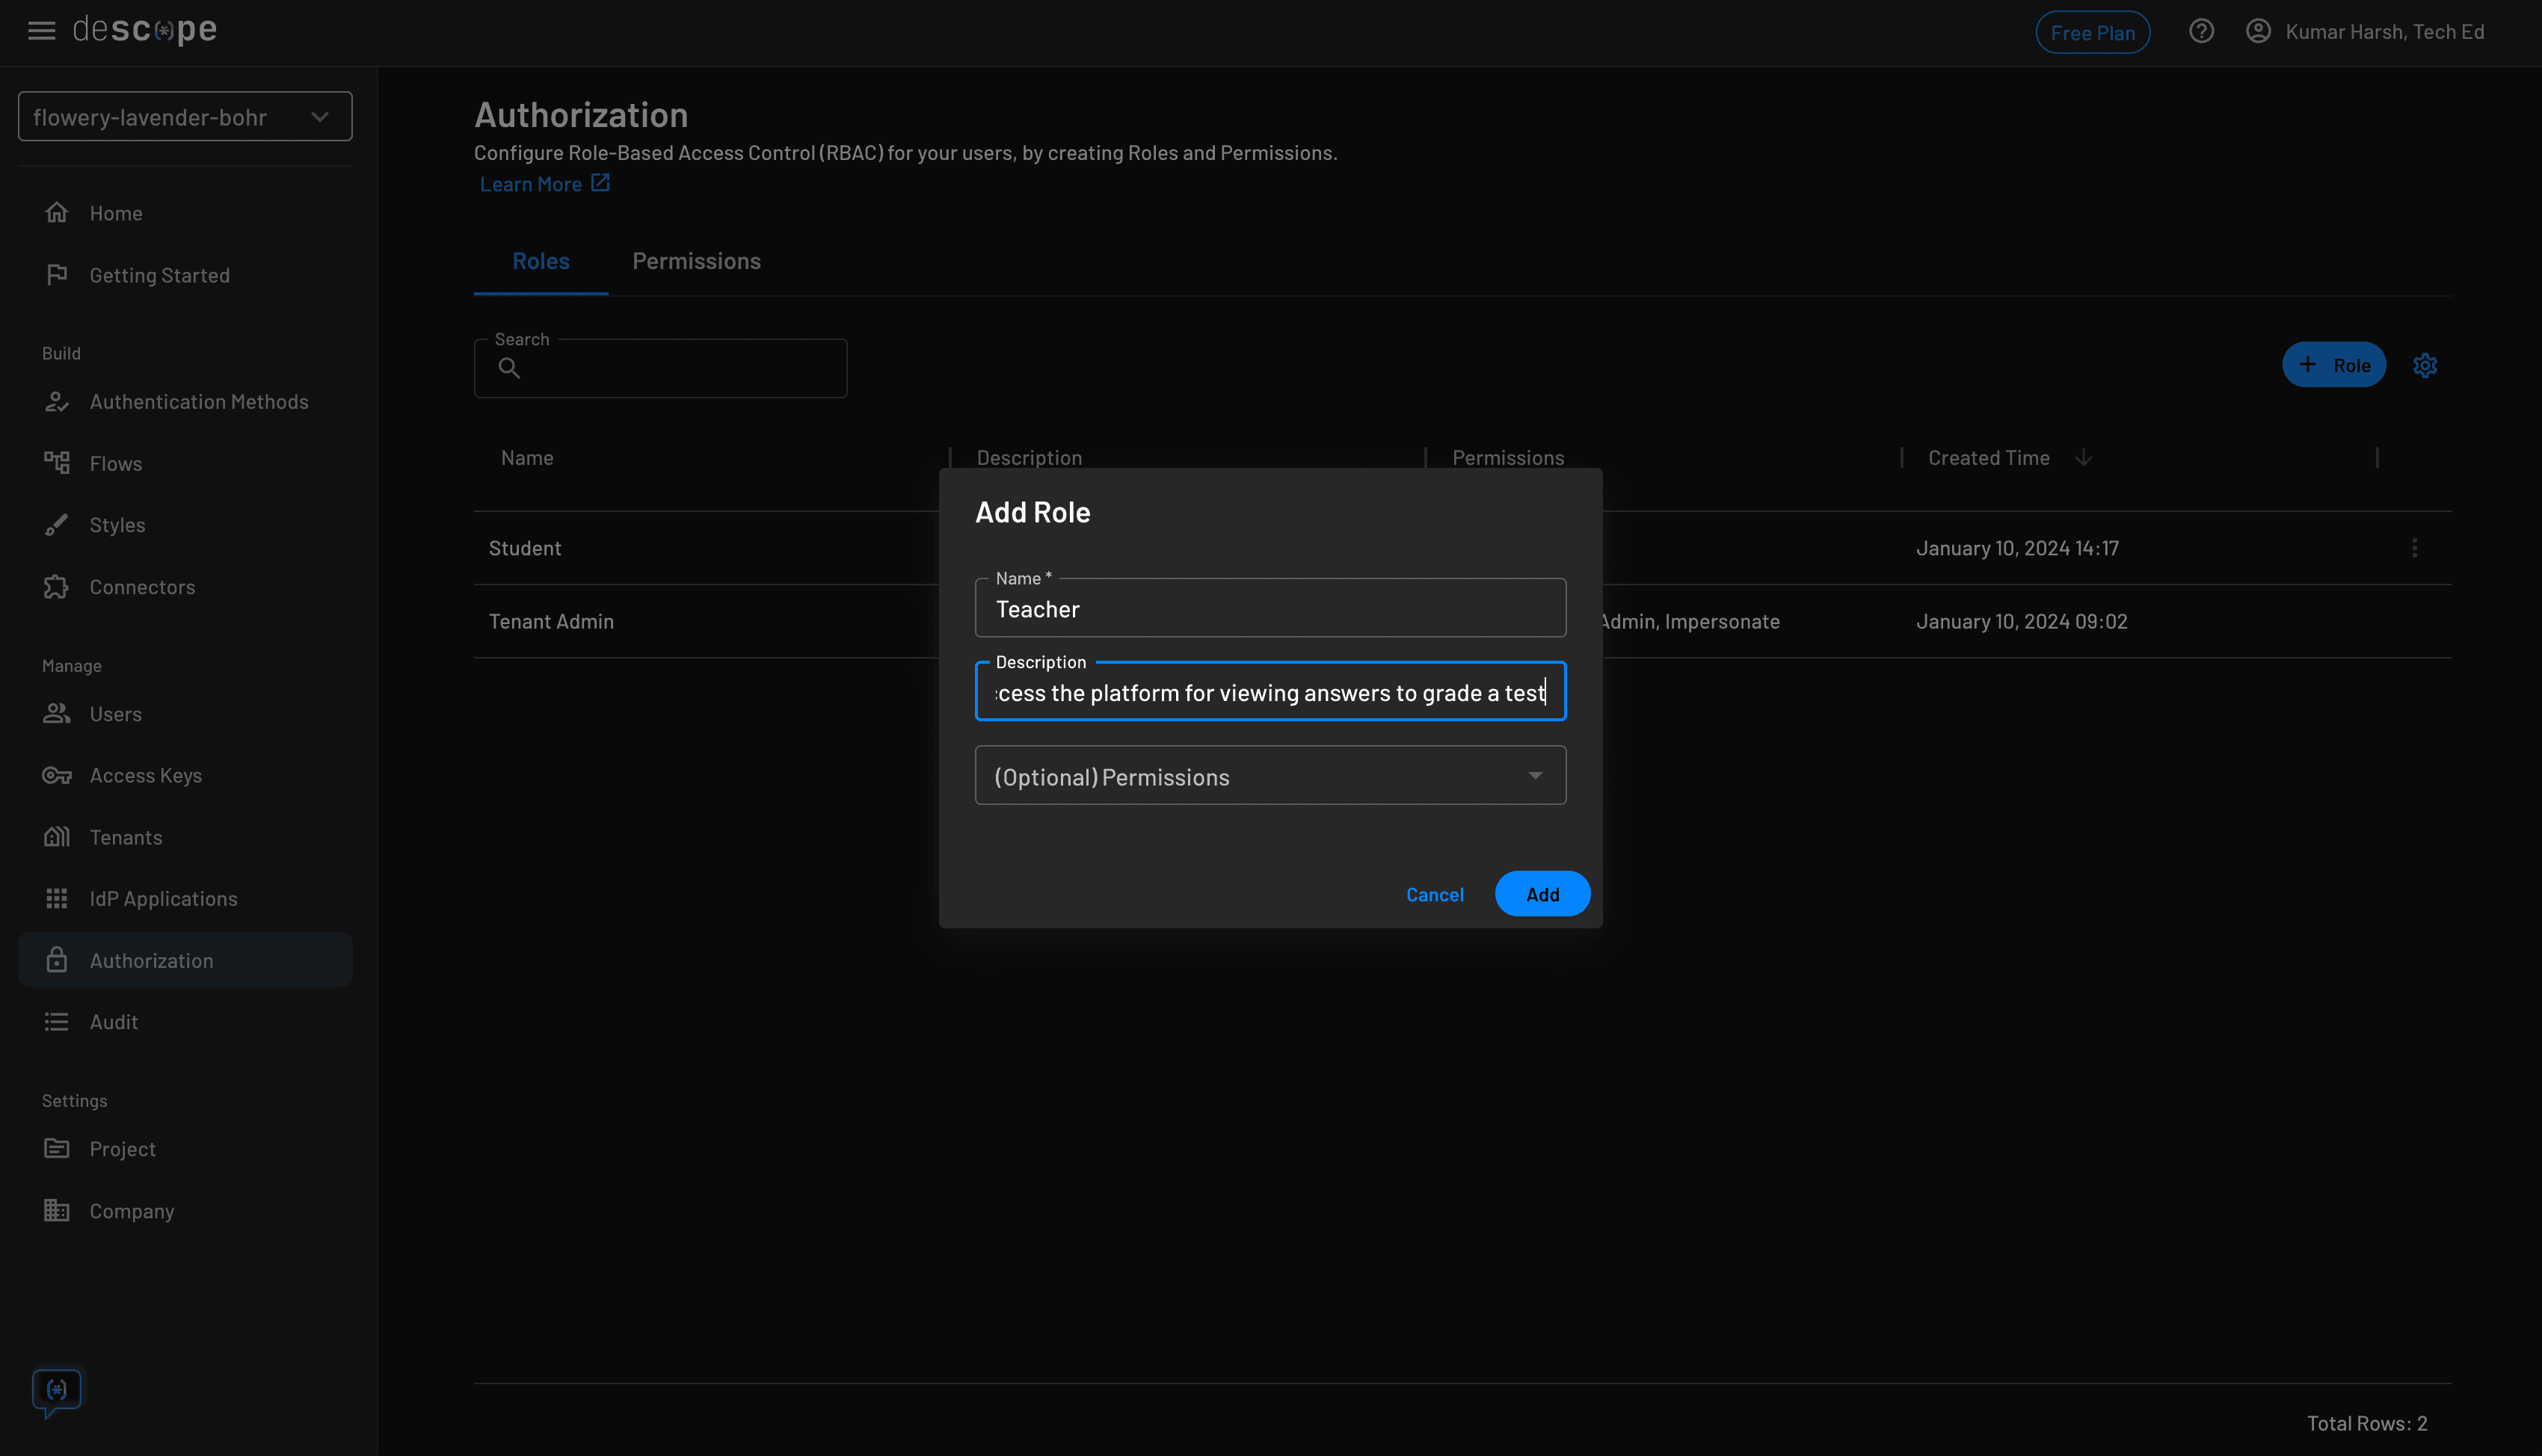
Next, create a new role named Teacher for teachers:
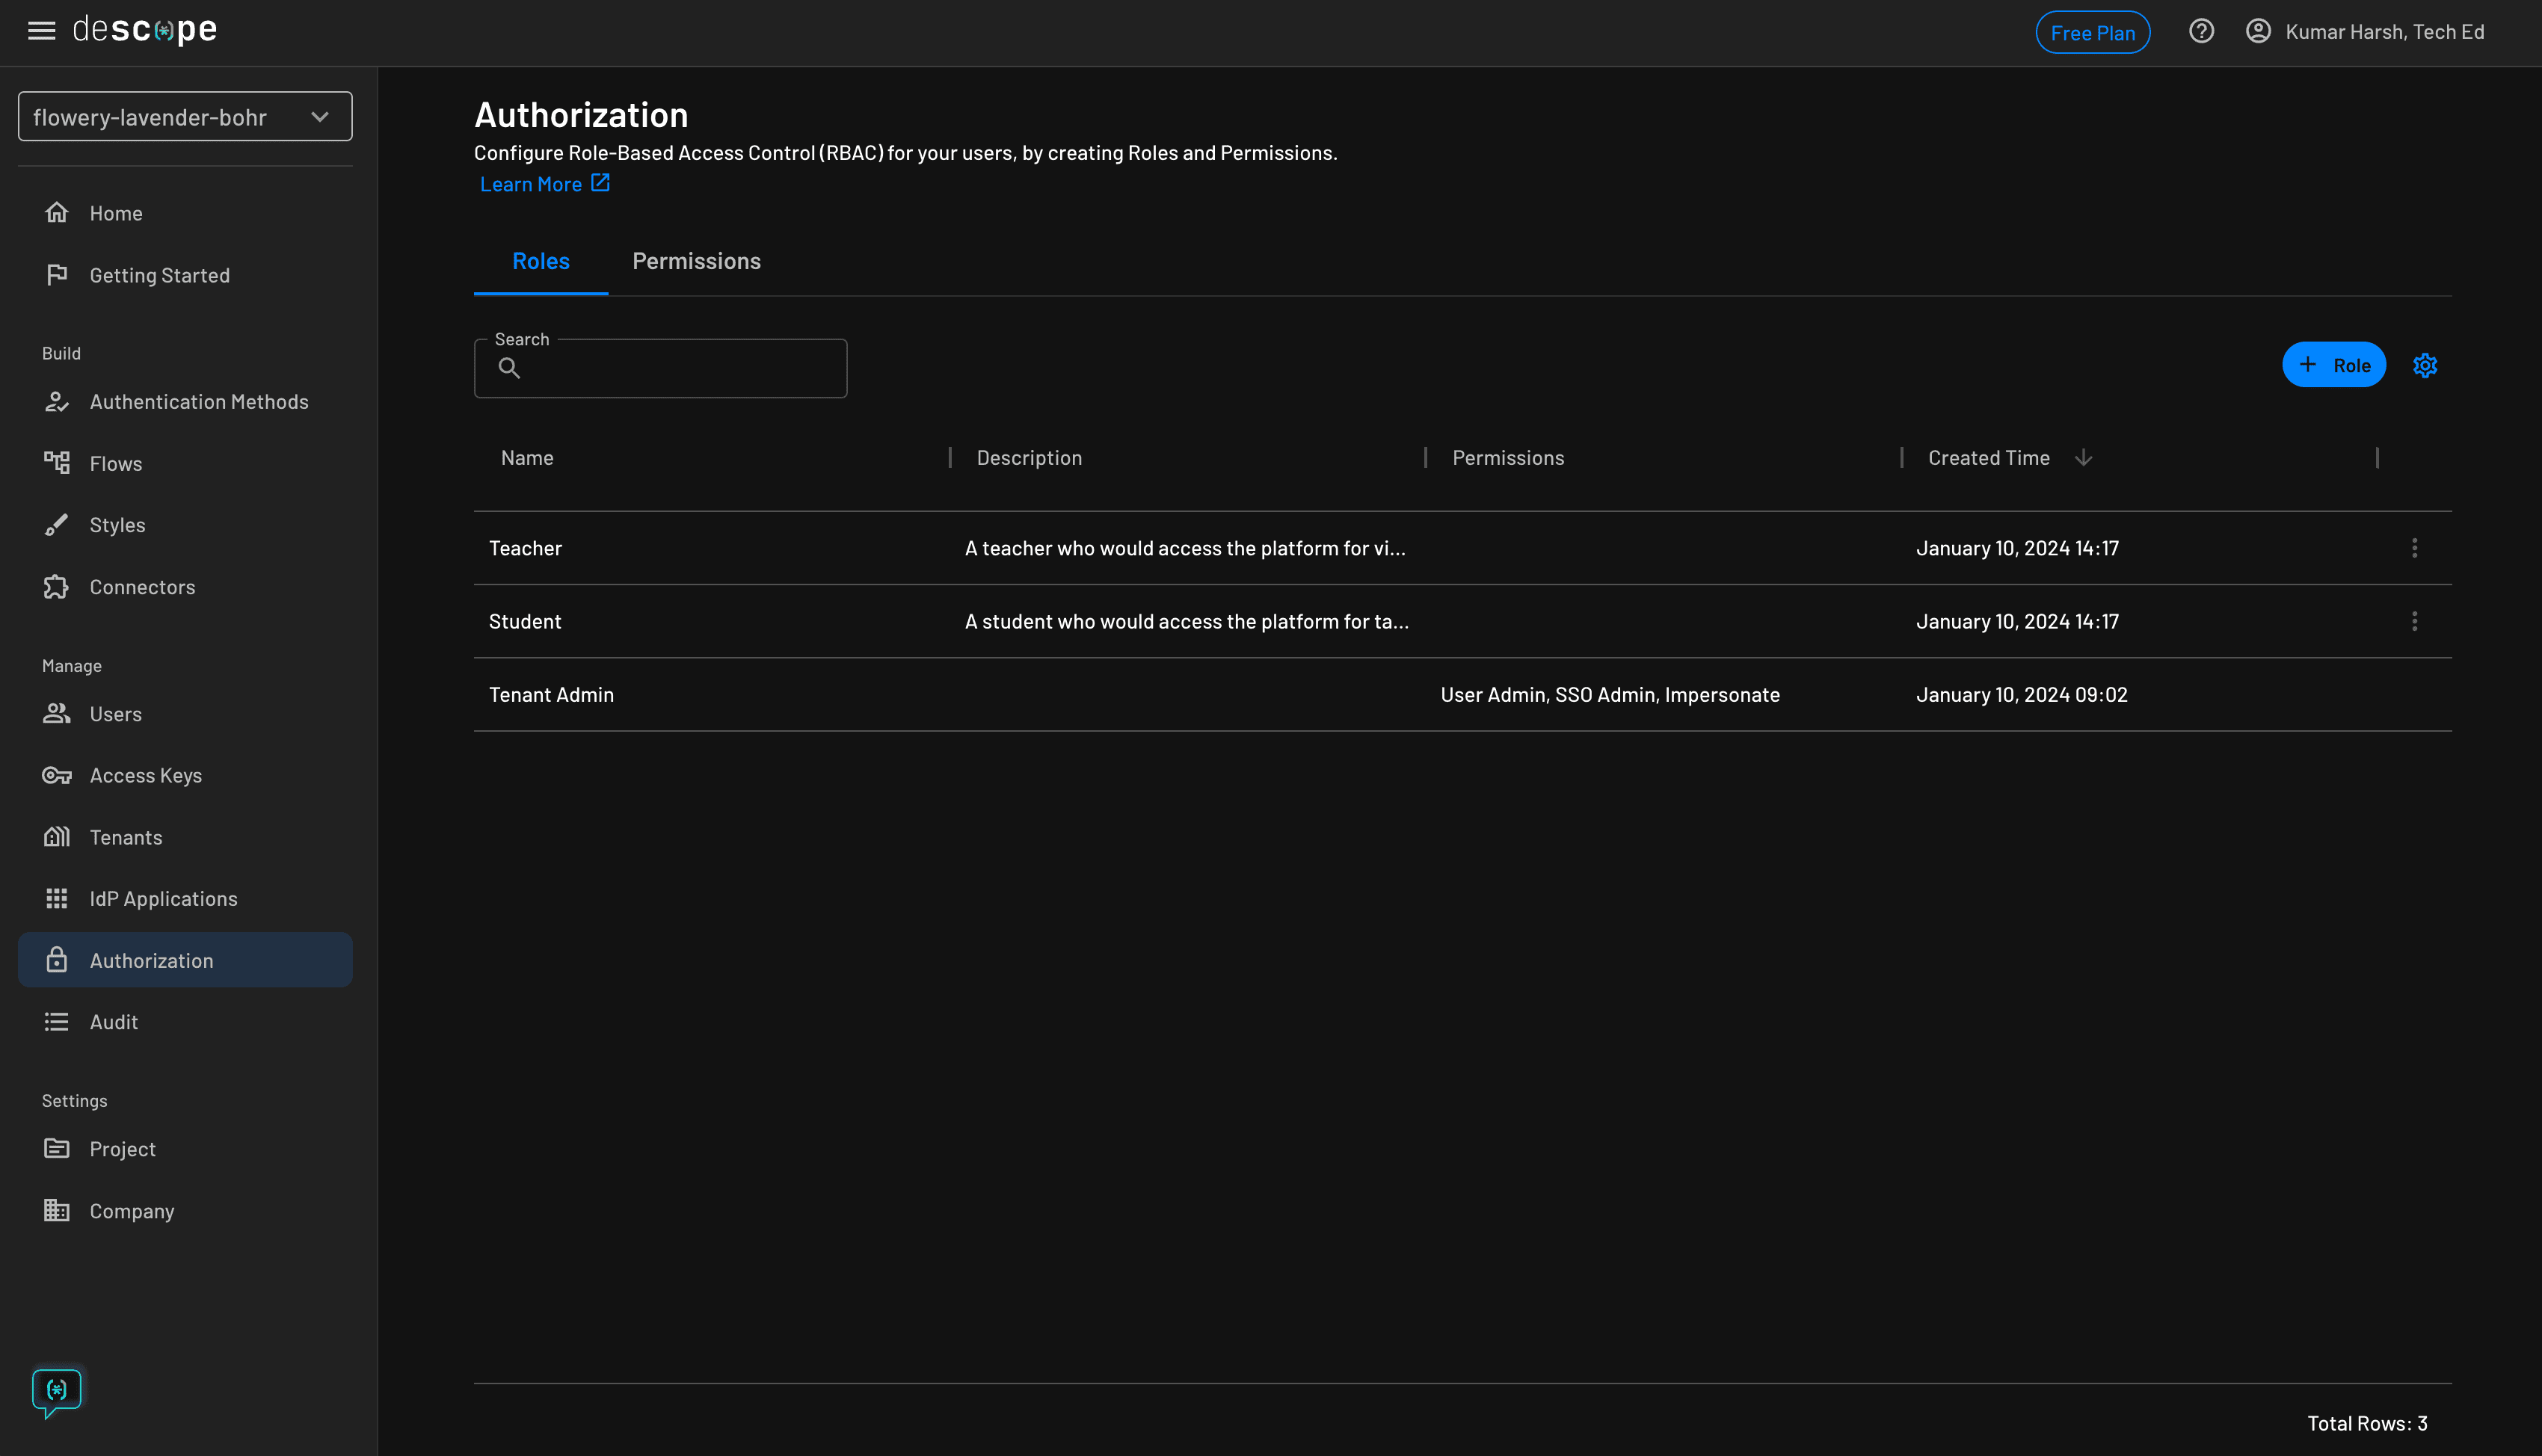
This is how the Authorization page should look when you've created the two roles:
You can now integrate these roles along with the flows you created earlier in your project. To do that, you need your project ID from the developer console.
Head over to the Project page in the Descope Console Settings. You'll find your project ID here:

You need this ID to initialize the SDK on both the frontend and the backend. Now, you can proceed to integrate Descope into your project.
Integrate Descope
Since you've already installed the Descope React package in your project, you only need to initialize it and write the necessary code for including the auth flows and making requests to the backend.
Finish up the frontend
To initialize the SDK, replace the code in your src/main.jsx file with the following code snippet:
import React from 'react'
import ReactDOM from 'react-dom/client'
import App from './App.jsx'
import './index.css'
import { AuthProvider } from '@descope/react-sdk';

ReactDOM.createRoot(document.getElementById('root')).render(
  <React.StrictMode>
    <AuthProvider projectId={import.meta.env.VITE_DESCOPE_PROJECT_ID}>
      <App />
    </AuthProvider>
  </React.StrictMode>,
)
This initializes the SDK and wraps your entire app in its context, allowing you to conveniently access the user object and all other methods throughout the application.
Next, replace the code in the src/App.jsx file with the following code snippet:
import { useCallback, useEffect, useState } from 'react'
import { useDescope, useSession, useUser } from '@descope/react-sdk'
import { Descope } from '@descope/react-sdk'
import { getSessionToken } from '@descope/react-sdk';

const App = () => {
  const { isAuthenticated, isSessionLoading } = useSession()
  const { isUserLoading } = useUser()

  return <div style={{
    margin: "5vw",
    width: "90vw",
    display: "flex",
    flexDirection: "column",
    alignItems: "flex-start",
    justifyContent: "center",
  }}>
    {!isAuthenticated && (
      <Descope
        flowId="sign-up-or-in"
        onSuccess={() => console.log('Logged in!')}
        onError={() => console.log('Could not log in!')}
      />
    )}

    {(isSessionLoading || isUserLoading) && <p>Loading...</p>}

    {!isUserLoading && isAuthenticated && (<LoggedIn />)}
  </div>;
}

const LoggedIn = () => {

  const [questions, setQuestions] = useState([])
  const [answers, setAnswers] = useState([])
  const [error, setError] = useState(null)

  const { logout } = useDescope()
  const { user } = useUser()

  const handleLogout = useCallback(() => {
    logout()
  }, [logout])

 const fetchQuestions = async () => {
   const sessionToken = getSessionToken();

   try {
       const response = await fetch('http://localhost:3000/get-questions', {
         headers: {
           Accept: 'application/json',
           Authorization: `Bearer ${sessionToken}`,
         },
       });

       if (!response.ok) {
         throw new Error(`HTTP error! Status: ${response.status}`);
       }

       const data = await response.json();

       if (!data.questions || !data.answers) {
         throw new Error('Questions or answers are undefined or null');
       }

       setQuestions(data.questions);
       setAnswers(data.answers);
     } catch (error) {
       console.error('Fetch error:', error);
       setError('Failed to fetch questions or answers');
     }
 }


  useEffect(() => {
    fetchQuestions()
  }, [])


const getRoleMessage = () => {
 return (user.roleNames && user.roleNames.length > 0)
   ? "For " + user.roleNames[0].toLowerCase() + "s"
   : "No roles assigned";
}

  return <>
    <h1>Unit Test</h1>
    <p>
     {getRoleMessage()}
      <br />
      {"Logged in user: " + user.email}
    </p>
    {error && <p>{error}</p>}
    {questions.map((elem, index) => {
      return <Question questionString={elem} answerString={answers && answers.length !== 0 ? answers[index] : ""} key={index} serialNumber={index + 1} />
    })}
    <button onClick={handleLogout}>Logout</button>
  </>
}

const Question = (props) => {
  return <div>
    <h2>{props.serialNumber + ". " + props.questionString}</h2>
    <p>{props.answerString}</p>
  </div>
}

export default App;
This sets up the frontend to render the Descope authentication flow first, and when logged in, it renders a questions list. The questions list component sends a request to the backend (which you'll build next) to retrieve the list of questions. It sends the session token of the currently signed-in user through which you can access their role on the backend.
Run the frontend with the following command:
npm run devSet up the backend
To set up the backend, create a new directory in the descope-qna directory with the name backend and create a new file named index.js in it. Next, paste the following code into the new file:
const express = require("express")
const postgres = require('postgres')
const cors = require('cors')
const dotenv = require('dotenv')

dotenv.config({path: "../.env"})

const DescopeClient = require('@descope/node-sdk').default

const descopeClient = DescopeClient({ projectId: process.env.VITE_DESCOPE_PROJECT_ID });

const sql = postgres({
    host: process.env.PGHOST,            // Postgres ip address[s] or domain name[s]
    port: process.env.PGPORT,                   // Postgres server port[s]
    database: process.env.PGDATABASE,             // Name of database to connect to
    username: process.env.PGUSER,             // Username of database user
    password: process.env.PGPASSWORD,             // Password of database user
ssl: {
       rejectUnauthorized: false // Adjust as needed for SSL settings
   }

})
The rejectUnauthorized: false setting is used in this code to allow the PostgreSQL client to connect to the database even if the SSL certificate presented by the server cannot be verified.

const app = express()

const authMiddleware = async (req, res, next) => {
    try {
        const authorizationHeader = req.headers.authorization || ""

        const sessionToken = authorizationHeader.split(" ")[1] || ""

        if (sessionToken === "") {
            res.status(400).json({ "message": "Unauthenticated user" })
            return
        }

        req.authInfo = await descopeClient.validateSession(sessionToken);

        next();
    } catch (e) {
        console.error(e);
        res.status(401).json({ error: "Unauthorized!" });
    }

}

app.use(cors())
app.use(authMiddleware)

app.get("/get-questions", async (req, res) => {
   const authInfo = req.authInfo;
   const isStudent = descopeClient.validateRoles(authInfo, ['Student']);
   const isTeacher = descopeClient.validateRoles(authInfo, ['Teacher']);


   let responseData = {};
   if (isTeacher || isStudent) {
       try {
               const questions = await sql`
               SELECT * FROM questions
           `;
           console.log('Fetched questions:', questions);

           responseData = {
               ...responseData,
               questions: questions.map(elem => elem.content)
           };

           if (isTeacher) {
               const answers = await sql`
                   SELECT * FROM answers
               `;
               console.log('Fetched answers:', answers);

               responseData = {
                   ...responseData,
                   answers: answers.map(elem => elem.content)
               };
           }
       } catch (error) {
           console.error('Database query error:', error);
           res.status(500).json({ error: 'Internal Server Error' });
           return;
       }
   }

   res.status(200).json(responseData);
});

try {
 app.listen(3000, () => {
   console.log("Server is running on port 3000");
 });
} catch (error) {
 console.error("Error starting the server:", error);
}
This code creates a new Express server, sets up dotenv to load access credentials for database and Descope, and configures CORS. Next, it defines an authentication middleware that checks incoming requests for the presence of a session token and extracts the logged in user's information based on the session token. Finally, the code sets up a /get-questions endpoint to allow clients to access questions and answers.
This endpoint first retrieves the authentication information of the user sending the GET request and validates their roles. Based on the user's role, the server then retrieves either just the questions or both the questions and answers from the PostgreSQL database and sends the data back to the user.
To run this, you need to install the necessary dependencies and set up a PostgreSQL database with the right tables and data.
To install the necessary dependencies, run the following command:
yarn add express @descope/node-sdk postgres cors dotenvNext, set up a PostgreSQL instance to use with the project. You can either go for a local PostgreSQL installation or opt for a freemium remote PostgreSQL service like Neon.
Should you choose to go with a managed Postgres service like neon.tech, you would need to start by creating a new account on neon.tech. Next, you need to provision a new Postgres instance by providing it with a name. Once it’s ready, you will see a similar screen to this:

Click the dropdown that says Connection string and choose Node.js. Click the .env tab, and you'll see the credentials that you need to set up in your .env file.
Create a new .env file in your project’s root and add the following values to it:
PGHOST=<DB-Host> # e.g 'ep-happy-flower-125243-pooler.us-west-2.aws.neon.tech'
PGPORT=<DB-port> # e.g. 5432
PGDATABASE=<DB-name> # e.g 'neondb'
PGUSER=<DB-User> # e.g 'sarah'
PGPASSWORD=<DB-Password> # 'passwordless'
VITE_DESCOPE_PROJECT_ID=<Descope-Project-Id>
Note: Make sure the .env is in the correct directory ( you can use nano .env to create it within the terminal you are using).
You can also verify that you are getting the correct values from the .env file with this following snippet inside your code:
console.log(
   "PGHOST:", process.env.PGHOST,
   "PGPORT:", process.env.PGPORT,
   "PGDATABASE:", process.env.PGDATABASE,
   "PGUSER:", process.env.PGUSER,
   "PGPASSWORD:", process.env.PGPASSWORD
);
Once done, you also need to connect to your PostgreSQL instance with a client, like psql or pgAdmin, to set up the questions and answers tables. The schema for the tables is simple: each has an identifier field named qaid and a varchar field content to store the textual content (i.e. either the question or the answer).
If you’re using psql, you will need to run the following command in a new terminal window to connect to the database:
psql -h <your-db-host> -p <your-db-port> -d <your-db-name> -U <your-db-username>You might be prompted to enter your password before you can access the database. Once you’ve established a connection, you can start creating the tables and adding some records to them by running the following commands:
CREATE TABLE public.questions (
    qaid integer NOT NULL,
    content character varying(512)
);

CREATE TABLE public.answers (
    qaid integer NOT NULL,
    content character varying(512)
);

ALTER TABLE public.questions OWNER TO postgres;

ALTER TABLE public.answers OWNER TO postgres;

ALTER TABLE ONLY public.questions
    ADD CONSTRAINT questions_pkey PRIMARY KEY (qaid);

ALTER TABLE ONLY public.answers
    ADD CONSTRAINT answers_pkey PRIMARY KEY (qaid);


COPY public.questions (qaid, content) FROM stdin;
0	Compared to their body weight, what animal is the strongest - Dung Beetle, Elephant, Ant, or Cow?
1	How many dots appear on a pair of dice?
2	Which is the only body part that is fully grown from birth?
3	What is acrophobia a fear of?
4	In what country was Elon Musk born?
5	Who performs the voice of Homer Simpson?
6	What country has the most islands?
7	In Australia what is commonly known as a Bottle-o?", "An off-license / Liquor Store
8	How many hearts does an octopus have?
9	What planet is closest to the sun?
\.

COPY public.answers (qaid, content) FROM stdin;
0	Dung Beetle
1	42
2	Eyes
3	Heights
4	South Africa
5	Dan Castellaneta
6	Sweden - 270,000
7	An off-license / Liquor Store
8	3
9	Mercury
\.
If you’re using neon, this SQL script will not work in that environment. You’ll need to replace the COPY statements with INSERT INTO and replace FROM stdin to values.
The SQL script will look something like this for neon:
 CREATE TABLE public.questions (
     qaid integer NOT NULL,
     content character varying(512)
 );

 CREATE TABLE public.answers (
     qaid integer NOT NULL,
    content character varying(512)
 );
 ALTER TABLE public.questions OWNER TO postgres;

 ALTER TABLE public.answers OWNER TO postgres;

 ALTER TABLE ONLY public.questions
     ADD CONSTRAINT questions_pkey PRIMARY KEY (qaid);

 ALTER TABLE ONLY public.answers
     ADD CONSTRAINT answers_pkey PRIMARY KEY (qaid);


INSERT INTO public.questions (qaid, content) values
 (0,'Compared to their body weight, what animal is the strongest - Dung Beetle, Elephant, Ant, or Cow?'),
(1,'How many dots appear on a pair of dice?'),
(2,	'Which is the only body part that is fully grown from birth?'),
(3,	'What is acrophobia a fear of?'),
(4,	'In what country was Elon Musk born?'),
(5,	'Who performs the voice of Homer Simpson?'),
(6,	'What country has the most islands?'),
(7,	'In Australia what is commonly known as a Bottle-o?'),
(8,	'How many hearts does an octopus have?'),
(9,	'What planet is closest to the sun?')
;

INSERT INTO public.answers (qaid, content) values
(0,	'Dung Beetle'),
(1,	'42'),
(2,	'Eyes'),
(3,	'Heights'),
(4, 'South Africa'),
(5,	'Dan Castellaneta'),
(6,	'Sweden - 270,000'),
(7,	'An off-license / Liquor Store'),
(8,	'3'),
(9,	'Mercury')
;
Once the data is loaded and you've configured the database credentials in the server script, you can enter the following command in a new terminal window to run the server:
node index.jsSet up a new role
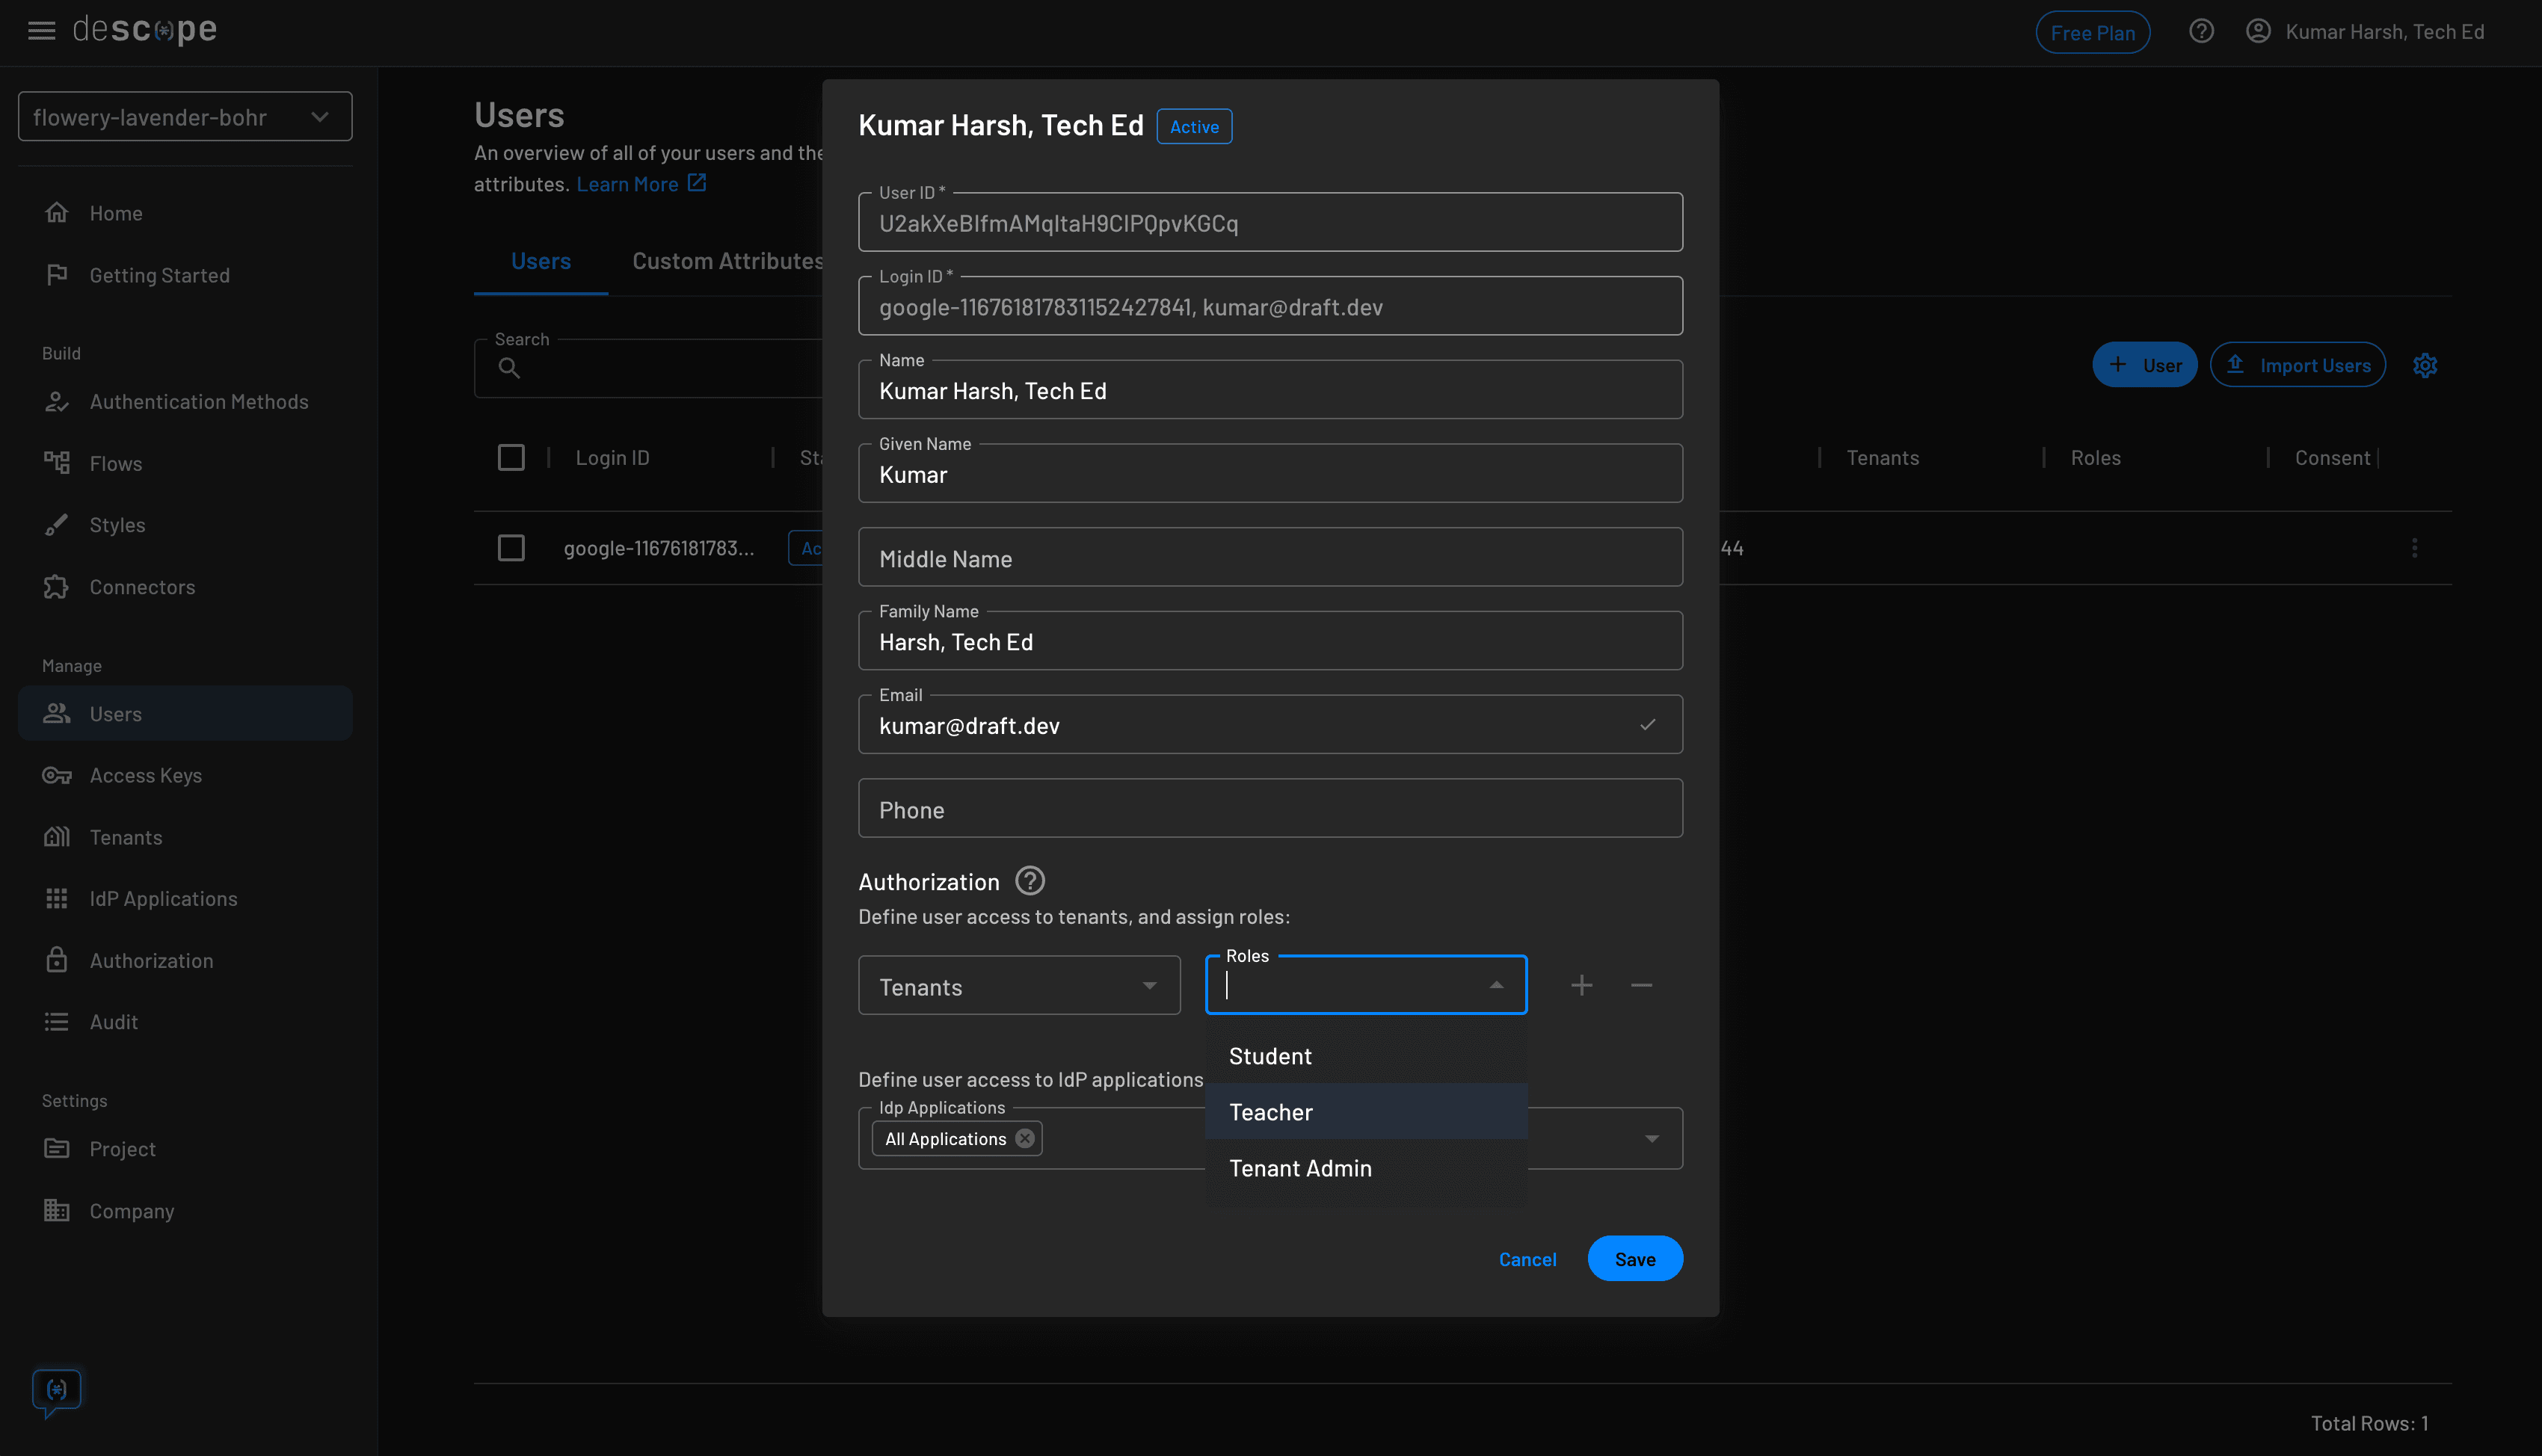
For the final step, in the Descope developer console, you need to assign a role to one of your users that validates them as either a teacher or a student. You can do that by heading over to the Users on the console and editing a user to add a role to their record:
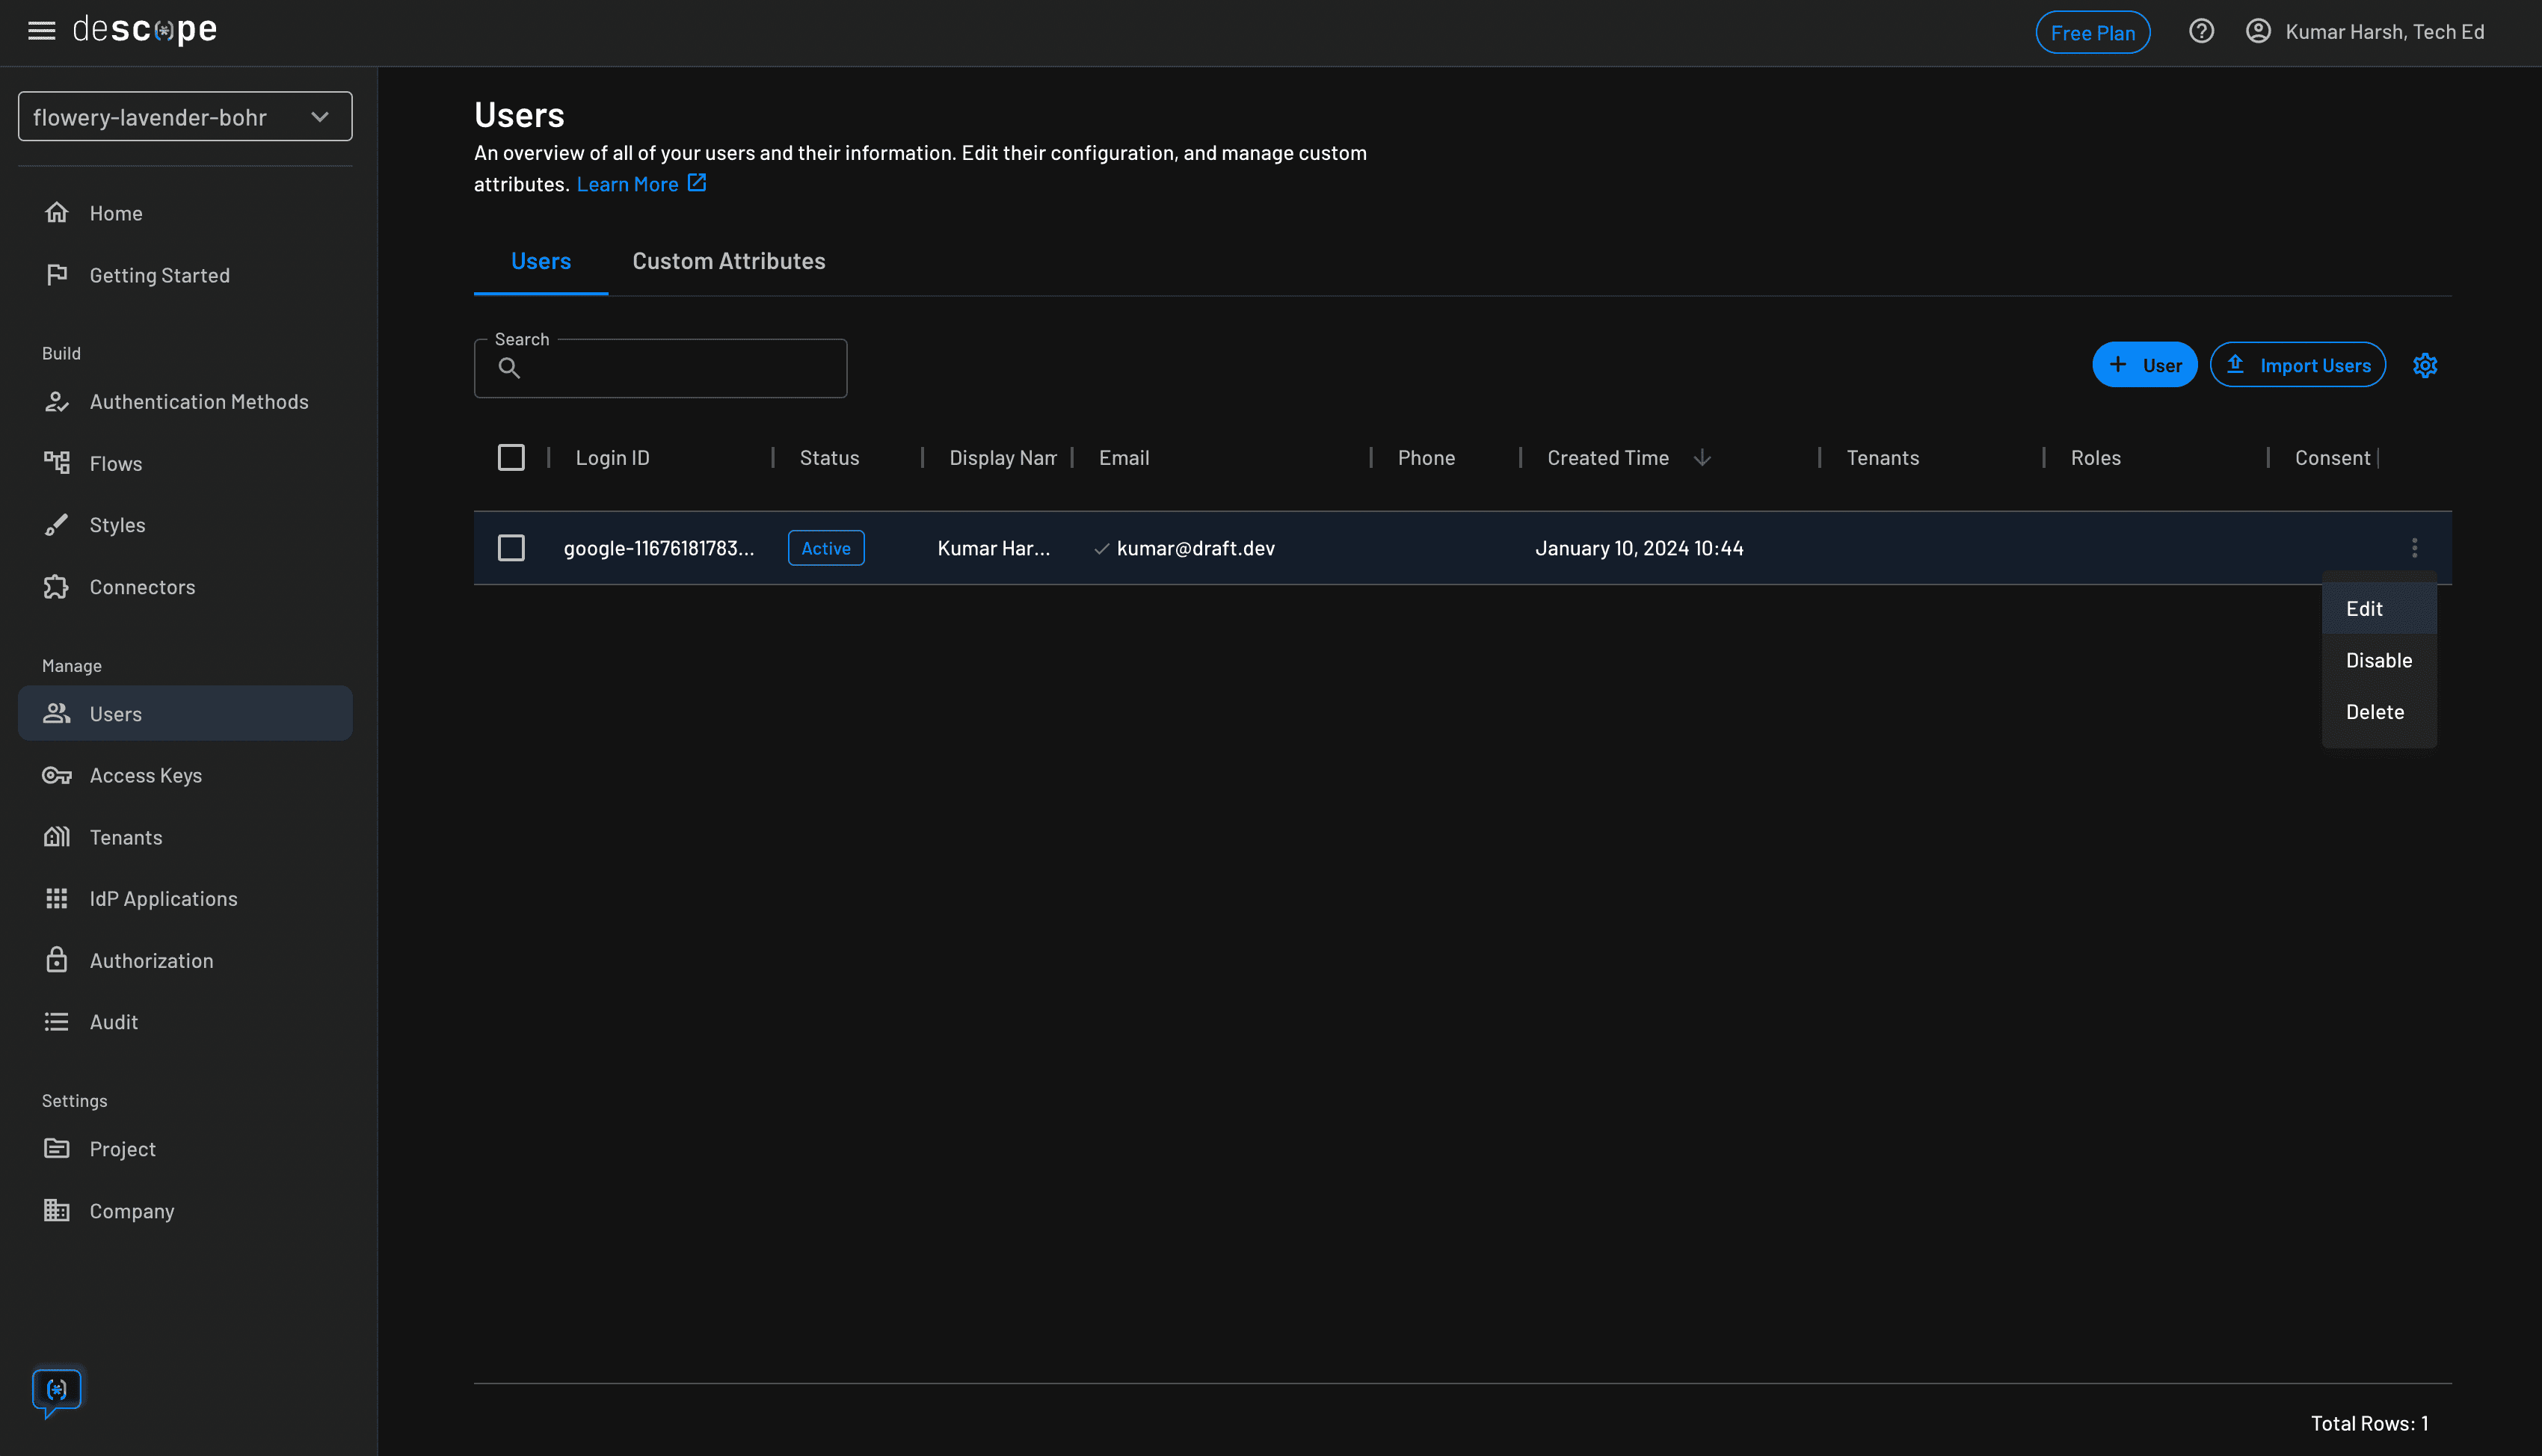
Please note that there needs to be an existing user for you to assign a role to them. If you don’t see a user in your table, have the user log in so that their record shows up and you can edit their record.
Assign either of the two roles to the user and click the Save button:
You are now ready to test the application!
Demonstrate the app
This is how the app works:
You'll notice that when the role of a user is changed from the Descope developer console, it is automatically reflected in the app as well, allowing them to access data based on their new role.
You can find the complete code for the application built in this tutorial in this GitHub repo.
Conclusion
In this tutorial, you learned how to set up a new Descope account and use one of their passwordless authentication flows to set up authentication in a React app. Descope simplifies setting up roles and using them on the server-side to control access to application data.
If you want to set up authentication and authorization in your React app, sign up for a Free Forever Descope account.