

Table of Contents
This tutorial was written by Subha Chanda, a freelance web developer. You can connect with him on LinkedIn and X to see more of his work!
Improving user experience has become a crucial part of web development today. Integrating long and boring forms for user registration can cause a bad experience, and many can be put off from trying your product when faced with such long forms. Moreover, using password-based authentication introduces additional cognitive load for users and poses security risks. That's why OAuth 2.0 is something to consider.
OAuth stands for "Open Authorization". It allows applications to interact with each other without requiring users to expose their login credentials. Instead, OAuth enables users to grant limited access to their private resources from one site (such as a Google account) to another site or application. We will use OAuth 2.0 and OAuth2 interchangeably in this tutorial.
This article explains how to connect OAuth 2.0 to a React application. First, you'll see how you can manually integrate OAuth 2.0 into your application, and second, you'll discover how using a provider like Descope makes it much simpler.
If you'd like to save time on OAuth2 implementation while also enhancing security and adding account merging capabilities across auth methods, go to the "Simplifying OAuth 2.0 with Descope" section of this tutorial.
But starting the tutorial, it's crucial that you understand what OAuth 2.0 is and how it works.
What is OAuth?
As mentioned, OAuth2 is a framework designed for granting access to resources but not for authenticating. OAuth2 has been the current standard since its adoption in 2012. It's widely utilized by full-stack developers for implementing features like social logins, allowing users to sign in to applications using their social network credentials. It simplifies the login process, enhances user experience, and leverages the robust authentication mechanisms of these social platforms.
The most common OAuth grant type for social logins is the Authorization Code grant flow, ideal for applications that securely store credentials and require server-side handling:
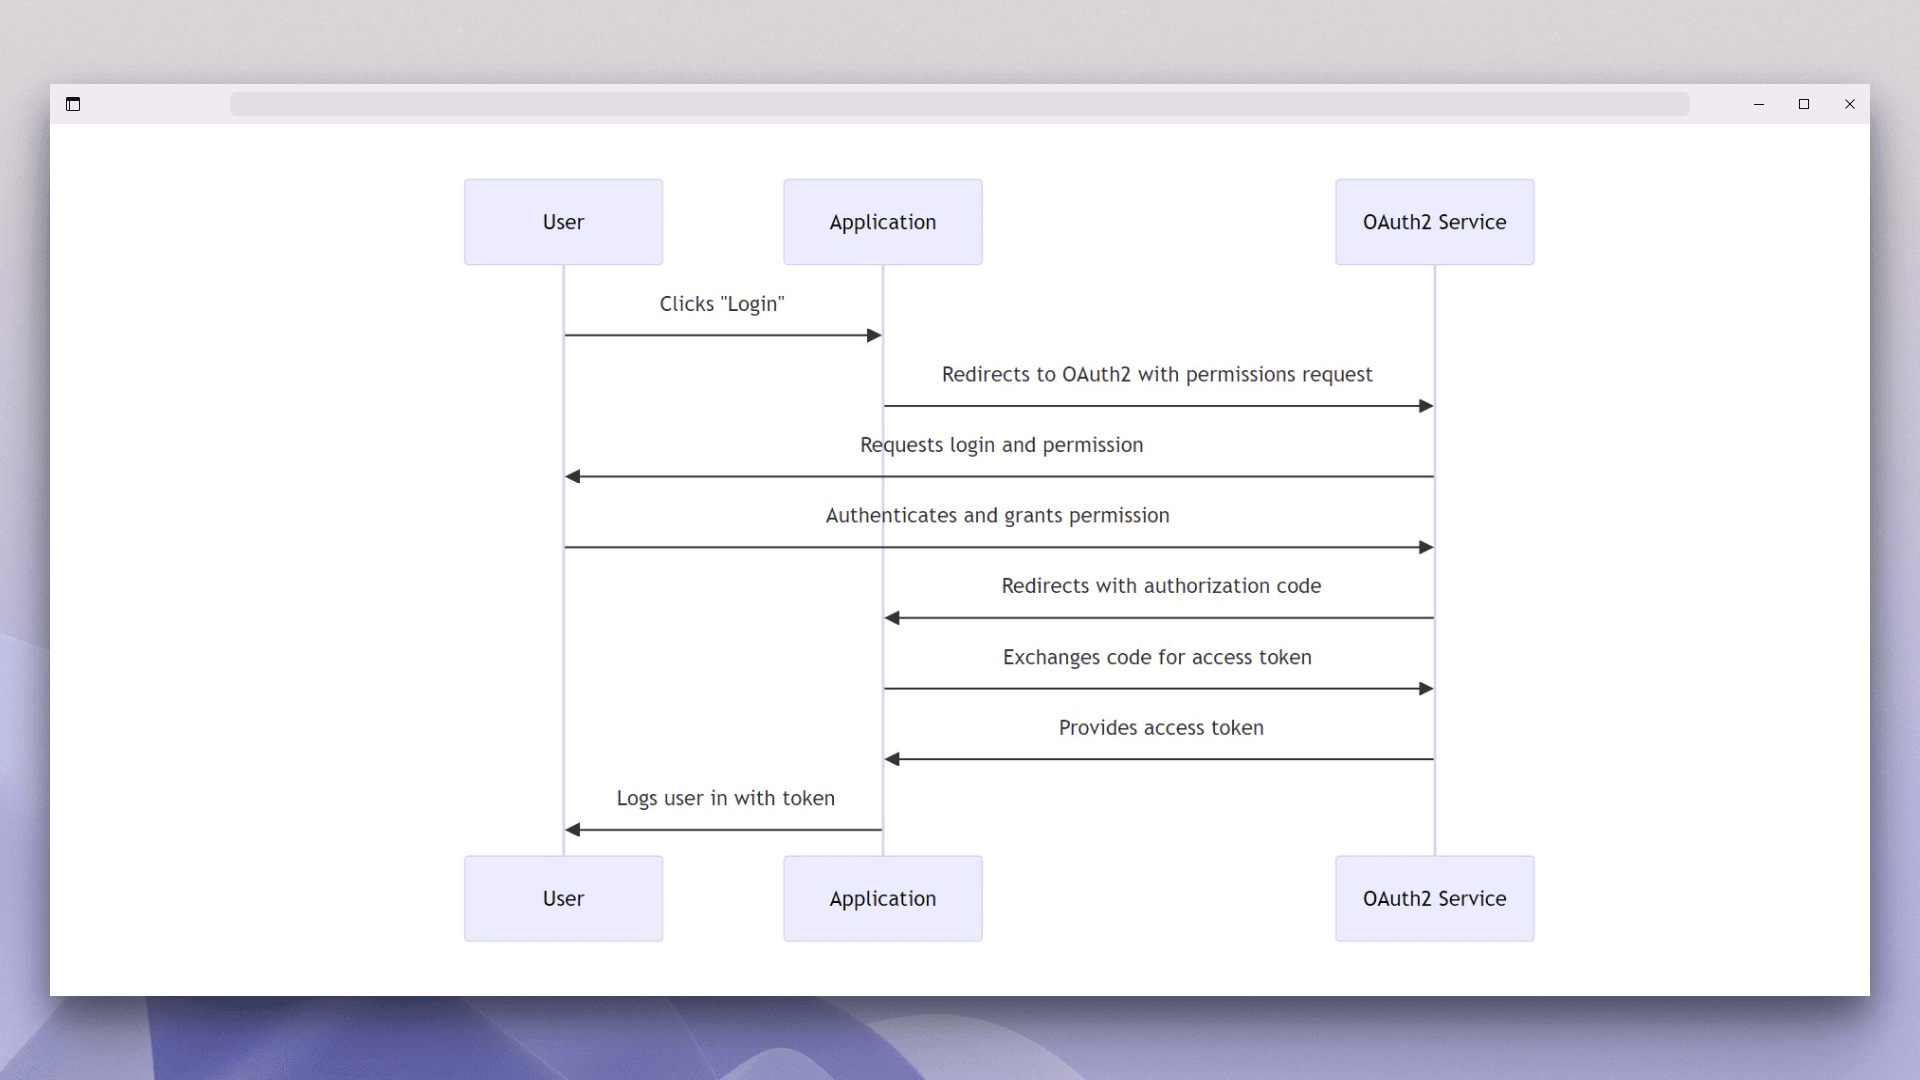
The preceding diagram explains the process of logging in using OAuth. The OAuth process involves several key steps:
It starts with the user's login request via a provider, which can include social networks, online services like Amazon or PayPal, and other platforms that support OAuth authorization
Then the application redirects to the social provider's OAuth service for permission.
Upon user authorization, the provider sends back an authorization code, which the application exchanges for an access token to access user details, completing the login process.
This flow ensures that user credentials are not exposed, which enhances security.
OAuth implementation with Google, GitHub, Facebook, or X has become mainstream as most applications use some or all the mentioned methods. Understanding and correctly implementing this standard is crucial for modern applications. It not only secures access to user data but also simplifies the authentication process, making it an essential skill for developers.
Adding OAuth 2.0 to a React app
This tutorial demonstrates two methods of implementing Google OAuth into a React application from scratch.
The first involves manually handling OAuth without an identity management service, including access tokens management.
The second method utilizes Descope to simplify OAuth integration.
Before starting, this tutorial assumes that you are familiar with JavaScript and React and that you have Node.js installed. Refer to this guide if Node.js is not installed.
Obtaining a Client ID from Google
You first need to obtain the OAuth client ID from the Google Cloud Console.
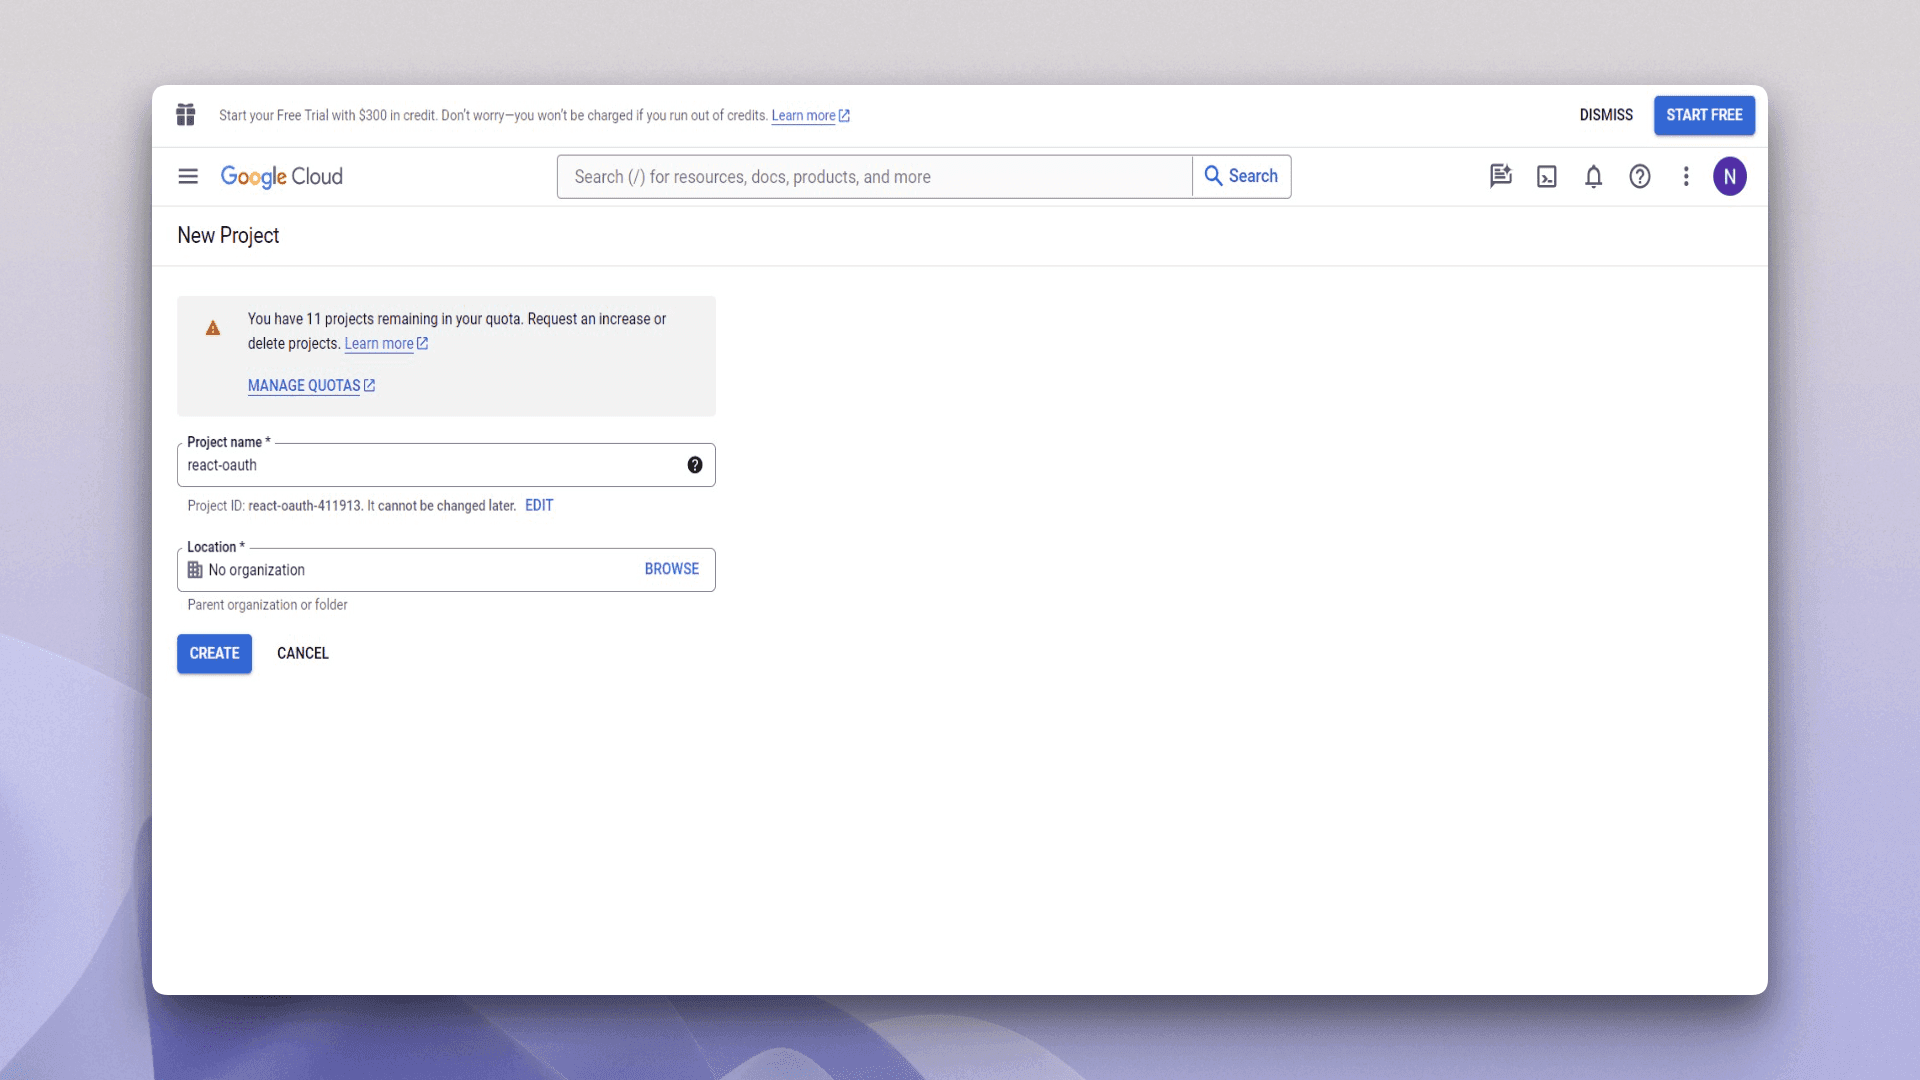
Log into the Google Cloud Console and create a new project. In the New Project menu, give your project a name and click Create:
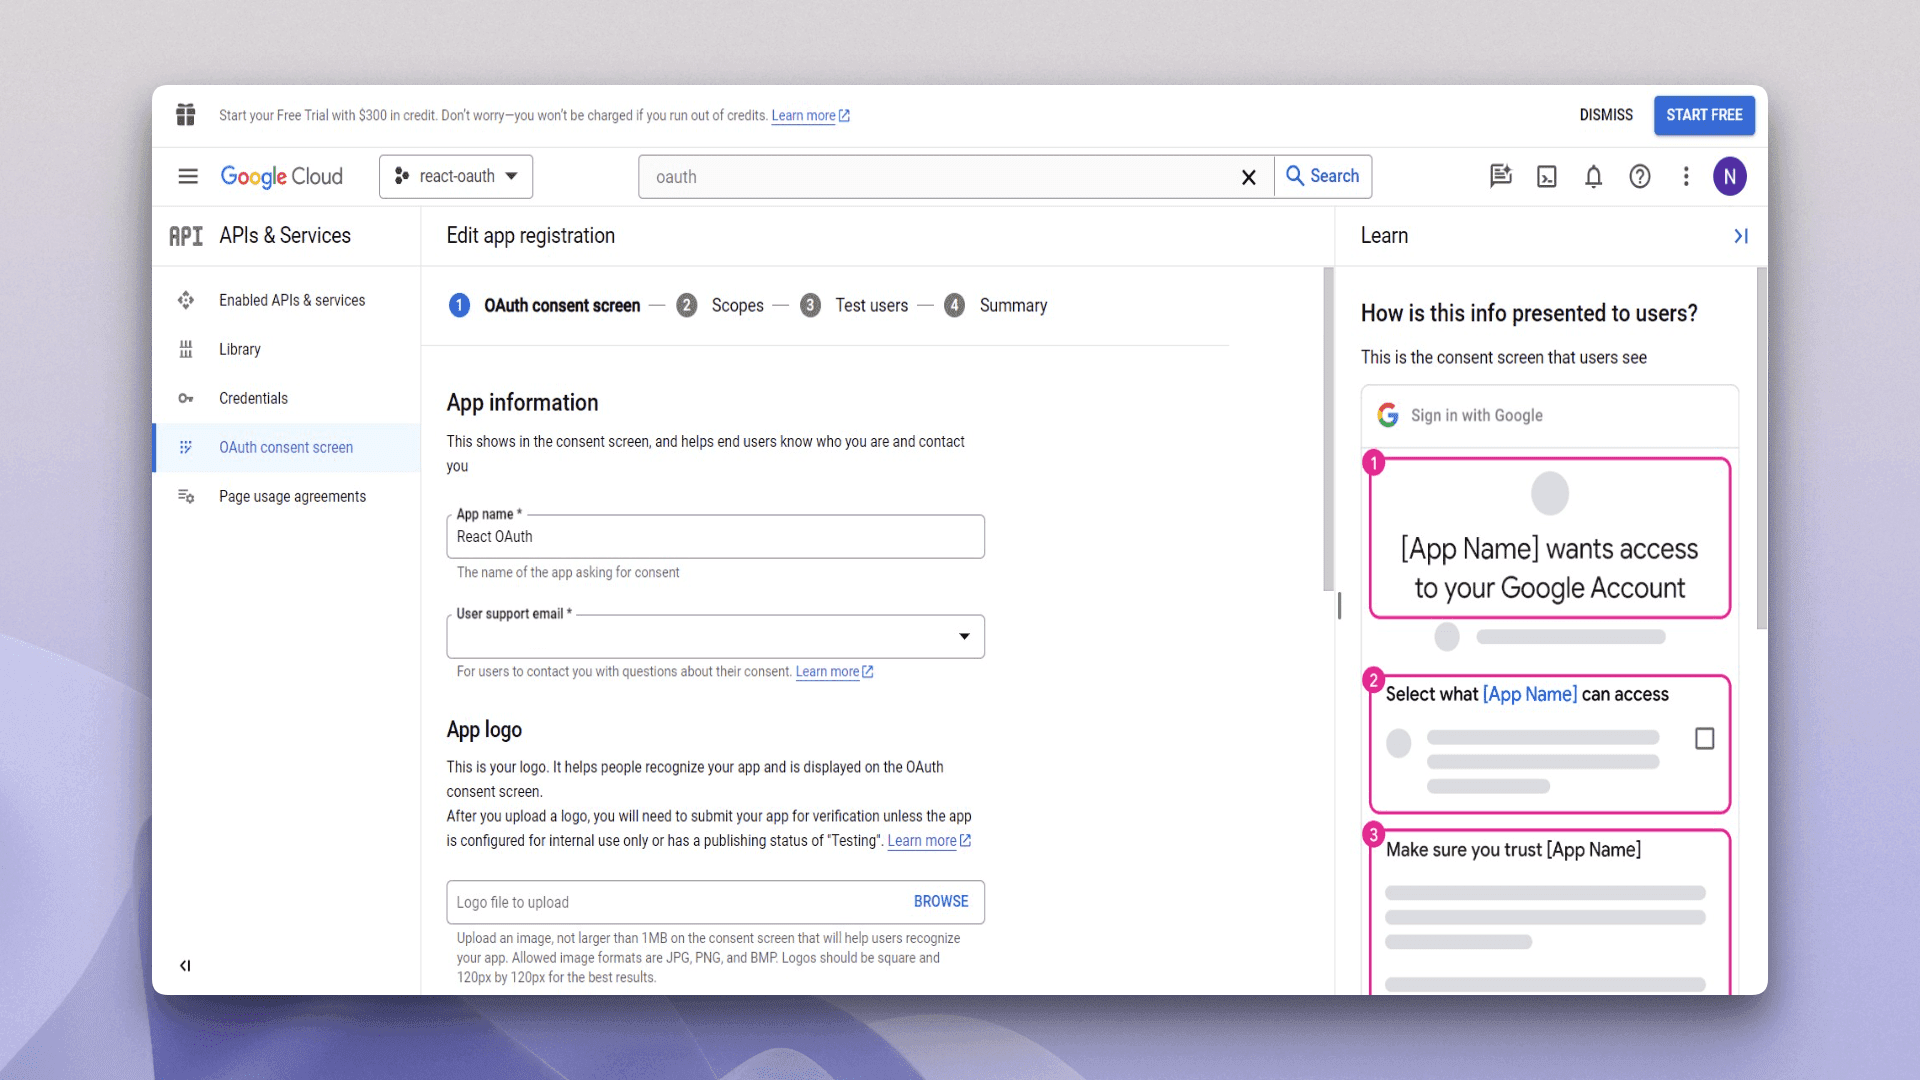
Google takes a couple of seconds to create the project. Once created, select the project and search "oauth" from the search bar. Click OAuth consent screen.
The OAuth consent screen appears when your app requests permissions for various scopes of access associated with a Google account. This screen offers users a summary of your project, its policies, and the specific access scopes for which your application is seeking authorization.
When setting up an OAuth consent screen, you must decide between an Internal or an External user type. Internal restricts access to your application so that only members of your organization (who are in the same Google Workspace) can access it, making this type suitable for internal tools or social SSO use cases. However, External allows users outside your organization to authenticate, offering broader access and making it relevant for customer authentication use cases.
Choosing External for a tutorial is practical because it ensures anyone can follow along, regardless of their Workspace access. This also demonstrates how to set up a more production-ready, universally accessible application. Nevertheless, you can choose any option depending on your preferences:

The next screen asks for relevant information regarding your application; for example, the application name, user support email, logo, and application domain. Fill in the required fields at this moment and click Save and Continue:
The next page asks for the required scopes. As no specific scope is required for this application, you can simply click the Save and Continue button without changing anything.
The next screen (if your application is of the External type) asks for the test users. You can add test users from here. Add any test users you want and click Save and Continue* Once your app details are saved, click the Credentials option from the side navbar.
You'll be creating and obtaining the client ID from the Credentials page. Click on the Create Credentials button and select OAuth client ID:
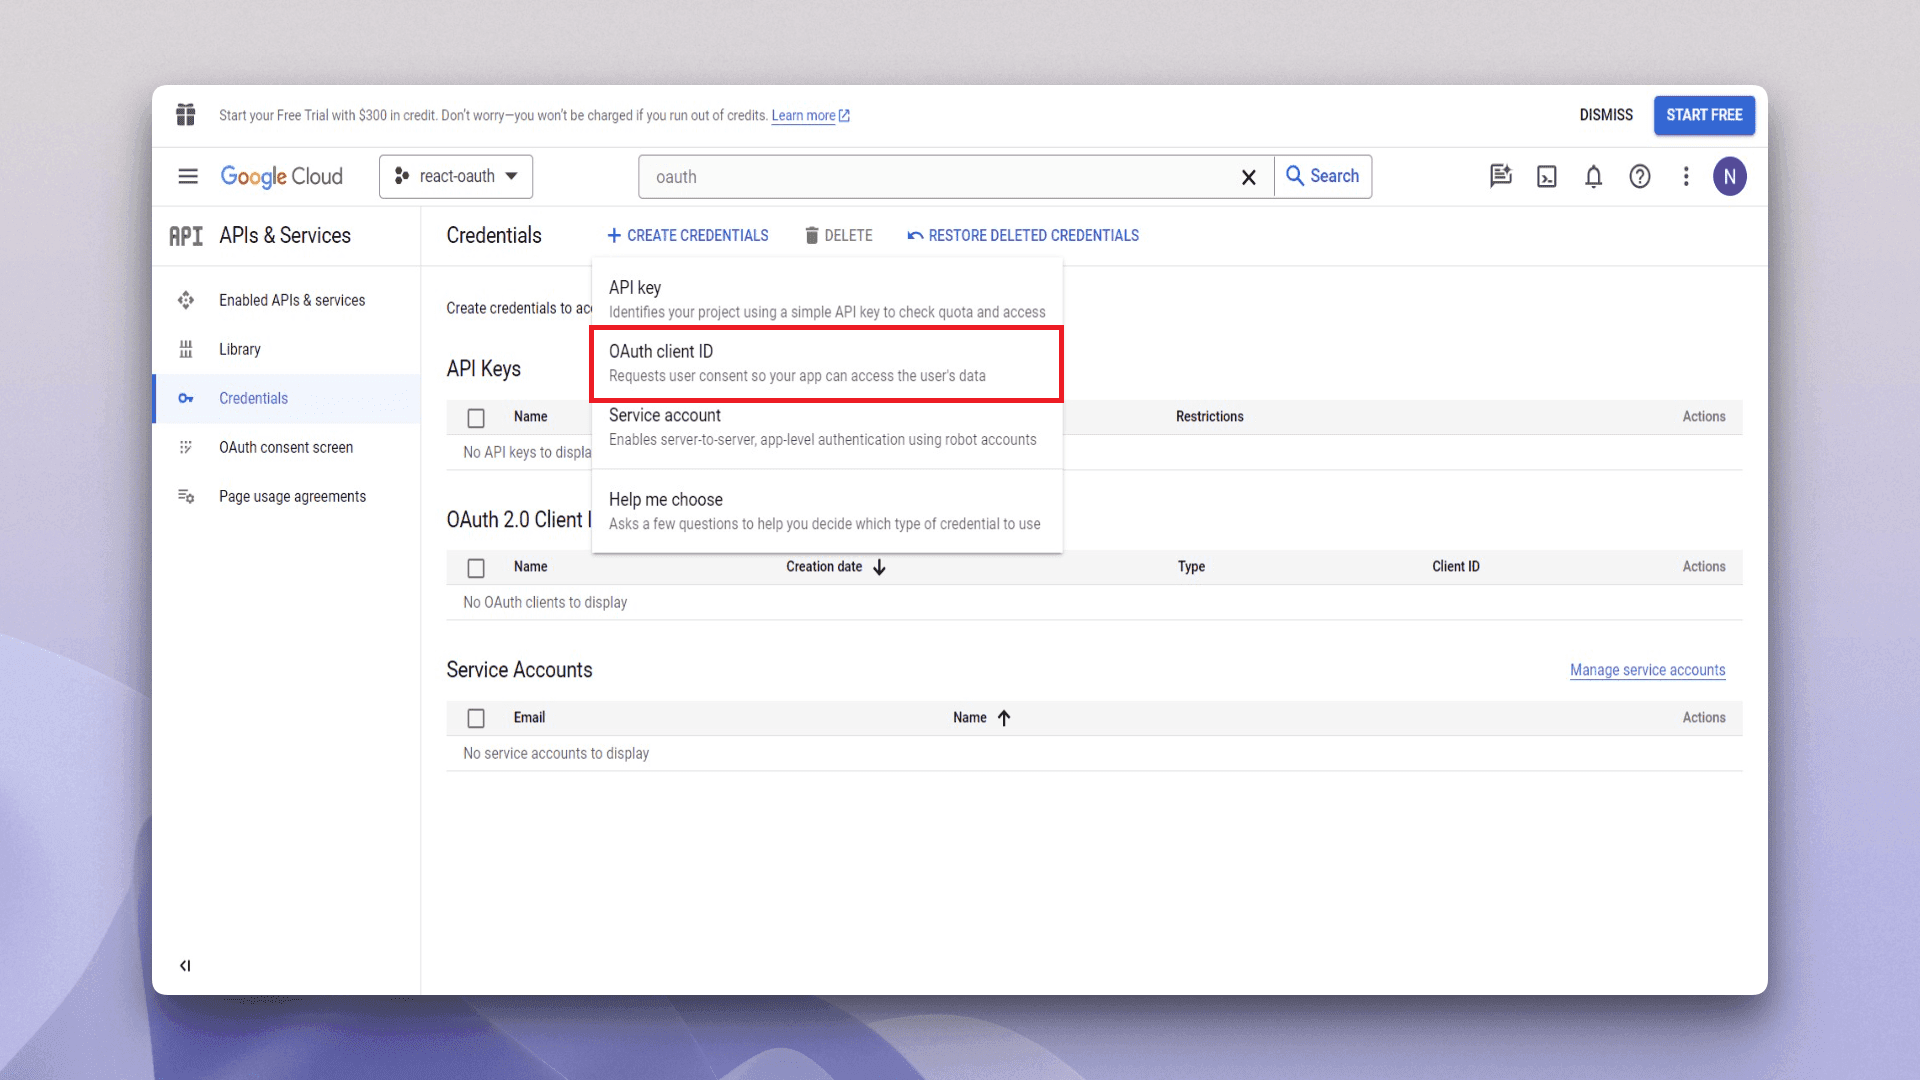
You need to choose the application type. As this tutorial is focused on building a web application, select Web application from the drop-down. This opens a new form with a few fields. Give your application a name and add an authorized JavaScript origin and an authorized redirect URI. Add http://localhost:5173 in the Authorized JavaScript origins field and https://api.descope.com/v1/oauth/callback in the Authorized redirect URIs field and click Create:
 entered and an Add URI button below, and an Authorized redirect URIs section with a highlighted input field containing [https://api.descope.com/v1/oauth/callback](https://api.descope.com/v1/oauth/callback), along with Add URI, Create, and Cancel buttons at the bottom and the Credentials section selected in the left navigation.](/_next/image?url=https%3A%2F%2Fimages.ctfassets.net%2Fxqb1f63q68s1%2F5vDE1MmsYHpUDdOxuvlJzj%2F326d8701d5504f6074f6940f9a24d4f4%2FNew-min.png&w=3840&q=75)
Google provides the client ID and client secret on the next page. Copy the client ID and keep it in a safe place. The client secret is not required for this tutorial.
You have now successfully obtained the required credentials. It's time to write some code.
Setting up the application
Vite will be used to set up and scaffold a new React application. Vite is a build tool that helps you by providing a faster and leaner development experience.
Scaffolding a new React application is very easy with Vite. Open your preferred code editor and run the following command:
npm create vite@latestAfter running the command, you'll be prompted to answer some questions. To keep this example simple, TypeScript is not used here. You can choose the following options for the prompts:
√ Project name: ... react-oauth-tutorial
√ Select a framework: » React
√ Select a variant: » JavaScript
Once the scaffolding is complete, `cd` into the directory and run `npm install` to install the necessary packages. The basic setup is complete. You can now set up auth from scratch.
Implementing OAuth2 in React
To manually implement OAuth in React, you first need to install the react-router-dom package to enable client-side routing. Also you’ll also need to install the js-cookie package in order to save and retrieve access tokens.
To install the packages, run the following command:
npm install react-router-dom js-cookieOnce the installation is complete, open the App.css file inside the src directory of your application. Copy the CSS style shown below and paste it into the file. This contains a few basic styles to improve the application's appearance.
.root {
  display: flex;
  flex-direction: column;
  align-items: center;
  justify-content: center;
  height: 100vh;
  width: 100vw;
}

.root h1 {
  margin-bottom: 1.6rem;
  font-size: 24px;
  text-align: center;
}

.btn-container {
  display: flex;
  justify-content: center;
}

.btn-primary {
  background-color: #1e293b;
  color: white;
  padding: 10px 15px;
  border: none;
  border-radius: 4px;
  cursor: pointer;
  font-size: 16px;
  text-align: center;
  display: inline-block;
  box-shadow: 0 2px 4px rgba(0, 0, 0, 0.2);
  transition: background-color 0.3s ease;
  display: flex;
  align-items: center;
  gap: 10px;
}

.btn-primary:hover {
  background-color: #334155;
}

.user-profile {
  display: flex;
  justify-content: center;
  align-items: center;
  height: 100vh;
  width: 100vw;
  background-color: #f4f4f4;
  background-image: linear-gradient(to bottom right, #f4f4f4, #eaeaea);
  font-family: "Helvetica Neue", Arial, sans-serif;
}

.card {
  background: white;
  border-radius: 15px;
  box-shadow: 0 4px 20px rgba(0, 0, 0, 0.05);
  padding: 40px;
  text-align: center;
  width: 80%;
  max-width: 500px;
  margin: 20px;
}

.profile-pic {
  width: 120px;
  height: 120px;
  border-radius: 50%;
  margin-bottom: 20px;
  border: 3px solid #eaeaea;
}

.name {
  color: #333;
  margin: 10px 0;
  font-size: 32px;
  font-weight: 600;
}

.email {
  color: #666;
  font-size: 16px;
  margin: 5px 0;
}

.locale {
  color: #666;
  font-size: 14px;
  margin-top: 25px;
  letter-spacing: 1px;
  font-family: monospace;
}
Now, open the `App.jsx` file and replace the existing content with the following:
import { BrowserRouter as Router, Route, Routes } from "react-router-dom";
import Login from "./components/Login";
import Secure from "./components/Secure";
import "./App.css";

function App() {
  return (
    <>
      <Router>
        <Routes>
          <Route path="/" element={<Login />} />
          <Route path="/secure" element={<Secure />} />
        </Routes>
      </Router>
    </>
  );
}

export default App;
This App.jsx is the main component and sets up routing using react-router-dom. It imports BrowserRouter, Route, and Routes. It also imports Login and Secure components (not created yet). These will be covered later. App.css is imported for styling.
Within App, the Router component wraps the app for routing. The Routes inside it defines different routes. Two routes are defined using Route: one for the root (`/`), rendering Login, and another for /secure, rendering Secure.
The router is now set up, and you are ready to create the components.
Creating the login component
Create a new folder called components inside the src directory and create a file called Login.jsx inside it. This is the login component for your application.
Inside the component, paste the following code:
import { useNavigate } from "react-router-dom";
import { useState, useEffect } from "react";
import Cookies from "js-cookie";

export default function Login() {
  const navigate = useNavigate();
  const [isLoggedin, setIsLoggedin] = useState(false);

  const handleClick = () => {
    const callbackUrl = `${window.location.origin}`;
    const googleClientId = "YOUR_CLIENT_ID_FROM_GOOGLE";
    const targetUrl = `https://accounts.google.com/o/oauth2/auth?redirect_uri=${encodeURIComponent(
      callbackUrl
    )}&response_type=token&client_id=${googleClientId}&scope=openid%20email%20profile`;
    window.location.href = targetUrl;
  };

  useEffect(() => {
    const accessTokenRegex = /access_token=([^&]+)/;
    const isMatch = window.location.href.match(accessTokenRegex);

    if (isMatch) {
      const accessToken = isMatch[1];
      Cookies.set("access_token", accessToken);
      setIsLoggedin(true);
    }
  }, []);

  useEffect(() => {
    if (isLoggedin) {
      navigate("/secure");
    }
  }, [isLoggedin, navigate]);

  return (
    <div className="root">
      <div>
        <h1>Log in with Google</h1>
        <div className="btn-container">
          <button className="btn btn-primary" onClick={handleClick}>
            <svg
              xmlns="http://www.w3.org/2000/svg"
              viewBox="0 0 326667 333333"
              shapeRendering="geometricPrecision"
              textRendering="geometricPrecision"
              imageRendering="optimizeQuality"
              fillRule="evenodd"
              clipRule="evenodd"
              width={20}
              height={20}
            >
              <path
                d="M326667 170370c0-13704-1112-23704-3518-34074H166667v61851h91851c-1851 15371-11851 38519-34074 54074l-311 2071 49476 38329 3428 342c31481-29074 49630-71852 49630-122593m0 0z"
                fill="#4285f4"
              />
              <path
                d="M166667 333333c44999 0 82776-14815 110370-40370l-52593-40742c-14074 9815-32963 16667-57777 16667-44074 0-81481-29073-94816-69258l-1954 166-51447 39815-673 1870c27407 54444 83704 91852 148890 91852z"
                fill="#34a853"
              />
              <path
                d="M71851 199630c-3518-10370-5555-21482-5555-32963 0-11482 2036-22593 5370-32963l-93-2209-52091-40455-1704 811C6482 114444 1 139814 1 166666s6482 52221 17777 74814l54074-41851m0 0z"
                fill="#fbbc04"
              />
              <path
                d="M166667 64444c31296 0 52406 13519 64444 24816l47037-45926C249260 16482 211666 1 166667 1 101481 1 45185 37408 17777 91852l53889 41853c13520-40185 50927-69260 95001-69260m0 0z"
                fill="#ea4335"
              />
            </svg>
            Log in with Google
          </button>
        </div>
      </div>
    </div>
  );
}
The code is more straightforward than it appears but is worth an explanation. You'll understand it better as you follow the tutorial. Before proceeding, take a moment to review the following screenshot of the rendered component:
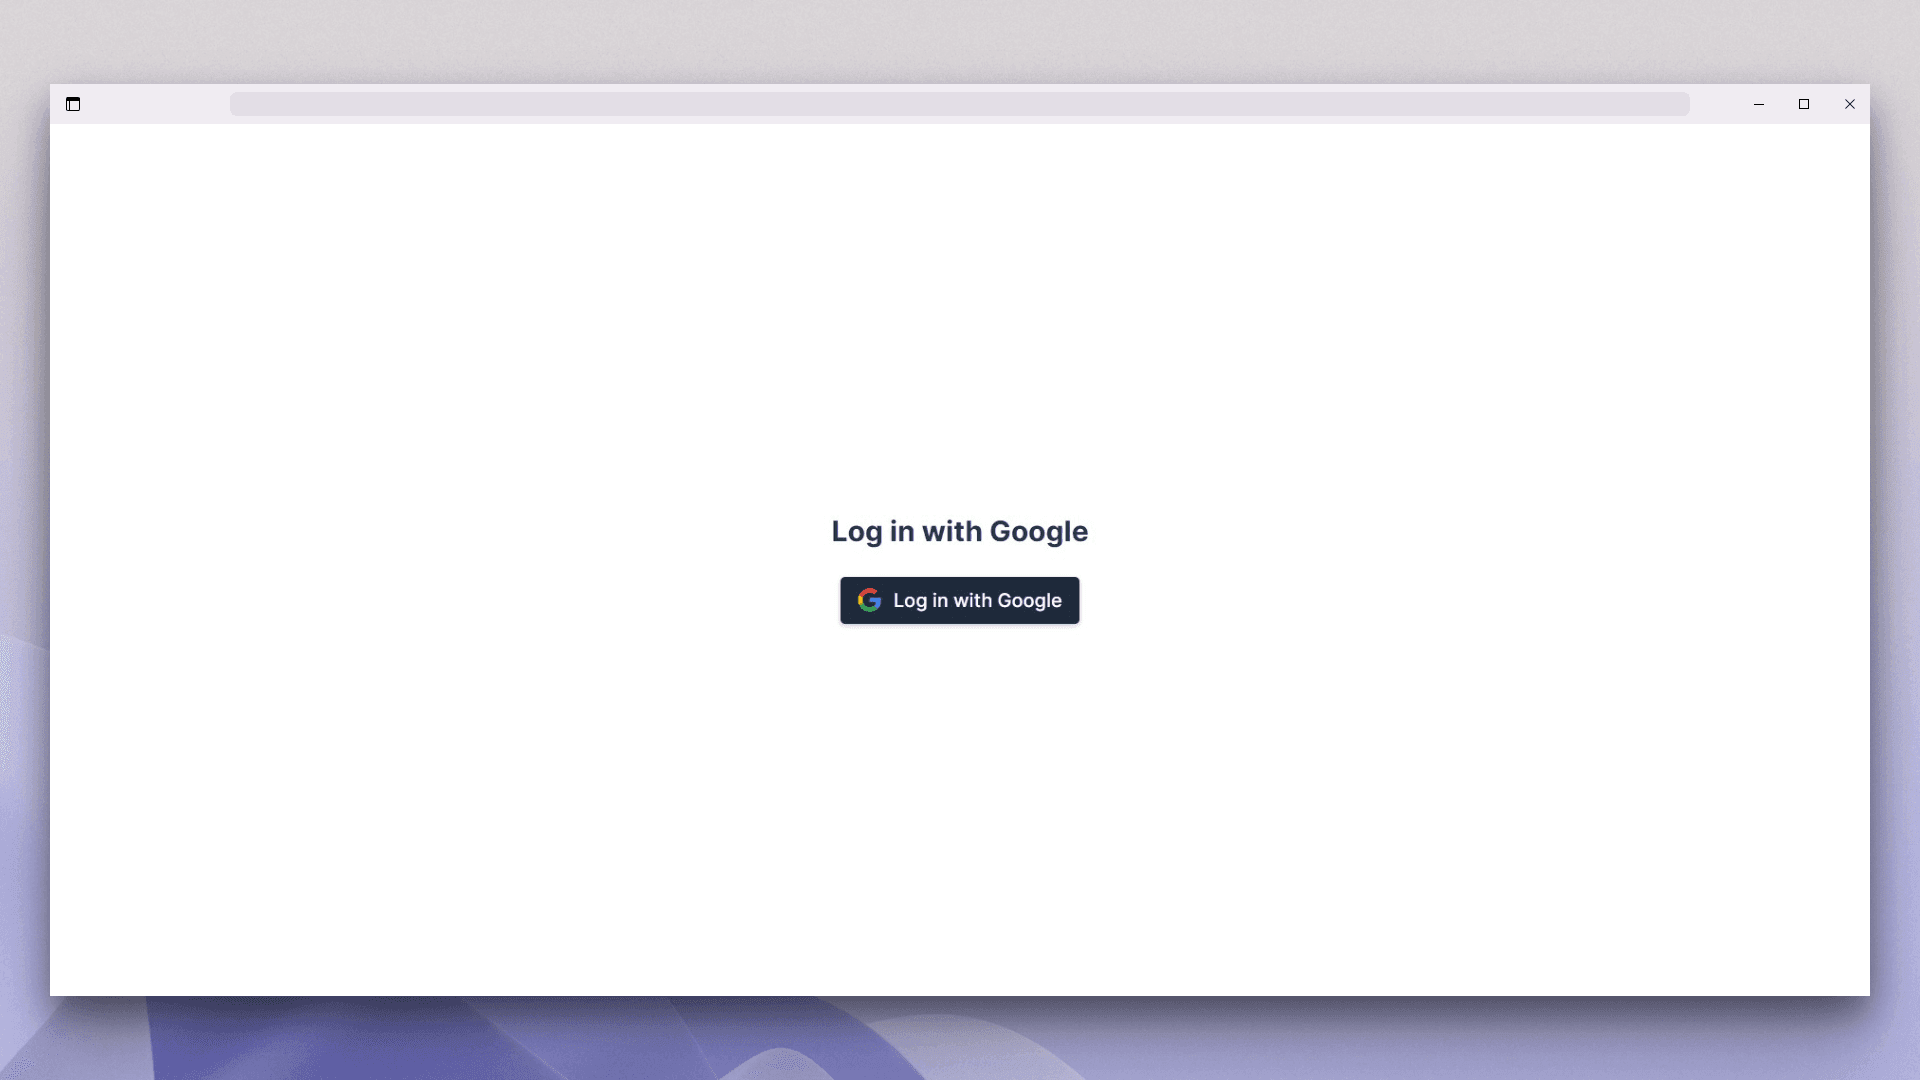
The component contains an H1 with the text Log in with Google and a button with the Google icon. This button is responsible for the OAuth2 login.
The file imports hooks and functions at the top. `useNavigate` from `react-router-dom` handles route navigation, while `useState` and `useEffect` manage component state and side effects, respectively.
Within the login function, useNavigate is obtained from the useNavigate hook. isLoggedin and setIsLoggedin track user login status.
The authButton function manages the onClick event of the Log in with Google button. It sets callbackUrl to the current window's origin, the URL for Google's post-authentication redirection. Ensure this URL matches the registered one with Google for proper authorization; mismatches will result in authentication failure, and Google will throw an error. You could use environment variables for more security, but as this is a simple tutorial, the client ID is set directly in the variable.
The function then constructs the OAuth URL in the targetUrl variable. This URL is where the user will be redirected to authenticate with Google. The URL includes several query parameters:
redirect_uri: This is the URL to which Google will redirect the user after authentication. It's set to the
callbackUrland is URL-encoded to ensure it's a valid URL parameter.response_type: This is set to
token, indicating that Google should return an access token in the URL fragment of the redirect URI.client_id: This is set to the
googleClientIdto identify the application.scope: This is set to
openid email profile, indicating the information the application is requesting access to.
The function redirects the user to the OAuth URL to initiate the authentication process by setting window.location.href to targetUrl.
The first useEffect hook defines a regular expression (accessTokenRegex) to match the access_token parameter in the URL, which Google includes upon successful authentication. It sets isMatch to the result of matching window.location.href with the regex.
An `if` statement checks if a match was found. If so, it means the user is authenticated, and the access token is extracted from isMatch and stored in accessToken. The token is then saved as cookies with the help of the js-cookie package.
Lastly, setIsLoggedin is called with true to update the component's state, indicating the user is logged in and storing the access token.
The second useEffect hook checks if the user is logged in by checking the value of the isLoggedIn state. If the user is logged in, the React router redirects the user to the /secure route.
The return statement renders the JSX component and displays an H1 and a Log in with Google button. The button has an onClick handler that calls the handleClick function.
Your login component is ready. Now, create a secure route accessible only to logged-in users.
Creating a secure route
To create a secure route, create a new component called Secure.jsx inside the `components` directory. To do this, simply paste the previous code in the Secure.jsx file:
import { useEffect, useState } from "react";
import { useNavigate } from "react-router-dom";
import Cookies from "js-cookie";

export default function Secure() {
  const navigate = useNavigate();
  const [userDetails, setUserDetails] = useState({});

  const getUserDetails = async (accessToken) => {
    const response = await fetch(
      `https://www.googleapis.com/oauth2/v1/userinfo?alt=json&access_token=${accessToken}`
    );
    const data = await response.json();
    setUserDetails(data);
  };

  useEffect(() => {
    const accessToken = Cookies.get("access_token");

    if (!accessToken) {
      navigate("/");
    }

    getUserDetails(accessToken);
  }, [navigate]);

  return (
    <>
      {userDetails ? (
        <div className="user-profile">
          <div className="card">
            <img
              src={userDetails.picture}
              alt={`${userDetails.given_name}'s profile`}
              className="profile-pic"
            />
            <p>Welcome</p>
            <h1 className="name">{userDetails.name}</h1>
            <p className="email">{userDetails.email}</p>
            <p className="locale">{`Locale: ${userDetails.locale}`}</p>
          </div>
        </div>
      ) : (
        <div>
          <h1>Loading...</h1>
        </div>
      )}
    </>
  );
}
Inside the functional components, the userDetails and setUserDetails state variables are used to store the details of the logged-in user.
The getUserDetails function is an async function that fetches the user's details from the Google API. It takes an access token as a parameter, which is included in the API request. The response from the API is parsed as JSON, and the resulting data is stored in the userDetails state variable.
Inside the useEffect hook, the user's login status is checked. It retrieves the access token from cookies and checks if it exists. If the access token does not exist, it uses the navigate function to redirect the user to the root route. If the access token does exist, it calls the getUserDetails function with the access token to fetch the user's details.
Finally, the return statement renders the JSX for the component. If the userDetails state variable is set, it renders a card with the user's profile picture, name, email, and locale, which are taken from the API call. If the `userDetails` state variable is not set, it renders a loading message.
Please note that the access token is stored in cookies accessible via JavaScript, which is suitable for this tutorial but not recommended for production due to potential XSS vulnerabilities. In a production scenario, consider using HTTP-only cookies and securing your application against XSS attacks.
Your application is now ready!
You can find the complete code for this section on this GitHub page.
Potential challenges and security considerations
Effectively implementing OAuth comes with its set of challenges and security risks that need careful attention. The complexity of the OAuth2 framework itself requires a thorough understanding to ensure correct implementation, particularly for developers who might be new to the concept. Managing sensitive data, like access and refresh tokens, demands strict security measures to prevent breaches. Additionally, supporting multiple OAuth providers increases these complexities, necessitating seamless integration across different clients.
Security vulnerabilities, such as redirect URI misconfigurations, can lead to severe risks, like phishing attacks or token theft. Token hijacking and insufficient error handling are other critical concerns as they can enable unauthorized access to user accounts and leak information that might help attackers exploit other vulnerabilities. Moreover, requesting excessive permissions beyond what's necessary for the application can unnecessarily expose data, increasing the risk in the event of a security breach.
In the last year alone, Descope and Truffle Security have found vulnerabilities and misconfigurations in OAuth implementations that open the door for attackers to perform account takeover on target accounts.
With these challenges and security considerations, it might make more sense to rely on established authentication services to mitigate risks and ensure a robust implementation.
Simplifying OAuth 2.0 with Descope
Descope is a possible solution for simplifying OAuth implementation and keeping your application protected from potential vulnerabilities. It's a drag-and-drop customer authentication and identity management solution that allows you to add authentication, authorization, and identity management with a no- or low-code workflow.
Descope has SDKs for most of the popular languages and frameworks. Along with that, the onboarding process guides you through the steps in integrating Descope into your favorite framework and backend. You also don't need to obtain a Google client ID to make Descope work for testing and development. However, bringing your own client ID and secret is important when deploying your application to production. Without it, your application will show the Descope branding.
Integrating Descope to React
You first need to create a Descope account to integrate Descope with your React application. Visit the sign-up page and create a new free forever account from here:
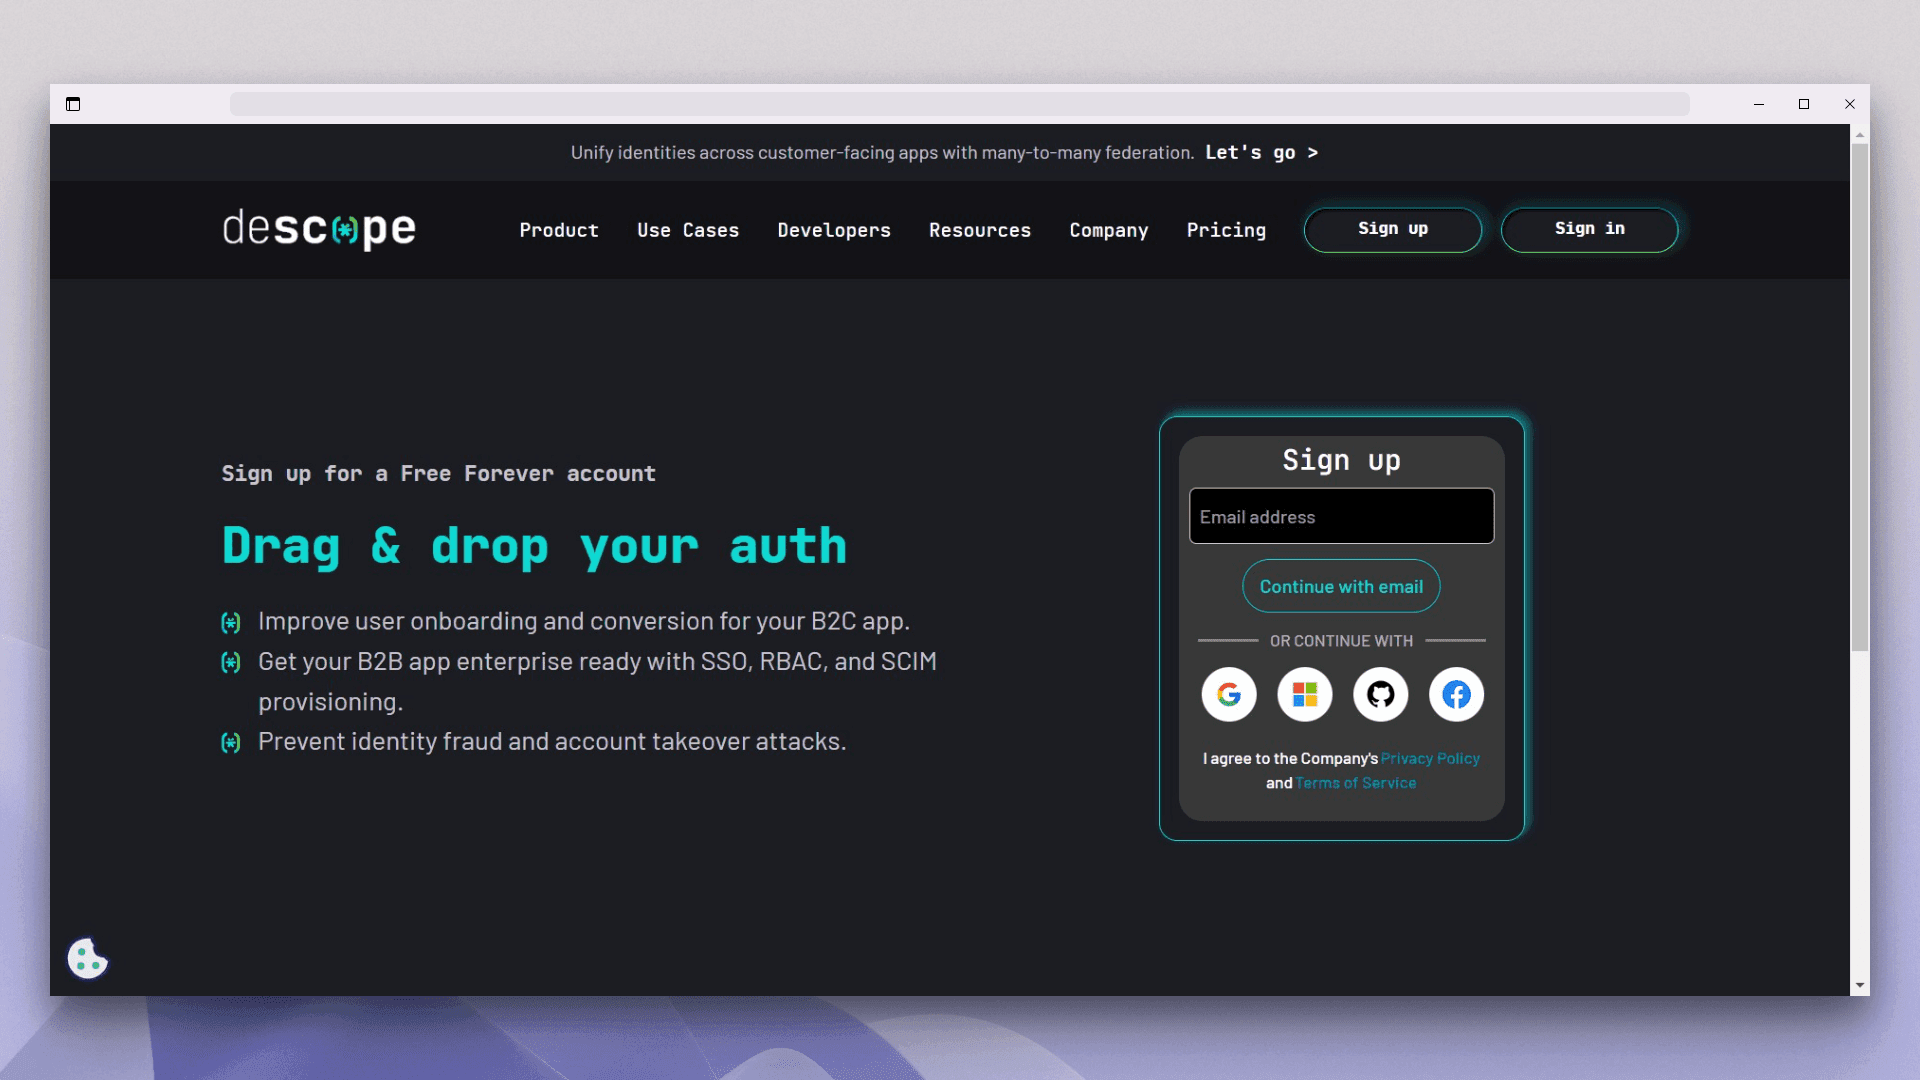
You can either use your email address or choose one of the OAuth providers from the list. Once you sign up, you'll be redirected to the Getting Started screen, where Descope will guide you in integrating OAuth into your application.
In the Getting Started screen, you'll be first asked to choose the target user of the application. It can be either businesses or consumers. For this application, choose Consumers and click Next. In the next screen, you'll be asked to choose an authentication method. Choose Social Login and click Next:
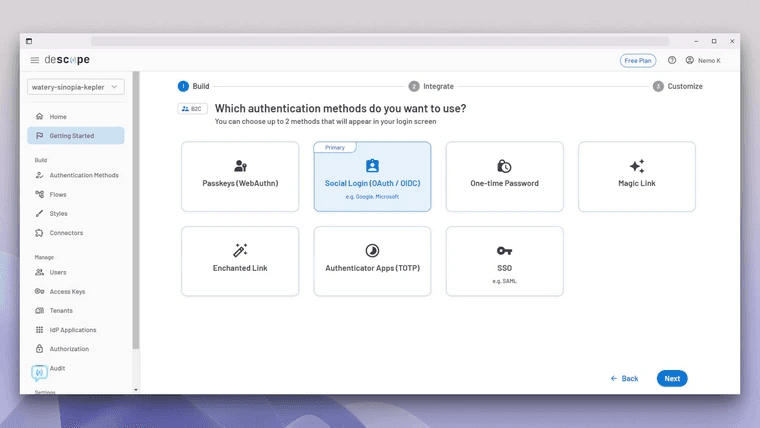
Once you click Next, Descope will prompt you to choose another authentication method for enabling multi-factor authentication (MFA). For this tutorial, it's not necessary to enable one. So you can just select Go ahead without MFA and move forward.
After clicking this button, Descope will show you the necessary integration code for both the frontend and backend. Another good thing about Descope is that it manages the tokens itself. So you don't need to care about the security of your tokens, and you can focus on your application:
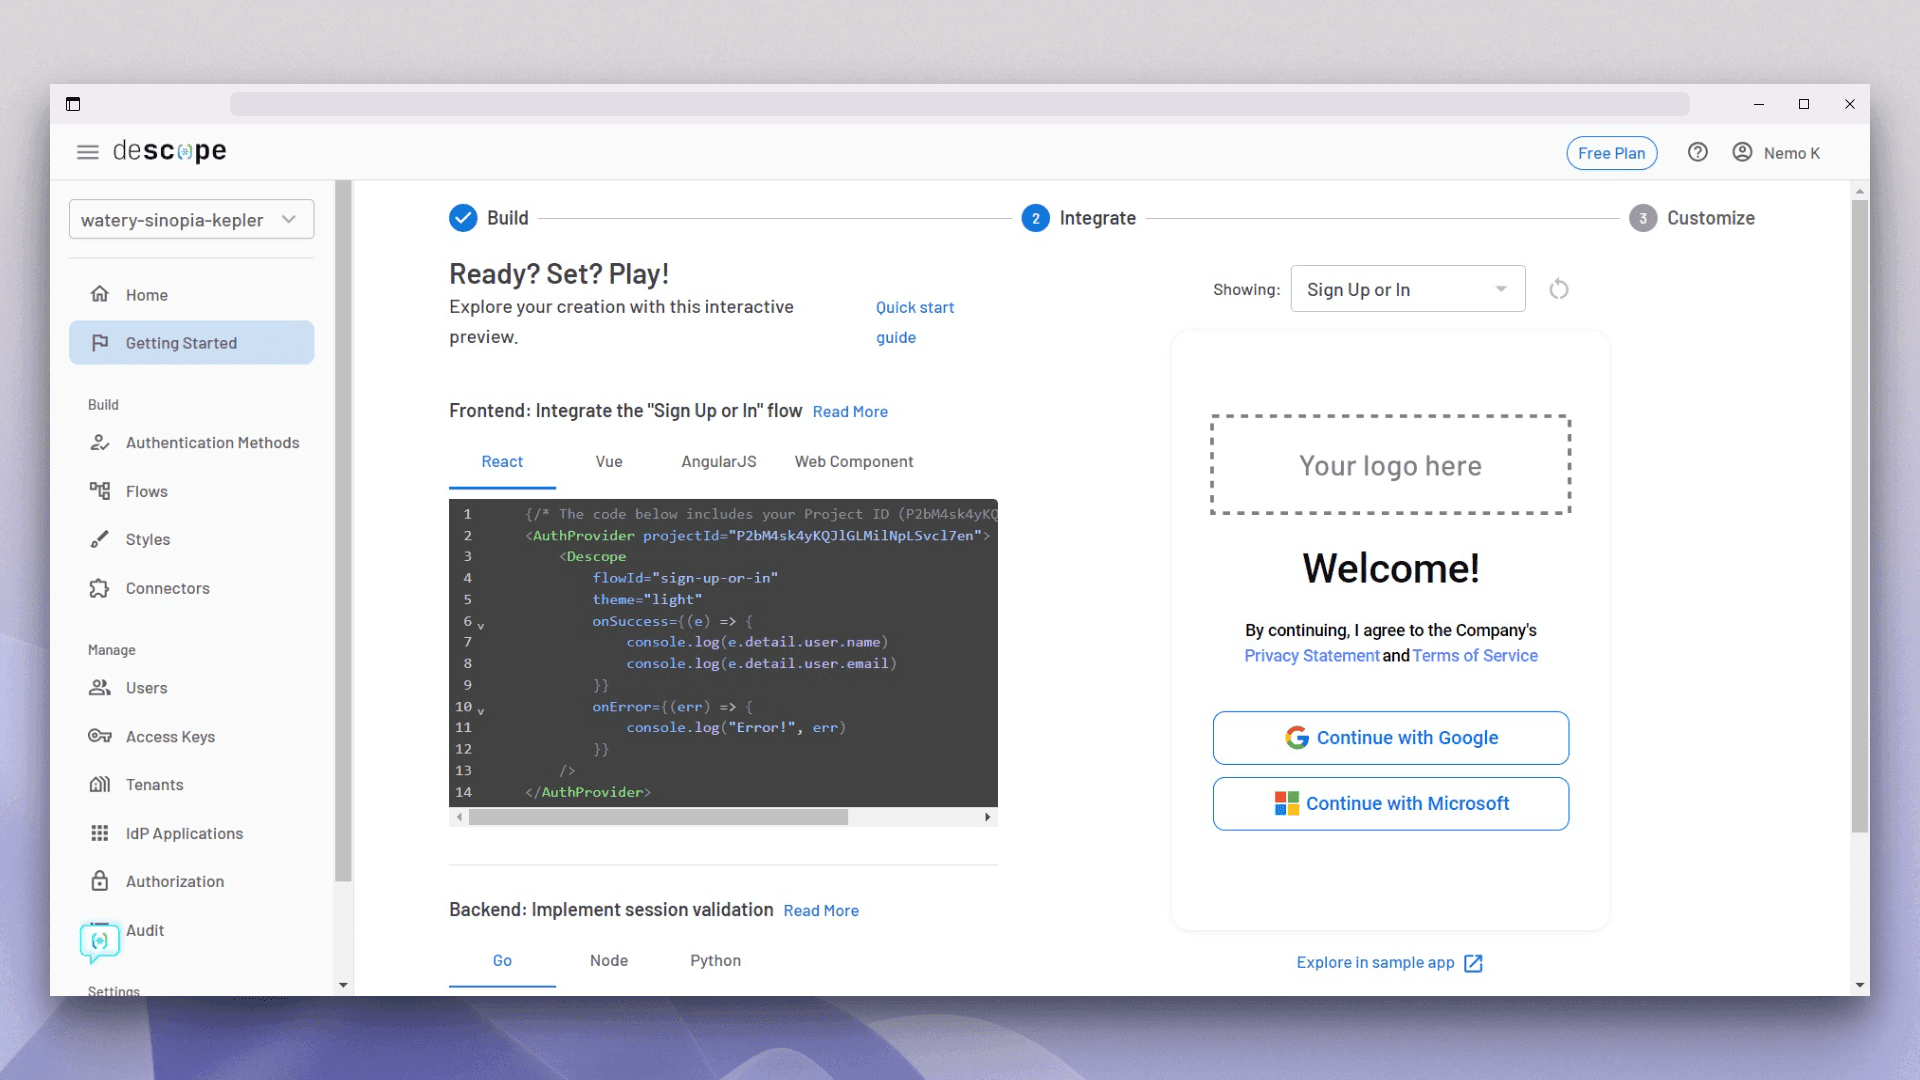
The preceding image shows you the screen from where you can copy the React code and paste it into your React application. But to do this, you first need to install the Descope React SDK.
Before installing the Descope React SDK, let’s first add the custom Google OAuth client ID and client secret for the authentication method. As mentioned earlier, it’s not necessary to use your own client ID and client secret when testing your application. However, in production mode, it is crucial that you don’t use the ones provided by Descope. Using the default ones will display Descope branding during the login process, which is not ideal.
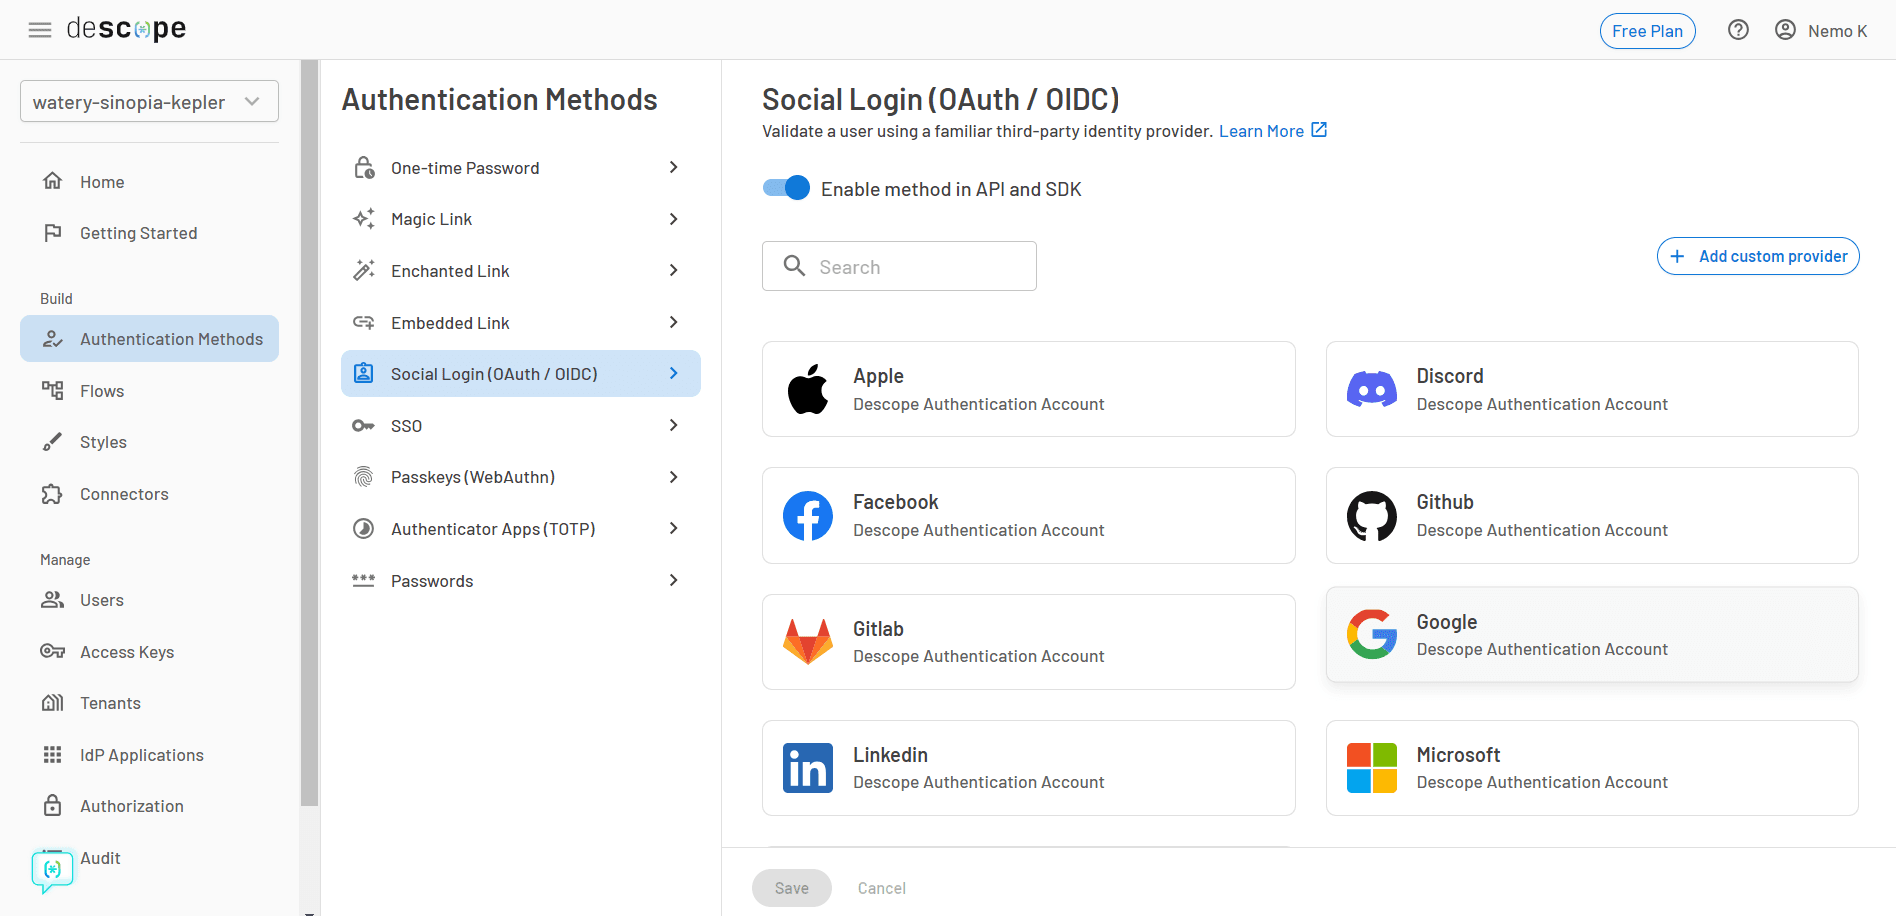
You can follow the steps mentioned in the “Obtaining a Client ID from Google” section to obtain both keys. Once obtained from the side menu, click on the “Authentication Methods” option. Once the page opens, choose the “Social Login (OAuth / OIDC)” option and click on the Google button.
From the next screen, you can choose whether you want to use the Descope authentication account or your own account. Click on the “Use my own account” radio button, and paste the client ID and client secret in the fields shown below.
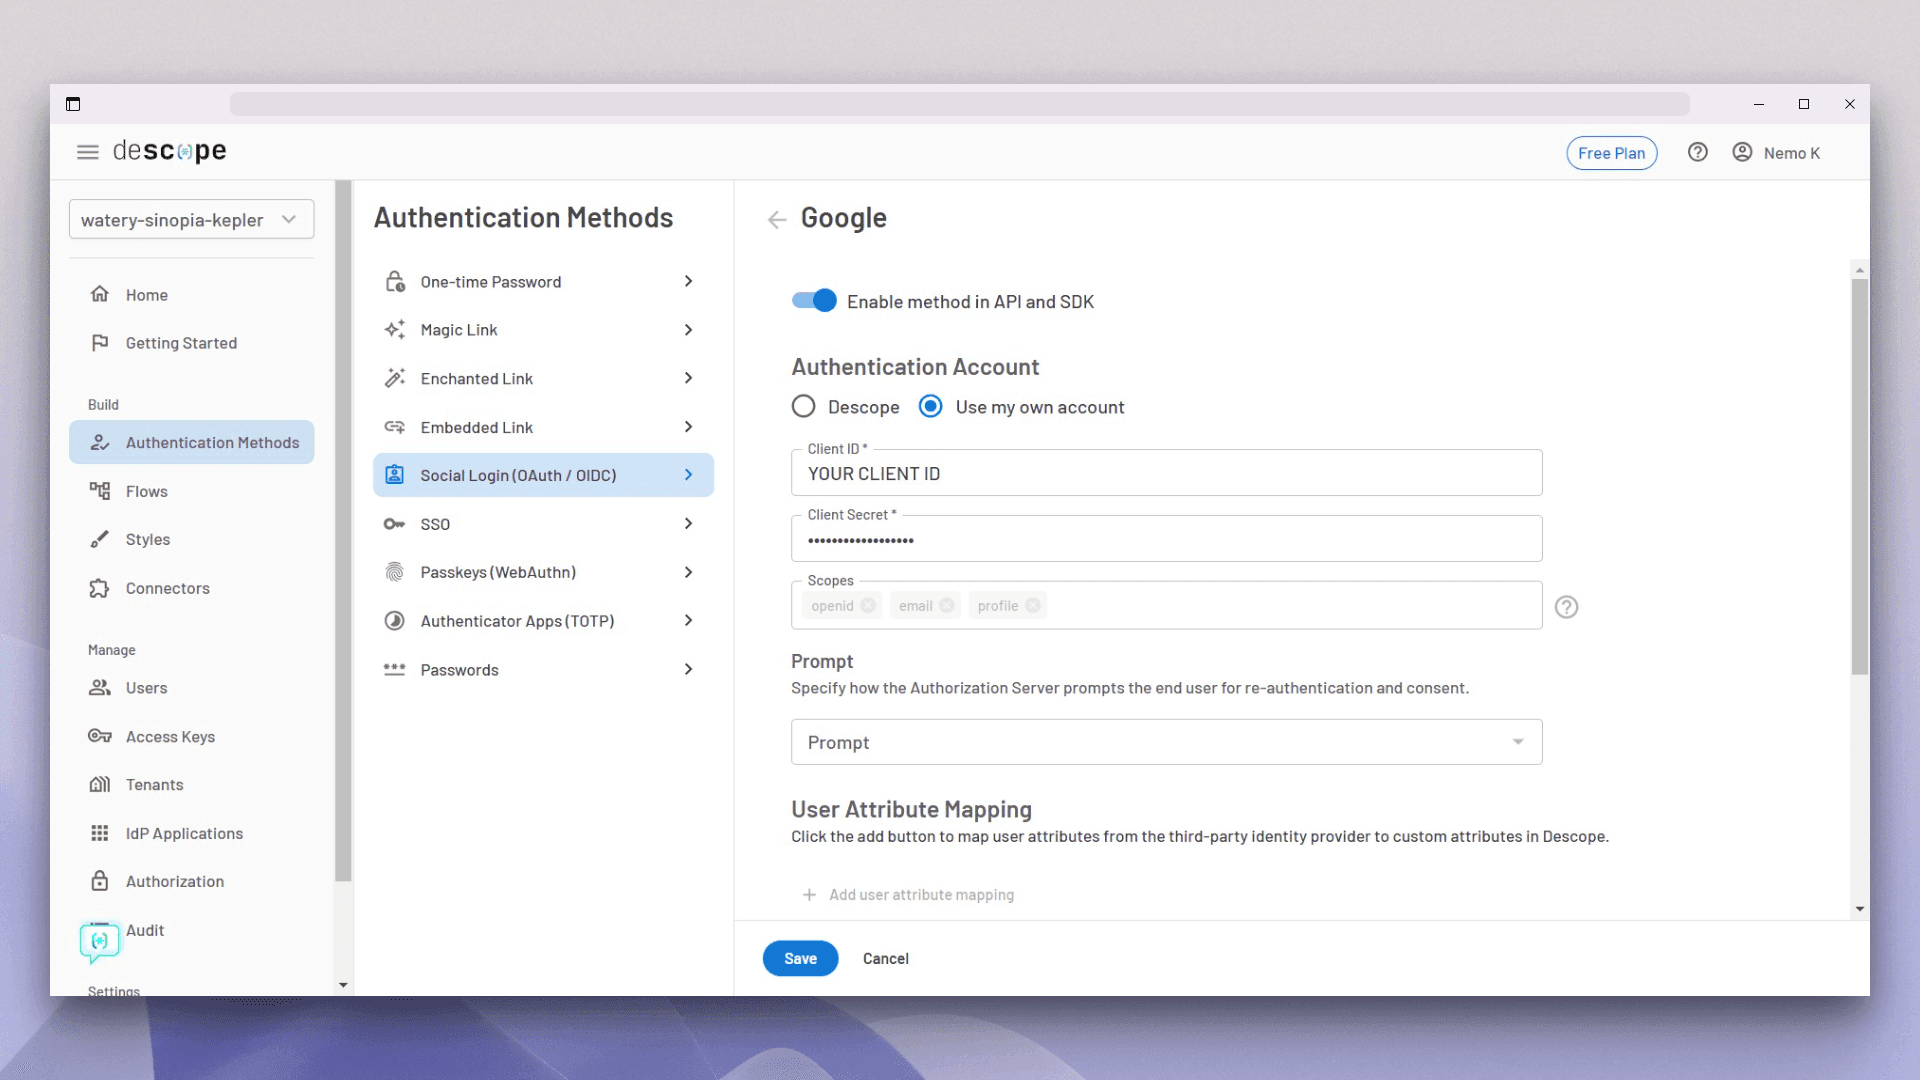
Keep the rest of the options as it is and click on save. Once saved, you are ready to install the Descope React SDK.
Installing packages and setting up the React app with Descope
You can use the existing application and set it up with Descope now. Run the following command from your terminal:
npm i @descope/react-sdkThis installs the SDK. Once installed, open the App.jsx file and wrap your component with the AuthProvider context. Here's how it should look:
import { BrowserRouter as Router, Route, Routes } from "react-router-dom";
import Login from "./components/Login";
import Secure from "./components/Secure";
import { AuthProvider } from "@descope/react-sdk";

import "./App.css";

function App() {
  return (
    <>
      <AuthProvider projectId="YOUR_PROJECT_ID">
        <Router>
          <Routes>
            <Route path="/" element={<Login />} />
            <Route path="/secure" element={<Secure />} />
          </Routes>
        </Router>
      </AuthProvider>
    </>
  );
}

export default App;
You can find the project ID from the Descope dashboard. It's also shown in the earlier image. Now, open your Login.jsx file and replace it with the following code:
import { useNavigate } from "react-router-dom";
import { Descope } from "@descope/react-sdk";

export default function Login() {
  const navigate = useNavigate();

  return (
    <div className="root">
      <div>
        <h1>Log in With Descope</h1>
        <div className="btn-container">
          <Descope
            flowId="sign-up-or-in"
            theme="light"
            onSuccess={(e) => {
              console.log(e.detail.user.name);
              console.log(e.detail.user.email);
              navigate("/secure");
            }}
            onError={(err) => {
              console.log("Error!", err);
              alert("Error: " + err.detail.message);
            }}
          />
        </div>
      </div>
    </div>
  );
}
And you're done! You have successfully implemented authentication with Descope. The Descope module adds an OAuth screen to your application. The onSuccess handler is for when the login is successful, and the onError handler is for when an error occurs. In this case, when the user successfully logs in, it navigates the user to the /secure route.
Open the Secure.jsx file and change it as follows:
import { useEffect, useState } from "react";
import { useNavigate } from "react-router-dom";
import { useSession, useUser } from "@descope/react-sdk";

export default function Secure() {
  const navigate = useNavigate();
  const [userDetails, setUserDetails] = useState({});
  const { isAuthenticated } = useSession();
  const { user } = useUser();

  useEffect(() => {
    if (!isAuthenticated) {
      navigate("/");
    }

    if (user) {
      setUserDetails(user);
    }
  }, [navigate]);

  return (
    <>
      {userDetails ? (
        <div className="user-profile">
          <div className="card">
            <img
              src={userDetails.picture}
              alt={`${userDetails.given_name}'s profile`}
              className="profile-pic"
            />
            <p>Welcome</p>
            <h1 className="name">{userDetails.name}</h1>
            <p className="email">{userDetails.email}</p>
          </div>
        </div>
      ) : (
        <div>
          <h1>Loading...</h1>
        </div>
      )}
    </>
  );
}
In this code, the useSession and useUser hooks are imported from @descope/react-sdk to manage the user's session and user data.
The useSession hook provides multiple state variables like isAuthenticated, isSessionLoading, and sessionToken. In this case, the isAuthenticated variable is used to check whether the user is authenticated. The application redirects the user to the root if the user is not authenticated. Otherwise, the data obtained from the `user` variable is stored in the userDetails React state.
Similar to the earlier implementation, the user data is then displayed on the screen.
You've now successfully implemented OAuth authentication and secured a route with Descope. Here's the flow of your application for users:
Notice the additional question the user is asked after they click the “Continue with Google” button. With Descope, you can easily implement progressive profiling and collect more information from the user at any point in their journey using a visual workflow.
Using Descope drastically reduces code and enhances application maintainability. It eliminates the need for managing complex tasks like cookie or session management. Descope offers integration of various authentication methods, such as magic links, WebAuthn, one-time password (OTP), and passkeys, saving significant time compared to manual implementation.
You can customize the application logo from the Descope styles page, ensuring brand consistency. Descope allows complete customization of the login screen without displaying its own branding, even in the free plan. Moreover, if you need an OAuth provider that Descope doesn't provide out of the box, you can bring your custom OAuth providers too. You can easily extend your sign-in functionality to add Spotify or even Ethereum wallet as a sign-in method.
A common thread running through all the above points is the ease of ongoing user journey modifications with Descope. You can change the screens, flows, auth logic, or add new auth methods in the workflow to see the changes automatically reflected in your app. No redeployment and no code changes needed.
Descope can also handle user management tasks, such as adding new users, importing existing ones, and assigning roles, making it an efficient solution for those who don't want to invest time in building a separate user management solution.
You can find this tutorial's code for authenticating with Descope in this GitHub repo.
Conclusion
This article explained how to integrate Google OAuth 2.0 into your React application. You also explored what OAuth is and how it works.
You saw how to obtain a client ID from Google and how you can implement authentication from scratch. The potential challenges and security considerations when implementing OAuth from scratch were also discussed in this piece.
Finally, you explored how easy it is to integrate OAuth using Descope. Descope offers a generous free-forever tier so you can use it for your hobby projects and you can upgrade only when you are fully satisfied. To explore all the features of Descope, sign up today! If you’re interested in using Descope for your business and would like a more detailed demo of the platform, reach out to the Descope team.