
Table of Contents
Don't have the time to read the entire post? Our human writers will be sad, but we understand. Summarize the post with your preferred LLM here instead.
Looking to add authentication to your Next.js 13 app using NextAuth? In this tutorial, we’ll walk through how to integrate Descope—a drag & drop CIAM platform—into a Next.js 13 project using NextAuth v4.
To make this hands-on and practical, we’ll build a hackathon-ready web app that demonstrates real-world usage of authentication, protected routes, and server/client components in the Next.js 13 App Router framework.
Whether you're a hacker, developer, or organizer looking to spin up a modern site for your next hackathon, this tutorial is for you.
What you’ll build
Descope + NextAuth authentication using a custom OAuth provider
Protected pages and API routes
A fully customizable landing page with About, Speakers, Sponsors, and FAQ sections
A Team page and personalized Dashboard for attendees
Airtable backend for form submissions and acceptance statuses
Fully responsive UI (mobile, tablet, computer) built with modern Next.js 13 conventions
Let’s dive in and explore how Next.js 13 and NextAuth work together with Descope to power secure, scalable authentication in just a few lines of code.
Prerequisites
Before we start adding Descope authentication to our Next.js 13 app with NextAuth, make sure you’ve got the basics covered:
All the code for this tutorial lives in our GitHub repository: next-hackathon-template. You’ll find setup instructions in the README.md file to help you get started quickly.
If you're new to Next.js 13 or transitioning from version 12, we recommend checking out our blog post on the differences between the two. It covers key changes around rendering methods, routing (App Router vs Pages Router), server components, and API handling—perfect context before diving into this tutorial.
Tutorial Overview: Next.js 13 + NextAuth via Descope
In this tutorial, we’ll explore how to integrate Descope authentication into a Next.js 13 app using NextAuth as a custom OAuth provider. Along the way, we’ll build a fully functional hackathon site using the new App Router architecture.
Here’s what we’ll cover:
Setting up NextAuth with Descope
Creating a custom sign-in page
Building a protected dashboard with server-side session handling
Validating and protecting API routes
Walking through a live demo of the finished hackathon template
Before jumping into the code, we’ll start with the fundamentals of authentication in Next.js and how NextAuth v4 fits into the picture.
Descope + NextAuth
To handle authentication in our Next.js 13 app, we’re using NextAuth.js—a flexible, open-source library designed specifically for Next.js. It’s a great fit because:
It supports a wide range of authentication providers out of the box
It’s fully compatible with Next.js 13 and the new App Router
Since Descope is an OIDC provider, we’ll integrate it into NextAuth v4 as a custom provider.
To start, create a route.ts file in the following directory: app/api/auth/[...nextauth]/route.ts
Then add the following code:
Overview
The tutorial will cover these core topics:
Descope + NextAuth
Sign-in page
Dashboard
Setting up our API
Demo
Let's start with the most fundamental concepts of Next.js.
Descope + NextAuth
NextAuth.js is a great choice for implementing authentication for several reasons:
It's a popular open-source authentication solution for Next.js applications.
It comes built-in with multiple authentication providers.
It supports various OAuth protocols such as OAuth 1.0, 2.0, and OIDC.
To use Descope, we’re going to implement a custom provider in NextAuth.
To start, create a route.ts file for your API endpoint in the following directory: app/api/auth/[...nextauth].
In route.ts, we will include the following code:
import NextAuth from "next-auth/next";
import { authOptions } from "../../../_utils/options";


const handler = NextAuth(authOptions)


export { handler as GET, handler as POST }
Code block: app/api/auth/[...nextauth]/route.ts
Here’s what’s happening:
The
[...nextauth]directory creates a catch-all route—any requests to/api/auth/*are handled here.Inside the file, we initialize the NextAuth handler with our configuration.
We export it for both
GETandPOST, which is required in Next.js 13 route handlers.
Now let’s define our Descope custom provider in the authOptions.
import { NextAuthOptions } from "next-auth"


export const authOptions: NextAuthOptions = {
  providers: [
    {
      id: "descope",
      name: "Descope",
      type: "oauth",
      wellKnown: `https://api.descope.com/${process.env.DESCOPE_PROJECT_ID}/.well-known/openid-configuration`,
      authorization: { params: { scope: "openid email profile" } },
      idToken: true,
      clientId: process.env.DESCOPE_PROJECT_ID,
      clientSecret: process.env.DESCOPE_ACCESS_KEY,
      checks: ["pkce", "state"],
      profile(profile) {
        return {
          id: profile.sub,
          name: profile.name,
          email: profile.email,
          image: profile.picture,
        }
      },
    },
  ]
}
Code block: app/_utils/options.ts
Here’s what we’re doing:
authOptions: Stores all NextAuth configuration, including your providersWithin the provider's array, we define our Descope custom provider object using the following attributes:
id&name: Identifiers for the custom providertype: Defines this as an OAuth providerwellKnown: Points to Descope’s OIDC discovery URL that contains the Configuration in the form of a JSON.authorization: Specifies the access permissions being requestedidToken: Ensures a valid ID token is returned in the responseclientId: Identifies the client with the authorization serverclientSecret: Authenticates to the authorization server and gets the access tokenchecks: Enables PKCE and state validation to prevent CSRF and token hijackingprofile: When the authentication is successful and the callback occurs, the user object is returned.
This sets the stage for Descope authentication in a secure and standards-compliant way. Next up, we’ll wire up the sign-in button on the frontend.
Sign-in page
Now that Descope is configured as a custom provider in NextAuth, it’s time to trigger the sign-in flow from the frontend of our Next.js 13 app.
We’ll do this using the signIn method provided by NextAuth. In our case, it’s wired to a button inside the Navbar component:
'use client'

...

import { useSession, signIn } from "next-auth/react"


export default function Navbar({ Logo }: { Logo: string }) {
    ...

    return (
       	...
       <button onClick={() => signIn("descope", { callbackUrl: "/dashboard" })}
className="text-[#e9e9e9] bg-[#262d3b] py-2 px-7 border-[#45546e] border-4">Apply</button>
 	...
    )
}
Code block: app/_components/Navbar.tsx
The signIn method has two parameters:
descoperefers to the authentication provider ID we defined earlier.callbackUrltells NextAuth where to redirect users after a successful login—in this case, the Dashboard page.
Once users click the Apply button, they’ll be redirected to Descope’s hosted login page. After authentication, they’ll land on a protected dashboard we’ll set up next.
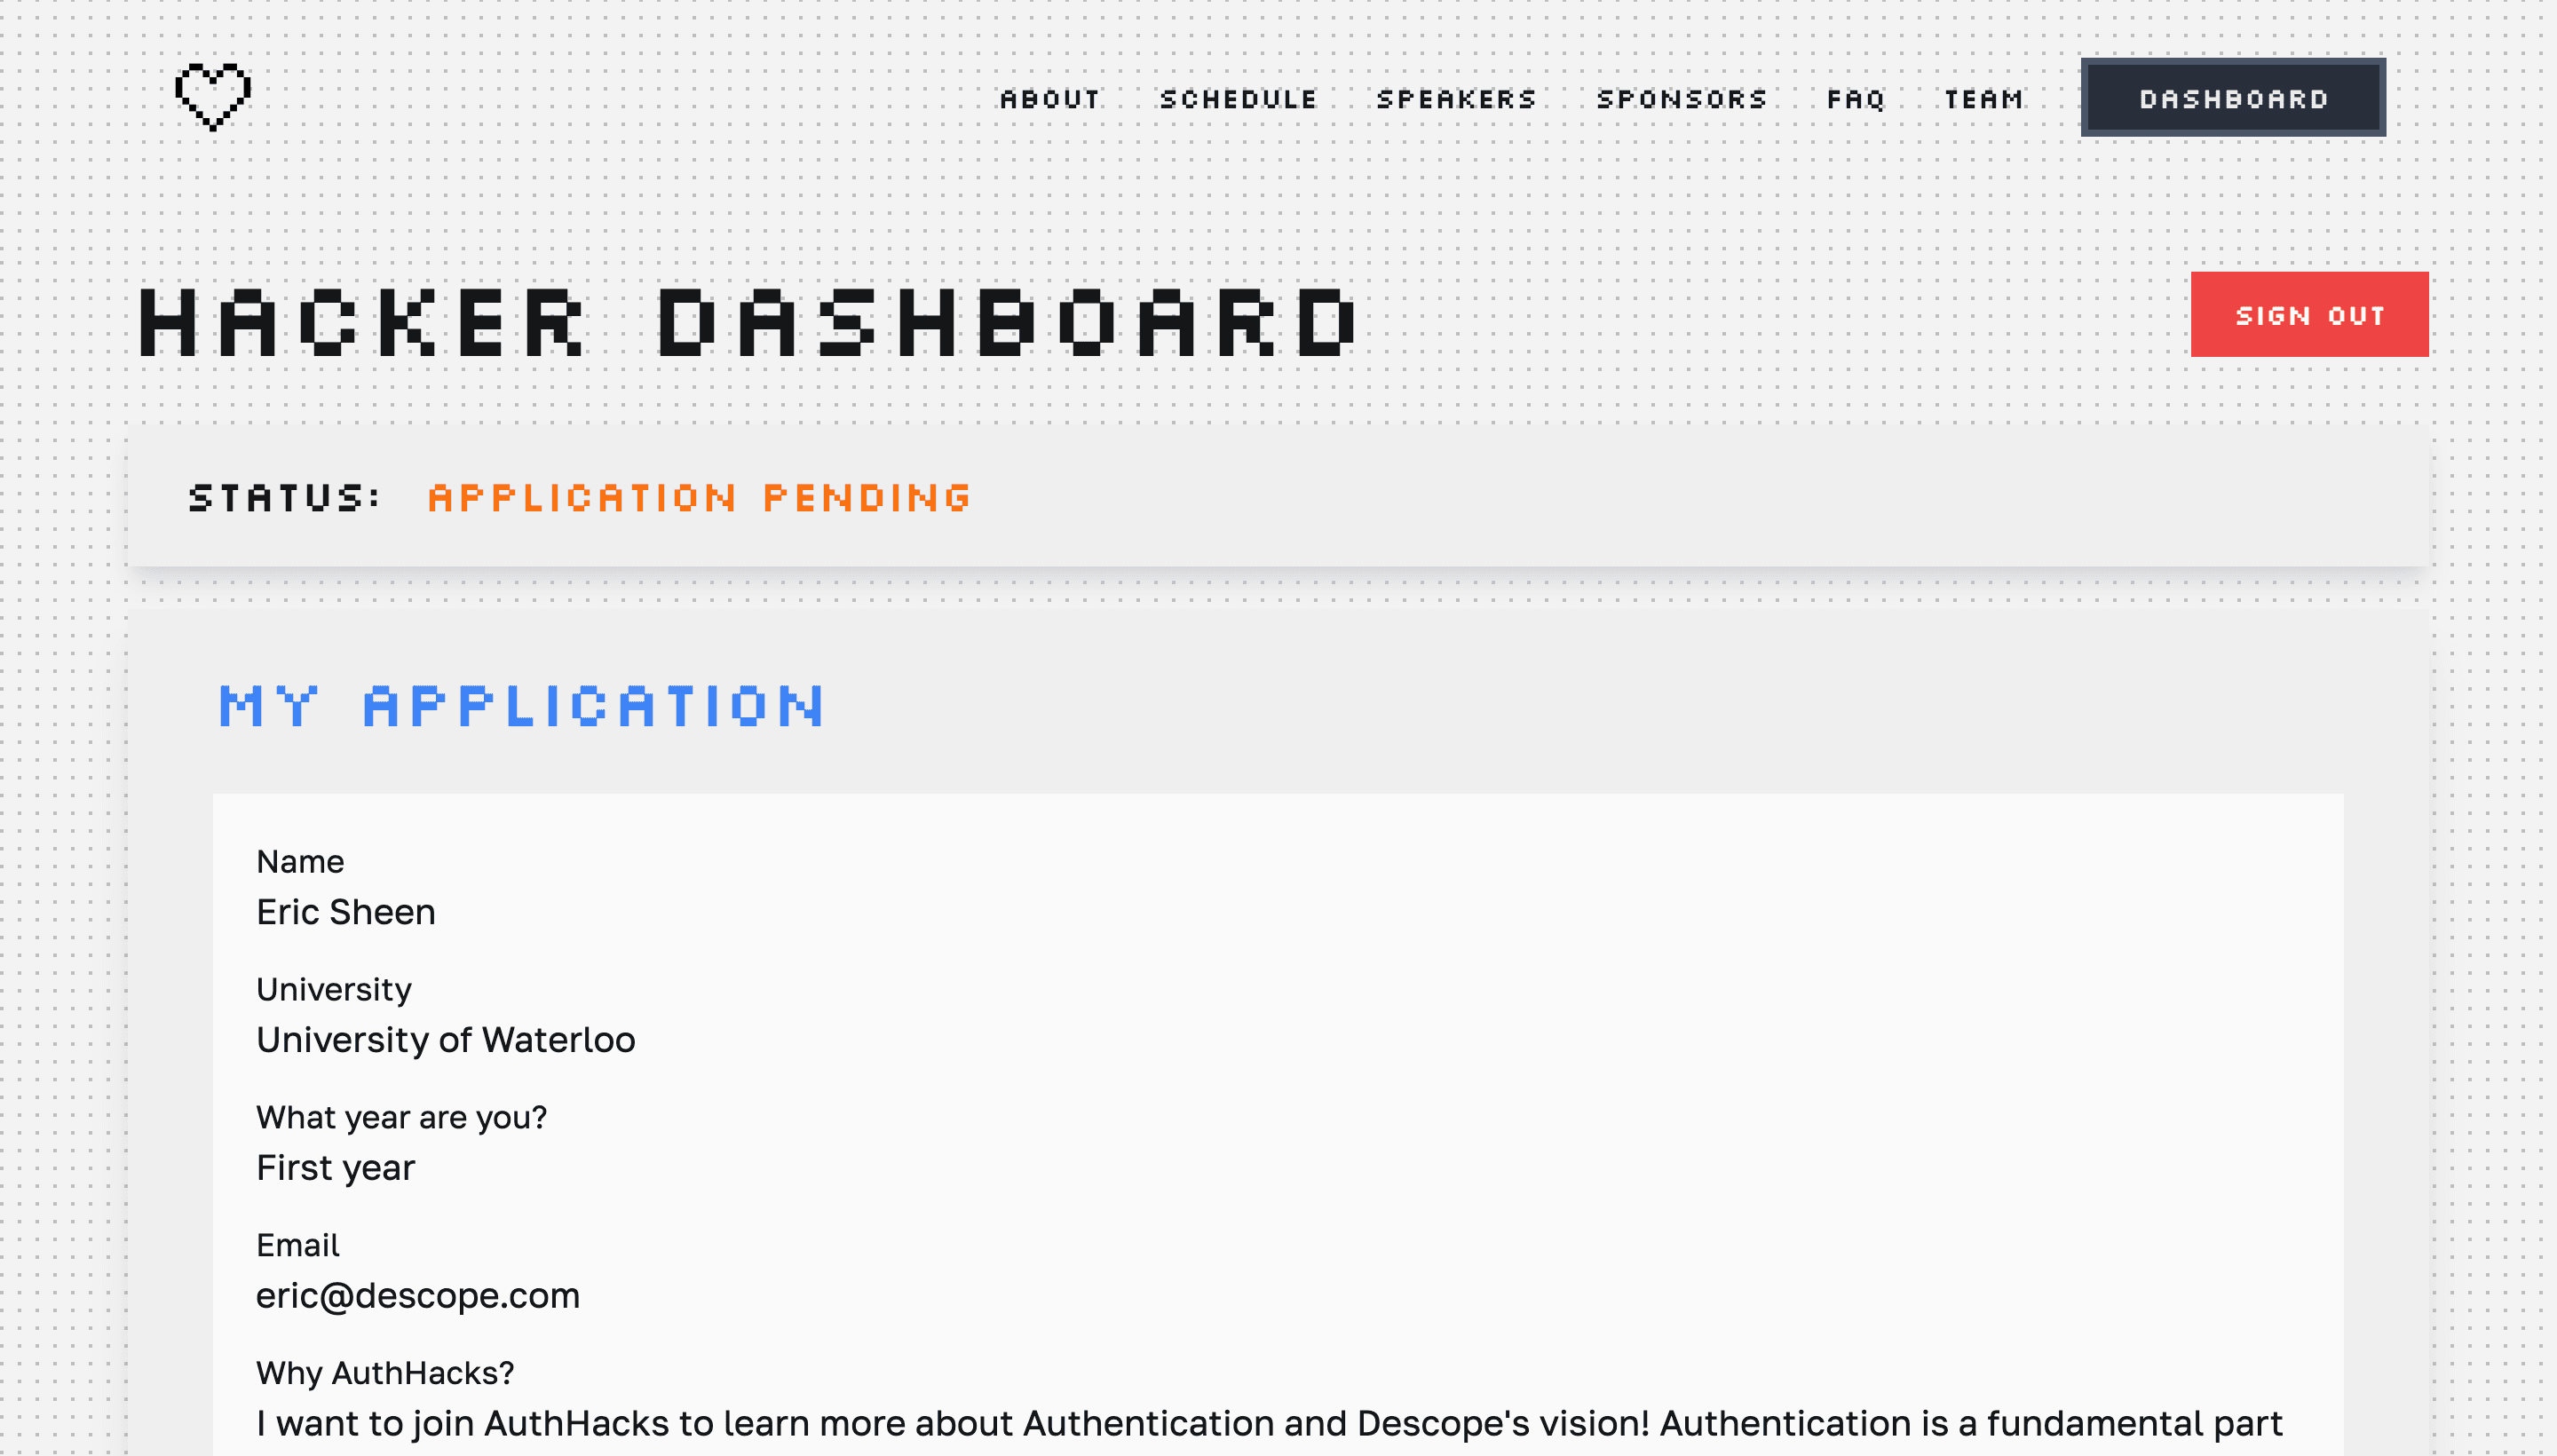
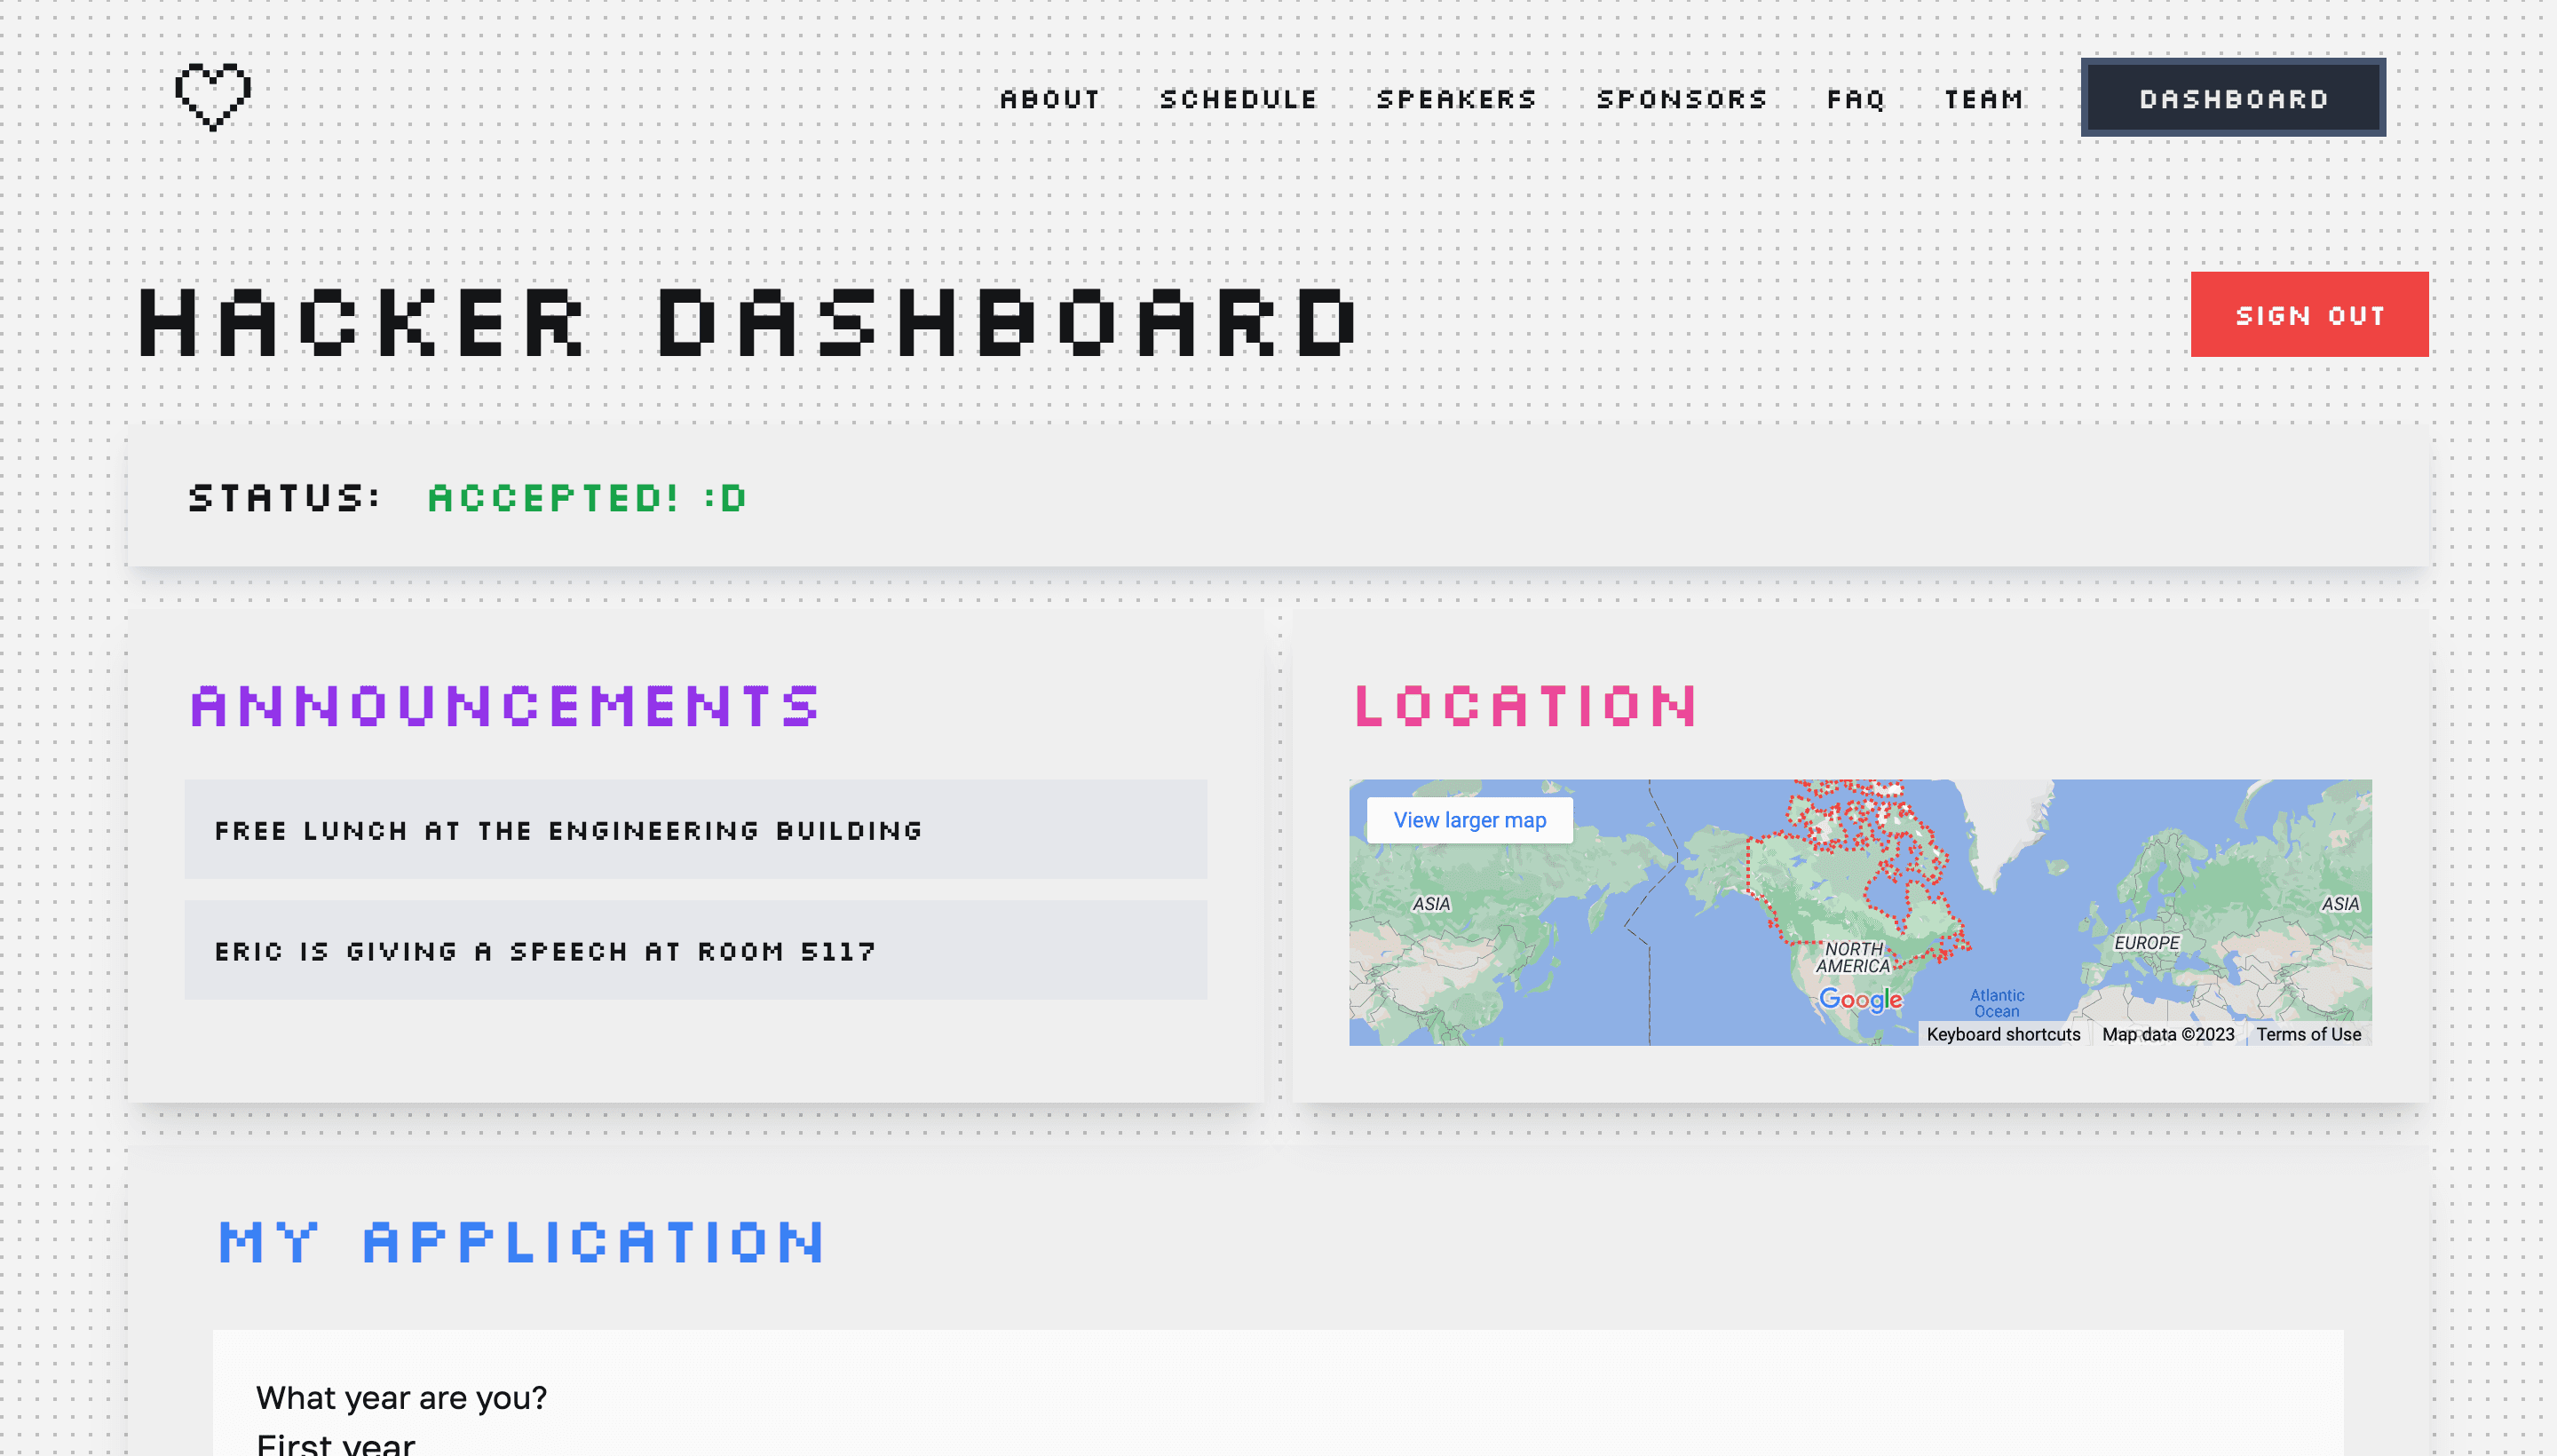
Dashboard
Once a user is signed in with Descope and NextAuth in Next.js 13, we’ll direct them to a protected dashboard page. This page uses server-side session handling via getServerSession to validate access.
The Dashboard page has two main functions:
getDatafetches data from our Airtable API routeDashboardis the main page component that renders content based on the user’s application status
We’re using Airtable as our backend to store hacker applications and acceptance status. Here’s the code:
...
const getData = async () => {
    const session = await getServerSession(authOptions)
    const email = encodeURIComponent(session?.user?.email || "")

    const res = await fetch(`${process.env.NEXTAUTH_URL}/api/airtable?email=${email}&secret=${process.env.SECRET_TOKEN}`)
    const data = await res.json()

    return data.body
}


export default async function Dashboard() {
    const session = await getServerSession(authOptions)
    if (!session) {
        redirect("/api/auth/signin?callbackUrl=/dashboard")
    }

    const airtableRecord = await getData()

    return (
        <div className='page space'>
            <div className="w-[90%]">
                <Header />
                {airtableRecord ?
                    <>
                        <Status accepted={airtableRecord['Accepted']} />
                        {airtableRecord['Accepted'] &&
                            <Info data={AnnouncementsList} />
                        }
                        <Application application={airtableRecord} />
                    </>
                    :
                    <Form />
                }
            </div>
        </div>
    )
}
Code block: app/dashboard/page.tsx
Within the fetch request of the getData function are two parameters:
email: We get the user’s email from thegetServerSessionabove. The email is passed in the query to identify the user data we are fetching.secret: The secret token acts as the API key that we get from our environment variables as a way for the API to validate the request. Here’s an example from the Next.js docs.
The Dashboard component is made up of three key parts:
To protect the Dashboard page, we use
getServerSessionto get the session and check if it exists. If not, we redirect to the sign-in page with the callback URL set to the Dashboard page.The
getDatafunction is called, and the response is an object that can contain anAcceptedfield to indicate whether the hacker has been accepted into the hackathon.In the return statement, we first check if user data exists in our Airtable. If it doesn’t, we display the Form component. If it does, we display the Status component and Application Component. If the user is accepted, we display the Info component.
NOTE: Since the Dashboard component is a server component, you can’t use useSession or getSession, as those are client-side React hooks. Instead, we use getServerSession to access the session and fetch the user’s email securely.
Setting up and protecting our API
In this final step, we’ll create a backend API route that securely fetches data from Airtable. This route will be used by our dashboard to retrieve user-specific information after authenticating with Next.js 13 and NextAuth.
Here’s the API route:
import { NextResponse } from 'next/server'
import type { NextRequest } from 'next/server'
import Airtable from 'airtable'


export async function GET(request: NextRequest) {
    const { searchParams } = new URL(request.url)
    const email = searchParams.get('email')

    if (searchParams.get('secret') !== process.env.SECRET_TOKEN) {
        return NextResponse.json("Unauthorized", { status: 401 })
    }

    ...

    const res = [{
        "fields": {
            "Name": 'Descope',
            "University": 'University of Waterloo',
            "What year are you?": 'First year',
            "Email": 'example@descope.com',
            'Why AuthHacks?': "Authentication is a fundamental part of any startup, SaaS, or business. The workshops and connections I'll make will profoundly broaden my knowledge of good security practices and industry leaders.",
            'Accepted': true
        }
    }]

    return NextResponse.json(
        {
            body: res[0].fields,
        },
        {
            status: 200,
        },
    );
}
Code block: app/api/airtable/route.ts
Here’s a list of steps we take to protect and get data:
Next.js 13 comes with HTTP methods as the route identifier. The
GETmethod will be triggered when we call aGETrequest to/api/airtable.We can use JavaScript’s built-in URL class to parse the incoming request and get the query parameters:
emailandsecret.We get the secret from the
searchParamsand check it against our secret token that we have stored as an environment variable. If it does not match, we return an unauthorized response.The
resvariable contains our hackathon dummy data, which we send to the client in the response body.
With this API route in place, our dashboard can securely fetch user-specific records from Airtable once authentication is complete.
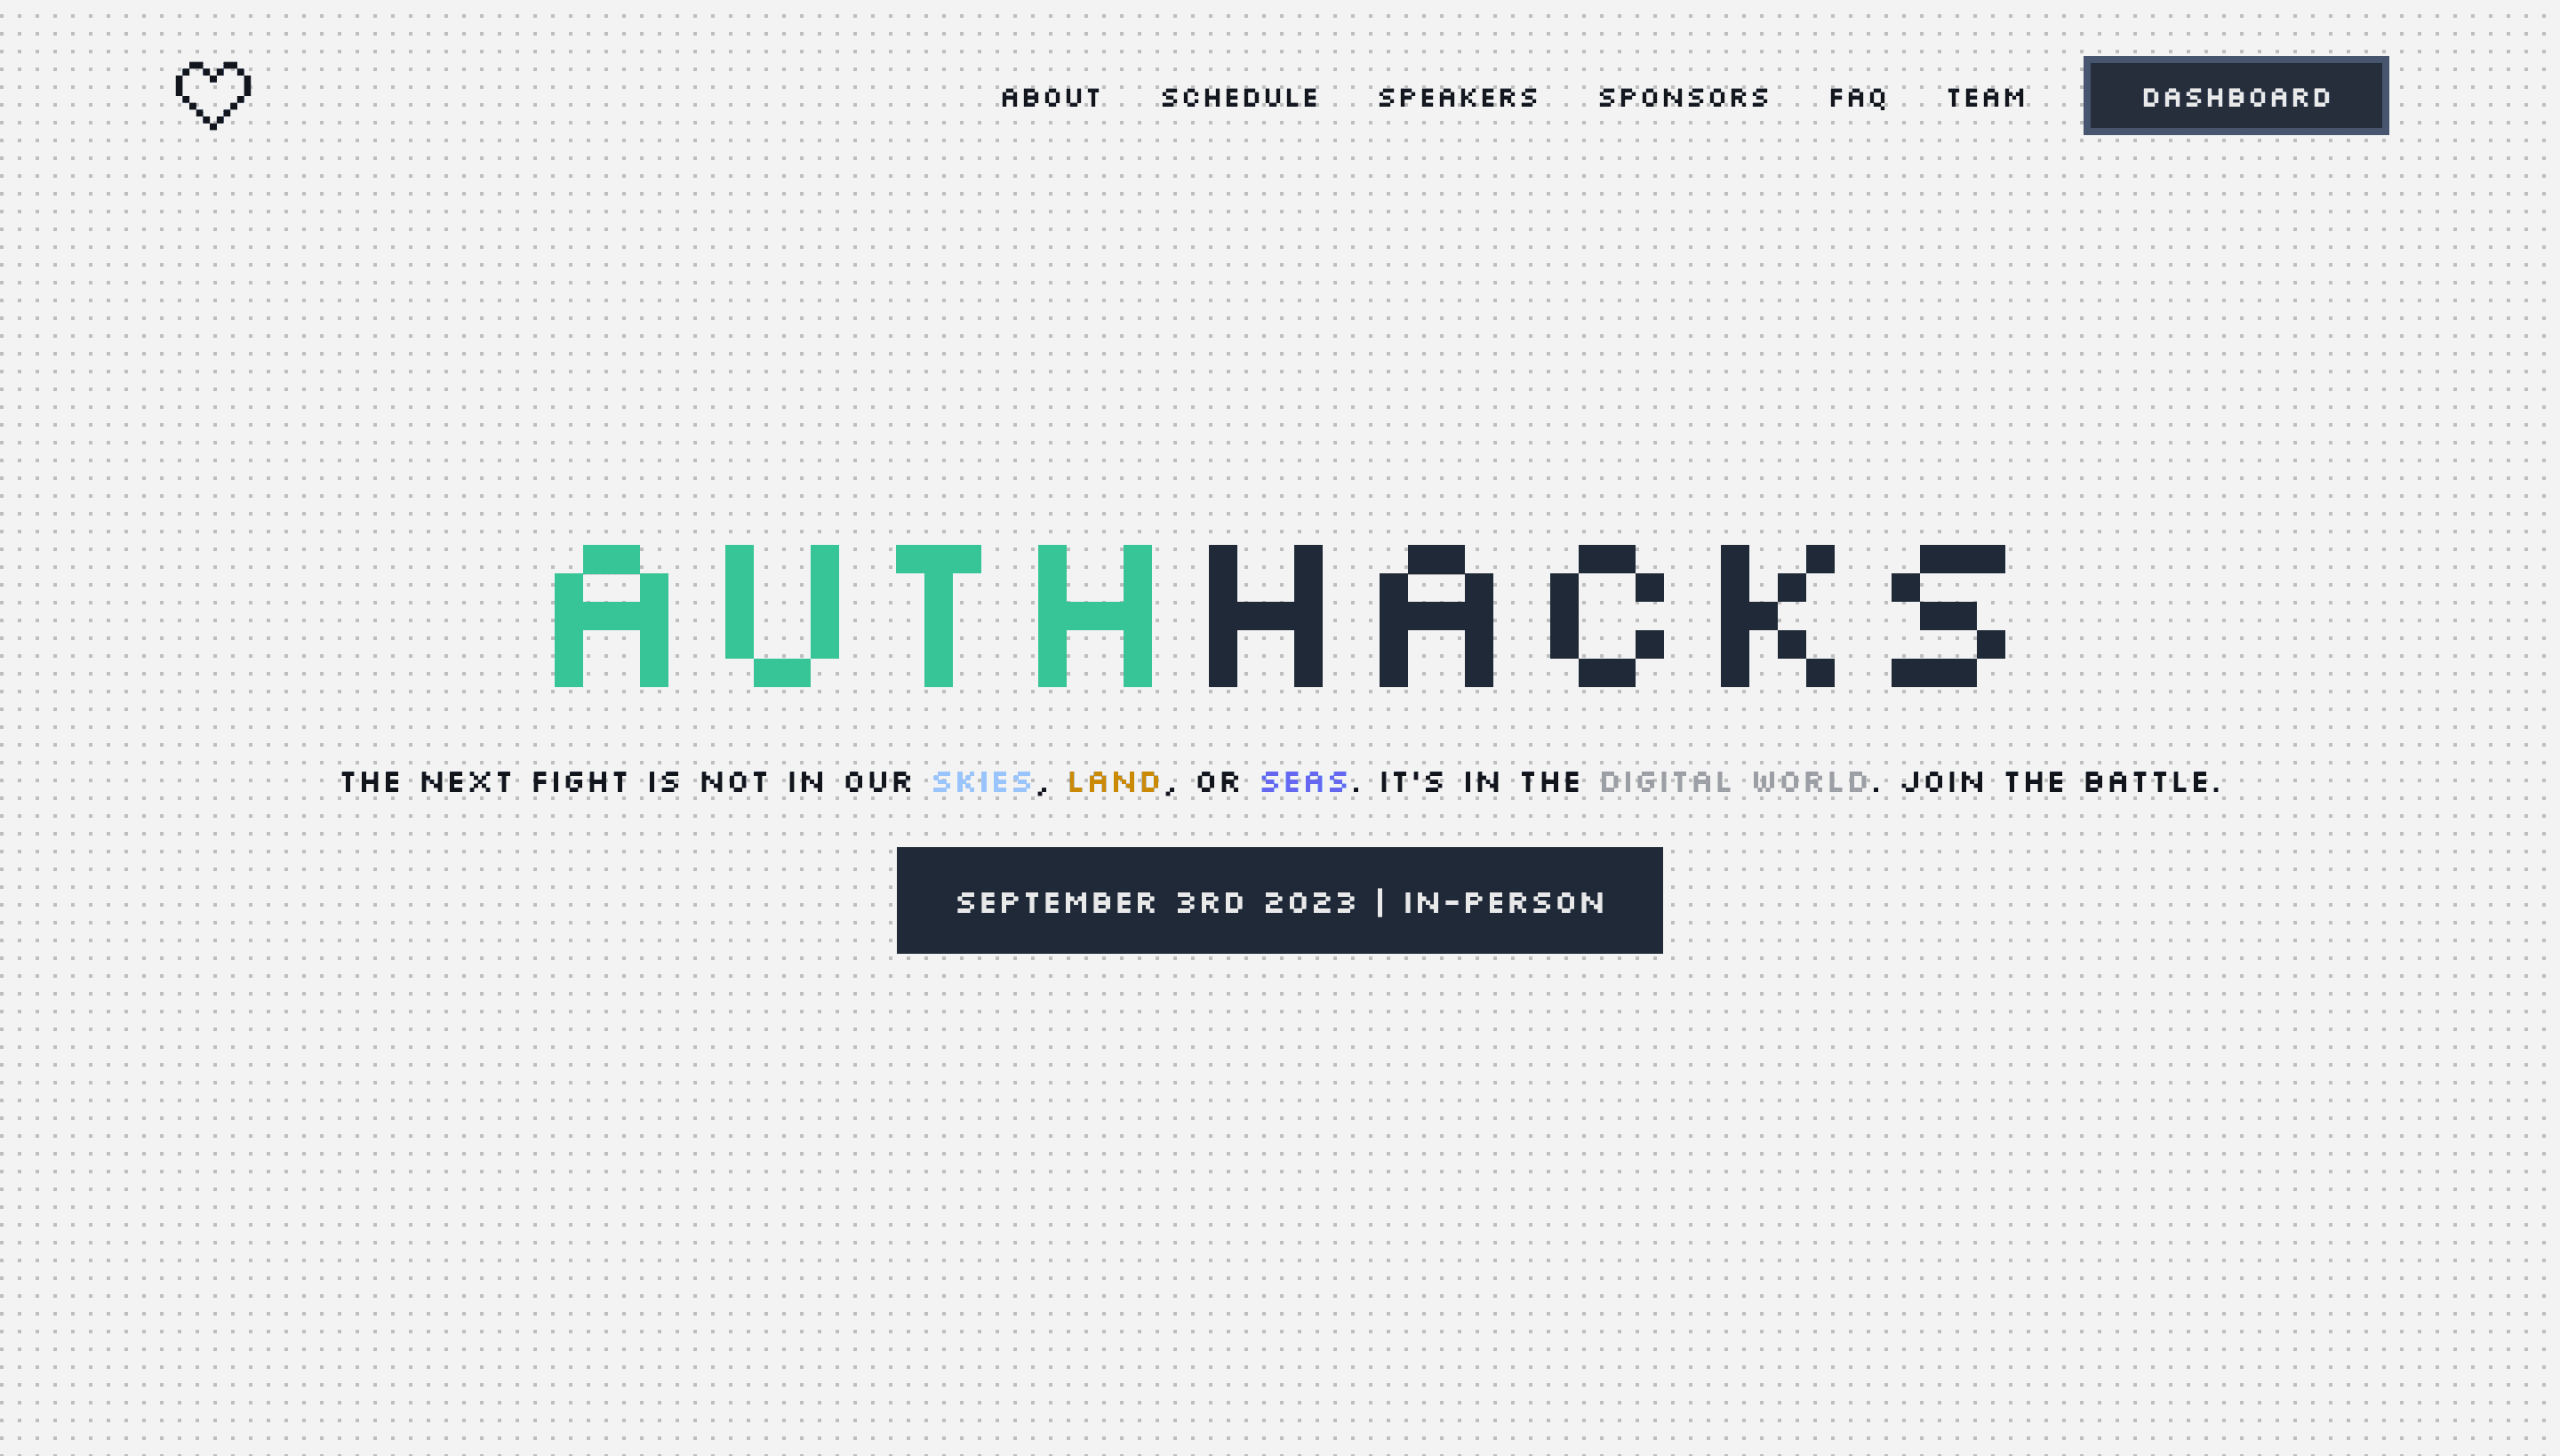
Demo day
Here are some screenshots from the hackathon template. You can also check out the live preview here: https://nextjs-hackathon-template.descope.com/

All the code used in this project is available in the GitHub repository. Feel free to clone, remix, and customize it for your own event or app.
Hack Next.js 13 x NextAuth with Descope

The name and theme for the hackathon template—AuthHacks—reflect our mission here at Descope: to make passwordless authentication available in just a few lines of code.
Whether you're building for a university hackathon or spinning up your next SaaS MVP, this Next.js 13 + NextAuth + Descope stack is ready to help you get started faster.
What will your hackathon be?
To learn more about Descope and showcase what you’re building, join hundreds of developers in our AuthTown community.
Descope also offers full support for Next.js 13 with sample apps, templates, and step-by-step guides.
If you’re ready to start your Descope journey, sign up for a Free Forever account and build something auth-some!