

Table of Contents
Late last year, the latest version of Next.js was released: Next.js 13. In this blog, we're going to explore and compare Next.js 12 with Next.js 13. By the end, you will fully understand pre-rendering (SSG vs SSR), server and client components, file differences, page & API routing, data fetching, and everything in between.
If you're thinking of migrating your Next.js app to a newer version, this blog is definitely for you.
Let's get started!
Overview
Here are the topics that will be discussed in this blog:
Pre-rendering: SSG vs SSR
Server and client components
Key file differences
Page and API routing
Data fetching
Throughout the blog, we will use two different example apps for comparison. For context, both sample apps are the exact same app made using different Next.js versions. The next-hackathon-template is made using Next 13, while the nextjs-hackathon-template-pages is made using Next 12.
Let's start with the most fundamental concepts of Next.js.
Pre-rendering: SSG vs SSR
Before we dive into the differences between Next 12 and 13, let’s first understand how Next.js uses pre-rendering to display the application in the browser. Two different pre-rendering techniques are used: Static Site Generation (SSG) and Server-side Rendering (SSR).
Let’s explore the differences in SSG and SSR with a diagram.

The diagram above shows the difference in rendering processes between SSR and SSG. Let’s break this down further:
Static Site Generation
In SSG, the entire application is compiled into HTML at build time. When the user requests a page, the static HTML and assets are sent to the client. The HTML is hydrated with the JS in the client. The static page is cached in a CDN to be reused when a request is made to the page again.
As a result, there is no server runtime, and it’s all in the client. This makes the website instantaneous!
Server-side Rendering
In SSR, pages are rendered in run-time, which means the page is regenerated for every request.
Data is fetched from the server through getServerSideProps (in Next.js 12). Then pre-rendering kicks in. The server renders the HTML for the requested page. HTML is then sent to the browser like a quick preview. However, it’s not interactive yet.
Then hydration occurs, which is the process of making the HTML interactive. A JavaScript bundle containing React JavaScript, states, and events is sent to the browser where it's downloaded and run. The JS is loaded and syncs with the HTML page, giving interactivity and functionality.
In Next 12, all components are considered client components because all components interact with the browser API in some way to render some part of the page, whether that’s SSG or through hydration and JS bundles.
In Next 13, something brand new is introduced: server components.
Server and client components
A significant change between Next 12 and Next 13 is the introduction of server components. A server component is fetched and rendered in the server with zero JS being sent to the browser (reducing the JS bundle size and improving performance). Rather than data fetching being handled from the client, it occurs on the server side, making it much faster. This differs from traditional SSR.
Here’s how server components work:
Data is fetched and the JS is executed on the server.
Data is serialized into a JSON-like data format.
This new JSON formatted data is sent in chunks and streamed to the client where it is translated to HTML and added to the ReactDOM.
Server components do not support state, hooks, or client events due to it all being rendered in the server. As a result, there is now a separation of server and client logic through server and client components.
So when should we use client vs server components?
Server components | Client components |
|---|---|
Great for fetching data or when no user interaction is required e.g. databases, APIs. | These are the typical React components e.g. hooks, event listeners, interactivity. |
Can we use client and server components together?
Server component in client component | Client component in server component |
|---|---|
Importing and using a server component in a client component is not allowed! Instead, make the server component a prop of the client component. | This works! As for how things are rendered in this case: server components are all first rendered and the HTML of the server component is displayed in the client. Then, only the JS of the client components are downloaded in the browser and run. |
Before we explore a practical example of server and client components, let’s take a pause to review what we have learned so far. Here’s an overview of the key differences between Next 12 and Next 13:
Next.js 12
All files created in the pages directory are client components.
Uses SSR by using
getServerSideProps.
Next.js 13
All files created in the app directory are server components, which do not interact with the client. Zero JS is sent to the browser.
To convert to a client component, at the top of a file, add the declaration “use client”
No more
getServerSidePropsandsetStaticProps. To fetch data, use server components.
Continuing on, let’s look at how we can implement a client component in a server component.
'use client'

import { SessionProvider } from "next-auth/react"


export default function NextAuthSessionProvider(
{ children }:
{ children: React.ReactNode }
) {
    return <SessionProvider>{ children }</SessionProvider>
}
Code block: app/_providers/sessionProvider.tsx
Above we have our NextAuthSessionProvider component, which is a client component denoted by the “use client” at the top of the file.
...
import NextAuthSessionProvider from './_providers/sessionProvider'
...

export default function RootLayout(
{ children }:
{ children: React.ReactNode }
) {
  return (
    <html lang="en">
      <body className={silkScreen.className}>
          <NextAuthSessionProvider>
            <Navbar Logo={LogoBlack.src} />
            <div>
              {children}
            </div>
            <Bottom Logo={LogoWhite.src} SocialList={SocialList}  />
          </NextAuthSessionProvider>
      </body>
    </html>
  )
}
Code block: app/layout.tsx
In the layout server component, we import the client component and wrap our nodes in the NextAuthSessionProvider.
Now that the important basics are covered, let’s explore the file differences.
Key file differences
Let’s first go over the differences in the main files.
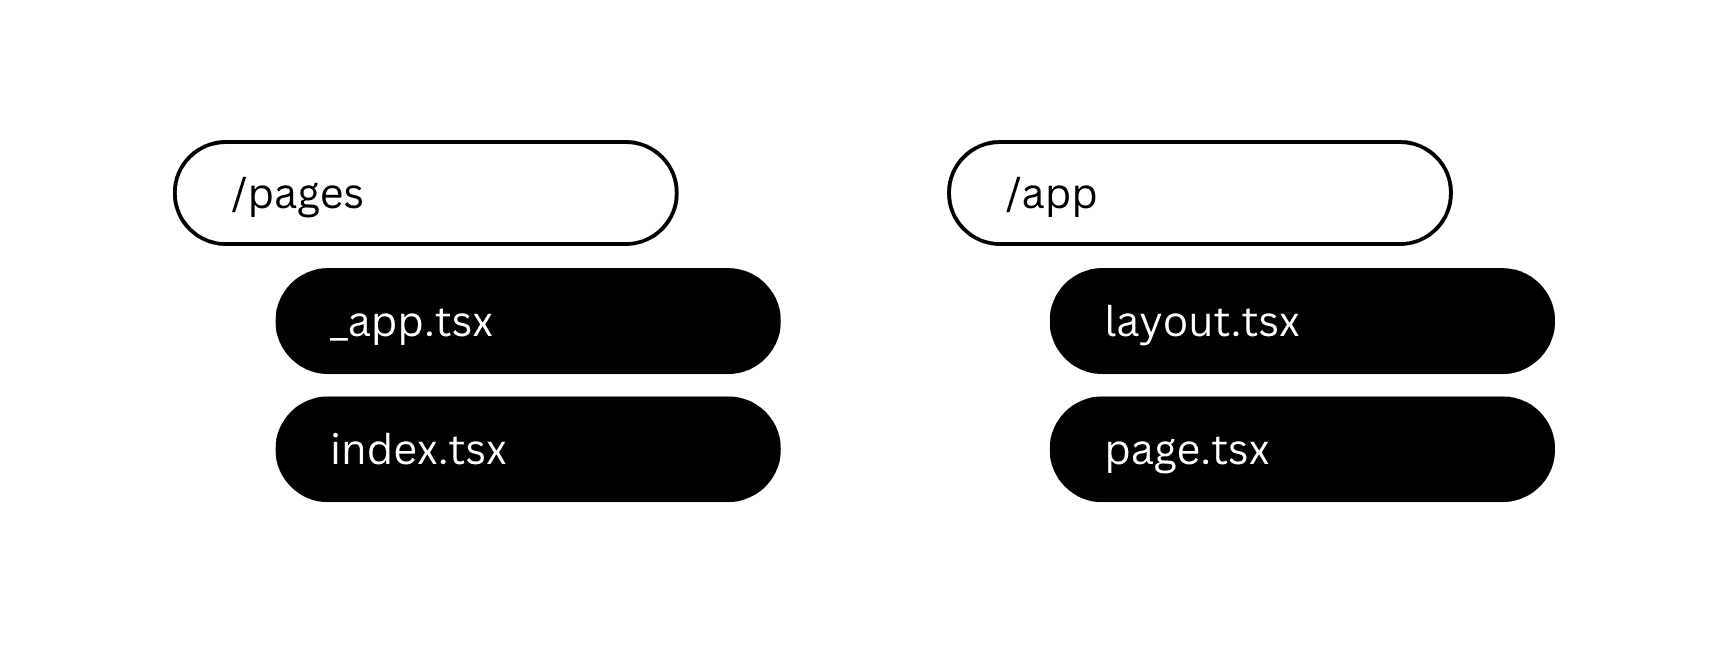
Above, we have the two sample apps: one made with the app directory, the other with pages. Both directories feature files that look completely different!
Let’s analyze the following two files:
File | Next 12 | Next 13 |
|---|---|---|
The main global app file that initializes pages and components. Anything added or edited in this file will impact the entire application. |
|
|
The main page. What you see when you go to “/” |
|
|
Main app files
Let’s look at two different code snippets in nextjs-hackathon-template-pages and nextjs-hackathon-template (Next 12 and 13 respectively).
...

export default function App(
{ Component, pageProps,}:
AppProps<{ session: Session }>
) {
  return (
    <SessionProvider session={pageProps.session}>
      <Navbar Logo={LogoBlack.src} />
      <div>
        <Component {...pageProps} />
      </div>
      <Bottom Logo={LogoWhite.src} SocialList={SocialList}  />
    </SessionProvider>
  )
}
Code block: pages/_app.tsx
Next 12 follows the concept of pages, where any file added to the pages directory is now a page.
The _app.tsx file contains the App component which serves as the entry point to all the pages.
Within the parameters are the Component and pageProps:
Component: Represents the page of concern to be rendered i.e. if we go to
/dashboard, the dashboard page component will be rendered.pageProps: Prop data that’s passed into every page.
The hackathon template we created using Next.js requires authentication throughout our entire application, so we include a session AppProps<{ session: Session } in the AppProps, which we then pass into the SessionProvider.
NOTE:
_app.tsxis a client component & andAppPropsreturns a JSX Element.
Now let’s look at Next 13.
...

export default function RootLayout(
{ children }:
{ children: React.ReactNode }
) {
  return (
    <html lang="en">
      <body className={silkScreen.className}>
          <NextAuthSessionProvider>
            <Navbar Logo={LogoBlack.src} />
            <div>
              {children}
            </div>
            <Bottom Logo={LogoWhite.src} SocialList={SocialList}  />
          </NextAuthSessionProvider>
      </body>
    </html>
  )
}
Code block: app/layout.tsx
In Next 13, we are introduced to the concept of layouts. From the Next.js docs, a layout is defined as “a UI that is shared between routes.”
We have our RootLayout, but instead of AppProps, we have children of type ReactNode.
NOTE:
layout.tsxis a server component
To summarize, there are three key differences between _app.tsx and layout.tsx (apart from the file names):
Next 12 | Next 13 |
|---|---|
|
|
Props are passed directly into the component. | Simply displays our node. The layout is a shared UI. |
|
|
Page and API routing
With the new version of Next, the routing changes as well. The table below shows two different example routes as well as the difference in the folder and file structure:
Examples | Next 12 | Next 13 |
|---|---|---|
Route 1 |
|
|
Project structure to achieve route 1 |
|
|
Route 2 |
|
|
Project structure to achieve route 2 |
|
|
In Next 12, any file created in the pages directory is a route. So, to create a dashboard and team page, we could simply create a file named dashboard.tsx and another named team.tsx.
On the other hand, Next 13 introduces a system where any directory created in the app folder is now the route. Thus, a page.tsx file must be created within the directory to contain the component.
API routes
API routes follow the same structure as page routing.
Examples | Next 12 | Next 13 |
|---|---|---|
API route |
|
|
Project structure to achieve the route |
|
|
Just like how page.tsx stores the component, route.ts stores the API handler logic.
Next 13 also now supports HTTP methods as the route. Now whenever someone makes a GET request, our GET API route below will be triggered.
...

export async function GET(request: NextRequest) {
...
}
Code block: Example of GET API route in Next 13
Previously in Next 12, you would instead have a handler function which would check if the request is a GET or a POST.
export default async function handler(
request: NextApiRequest,
response: NextApiResponse
) {

	if (request.method === "GET") {
	...
	}
}
Code block: Example of GET route in Next 12
It’s worth noting that Next 13 also features server actions / functions which serve as a replacement for API endpoints. For example, within the server component, there can be a submit form which posts to a server function within the same page. Server actions are currently an experimental feature so we won’t go too deep into that in this blog.
In the last part of this blog, let’s explore data fetching and how we fetch from our API routes.
Data fetching
Now that our API routes are established, let’s get the data.
...

export default function Dashboard(
{ airtableRecord }:
{ airtableRecord: any }
) {
    ...
}


export async function getServerSideProps(context: any) {
    const session = await getServerSession(context.req, context.res, authOptions)
    const headers = context.req.headers

    if (!session) {
        return {
          redirect: {
            destination: '/',
            permanent: false,
          },
        }
    }

    const email = encodeURIComponent(session?.user?.email || "")


    const res = await fetch(`${process.env.NEXTAUTH_URL}/api/airtable?email=${email}`, {
        headers: headers
    })

    const data = await res.json()
    const airtableRecord = data.body || null;

    return { props: { airtableRecord } }
}
Code block: pages/dashboard.tsx
In Next 12, data fetching can be accomplished through SSR functions like getServerSideProps.
In Next 13, this is greatly simplified through the use of server components.
...

const getData = async () => {
    const session = await getServerSession(authOptions)
    const email = encodeURIComponent(session?.user?.email || "")

    const res = await fetch(`${process.env.NEXTAUTH_URL}/api/airtable?email=${email}&secret=${process.env.SECRET_TOKEN}`)
    const data = await res.json()

    return data.body
}


export default async function Dashboard() {
    const airtableRecord = await getData()

    return (
        ...
    )
}
Code block: app/dashboard/page.tsx
The introduction of server components allows us to create and use ordinary async-await functions like getData, which we can then call in our Dashboard component. There are zero props involved.
It’s also important to understand that server components only interact within the server. So we cannot use the headers() function and pass that into our fetch, since that comes from the client.
Instead, we send a secret token which acts as the API key as a way for the API to validate the request. The secret is stored as an environment variable.
The future

Next.js is a constantly evolving framework and it’ll be exciting to see what the future holds. If you want us to cover more Next.js content feel free to join hundreds of other Descopers in our AuthTown community and let us know!
Descope is a no / low code authentication and identity management platform for developers. We fully support Next.js and have many sample apps and guides to help you get started. Create a Free Forever account on Descope and start your Next.js authentication journey today. We've also written about how we created a hackathon registration page using Descope, Next.js, and NextAuth.
Until next time!