Table of Contents
Why use OIDC?
When building any application, security is a top priority. But how do you protect users without bogging them down with clunky authentication methods? The key is finding the right balance between robust security and a smooth, seamless user experience.
By using OIDC, we simplify login with single sign-on (SSO)—users only need to log in once to access multiple applications securely, and we get a reliable, industry-standard authentication flow.
In this guide, we’ll focus on integrating Electron with OIDC for desktop app authentication. Electron’s cross-platform compatibility makes it an ideal choice for quickly building desktop apps. It allows you to repurpose much of the code you've already written for the web, saving time and effort in development.
By the end of this guide, you’ll know how to implement the same kind of seamless authentication in your Electron app using Descope and OIDC.
Why use OIDC?
One of the key benefits of using OIDC with Electron is having a session stored in the browser, in the future a user can log into any of your other apps on other platforms and reuse that same session seamlessly from mobile, web, or desktop apps.
If you do have a web application and wanted to allow for the cross-app functionality, you’ll need to set up CNAMEs and Cookies. This allows for the shared cookie to be used and when you login from one app it will allow automatic authentication from all others via the OIDC login page.
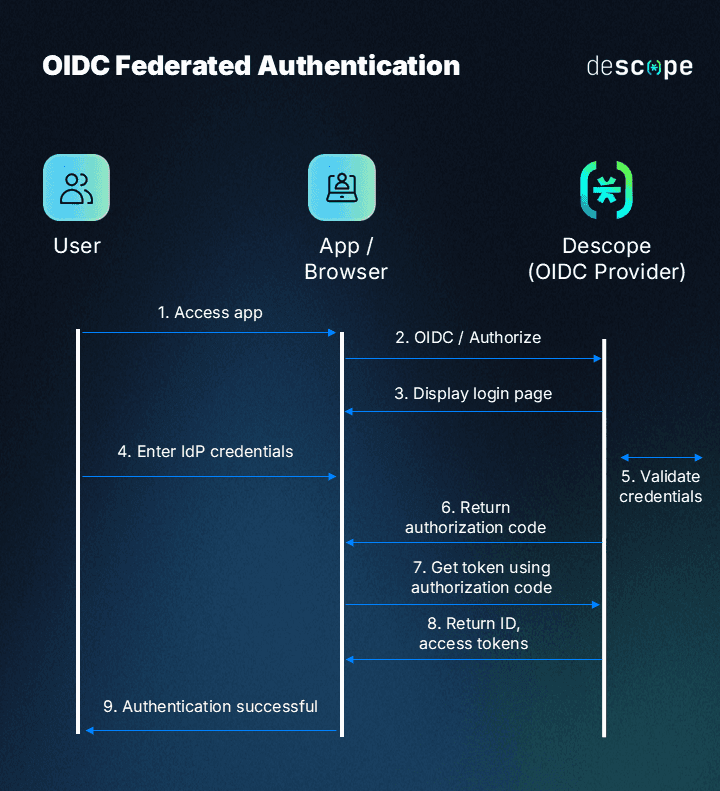
You can see a little more about the OIDC flow and Descope below.

Electron sample app
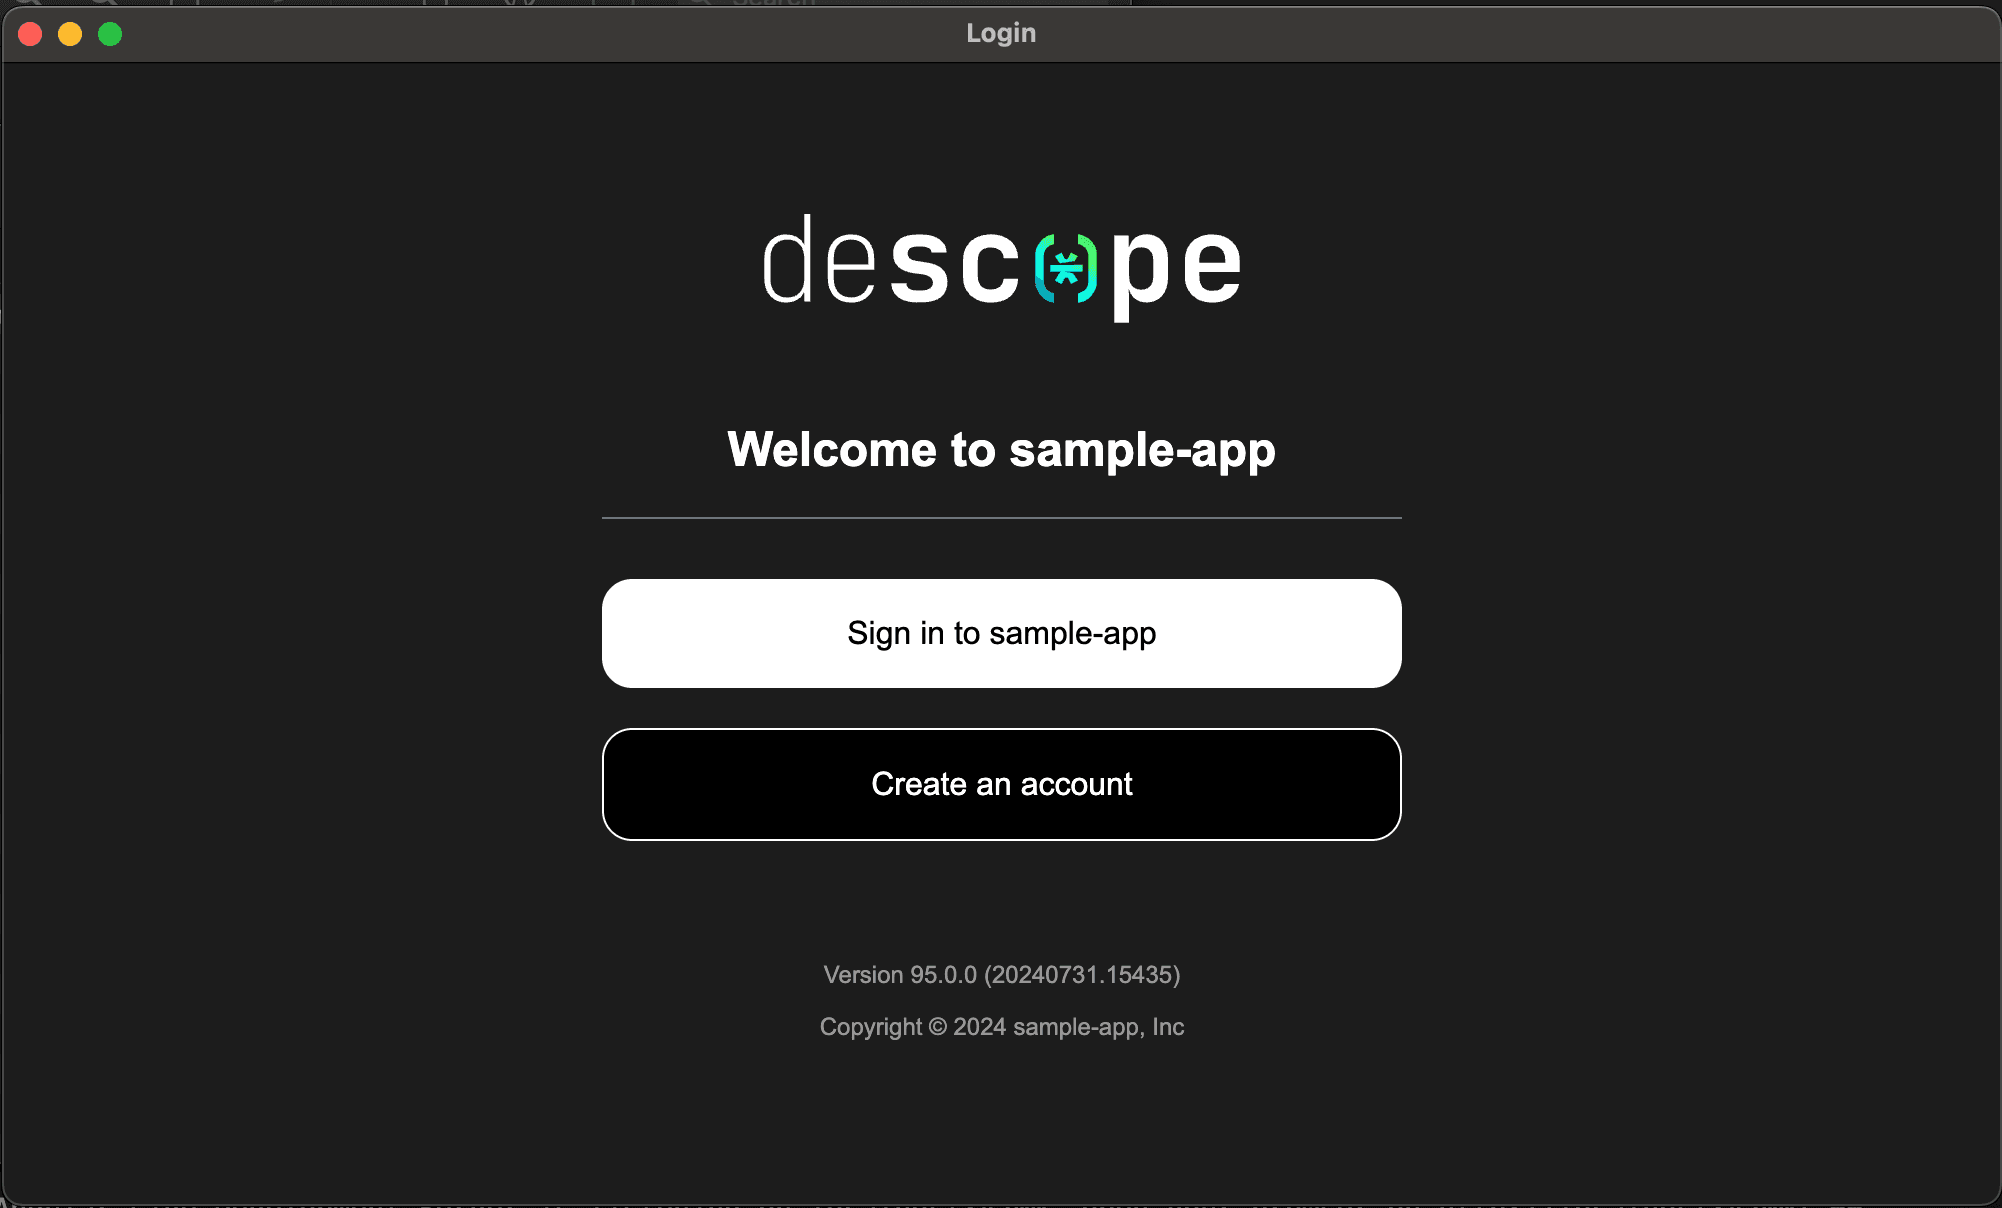
We will be going through the steps of setting up OIDC using a a simple Electron sample app, it will have a login screen and a dashboard screen for post-authentication. It’s a simple app written in Javascript, HTML, and CSS.
The goal: A user clicks login, gets redirected to the browser, after they authenticate, we bring them back to the desktop app, store the tokens, and take them to the dashboard. If they click logout, it will invalidate the token and sign them out on all apps that use OIDC.
To see user experience in action, check out this video:
You can also explore the sample app we’ll be building in this article here.
Here’s what we will be using:
Electron for our Desktop framework
HTML, Javascript, and CSS (You can use any framework you’d like!)
Descope as our IdP for user authentication
Configuring Descope
Let’s start by configuring Descope as an OIDC Provider If you don’t have a Descope account, you can sign up for free here.
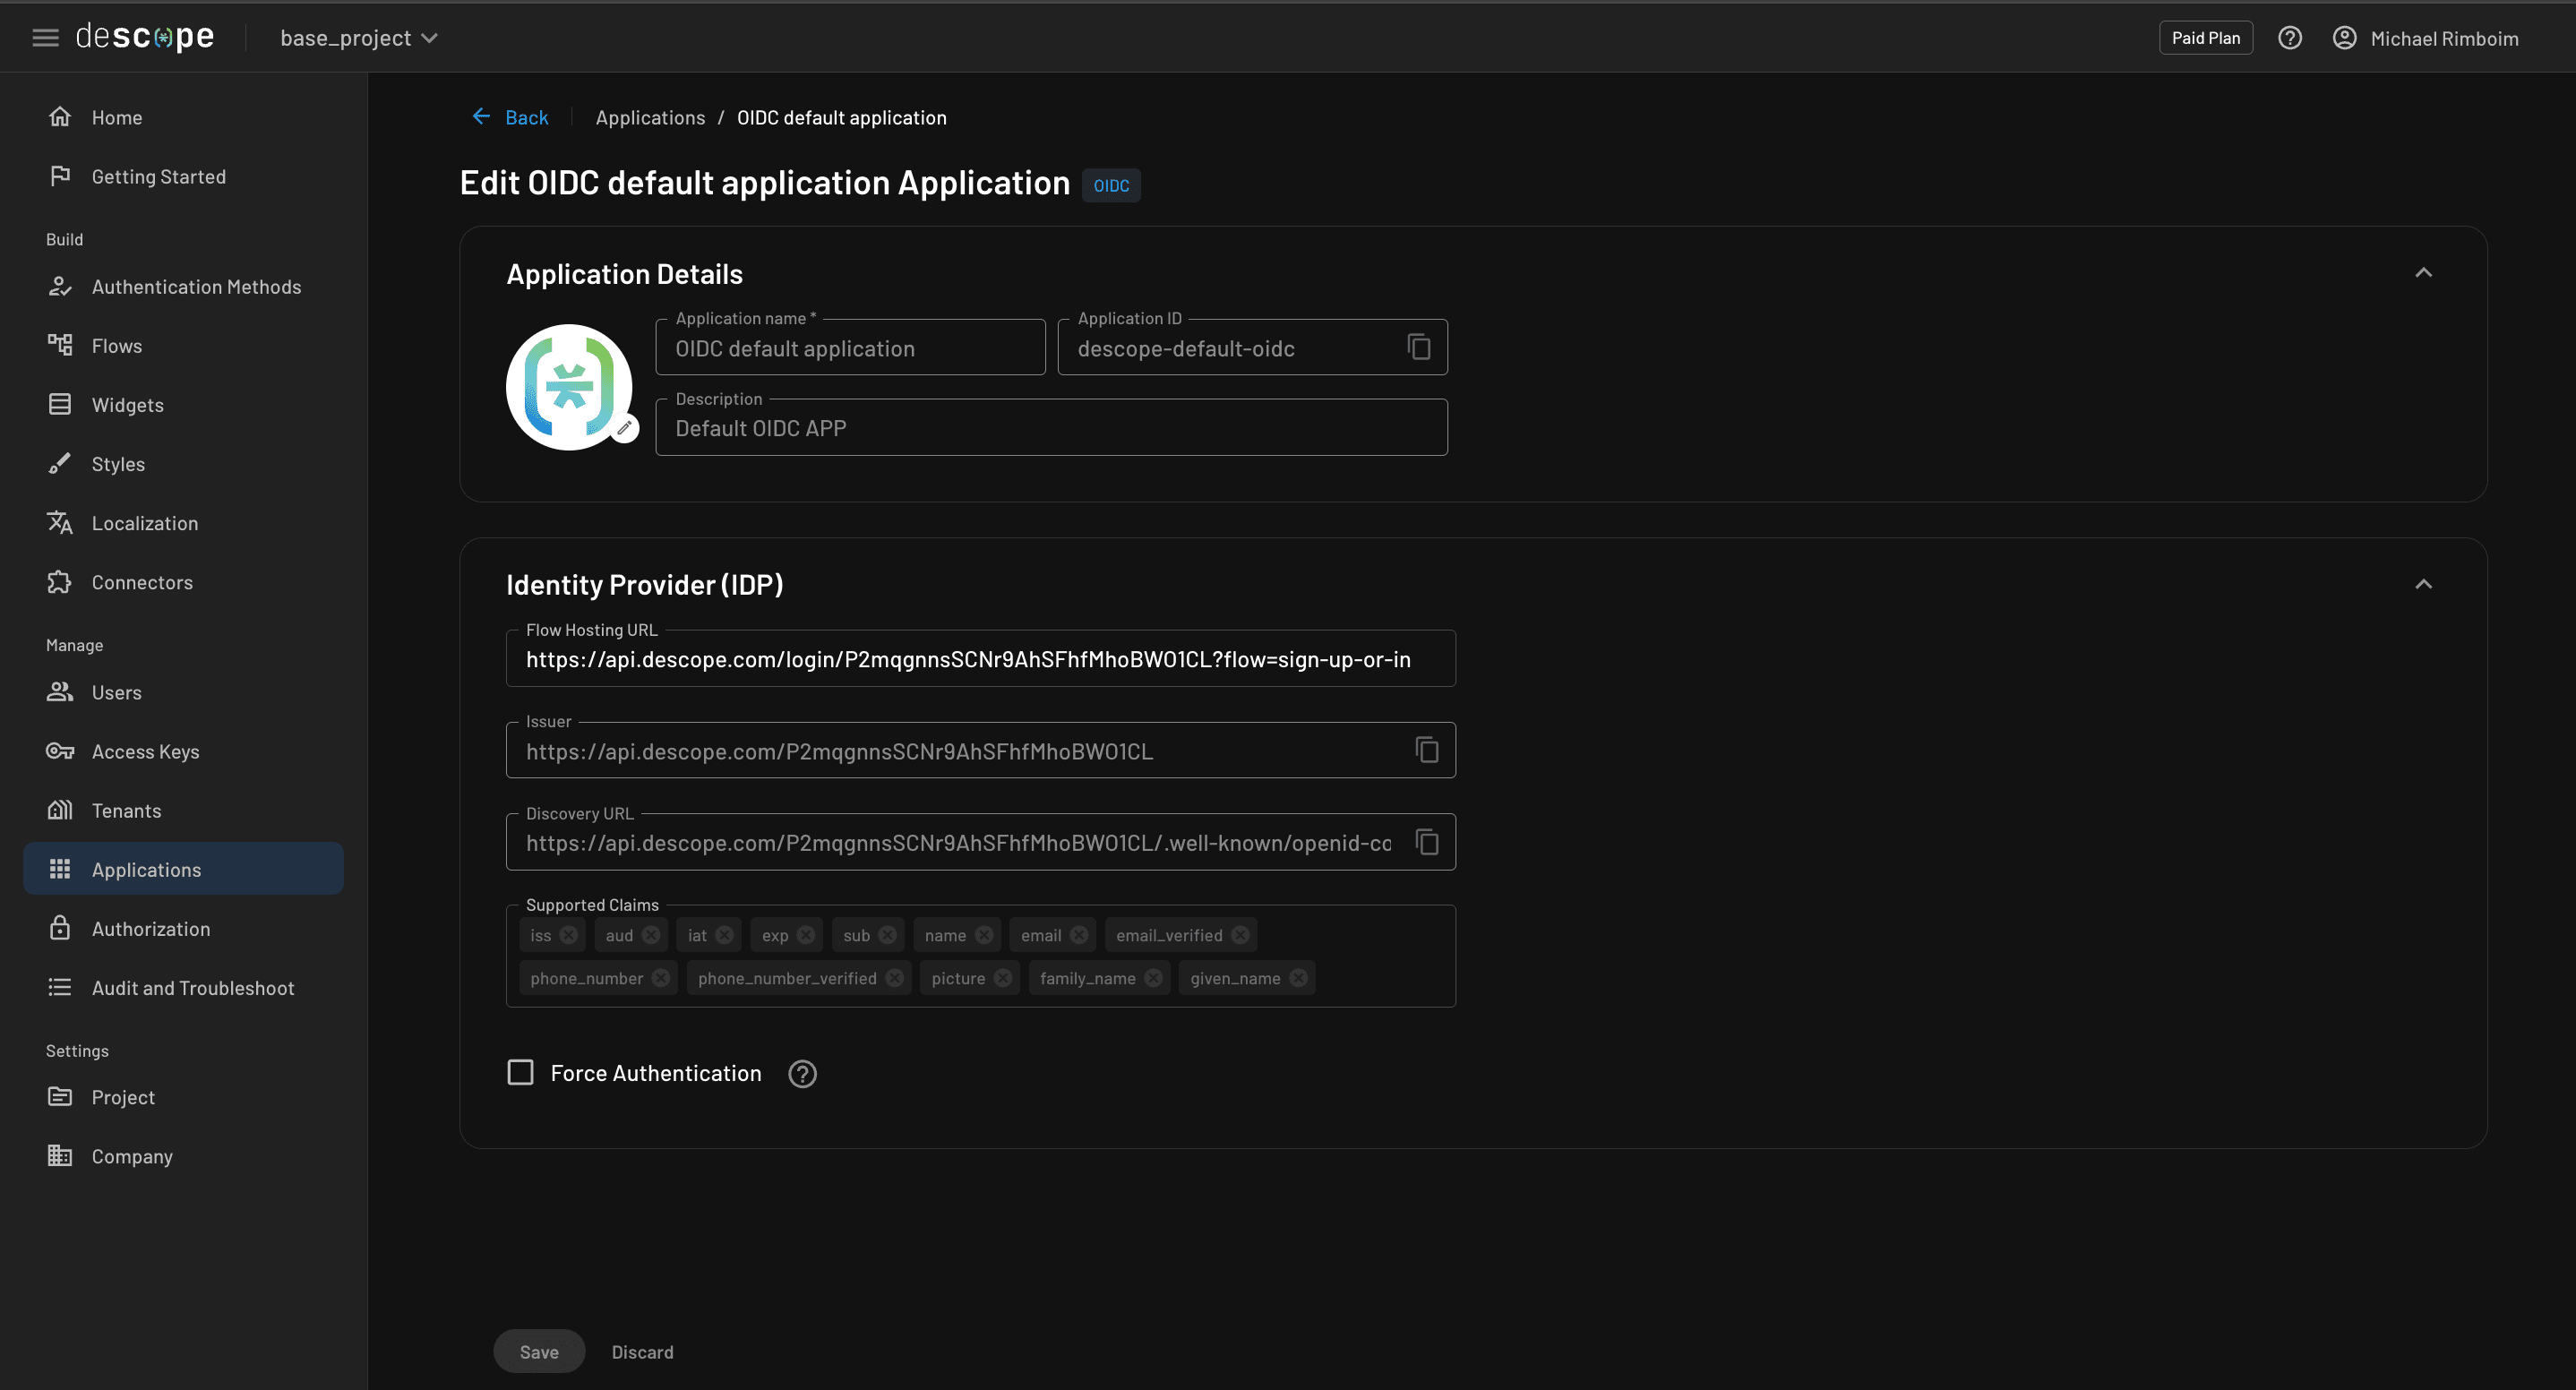
Once you're signed up, let’s set up an app in Descope to get things rolling. Head to the Console, and click on Applications in the sidebar. Here, you can configure Descope as either an OIDC or SAML Federated Identity Provider.
For this application, we’ll be using the “OIDC default application” that comes with every Descope project. If you click on it, you’ll see options to add claims or force authentication each time a user signs in. The field labeled Flow Hosting URL is where the user will be redirected when authentication is needed. The URL is composed of three parts:
The Hosted Page (
https://api.descope.com/login). It is recommended to use the Auth Hosted Page provided by Descope, though you can host it yourself if desired.The Project ID (
/P2mqgnnsSCNr9AhSFhfMhoBWO1CL).The specific flow you want to run on the Auth Hosted Page when a user is directed there (
?flow=sign-up-or-in).
To see the authentication flow in action, go to Flows in the sidebar and click on “sign-up-or-in”. From there you can click “run” to test out the flow.

Now that we’ve set up everything we need in the Descope console, let's set up our Descope Environment Variables. Get your Project ID from here, then copy and paste it into env.json.example, then rename the file to env.json.
Adding authentication in your Electron app
In our Electron app, we’ll use OIDC endpoints and open the authentication page in an external browser. We’ll also create a custom protocol to handle redirecting users back into the app after authentication.
Alongside Electron, Electron-Settings, and Electron-Builder, we’ll use Axios for making requests to the OIDC endpoints. Run the following commands to install the necessary dependencies:
# install electron settings
npm install electron-settings axios

# install Electron as Dev Dependency
npm i -D electron electron-builder
All authentication and OIDC logic is handled in auth-service.js. Here are the key functions:
Authorization URL: Builds the OIDC authorization URL, appending a code challenge for security (using PCKE for extra security).
Token Exchange: After user authentication, exchanges the authorization code for session and refresh tokens, which we store persistently across Electron sessions.
Refresh Session: Retrieves a new session token using the refresh token when the session token expires.
Validate Session: Ensures a valid session token exists; if not, the app will log the user out.
Get Profile: Retrieves user information from the
/meendpoint.Logout: Invalidates all session and refresh tokens, requiring re-authentication upon reopening the app.
Setting up the main process
First, we’ll set up a custom protocol. This lets us create a unique URL scheme (e.g., electron://auth/) that allows the app to intercept and handle requests from both the browser and the app itself.
This is key for redirecting users back into the Electron app after they authenticate in the browser. When users are redirected to electron://auth/ after authentication (as configured in auth-service.js), the app will capture the token and process it.
Here’s how we set up the custom protocol and handle authentication redirect:
// main/main.js
const { app, ipcMain, BrowserWindow } = require("electron");
...

if (process.defaultApp) {
  // Setup the custom protocol
  if (process.argv.length >= 2) {
    app.setAsDefaultProtocolClient("electron", process.execPath, [
      path.resolve(process.argv[1]),
    ]);
  }
} else {
  app.setAsDefaultProtocolClient("electron");
}
...

app.on("open-url", (event, url) => {
  // Listens for app protocol link to be opened and gets custom protocol URL
  authService.loadTokens(url)
    .then(() => {
      BrowserWindow.getAllWindows().forEach((window) => window.close());
      createAppWindow();
    })
    .catch((error) => {
      console.error("Error loading tokens:", error);
    });
});
...
The app on the open-url event is where we actually get the URI from the returning user with the token attached. We take the URL and pass it to our loadTokens Function.
Managing tokens and user sessions
One key difference between authenticating on the web vs. desktop apps is how tokens are stored long-term. On the web, tokens can be stored in cookies or local storage, but desktop apps require a different approach to ensure tokens persist across sessions. If tokens were lost every time the Electron app closed, users would have to re-authenticate frequently.
To avoid this, we’ll securely store tokens on the device using SafeStorage and Electron-Settings.
SafeStorage is an Electron feature that leverages OS-provided cryptography to encrypt sensitive data. The beauty of this method is that it eliminates the need for developers to handle cryptography directly—the OS takes care of everything, including securely managing the encryption keys.
We use Electron-Settings, a library for persistent key-value storage, to securely store the encrypted tokens across sessions.
Here’s how it works in the store-service.js file:
// services/store-service.js
const { safeStorage } = require("electron");
const settings = require("electron-settings");

async function storeToken(token_name, token) {
    const encrypted_token = safeStorage.encryptString(token);
    await settings.set(token_name, encrypted_token);
}

async function retrieveToken(token_name) {
    const token = await settings.get(token_name);
    const decrypted_token = safeStorage.decryptString(Buffer.from(token.data));
    return decrypted_token;
}

module.exports = {
    storeToken,
    retrieveToken
}
In this code:
The
storeTokenfunction encrypts the token using SafeStorage and saves it using Electron-Settings.The
retrieveTokenfunction retrieves the encrypted token, decrypts it, and returns the original value.
We then integrate these functions into auth-service.js for managing tokens when users sign in, ensuring the tokens are securely stored and easily retrievable across sessions.
Running the app
Now that everything is set up, we can compile and package the app. Keep in mind that for features like redirects and deep linking to work properly, the app must be fully compiled—you won’t be able to test these in an uncompiled development environment.
To package the app, run the following command:
npm run distOnce the app compiles, you’ll find the executable in the dist folder, which may vary based on your operating system.
Congratulations! You’ve successfully added authentication to your Electron app—delivering the kind of seamless, secure experience used by major platforms.


Conclusion
This guide has helped you seamlessly integrate authentication into your Electron app using OIDC. By redirecting users to authenticate through their browser, you’ve not only enhanced security but also improved the overall user experience. This approach offers a smoother, more secure solution than many other Electron-based authentication methods.
For those interested in further exploring this project or implementing similar features in their applications, please visit the Electron OIDC Sample App repository.
You can Sign up for a Free Forever Descope account or book time with our auth experts to ask any lingering auth-related questions.


