

Table of Contents
Don't have the time to read the entire post? Our human writers will be sad, but we understand. Summarize the post with your preferred LLM here instead.
When you first build an authentication system, simplicity is the goal. An email-and-password login gets users signed in quickly and lets your team focus on product features. But as your app starts to attract larger customers, the conversation changes.
Protocol complexity: SAML, OIDC, OAuth—they all sound similar but work very differently.
Full SSO lifecycle: Handling metadata, login hints, domain routing, logout, user attributes, etc.
Enterprise requirements: Customers don’t just want SSO; they want to integrate their own IdPs (like Microsoft Entra ID) securely, with full admin control over authentication and access policies.
Trying to build all of this from scratch is not only time-consuming, it also introduces security risks if not done right. Using a platform like Descope is the easiest way to extend a homegrown system with SSO and multi-tenancy, without rebuilding everything from the ground up.
In this blog, we’ll walk through how to add SSO to a homegrown authentication system using Descope, with Microsoft Entra ID (formerly Azure AD) as the provider. But first, let’s address why SSO can be such a challenge to implement within a custom-built auth system.
Why adding SSO to homegrown auth is so hard
SSO is a core expectation of enterprise B2B customers. But if you’re working with a custom-built system teeming with tech debt, extending a homegrown authentication system to support enterprise SSO is rarely straightforward. You’re not simply adding a SAML or OIDC endpoint, but are instead managing the entire lifecycle:
Tenant discovery: Determining which IdP to route a user to, usually based on their email domain.
Certificates and metadata: Exchanging, configuring, and rotating SAML certificates across tenants.
Custom endpoints: Setting up login, logout, and callback URLs for each enterprise customer.
Ongoing maintenance: Handling unique customer requirements, configuration drift, and constant updates as IdPs evolve.
Each new enterprise deal often brings its own quirks, creating a steady stream of custom integrations and ongoing support work. For a product team, this quickly turns into a major distraction from core development.
Adding SSO to homegrown authentication with Descope
This is where Descope comes in. Instead of rebuilding your authentication system from the ground up, you can extend it with enterprise-ready SSO support out of the box. Descope handles the protocol complexity, tenant routing, and IdP integrations, while still letting you keep your existing login system intact. You get the best of both worlds:
Users log in seamlessly with their company credentials.
Enterprises securely connect their own IdPs and let their admins control access.
Your team avoids the heavy lift of building and maintaining these flows in-house.
Prerequisites
Before continuing, ensure you have the following:
Node.js (version 18+) installed on your computer
A Descope account (sign up for a free forever account if you don’t have one)
An enterprise application in Microsoft Entra ID
Configuring Descope as a SAML application in Microsoft Entra ID
Go to the Microsoft Azure / Entra ID portal and add a new enterprise application:
Click + Add Enterprise Application
Choose Create your own Application and give it a name
Select Integrate any other application you don’t find in the gallery
Click Create
Set up single sign-on:
Once the application is created, go to the single sign-on in the left panel.
Choose the SAML option.
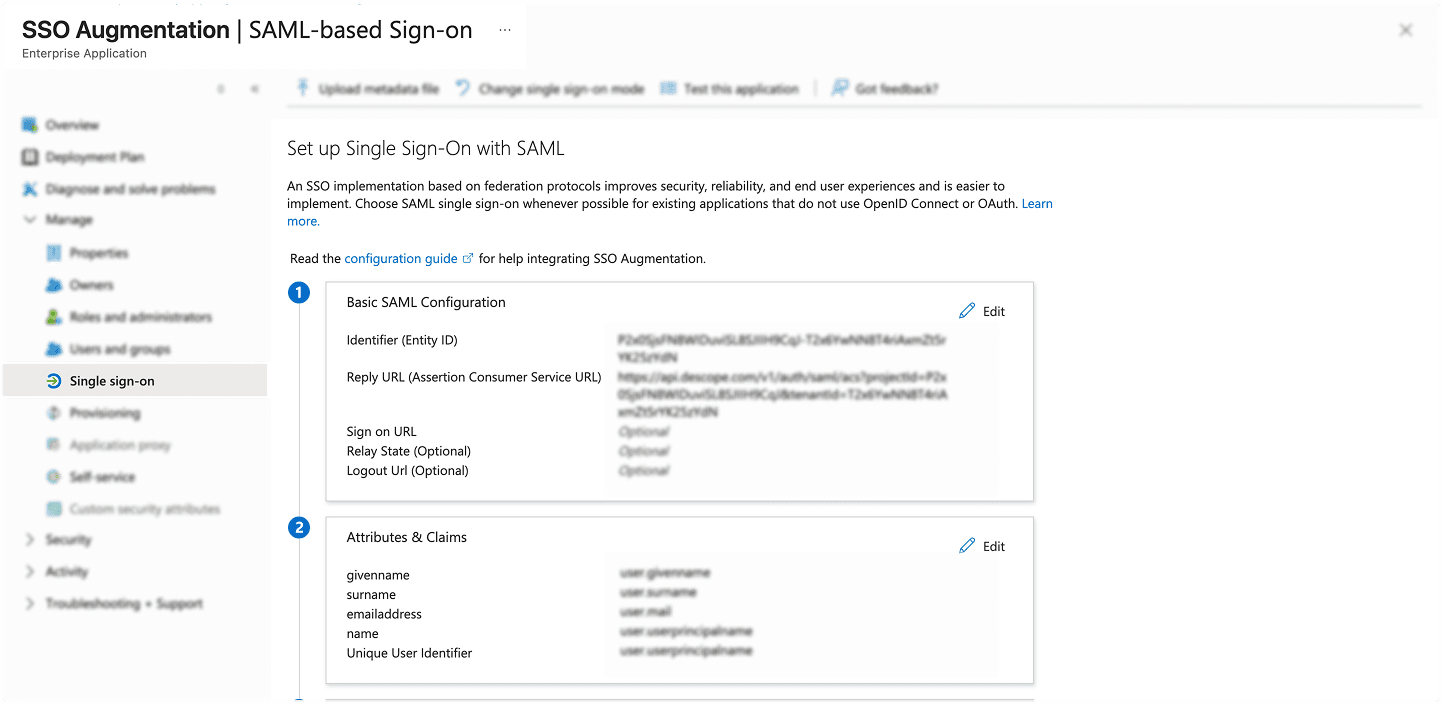
Configure SAML settings:
In the basic SAML configuration section, enter the following:
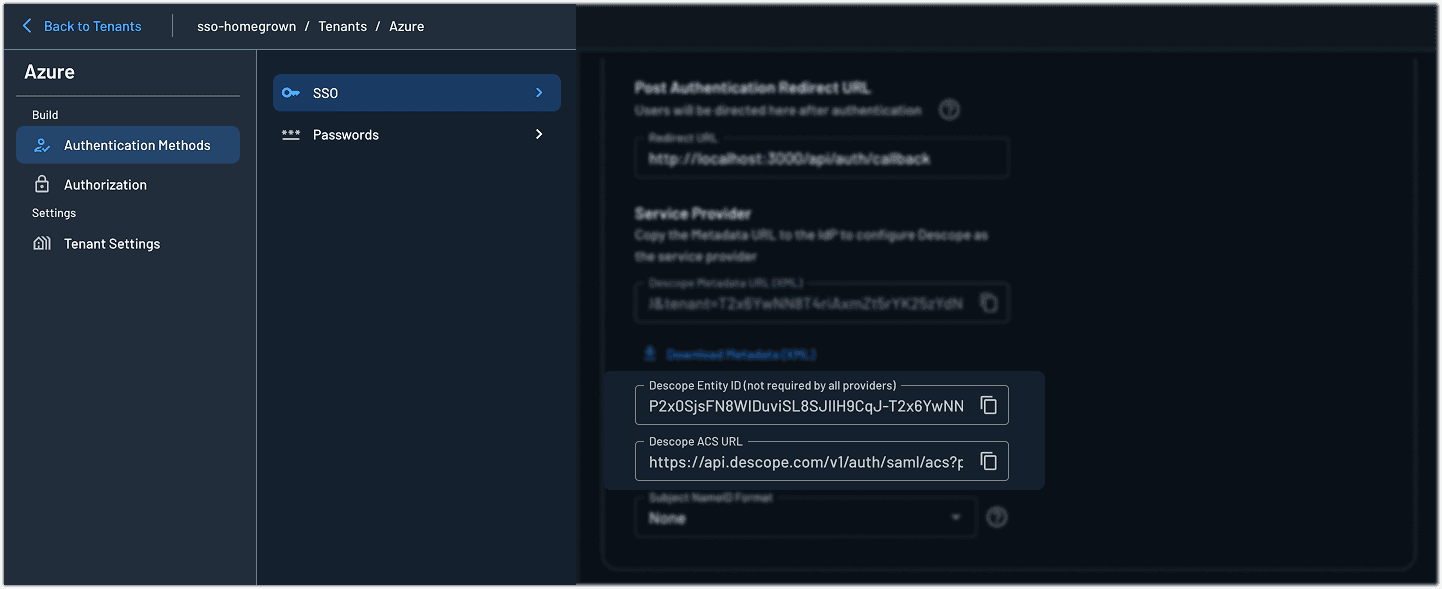
Identifier (Entity ID): Copy this from the Descope Console under Tenant Settings > Authentication Methods > SSO > SAML > SSO Configuration
Reply URL (Assertion Consumer Service URL/ Descope ACS URL): Also found in the same SAML settings section in Descope
Click Save once you’ve filled in the required fields.
Project and SSO configuration in Descope
Log in to the Descope Console and create a new project if you don’t already have one.
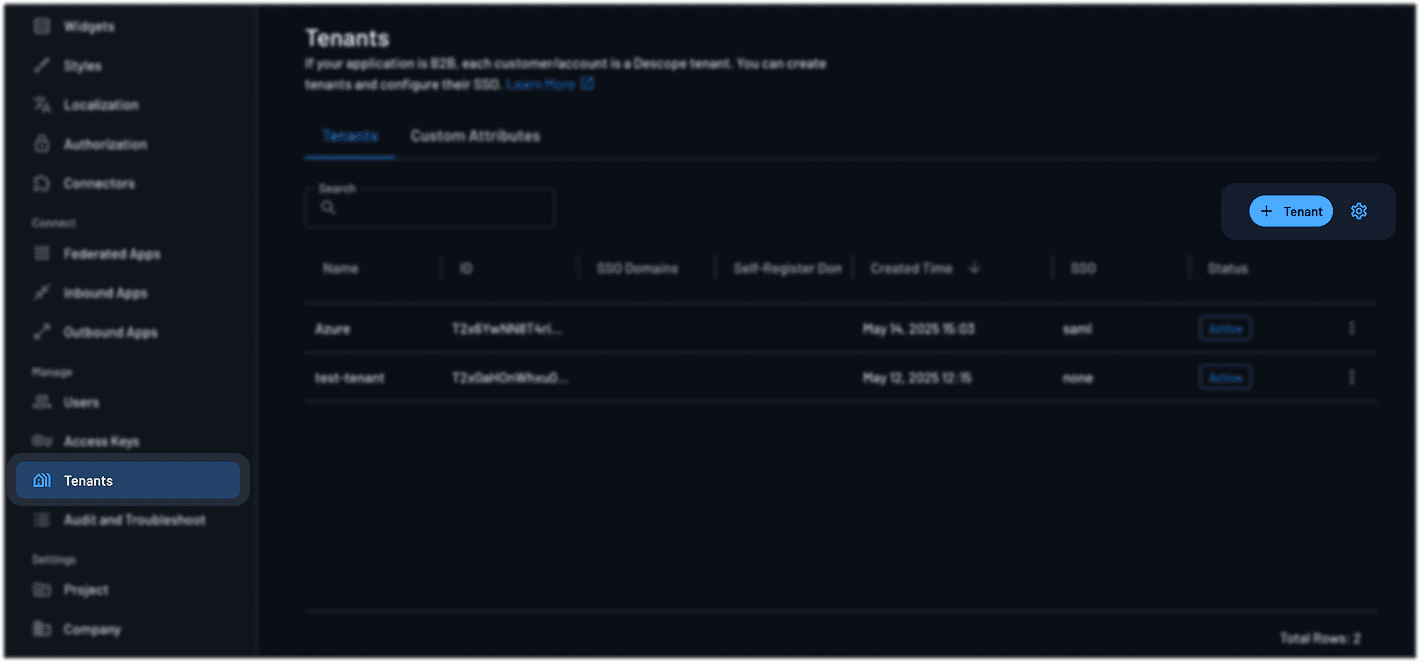
Create a Tenant:
Go to the Tenants section
Create a new tenant for your organization or customer
Copy the Tenant ID—you’ll need it later
Configure SAML as the authentication protocol:
Go to Tenant Settings > Authentication Methods > SSO
Under Authentication Protocol, select SAML

Update SSO mapping:
Still in the SAML configuration screen, find the SSO Mapping section.
Add the appropriate attributes and claims to match what’s configured in your Entra ID Portal (e.g.,
email,firstName,lastName,groups, etc.)

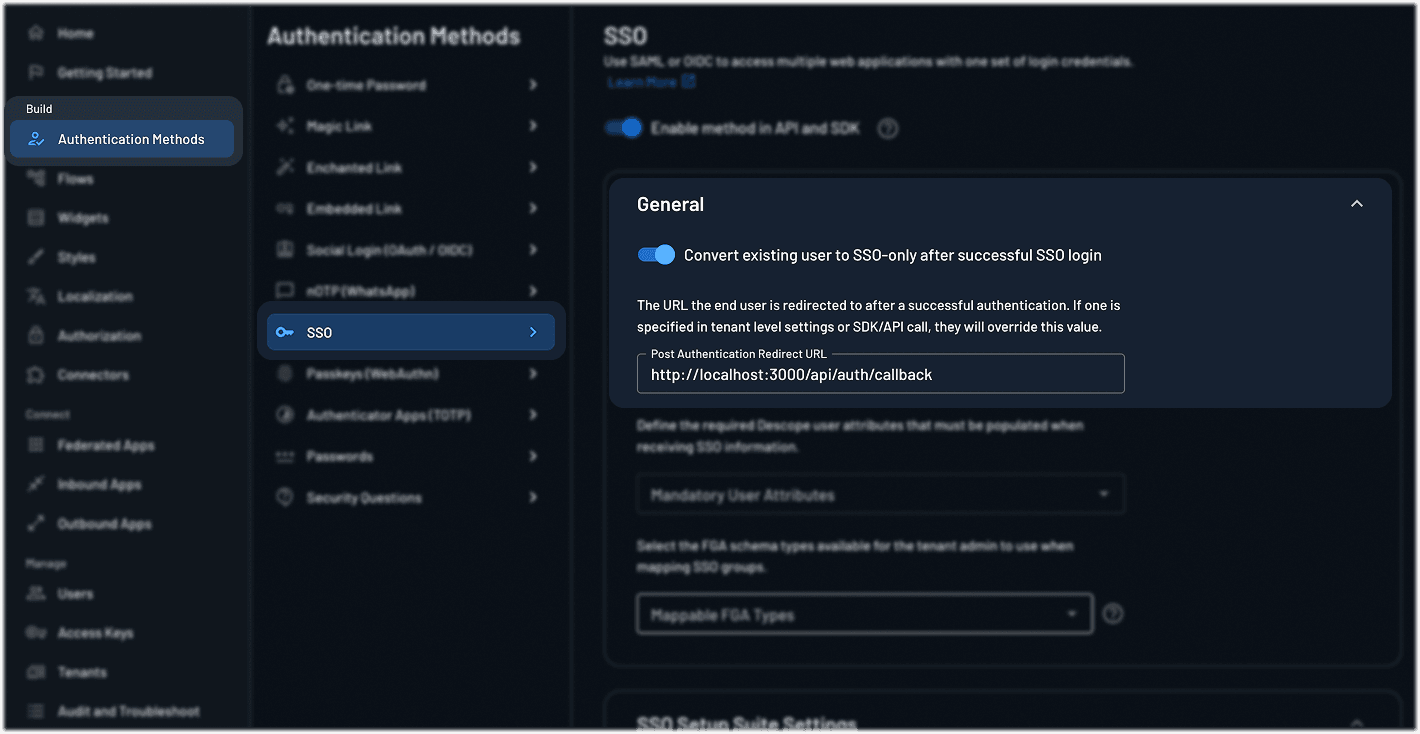
Set the post-authentication redirect URL
Back in the Descope console, go to Authentication Methods > SSO
Set the post authentication redirect URL to the page you want users to land on after logging in.
The setup is straightforward, and with the SSO setup suite, you can even share a link that lets your customer’s tenant admins configure their own SSO connection.
Validate credentials
This endpoint demonstrates how you can adapt an existing login API route to support SSO with Microsoft Entra (or any other IdP) using Descope.
In a traditional setup, your login API receives the user’s email and password, verifies those credentials, and establishes a session. When introducing SSO, the flow changes: instead of validating a password, you only take the user’s email, determine which tenant (and IdP) they belong to, and return a redirect URL that initiates the SSO login with their company’s identity provider.
Here’s what’s happening step by step:
Client request: The client sends the user’s email to /api/auth/login.
Backend Processing: The backend calls getSamlRedirectUrl(email), which:
Identifies the correct tenant based on the email domain. This is sometimes referred to as Home Realm Discovery, which is natively supported by Descope.
Uses the Descope SDK
(saml.start)to generate a redirect URL for that tenant’s IdP.Appends a
login_hintparameter so Microsoft Entra can pre-fill the user’s email on the login page.
API response: The backend returns the redirect URL to the client.
Client redirect: The client uses that URL to send the user directly into their organization’s Microsoft Entra login page.
Why does this approach work? From a security standpoint, the backend controls tenant and IdP selection, meaning the client cannot spoof or choose an IdP on its own. Meanwhile, different email domains can map to different tenants and IdPs, making it easy to support multiple organizations in one app. Lastly, with login_hint, users don’t need to re-enter their email, making the SSO flow smoother and faster.
app.post('/api/auth/login', async (req: Request, res: Response) => {
  const { email } = req.body;
  try {
    const redirectUrl = await getSamlRedirectUrl(email);
    console.log('Sending redirect URL:', redirectUrl);
    res.json({ redirectUrl });
  } catch (error) {
    console.error('Login error:', error);
    res.status(500).json({ message: 'Error getting redirect URL' });
  }
});
Get the SAML redirect URL
This function uses descopeClient.saml.start() to initiate the SSO login and appends a login_hint to streamline the Microsoft Entra experience by pre-filling the email.
const getSamlRedirectUrl = async (userEmail: string) => {
    const tenantId = process.env.DESCOPE_TENANT_ID;
    const projectId = process.env.DESCOPE_PROJECT_ID;
    const response = await descopeClient.saml.start(tenantId);
    return response.data.url + `&login_hint=${userEmail}`;
};
Handle the callback
This endpoint receives the callback from Descope after the user authenticates with the identity provider (Microsoft Entra). It extracts the authorization code from the query parameters.
app.get('/api/auth/callback', async (req: Request, res: Response) => {
  const { code } = req.query;

  if (!code) {
      console.error('No code provided');
      return res.status(400).json({ message: 'No code provided' });
  }

// Proceed to token exchange...
};
Exchanging the code for a session
Once we have the authorization code, we use Descope’s SDK to exchange it for a session token. This token represents the user’s authenticated session.
const sessionResponse = await descopeClient.saml.exchange(code as string);

if (!sessionResponse.data?.refreshJwt) {
  return res.status(401).json({ message: 'No session token received' });
}
We then validate this session token to confirm its authenticity.
const sessionValidation = await descopeClient.validateSession(sessionResponse.data.refreshJwt);Protect routes with middleware
In this example, we’re issuing a custom JWT after validating Descope’s session. The key idea here is that once Descope confirms the user’s identity through SSO, you can integrate that result into your existing session flow, whatever that may be. This way, you continue managing sessions exactly as before, while still gaining SSO support.
This token can then be used to authorize access to protected routes, just like any other token-based authentication flow.
app.get('/api/protected', authenticateToken, (req: AuthenticatedRequest, res: Response) => {
  res.json({ message: 'This is a protected route', user: req.user });
});
What’s going on under the hood
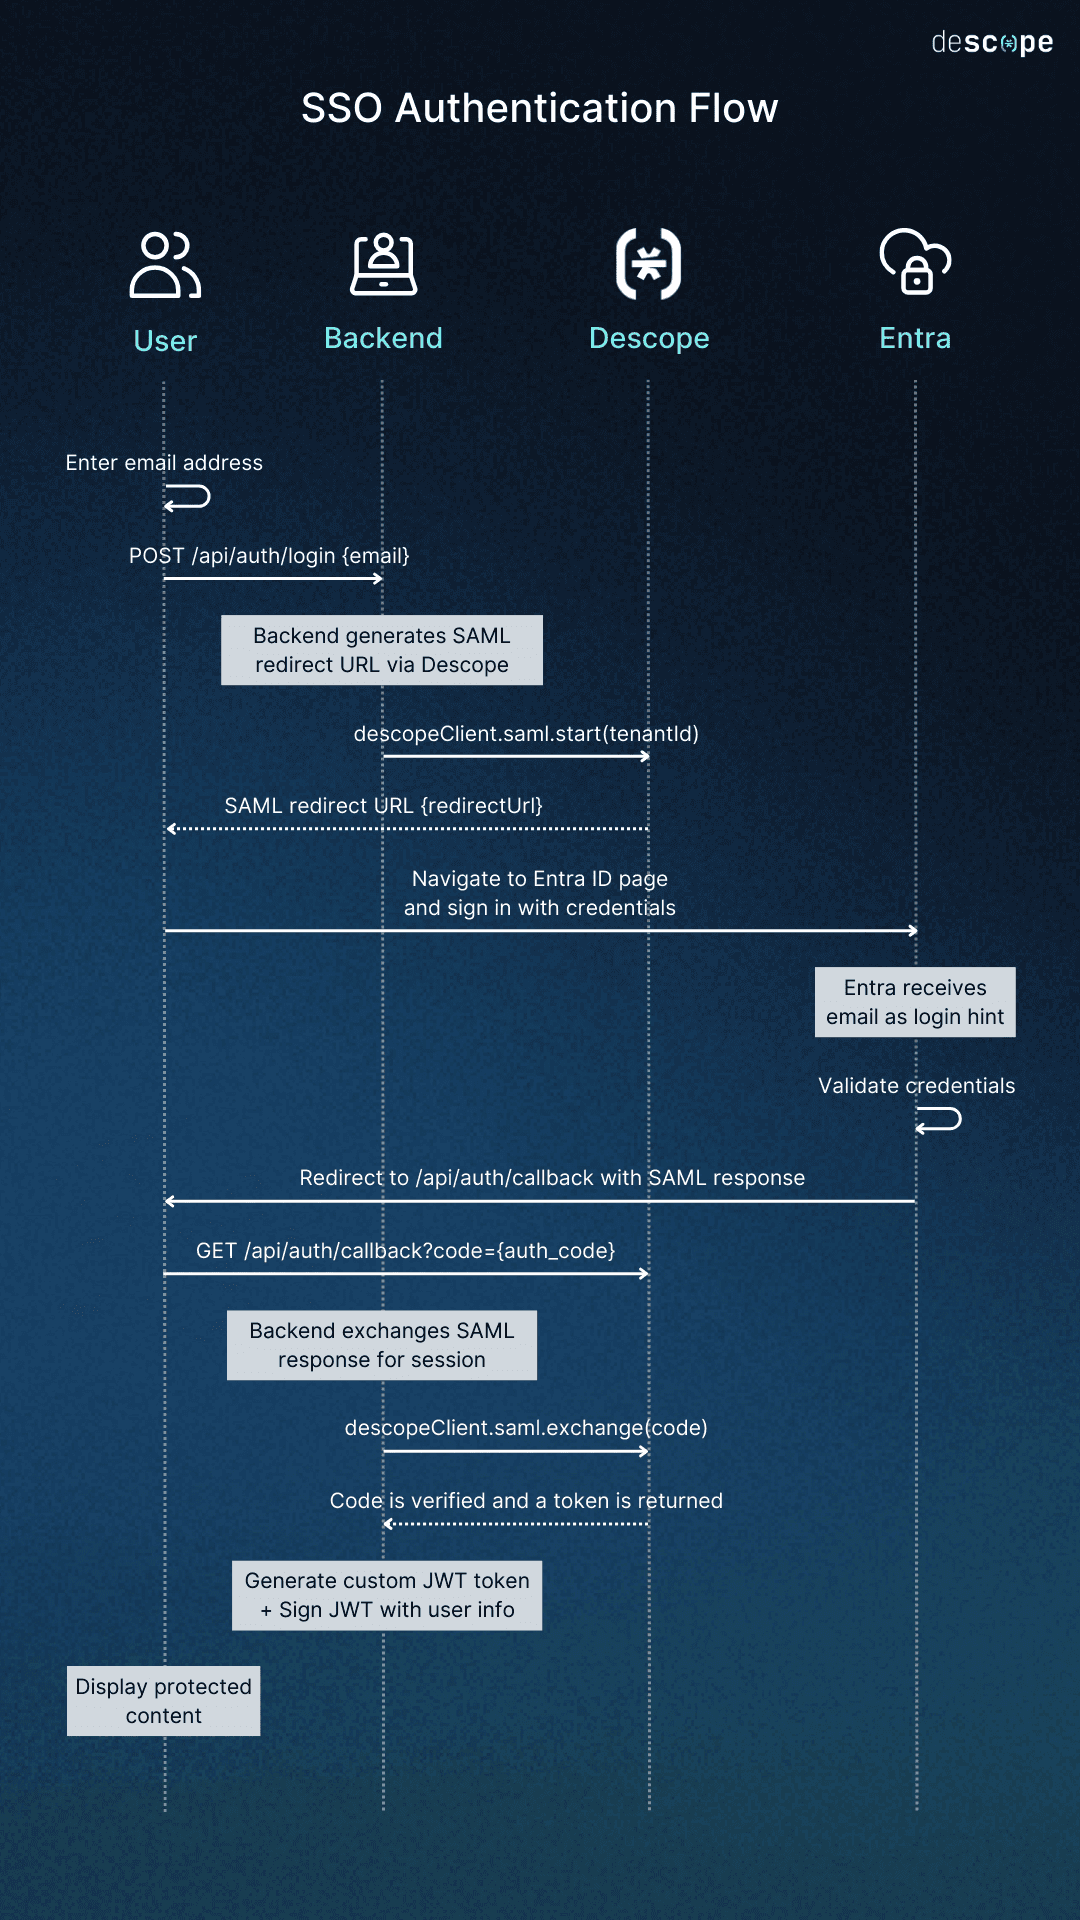
Here’s how the SSO authentication flow works, step by step:
Enter email address: The user starts by entering their email address, which is sent to the backend in a
POST /api/auth/login {email}request.Generate redirect URL: The backend calls
descopeClient.saml.start(tenantId)to generate a SAML redirect URL through Descope.Receive redirect URL: Descope responds with the redirect URL, which the backend returns to the user.
Redirect to identity provider: The user is redirected to the Entra ID sign-in page, and their email address is passed along as a login hint.
Sign in with credentials: On the Entra page, the user enters their credentials, and Entra validates them.
Return with SAML response: After successful validation, Entra redirects the user back to the backend at
/api/auth/callbackalong with the SAML response.Handle callback: The backend processes this redirect as a
GET /api/auth/callback?code={auth_code}request.Exchange for session: The backend calls
descopeClient.saml.exchange(code)to exchange the SAML response for a session.Verify and return token: Descope verifies the code and returns a valid token to the backend.
Generate custom JWT: The backend creates a custom JWT token, embedding the user’s information, and signs it securely.
Access granted: With the JWT in place, the user is successfully authenticated and can now view the protected content.
Simplifying SSO for homegrown auth with Descope
Adding SSO to a homegrown authentication system doesn’t have to mean a full rebuild. With Descope, you can handle the complex parts of enterprise SSO—protocols, IdP integrations, and tenant management—while still keeping control of your own session logic.
This approach gives you what enterprises expect: secure, standards-based SSO with providers like Microsoft Entra, plus the flexibility to issue and manage your own tokens. It’s a foundation that scales with your customers, strengthens security, and delivers a smoother login experience for everyone.
To explore Descope on your own, sign up for a Free Forever account. Have questions? Book a demo with our team.