Table of Contents
This tutorial was written by Gideon Idoko, a solution-driven software engineer and technical writer based in Nigeria. Check out their X account to see more of their work!
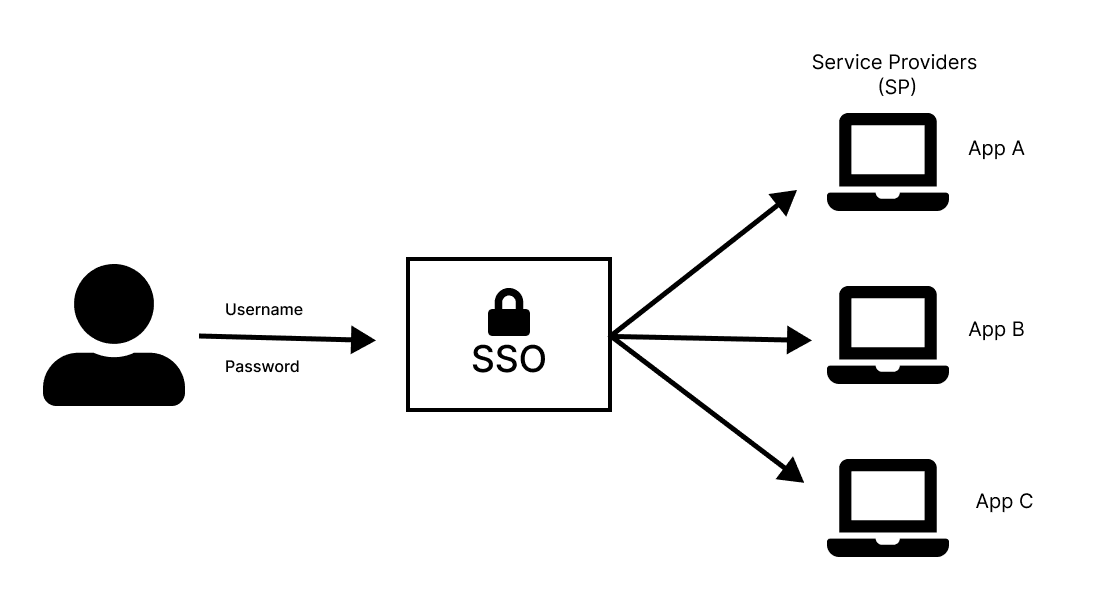
In its simplest form, single sign-on (SSO) is a way to prove who you are by logging in only once to use multiple services or apps. It eliminates the need for users to remember and manage multiple sets of credentials, thereby improving the user experience and security.
This developer guide explores SSO, from the fundamentals, including its benefits, drawbacks, and types, to the implementation. By the end of this guide, you’ll have a working knowledge of what SSO is and how to add it to an app.
If you'd like to save time on SSO implementation while also enhancing security and adding self-service SAML configuration capabilities for your customer admins, go to the "Implementing SSO with Descope" section of this tutorial.
What is SSO?
Imagine attending a large tech conference with company booths that require individual registration to access exclusive demos or information. This registration process may be long if you want to access multiple booths. If the conference uses a system like SSO, once you register at a central registration booth, you will get a token or badge to enter all booths without re-signing, which saves time and effort.
From a software development perspective, SSO is an authentication mechanism that simplifies the login process by enabling users (also called principals) to access various applications with a single set of credentials (such as username and password). With SSO in your application, you reduce sign-up and login friction, thereby boosting user acquisition and retention:
Common SSO terms
Before getting into the details of implementation, let’s review some of the common terms used in SSO:
Identity provider (IdP): Going back to the tech conference analogy, the IdP is like the central registration booth where you’re asked to provide first-point information, such as your name or event passcode, which is checked against existing records or a database. An IdP is a service that functions as the central authority responsible for user identification, authentication, and authorization. It confirms your identity and issues a badge (token or security assertion) that contains more information about you and your access rights.
Examples of popular IdPs include Google, Okta, Microsoft Entra ID (formerly Azure Active Directory or AD), Descope, and OneLogin. You can find more details about IdPs in this guide: What Is an Identity Provider (IdP) & How Does It Work?
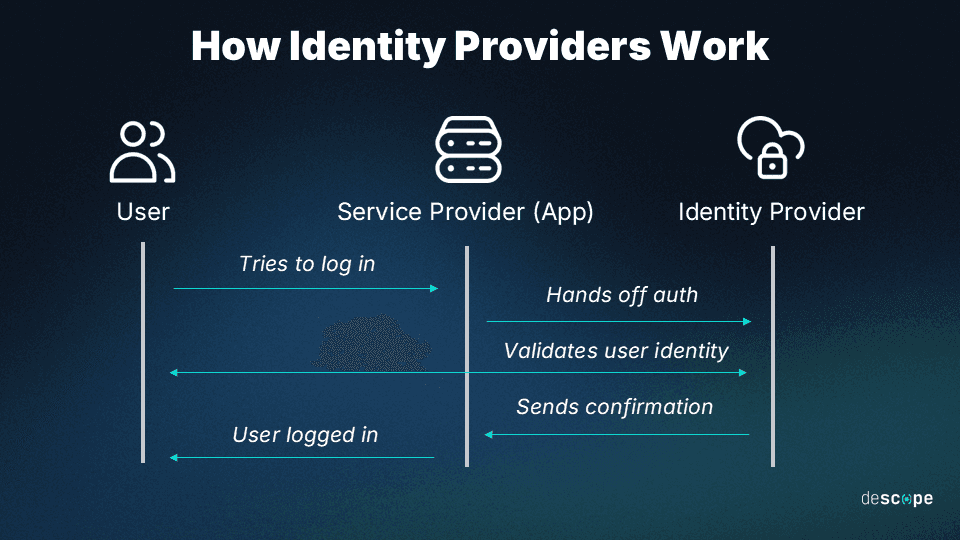
Service provider (SP): An application or system resource that provides services to users. Think of this as the company booths at the tech conference that provide you with information and demos (services). As opposed to conventional login systems, SPs depend on IdPs to validate user credentials and establish permissions rather than directly handling user authentication. The SP receives the token from the user and verifies its authenticity with the IdP before granting the user access to the application.
Note: The SP doesn’t directly communicate with the IdP; instead, a browser acts as the medium of data exchange.
Directory: A centralized database that the IdP uses as a single source of truth for user identities. It can exist within the IdP or as a separate system.
Protocols: Establishes the communication standards that govern the exchange of authentication and authorization information between the IdP, SP, and other components, such as the security tokens used in the SSO process. Some common protocols used in SSO implementation include Security Assertion Markup Language (SAML) 2.0, Open Authorization (OAuth) 2.0, and OpenID Connect (OIDC):
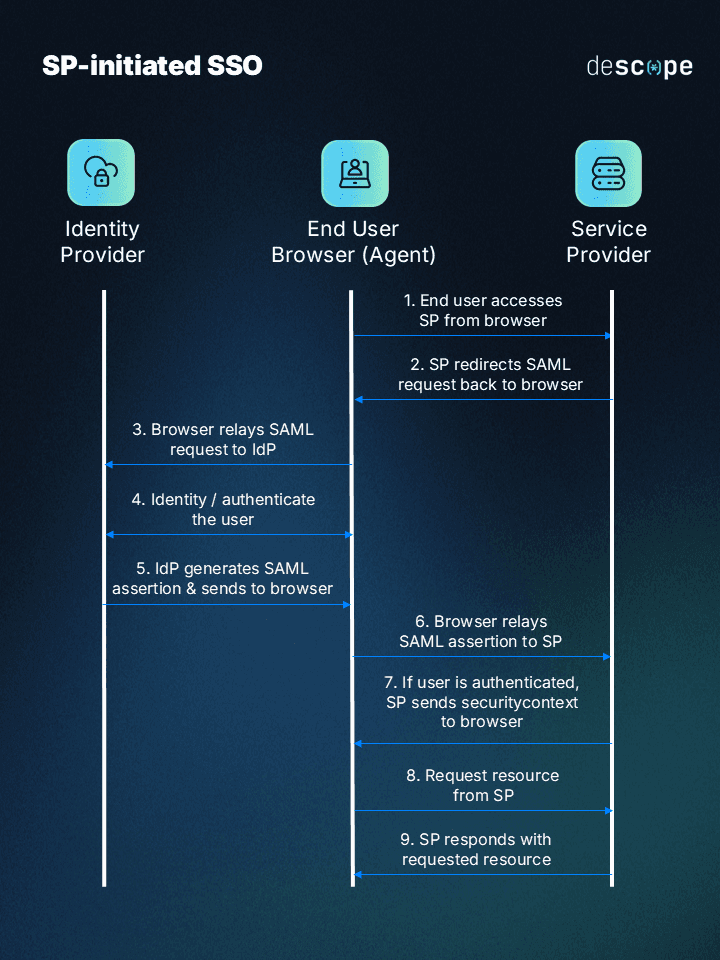
SAML is an XML-based standard for authentication, authorization, and the secure exchange of user identities. After a user attempts to access a service, the SP sends them to the IdP for authentication. The IdP then creates a SAML assertion (token) with the user’s information, which it sends back to the SP. The SP verifies the assertion and then authorizes the user to use the service they desire.
This flow is called an SP-initiated SSO (more on this later). There are two main methods of sending assertions:
HTTP POST binding: Here, the IdP sends the assertion to the SP by encoding it as a parameter in an HTTP POST request.
HTTP Redirect binding: As a second option, the IdP can communicate with the SP by directing the user’s browser to a predefined URL that contains the assertion.
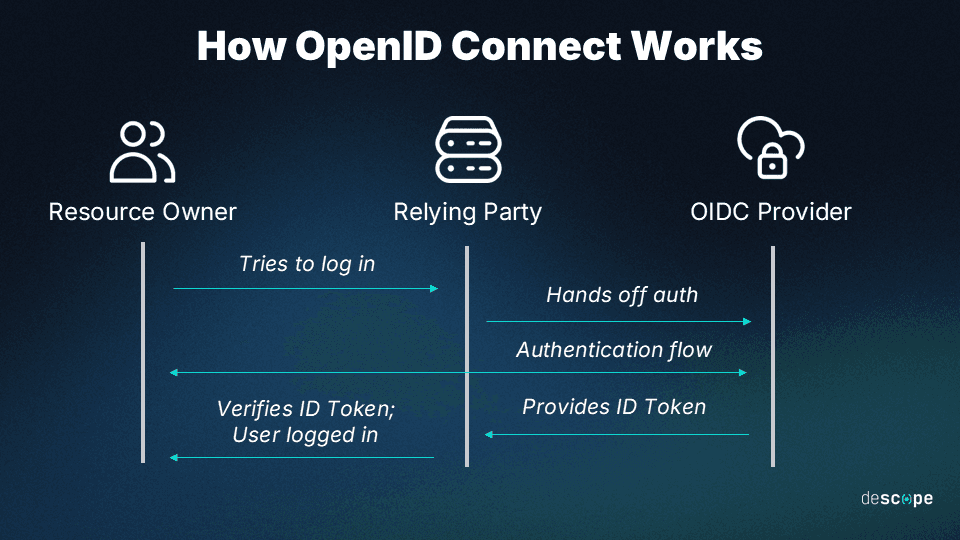
OIDC is an authentication layer built on top of OAuth 2.0 that uses JSON Web Tokens (JWTs) for secure data exchange. This is how OIDC helps in an SP-initiated SSO process:
when a user tries to access a service, the SP sends that user to the IdP, requesting an authorization code. The SP uses the authorization code to request an ID token that contains essential user information, such as an email address. The SP proceeds to validate the ID token’s authenticity and, if positive, grants the user permission to use the service they want.
Different types of SSO
There are two types of SSO operations based on how they’re initiated:
IdP-initiated SSO: A type of SSO operation where the authentication flow is initiated by the IdP. In this case, the user first visits the IdP platform, which authenticates them and then sends them to the SP with a valid authentication token.

SP-initiated SSO: The SP starts this type of SSO operation, unlike the IdP-initiated SSO. Here, the user initially attempts to access services from an SP, which redirects them to the IdP for authentication if they have yet to be authenticated. The IdP then sends the user back to the SP with an authentication token.

Advantages of adding SSO to an application
Adding SSO to an application offers several benefits for both you and your users. Here are some of them:
It provides an easy and secure way for users to access your application.
It eliminates the need for multiple passwords, reducing password fatigue.
It makes user management easier through a federated system with the IdP.
It can decrease the number of password-related support tickets.
It makes it easier to comply with data privacy regulations with SSO’s ability to centralize access control.
It is scalable and can efficiently handle an increasing number of users and applications.
Learn more: 6 Benefits of SSO
Drawbacks of adding SSO to an application
Although SSO has many advantages, you should also be aware of its possible disadvantages:
SSO poses a risk of becoming that single point of failure since it consolidates authentication in the IdP. This means that users might be unable to access any linked applications if an SSO system fails.
You’re dependent on your SSO provider’s security; if it’s weak, malicious actors could exploit vulnerabilities to access the application and its data.
Implementing single sign-on in-house can be expensive and require ongoing maintenance.
SSO can potentially improve security, but it also poses new threats. An attacker with a user’s SSO credentials could access multiple applications.
Protocol compatibility can be a limitation. Certain applications and services that are incompatible with SSO protocols are difficult to incorporate into an SSO environment.
B2B Enterprise Readiness Checklist
Score your tech stack on enterprise readiness pillars - from dev and IT experience to security and architecture.
Download
Implementing SSO from scratch
As with most software features, you can either implement SSO from scratch by yourself or use a third party solution. This section explains how you can do it yourself.
The initial step is deciding what SSO protocol to use and which IdP supports the protocol you want. To learn how this works, you’ll work through an example using SAML as your protocol and Okta as your IdP and then implementing the SSO in a Next.js application (SP). Here’s a high-level diagram showing the SP-initiated SSO with SAML that you’re going to implement:
A starter Next.js project has been provided in this GitHub repo to help you get started. The project requires Node.js and uses pnpm for package management, so ensure you have these installed on your machine.
Clone the project, cd into the directory, and install the base dependencies using pnpm i.
As you already know, SAML is XML-based, so its requests and responses (assertions) are sent as XML data but encoded to ensure the special characters and formatting are preserved when transmitted over a network. Base64 encoding is commonly used to convert XML data into a transmission-safe ASCII string format at the sender’s end. The string is decoded back to its original form when it gets to the recipient.
The SAMLRequest and SAMLResponse keys specify the request and assertion tokens, respectively. If the method of sending the assertion is via a POST request, the token is sent in the format SAMLResponse=<token> (eg SAMLRequest=mVxdWVzdC…) in the request. While the token is conveyed as the value of the key query parameter in the request endpoint (eg /acs?SAMLResponse=mVxdWVzdC…).
Because you’re implementing your SSO, you have to be able to decode the data from the chosen IdP (Okta) and parse the XML data. Primarily, doing this yourself may be tedious, so it’s better to outsource such tasks to an open source SAML toolkit like samlify.
Go ahead and install the following packages:
pnpm add samlify jsonwebtoken server-only
pnpm add -D @types/jsonwebtoken
Here, the jsonwebtoken helps sign user data, while server-only ensures that the server-side logic isn’t allowed to run on the client side.
Configuring Okta as IdP
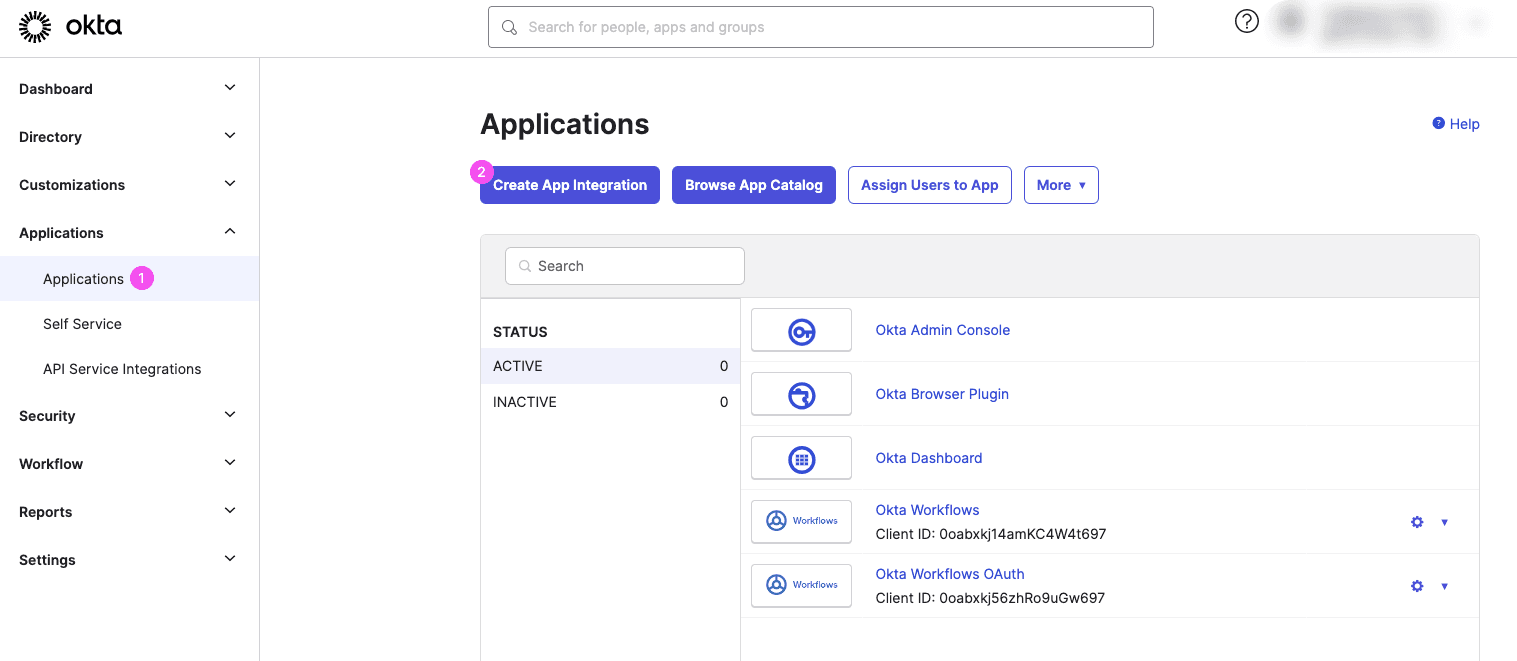
Before continuing with the implementation, you need to set up Okta. Start by creating an account if you don’t have one yet and ensure you’re logged in as an admin (use the Admin button on the top navbar).
Create a new app integration:
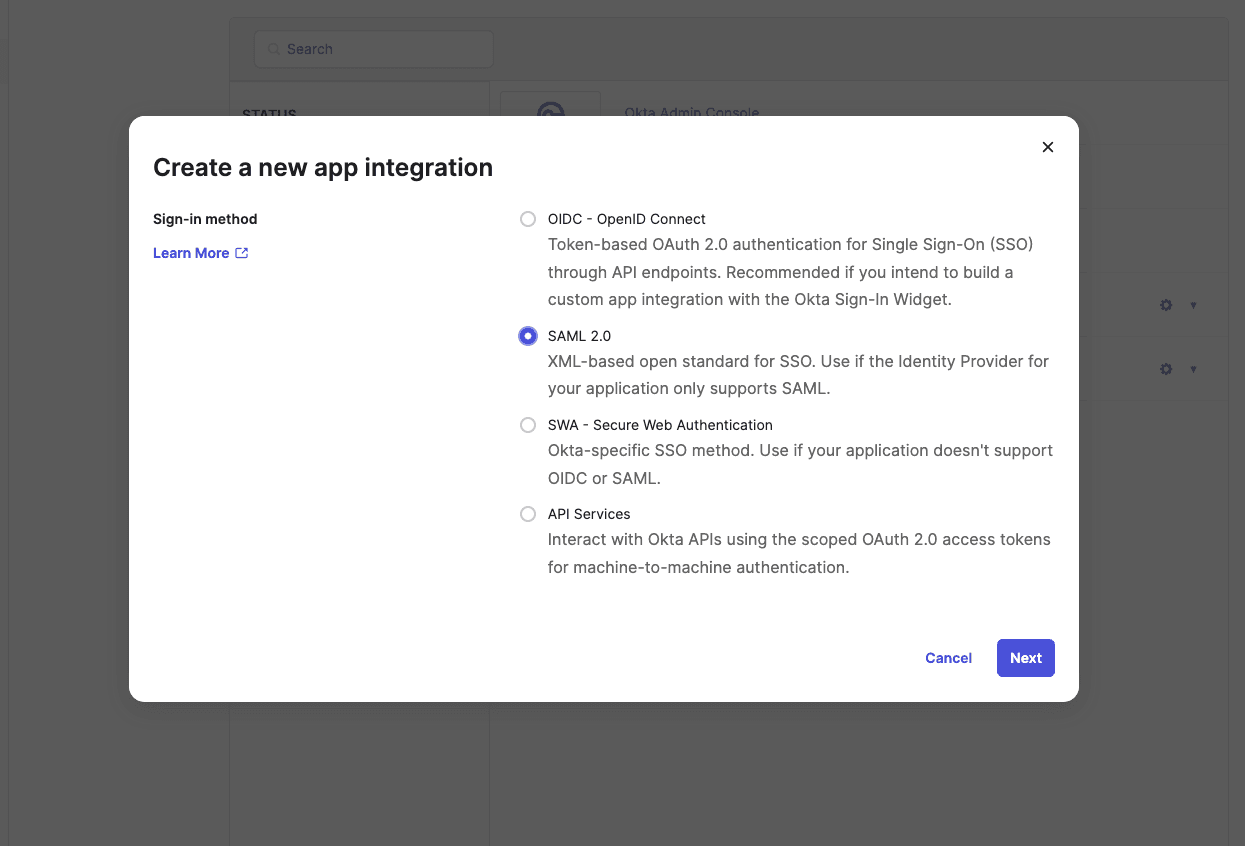
Select SAML 2.0 as your sign-in method and click Next:
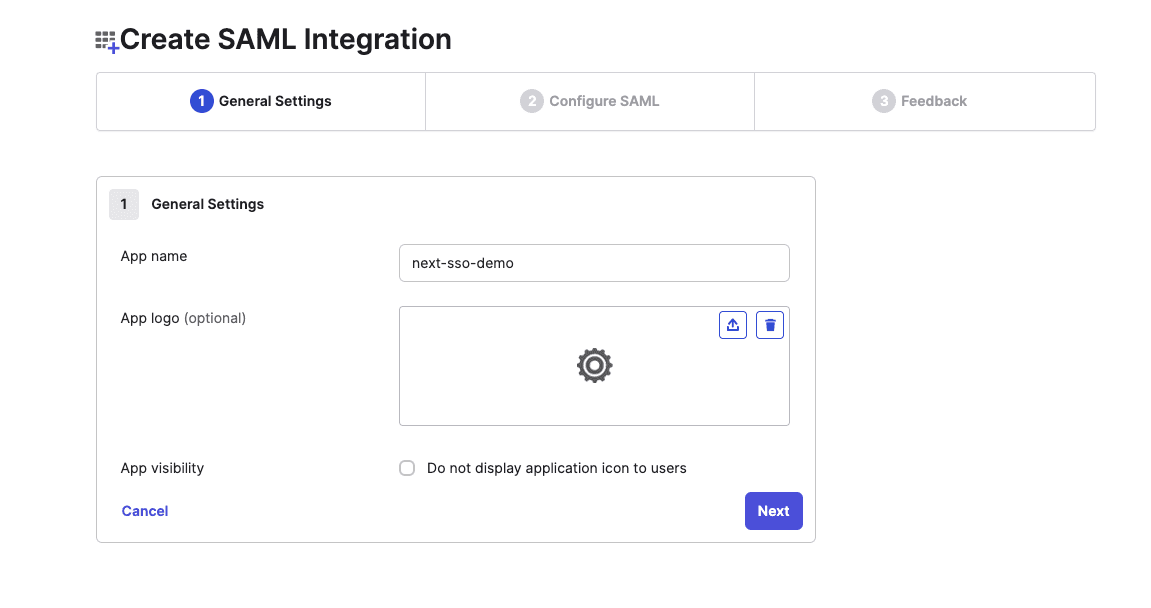
In the General Settings tab, type in the app name and click Next:
In the Configure SAML tab, do the following:
Type in http://localhost:3000/api/acs as your
Single sign-on URL.Check
Use this for Recipient URL and Destination URL.Select
EmailAddressfor theName ID format.Select
Emailfor theApplication username.Select
Create and updateas the events toUpdate application username on.
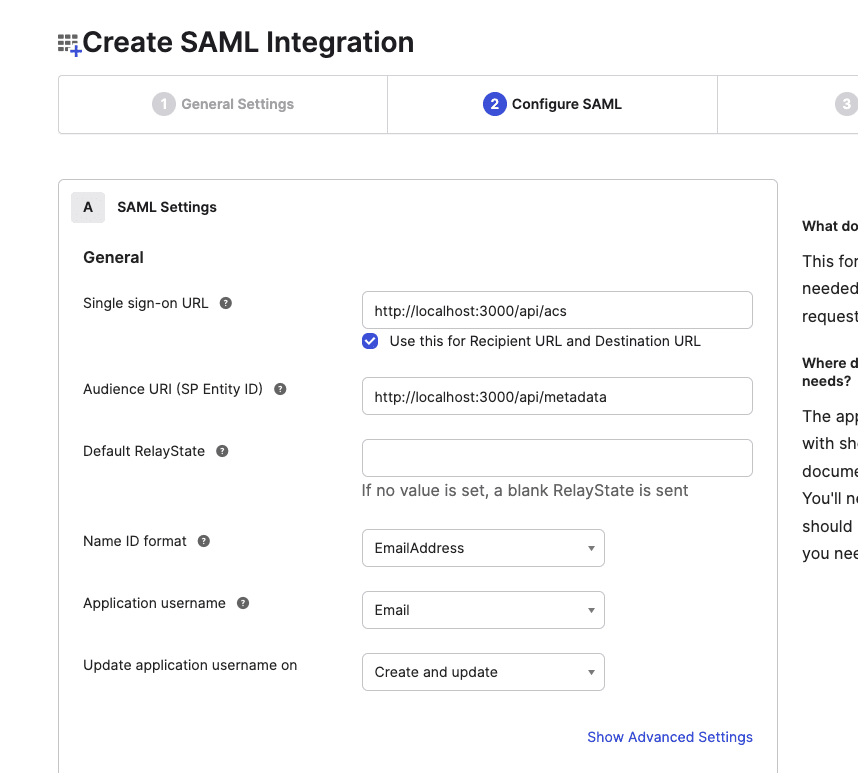
This URL is called the assertion consumer service (ACS) URL. You’ll implement this later on to consume the SAML assertions sent from Okta.
Update the Attribute Statements and map the names firstName, lastName, email, and uid to the values user.firstName, user.lastName, user.email, and user.id, respectively. Also, update the Group Attribute Statements and map the name groups to start with the value my.groups.*:
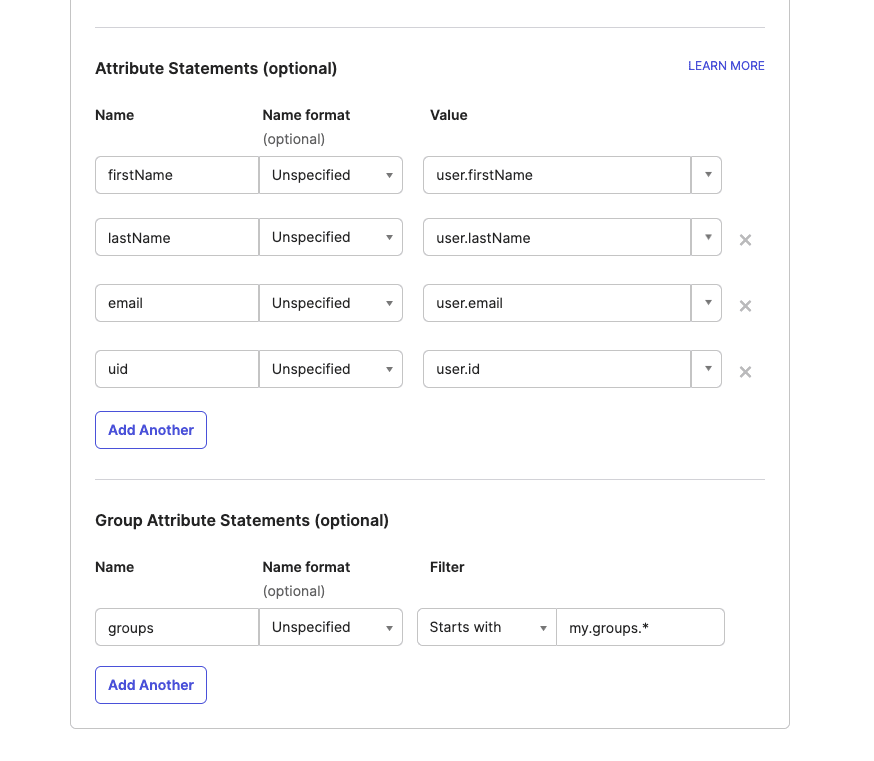
Note: An attribute statement is a part of the SAML assertion that contains additional information about a user. You’ll use this information to sign a new token for authentication in your SP (Next.js app).
Finish up the app creation process in the Feedback tab. In the new Sign On tab, copy the Metadata URL (you’ll need it soon):
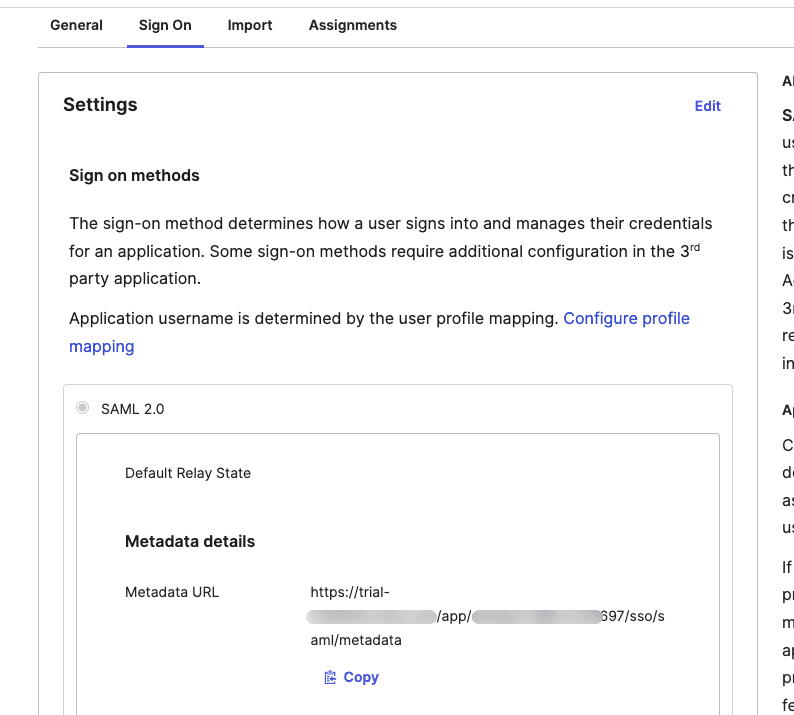
The metadata is an XML document that contains information like endpoints about entities such as your SP and the IdP (Okta). This metadata is commonly exchanged between the entities to automatically build trust.
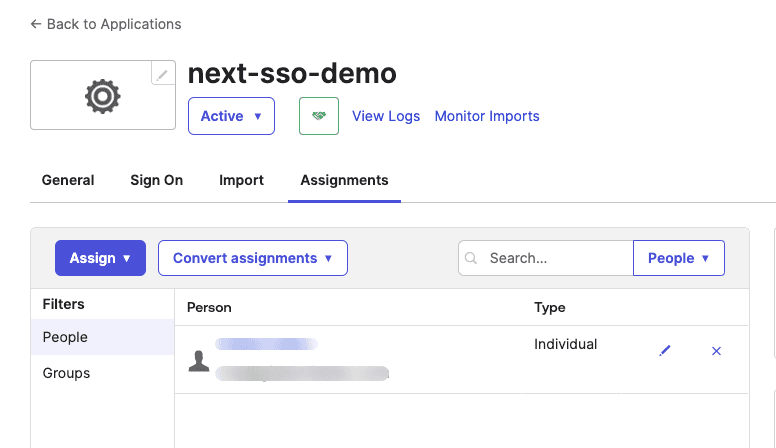
Finally, go to the Assignments tab and add users to your app:
Implementing the Next.js SP
To implement the Next.js SP, you need to create a .env file and include the following variables:
NEXT_PUBLIC_APP_URL=http://localhost:3000
OKTA_METADATA_URL=
JWT_SECRET=xxxxxxxxxxxxxxxxxx
Note: Update the
OKTA_METADATA_URLvariable with the metadata URL you copied earlier.
Now, create a saml.ts file in the src directory and paste the following code, which exports a function that creates and returns an IdP and SP configuration using samlify and the metadata from Okta:
import "server-only";
import * as saml from "samlify";

export async function getProviders() {
  const response = await fetch(process.env.OKTA_METADATA_URL!);
  if (!response.ok) throw new Error("Failed to fetch metadata.");
  const metadata = await response.text();

  const idp = saml.IdentityProvider({
    metadata,
  });

  const sp = saml.ServiceProvider({
    metadata,
    assertionConsumerService: [
      {
        Binding: saml.Constants.namespace.binding.post,
        Location: `${process.env.NEXT_PUBLIC_APP_URL}/api/acs`,
      },
    ],
  });

  saml.setSchemaValidator({
    // Schema validation function
    validate: () => Promise.resolve(),
  });

  return { idp, sp };
}
The SP has been configured to receive the encoded SAML token from Okta via a POST request. It’s ideal to validate the schema of the SAML XML sent to your SP. That’s what the saml.setSchemaValidator() method does. Currently, the validate function is always resolved because XML schema validation is beyond the scope of this guide.
In the same directory, add an auth.ts file to export two important utility functions:
import "server-only";
import { cookies } from "next/headers";
import jwt from "jsonwebtoken";

export function getUser() {
  const ssoAuth = cookies().get("sso-auth");
  if (!ssoAuth) return null;
  try {
    const user = jwt.verify(ssoAuth.value, process.env.JWT_SECRET!);
    return user as Record<"firstName" | "lastName" | "email" | "uid", string>;
  } catch (e) {
    return null;
  }
}

export function authenticate(user: object) {
  const token = jwt.sign(user, process.env.JWT_SECRET!, {
    expiresIn: "1h",
  });
  cookies().set("sso-auth", token, {
    httpOnly: true,
    secure: process.env.NODE_ENV !== "development",
    sameSite: "lax",
    maxAge: 3600, // 1 hour
    path: "/",
  });
}
The authenticate() function here signs a user object using JWT and sets the created token as a cookie, while getUser() does the opposite.
Moving on, let’s provide the ACS endpoint with which Okta interacts. Create a src/app/api/acs/route.ts file for the ACS endpoint you specified in Okta. In that file, add the following code:
import { getProviders } from "@/saml";
import type { NextRequest } from "next/server";
import { redirect } from "next/navigation";
import { authenticate } from "@/auth";

export const dynamic = "force-dynamic"; // Opt out of Next.js caching. defaults to auto

export async function POST(request: NextRequest) {
  const { idp, sp } = await getProviders();
  // Get SAML Response
  const raw = (await request.text()).replace("SAMLResponse=", "");
  const SAMLResponse = decodeURIComponent(raw);
  const { extract } = await sp.parseLoginResponse(idp, "post", {
    body: { SAMLResponse },
  });
  // extract.attributes, should contains : firstName, lastName, email, uid, groups from Okta
  authenticate(extract.attributes);
  redirect("/dashboard");
}
The POST request here (as you specified in the SP config) takes the token from the request object, parses it with samlify, authenticates the user with the function created earlier, and redirects them to the dashboard, which is going to be a protected route.
For the protected dashboard page, create a src/app/dashboard/page.tsx file and add the following:
import Image from "next/image";
import { getUser } from "@/auth";
import Link from "next/link";
import { redirect } from "next/navigation";
export default function Dashboard() {
const user = getUser();
if (!user) return redirect("/");
return (
<main className="flex min-h-screen flex-col items-center p-24">
<div className="flex items-end gap-3.5">
<Image
className="relative"
src="/next.svg"
alt="Next.js Logo"
width={180}
height={37}
priority
/>
<h1 className="text-5xl font-medium translate-y-1.5">
SSO Demo Dashboard
</h1>
</div>
<Link href="/" className="underline mt-4">
Go home
</Link>
<div className="text-center">
<h2 className="text-2xl mt-8">Hello {user.firstName},</h2>
<p className="mt-3">
You're signed in as <strong>{user.email}</strong>
</p>
</div>
<Link
href="/logout"
className="inline-block py-2 px-3 rounded bg-red-500 text-white mt-8"
>
Log out
</Link>
</main>
);
}If getUser() returns a valid value, that means the user is authenticated; otherwise, the user is redirected to the home page.
Add a src/app/login/route.ts file to make a login redirect request to the IdP:
import { getUser } from "@/auth";
import { getProviders } from "@/saml";
import { redirect } from "next/navigation";
import { NextResponse } from "next/server";

export const dynamic = "force-dynamic"; // defaults to auto

export async function GET() {
  const user = getUser();
  if (user) redirect("/dashboard");
  try {
    const { idp, sp } = await getProviders();
    const { context } = sp.createLoginRequest(idp, "redirect");
    return NextResponse.redirect(context);
  } catch (e) {
    console.error("Error: ", e);
    return redirect("/");
  }
}
Add another src/app/logout/route.ts file to clear the SSO cookie and log out a user:
// src/app/login/route.ts
import { redirect } from "next/navigation";
import { cookies } from "next/headers";

export const dynamic = "force-dynamic"; // defaults to auto

export async function GET() {
  cookies().delete("sso-auth");
  redirect("/");
}
Finally, update the home page (src/app/page.tsx) with links to the dashboard, login, and logout routes:
import { getUser } from "@/auth";
import Image from "next/image";
import Link from "next/link";
export default function Home() {
const user = getUser();
return (
<main className="flex min-h-screen flex-col items-center p-24">
<div className="flex items-end gap-3.5">
<Image
className="relative"
src="/next.svg"
alt="Next.js Logo"
width={180}
height={37}
priority
/>
<h1 className="text-5xl font-medium translate-y-1.5">SSO Demo</h1>
</div>
{user && (
<Link href="/dashboard" className="underline mt-4">
Go dashboard
</Link>
)}
<div className="mt-12 flex items-center flex-col">
{user ? (
<>
<p>LOGGED IN</p>
<Link
href="/logout"
className="inline-block py-2 px-3 rounded bg-red-500 text-white mt-8"
>
Log out
</Link>
</>
) : (
<>
<p>LOGGED OUT</p>
<Link
href="/login"
className="inline-block py-2 px-3 rounded bg-green-500 text-white mt-8"
>
Log in
</Link>
</>
)}
</div>
</main>
);
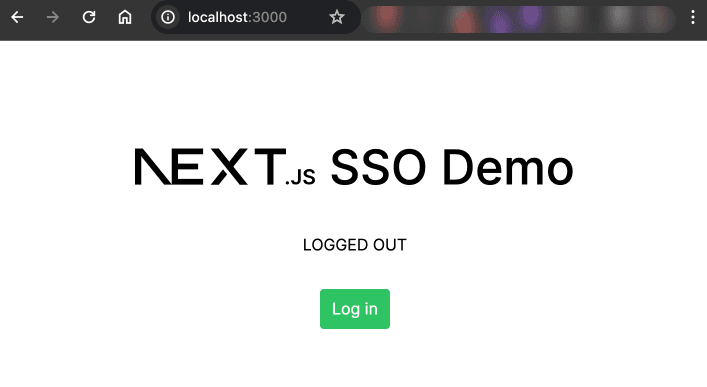
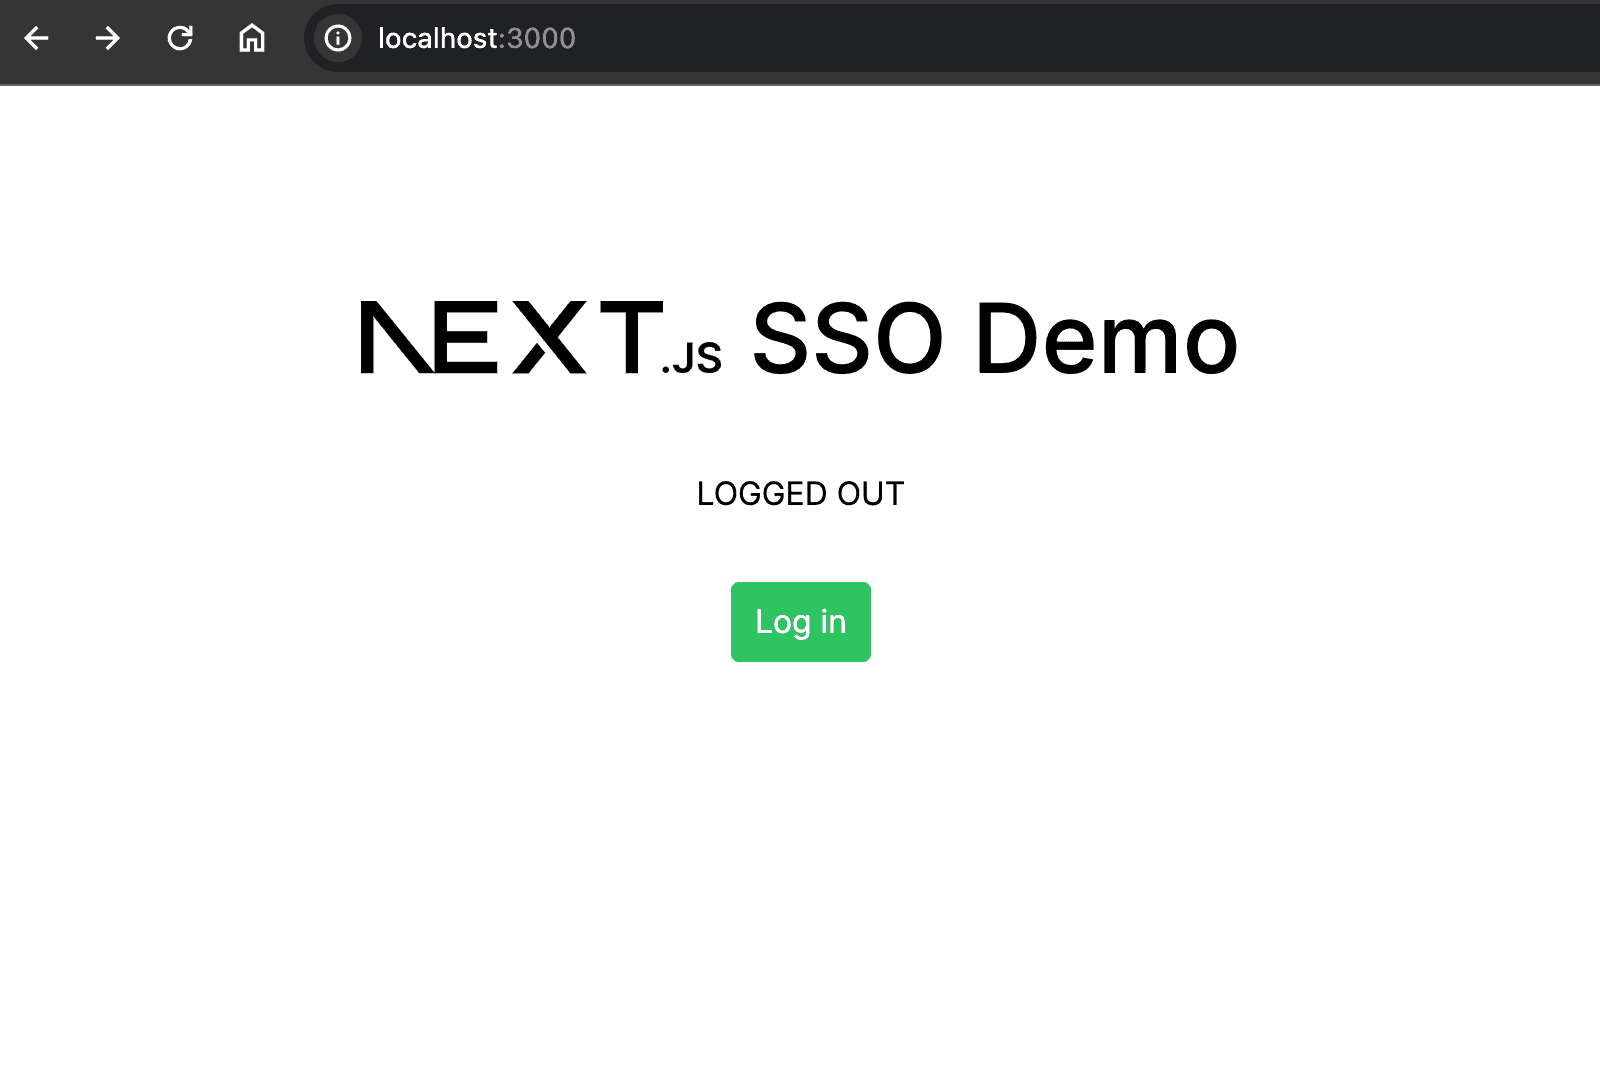
}Now, run pnpm dev to spin up the dev server. Open port 3000 in your browser, and you should see the demo home page:
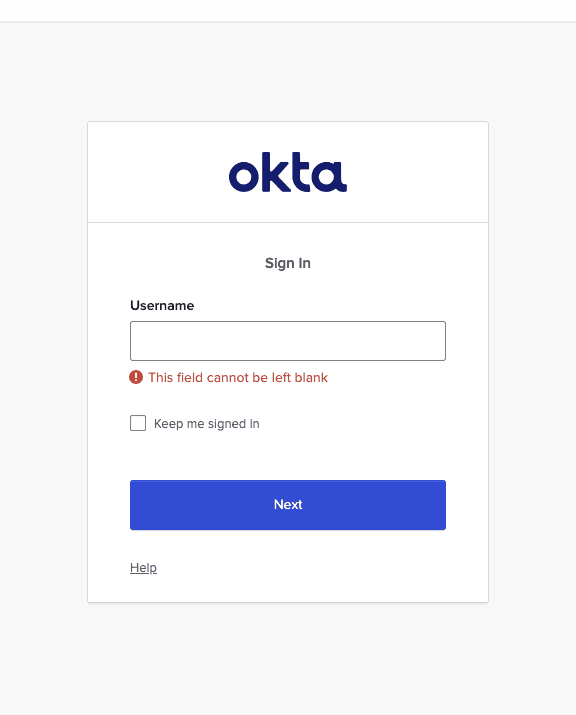
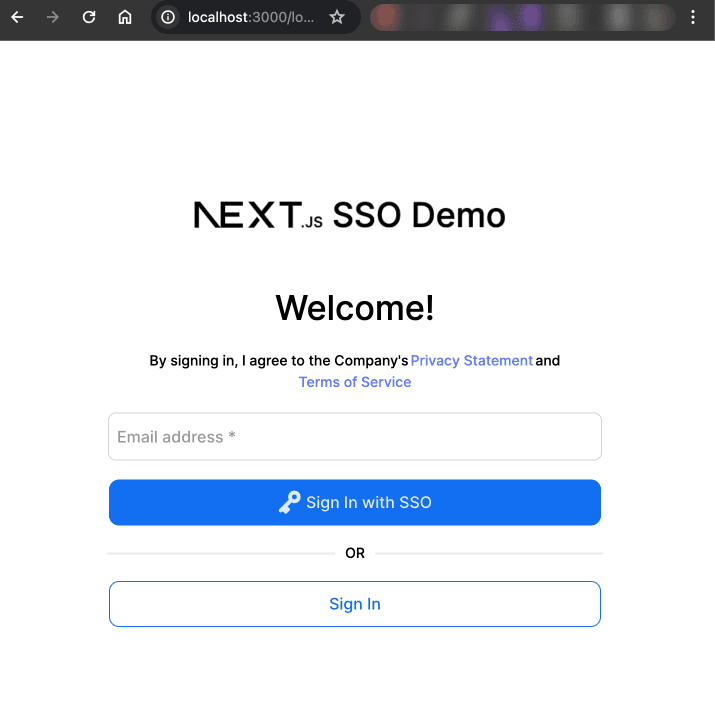
When you click on the Log in button, you’ll be redirected to Okta:
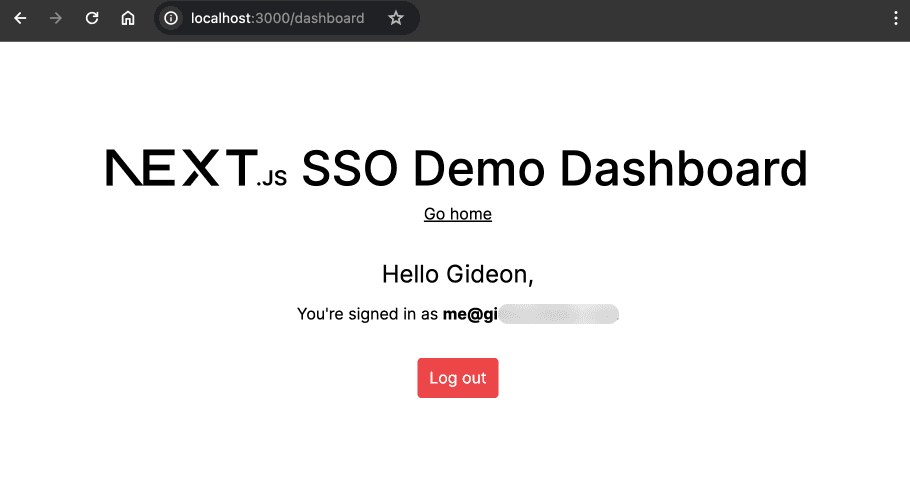
Sign in with one of the users you have added to your Okta app, and you’ll be taken back to your Next.js SP, this time as a logged-in user:

Check out the full code on this GitHub repo.
One way to view the SAML data sent between your IdP and your SP is to use a tool like the SAML-tracer Chrome extension. You can use it to inspect your SAML SSO implementation:
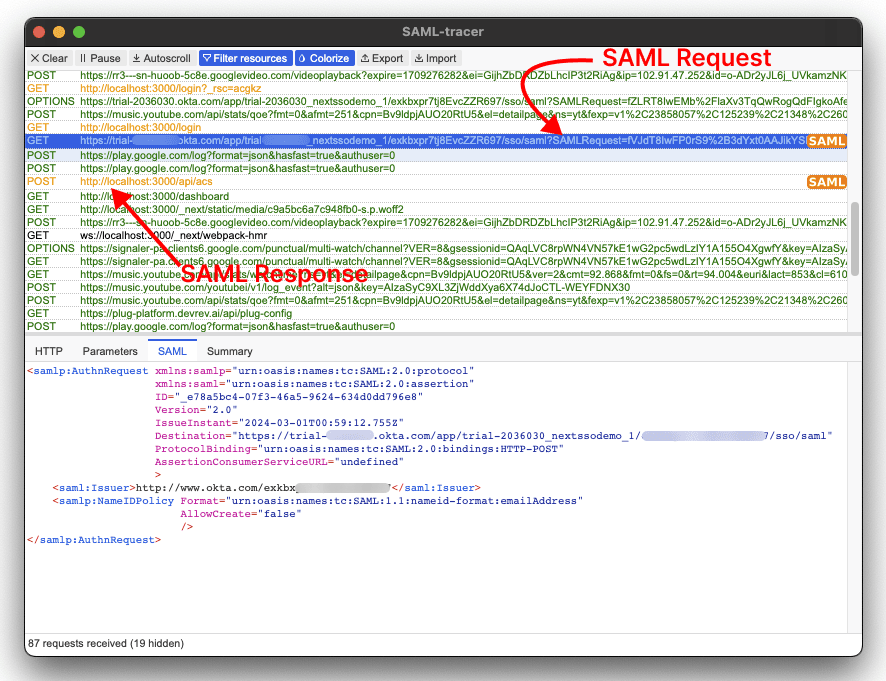
SAML requests and responses are labeled with an orange SAML badge.
Disadvantages of implementing SSO from scratch
While this basic implementation is functional and may seem like a cost-effective option, there are a few issues with it:
There’s no token encryption; hence, the token passed between the entities may be vulnerable to interception and tampering.
There’s no protection against cross-site request forgery (CSRF).
Because users are not being persisted to any database in the SP, merging SSO identities with previously defined users becomes a problem.
No SAML schema validation is implemented, meaning there’s a risk of accepting invalid or maliciously crafted SAML messages.
Taking this implementation to where it needs to be in terms of security and features would take quite some time, and you may likely run into issues with limited access to support or resources. However, using an established solution like Descope provides you with prebuilt features, security, compliance, and self-service capabilities out of the box.
Implementing SSO with Descope
Let’s see how you can implement the same SSO flow in your Next.js SP using Descope. If you don’t have a Descope account, you can create a free one here.
Configuring Okta as IdP and Descope as SSO Provider
After you’ve signed in to Descope, you’ll be taken to your Descope console. Create a new Descope project (at the top of the sidebar). Follow the steps outlined subsequently to quickly get the SSO configured.
Click on the Getting Started button to initiate the onboarding wizard:
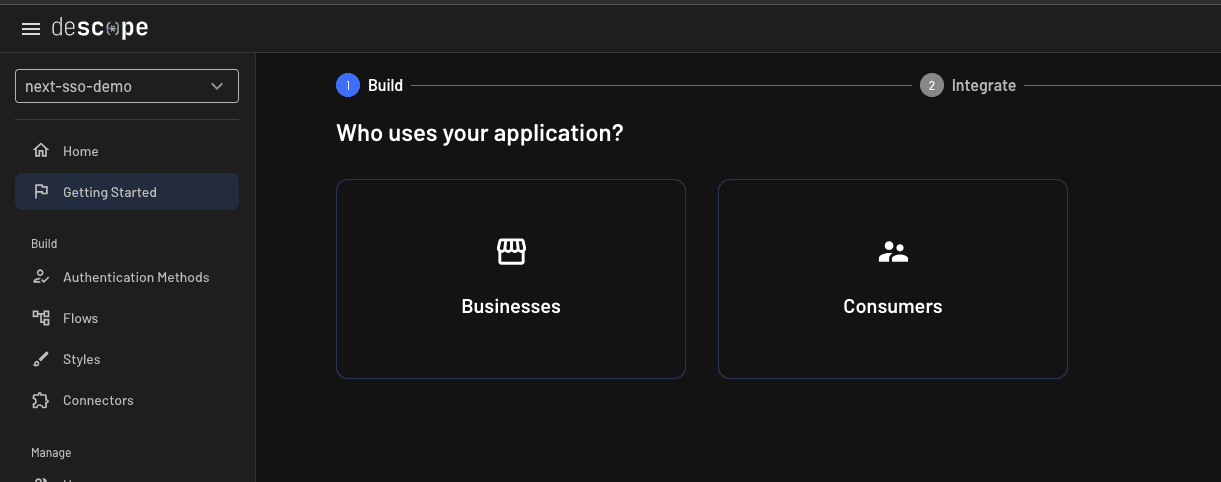
Select Businesses as your application user and click Next.
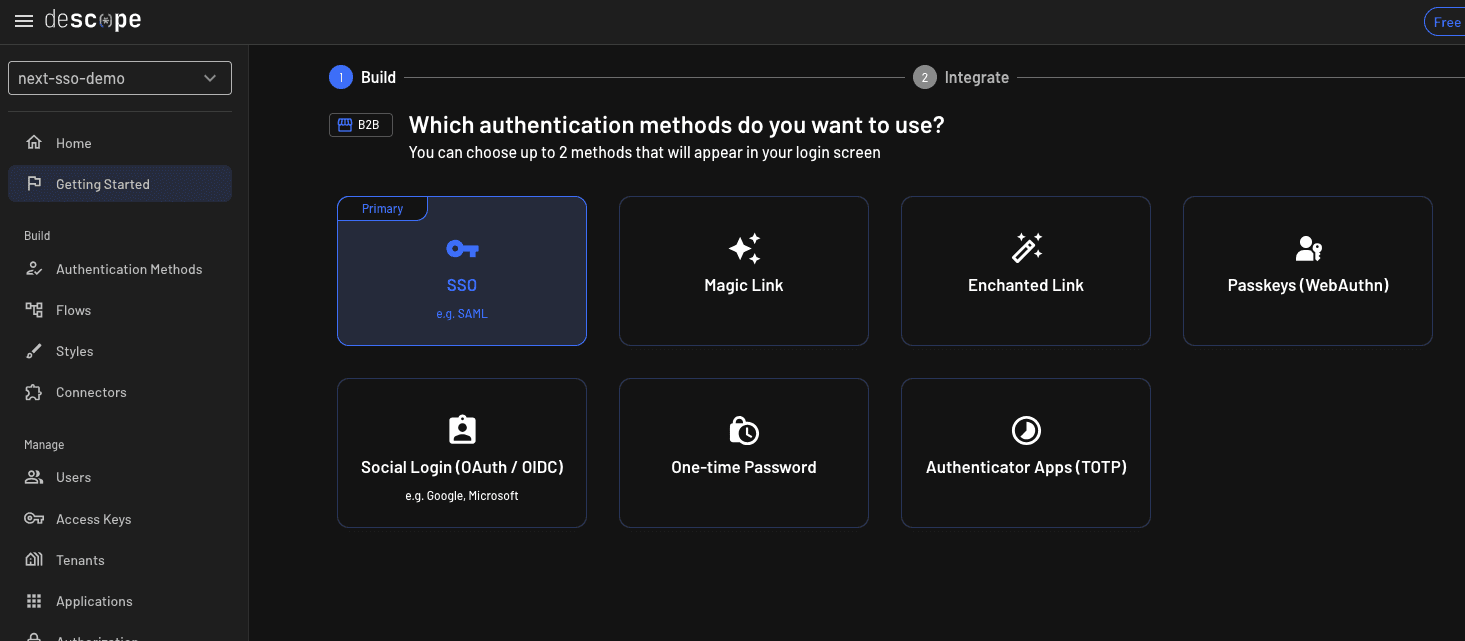
Select SSO as the authentication method you want to use and click Next:
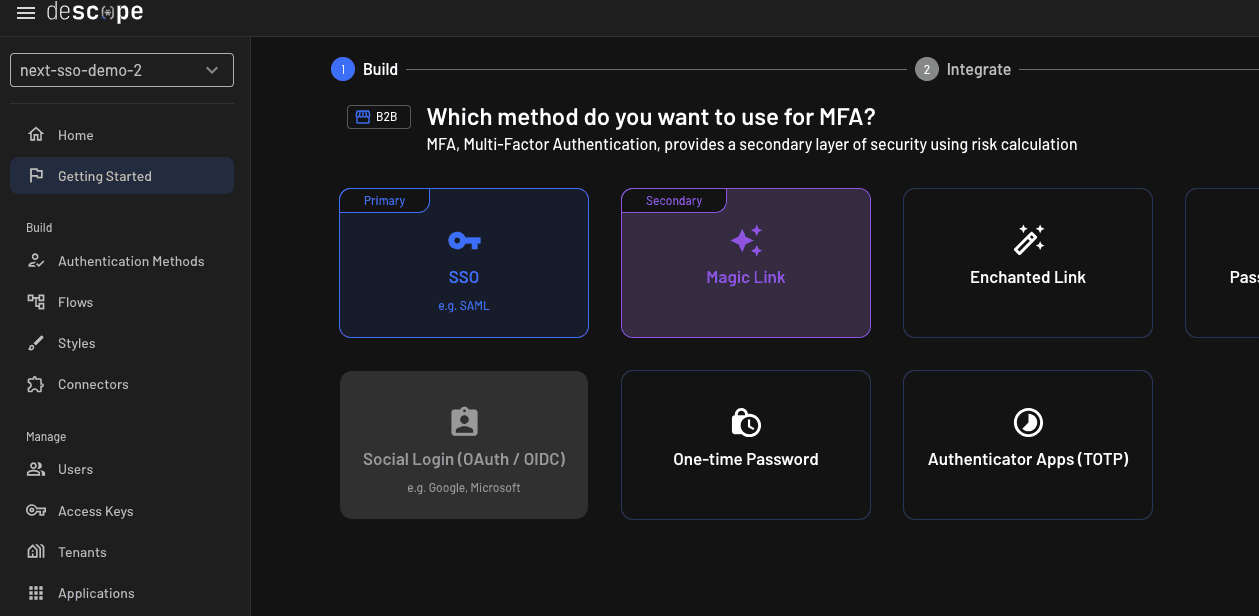
Select Magic Link as the multifactor authentication (MFA) method to use and click Next:
Select your preferred login screen layout on the next screen and click Next. Click Next again, and Descope generates the Sign In, Sign Up, Sign Up or In, and Step Up flows for you. You’ll implement the Sign In flow in a later section.
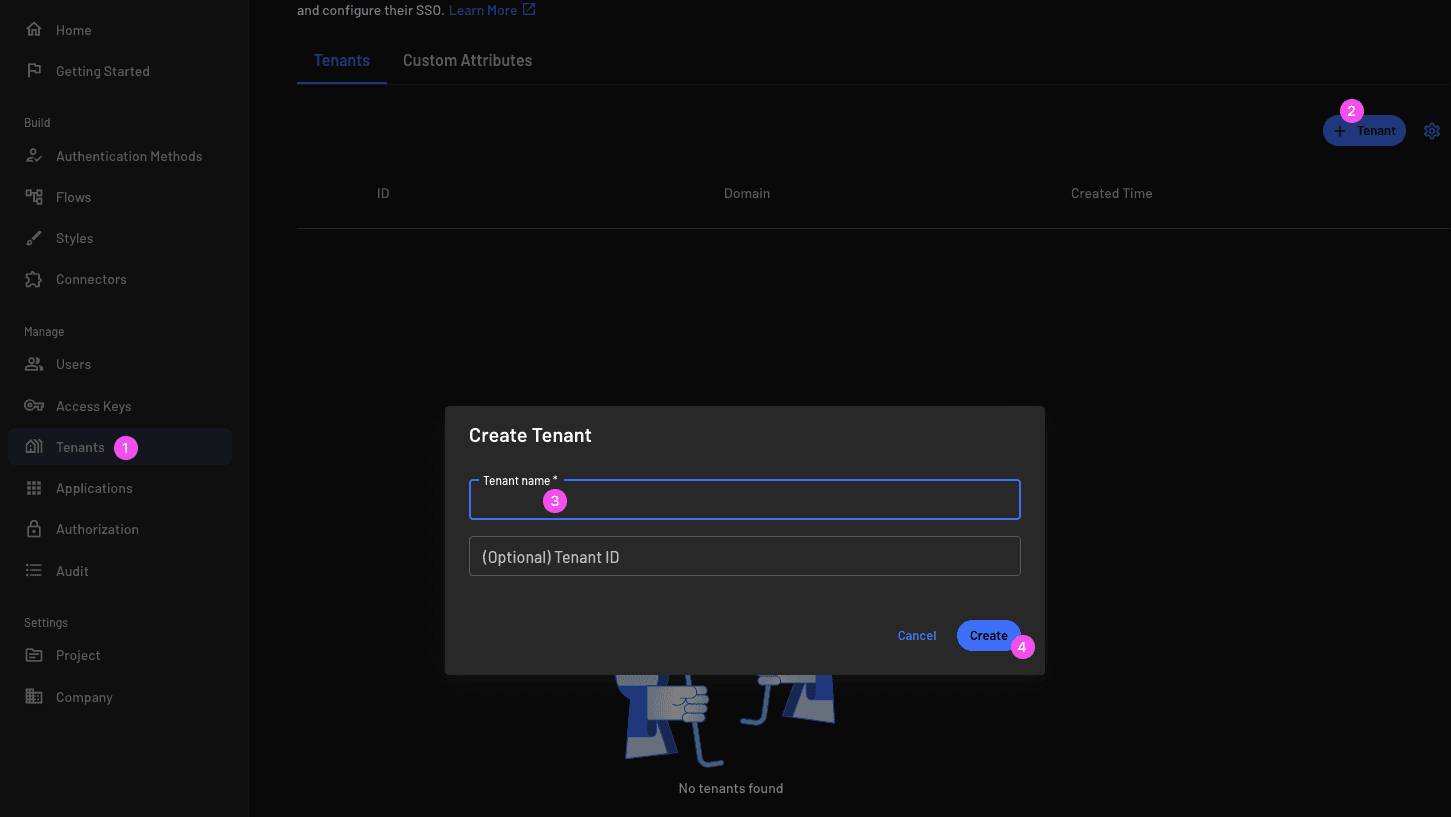
The Descope SSO implementation is tied to tenants (organizations or businesses that use your application), so create one by clicking Tenants in the sidebar:
Click the created tenant and update the email domain in the Tenant Settings. Descope enforces the email domain.
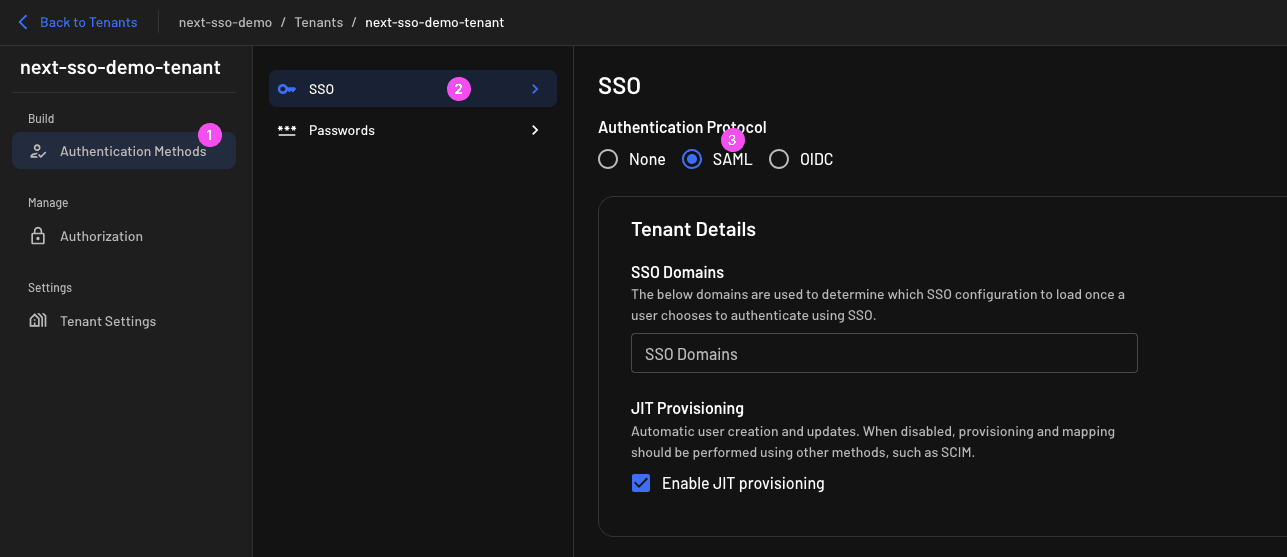
Go to the tenant Authentication Methods section, select the SAML protocol, and type in your email domain in the SSO Domains field in the Tenant Details settings:
You also need to update this page with the metadata URL and attributes from Okta.
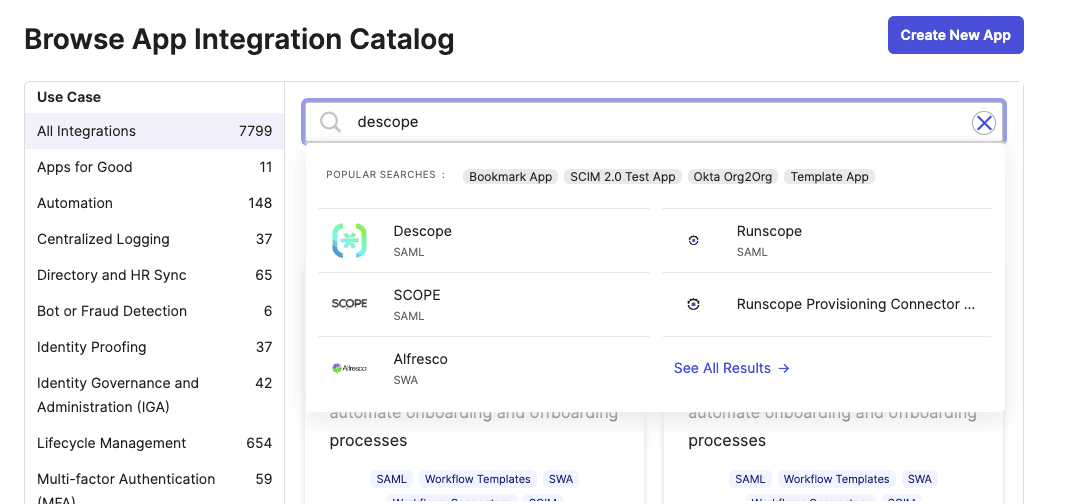
The Okta Descope integration simplifies the process of setting up Okta as your IdP for the Descope SSO provider. Head over to the Applications page of your Okta admin account, click on Browse App Catalog to view a list of available integrations, search for “descope”, and add it as an integration:
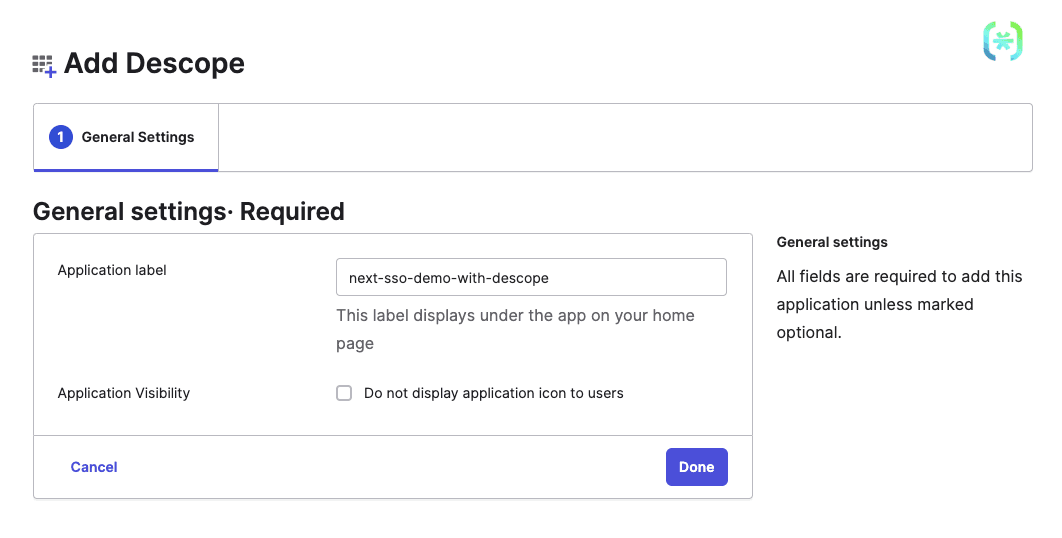
A new Okta app is created after the Descope integration is added. Update the Application label as follows and click Done:
Click Edit in the Sign On tab and copy the Metadata URL to your Descope tenant SSO settings. Also, copy the ACS URL and Entity ID values from your SSO settings to the Sign On settings on Okta.
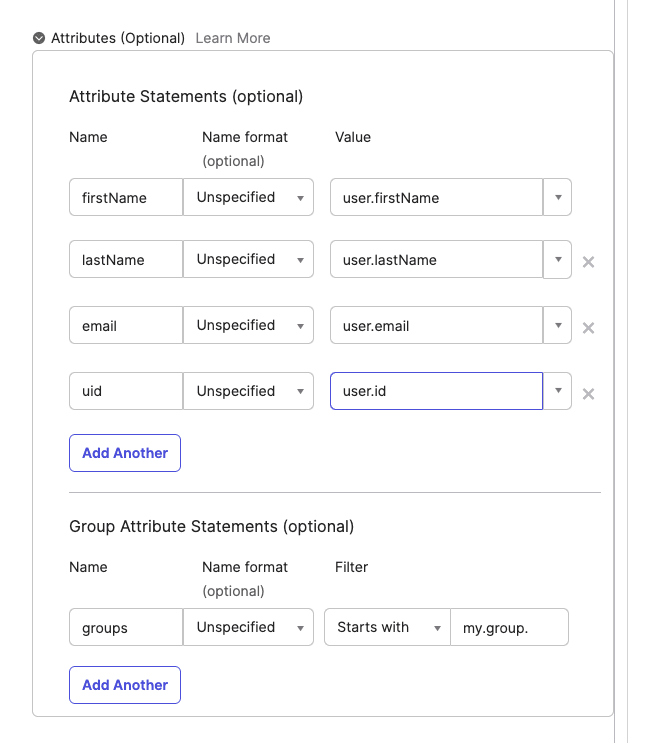
Update the Attribute Statements and map the names firstName, lastName, email, and uid to the values user.firstName, user.lastName, user.email, and user.id, respectively. Also, update the Group Attribute Statements and map the name groups to start with the value my.group.:
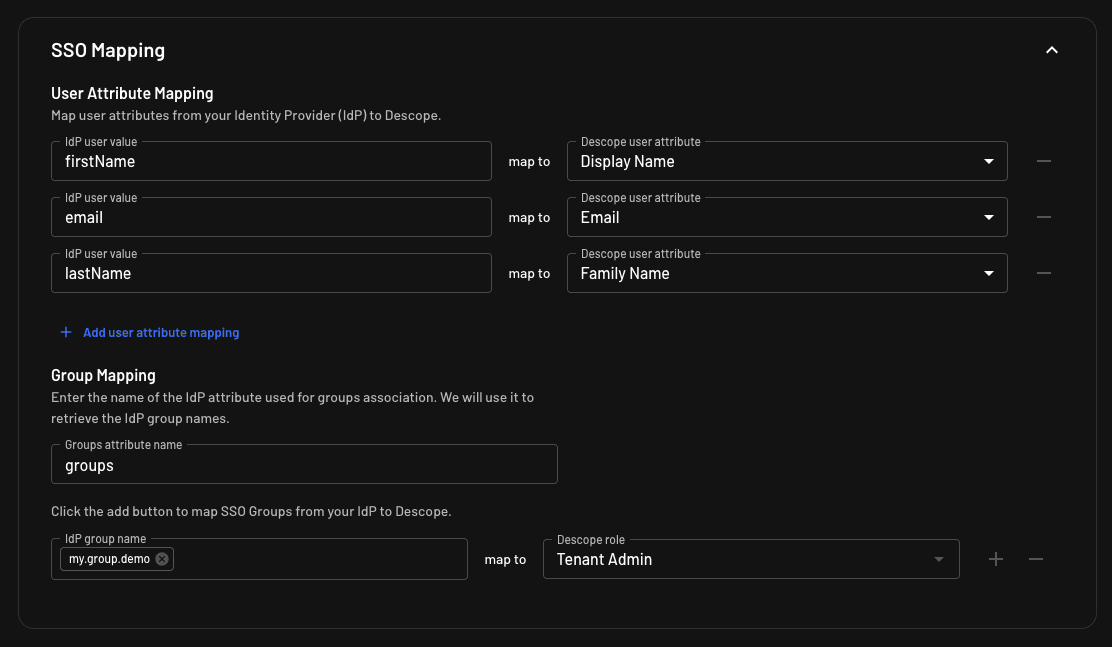
Update your tenant SSO Mapping settings to remap the attributes from Okta to the ones supported by Descope, like this:
Lastly, create a my.group.demo group on Okta (Directory > Groups), assign users to it, and assign the group to your Okta app.
Implementing the Descope SSO–enabled Next.js SP
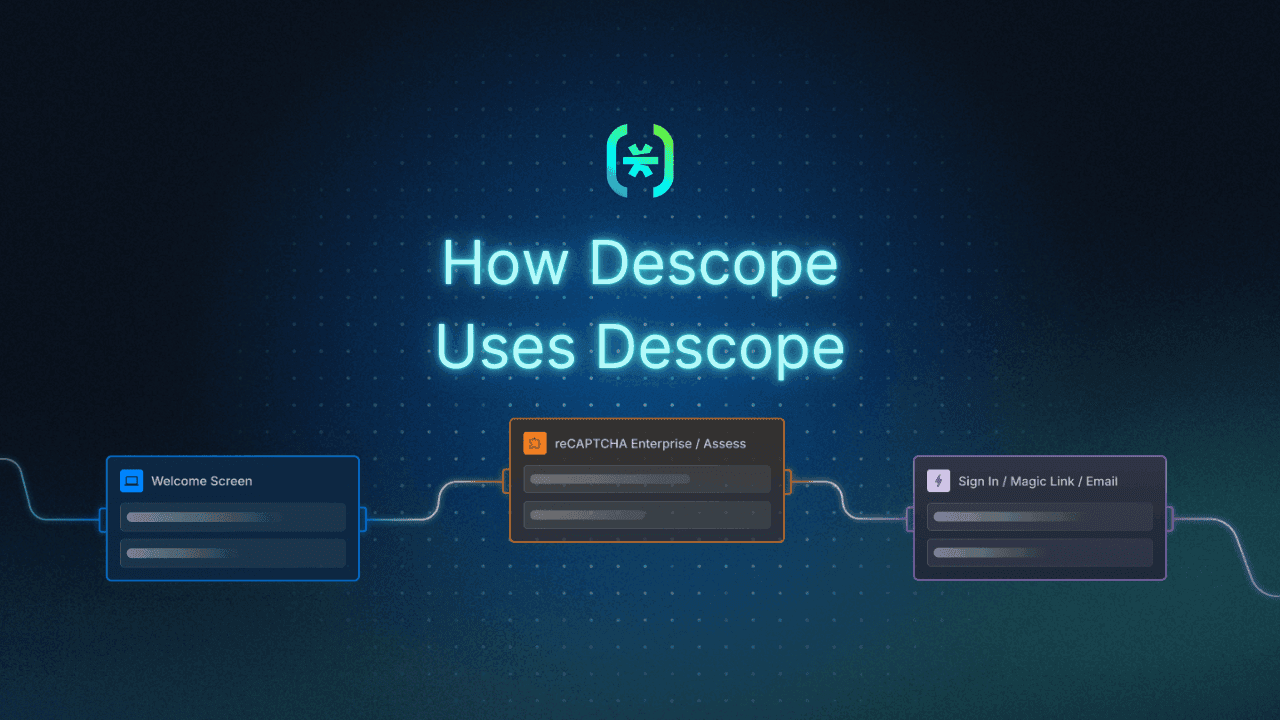
In this section, you’ll further develop the Next.js SP you built from scratch to integrate with Descope for SSO. Now that you’ve configured Okta to function with Descope, you can proceed with integrating SSO into your SP. Descope generated several flows in the previous section, but you’ll focus specifically on implementing the Sign In flow for this tutorial.
Start by cloning the starter Next.js project and installing its dependencies using pnpm i.
Use the following command to install the Descope Next.js SDK:
pnpm add @descope/nextjs-sdkNow, create a .env file and include the NEXT_PUBLIC_DESCOPE_PROJECT_ID variable in it. You’ll find your project ID from the project settings on Descope.
Next, wrap your app with the Descope auth provider in the src/app/layout.tsx file and pass your project ID to the provider:
// …
import { AuthProvider } from "@descope/nextjs-sdk";

//…

  return (
    <AuthProvider projectId={process.env.NEXT_PUBLIC_DESCOPE_PROJECT_ID!}>
      <html lang="en">
        <body className={inter.className}>{children}</body>
      </html>
    </AuthProvider>
  );

// …
Create a login page (src/app/login/page.tsx) and use the Descope component to embed a sign-in form:
import { Descope } from "@descope/nextjs-sdk";
import { session } from "@descope/nextjs-sdk/server";
import { redirect } from "next/navigation";

export default function Login() {
  const sessionRes = session();
  if (sessionRes) redirect("/dashboard");
  return (
    <main className="flex min-h-screen flex-col items-center p-24">
      <Descope
        flowId="sign-in"
        theme="light"
        redirectAfterSuccess="/dashboard"
      />
    </main>
  );
}
The flowId prop specifies the ID of the type of flow, which, in this case, is a Sign In flow. The redirectAfterSuccess prop specified here makes Descope redirect the user to the dashboard (protected route) after logging in. The session method enables us to get the current session in a server component or route handler. For this to work, you need to add the Descope auth middleware and match the routes that need it.
Create a src/middleware.ts file and add this:
import { authMiddleware } from "@descope/nextjs-sdk/server";

export default authMiddleware({
  // The Descope project ID to use for authentication
  projectId: process.env.NEXT_PUBLIC_DESCOPE_PROJECT_ID,
  // The URL to redirect to if the user is not authenticated
  redirectUrl: "/login",
  // An array of public routes that do not require authentication
  publicRoutes: ["/", "/login"],
});

export const config = {
  matcher: ["/", "/login", "/dashboard"],
};
The Descope SDK exports the useDescope() hook that returns a logout method for logging users out. Let’s add a Log out button component that calls the method.
Create a src/LogoutBtn.tsx file and add this code:
"use client";

import { useDescope } from "@descope/nextjs-sdk/client";

const LogoutBtn = () => {
  const { logout } = useDescope();
  return (
    <button
      className="inline-block py-2 px-3 rounded bg-red-500 text-white mt-8"
      onClick={() => {
        logout();
      }}
    >
      Log out
    </button>
  );
};

export default LogoutBtn;
Update the home page (src/app/page.tsx) to show if a user is logged in or not, as you did when implementing this from scratch:
import Image from "next/image";
import Link from "next/link";
import { session } from "@descope/nextjs-sdk/server";
import LogoutBtn from "@/LogoutBtn";

export default function Home() {
  const sessionRes = session();
  return (
    <main className="flex min-h-screen flex-col items-center p-24">
      <div className="flex items-end gap-3.5">
        <Image
          className="relative"
          src="/next.svg"
          alt="Next.js Logo"
          width={180}
          height={37}
          priority
        />
        <h1 className="text-5xl font-medium translate-y-1.5">SSO Demo</h1>
      </div>
      {sessionRes && (
        <Link href="/dashboard" className="underline mt-4">
          Go dashboard
        </Link>
      )}
      <div className="mt-12 flex items-center flex-col">
        {sessionRes ? (
          <>
            <p>LOGGED IN</p>
            <LogoutBtn />
          </>
        ) : (
          <>
            <p>LOGGED OUT</p>
            <Link
              href="/login"
              className="inline-block py-2 px-3 rounded bg-green-500 text-white mt-8"
            >
              Log in
            </Link>
          </>
        )}
      </div>
    </main>
  );
}
Finally, add the protected dashboard page (src/app/dashboard/page.tsx):
"use client";
import { useEffect } from "react";
import Image from "next/image";
import Link from "next/link";
import { useUser, useSession } from "@descope/nextjs-sdk/client";
import LogoutBtn from "@/LogoutBtn";
import { redirect } from "next/navigation";
export default function Dashboard() {
const { user, isUserLoading } = useUser();
const { isSessionLoading, isAuthenticated } = useSession();
useEffect(() => {
if (!isSessionLoading && !isUserLoading && !isAuthenticated)
redirect("/login"); // Redirect to login page if user is not logged in.
}, [isSessionLoading, isUserLoading, isAuthenticated]);
if (!user || isSessionLoading || isUserLoading)
return <p className="text-center mt-4">Loading...</p>;
return (
<main className="flex min-h-screen flex-col items-center p-24">
<div className="flex items-end gap-3.5">
<Image
className="relative"
src="/next.svg"
alt="Next.js Logo"
width={180}
height={37}
priority
/>
<h1 className="text-5xl font-medium translate-y-1.5">
SSO Demo Dashboard
</h1>
</div>
<Link href="/" className="underline mt-4">
Go home
</Link>
<div className="text-center">
<h2 className="text-2xl mt-8">Hello {user.name},</h2>
<p className="mt-3">
You're signed in as <strong>{user.email}</strong>
</p>
</div>
<LogoutBtn />
</main>
);
}Run the dev server with pnpm dev, and you’ll see the same home page as in the previous implementation:
Click on the Login button to navigate to the /login route, and you’ll see a sign-in form similar to this:
Sign in with one of the users assigned to your Okta IdP, and then you’ll be taken to Okta for verification:

After verification, you’ll be redirected back to your SP dashboard as an authenticated user:
That’s it! You’ve successfully implemented an SSO. You can find the full code in this GitHub repo.
Conclusion
This guide explored what the fundamentals of single sign-on (SSO) are and how to implement it from scratch. While building an SSO solution from scratch might seem like a cost-effective solution, the difficulties, security risks, and upkeep costs may outweigh the initial cost savings.
Through established SSO providers like Descope, you can gain access to prebuilt, robust functionalities, ensuring a smoother implementation. Descope is built on a scalable and flexible multitenant architecture that supports advanced B2B SSO enterprise requirements, including enforcing SSO-enabled domains and offering SSO self-service setup for B2B tenant admins.
Sign up for a free-forever account today. Have questions about the platform? Book time with the team.