
Table of Contents
Hello, fellow Descopers! In this tutorial, we will learn how to add authentication to your Flask app. The project is built with a React frontend and a Flask backend. By the end of this tutorial, you will have a multi-page web app with home, login, and profile pages, along with protected routes and authentication from top to bottom.
Prerequisites
All the code for the tutorial will be in the GitHub Repository at https://github.com/descope-sample-apps/flask-react-sample-app. Instructions on the installation are on the README.
If you're a total beginner or getting started with Descope, feel free to follow along! You can sign up for a free Descope account on our website. There’s also the Descope Getting Started Docs, and the Flask Quick Start guide to help you get a general understanding.
Let's get started!
Frontend: Add Descope to React
This is where the authentication form is displayed in our React app, and sends requests to our backend / server which is our Flask app.
import { AuthProvider } from '@descope/react-sdk'


const root = ReactDOM.createRoot(document.getElementById('root'));
root.render(
 <React.StrictMode>
   <AuthProvider projectId={process.env.REACT_APP_PROJECT_ID}>
     <App />
   </AuthProvider>
 </React.StrictMode>
);
Code snippet: index.js file code snippet
To get started, we first have to wrap our App component with the AuthProvider in our index.js file. The project id is added to the AuthProvider as an environment variable and enables the nested components and the entire React app to use Descope authentication throughout the app.
Setting up our routes
Since our app is going to have a couple of pages, let’s see how we set up our routes in the App.js file.
import './App.css';
import Home from './components/Home';
import Login from './components/Login';
import Profile from './components/Profile';
import { BrowserRouter as Router, Routes, Route } from 'react-router-dom';
import Dashboard from './components/Dashboard';


function App() {
 return (
   <Router>
     <Routes>
       <Route path='/' element={<Home />} />
       <Route path='/login' element={<Login />} />
       <Route path='/profile' element={<Profile />} />
       <Route path='/dashboard' element={<Dashboard />} />
     </Routes>
   </Router>
 );
}

export default App;
Code snippet: App.js file
In our App.js we have a couple routes. There’s the home, login, profile, and dashboard routes.
Login page
In our Login.js component, we have imported the Descope libraries and have created variables such as isAuthenticated.
import '../App.css';
import React, { useEffect } from "react";
import { useSession, useUser } from '@descope/react-sdk'
import { Descope } from '@descope/react-sdk'


function Login() {
   // isAuthenticated: boolean - is the user authenticated?
   // isSessionLoading: boolean - Use this for showing loading screens while objects are being loaded
   const { isAuthenticated, isSessionLoading } = useSession()
   // isUserLoading: boolean - Use this for showing loading screens while objects are being loaded
   const { isUserLoading } = useUser()
   const navigate = useNavigate()


   useEffect(() => {
       if (isAuthenticated) {
           return navigate("/profile");
       }
   }, [isAuthenticated]) // listen for when isAuthenticated has changed


   return (
       <div className='page'>
           {
               (isSessionLoading || isUserLoading) && <p>Loading...</p>
           }


           {!isAuthenticated &&
               (
                   <>
                       <h1 className='title'>Login/SignUp to see the Secret Message!</h1>
                       <Descope
                           flowId="sign-up-or-in"
                           onSuccess = {(e) => console.log(e.detail.user)}
                           onError={(e) => console.log('Could not log in!')}
                           theme="light"
                       />
                   </>
               )
           }
       </div>
   )
}


export default Login;
Code snippet: Login.js file
In the useEffect, we check if the isAuthenticated value has changed and run the condition. If the user is authenticated then we navigate to the profile page.
In the return statement, we check if the user isn’t authenticated and render the Descope authentication flow component.
Creating our profile
Almost all websites with authentication have a profile page of some sort. Let’s create our own custom profile page!
   const { isSessionLoading } = useSession()


   const { user } = useUser()
   const { logout } = useDescope()
   const navigate = useNavigate()


   const [secret, setSecret] = useState({
       secret: "",
       role: []
   })


   const sessionToken = getSessionToken(); // get the session token


   const logoutUser = async() => {
       await logout()
       return navigate('/login')
   }


   useEffect(() => {
       fetch('/get_roles', { // call the api endpoint from the flask server
           headers: {
               Accept: 'application/json',
               Authorization: 'Bearer ' + sessionToken,
           }
       }).then(data => {
           if (data.status === 401) {
               navigate('/login')
           }
           return data.json()
       }).then(jsonData => {
           setSecret({
               secret: jsonData.secretMessage,
               role: jsonData.role
           })
       }).catch((err) => {
           console.log(err)
           navigate('/login')
       })
   }, [])
Code snippet: Profile.js file
In our Profile.js file, starting from the top, there are a six variables to consider:
useSessionto maintain the session of the page.userobject which contains the user details such as email, name etc.navigateobject for routing.logoutwhich clears the sessions.useStatevariable named secret which stores an object containing the “secret” and “role” fields.sessionTokenwhich gets the session token.
Below the variables is the logoutUser function and useEffect. The logoutUser function is called by a button onClick.
The useEffect hook contains a fetch call to an endpoint in our Flask server /get_roles, and we send our session token within the Authorization headers. If all goes well, our Flask server returns the data, and we convert it to JSON and set the secret variable to the object. If status 401 is returned, then we redirect the user back to the login page.
Now that you have learned how to integrate Descope into React, see if you can understand the Dashboard.js file.
So far so good!

Let’s now check out the Flask app.
Backend: Add Descope to Flask
The DescopeClient is imported and initialized with our project_id and stored in the descope_client variable.
import os
from flask import Flask, request, make_response, jsonify
from descope import DescopeClient
from functools import wraps


app = Flask(__name__) # initialize flask app


try:
   descope_client = DescopeClient(project_id=os.environ.get("PROJECT_ID")) # initialize the descope client
except Exception as error:
   print ("failed to initialize. Error:")
   print (error)
Code snippet: App.py file to initialize the Descope client
Protecting our routes
Before we implement our Flask endpoints we need to build an authentication decorator to prevent unauthorized users from accessing our endpoints. We are going to name our decorator token_required. A decorator adds more functionality to a function by wrapping it with another function.
def token_required(f): # auth decorator
   @wraps(f)
   def decorator(*args, **kwargs):
       session_token = None


       if 'Authorization' in request.headers: # check if token in request
           auth_request = request.headers['Authorization']
           session_token = auth_request.replace('Bearer ', '')
       if not session_token: # throw error
           return make_response(jsonify({"error": "❌ invalid session token!"}), 401)


       try: # validate token
           jwt_response = descope_client.validate_session(session_token=session_token)
       except:
           return make_response(jsonify({"error": "❌ invalid session token!"}), 401)


       return f(jwt_response, *args, **kwargs)


   return decorator
Code snippet: App.py file, highlighting the token_required decorator
There are five important things to understand about the decorator:
The decorator
token_requiredtakes in a function f as a parameter (whatever it may be).Since we are wrapping our function f with the
token_requireddecorator, we need to make sure the inner function called decorator, preserves the original values of the original functionf. We use@wraps(f)to accomplish this.We allow our nested function decorator to take in any number of arguments denoted by the
argsandkwargs. This is in the case that theffunction may have any arguments.In our inner function decorator, we check if the Authorization is in the headers and set the session token. If not, we return an error message.
Then we validate our session token and store the JWT in the
jwt_responsevariable.We then return the function
fwith thejwt_responsebecause we will need our JWT to access other information in our endpoints.
Now let’s see how we use our authentication decorator in our Flask endpoints.
Getting our roles
To protect the /get_roles endpoint, we wrap the function with the token_required decorator. When our React component calls the get_roles endpoint, our token_required decorator will first process the request to see if it’s authorized. If all goes well, we will continue with the get_roles function and the jwt_response that was passed in from the decorator.
@app.route('/get_roles', methods=['GET'])
@token_required
def get_roles(jwt_response):
   roles = jwt_response["roles"]


   return { "secretMessage": "You are now a trained Descope user!", "roles": roles}
Code snippet: App.py file, highlighting the get_roles endpoint
The roles variable is set to the response object roles which will be a list. Once the role value is set, an object containing the secretMessage and role is returned.
Back in our frontend, the data is fetched and set to our secret variable.
Some more roles
In our Dashboard.js we call our get_role_data to validate our user roles.
@app.route('/get_role_data', methods=['GET'])
@token_required
def get_role_data(jwt_response):
   valid_student_role = descope_client.validate_roles(
       jwt_response, ["student"]
   )
   valid_teacher_role = descope_client.validate_roles(
       jwt_response, ["teacher"]
   )


   return {"valid_teacher": valid_teacher_role, "valid_student": valid_student_role}
Code snippet: App.py file, highlighting get_role_data
Here is a step-by-step of what the get_role_data function is doing:
We also add the
token_requireddecorator to protect the endpoint.Then validate the roles a user may have; teacher or student. Using the Descope Python SDK, we can validate whether or not we have the roles by using the
validate_rolesmethod. Our JWT and roles are passed in as parameters.The variables
valid_student_roleandvalid_teacher_rolewill either be true or false. We then return them as an object.
Now for the demo!
It’s Showtime
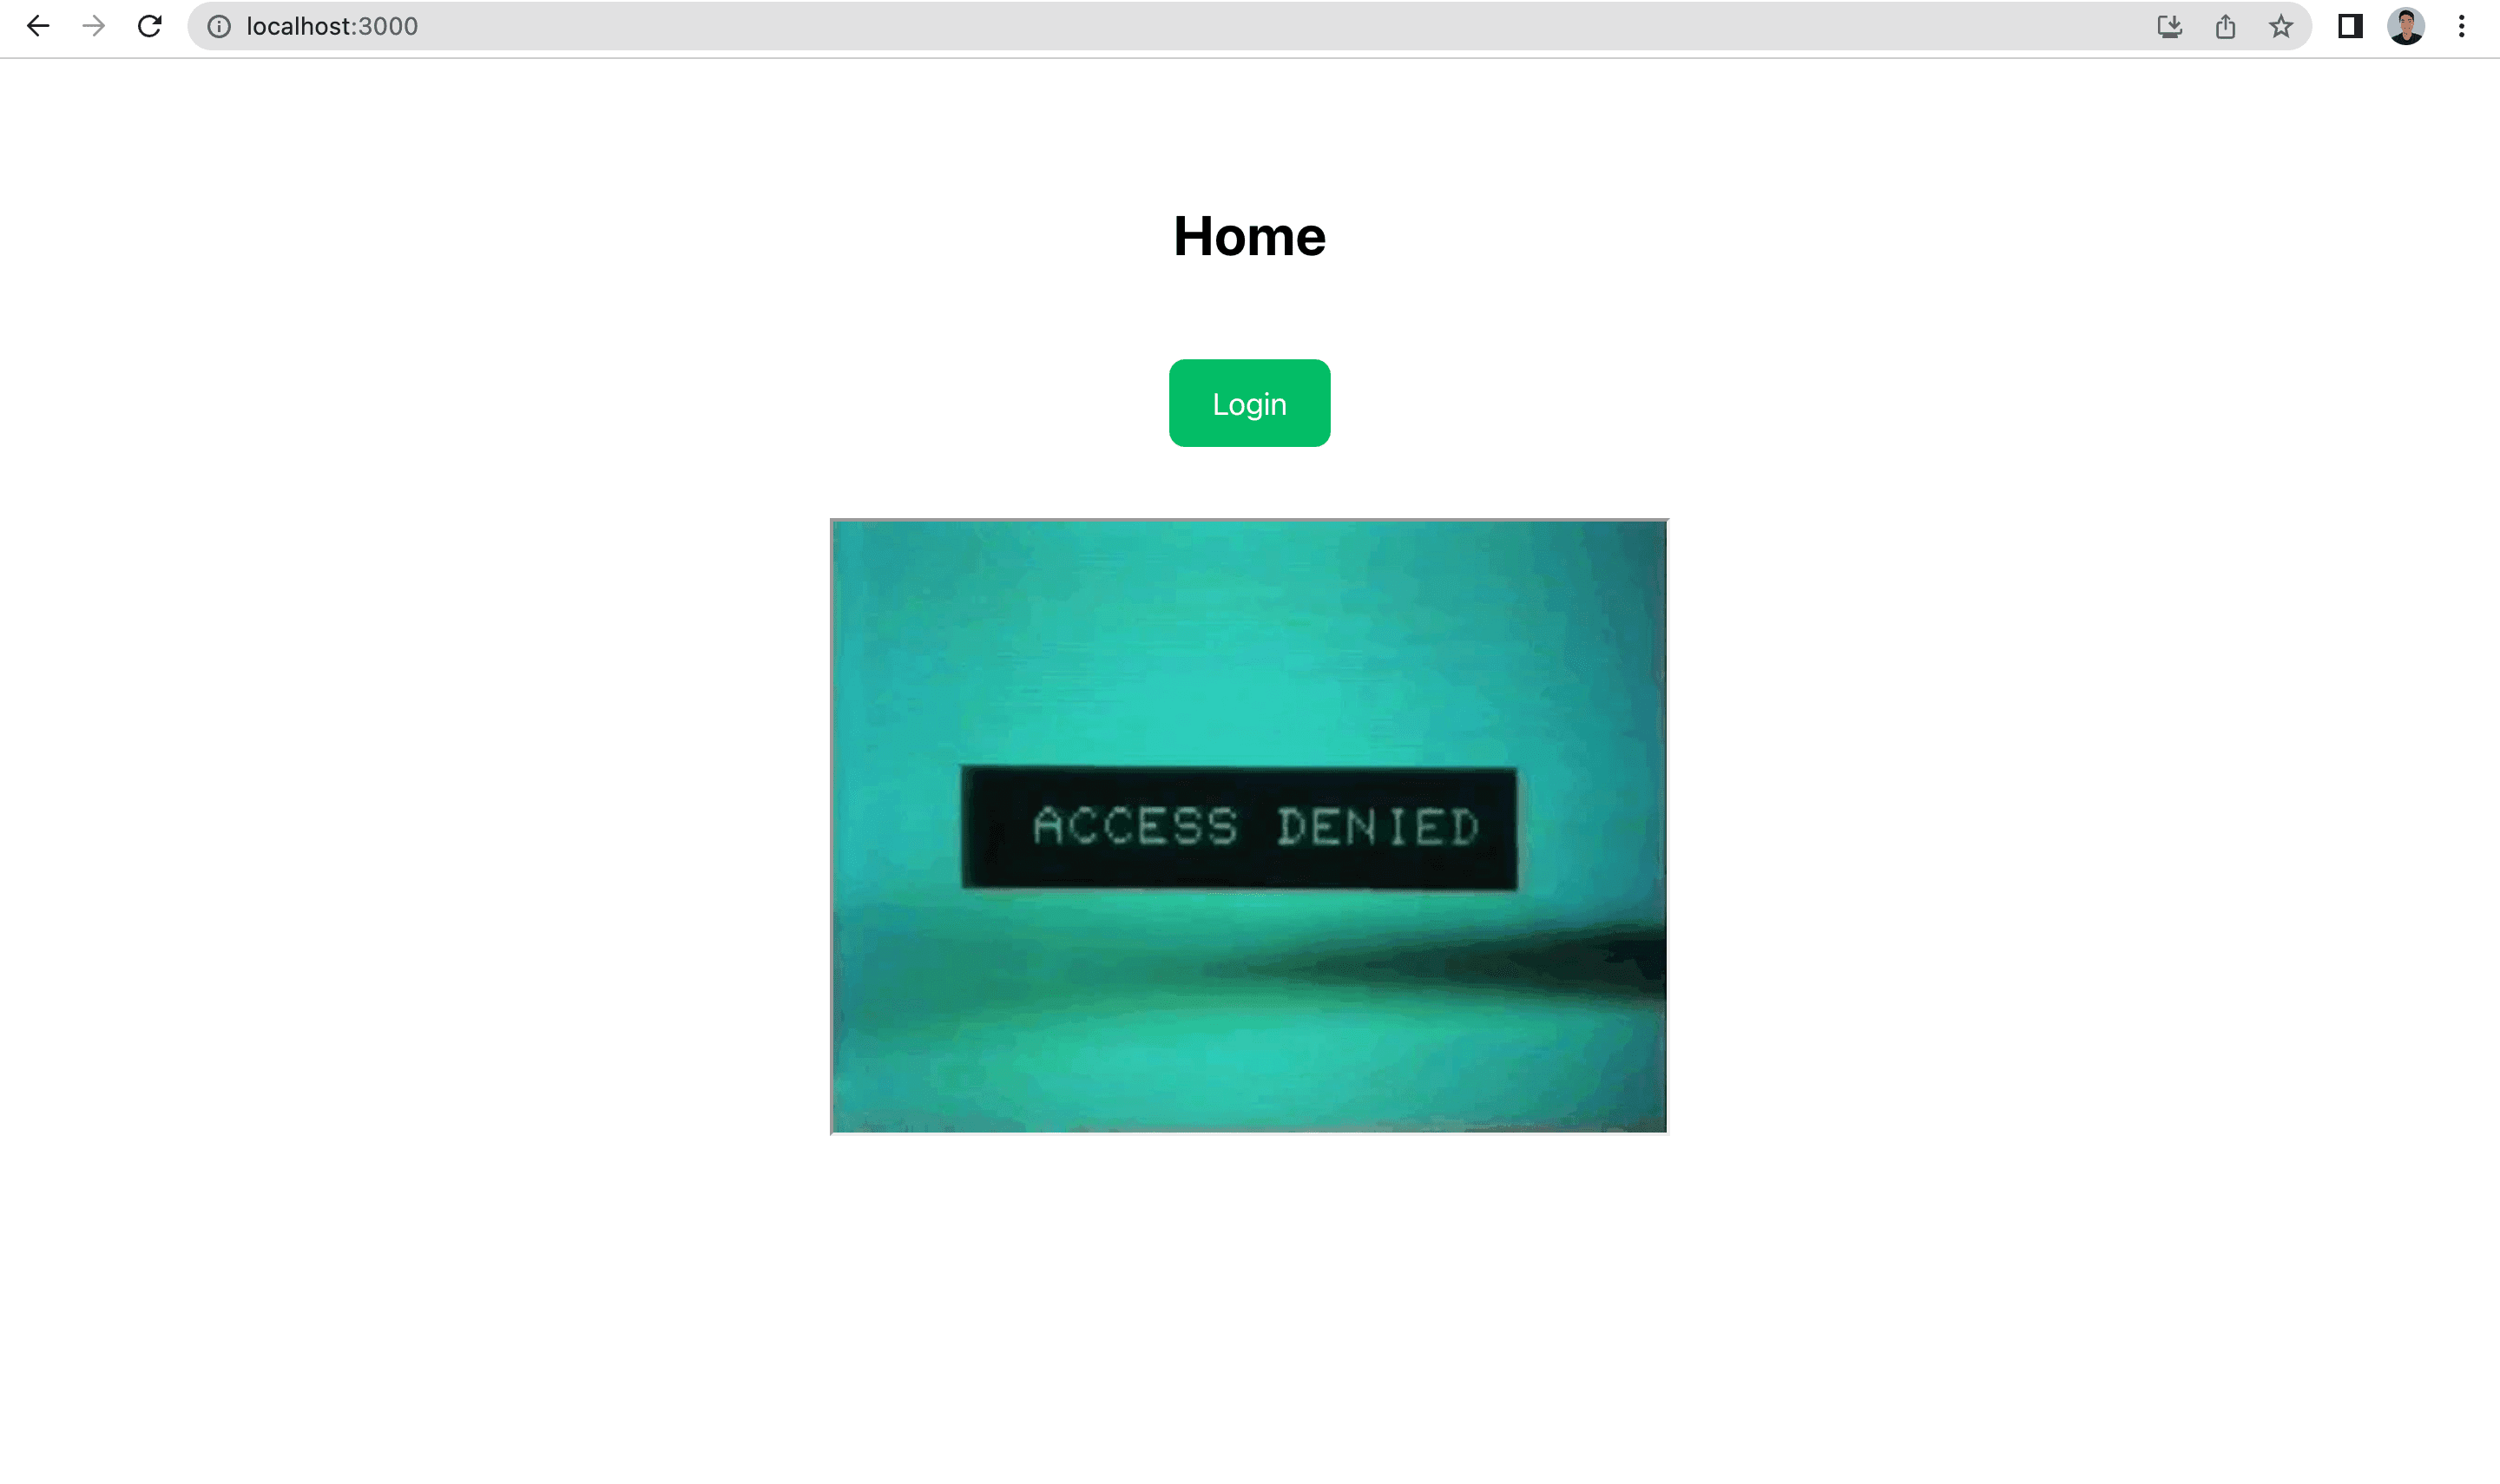
Run your app to see the result. Below is our home page with a button to the login page.
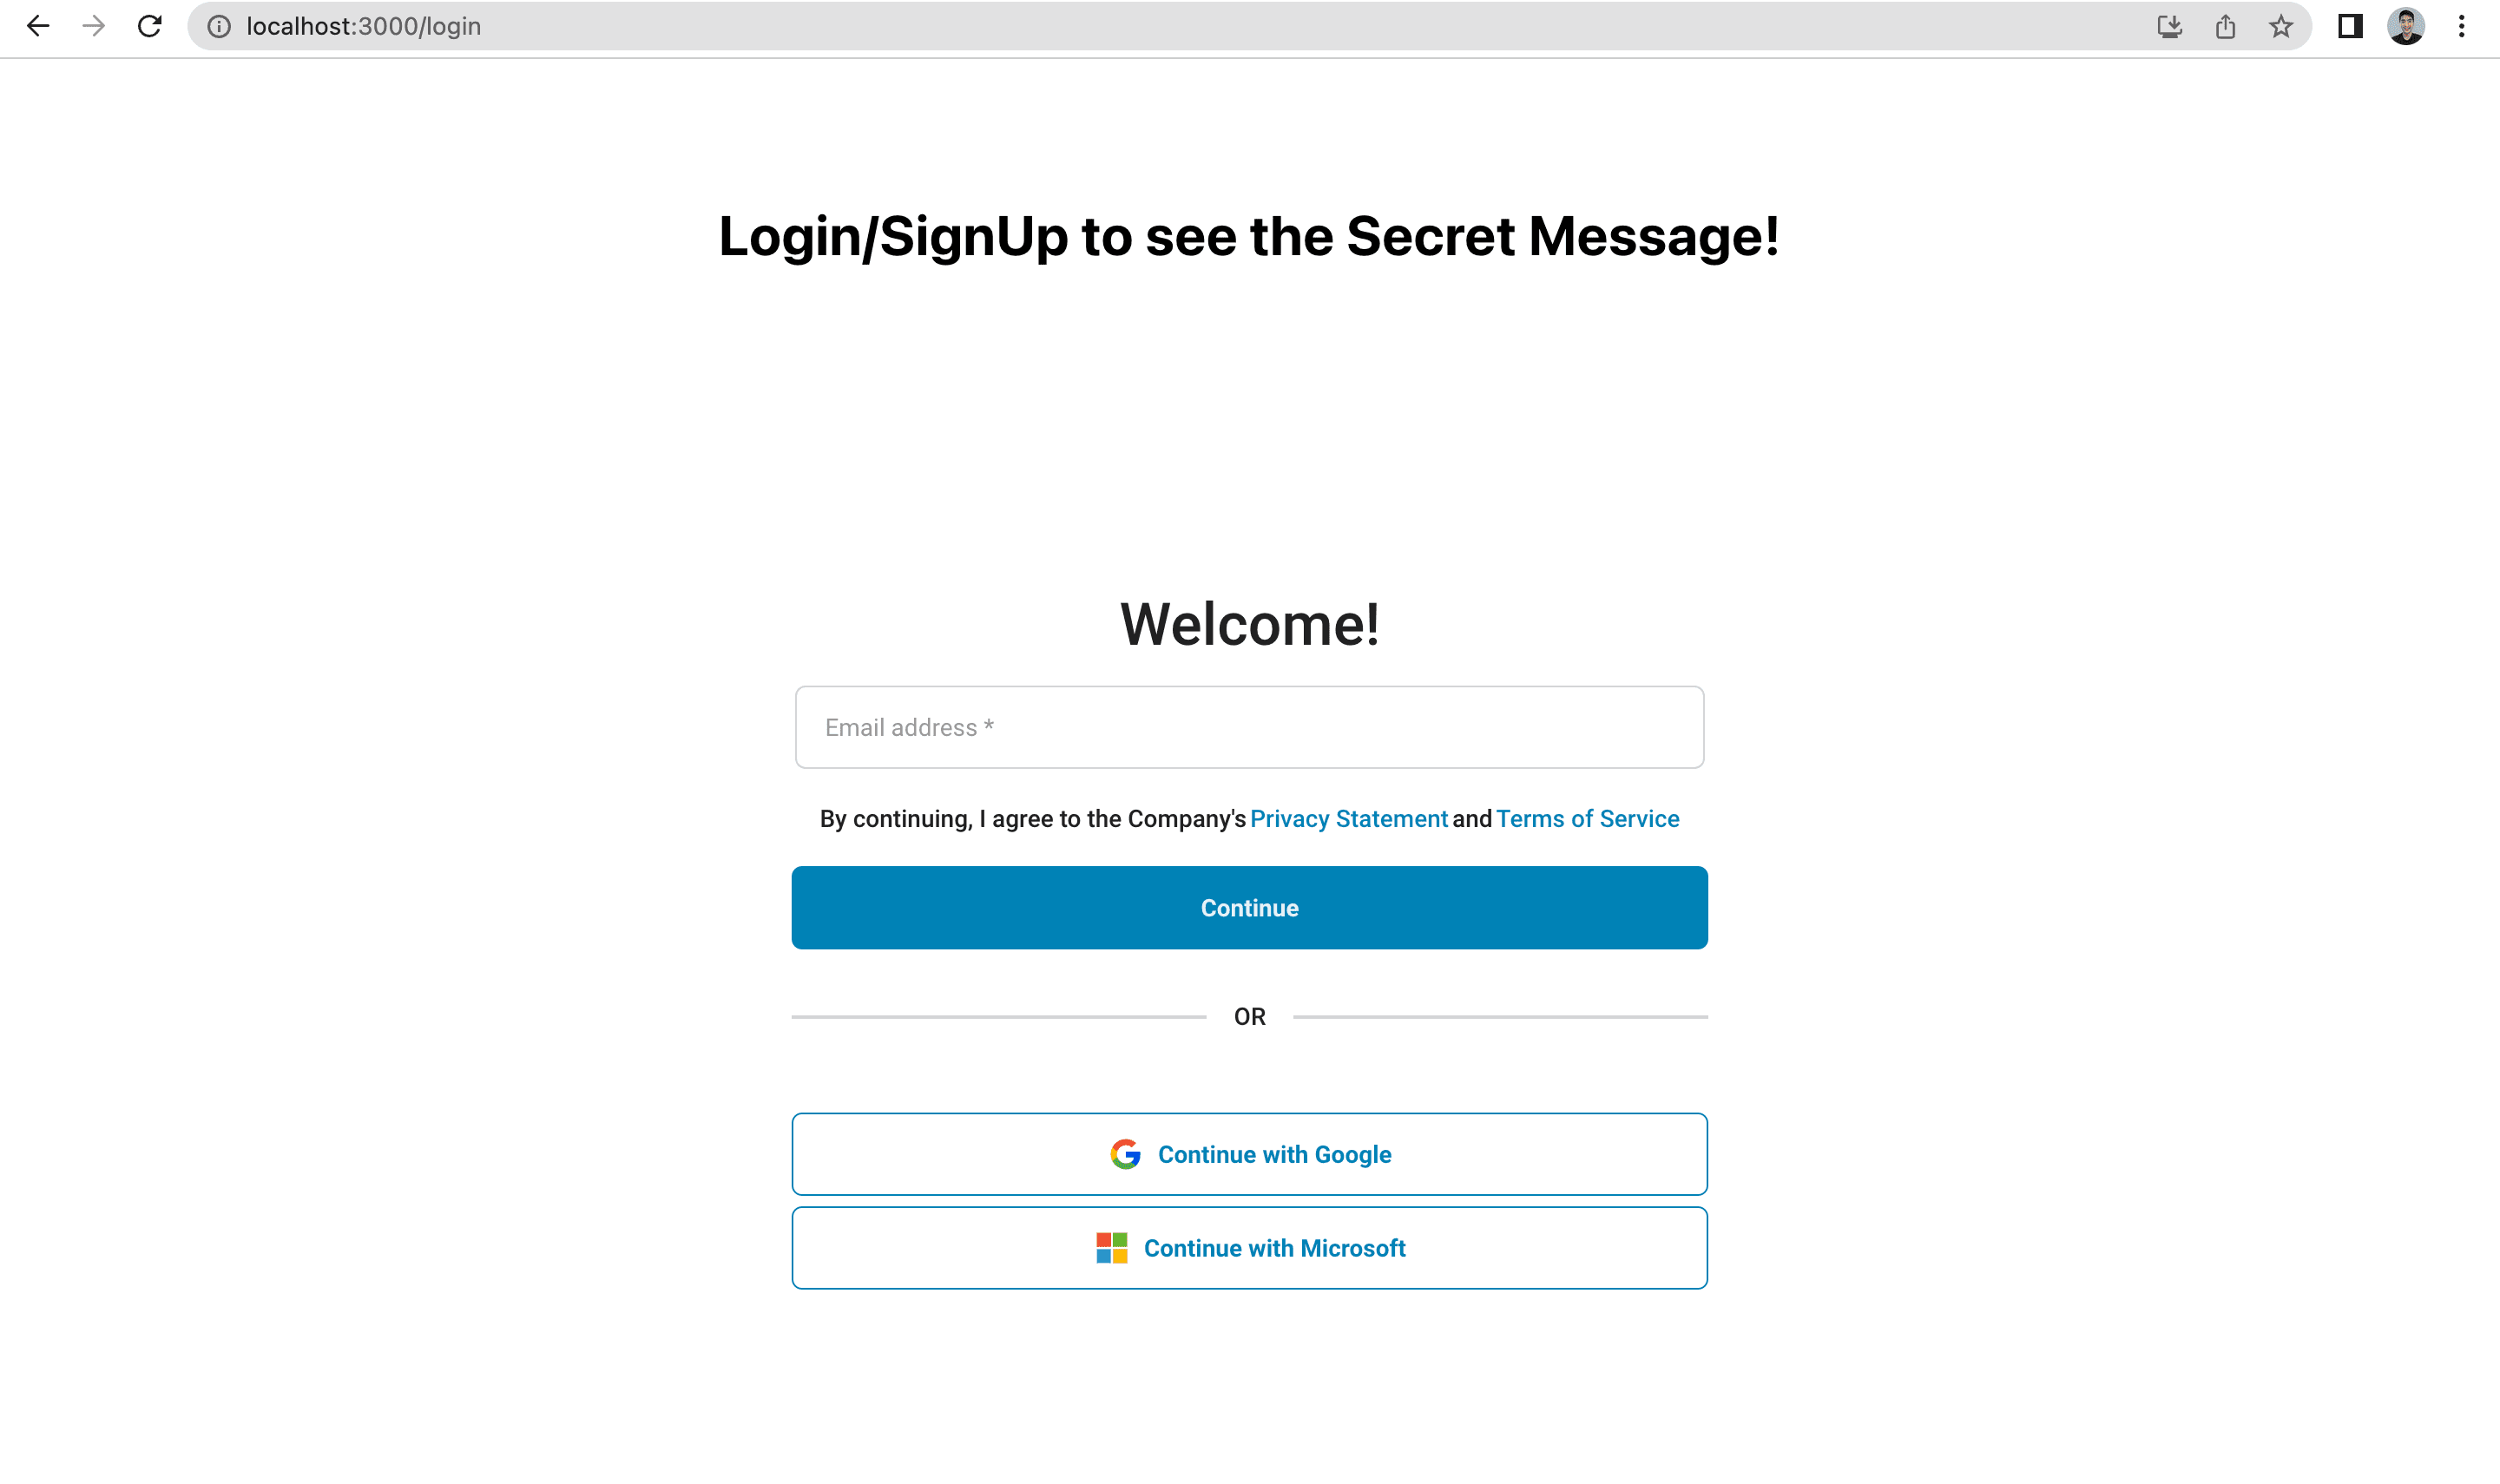
Below is our login page which is displayed when the user is not logged in.
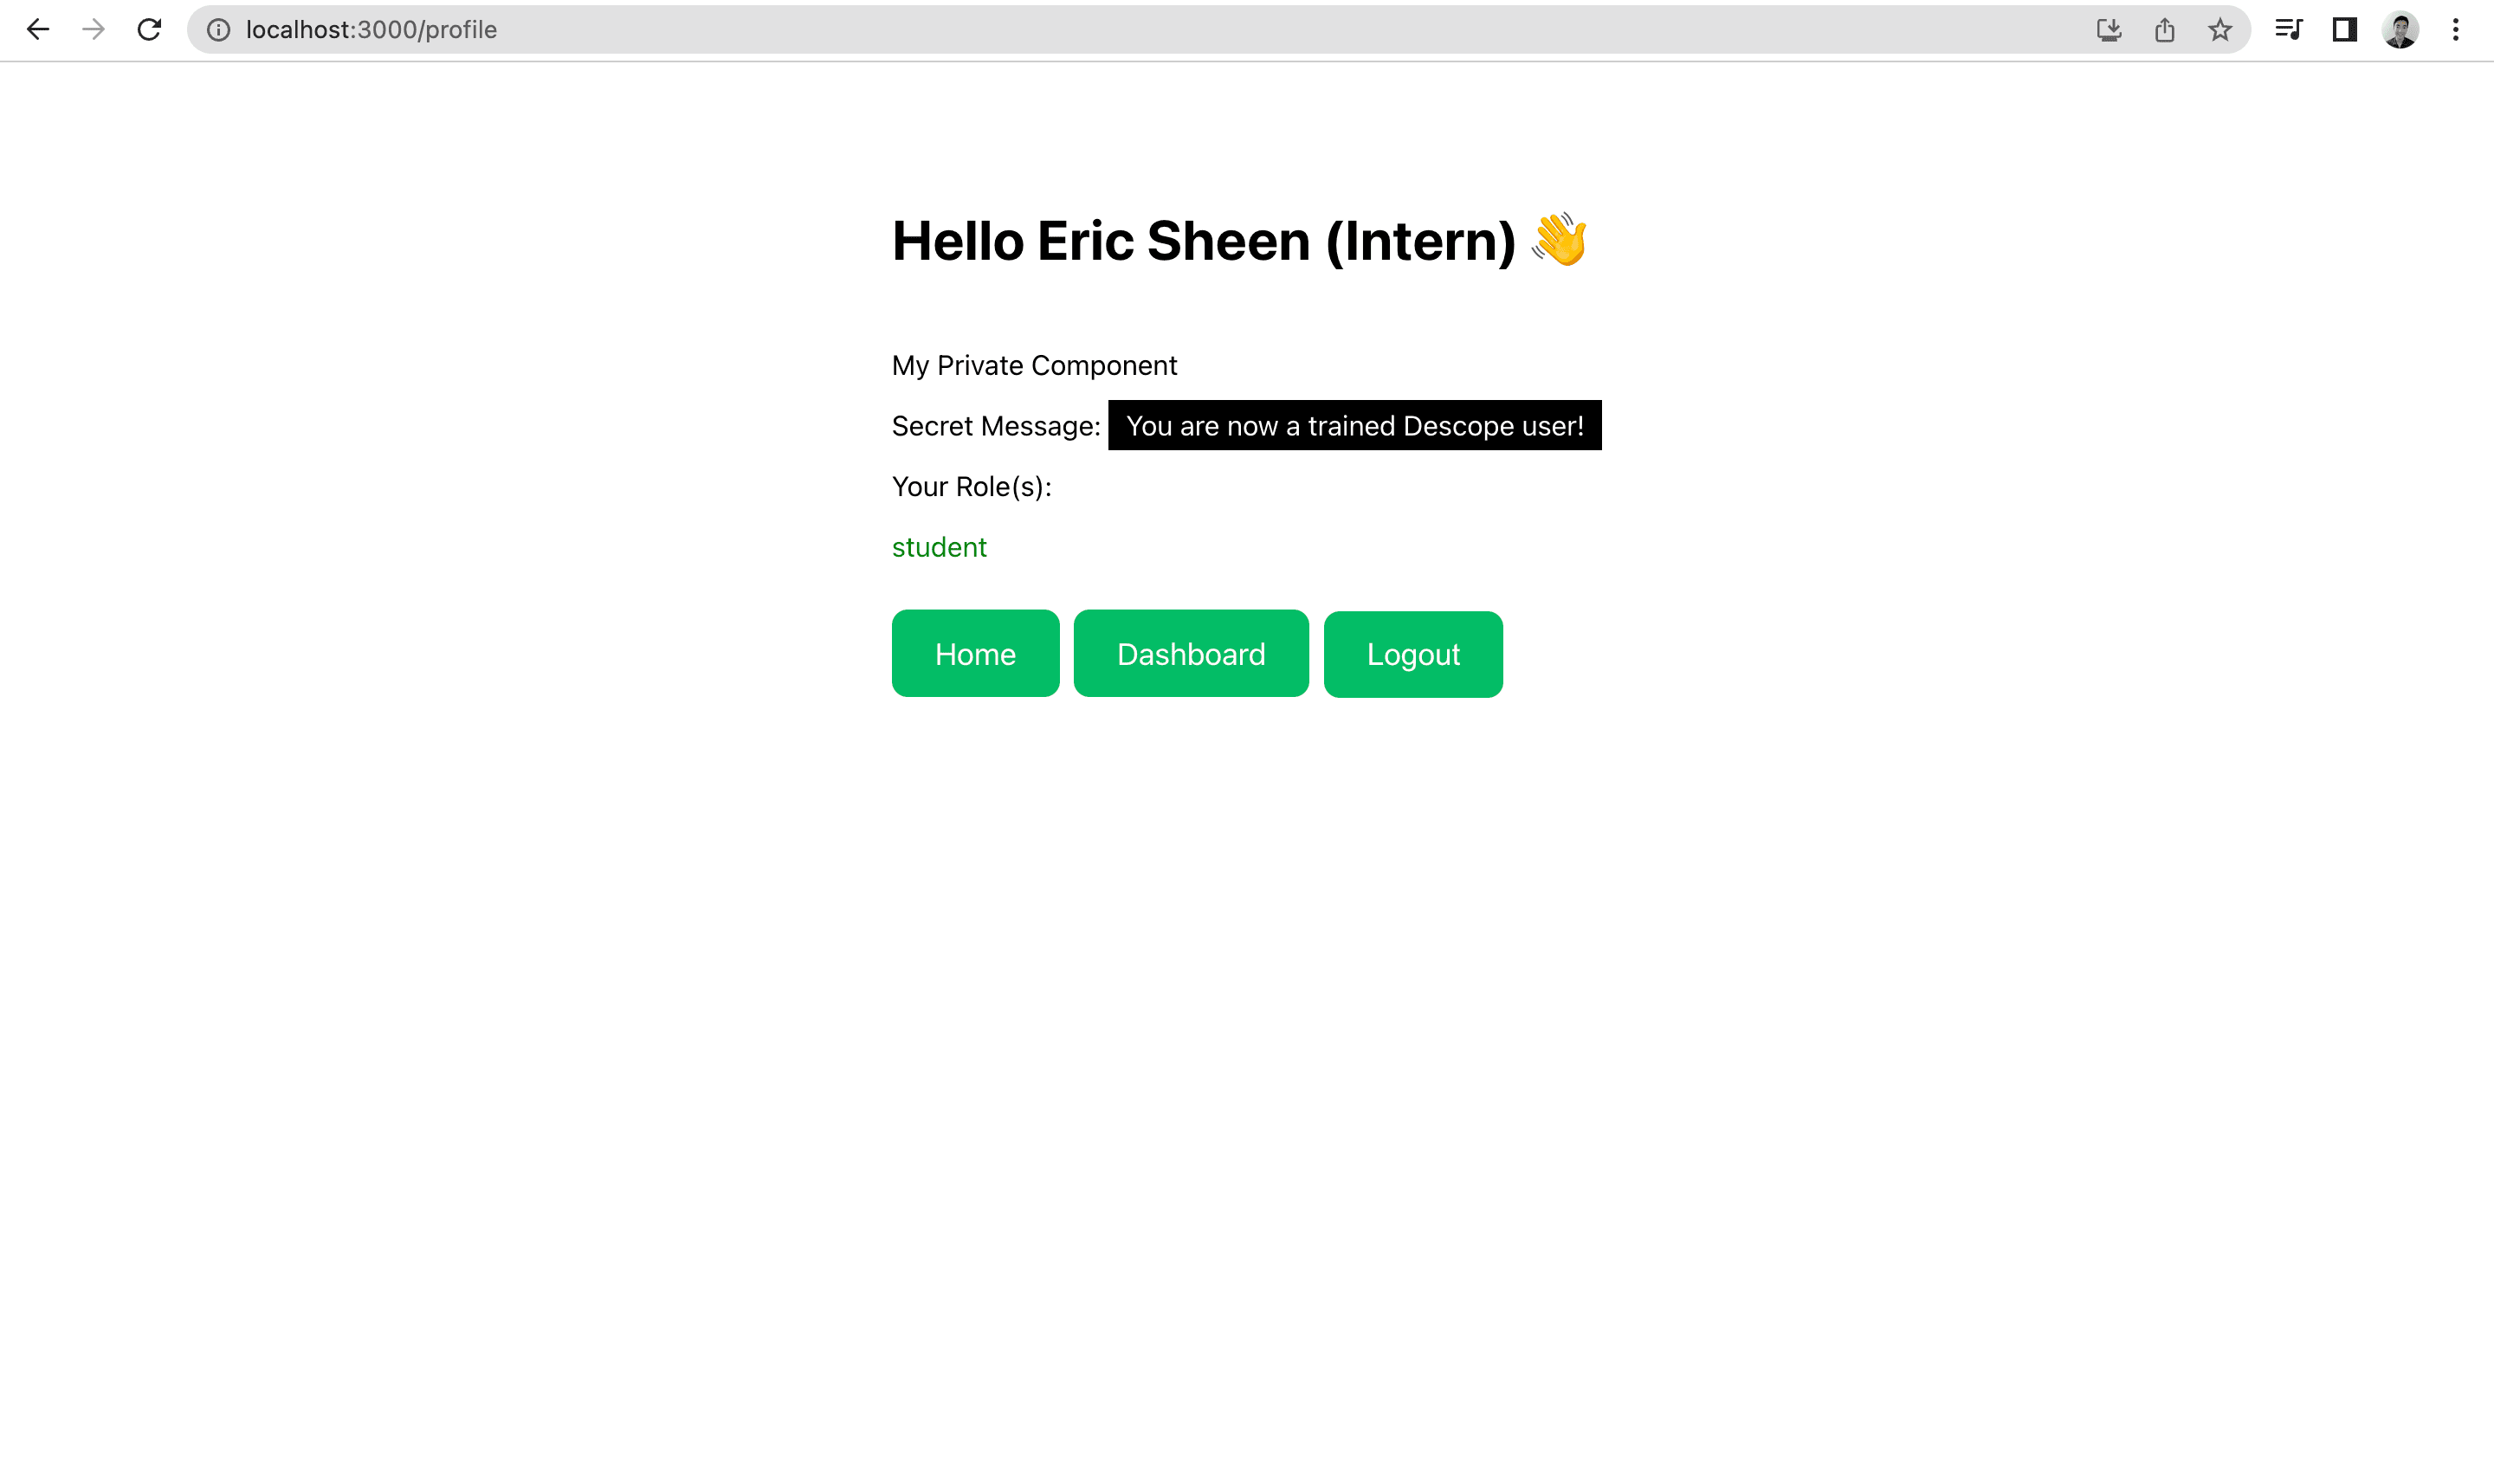
Upon being authenticated, our profile component is shown with our name, secret message, and roles, as highlighted in the screenshot below.
Based on what role you have (teacher or student), you will be presented with a different dashboard. The screenshot below shows one such example.

You can update your user roles in the “Users” tab on the Descope console and reload to see the update.
Well done on completing the tutorial! You have learned about adding Descope authentication to your React+Flask app.
If you want to start your Descope journey, sign up for our platform. If you have questions about React authentication or Flask authentication, join AuthTown, our open user community for developers to learn about the world of identity and authentication.