
Table of Contents
This tutorial was written by Kevin Kimani, a passionate developer and technical writer who enjoys explaining complicated concepts in a simple way. You can check out his GitHub or X account to connect and see more of his work!
Model Context Protocol (MCP) servers allow developers to connect large language models (LLMs) to external tools and resources through a standardized protocol. Some MCP servers are designed to run locally, often because they need to access resources that are in the same environment as the AI agent. Others are designed to run remotely, such as when exposing shared APIs, cloud-hosted tools, or team-wide services. Remote access is powerful, but without proper controls, it can easily become a security risk.
An unsecured MCP server exposed to the internet can be discovered by automated scanners, abused by unauthorized users, or even used to extract sensitive data from connected resources. Nevertheless, with proper authentication and authorization in place, remote MCP servers can unlock new collaboration models. Teams can share cloud-hosted tools and services, manage who can access which resources, and even integrate audit logs for compliance and observability. This makes MCP servers safer and more practical in enterprise or team-based environments.
In this guide, you'll learn how to take a local Playwright MCP server and make it remote-ready with authentication powered by Descope. You'll expose your server for secure remote access, add user authentication using Descope's Agentic Identity Hub, and implement role-based access control (RBAC) to ensure only authorized users can access sensitive tools.
Prerequisites
To complete this tutorial, you need the following:
Node.js v18+ installed on your local machine.
A code editor and a web browser.
Preparing the local MCP server
The Playwright MCP server exposes a set of tools that let LLMs interact with Playwright to perform actions such as running browser tests, inspecting pages, taking screenshots, and more. For example, you can use it to build an AI agent that automates quality assurance by navigating to a web application, filling out forms, and verifying that the UI behaves correctly. These tasks otherwise require manual testing or complex custom scripts.
When running locally, the Playwright MCP server is accessible only from your own machine. This is ideal for initial development and testing as there's no risk of unauthorized access. However, if you want to expose this server remotely, for example, to integrate it into a cloud-based workflow or share it with your team, you need to make it accessible over the internet. This is where you need to start thinking about security; anyone who invokes the server's URL can invoke its tools and potentially run arbitrary browser automation on your infrastructure.
Let's go ahead and set up the Playwright MCP server locally. Start by creating a new project folder and initializing a Node.js project:
mkdir descope-playwright-mcp-auth
cd descope-playwright-mcp-auth

npm init -y
Install the Playwright MCP server, which is offered as an npm package by Microsoft:
npm install @playwright/mcpOpen the package.json file and replace the scripts section with the following content that provides a command to run the MCP server as a standalone server and adds the port flag to enable HTTP transport:
"scripts": {
   "start:mcp": "mcp-server-playwright --port 3001"
},
You can now run the Playwright MCP server by executing the following command in the terminal:
npm run start:mcpYou should get the following output:
> descope-playwright-mcp-auth@1.0.0 start:mcp
> mcp-server-playwright --port 3001

Listening on http://localhost:3001
Put this in your client config:
{
 "mcpServers": {
   "playwright": {
     "url": "http://localhost:3001/mcp"
   }
 }
}
For legacy SSE transport support, you can use the /sse endpoint instead.
To test that the Playwright MCP server is running as expected, you can use MCP Inspector. The MCP Inspector is a browser-based debugging tool that lets you interact with MCP servers without writing any client code. It's perfect for quickly verifying that your server is exposing the right tools and responding correctly before integrating it with an actual AI agent. On a separate terminal, execute the following command to start the MCP Inspector:
npx @modelcontextprotocol/inspector@0.17.2 --transport http --server-url http://localhost:3001/mcpThe --transport flag specifies how the client communicates with the MCP server. MCP supports three transport types: http (streamable HTTP), sse (server-sent events (SSE) for streaming), and stdio (standard input/output for local processes). Since the Playwright MCP server is running as an HTTP server on port 3001, you're using the http transport to connect to it.
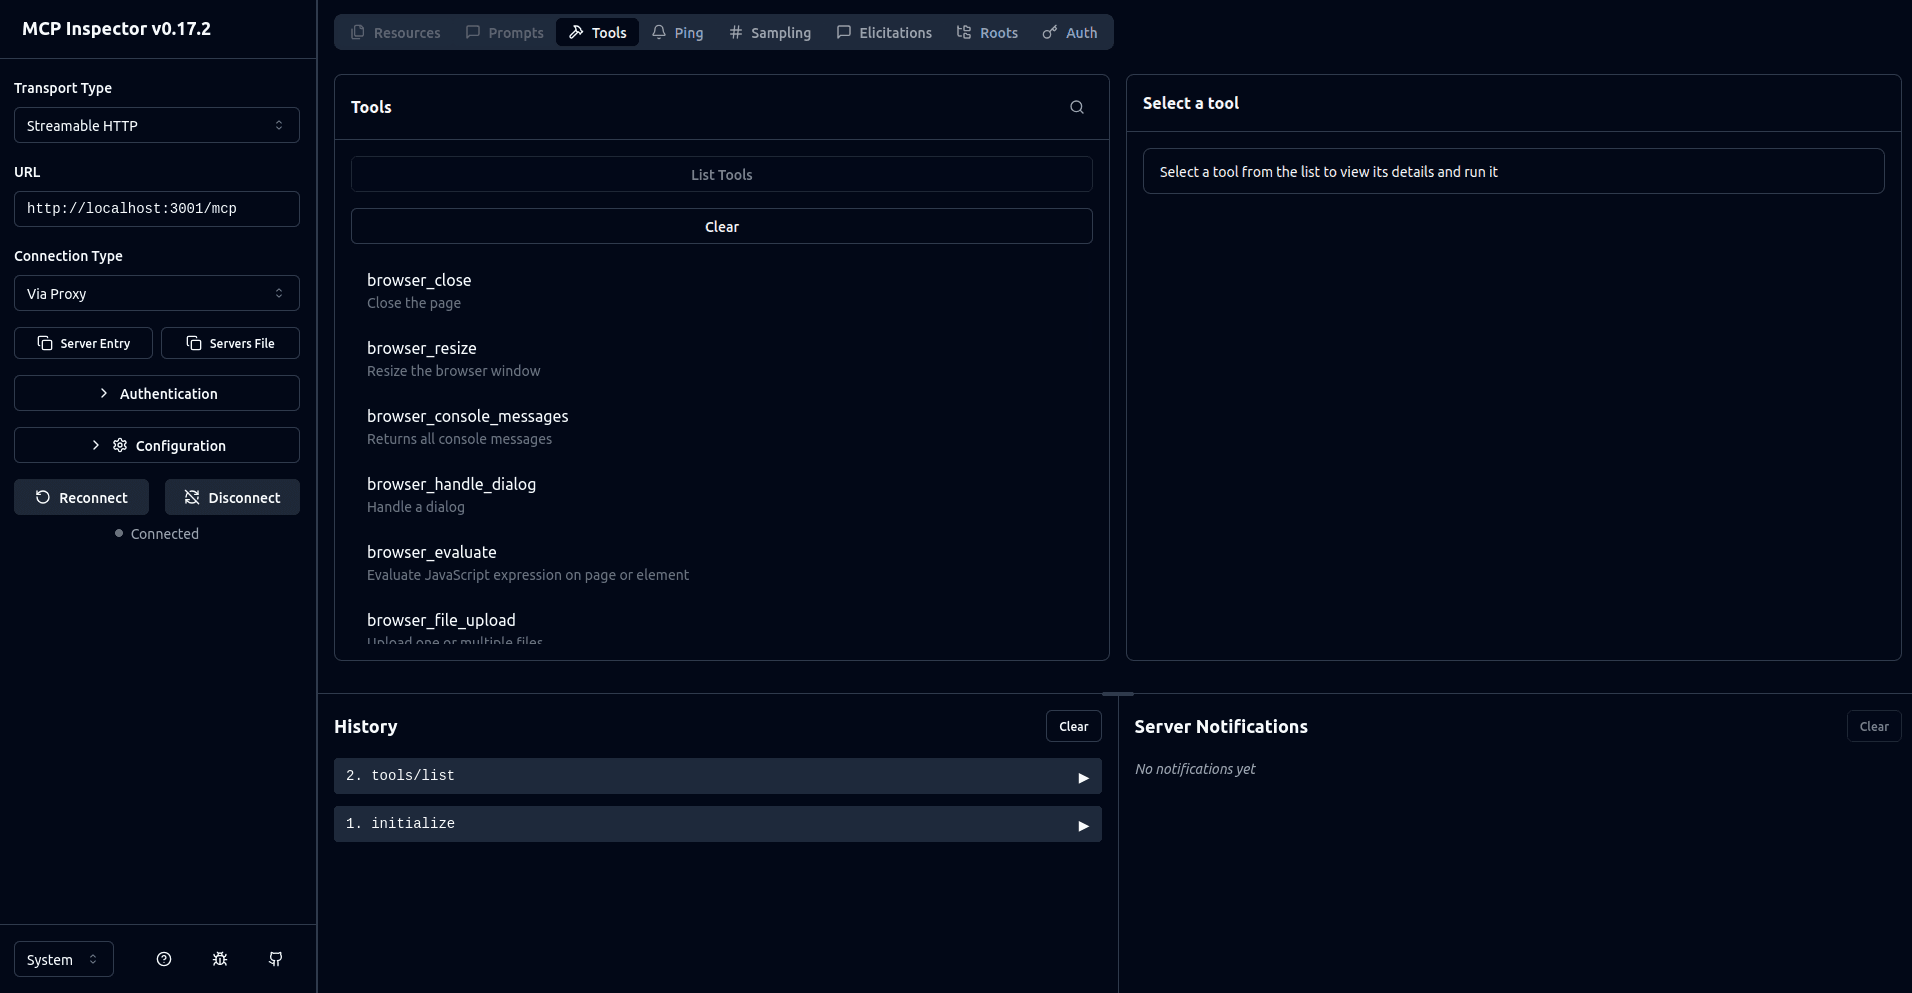
This opens a browser tab where you can see the MCP Inspector interface. On the interface, select the Connect button to connect to your MCP server:

Once you're connected, you can perform actions such as listing the tools or invoking them:
Making the MCP server remote-capable
So far, the Playwright MCP server is listening on localhost:3001, which means it's accessible only from your own machine. No external connections can reach it because it's bound to localhost (127.0.0.1). This isolation makes it safe for local testing, but it also means teammates can't connect or share the same tools. To enable collaboration, you need to expose it over the network, but doing so requires proper authentication and authorization to prevent unauthorized access.
There are several approaches you can use to make the MCP server remotely accessible:
Binding to all interfaces (
--host 0.0.0.0) exposes your server directly to your network but offers no authentication.Using an authentication proxy offers programmatic control over authentication and authorization.
For this guide, you will use the authentication proxy approach with Express. This gives you full control over authentication logic and RBAC. It also integrates well with the Descope MCP Express SDK, which is designed to allow you to easily add MCP specification-compliant authorization to your MCP server. The authentication proxy sits between clients and the MCP server, and validates every request before forwarding it.
Start by installing the required dependencies for the authentication proxy:
npm i express cors http-proxy @descope/mcp-express dotenv
npm i -D typescript @types/node @types/express @types/cors @types/http-proxy ts-node
Create a new file named .env to store your configuration and add the following:
AUTH_PROXY_PORT=3000
MCP_SERVER_PORT=3001
This defines the ports assigned to the Playwright MCP server and the authentication proxy.
Define your TypeScript configuration by creating a new file named tsconfig.json and add the following:
{
   "compilerOptions": {
       "target": "ES2022",
       "module": "commonjs",
       "outDir": "./dist",
       "rootDir": "./src",
       "strict": true,
       "esModuleInterop": true,
       "skipLibCheck": true
   }
}
To implement the proxy logic, create a new file named src/auth-proxy.ts and add the following:
import "dotenv/config";
import express from "express";
import cors from "cors";
import httpProxy from "http-proxy";


const app = express();
app.use(cors());


const AUTH_PROXY_PORT = process.env.AUTH_PROXY_PORT || 3000;
const MCP_SERVER_PORT = process.env.MCP_SERVER_PORT || 3001;


// Create proxy instance targeting the localhost-bound MCP server
const proxy = httpProxy.createProxyServer({
   target: `http://localhost:${MCP_SERVER_PORT}`,
   changeOrigin: true,
   ws: false,
});


// Handle proxy errors
proxy.on("error", (err, req, res) => {
   console.error("Proxy error:", err);
   try {
       (res as any).writeHead?.(500, { "Content-Type": "text/plain" });
       (res as any).end?.("Proxy error");
   } catch (e) {
       // Ignore if already closed
   }
});


// Proxy all /mcp requests
app.use("/mcp", (req: any, res: any) => {
   proxy.web(req, res);
});


app.listen(AUTH_PROXY_PORT, () => {
   console.log(`Server running on port ${AUTH_PROXY_PORT}`);
});


process.on("SIGINT", () => {
   console.log("Shutting down server...");
   process.exit();
});
This code sets up a simple Express proxy server that listens on port 3000 and forwards all /mcp requests to the local Playwright MCP server running on port 3001. It uses http-proxy for request forwarding, applies cors to allow cross-origin access, and includes basic error handling.
Note: Please note that this setup supports HTTP transport only. Clients attempting to use SSE via the
/sseendpoint or WebSocket connections do not function with this configuration. Supporting SSE requires additional setup to handle streaming responses, and WebSocket support requires thewsproxy option enabled. For most remote MCP deployments, HTTP transport is sufficient and easier to secure.
To make sure that the proxy is working as expected, run the MCP server using the command npm run start:mcp. In a separate terminal, run the proxy server:
npx nodemon --exec 'ts-node' src/auth-proxy.tsNote: The
--exec ts-nodeflag explicitly tells nodemon to usets-nodeto execute the TypeScript file.
Run the MCP Inspector:
npx @modelcontextprotocol/inspector@0.17.2 --transport http --server-url http://localhost:3000/mcpNote: Note that the
--server-urlflag is now pointing to the proxy server.
Once the MCP Inspector interface launches, you should be able to connect to the MCP server, list tools, and invoke them.
At this stage, your MCP server is accessible to anyone who can reach the exposed host and port. There's no authentication, no encryption (TLS), and no request validation. This means that anyone can potentially connect to your MCP server and invoke any tool.
Introducing MCP authentication with Descope
As you saw in the previous section, anyone who discovers your proxy server's URL can connect to your MCP server and invoke any available tool. In production or shared development environments, this opens doors to unauthorized access and abuse.
For a Playwright MCP server, this can mean unauthorized users running browser automation on your infrastructure, executing scripts that capture sensitive data from your environment, or triggering resource-intensive operations that consume server resources. Without authentication, you have no control over who has access to your tools and no way to audit usage or attribute usage to specific users.
Descope simplifies securing your MCP server through its Agentic Identity Hub. Instead of writing authentication logic from scratch, you can create an MCP Server directly in the Hub, which handles OAuth 2.1, Client ID Metadata Documents (CIMD), consent screens, and token validation — all configured in one place without any custom flow imports.
Step 1: Create a Descope project
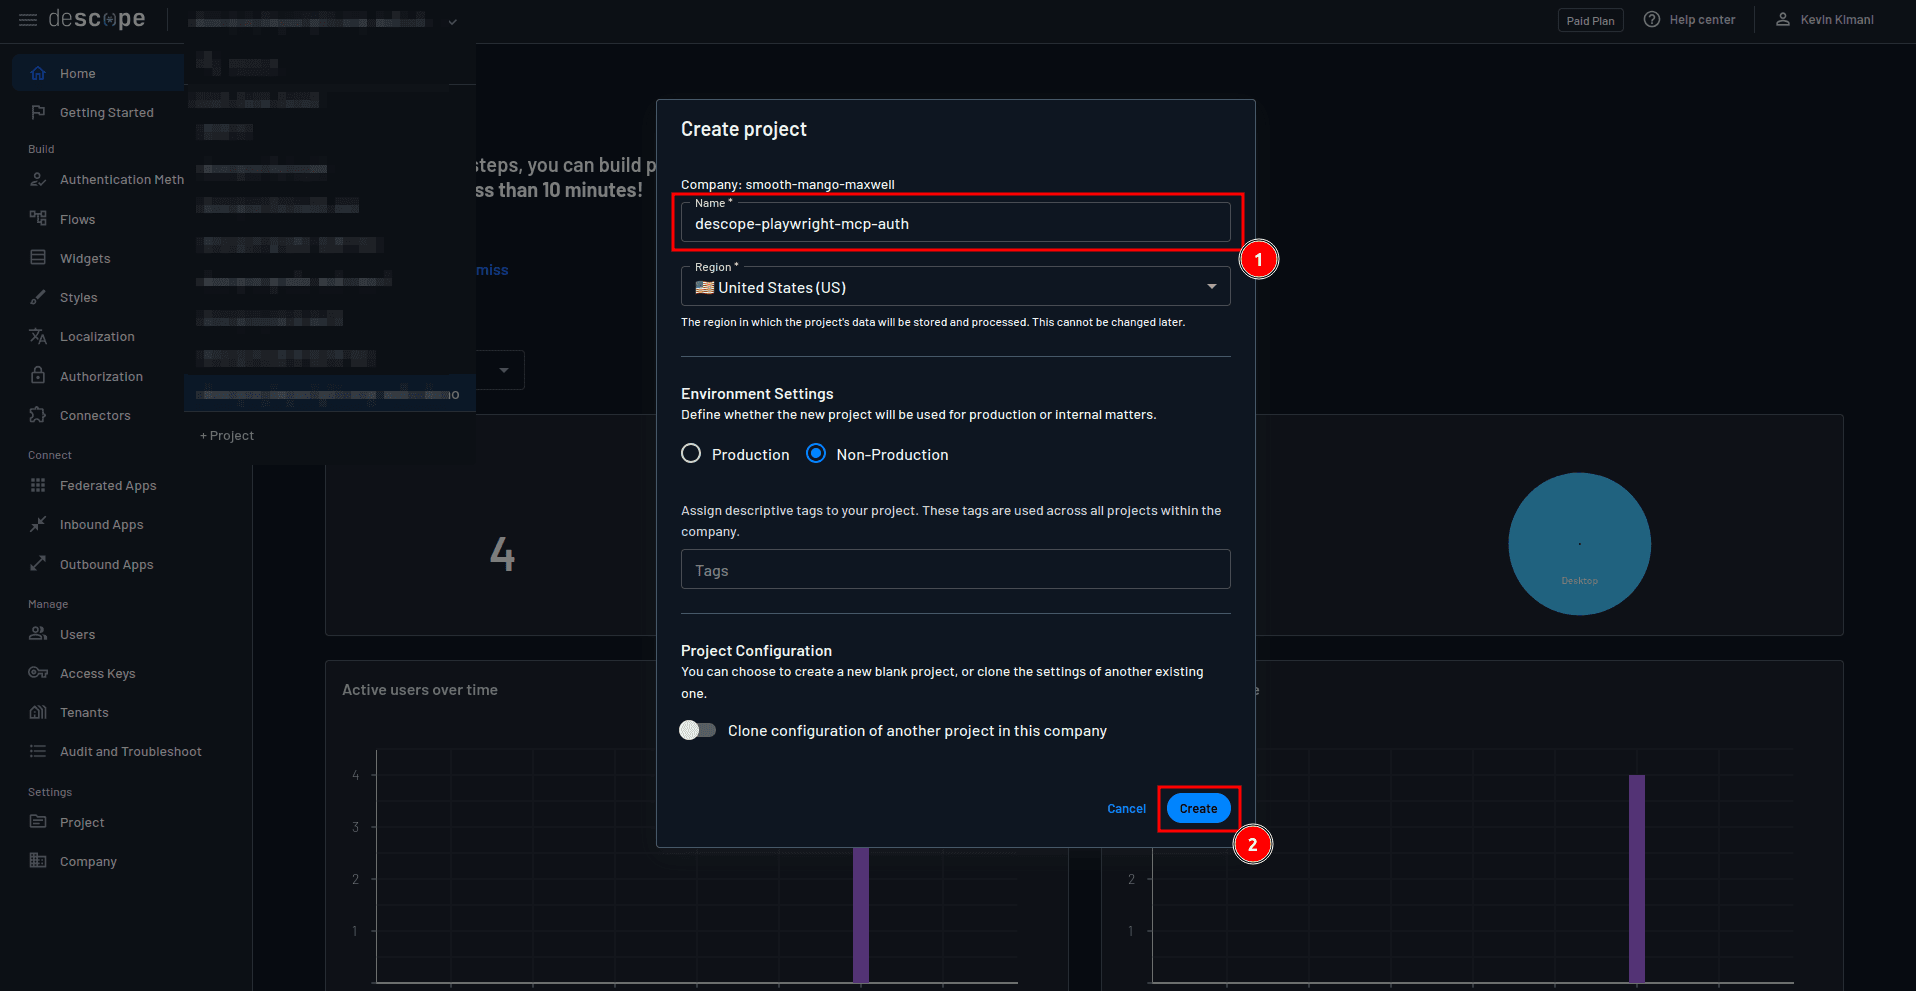
On your Descope console, click the project drop-down on the top navigation pane, and select + Project:

On the Create project form, provide descope-playwright-mcp-auth as the name of the project and select Create:
Step 2: Create an MCP Server in the Agentic Identity Hub
Navigate to Agentic Identity Hub → MCP Servers in the sidebar and click + MCP Server. Configure the following:
MCP Server name: Give it a descriptive name, for example "Playwright MCP Server".
Description: Optionally add a short description of what this server does.
MCP Server URLs: Leave this blank for now, or enter your proxy URL once it is deployed.

After saving, Descope will generate an MCP Server ID for you.
Step 3: Enable Client ID Metadata Documents (CIMD)
Scroll down to the MCP Client Registration section. You'll see two options here: Client ID Metadata Documents (CIMD) and Dynamic Client Registration (DCR). Toggle on Enable CIMD.
CIMD is the approach recommended by the MCP Authorization spec. Instead of clients registering with your server via a /register endpoint, the MCP client hosts a metadata.json file at a public HTTPS URL and uses that URL as its Client ID. When a client connects, Descope fetches and validates that metadata document to establish trust — no open registration endpoint required.
Note: DCR is still available as a fallback for clients that don't support CIMD yet. You can enable both simultaneously — Descope supports it and the MCP client decides which method to use.
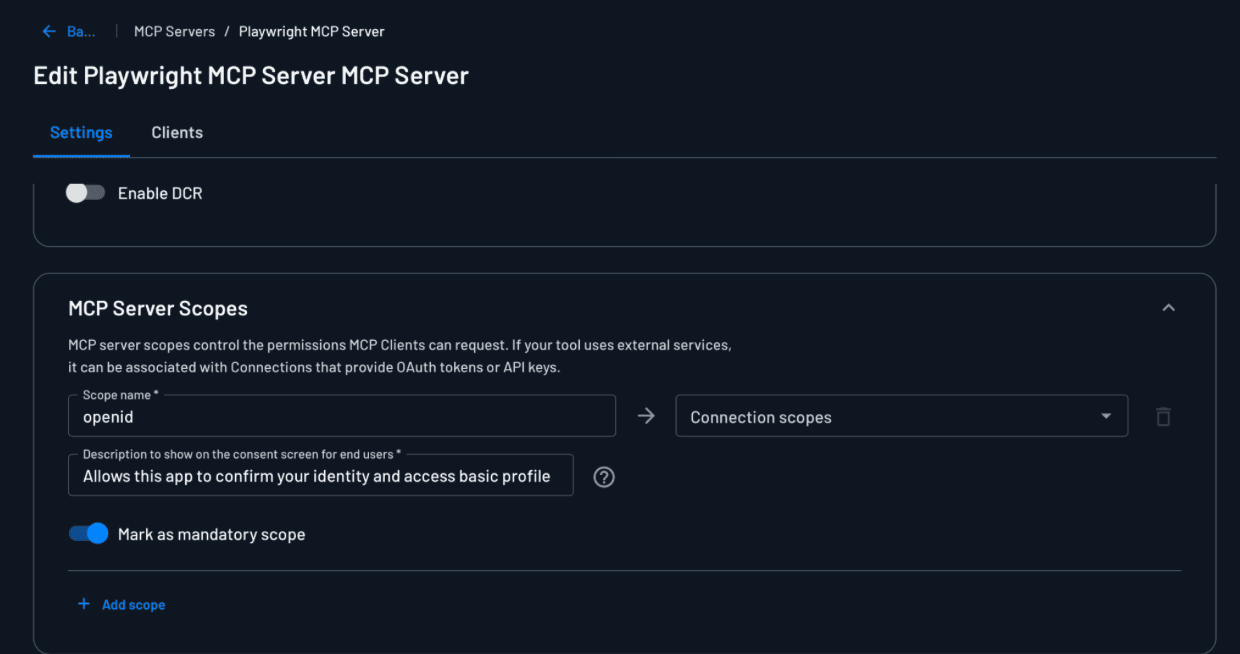
Step 4: Configure MCP Server Scopes
Scroll down to the MCP Server Scopes section and add the following scope:
Scope name:
openidDescription:
"Allows this app to confirm your identity and access basic profile information, such as your assigned roles."Mandatory: Toggle this on to make the scope mandatory.
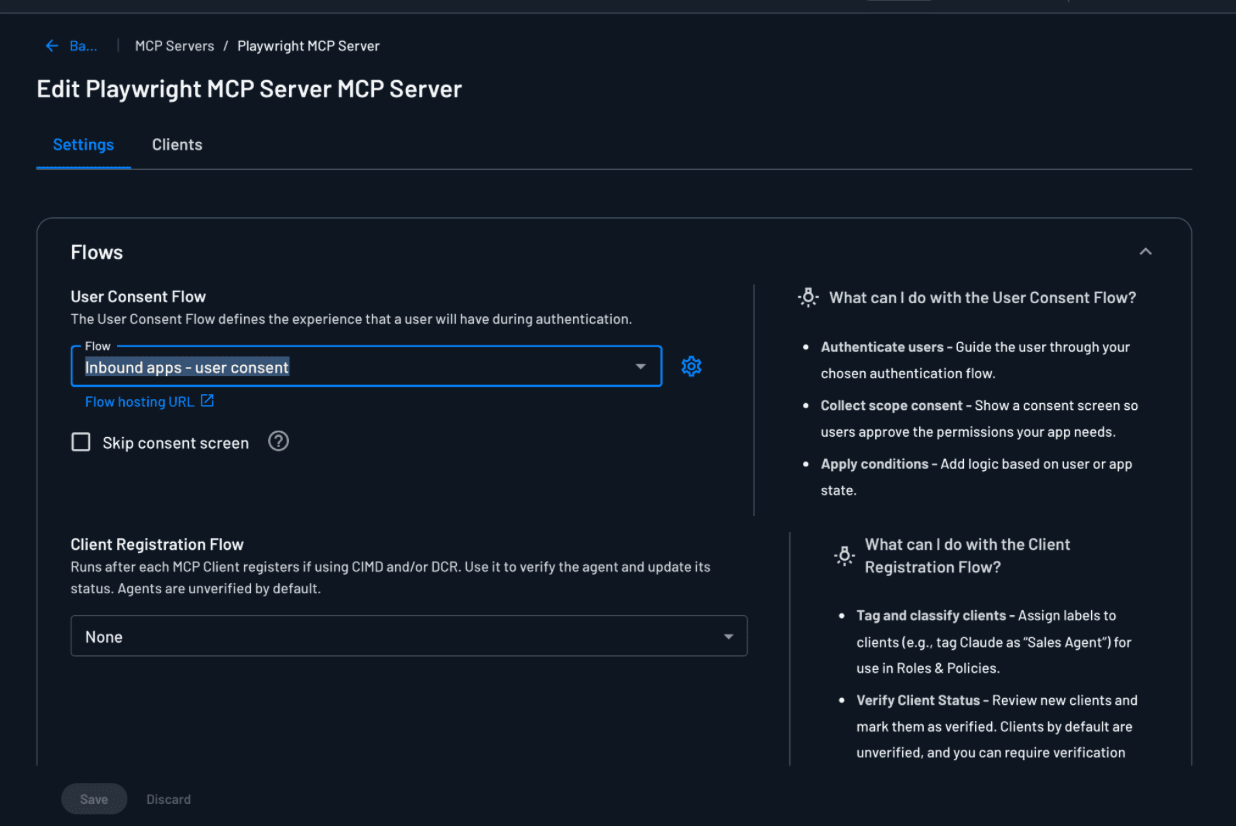
Step 5: Set the User Consent Flow
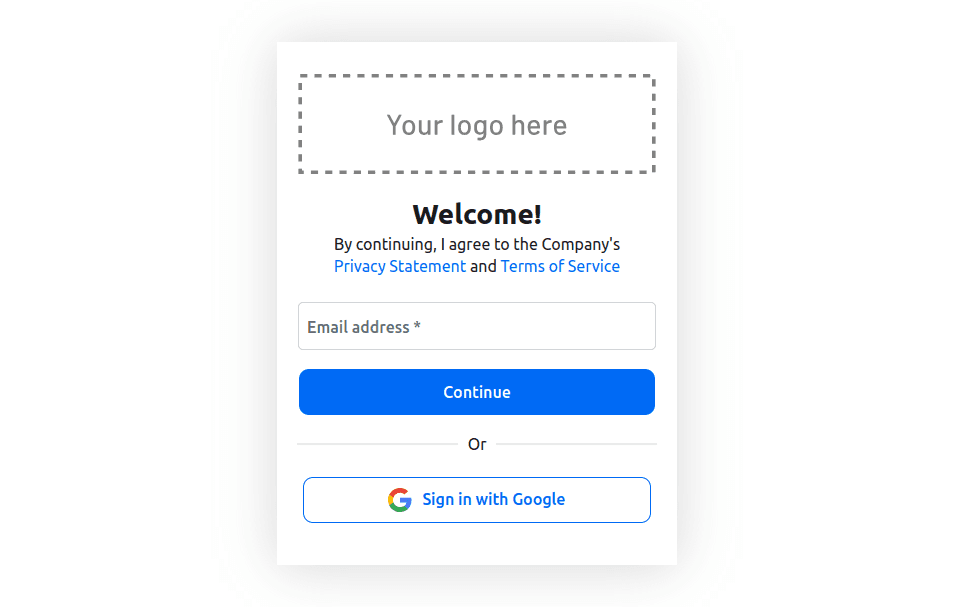
Scroll down to the User Consent Flow section. In the Flow dropdown, select inbound-apps-user-consent. This built-in flow handles the full authentication and consent journey — checking if the user is logged in, redirecting them to sign in using either an emailed one-time password (OTP) or Google SSO if not, and then presenting a consent screen where the scopes being requested by the MCP client are displayed for the user to approve.
Make sure Skip consent screen is unchecked so that users are prompted to approve the requested scopes when connecting a new MCP client.
Step 6: Obtain your credentials
Now that the MCP Server is configured, you need to obtain credentials that your proxy server uses to communicate with the Descope APIs.The proxy needs this to validate tokens and enforce authentication policies.
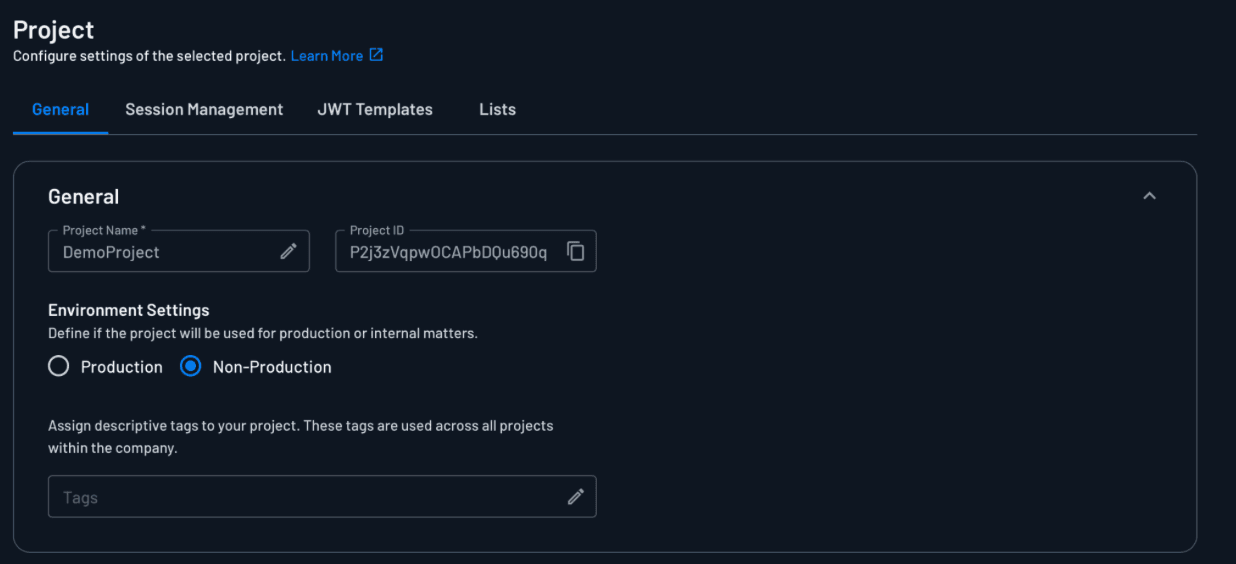
Start by obtaining the project ID, which identifies your Descope project and tells the proxy which project's authentication rules to enforce. You can get this by navigating to the Project page:
Integrating Descope into the Playwright MCP server
At this point, you have completed setting up Descope. You created an MCP Server in the Agentic Identity Hub, enabled CIMD so MCP clients can register automatically, configured the authentication and consent flow that users go through, and obtained the project ID your proxy server needs to validate tokens. The next step is to use these credentials to build the authentication proxy.
With your Descope project set up, you can now integrate authentication into the proxy. The goal is to make sure that every request is verified before it's proxied to the MCP server.
Before diving into the implementation, it's important to understand how the authentication flow works:
The MCP client connects to your proxy and discovers the authorization server via the
.well-knownmetadata endpoint.You're redirected to the authentication/consent flow you configured earlier in the Agentic Identity Hub.
You log in and consent to the request scopes.
Descope issues an access token to the MCP client.
The MCP client includes this token in its requests to the proxy server.
The proxy server validates the token before forwarding the request to the MCP server.
To handle auth in the proxy, use the Descope MCP Express SDK you installed earlier. Start by adding the following to your .env file:
DESCOPE_PROJECT_ID=<YOUR-DESCOPE-PROJECT-ID>
SERVER_URL=http://localhost:3000
The SERVER_URL ENV variable refers to the URL that exposes your MCP server; in this case, it's the proxy URL. Make sure to replace the placeholder for DESCOPE_PROJECT_ID with the value you obtained from your Descope console.
Next, open the src/auth-proxy.ts file and add the following imports:
import {
   descopeMcpAuthRouter,
   descopeMcpBearerAuth,
   DescopeMcpProvider,
} from "@descope/mcp-express";
Just below the MCP_SERVER_PORT definition, add the Descope MCP provider configuration:
const descopeProvider = new DescopeMcpProvider({
   projectId: process.env.DESCOPE_PROJECT_ID!,
   managementKey: process.env.DESCOPE_MANAGEMENT_KEY!,
   serverUrl: process.env.SERVER_URL!,

// Add OAuth metadata and DCR endpoints
app.use(descopeMcpAuthRouter(undefined, descopeProvider));

// Protect your MCP endpoints with bearer authentication
app.use(["/mcp"], descopeMcpBearerAuth(descopeProvider));
This code initializes DescopeMcpProvider with your Descope project ID and the proxy server URL. The descopeMcpAuthRouter() function adds the required OAuth metadata endpoints so CIMD-capable clients can discover your authorization server. The descopeMcpBearerAuth() function protects the specified endpoints by validating the incoming bearer token against Descope's public keys and attaching the user information to req.auth.
Adding authorization to the Playwright MCP server
At this point, your proxy requires authentication but doesn't enforce RBAC, which restricts access to tools based on user roles. Authorization determines what authenticated users are allowed to do. For example, you may want to prevent regular users from installing browser binaries (which can consume significant resources or introduce security risks) while allowing admins full access to all tools.
For this guide, you'll use the already defined Tenant Admin role in Descope to represent a user with full access to all Playwright MCP tools. Only a user with this role can invoke the browser_install tool. In a production environment, you define custom roles and permissions that map to specific MCP tools or categories of tools. You maintain a configuration file or database that maps tool names to required roles and then check user roles against this mapping before allowing tool invocation. This tutorial uses a simple hard-coded check with a built-in Tenant Admin role to demonstrate the authorization pattern.
Start by adding the following import statement to the src/auth-proxy.ts file:
import { Readable } from "stream";
Next, add the following code before the line where you proxy /mcp requests:
app.use("/mcp", express.json(), async (req: any, res: any, next: any) => {
   // Only check authorization for POST requests with a body
   if (req.method == "POST" && req.body) {
       const mcpReq = req.body;


       // Check if the MCP method is a tools call
       if (mcpReq.method === "tools/call") {
           const toolName = mcpReq.params?.name;
           console.log(`Accessing tool: ${toolName}`);


           // If the tool is an admin tool, verify user has admin role
           if (toolName === "browser_install") {
               const authInfo = await descopeProvider.descope.validateJwt(
                   req?.auth?.token!
               );
               const isAdmin = descopeProvider.descope.validateRoles(
                   authInfo,
                   ["Tenant Admin"]
               );


               if (!isAdmin) {
                   console.log(
                       `Unauthorized access attempt to admin tool: ${toolName}`
                   );
                   return res.status(403).json({
                       jsonrpc: "2.0",
                       error: {
                           code: -32000,
                           message: `Access denied: Tool '${toolName}' requires Tenant Admin role.`,
                       },
                       id: mcpReq.id || null,
                   });
               }
           }
       }


       // Convert object back to string for the proxy
       req.body = JSON.stringify(mcpReq);
       req.headers["content-length"] = Buffer.byteLength(req.body).toString();
   }


   next();
});
This middleware intercepts all requests to the /mcp endpoint and uses express.json() to parse incoming JSON bodies so they can be inspected. The middleware specifically looks for tool invocation requests (identified by tools/call method) and checks the tool name against your authorization rules.
For the restricted browser_install tool, it validates the user's JWT using the Descope SDK and ensures that they have the Tenant Admin role. Unauthorized requests are blocked with a 403 error, while valid requests continue through to the MCP server. The middleware reconstructs the request body and updates its headers so it can be properly proxied to the MCP server.
Finally, update the proxy handler to properly forward the reconstructed body:
app.use("/mcp", (req: any, res: any) => {
   proxy.web(req, res, {
       buffer: Readable.from([req.body ?? ""]),
   });
});
This code creates a readable stream from the reconstructed request body because the proxy library expects streaming data, not a plain string. After the middleware parses and potentially modifies the JSON body, you need to convert it back into a stream format that the proxy can forward to the upstream MCP server.
Your proxy now enforces both authentication and RBAC before forwarding requests to the MCP server.
Testing the integrations
You've set up authentication and authorization, so let's test that authenticated users can connect to your MCP server, unauthorized users are blocked, and RBAC properly restricts admin-only tools.
Start by running your local MCP server:
npm run start:mcpIn a separate terminal, run the auth proxy:
npx nodemon --exec 'ts-node' src/auth-proxy.tsIn another terminal, run the MCP Inspector:
npx @modelcontextprotocol/inspector@0.17.2 --transport http --server-url http://localhost:3000/mcpNote: If you have another machine running on the network, you can run the MCP Inspector on it with the command
npx @modelcontextprotocol/inspector@0.17.2 --transport http --server-url http://<AUTH-PROXY-MACHINE-IP>:3000/mcp, where<AUTH-PROXY-MACHINE-IP>is the IP address of the machine that is running both the MCP server and the auth proxy.
Once the MCP Inspector UI launches, select Connect to connect to your MCP server. You are then redirected to Descope to sign in:
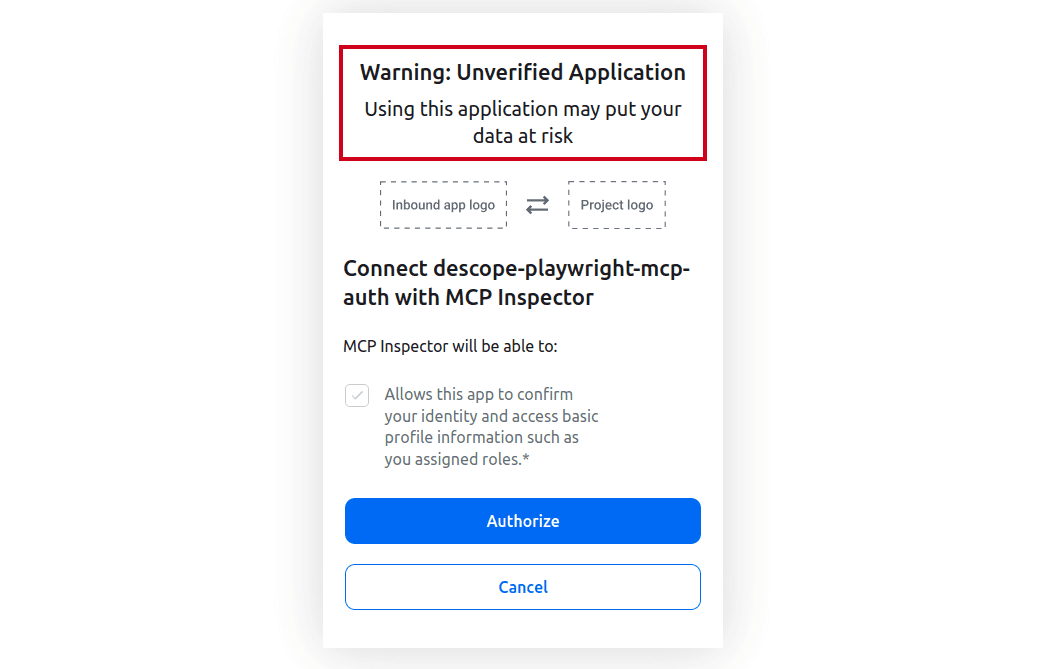
Consent to the requested scopes:
Once you authorize the MCP client, you'll be connected to the MCP server:

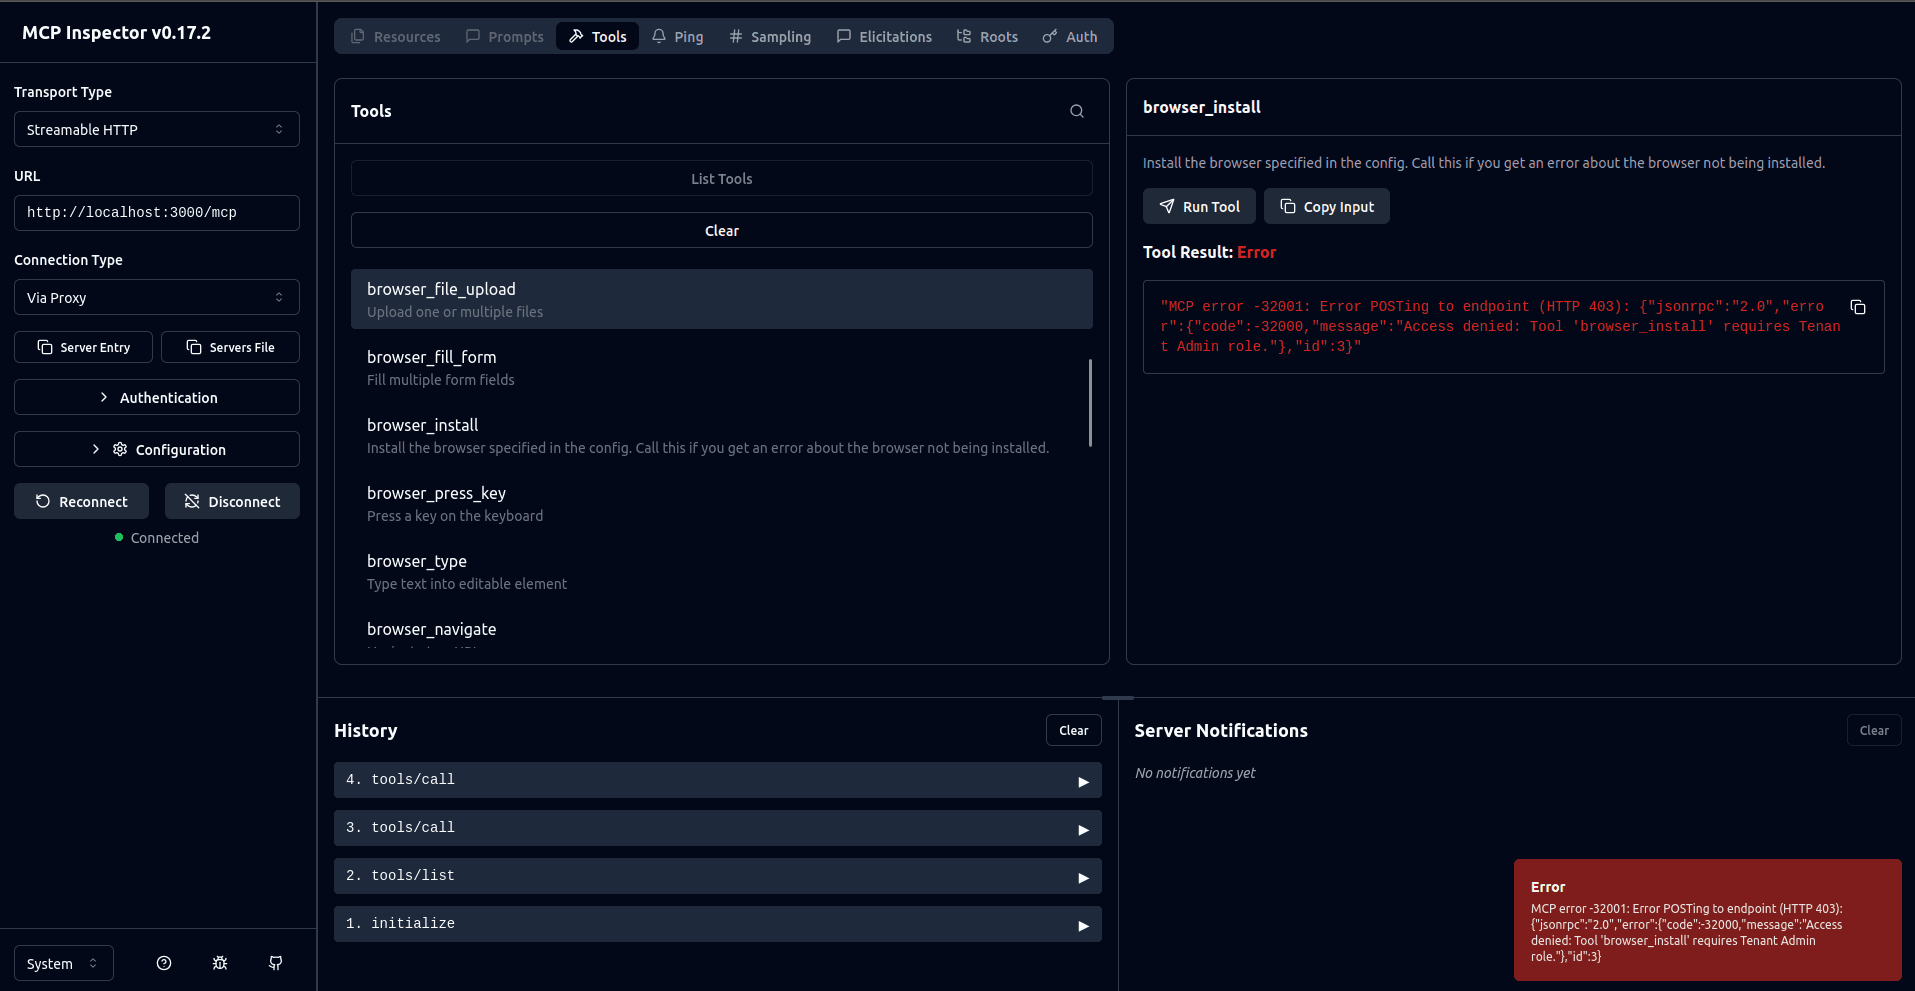
At this point, if you try to invoke the browser_install tool, you will get an error that confirms RBAC is working as expected:
You now need to assign the user the Tenant Admin role to confirm that they can invoke the browser_install command if they have the appropriate roles. To do this, navigate to the Descope Users page and edit your user to assign them the Tenant Admin role:

Go back to the MCP Inspector UI, disconnect from the MCP server, and connect again. You are then prompted to sign in and consent to the requested scopes. Once you've done this, you can successfully invoke the browser_install command:

You can access the full code on GitHub.
Audit logging for compliance
For production environments, logging user activity is important for security monitoring and regulatory compliance. The current setup logs basic activity (such as tool access and authorization results) to the console. This is useful for local testing but not sufficient for production.
In a production environment, you should enhance this by doing the following:
Application-level logging: Capture detailed information about each request, including the timestamps, user IDs, roles, tools accessed, params used, and status of whether the request was granted. Send these logs to a centralized logging service, such as Amazon CloudWatch or Datadog, for long-term retention and analysis.
Descope audit logs: Descope automatically tracks all authentication events, login attempts, token generation, and role assignments. You can view these on the Audit page and export them for compliance reporting.
Compliance considerations: Different regulations (System and Organization Controls (SOC) 2 type 2, Health Insurance Portability and Accountability Act (HIPAA), General Data Protection Regulation (GDPR)) have specific requirements for log retention periods, tamper-proof storage, and access controls. Ensure your logging strategy aligns with your organization's compliance needs.
With proper audit logging, you gain full visibility into who is accessing your MCP server and what actions they're performing. As a result, you can quickly detect suspicious activity or unauthorized access attempts.
Conclusion
In this guide, you transformed a basic, local-only Playwright MCP server into a secure, remote-capable service. You learned how to upgrade from the default stdio transport to a remote-capable transport, expose it to remote connections through a proxy, protect it behind an authentication layer, and enforce fine-grained authorization using Descope.
Leaving an MCP server exposed without protection is a serious security risk. By adding authentication and authorization layers, you prevent unauthorized access while enabling collaborative, enterprise-grade workflows. This approach makes it possible for teams to connect to shared MCP servers with confidence that only approved users and roles can perform sensitive operations.
Descope provides purpose-built identity infrastructure for AI agents and MCP servers.
Teams building MCP servers can add OAuth 2.1, PKCE, and secure CIMD in three lines of code
Teams building AI agents can offload token management and storage for third-party tool connections
Teams building internal-facing MCP servers and AI agents can implement policy-based AI agent access to corporate tools and backend APIs
Whether you're building your first MCP server or scaling agentic workflows to production, Descope eliminates auth complexity so you can focus on building AI experiences. Explore Descope's AI-focused use cases, check out the MCP documentation, or get started with a Free Forever account.