
Table of Contents
Don't have the time to read the entire post? Our human writers will be sad, but we understand. Summarize the post with your preferred LLM here instead.
This tutorial was written by Vivek Maskara, a Software Development Engineer at Remitly. Connect with him on his website or X to see more of his work!
Substitutable Medical Applications, Reusable Technologies on Fast Healthcare Interoperability Resources (SMART on FHIR) is a widely adopted set of specifications for securely integrating healthcare applications with electronic health record (EHR) systems. FHIR defines how healthcare data is modeled and exchanged, and SMART on FHIR builds on modern web standards to standardize authentication, authorization, and user context. This combination enables apps (i.e., patient portals and clinical decision tools) to work consistently across various healthcare systems without custom, vendor-specific integrations.
Unfortunately, implementing SMART on FHIR is often more complex than a standard OAuth setup. Developers need to integrate authentication into EHR-based flows, request granular scopes, build consent screens, and process SMART-specific claims like patient and fhirUser. These requirements introduce additional redirects, token validation rules, and UX considerations that can be difficult to implement correctly while maintaining security and compliance.
In this article, you’ll learn how to build a SMART on FHIR-compatible application using Descope to handle user authentication and consent. Descope authenticates users, collects consent for data access, and seamlessly hands off to the EHR’s OAuth server, which issues the SMART on FHIR access tokens. This reduces the developer effort for maintaining compliance with SMART specifications while preserving the EHR as the authoritative token issuer.
SMART on FHIR requirements
Before building the application, let's look at how SMART extends standard OAuth.
What makes SMART on FHIR Different?
SMART on FHIR extends the OAuth 2.0 protocol to ensure apps can safely access patient data from EHR systems in a consistent way.
SMART scopes: SMART defines fine-grained, healthcare-specific scopes like
patient/*.read,patient/Observation.read, oruser/MedicationRequest.read. These scopes determine which FHIR resources an app can access and whether access is patient or current user-centric.Launch context: When an app is launched, it can request specific context via scopes, and the server decides what it will actually provide. For example, an app launched from within an EHR can request the
launchscope to receive context about the current session, such as the in-scope patient.The
fhirUserclaim: The access token granted to SMART apps can include afhirUserclaim identifying the authenticated user. Apps can use this to distinguish who is acting versus which patient is in context.EHR-backed authorization flow: SMART apps authenticate through the EHR’s OAuth endpoints, not a standalone identity provider. The EHR initiates redirects, issues authorization codes and access tokens, and enforces SMART-specific validation rules.
Why building SMART on FHIR manually is difficult
While building SMART on FHIR applications, developers need to handle redirects and token exchanges, present clear consent experiences for granular SMART scopes, and request the right scopes so that access tokens include the required claims like patient and fhirUser.
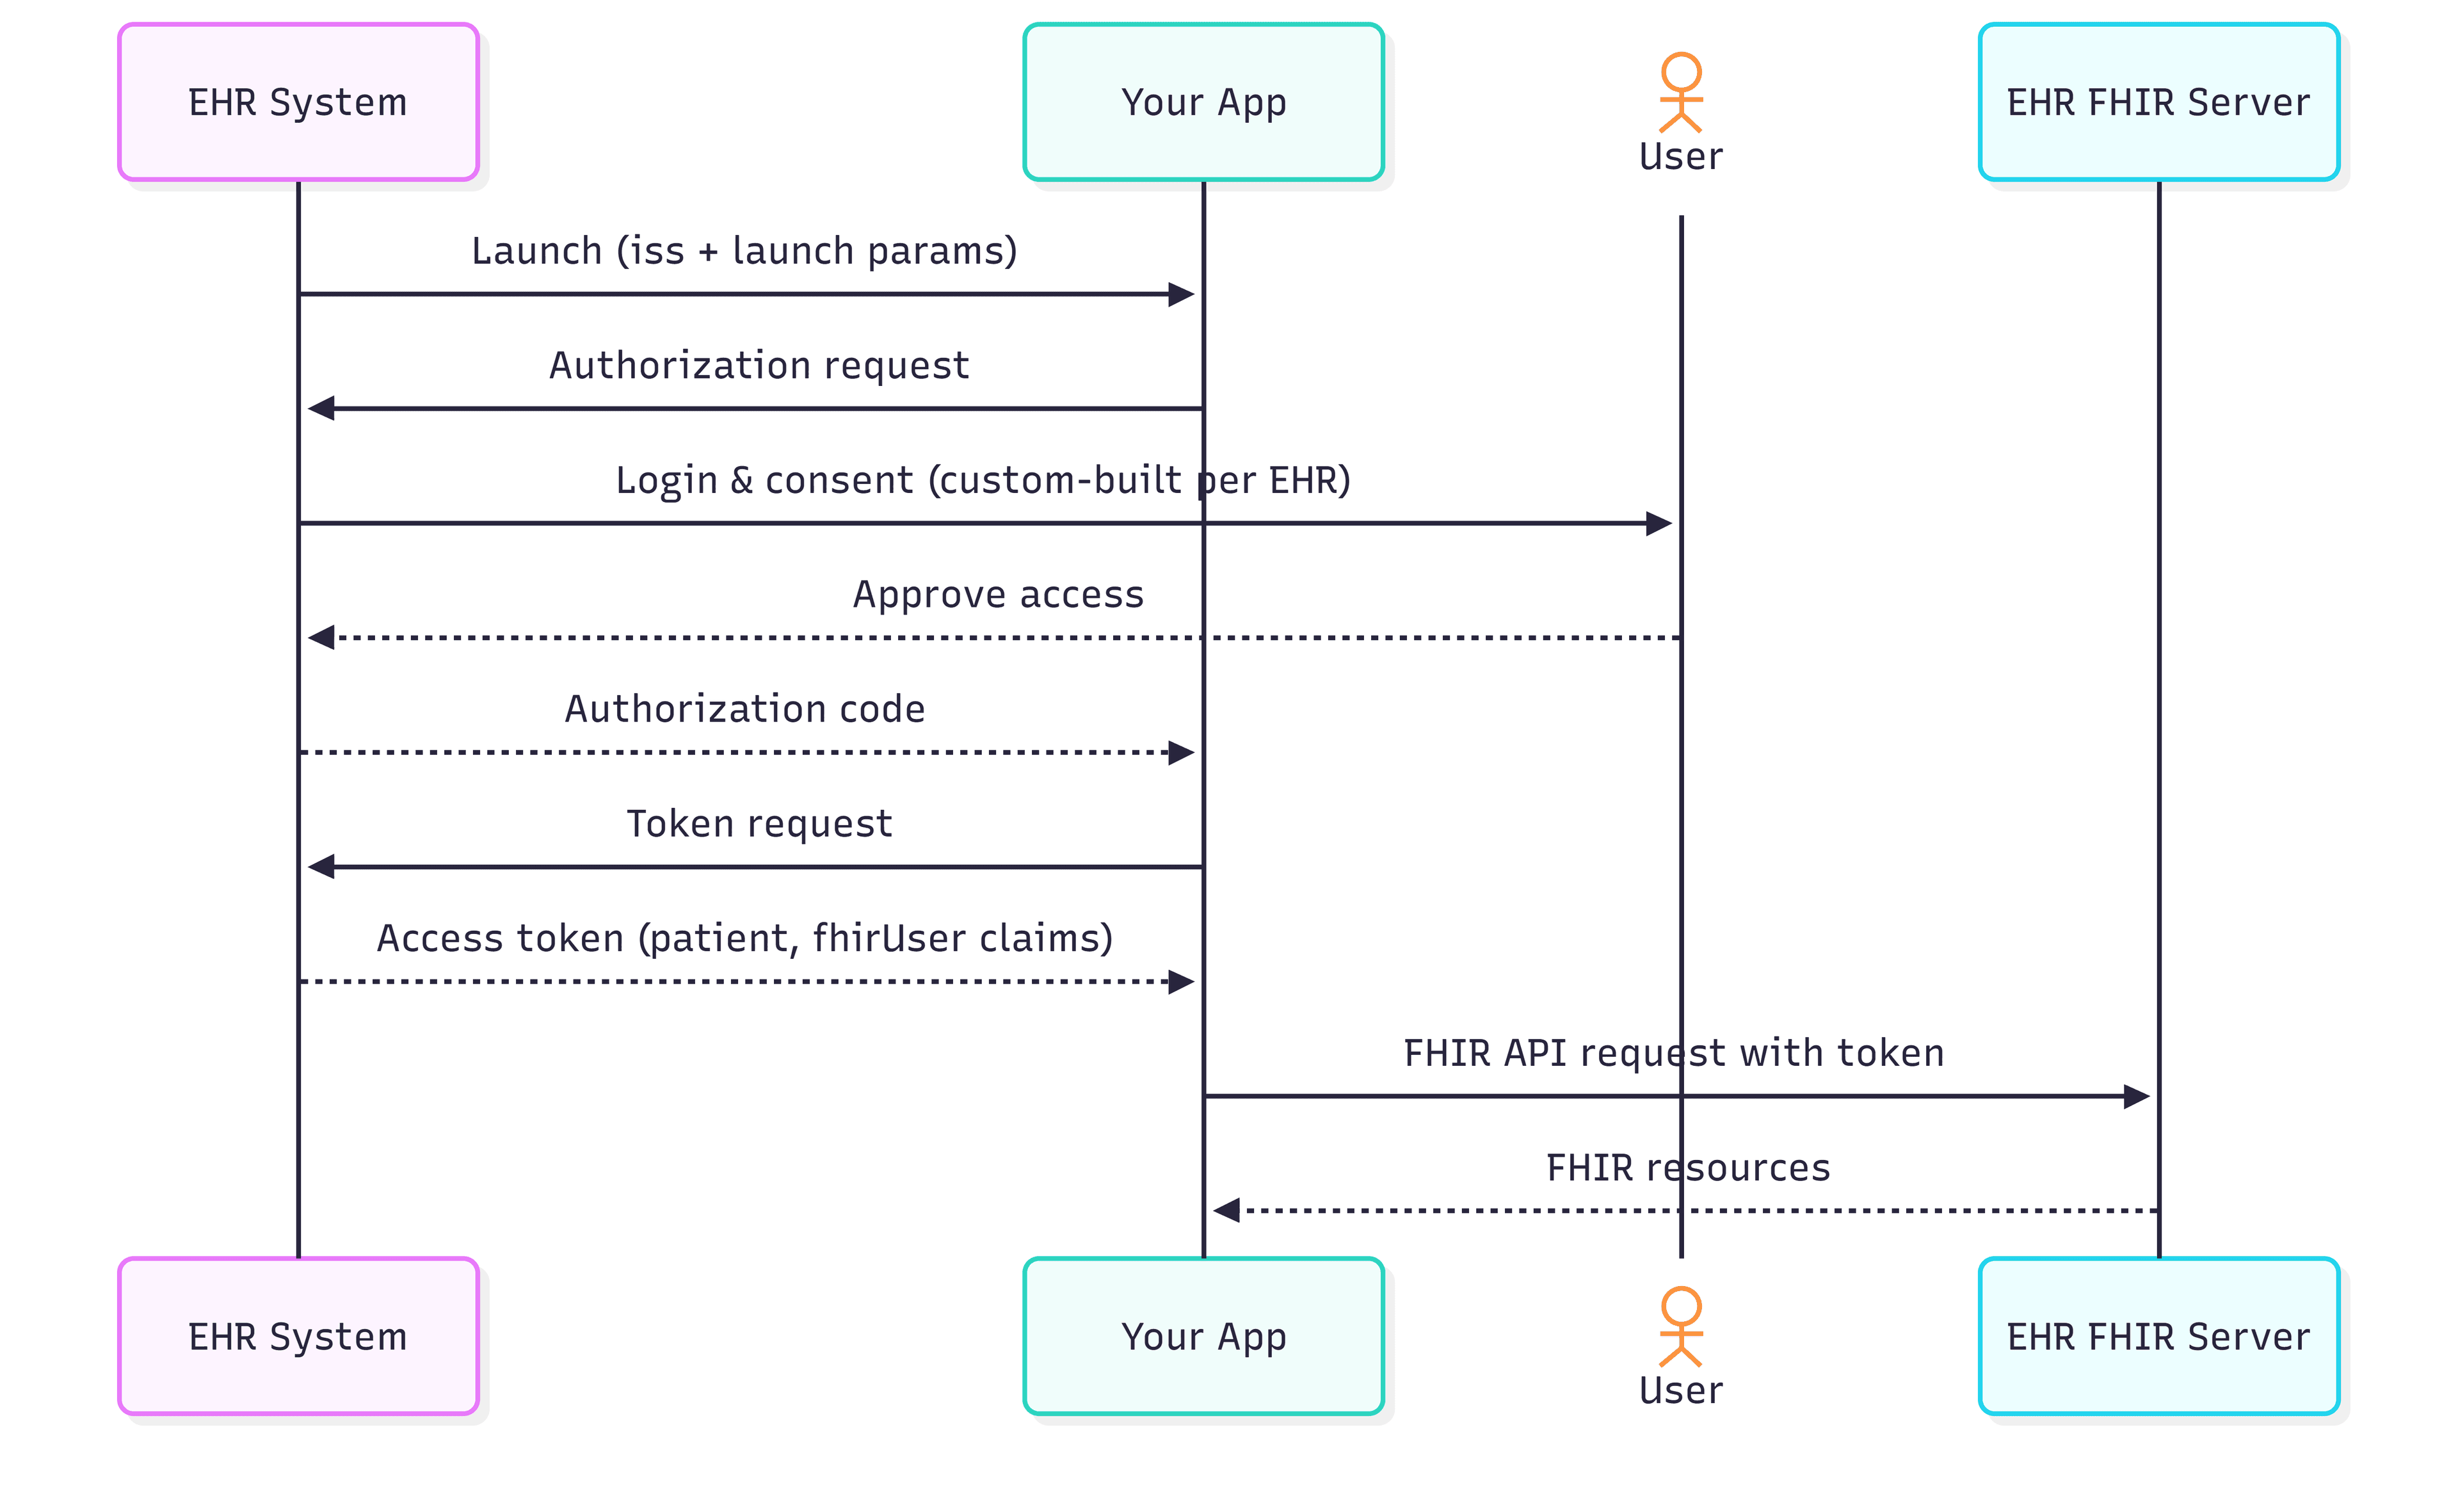
Since the authentication is initiated and controlled by the EHR, apps must correctly support SMART launch flows and redirect behavior. Tokens are issued by the EDHR and must be validated according to SMART-specific rules, and consent screens must clearly communicate data access in a way that aligns with healthcare and compliance expectations.
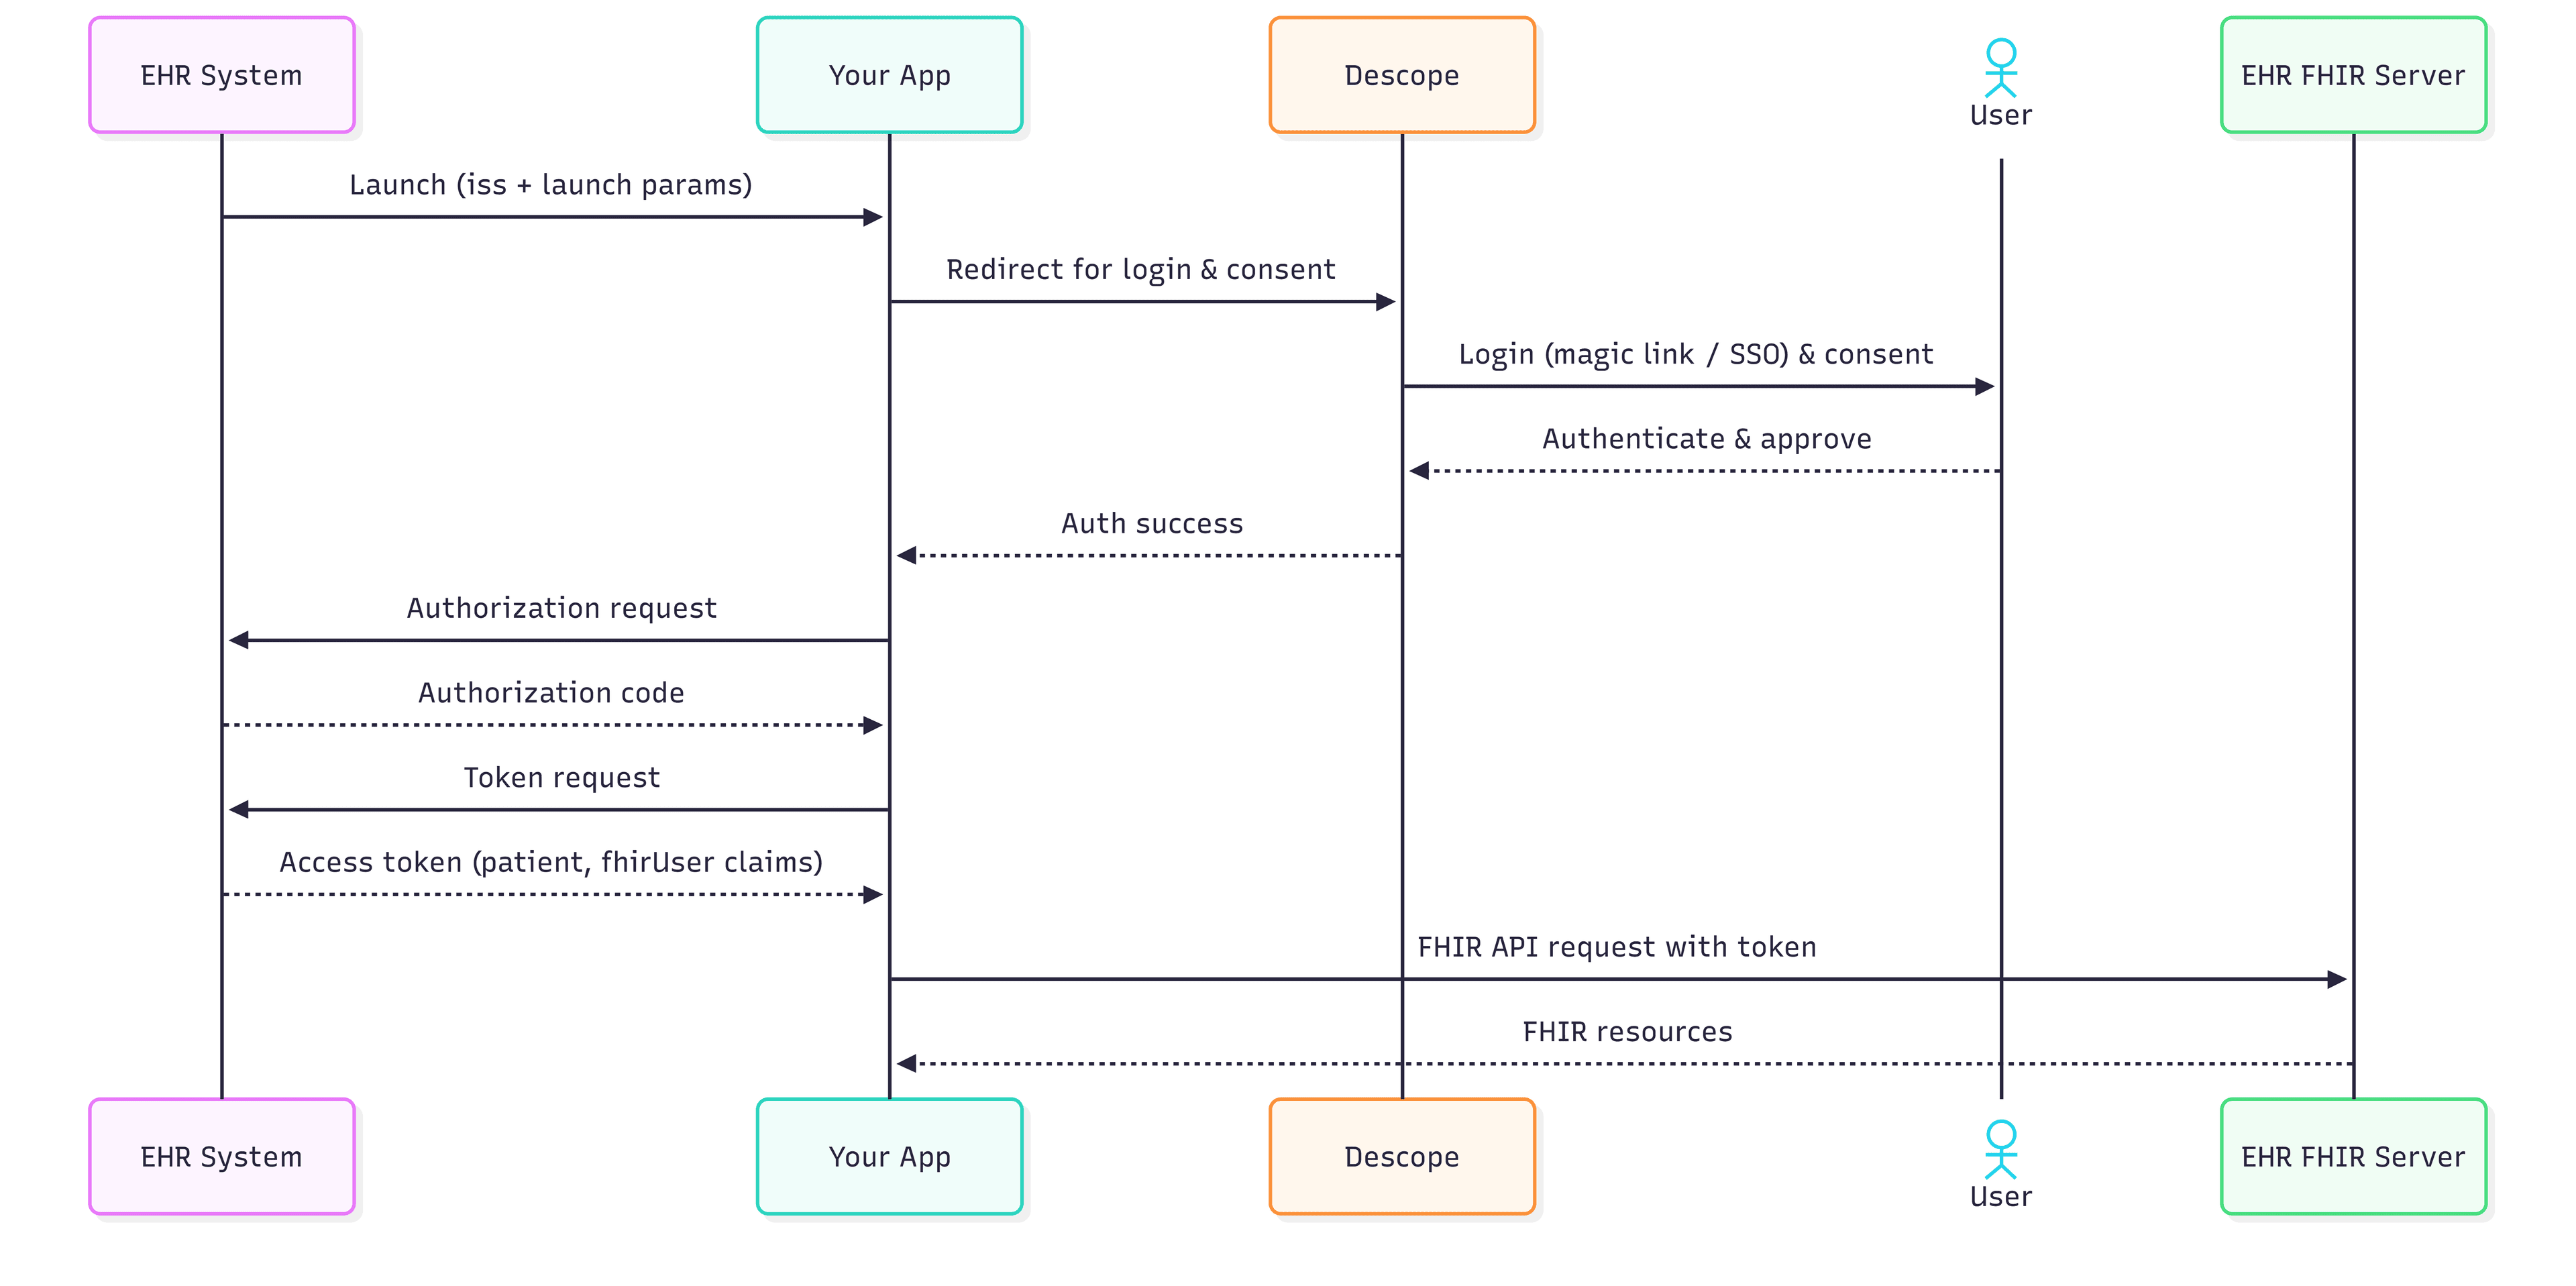
To reduce the complexity, Descope handles the user-facing portions of the flow, including authentication and consent, while EHR still acts as the token issuer. This reduces developer effort as they no longer need to handle the nuances of the consent UX.
How Descope simplifies SMART on FHIR
Descope makes it easier to implement SMART on FHIR by handling the user-facing portions of the flow including authentication and consent, so that developers don’t have to build them from scratch.
With Inbound Apps, Descope manages the consent screen for SMART scope requests, presents users with a standardized and compliant UX. Descope Flows provide ready to use sign-in experiences, including magic links and SSO so that patients can authenticate securely without custom login or consent screens. Once the user authenticates through Descope, the app initiates the SMART OAuth flow with the EHR using the launch context it received at startup. The EHR server issues the SMART access token with the required claims (like patient, fhirUser) which the app can then use to call the FHIR APIs.
In the following sections, you'll learn how to create a simple diabetes monitoring app that lets patients authenticate using magic links and SSO, then access their glucose readings and medication data from an EHR system. This tutorial uses a generic sandbox SMART server similar to major EHR platforms such as Epic, Cerner, and OpenEHR.
Setting up a Descope project
Before you can integrate authentication into your SMART application, you need to set up a Descope project.
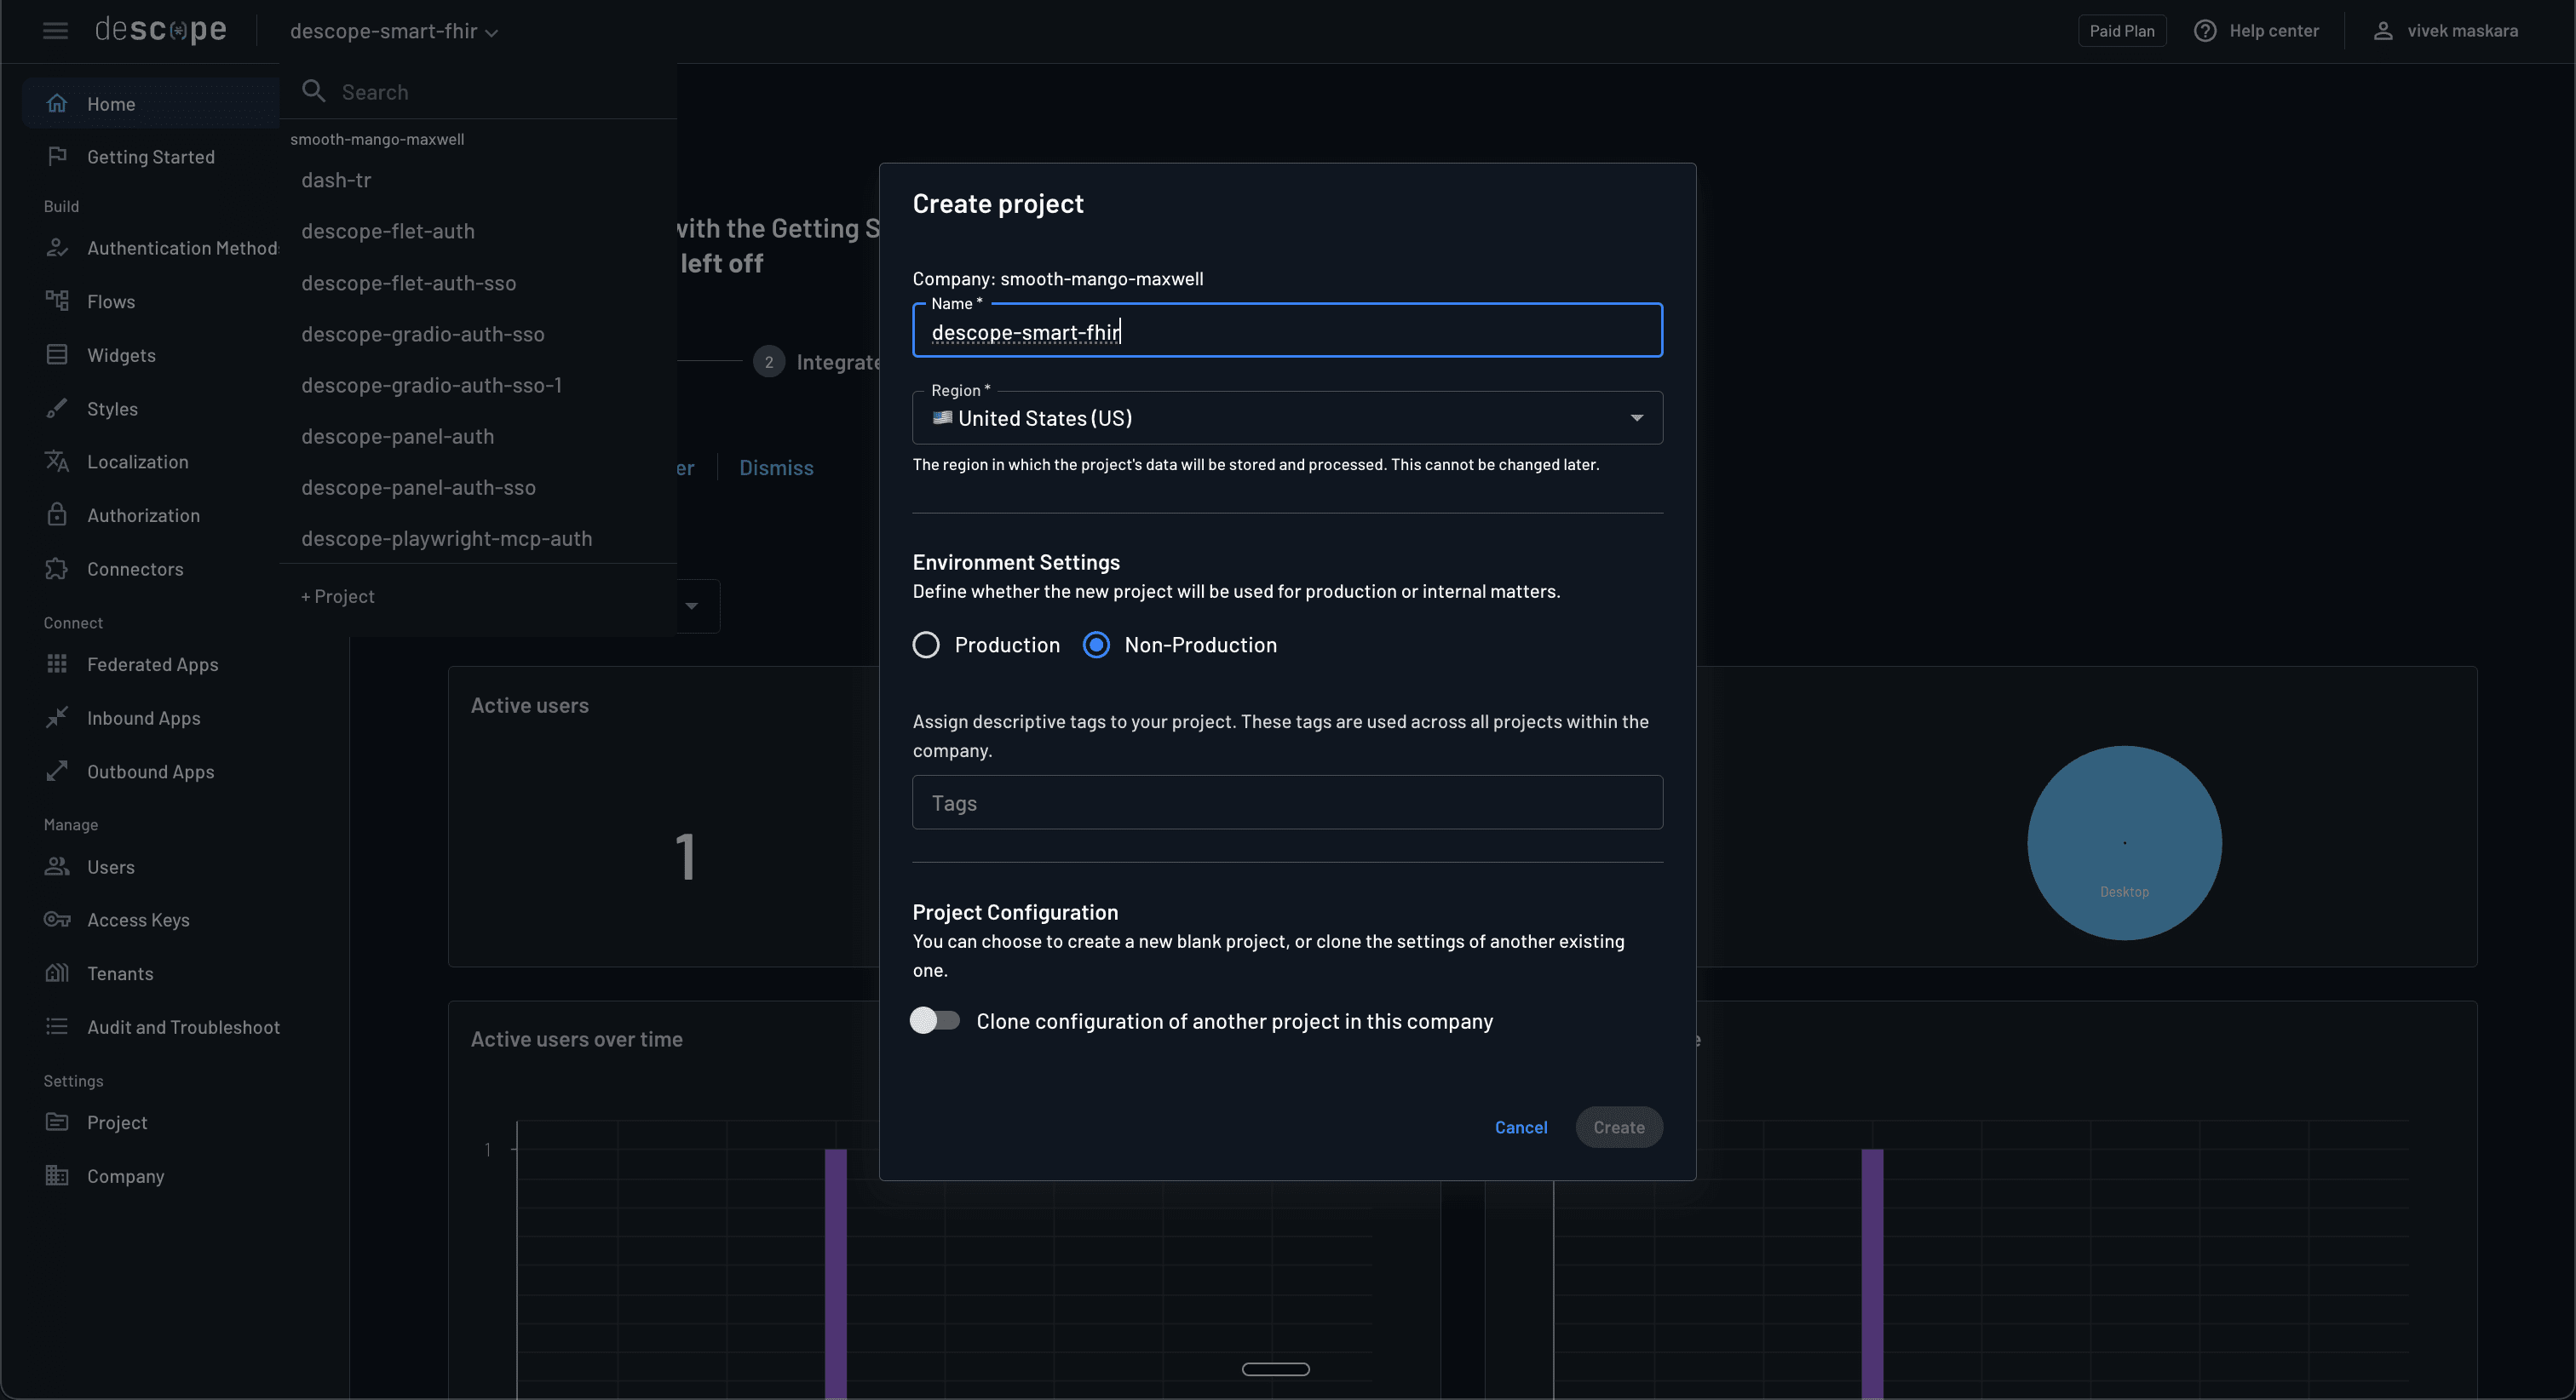
Sign up for a free Descope account if you don’t already have one. Then, log in to the portal, click Create New Project, choose a name (for example, descope-smart-fhir), and select a region.
Next, you need to enable Magic link and SSO authentication methods for your project. Navigate to Authentication Methods on the Descope portal and select Magic link. Check the Enable method in API and SDK option, set the Expiration time to "15" minutes, and save the settings. You could also use the default expiration, but a longer expiration duration ensures that your users will have sufficient time to receive the magic link and log in using it.
Navigate to Authentication Methods > SSO and verify that the Enable method in API and SDK option is checked.
Finally, navigate to Settings > Project > General and copy the Project ID. You need it later while configuring the environment variables.
Create and customize the user consent flow
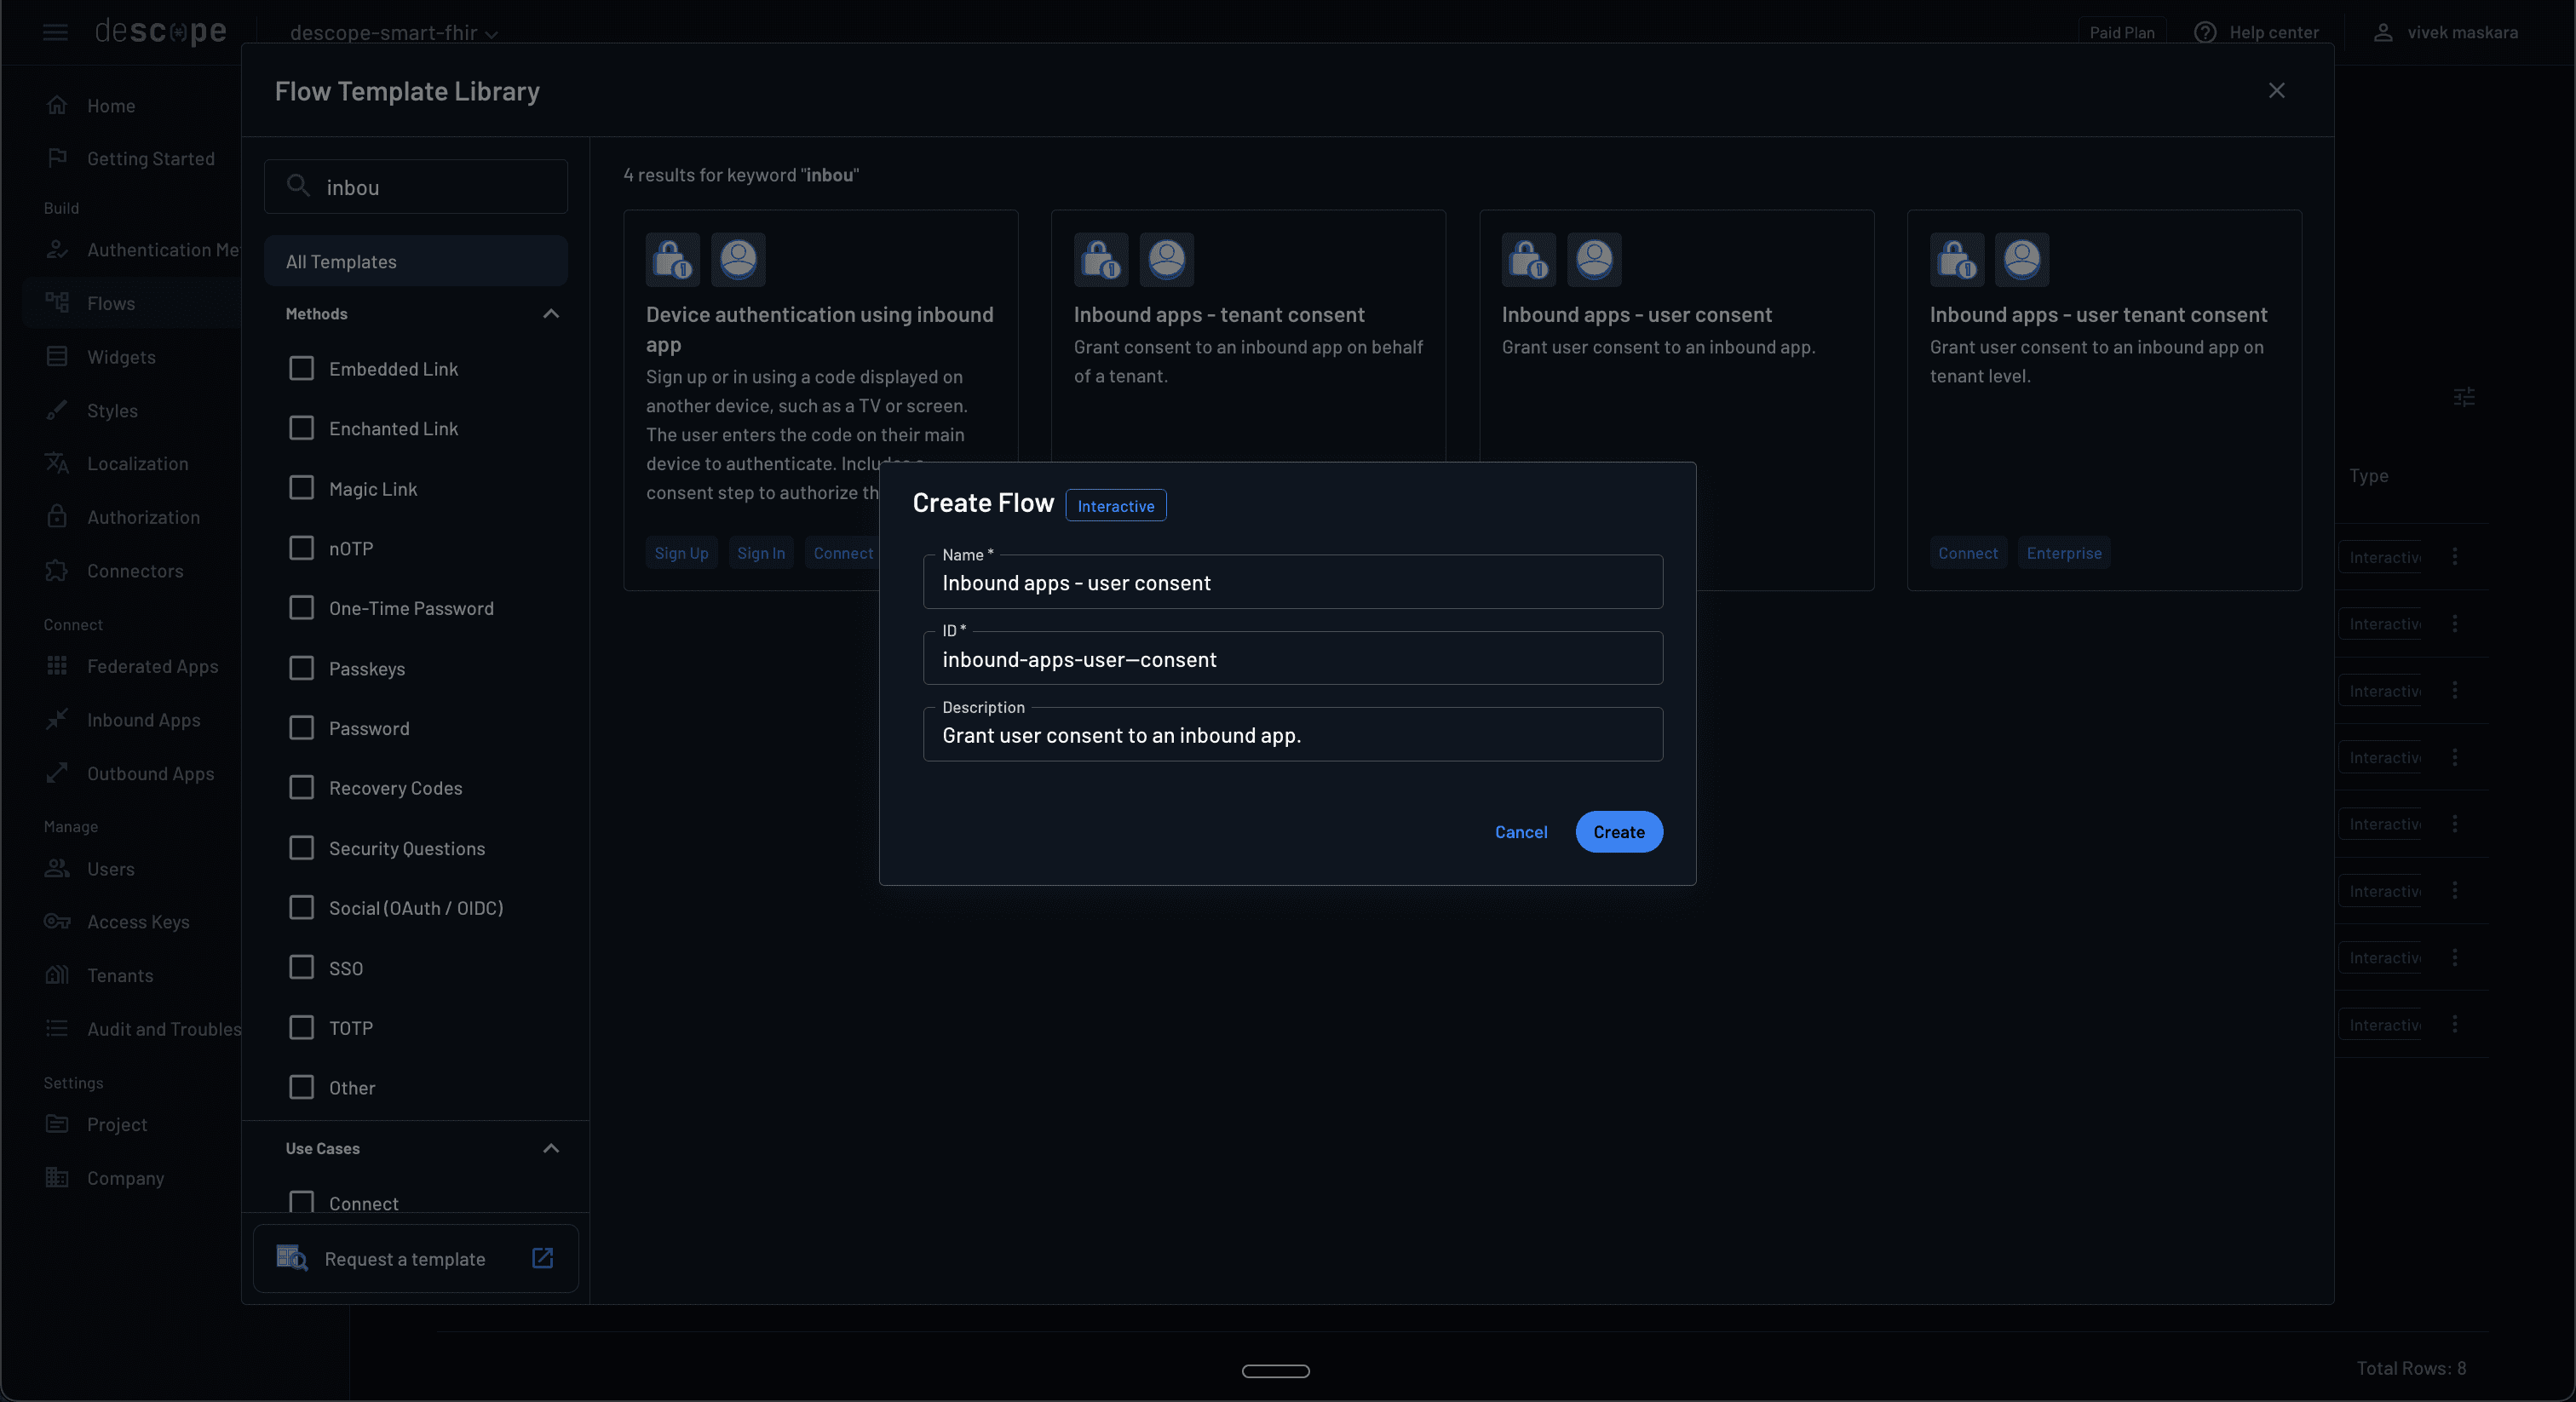
To create and customize the user consent flow, navigate to Flows, and click Start from template. Search for "Inbound apps - user consent" and click Use Template to create a new flow using the template.
Enter the flow name and ID to create the flow.
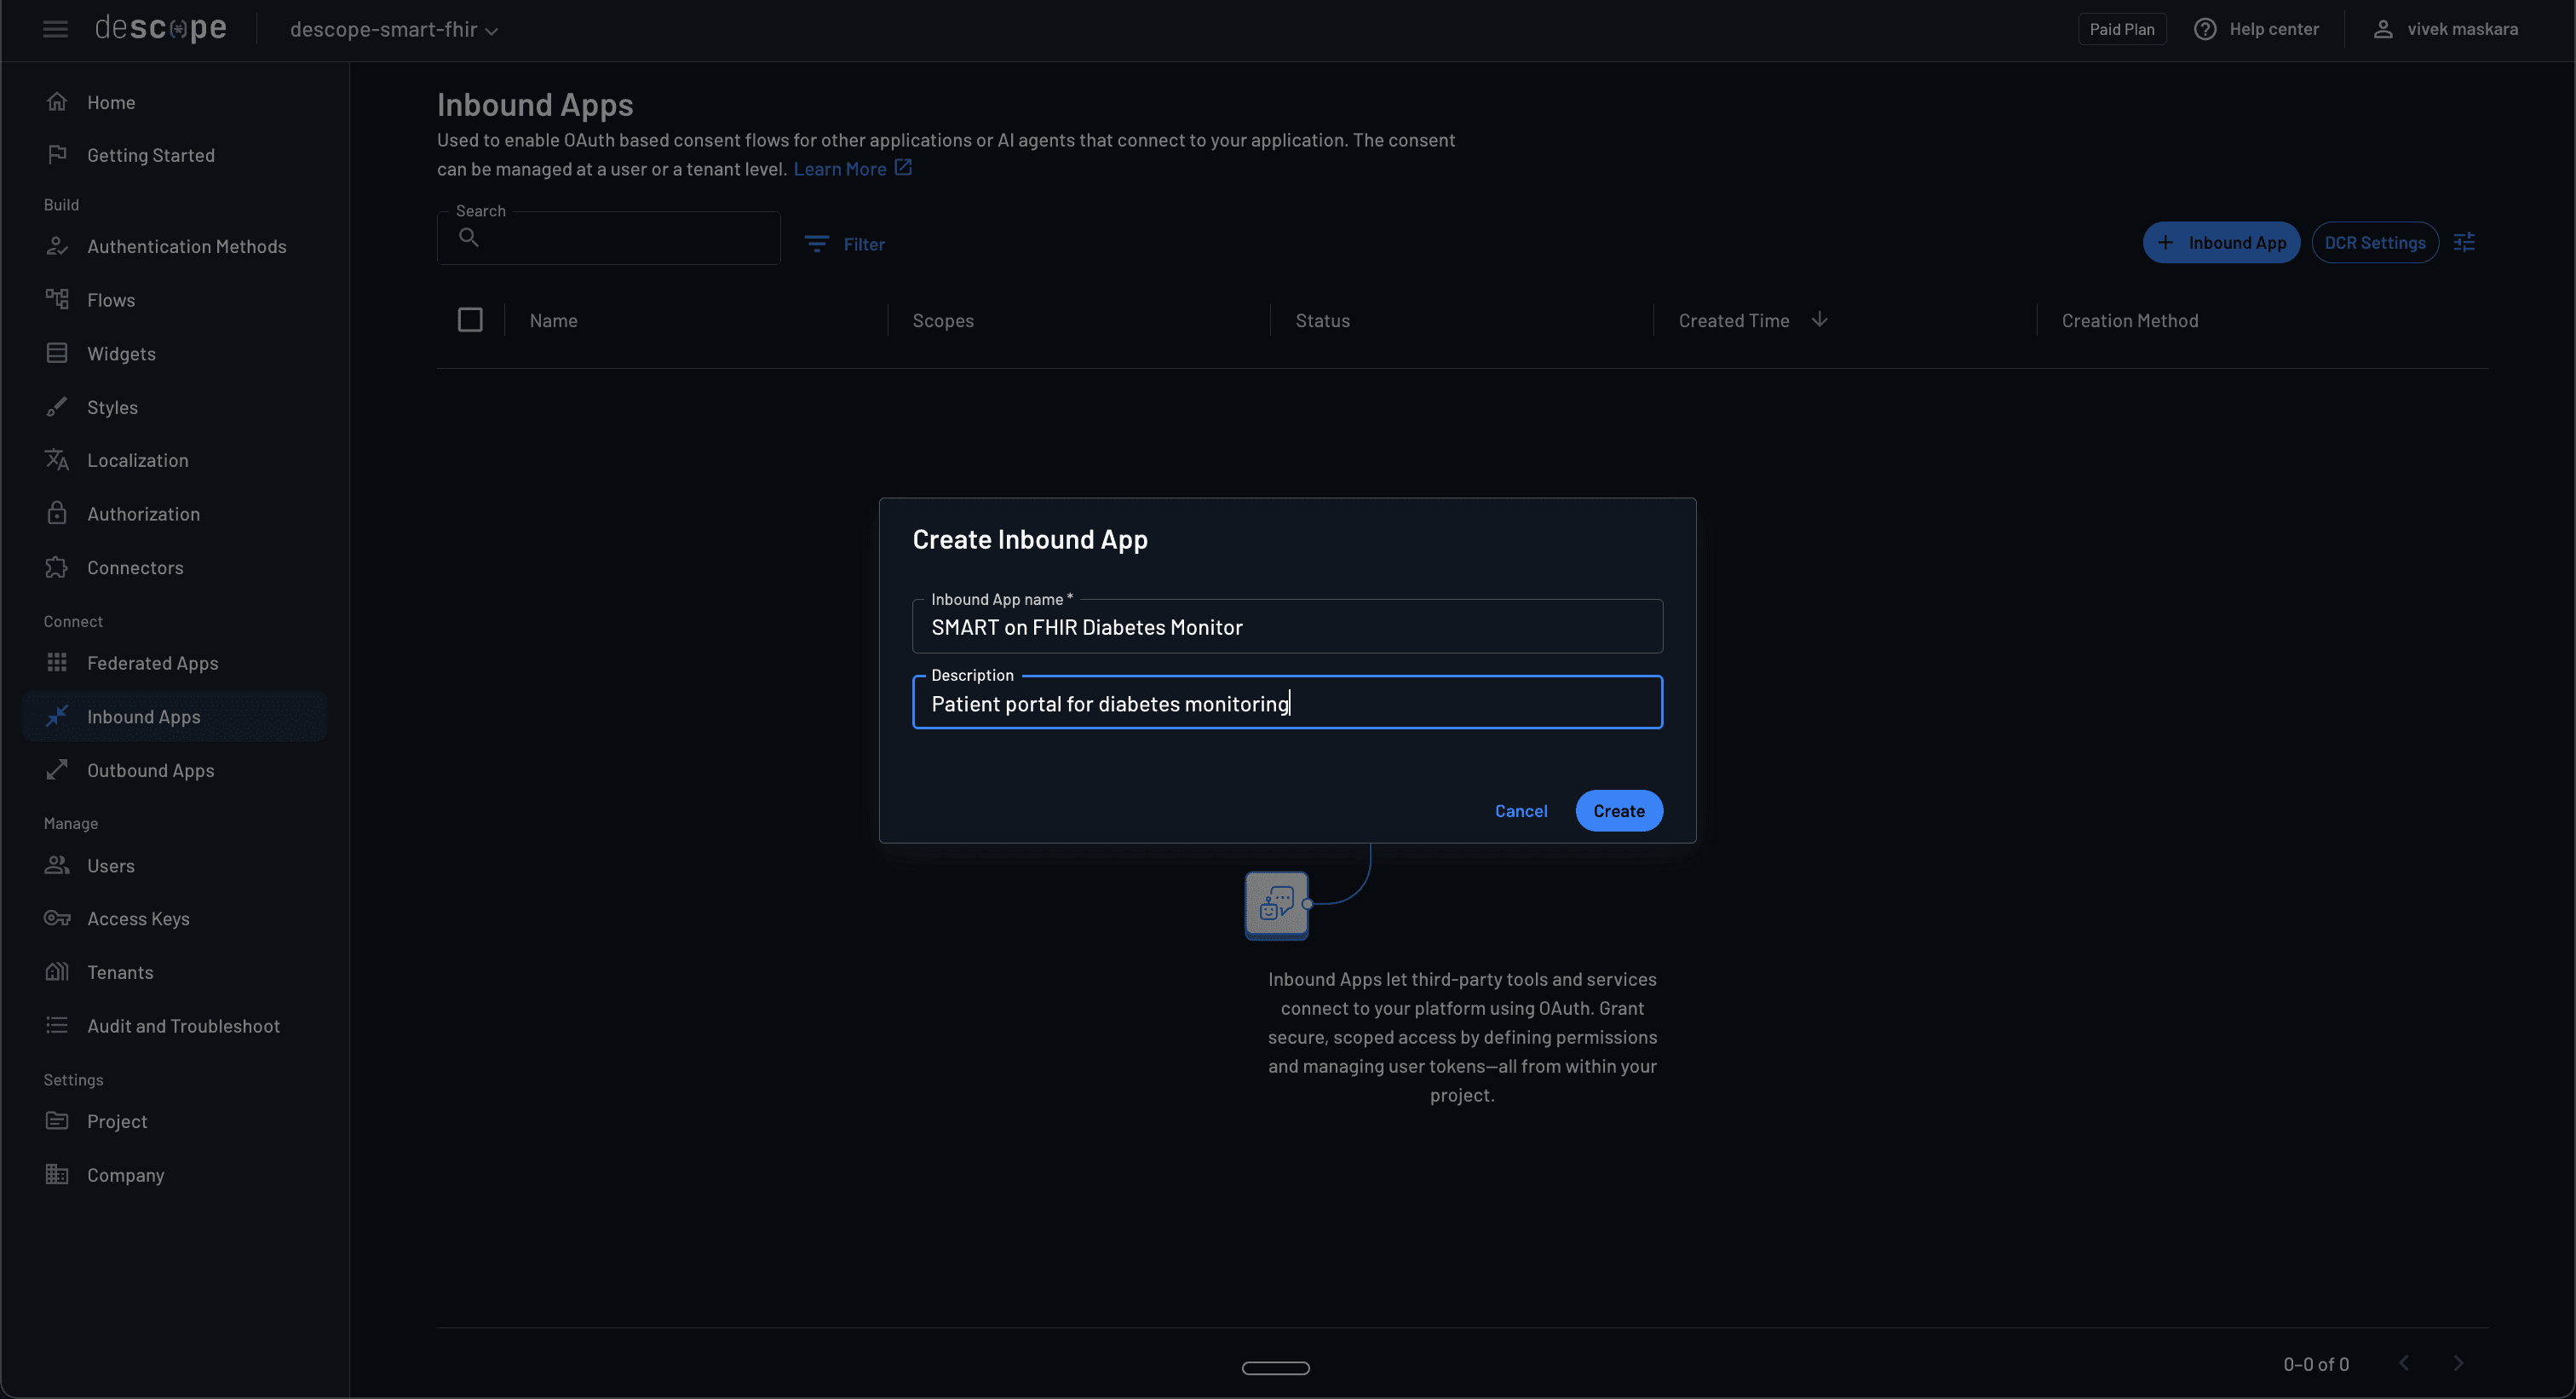
Create an Inbound App for SMART on FHIR
To create an Inbound App that acts as your OAuth client for SMART on FHIR, in the Descope Console, go to Applications > Inbound Apps and click Create New App. Fill in the application name and description to create the inbound application.
Once the app is created, navigate to the Connection Settings of the inbound app and update its Flow Hosting URL to use the flow ID you created above. For example:
https://api.descope.com/login/P37BEmQx2pLjHwU6TPDepmQsdGum?flow=inbound-apps-user-consentSetting up the diabetes monitoring starter app
Begin by cloning the starter code for the diabetes monitoring app from the starter branch and follow the instructions in the README.md file to set up the app. When you run the starter app, you'll notice that you are directly taken to the dashboard page without authentication:
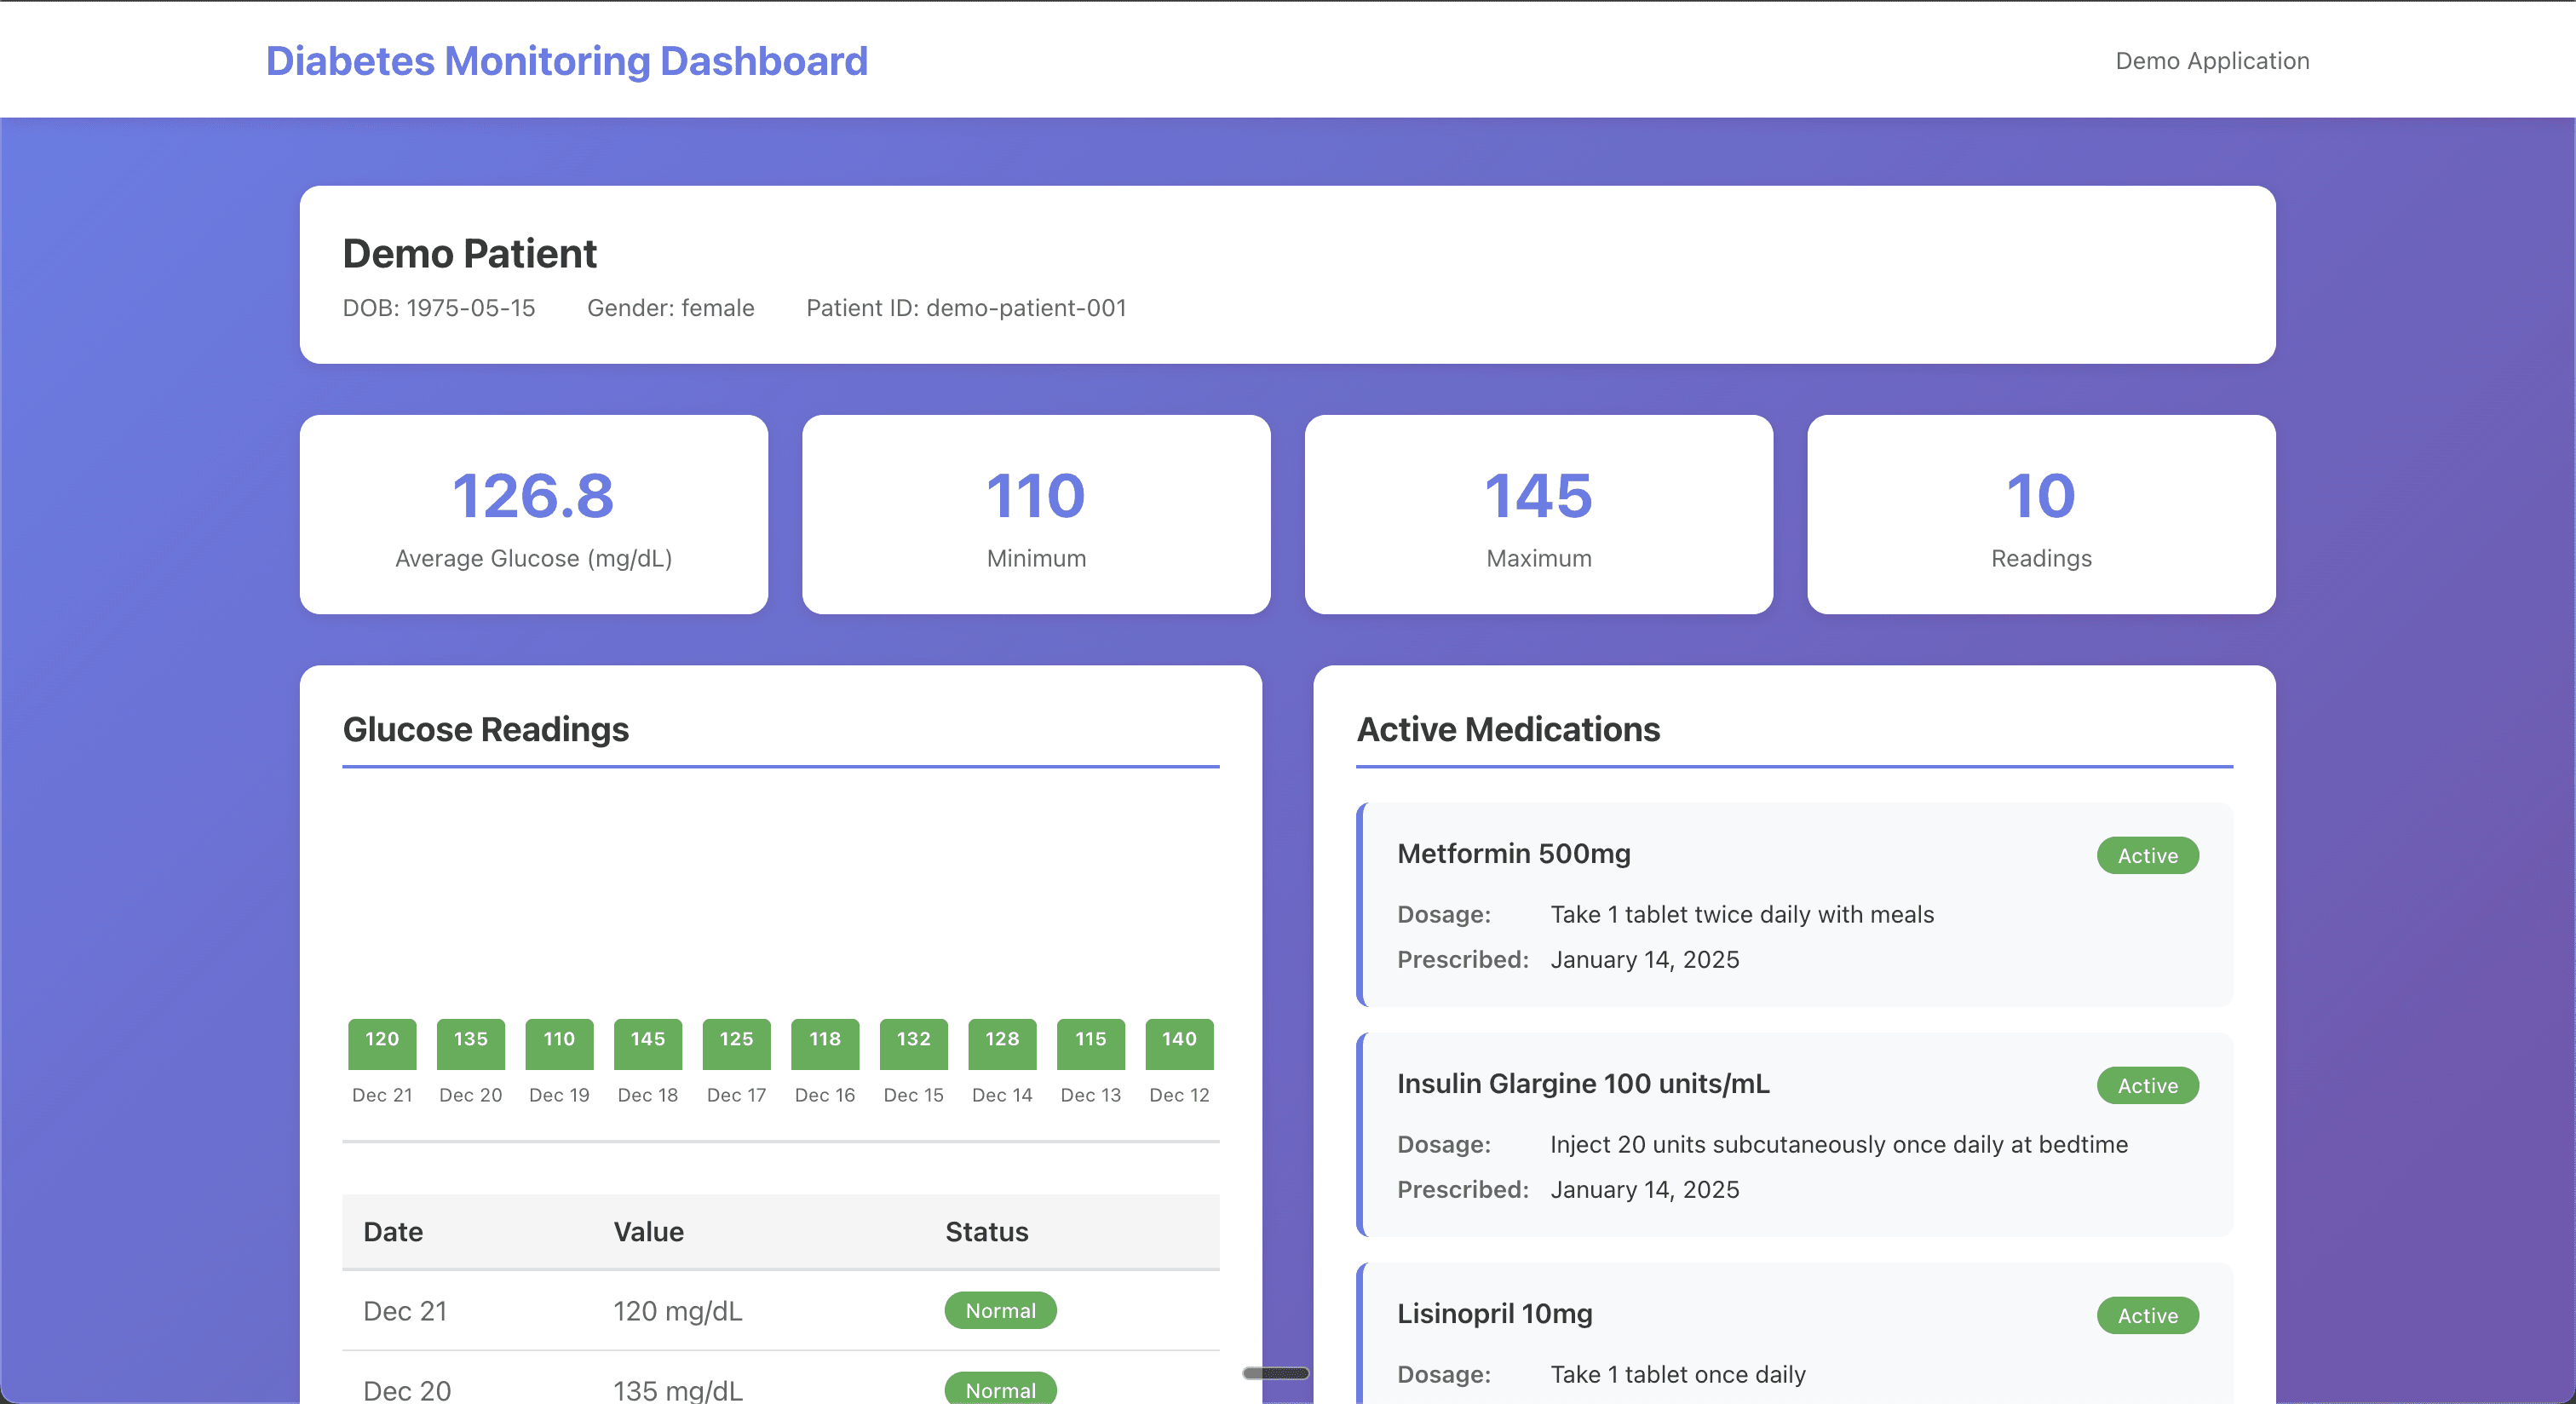
The starter app uses mock data defined in the DiabetesMonitor.jsx component. In the following sections, you'll update this app to add the following features:
Descope authentication: Implement authentication using Descope's Inbound Apps feature to authenticate users before initiating the SMART OAuth flow.
SMART on FHIR integration: Connect to an EHR system to fetch real patient data including glucose observations and medication requests using the FHIR API.
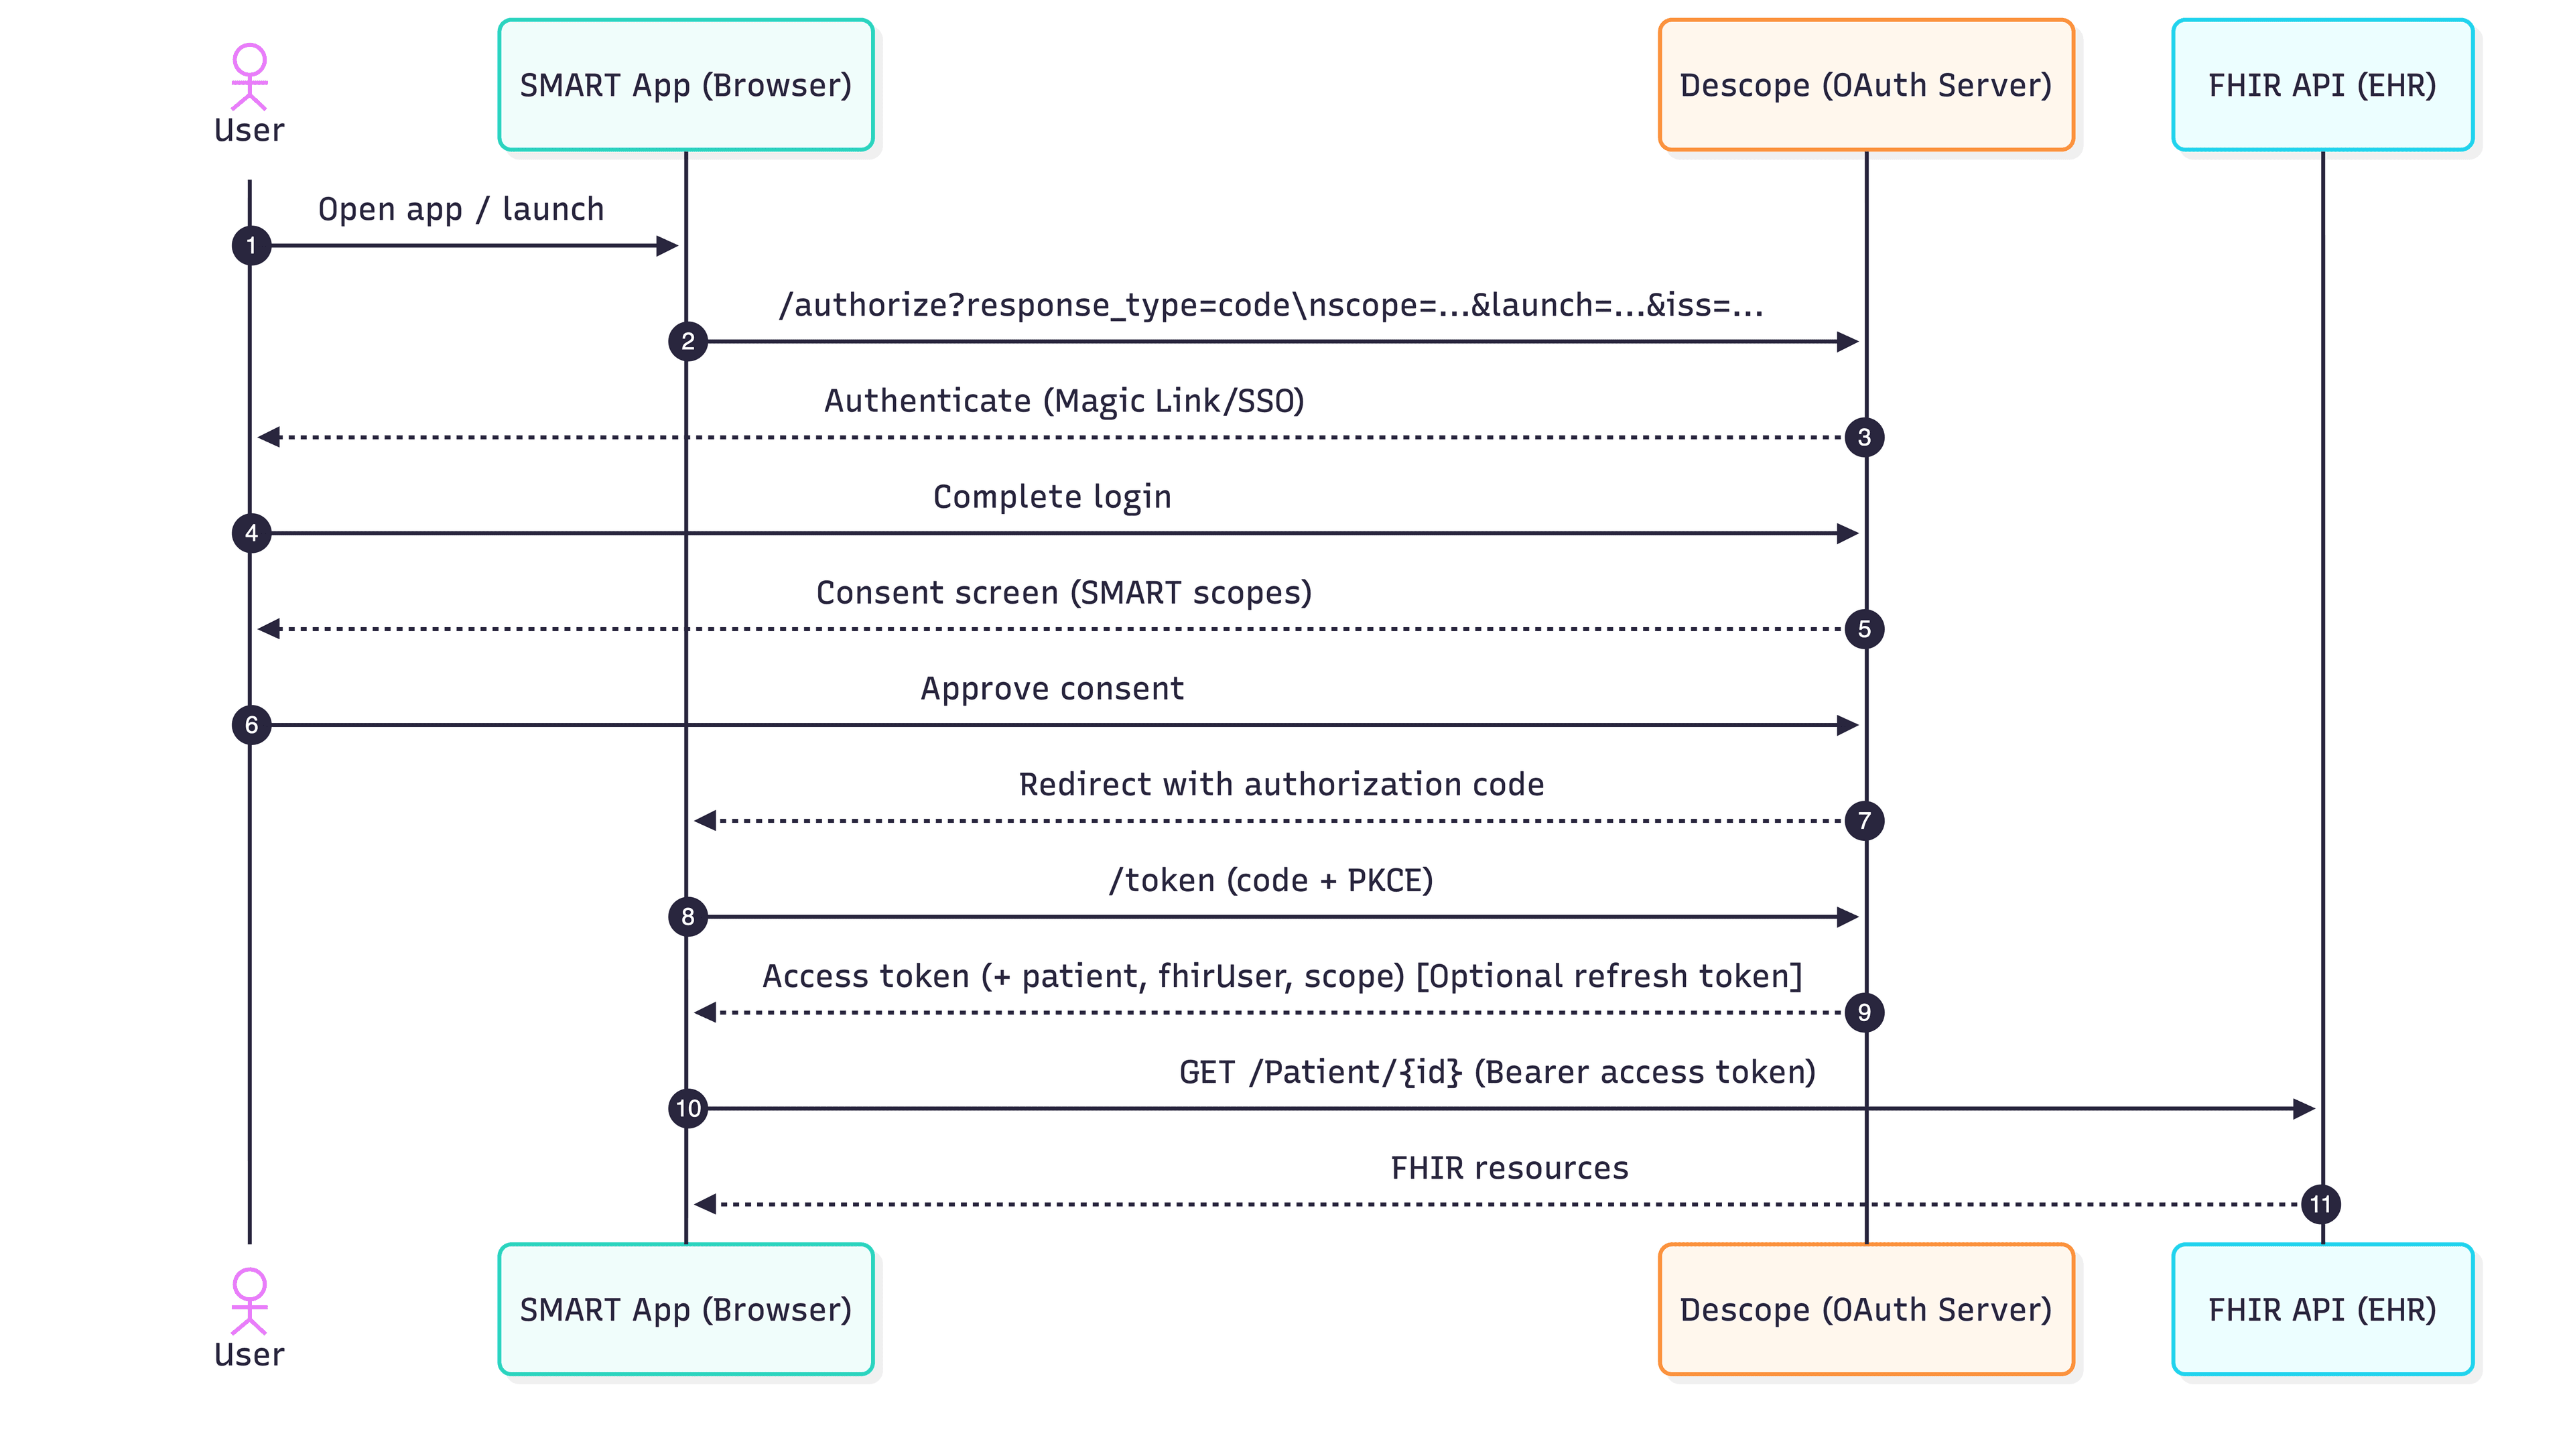
Launch sequence: Create a proper launch sequence that receives EHR launch parameters, authenticates the user with Descope, and then proceeds to the SMART OAuth authorization.
Installing NPM dependencies
You need to add a dependency for FHIR client to add authentication to your diabetes monitoring app. Install the library using the following command:
yarn add fhirclientOr using NPM:
npm install fhirclientThis installs the FHIR client library for interacting with EHR FHIR servers.
Set up Descope authentication
To set up Descope authentication, first, create a public/config.js configuration file to store your Descope client details and scopes.
window.DESCOPE_CONFIG = {
    projectId: 'YOUR_DESCOPE_PROJECT_ID',

    clientId: 'YOUR_DESCOPE_INBOUND_APP_CLIENT_ID',

    // SMART on FHIR scopes to request
    scopes: [
        'openid',
        'patient/Observation.read',
        'launch',
        'patient/MedicationRequest.read'
    ]
};
This centralizes your Descope configuration and will be used during the Descope OAuth flow.
Next, update src/main.jsx to initialize the React app:
import React from 'react';
import ReactDOM from 'react-dom/client';
import App from './App';
import './index.css';

ReactDOM.createRoot(document.getElementById('root')).render(
  <React.StrictMode>
    <App />
  </React.StrictMode>
);
Note that you don’t need to wrap the App with an authentication wrapper, since Descope authentication happens via OAuth before the React app loads.
Next, add a lightweight launch page that captures the EHR launch context and redirects to Descope's OAuth authorization endpoint. Create public/launch.html as the SMART launch entry point:
<!DOCTYPE html>
<html lang="en">
<head>
    <meta charset="UTF-8">
    <meta name="viewport" content="width=device-width, initial-scale=1.0">
    <title>SMART Launch</title>
    <script src="/config.js"></script>
    <script src="https://cdn.jsdelivr.net/npm/fhirclient@2.5.2/build/fhir-client.js"></script>
</head>
<body>
    <div style="display: flex; align-items: center; justify-content: center; min-height: 100vh; font-family: sans-serif;">
        <div style="text-align: center;">
            <h2>Launching SMART on FHIR App...</h2>
            <p>Please wait while we connect to your health records.</p>
            <div style="margin-top: 20px;">
                <div style="width: 50px; height: 50px; border: 4px solid #f3f3f3; border-top: 4px solid #667eea; border-radius: 50%; animation: spin 1s linear infinite; margin: 0 auto;"></div>
            </div>
        </div>
    </div>

    <style>
        @keyframes spin {
            0% { transform: rotate(0deg); }
            100% { transform: rotate(360deg); }
        }
    </style>

    <script>
        // SMART on FHIR launch sequence through Descope Inbound App
        // The EHR will call this page with 'iss' and 'launch' parameters
        const urlParams = new URLSearchParams(window.location.search);
        const iss = urlParams.get("iss");
        const launch = urlParams.get("launch");

        if (!iss || !launch) {
            document.body.innerHTML = '<div style="padding: 20px; color: red;">Error: Missing required SMART launch parameters (iss and launch)</div>';
        } else {
            // Store launch parameters for use after Descope authentication
            sessionStorage.setItem('smart_iss', iss);
            sessionStorage.setItem('smart_launch', launch);

            console.log('Stored SMART params:', { iss, launch });
            console.log('Redirecting to Descope OAuth authorize...');

            // Get Descope configuration
            const { clientId, scopes } = window.DESCOPE_CONFIG;
            const redirectUri = window.location.origin + '/callback.html';

            // Join scopes array into space-separated string
            const scopeString = scopes.join(' ');

            // Build Descope OAuth authorize URL (for Inbound Apps, use /apps/ path)
            const authorizeUrl = new URL(`https://api.descope.com/oauth2/v1/apps/authorize`);
            authorizeUrl.searchParams.set('client_id', clientId);
            authorizeUrl.searchParams.set('redirect_uri', redirectUri);
            authorizeUrl.searchParams.set('response_type', 'code');
            authorizeUrl.searchParams.set('scope', scopeString);
            authorizeUrl.searchParams.set('state', Math.random().toString(36).substring(7));

            // Redirect to Descope Hosted Auth
            window.location.href = authorizeUrl.toString();
        }
    </script>
</body>
</html>
This page reads the iss and launch parameters from the EHR, stores them in session storage, and then constructs an OAuth authorization URL that redirects to Descope's hosted authentication page. The scopes specified in config.js will be displayed on the consent screen. If one of the OAuth parameters is missing, the page shows an error instead of proceeding with the flow.
Next, create public/callback.html to handle the OAuth callback from Descope and initiate the SMART OAuth flow with the EHR:
<!DOCTYPE html>
<html lang="en">
<head>
    <meta charset="UTF-8">
    <meta name="viewport" content="width=device-width, initial-scale=1.0">
    <title>Processing Authentication</title>
    <script src="/config.js"></script>
    <script src="https://cdn.jsdelivr.net/npm/fhirclient@2.5.2/build/fhir-client.js"></script>
</head>
<body>
    <div style="display: flex; align-items: center; justify-content: center; min-height: 100vh; font-family: sans-serif;">
        <div style="text-align: center;">
            <h2>Processing Authentication...</h2>
            <p>Please wait while we complete the authorization.</p>
            <div style="margin-top: 20px;">
                <div style="width: 50px; height: 50px; border: 4px solid #f3f3f3; border-top: 4px solid #667eea; border-radius: 50%; animation: spin 1s linear infinite; margin: 0 auto;"></div>
            </div>
        </div>
    </div>

    <style>
        @keyframes spin {
            0% { transform: rotate(0deg); }
            100% { transform: rotate(360deg); }
        }
    </style>

    <script>
        // Handle OAuth callback from Descope
        const urlParams = new URLSearchParams(window.location.search);
        const code = urlParams.get('code');
        const error = urlParams.get('error');

        if (error) {
            document.body.innerHTML = `<div style="padding: 20px; color: red;">
                <h2>Authentication Error</h2>
                <p>${error}: ${urlParams.get('error_description') || 'Unknown error'}</p>
            </div>`;
        } else if (!code) {
            document.body.innerHTML = '<div style="padding: 20px; color: red;">Error: No authorization code received</div>';
        } else {
            // Successfully received authorization code from Descope
            console.log('Received authorization code from Descope');

            // Retrieve SMART launch parameters stored earlier
            const iss = sessionStorage.getItem('smart_iss');
            const launch = sessionStorage.getItem('smart_launch');

            if (!iss || !launch) {
                document.body.innerHTML = '<div style="padding: 20px; color: red;">Error: SMART launch parameters not found. Please restart from the EHR.</div>';
            } else {
                console.log('Proceeding to SMART OAuth flow with EHR...');

                // Get Descope configuration
                const { clientId, scopes } = window.DESCOPE_CONFIG;

                // Build scope string including SMART-specific scopes
                const smartScopes = [...scopes, 'fhirUser', 'launch/patient'].join(' ');

                // Now initiate SMART on FHIR OAuth flow with the EHR
                FHIR.oauth2.authorize({
                    clientId: clientId,
                    scope: smartScopes,
                    redirectUri: window.location.origin + "/index.html",
                    iss: iss,
                    launch: launch,
                    pkceMode: "required"
                }).catch(error => {
                    console.error('SMART OAuth error:', error);
                    document.body.innerHTML = `<div style="padding: 20px; color: red;">
                        <h2>SMART OAuth Error</h2>
                        <p>Failed to initiate SMART OAuth flow: ${error.message}</p>
                    </div>`;
                });
            }
        }
    </script>
</body>
</html>
After Descope authenticates the user and they approve the consent screen showing the requested scopes, Descope redirects here with an authorization code. This page then retrieves the stored SMART launch parameters and initiates the SMART OAuth authorization flow with the EHR's FHIR server.
Note that the clientId here is your Descope Inbound App’s client ID that registers your app as the OAuth client in the SMART Flow. The iss value is provided by the EHR (or SMART launcher) when it initiates the app launch, and it represents the base FHIR endpoint for the current session.
Integrate the FHIR client
With authentication in place, centralize FHIR API access so your UI can stay focused on rendering. Create src/services/fhirClient.js to wrap FHIR API calls and normalize the data into simple arrays your UI can render:
class FHIRService {
  constructor(client) {
    this.client = client;
  }

  async getGlucoseObservations(patientId) {
    try {
      const observations = await this.client.request(
        `Observation?patient=${patientId}&code=http://loinc.org|2339-0&_sort=-date&_count=20`
      );
      return this.parseGlucoseObservations(observations);
    } catch (error) {
      console.error('Error fetching glucose observations:', error);
      return [];
    }
  }

  parseGlucoseObservations(data) {
    if (!data || !data.entry) return [];

    return data.entry.map((entry) => {
      const observation = entry.resource;
      return {
        id: observation.id,
        date: observation.effectiveDateTime,
        value: observation.valueQuantity?.value,
        unit: observation.valueQuantity?.unit || 'mg/dL',
        status: observation.status,
      };
    });
  }

  async getMedicationRequests(patientId) {
    try {
      const medications = await this.client.request(
        `MedicationRequest?patient=${patientId}&status=active&_sort=-authoredon&_count=20`
      );
      return this.parseMedicationRequests(medications);
    } catch (error) {
      console.error('Error fetching medications:', error);
      return [];
    }
  }

  parseMedicationRequests(data) {
    if (!data || !data.entry) return [];

    return data.entry.map((entry) => {
      const medication = entry.resource;
      const medicationName =
        medication.medicationCodeableConcept?.text ||
        medication.medicationCodeableConcept?.coding?.[0]?.display ||
        'Unknown Medication';

      return {
        id: medication.id,
        name: medicationName,
        status: medication.status,
        authoredOn: medication.authoredOn,
        dosageInstruction: medication.dosageInstruction?.[0]?.text || 'See prescription',
      };
    });
  }

  async getPatient() {
    try {
      const patient = await this.client.patient.read();
      return {
        id: patient.id,
        name: this.getPatientName(patient),
        birthDate: patient.birthDate,
        gender: patient.gender,
      };
    } catch (error) {
      console.error('Error fetching patient data:', error);
      return null;
    }
  }

  getPatientName(patient) {
    if (!patient.name || patient.name.length === 0) return 'Unknown Patient';

    const name = patient.name[0];
    const given = name.given ? name.given.join(' ') : '';
    const family = name.family || '';
    return `${given} ${family}`.trim();
  }
}

export default FHIRService;
This keeps SMART/FHIR parsing in one place and makes your components easier to read.
Now wire the SMART session into the app shell so it only renders after OAuth completes. Replace the starter App.jsx to initialize the FHIR client after the SMART redirect. FHIR.oauth2.ready() resolves once tokens are available, and then the app loads the current patient:
import React, { useState, useEffect } from 'react';
import FHIR from 'fhirclient';
import DiabetesMonitor from './components/DiabetesMonitor';
import './App.css';

function App() {
  const [loading, setLoading] = useState(true);
  const [error, setError] = useState(null);
  const [fhirClient, setFhirClient] = useState(null);
  const [user, setUser] = useState(null);

  useEffect(() => {
    initializeFHIRClient();
  }, []);

  const initializeFHIRClient = async () => {
    try {
      const client = await FHIR.oauth2.ready();
      setFhirClient(client);

      const patient = await client.patient.read();
      const patientName = getPatientName(patient);
      setUser({ name: patientName, id: patient.id });

      setLoading(false);
    } catch (err) {
      console.error('FHIR initialization error:', err);
      setError('Unable to connect to FHIR server');
      setLoading(false);
    }
  };

  const getPatientName = (patient) => {
    if (!patient.name || patient.name.length === 0) return 'Patient';
    const name = patient.name[0];
    const given = name.given ? name.given.join(' ') : '';
    const family = name.family || '';
    return `${given} ${family}`.trim() || 'Patient';
  };

  const handleLogout = () => {
    sessionStorage.clear();
    localStorage.clear();
    window.location.href = '/launch.html';
  };

  if (loading) {
    return (
      <div className="loading-container">
        <div className="loading-spinner"></div>
        <p>Loading...</p>
      </div>
    );
  }

  if (error || !fhirClient) {
    return (
      <div className="app-container">
        <div className="login-container">
          <div className="login-card">
            <h1>Diabetes Monitoring</h1>
            <p className="subtitle">This app must be launched from your EHR system</p>
            <a href="/launch.html?iss=https://launch.smarthealthit.org/v/r4/fhir&launch=test-launch">
              Test with SMART Launcher
            </a>
          </div>
        </div>
      </div>
    );
  }

  return (
    <div className="app-container">
      <header className="app-header">
        <div className="header-content">
          <h1>Diabetes Monitoring Dashboard</h1>
          <div className="user-section">
            <span className="welcome-text">Welcome, {user?.name || 'Patient'}</span>
            <button onClick={handleLogout} className="logout-button">Logout</button>
          </div>
        </div>
      </header>
      <main className="app-main">
        <DiabetesMonitor fhirClient={fhirClient} />
      </main>
    </div>
  );
}

export default App;
If initialization fails, the app falls back to a launch link for testing. Logout clears stored launch/auth data and returns to launch.html.
Update the dashboard component to prefer live FHIR data while keeping mock data as a fallback. Then, modify src/components/DiabetesMonitor.jsx to fetch real FHIR data:
import React, { useState, useEffect } from 'react';
import FHIRService from '../services/fhirClient';
import GlucoseChart from './GlucoseChart';
import MedicationList from './MedicationList';
import './DiabetesMonitor.css';

function DiabetesMonitor({ fhirClient }) {
  const [loading, setLoading] = useState(true);
  const [error, setError] = useState(null);
  const [patient, setPatient] = useState(null);
  const [glucoseData, setGlucoseData] = useState([]);
  const [medications, setMedications] = useState([]);
  const [useMockData, setUseMockData] = useState(false);

  useEffect(() => {
    loadPatientData();
  }, [fhirClient, useMockData]);

  const loadPatientData = async () => {
    setLoading(true);
    setError(null);

    try {
      if (useMockData) {
        loadMockData();
      } else {
        await loadFHIRData();
      }
    } catch (err) {
      console.error('Error loading patient data:', err);
      setError('Unable to load FHIR data. Using mock data instead.');
      setUseMockData(true);
    } finally {
      setLoading(false);
    }
  };

  const loadFHIRData = async () => {
    if (!fhirClient) {
      throw new Error('FHIR client not available');
    }

    const fhirService = new FHIRService(fhirClient);

    const patientData = await fhirService.getPatient();
    setPatient(patientData);

    if (patientData) {
      const glucose = await fhirService.getGlucoseObservations(patientData.id);
      const meds = await fhirService.getMedicationRequests(patientData.id);

      setGlucoseData(glucose);
      setMedications(meds);
    }
  };

  // ... rest of component (mock data, stats calculation, render)
}

export default DiabetesMonitor;
The component now prefers real FHIR data and gracefully switches to mock data if the request fails.
Test the application
Before testing, you need to configure Approved Domains for your Descope project for the OAuth callback to work. For testing, add http://localhost:3000/* under Project > General -> Security and click Save.
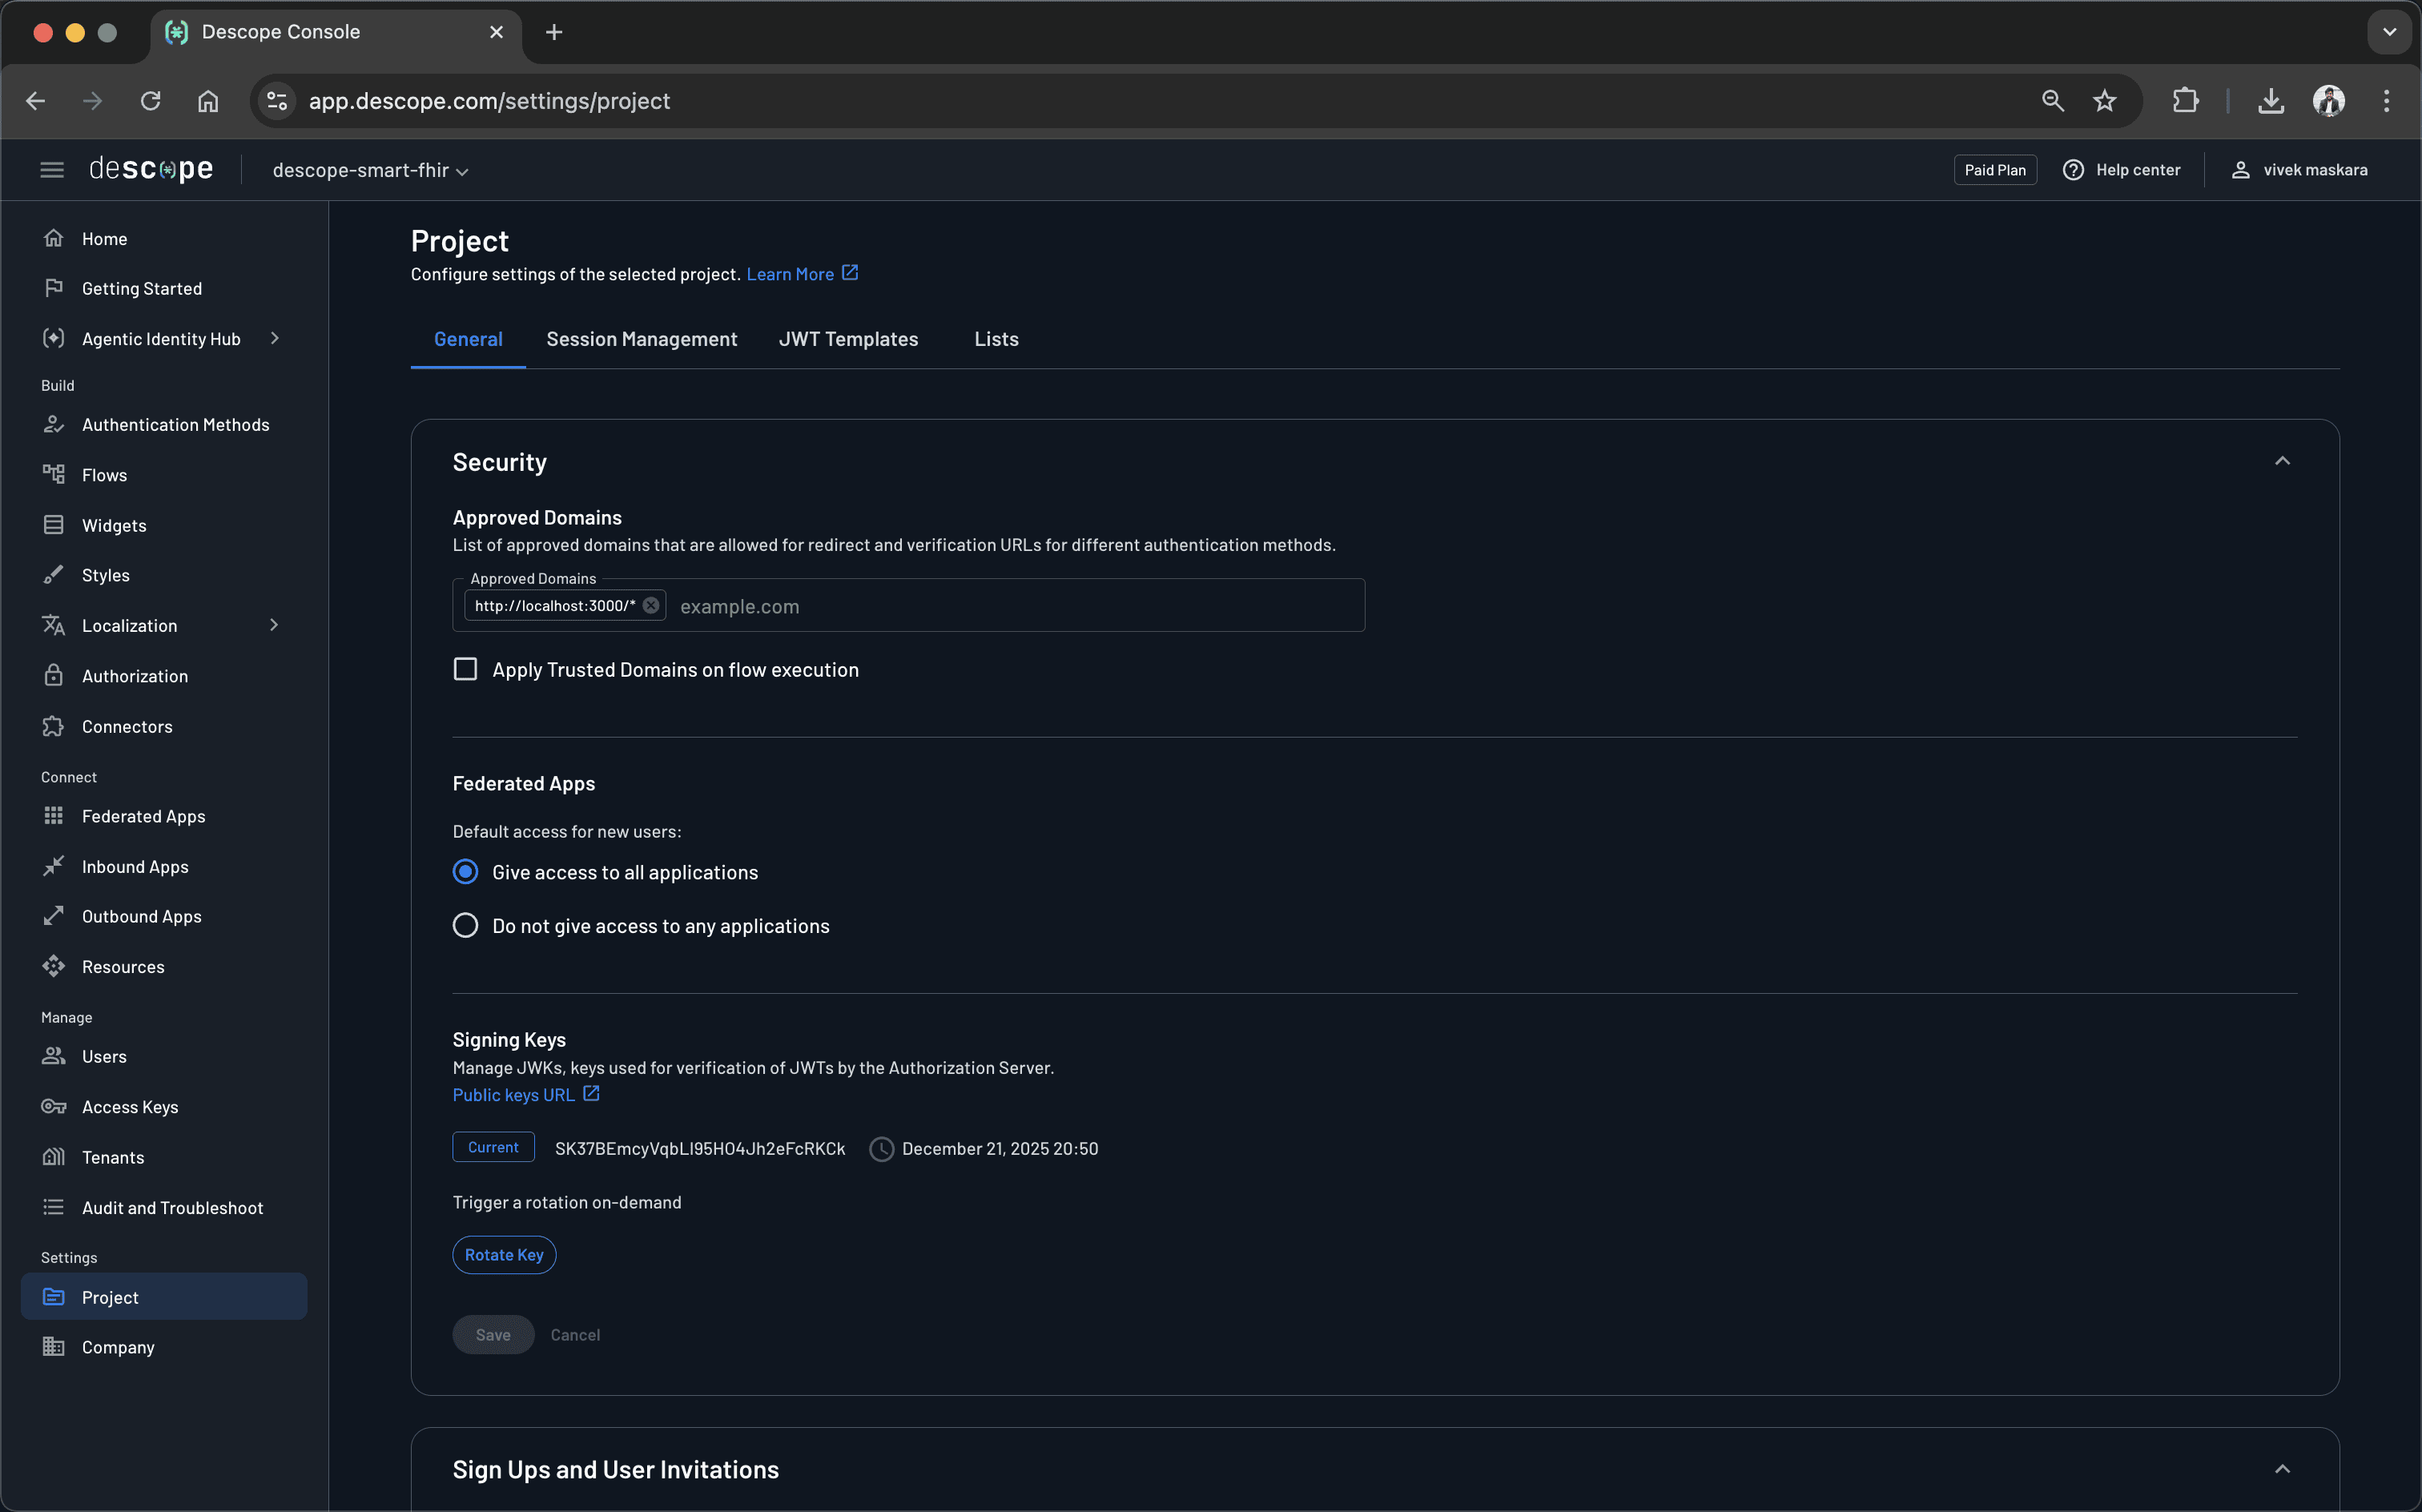
This allows Descope to redirect back to your application after authentication. For production deployments, you will need to add your production domain.
With the configuration in place, start the development server:
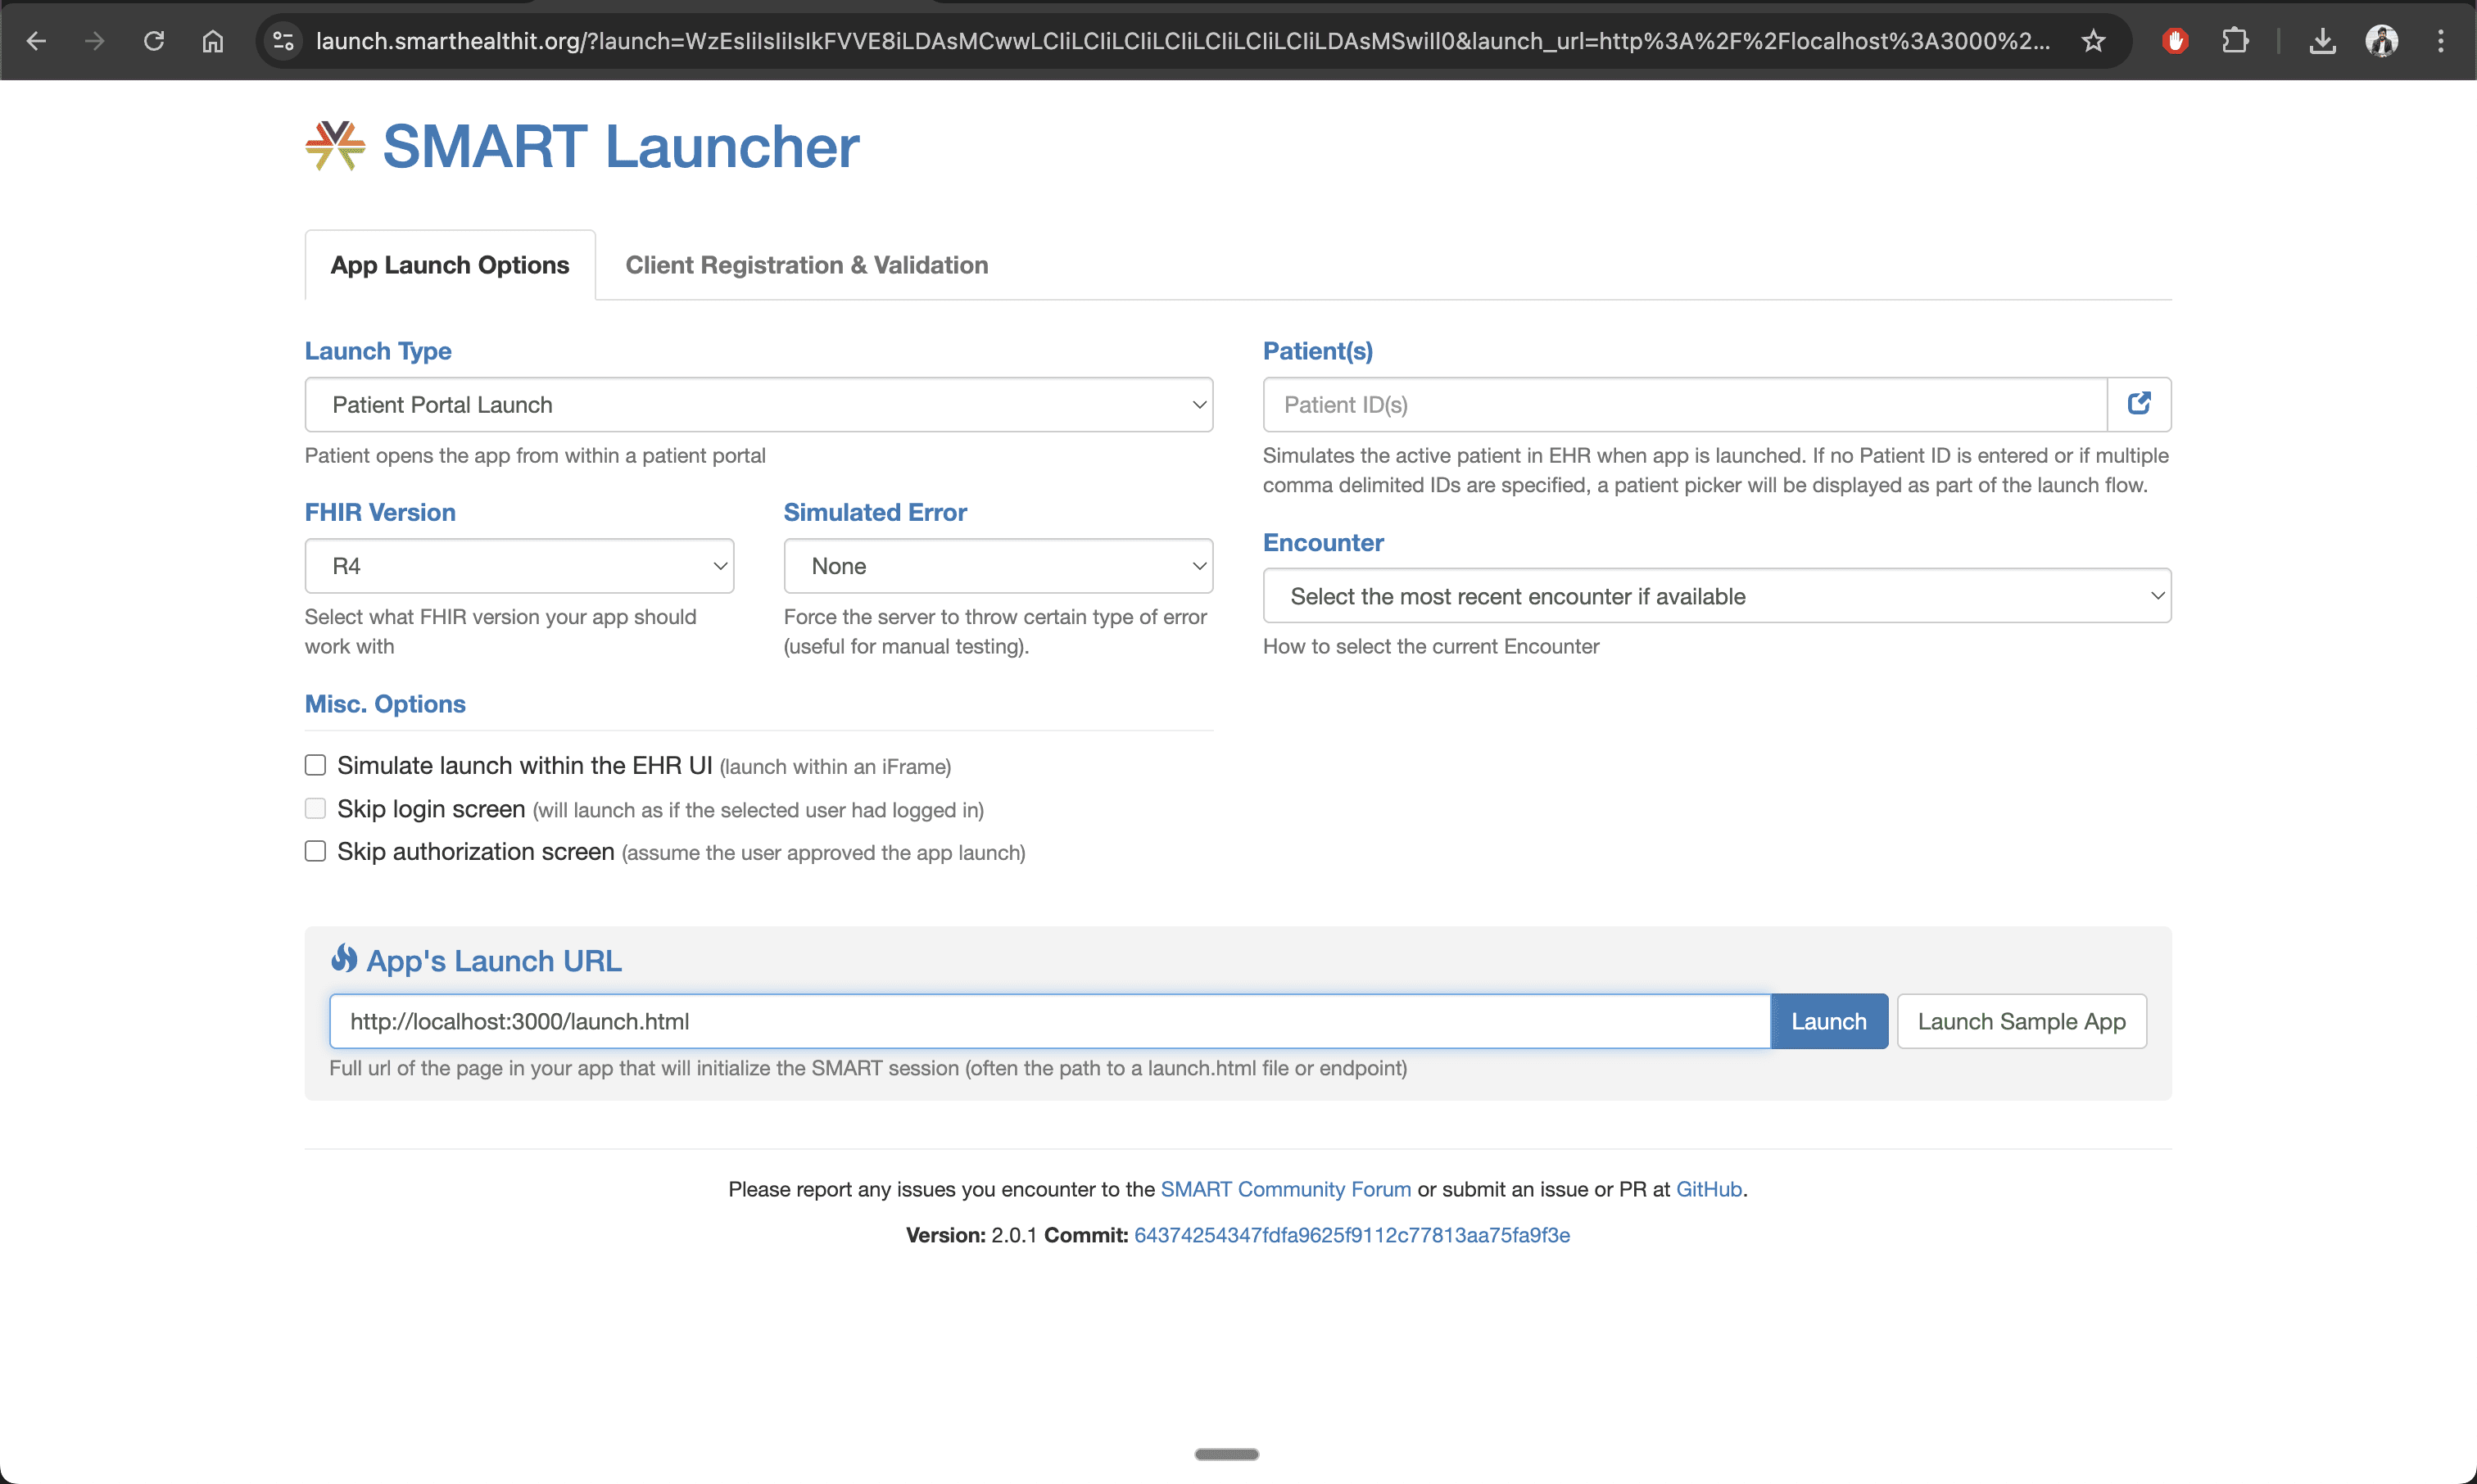
npm run devTest using the SMART Health IT Launcher. Set Launch Type to "Patient Portal", Launch URL to "http://localhost:3000/launch.html", and click Launch:
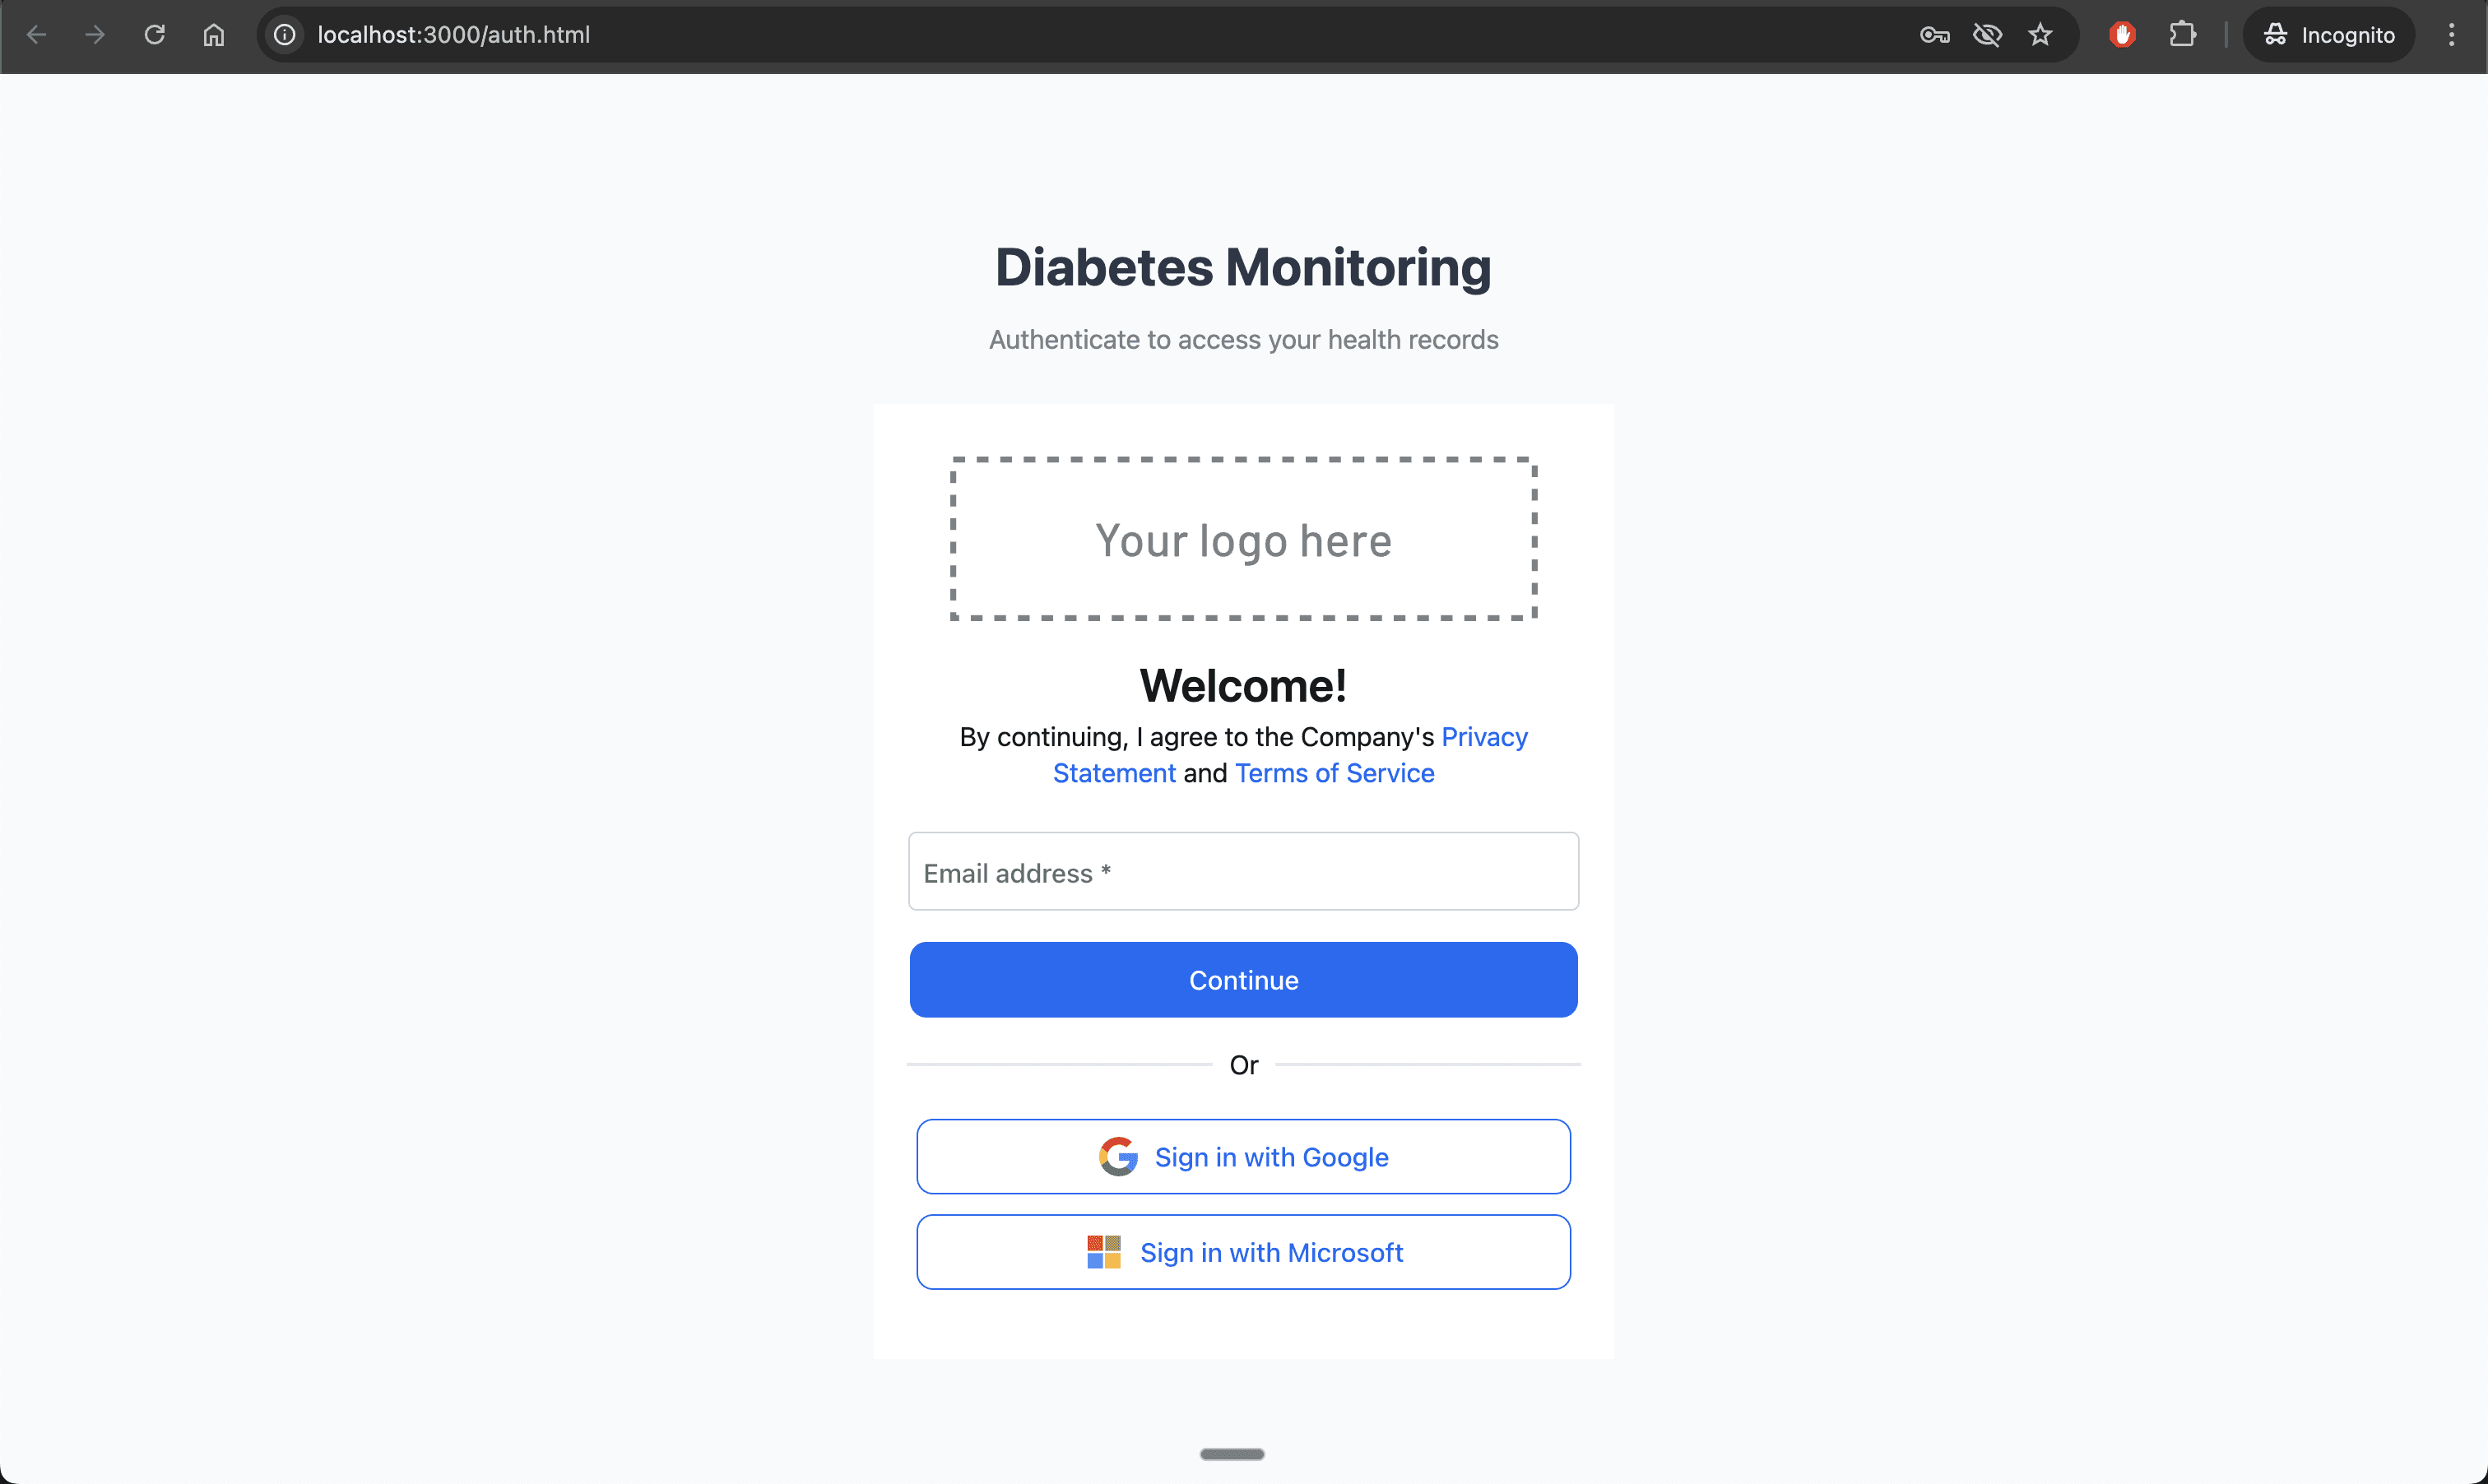
You'll be redirected to the Descope authentication screen, where you can log in using one of the configured methods (magic link or SSO).
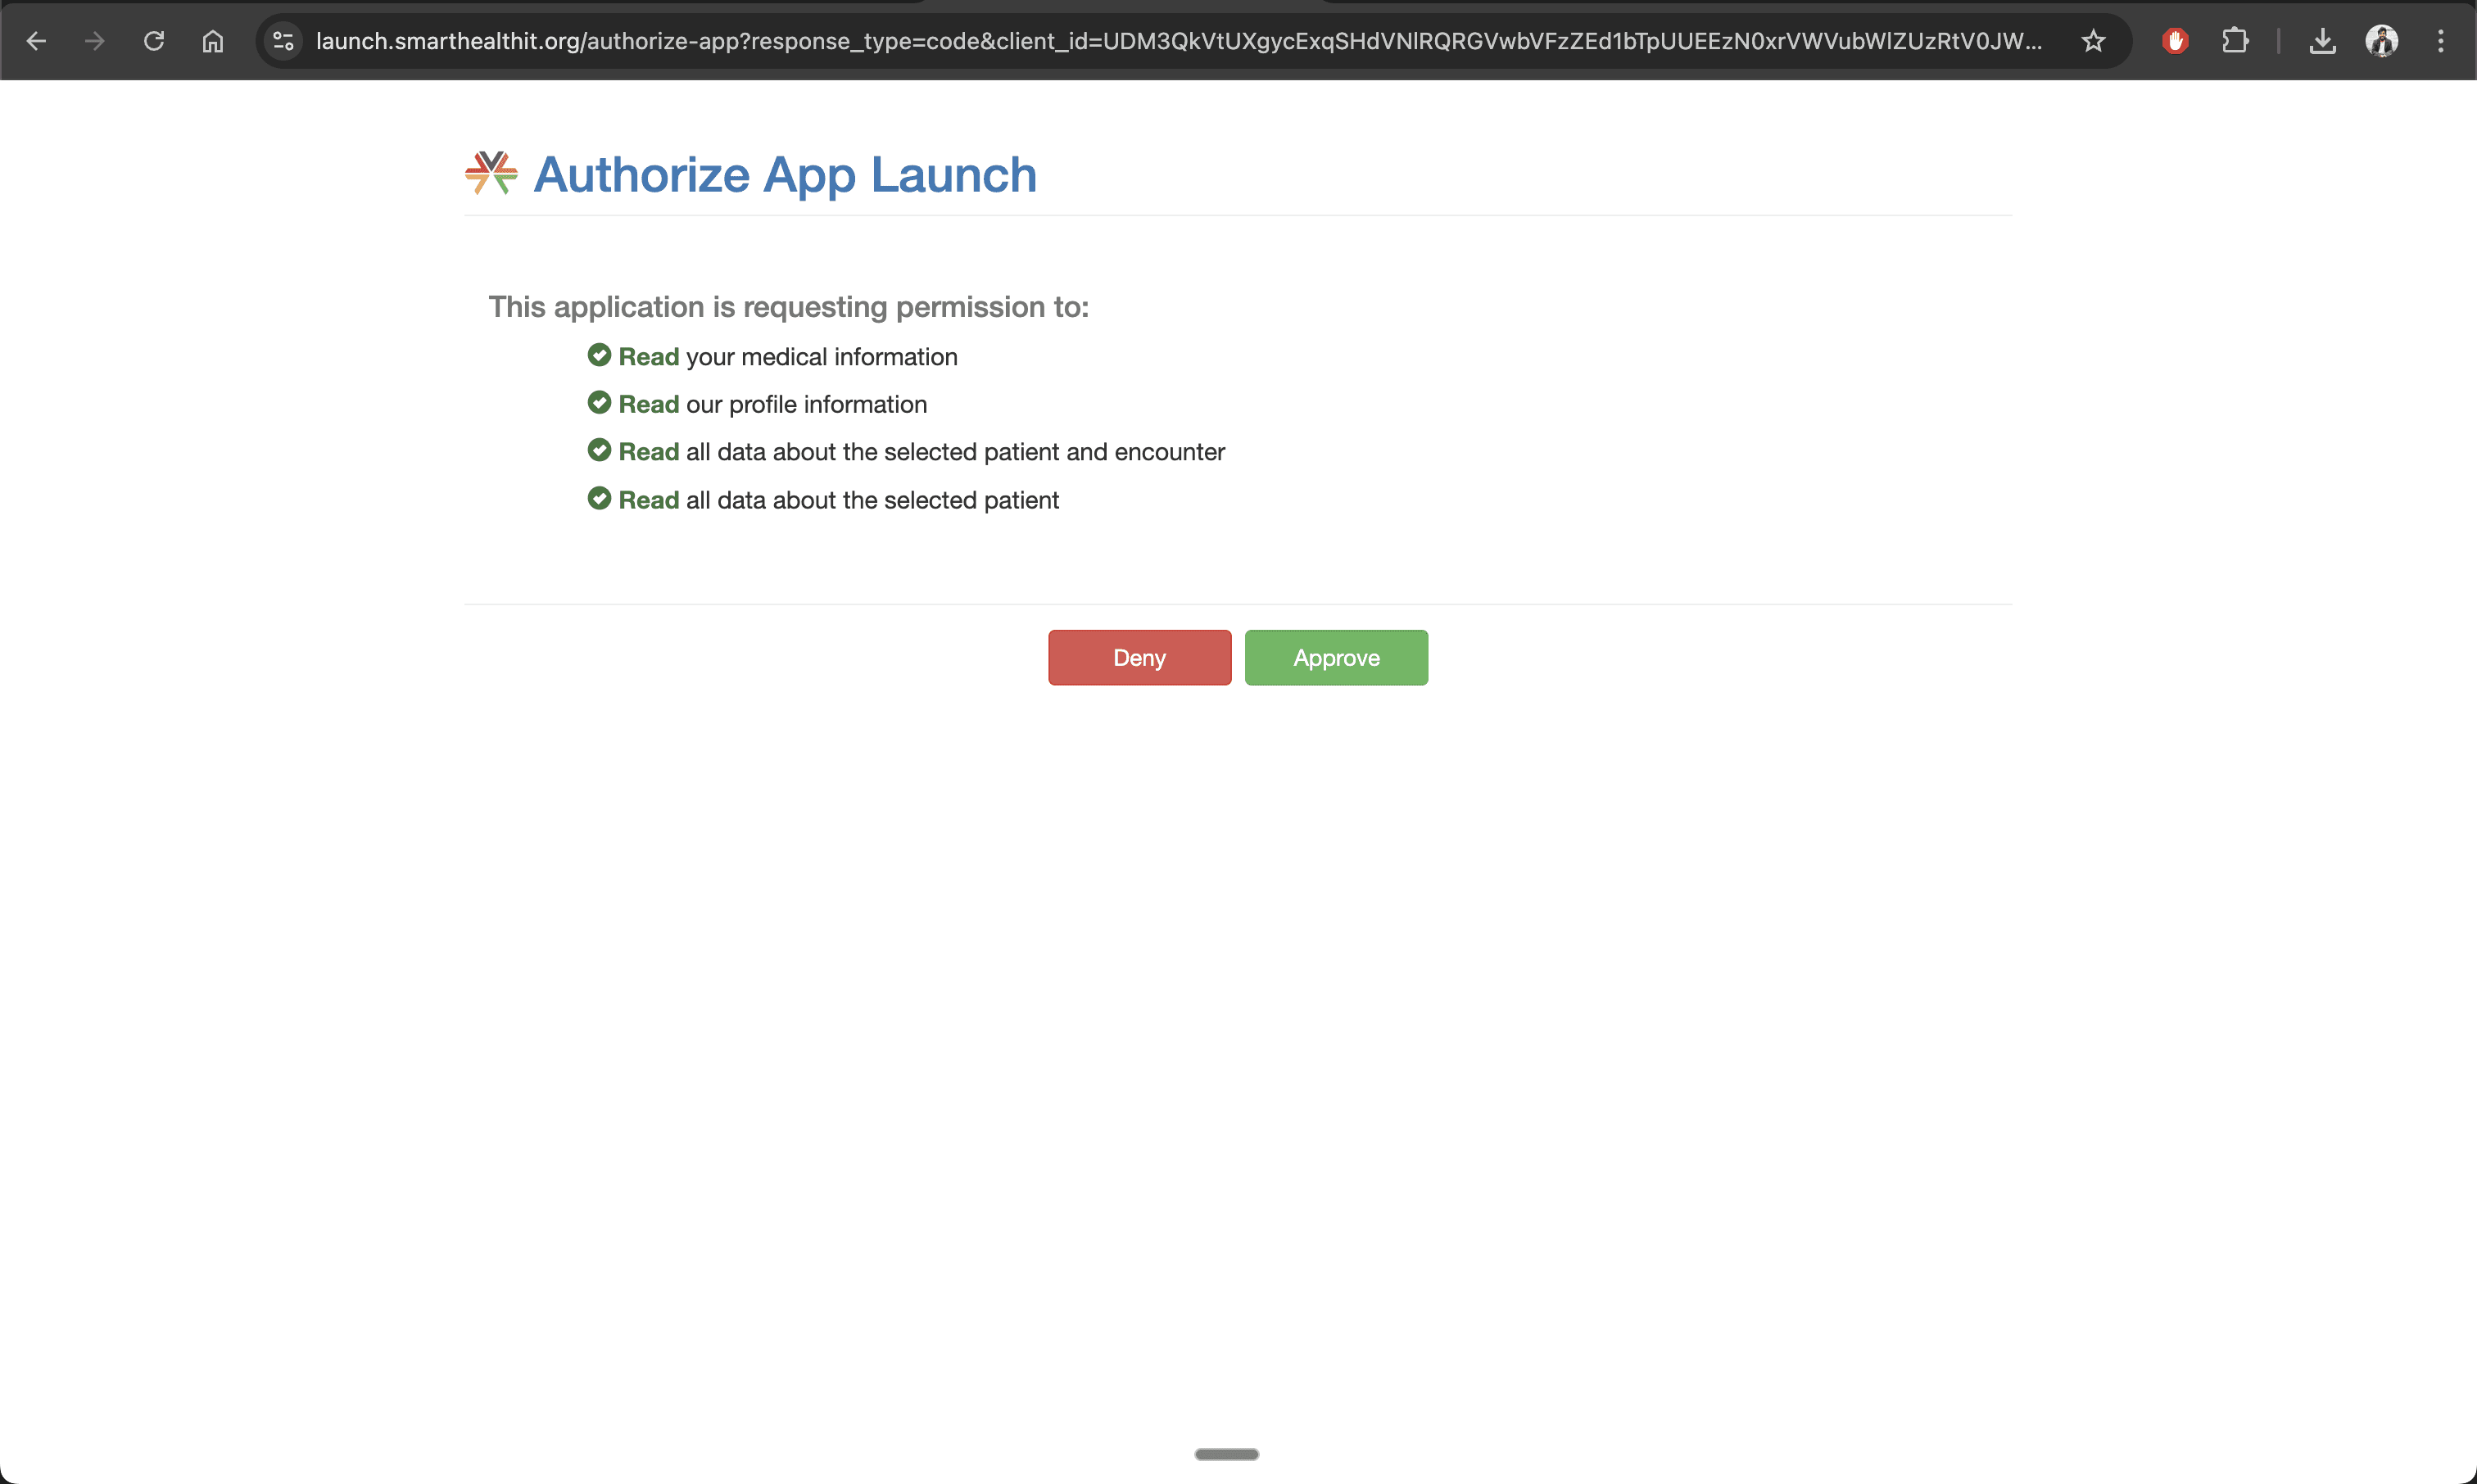
Once you authenticate, you will be redirected to the inbound app consent screen like this:
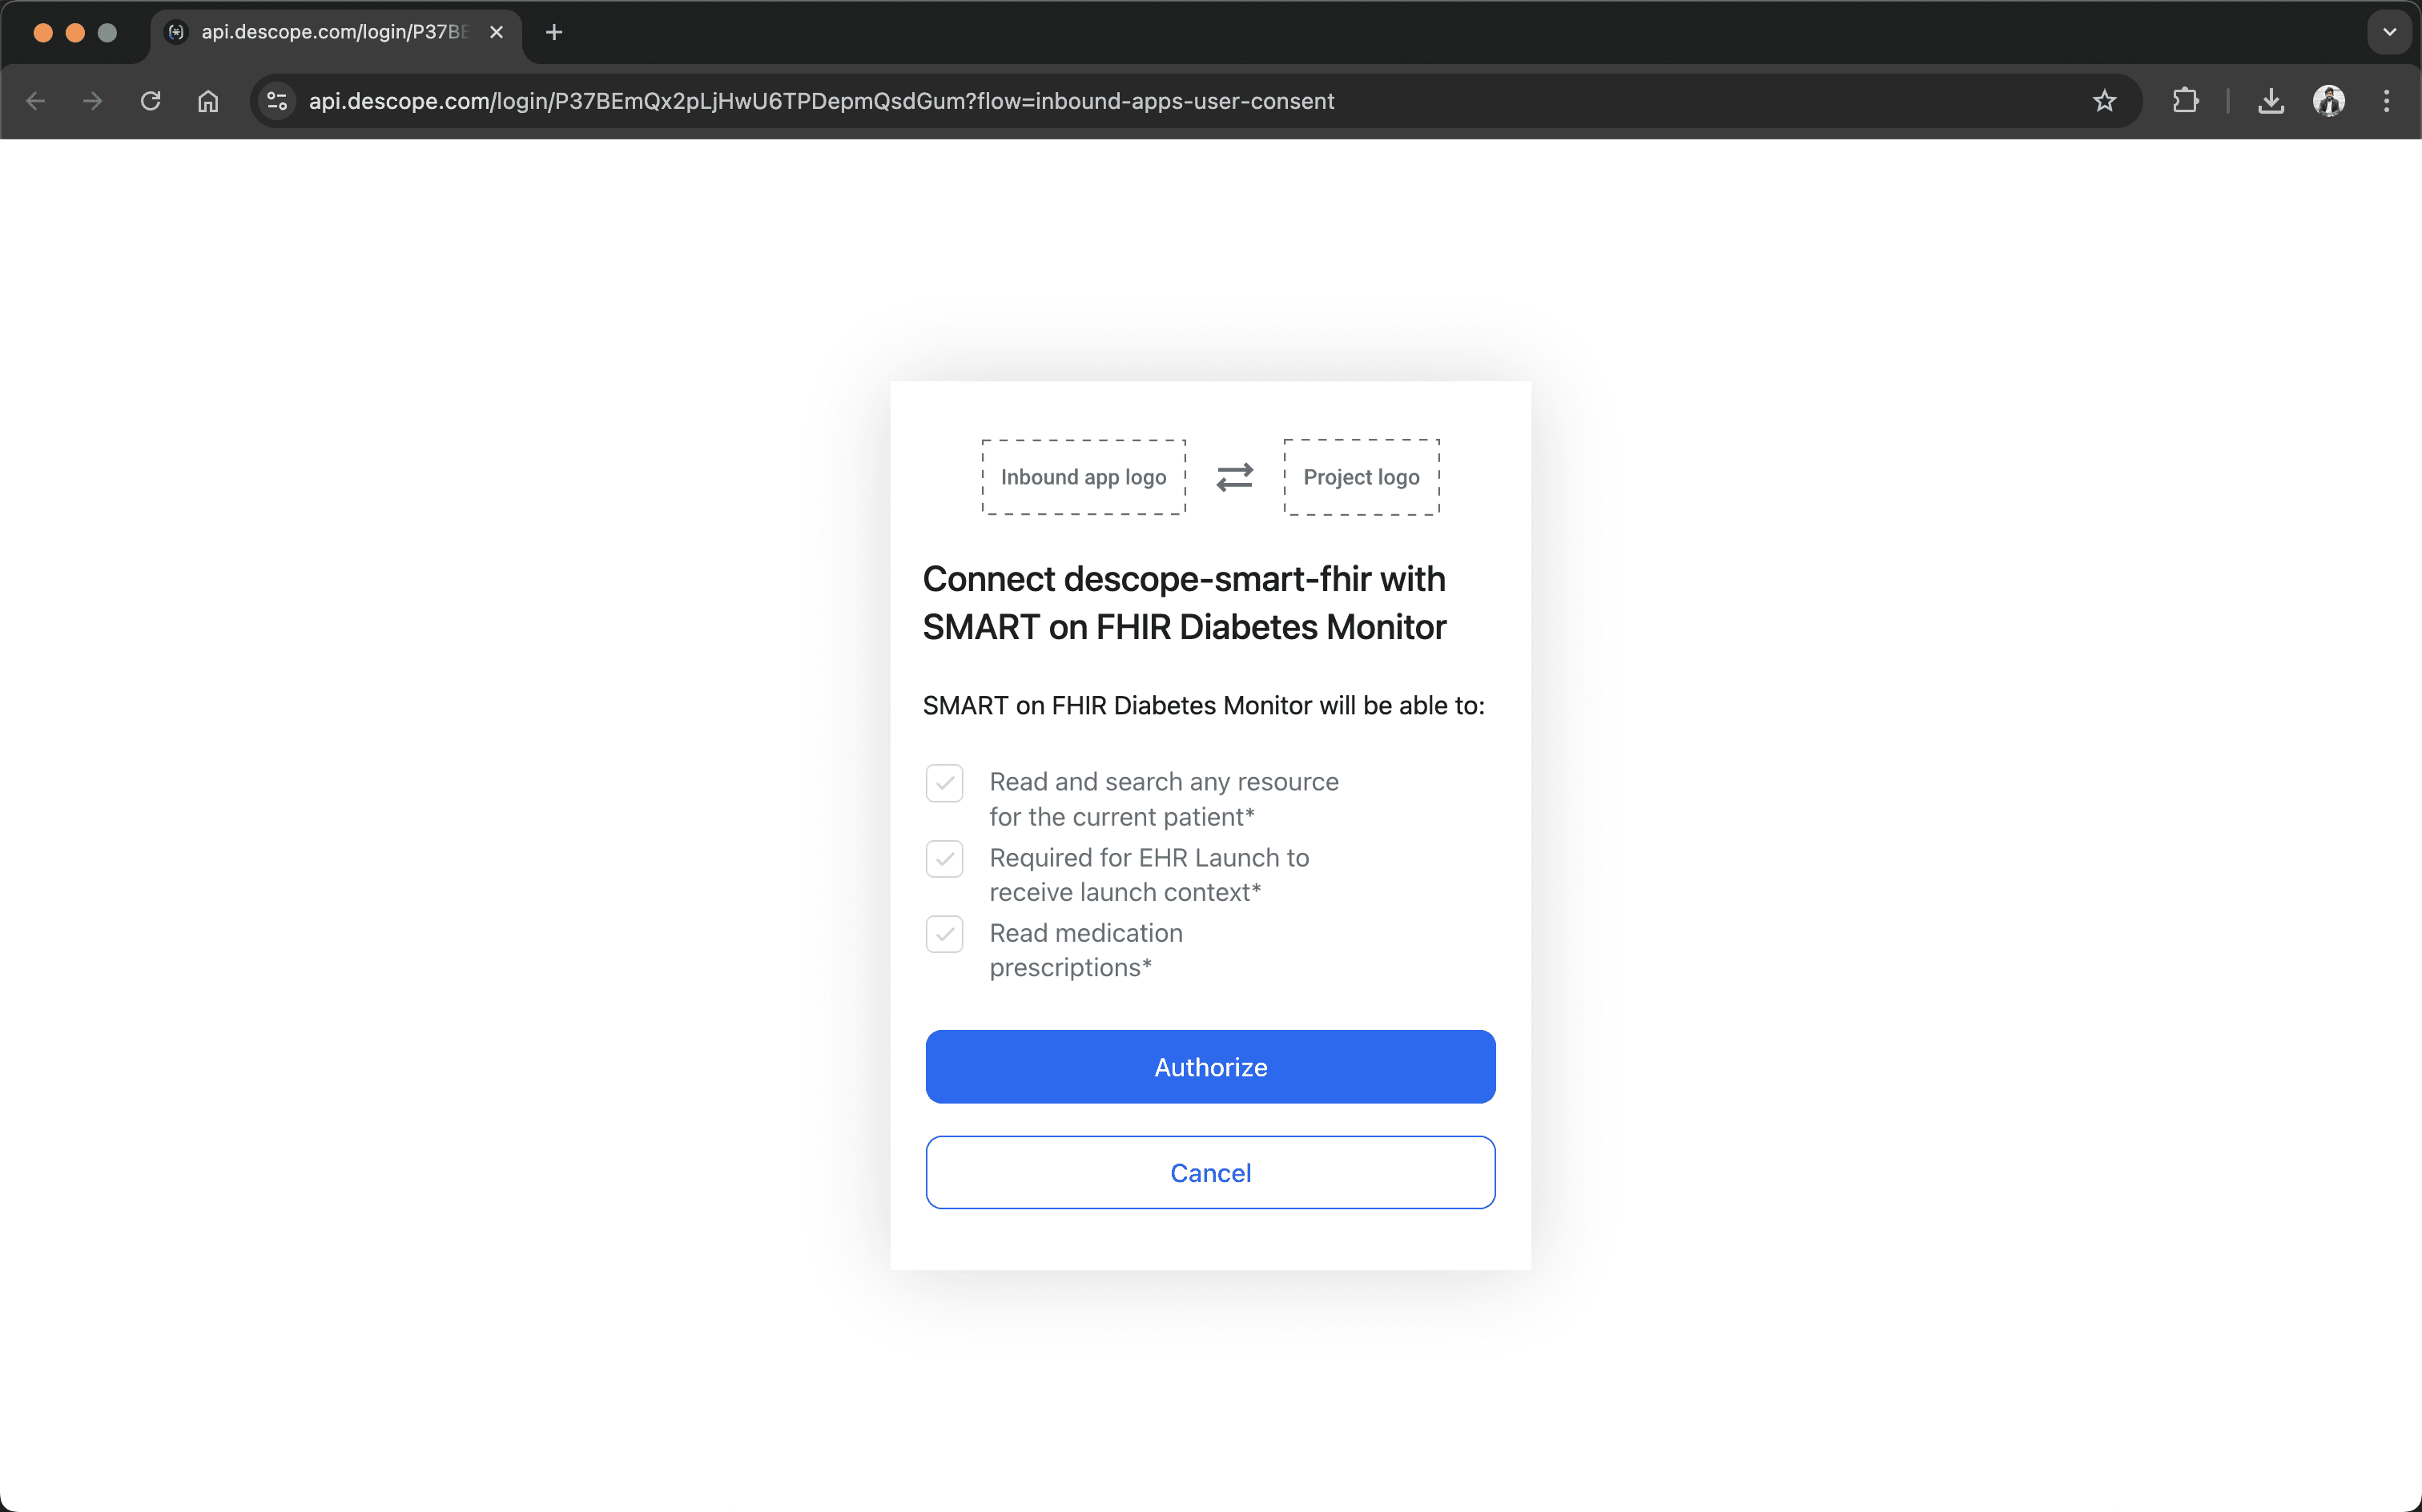
After providing approval on the consent screen, click Authorize on the next screen to allow the app to access FHIR data.
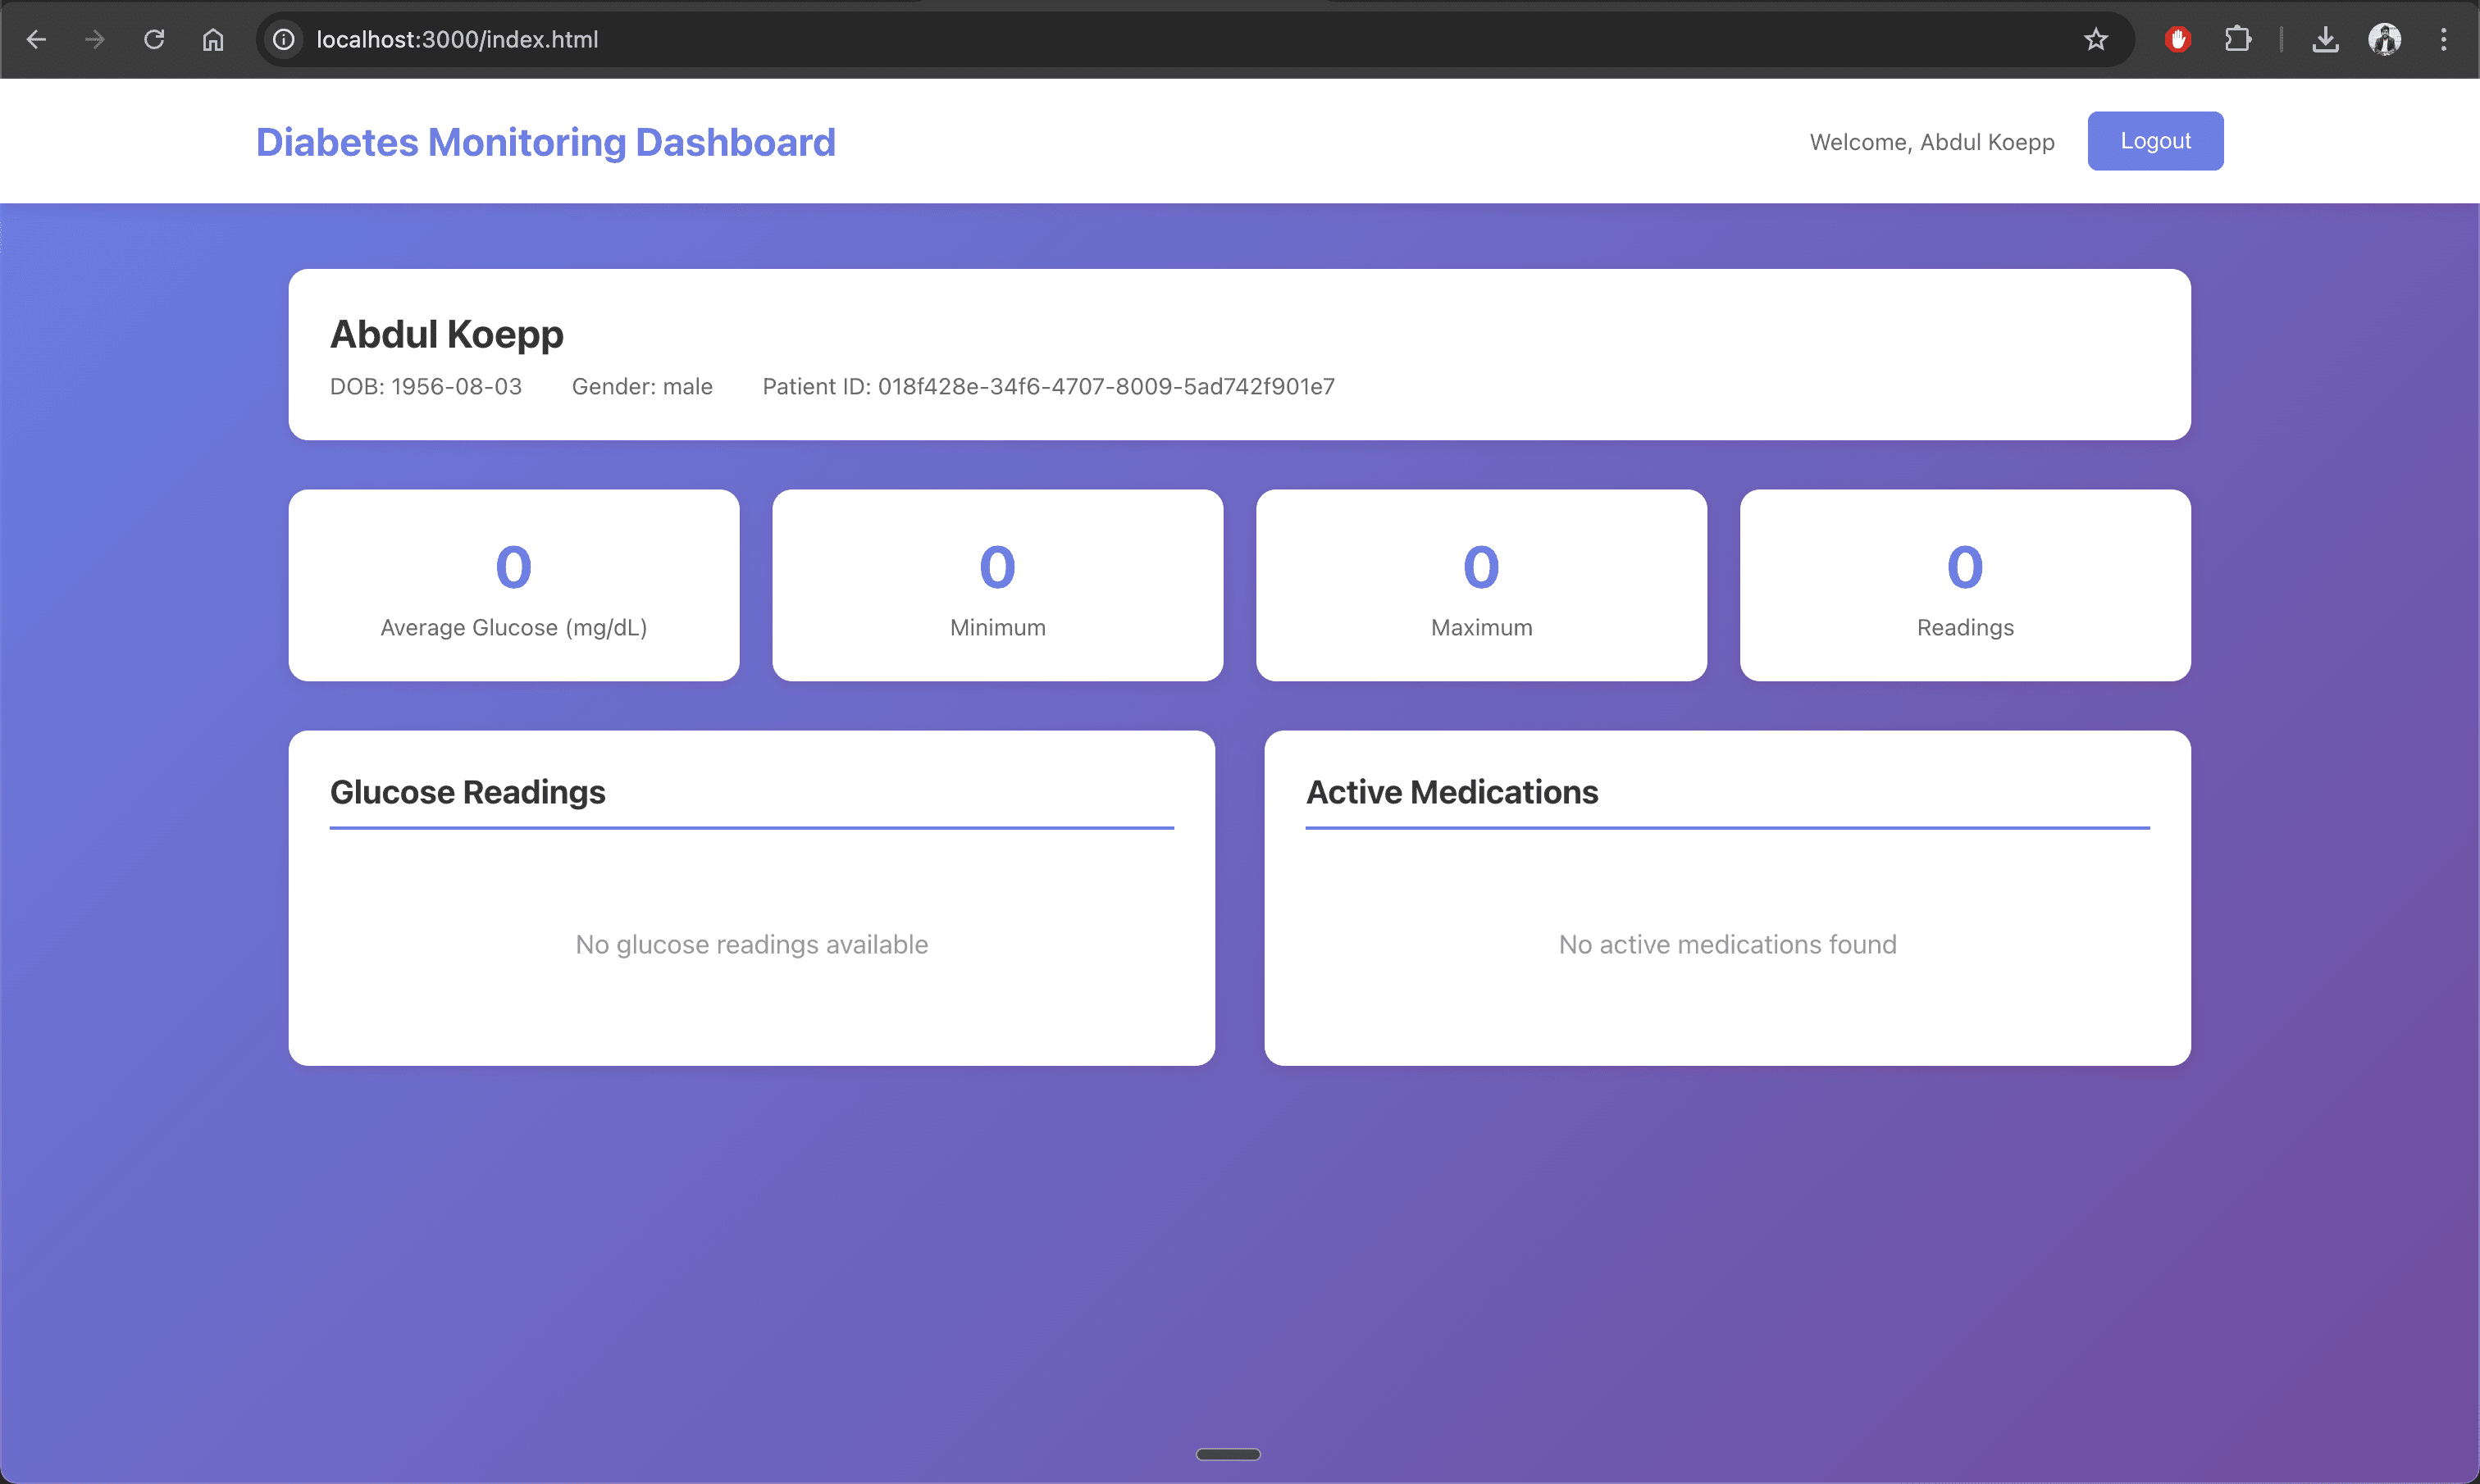
Finally, you'll be redirected to the diabetes monitoring dashboard with patient details displayed on it.
Conclusion
SMART on FHIR enables interoperable healthcare apps, but its authentication, consent, and launch requirements are complex. Supporting EHR-driven launches, SMART scopes, and required claims like patient and fhirUser adds meaningful overhead for development teams.
In this article, you learned how to use Descope to simplify SMART on FHIR app development. By offloading identity and authorization complexity, developers can focus on healthcare features and securely access EHR data via the FHIR API. You can find this tutorial's complete source code on GitHub.
Sign up for a Free Forever Descope account and request a demo to learn more.