

Table of Contents
Don't have the time to read the entire post? Our human writers will be sad, but we understand. Summarize the post with your preferred LLM here instead.
Need to add authentication to your command-line tool? Most command-line applications rely on API keys, manual token management, and other methods that create friction for users who just want to get authenticated.
In this blog, we’ll walk through the challenges of CLI authentication and how to implement it seamlessly with Descope Inbound Apps. We’ll also show how to bring OAuth 2.0 directly to your CLI app with code examples in Go.
What is CLI authentication?
In the context of command-line applications, authentication presents a unique challenge: how do you securely authenticate users in an environment that traditionally lacks the interactive elements of web applications?
Most CLI tools handle this via the tedious storage of API keys in configuration files or environment variables. This approach creates friction for users and introduces security risks as a byproduct of storing credentials in plain text or across systems.
Consider this scenario: You switch to a new laptop and need to set up various CLI applications, such as deployment tools, database clients, cloud service CLIs, and internal company tools. For each of these tools, you will need to generate API keys from different dashboards, make new cryptic environment variables to store these values, and save them in obscure configuration files.
Now, you have API keys scattered across config files and tokens with overly broad permissions because of mishandled scoping. And eventually when you leave your company, IT will have no way to revoke access to these tools with these keys. This is the tax of API key storage for authentication and the potential security nightmare.
CLI authentication using OAuth 2.0 solves this by bringing the familiar browser-based authentication flow directly to terminal applications. Users are able to authenticate through the same OAuth providers and flows they use in web applications.
How authentication looks with Descope Inbound Apps
Inbound apps in Descope turn your application into an identity provider, making it compliant with OAuth standards and allowing third-party applications, APIs, and tools to authenticate and access authorized user data through a user consent flow with scope-based access control. They also handle OAuth flows and contain the necessary credentials for OAuth parameters, redirect URIs, and authentication settings.
If you would like to learn more, check out our blog on Inbound Apps.
When a user runs an authentication command, or any command that requires authentication to use, the CLI tool generates an OAuth authorization URL corresponding to your Inbound App and opens the link in the user’s default browser. The user then proceeds to complete the standard OAuth flow in their browser, signing in and authorizing the inbound app. Finally, the CLI app will receive the authorization callback with the necessary tokens to act on the user’s behalf.
Example: CLI authentication in Golang
Now that we understand the purpose of CLI authentication and what our authentication flow looks like with Descope Inbound Apps, we can implement our own sample application.
Prerequisites and set up
Before we dive into our CLI application, make sure you have Go 1.19 or later and a configured Descope Inbound App. If you’re new to Descope, no problem. To get started, sign up for a free account on Descope Get started docs.
Step 1: Create your Descope Inbound App
Navigate to your Descope console and click on Inbound Apps in the left sidebar.
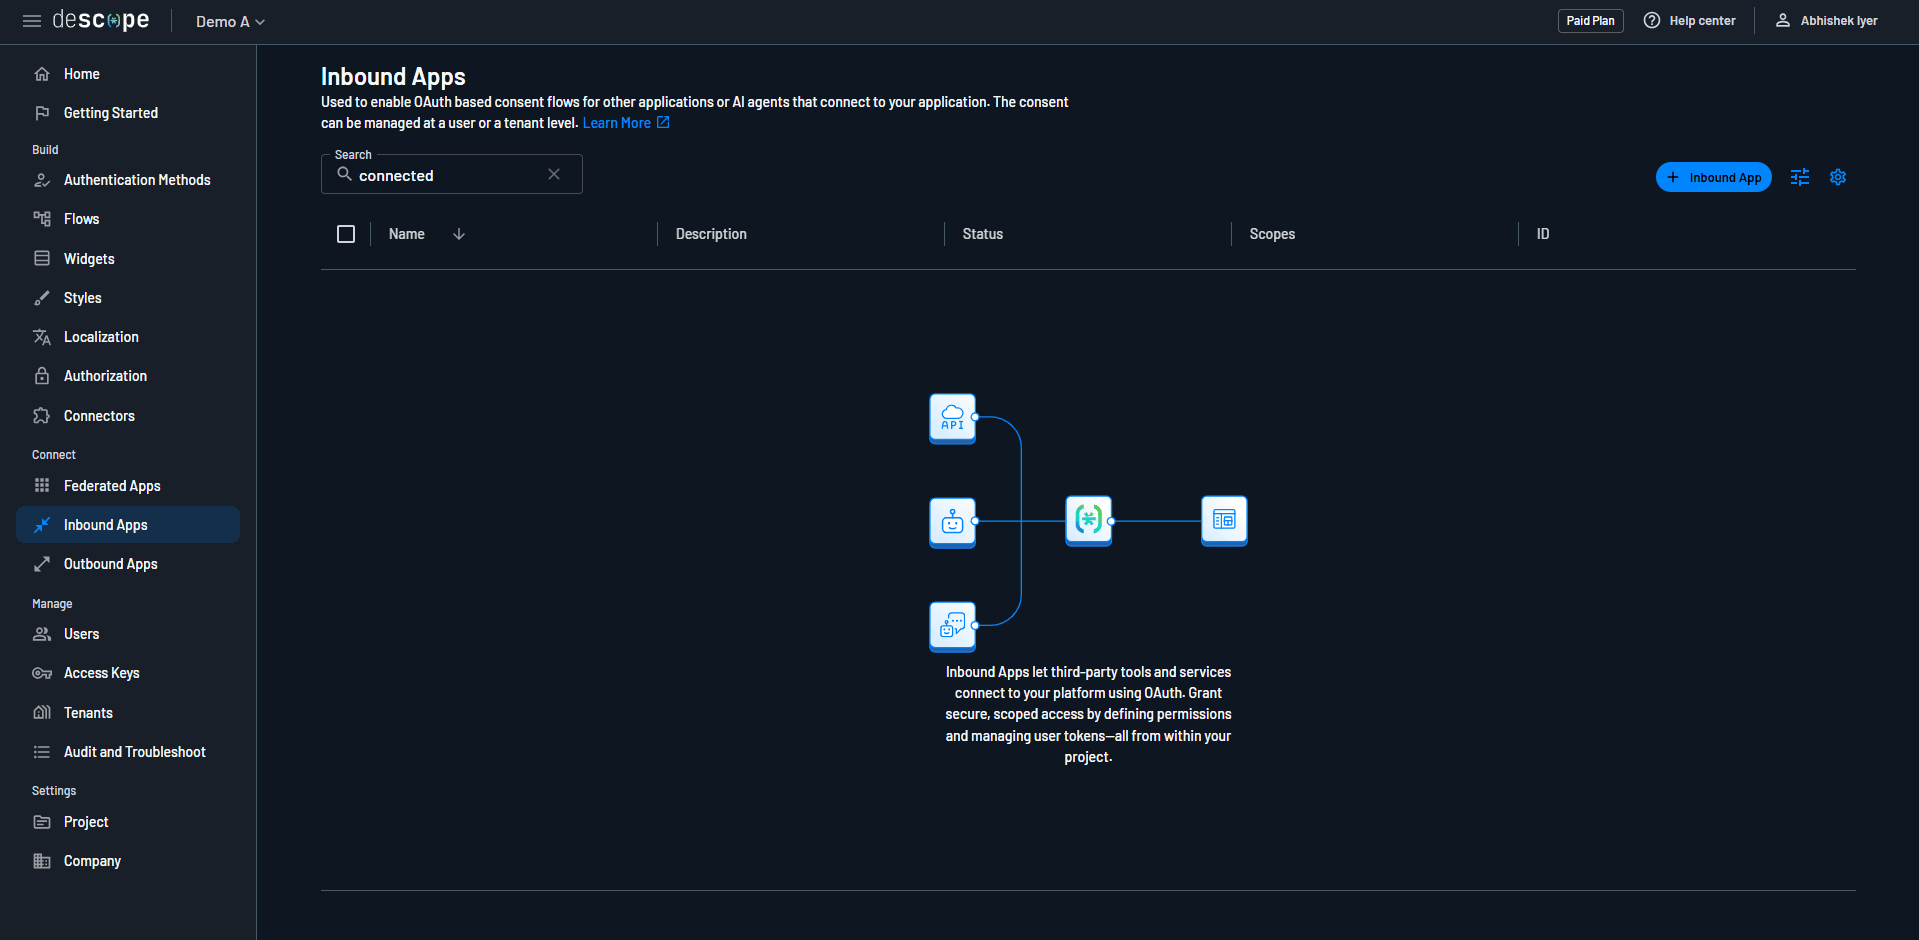
Click the + Inbound App button and give your app a name. Once created, you can configure scopes and view your connection information.
Step 2: Set up your Go command-line app with Cobra
To initialize your new Go module and install the Cobra generator, run:
go mod init <your-module-name> &&
go install github.com/spf13/cobra-cli@latest &&
go get github.com/spf13/cobra &&
cobra-cli init
Now, you will see your basic project structure including your main application file (main.go) and a cmd folder containing your root.go file.
You should see the following in the root.go file:
package cmd

import (
	"os"
	"github.com/spf13/cobra"
)

var rootCmd = &cobra.Command{
	Use:   "clidemo",
	Short: "A brief description of your application",
	Long: `A longer description that spans multiple lines and likely contains examples and usage of using your application. For example: Cobra is a CLI library for Go that empowers applications. This application is a tool to generate the needed files to quickly create a Cobra application.`,
	Run: func(cmd *cobra.Command, args []string) {},
}

func Execute() {
	err := rootCmd.Execute()
	if err != nil {
		os.Exit(1)
	}
}

func init() {
	rootCmd.Flags().BoolP("toggle", "t", false, "Help message for toggle")
}
For the purposes of the demonstration, we will be using the Run in rootCmd in order to run our authentication flow upon program execution.
Step 3: Configuring your Inbound App
Connecting to your Inbound App requires setting up the relevant credentials. The form of the configuration will look like this:
type InboundAppConfig struct {
	Issuer                            string
	JwksURI                          string
	AuthorizationEndpoint            string
	ResponseTypesSupported           []string
	SubjectTypesSupported            []string
	IdTokenSigningAlgValuesSupported []string
	CodeChallengeMethodsSupported    []string
	TokenEndpoint                    string
	UserInfoEndpoint                 string
	ScopesSupported                  []string
	ClaimsSupported                  []string
	RevocationEndpoint               string
	RegistrationEndpoint             string
}

// then, in your Run function, define your configuration
// the base URL and project ID should be defined as environmental variables
config := InboundAppConfig{
	Issuer:                            DESCOPE_BASE_URL + "/v1/apps/" + DESCOPE_PROJECT_ID,
	JwksURI:                          DESCOPE_BASE_URL + "/" + DESCOPE_PROJECT_ID + "/.well-known/jwks.json",
	AuthorizationEndpoint:            DESCOPE_BASE_URL + "/oauth2/v1/apps/authorize",
	ResponseTypesSupported:           []string{"code"},
	SubjectTypesSupported:            []string{"public"},
	IdTokenSigningAlgValuesSupported: []string{"RS256"},
	CodeChallengeMethodsSupported:    []string{"S256"},
	TokenEndpoint:                    DESCOPE_BASE_URL + "/oauth2/v1/apps/token",
	UserInfoEndpoint:                 DESCOPE_BASE_URL + "/oauth2/v1/apps/userinfo",
	ScopesSupported:                  []string{"openid"},
	ClaimsSupported: []string{
		"iss",
		"aud",
		"iat",
		"exp",
		"sub",
		"name",
		"email",
		"email_verified",
		"phone_number",
		"phone_number_verified",
		"picture",
		"family_name",
		"given_name",
	},
	RevocationEndpoint:    DESCOPE_BASE_URL + "/oauth2/v1/apps/revoke",
	RegistrationEndpoint:  DESCOPE_BASE_URL + "/v1/mgmt/inboundapp/app/" + DESCOPE_PROJECT_ID + "/register",
}
This is a blueprint for the Inbound App, identifying it by the aforementioned connection information.
Next, we create a handler for OpenID Connect discovery requests through the .well-known/openid-configuration endpoint.
http.HandleFunc("/.well-known/openid-configuration", func(w http.ResponseWriter, r *http.Request) {
	w.Header().Set("Content-Type", "application/json")
	w.Header().Set("Access-Control-Allow-Origin", "*")
	w.Header().Set("Access-Control-Allow-Methods", "GET, OPTIONS")
	w.Header().Set("Access-Control-Allow-Headers", "Content-Type, mcp-protocol-version")

	if r.Method == http.MethodOptions {
		w.WriteHeader(http.StatusNoContent)
		return
	}

	json.NewEncoder(w).Encode(config) // using our Inbound App config
})
Step 4: Generating an OAuth URL
Creating the parameters for the OAuth URL requires creating an OAuth2 CSRF state, a PKCE code verifier, and a code challenge. The state prevents Cross-Site Forgery attacks, verifying that the state remains the same when starting the OAuth2 flow and when redirecting back to the app.
The Proof Key for Code Exchange code verifier is hashed in the code challenge, and the server verifies the two values are corresponding when exchanging the authorization code for tokens.
To create these parameters, we will make a util.go class for the associated functions.
func randomString(n int) string { // used to generate the state & verifier
	b := make([]byte, n)
	rand.Read(b)
	return base64URLEncode(b)
}

func sha256Hash(input string) []byte { // for hashing the verifier
	h := sha256.New()
	h.Write([]byte(input))
	return h.Sum(nil)
}

func base64URLEncode(data []byte) string { // for encoding the string & hash
	return strings.TrimRight(base64.URLEncoding.WithPadding(base64.NoPadding).EncodeToString(data), "=")
}
Then, in root.go, we create the authorization URL using the authorization endpoint and params:
state := randomString(16)
codeVerifier := randomString(64)
codeChallenge := base64URLEncode(sha256Hash(codeVerifier))

params := url.Values{
	"response_type":         {"code"},
	"client_id":             {DESCOPE_CLIENT_ID},
	"redirect_uri":          {REDIRECT_URI},
	"scope":                 {""},
	"state":                 {state},
	"code_challenge":        {codeChallenge},
	"code_challenge_method": {"S256"},
}

authURL := config.AuthorizationEndpoint + "?" + params.Encode()
Step 5: Authorization callback and retrieving tokens
Now, we will set up a channel to receive our authorization code and exchange it for tokens. Go makes this elegant:
codeChan := make(chan string) // channel receiving strings
srv := &http.Server{Addr: ":8080"} // server to listen to
Since the redirect URI is configured to http://localhost:8080/callback (can be configured to a custom redirect URI), we set up an HTTP server listening on port 8080 to handle the OAuth callback response.
We then handle the OAuth callback through a couple of steps:
Error handling
Verify that the OAuth provider did not send back any error.
if errorCode := r.URL.Query().Get("error"); errorCode != "" {
	errorDesc := r.URL.Query().Get("error_description")
	log.Printf("OAuth Error: %s - %s", errorCode, errorDesc)
	http.Error(w, fmt.Sprintf("OAuth error: %s - %s", errorCode, errorDesc), http.StatusBadRequest)
	return
}
State validation
Compare the state parameter of the callback URL to the originally generated CSRF state.
if r.URL.Query().Get("state") != state {
	http.Error(w, "Invalid state", http.StatusBadRequest)
	return
}
Authorization code extraction
Look for the code parameter of the callback URL provided after successful login.
code := r.URL.Query().Get("code")
if code == "" {
	http.Error(w, "Missing code", http.StatusBadRequest)
	return
}
Success!
Receive the authorization code and output a success on the page for visual representation.
fmt.Fprintln(w, "Login successful! You may close this browser window.")
codeChan <- code
Opening the browser, posting, and fetching the token
We want the user to interact with the authorization URL to proceed with the callback. In order to open the user browser, we add the following to our util.go:
func openBrowser(url string) {
	var cmd string
	var args []string

	switch runtime.GOOS {
	case "windows":
		cmd = "rundll32"
		args = []string{"url.dll,FileProtocolHandler", url}
	case "darwin":
		cmd = "open"
		args = []string{url}
	default:
		cmd = "xdg-open"
		args = []string{url}
	}

	exec.Command(cmd, args...).Start()
}
The function will call the corresponding shell command to open the user’s browser for their respective operating system. Our next steps to retrieve the token response will be to post a request to the token endpoint of the following form:
"grant_type":     {"authorization_code"}, // grant by auth code
"client_id":      {DESCOPE_CLIENT_ID},    // your inbound app client id
"code":           {code},                 // the code fetched from the channel
"redirect_uri":   {REDIRECT_URI},         // your redirect URI
"code_verifier":  {codeVerifier},         // previously calculated verifier
And, putting it all together with a final authentication message on the CLI app:
openBrowser(authURL)
code := <-codeChan
srv.Shutdown(context.Background())

resp, err := http.PostForm(config.TokenEndpoint, url.Values{
    "grant_type":     {"authorization_code"},
    "client_id":      {DESCOPE_CLIENT_ID},
    "code":           {code},
    "redirect_uri":   {REDIRECT_URI},
    "code_verifier":  {codeVerifier},
})

if err != nil {
    log.Fatalf("Token exchange error: %v", err)
}

defer resp.Body.Close()

if resp.StatusCode != http.StatusOK {
    log.Fatalf("Token exchange failed with status: %d", resp.StatusCode)
}

var tokenResp map[string]interface{} // response format in Go

if err := json.NewDecoder(resp.Body).Decode(&tokenResp); err != nil {
    log.Fatalf("Invalid token response: %v", err)
}

fmt.Println("Welcome! You have successfully authenticated with Descope")
Visualizing the Flow
Run your application:
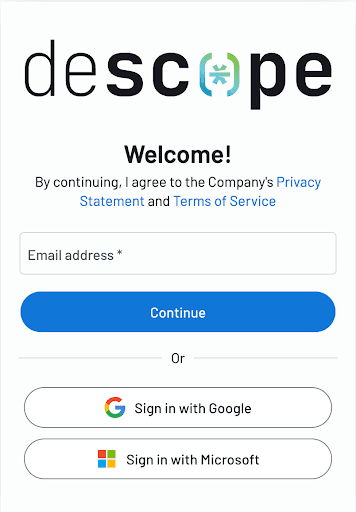
go run main.goThen, your browser will open a new page:
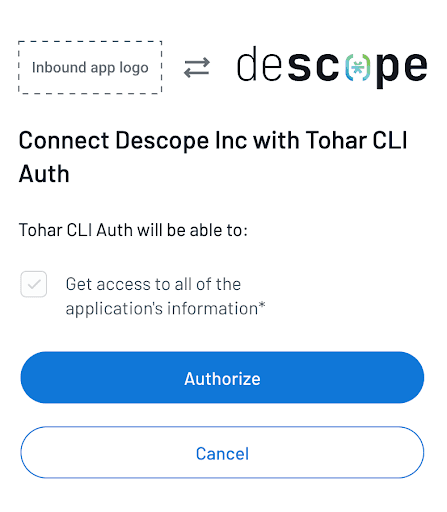
Sign in with your preferred method. You will then be prompted to authorize:
Next, you will see the browser output after authenticating the user and successfully authorizing the Inbound App:
Login successful! You may close this browser window.Finally, the CLI app will print a success message after receiving the authorization callback:
Welcome! You have successfully authenticated with Descope Inbound Apps.If you would like to see the full sample code, it is available in our Github repository.
CLI authentication made simpler with Descope
CLI auth with Descope Inbound Apps makes your command-line authentication flow smoother, safer, and free of user friction. Users will be able to authenticate with the same OAuth providers and flows they use in web applications, providing a seamless and familiar experience.
Sign up for a Free Forever Descope account now to start creating frictionless CLI authentication flows. You can also dive into more auth best practices by joining AuthTown, our community of developers building better identity experiences. Got questions about Descope? Book time with our auth experts.