
Table of Contents
Don't have the time to read the entire post? Our human writers will be sad, but we understand. Summarize the post with your preferred LLM here instead.
If you’re looking for a way to integrate passkeys along with fully customizable authentication workflows into your Firebase / GCP Identity app, you've come to the right place.
In this blog, we’ll discuss how you can use Descope as an OpenID Connect (OIDC) provider to manage authentication in a React Firebase app. We’ll also show you how to handle user linking for accounts with identical emails logged in via an OIDC provider and another Firebase account that uses username and password.
Adding passkeys will give GCP MFA inherently, meaning two authentication factors are used to log in. In our passkeys example, these factors are inherence (something you are, like a fingerprint) and possession (something you have, like the device you sign up with).
Note: OpenID Connect (OIDC) is an authentication protocol built on the OAuth 2.0 framework. It enables clients to verify users' identities based on the authentication performed by an authorization server.
How it works
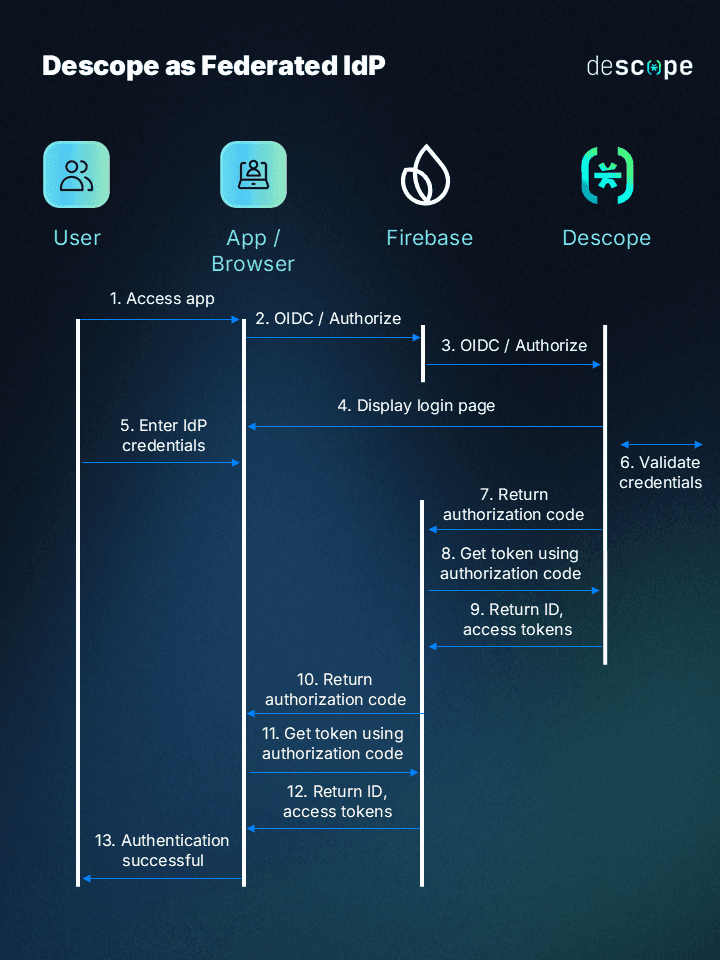
With the power of OpenID Connect, Descope acts as a federated identity provider to handle user authentication while GCP / Firebase acts as the primary identity provider and the user identity information store.
With this integration, new users are automatically created in the Firebase user directory. For existing users that want to sign in with passkeys rather than passwords, there are two different login processes to implement once their passkeys are set up. Either passkeys can exclusively be used as the primary medium for logging in using FirebaseUI, or email can continue to be an option by manually merging user identities with the Firebase SDK. Either option will retain all of the existing user permissions set in Firebase.
The simplified flow diagram below shows how the integration works:
The rest of the blog will go through how to add passkeys to your Firebase app. Let’s get started!
Setting up your Descope Flow
As a reminder, Descope Flows provide a drag-and-drop experience for building user authentication with a few lines of code.
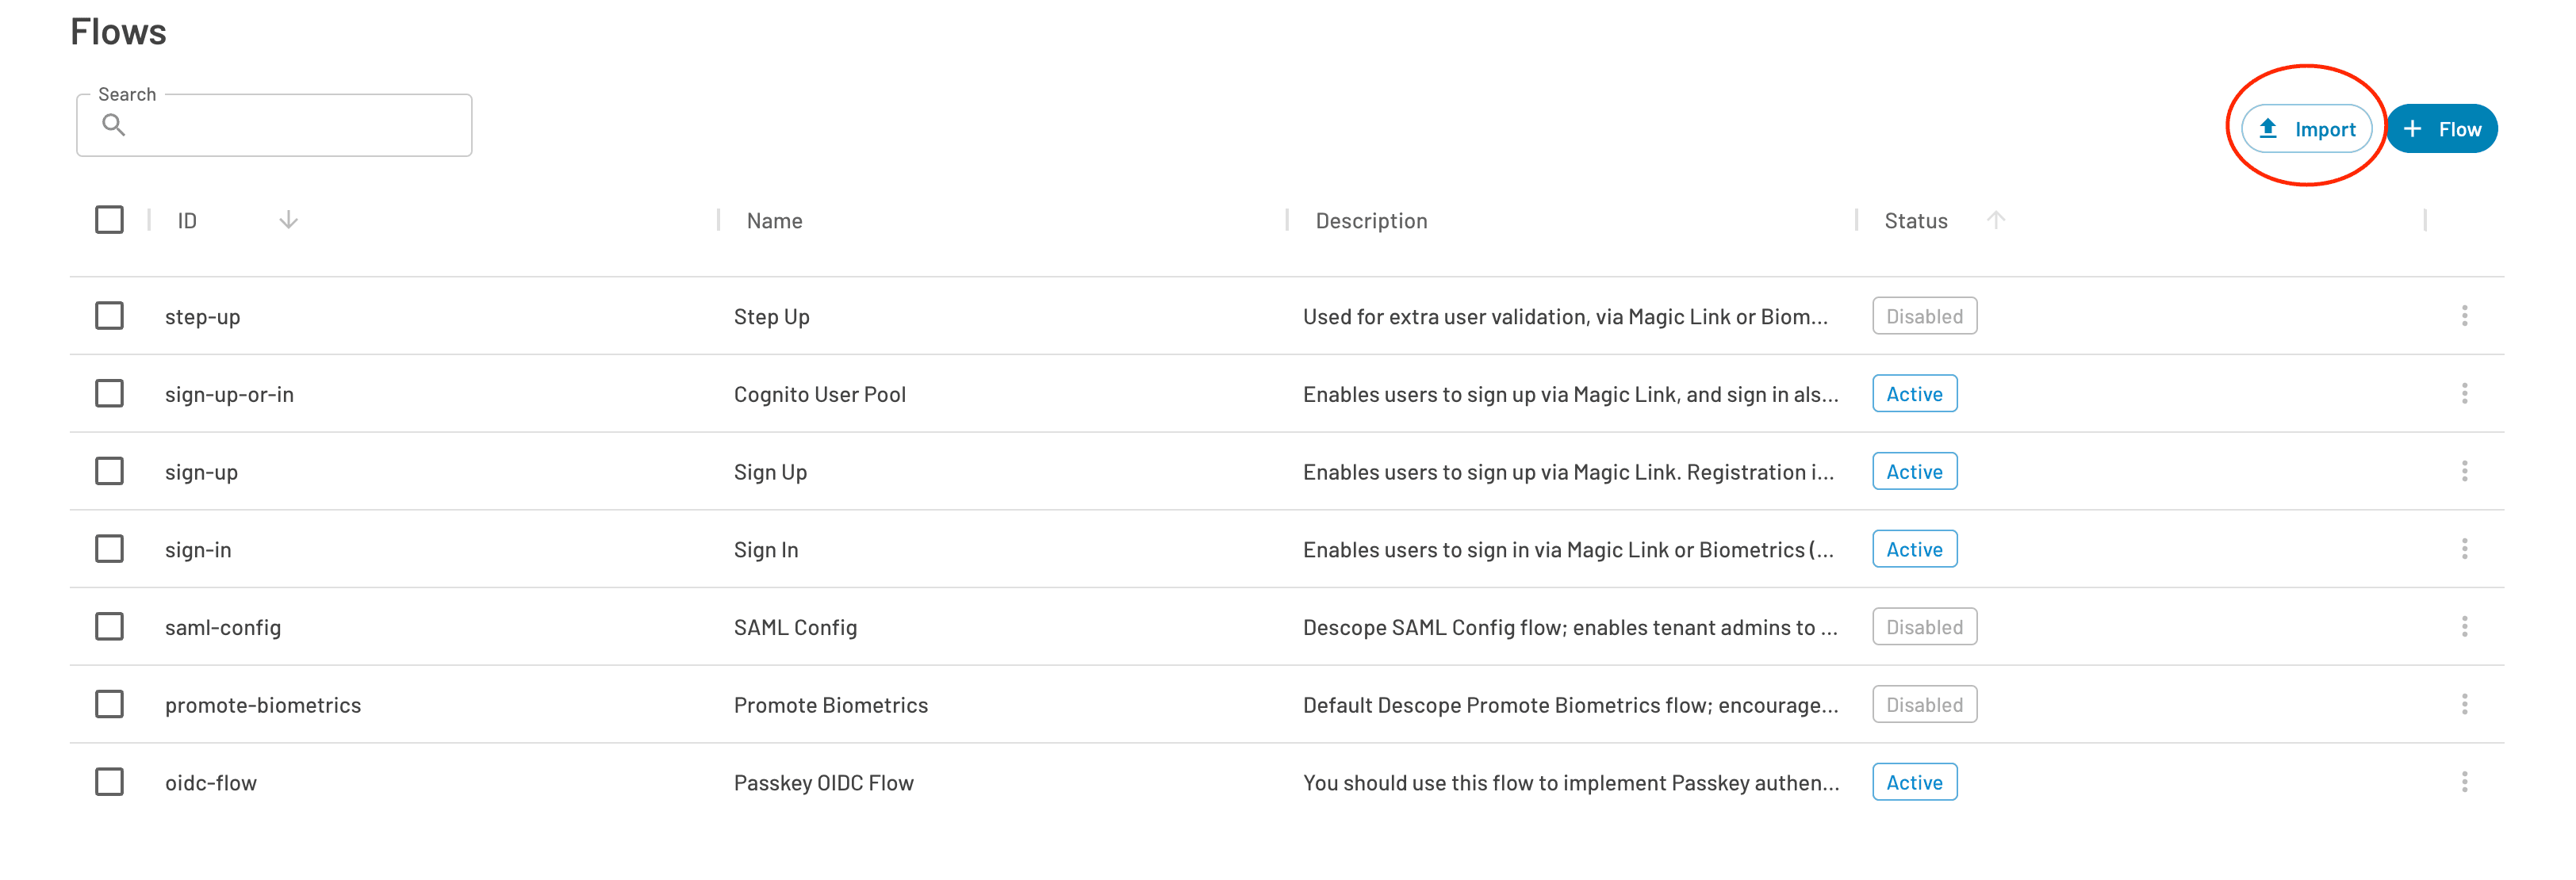
In our sample app repository, you can download the oidc-flow JSON which you can import into your own project. This flow is designed to verify a user via email if they are logging in with Descope the first time. If you decide to design and use your own flow instead, it’s important to make sure that the user is verified, either with their email or phone number, the first time they log in with Descope. This prevents a malicious actor from adding passkeys to another user’s account as a valid authentication method.
You will also need to embed the Flow component using either React or an HTML Web Component in your application, and specify in the Descope Console where it is hosted. This is important because Firebase will need to know where you redirect you to once you select Login with Passkeys on your main application login page.
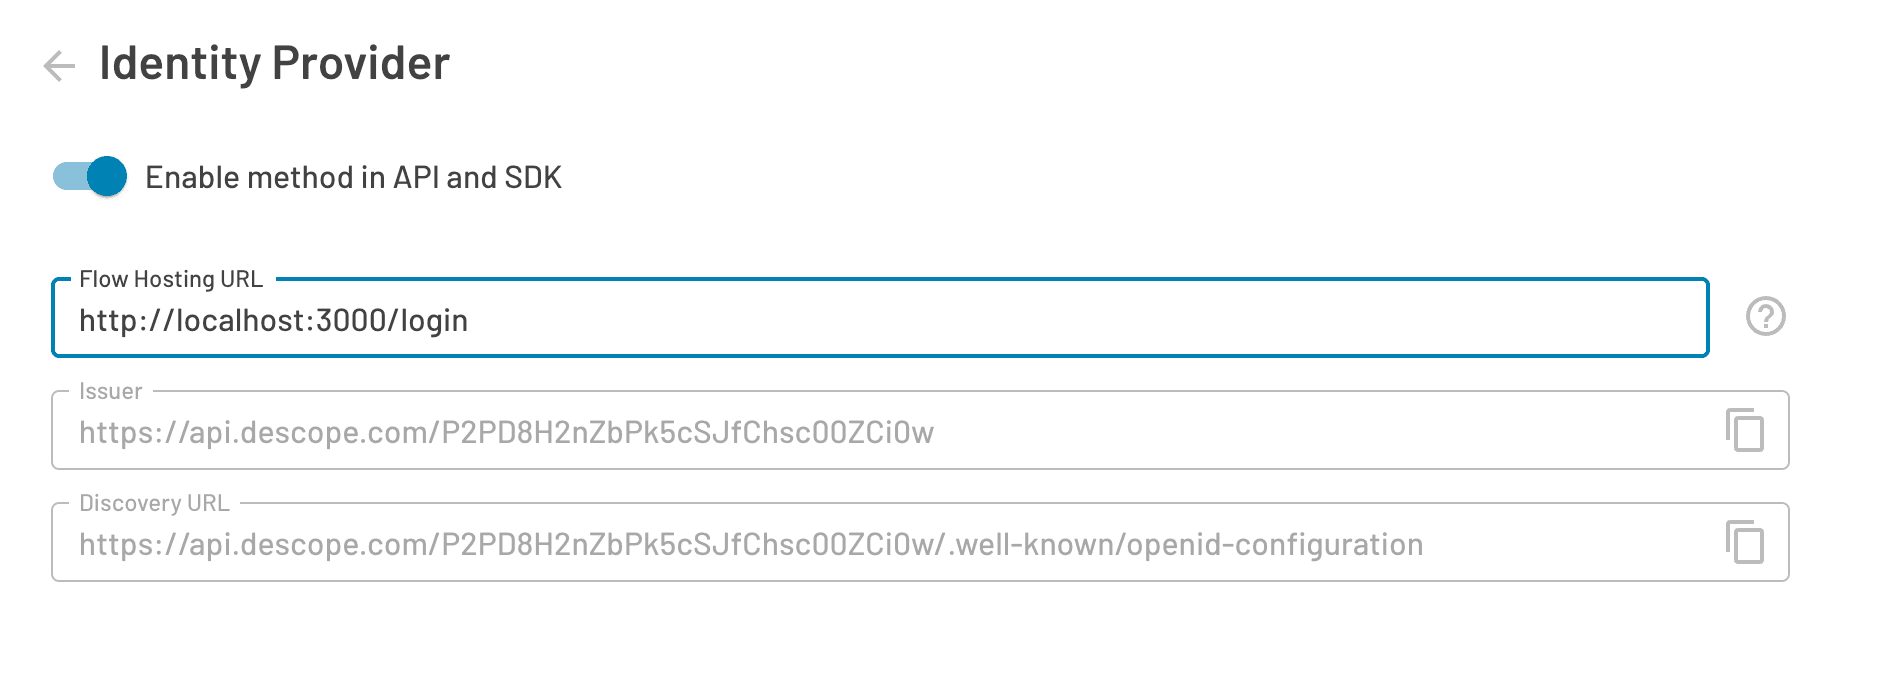
Note: You should keep this page open, as you’re going to need this information for the next part of this blog.
If you would like to edit the UI of the passkey login screen, you can do that in the Flow Editor. Once your flow is complete and your login redirect has been configured, you’ll need to connect your flow to Firebase by setting Descope up as an OIDC provider.
Setting up Descope as an OIDC provider
Let's jump into the setup process to get Descope added as an OIDC provider in your Firebase project.
Navigate to the Firebase Console, select Authentication under Build (in Product Categories), and go to Sign-in method.
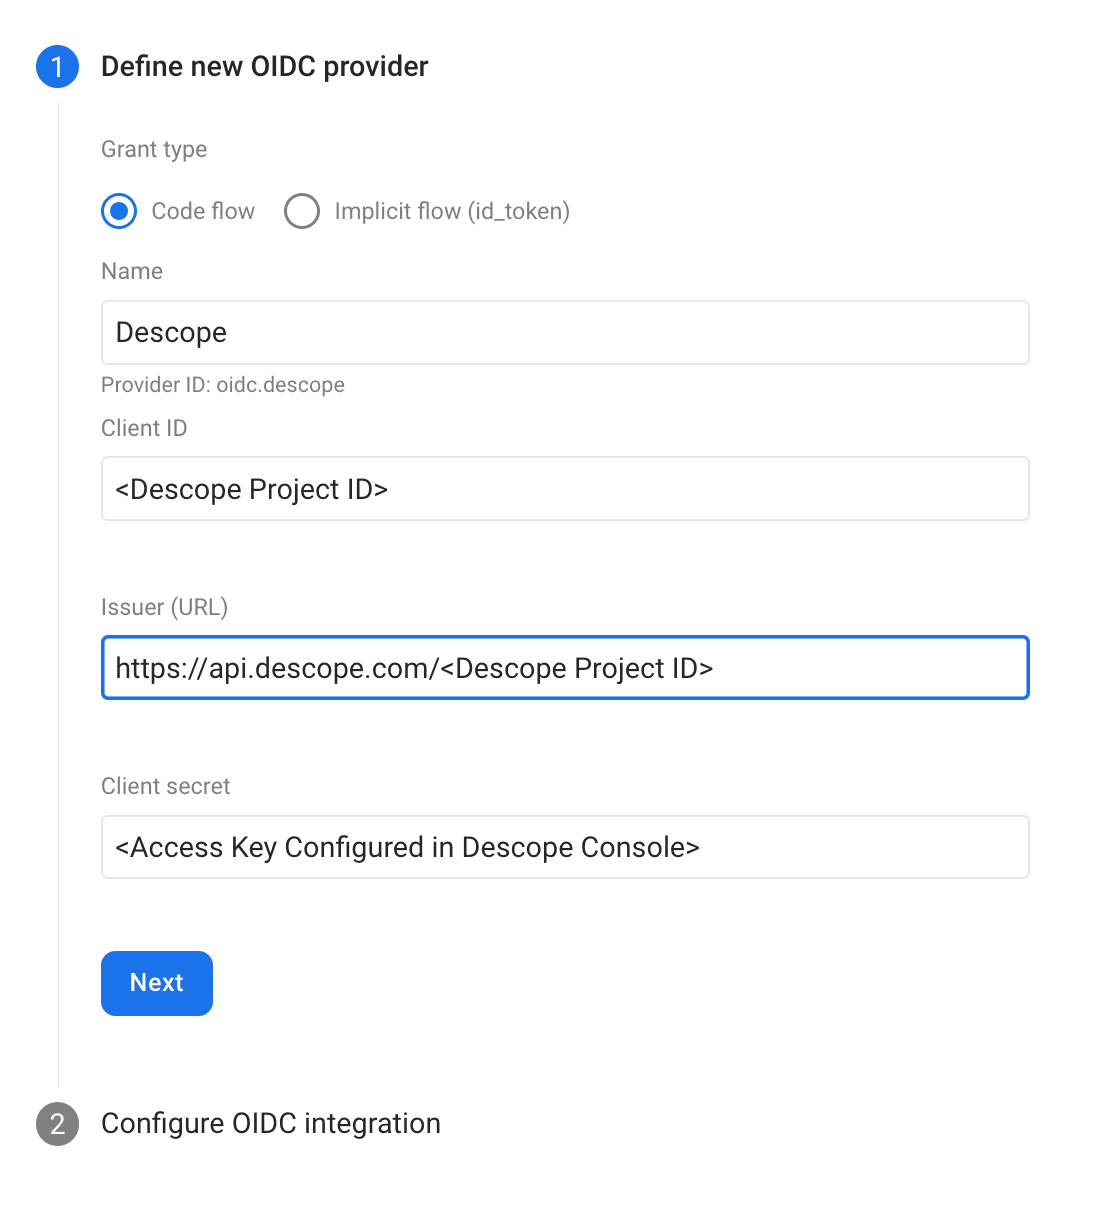
Select Add New Provider in the top right corner, and then click on the OpenID Connect.
Make sure that Code flow is selected and fill in the following necessary details:
Name: Call it Descope
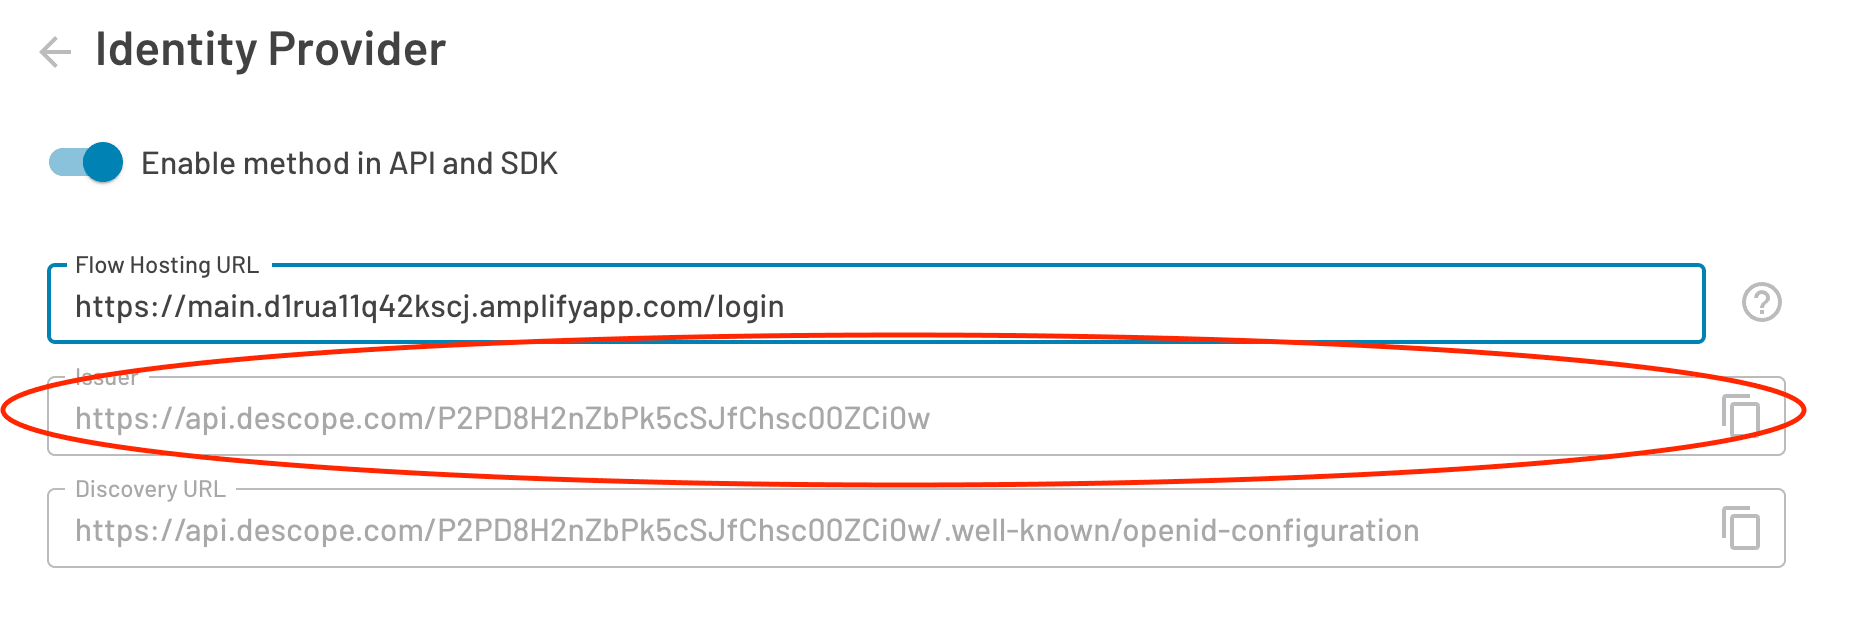
Client ID: Your Descope Project ID, which can be found under Project Settings in the Descope Console
Issuer URL: This is the Issuer URL which is found under your SSO Configuration settings (see below)
Client Secret: Access key generated under Access Keys in the Descope Console
The following screenshot from the Descope Console shows where the issuer URL is located:
Once you’ve gathered all of this information, put it in the Firebase console as shown below:
Once these steps have been completed, you’re all set to implement the new login process and Descope Flow in your application. For this blog, we’ll use a sample React application and Firebase to demonstrate OIDC, which you can find on GitHub.
Firebase authentication SDK
Firebase gives total flexibility on how to configure your login pages and define the overall process, so the instructions below may differ depending on your app implementation.
We will use the Firebase SDK to handle the entire OIDC authentication process, which makes it very simple to implement. It will also help us easily handle user linking, which will be discussed later on. For the login screen UI, the easiest approach is to use FirebaseUI.
If you’ve used Firebase for a while, you may be using the legacy Web namespaced API instead of the Web Modular API. For something simple like authentication, using the legacy Web namespaced API might be simpler as you won’t need to refactor older code using the compat libraries.
Now let’s take a look at how you actually design your login process and add Descope Flows to your Firebase app.
Building out the login page with GCP / Firebase
When designing your login page with Firebase, most developers either choose to use FirebaseUI (a library for customizing your login UI, recommended) or build out the authentication process themselves. In this blog, we’ll show you how to do it with FirebaseUI, and then explain how it can be implemented manually.
If you already have a functioning login page with Firebase, you can skip to the “Embedding Descope in your app” section of the tutorial.
Using FirebaseUI
FirebaseUI is a library provided by Firebase that you can use to quickly implement authentication functionality in your app. FirebaseUI provides pre-made user interface components for authentication and supports multiple authentication methods, including email/password, social login, and most importantly, OIDC.
If you’re already using FirebaseUI, you’ll need to simply add your OIDC provider configuration as a sign-in option in your uiConfig:
signInOptions: [
firebase.auth.EmailAuthProvider.PROVIDER_ID,
"oidc.descope", // "oidc.<The name configured in the Firebase Console>"
],
This will allow FirebaseUI to display a button that will start the OIDC flow and allow the user to log in with Descope instead of Firebase.
Under callbacks, you can also add an arrow function in your uiConfig to navigate to a different protected page like a dashboard. After these additions, your uiConfig will look something like this:
const uiConfig = {
    signInFlow: "redirect",
    signInOptions: [
      firebase.auth.EmailAuthProvider.PROVIDER_ID,
      "oidc.descope",
    ],
    callbacks: {
      signInSuccessWithAuthResult: () => {
        navigate("/dashboard");
        return false;
      },
   },
};
Finally, you’ll need to embed the <StyledFirebaseAuth /> react component in your page. Once embedded, you should see two buttons, one for email and password, and another for OIDC login with Descope.
If a user selects Sign in with Descope, the OIDC login flow will start and the user will be automatically redirected to the Flow Hosting URL that you previously configured in the Descope Console.
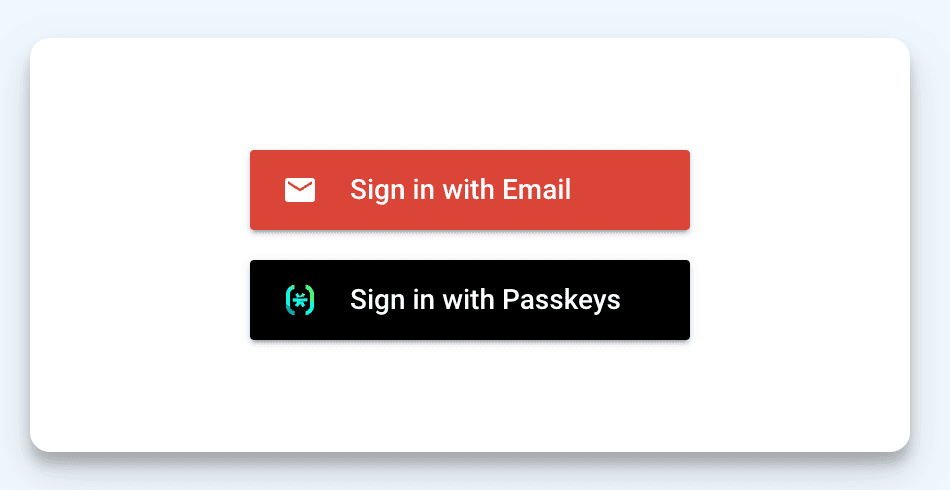
If you would like to style your buttons and change the text, you can include a fullLabel, buttonColor, and iconUrl field for each of the sign in options in your uiConfig, like so:
signInOptions: [
{
        provider: firebase.auth.EmailAuthProvider.PROVIDER_ID,
        fullLabel: "Sign in with Email", // Optional
      },
      {
        provider: "oidc.descope",
        fullLabel: "Sign in with Passkeys", // Optional
        buttonColor: "#000000", // Optional
        iconUrl: "https://images.ctfassets.net/...", // Optional
      },
]
With the configuration above, my login page looks like this:
With FirebaseUI, that’s pretty much it in regards to building out the login page with a Sign in with Descope button.
If you’re building out your login page with the SDK, you can follow the instructions below. Otherwise, skip to the “Embedding Descope in your app” section.
Using the SDK without FirebaseUI
If you wish to design your own login page without FirebaseUI, you’ll first need to initialize Descope as the provider using the following line of code:
const provider = new firebase.auth.OAuthProvider("oidc.descope");Then, you’ll need to create a function that can invoke the OIDC authentication flow. Depending on how you want to customize your login screen, you can invoke this function with a button or some other custom UI component:
const signInWithDescope = async () => {
    try {
      await firebase.auth().signInWithRedirect(provider);
    } catch (error) {
      console.error("Descope Sign-in Error", error);
    }
  };
All of the provider settings come from the configuration we set previously in the Firebase Console, so this simple async function is all we should need to log the user in using OIDC.
After following all of these steps, if you invoke the SignInWithDescope function, you should automatically be redirected to where your flow is.
Embedding Descope in your app
We still don’t have our Descope Flow embedded anywhere in our application, as we’ve just been setting up the Firebase / GCP Identity side of things so far.
In order to login with Descope Flows, you’ll need to use the Descope React Component in your app. You would typically do this by creating a page in the location of the Flow Hosting URL you previously configured.
In my example, I configured it to be http://localhost:3000/login for testing:

Therefore, I will create a new page with the /login route to contain the Descope React Component like this:
return (
    <div>
      <Descope
        flowId="oidc-flow"
        onSuccess={(e) => console.log(e.detail.user)}
        onError={(e) => console.log("Could not log in!")}
        theme="light"
      />
    </div>
  );
When the user is redirected to this page, they should see the screen to enable passkeys that is included in the oidc-flow.json file that’s part of the GitHub repository of the sample application.
After a user successfully logs in with Descope and verifies their email, Firebase will finish the OIDC flow and generate the JWT tokens that the rest of your application and APIs already use. For the end user, the experience will be very similar to before – it will seem as if they used Firebase to login, but they used Descope with passkeys instead of using a username and password.
After following all of the steps so far, you now have full-fledged Descope powered Flows embedded in your Firebase app, enabling you to have passkeys as an alternative authentication method for your users.
Handling user linking with Firebase / GCP Identity
We are almost done! The only remaining thing is to configure proper user linking in your app so that you don’t have duplicate user records.
If you test out the login right now, you may notice that user accounts don’t link together. Instead, depending on the current configuration, you’ll either see that two user accounts are created with the same email but different identity providers, or that one user account is created with just the last used login provider.
To ensure that both login methods (email/password and passkeys) can be used to sign in to one particular user account, you’ll need to link them using the Firebase SDK. Firebase provides the functionality to link user accounts sharing the same email address. This way, if a user logs in with an OIDC provider and another user account already exists in Firebase with the same email, Firebase can link these two accounts.
To start out, you’ll want to make sure that your Firebase application supports user account linking. To do this, head back to the Firebase Console -> Authentication -> Settings and make sure that Link accounts that use the same email is selected:
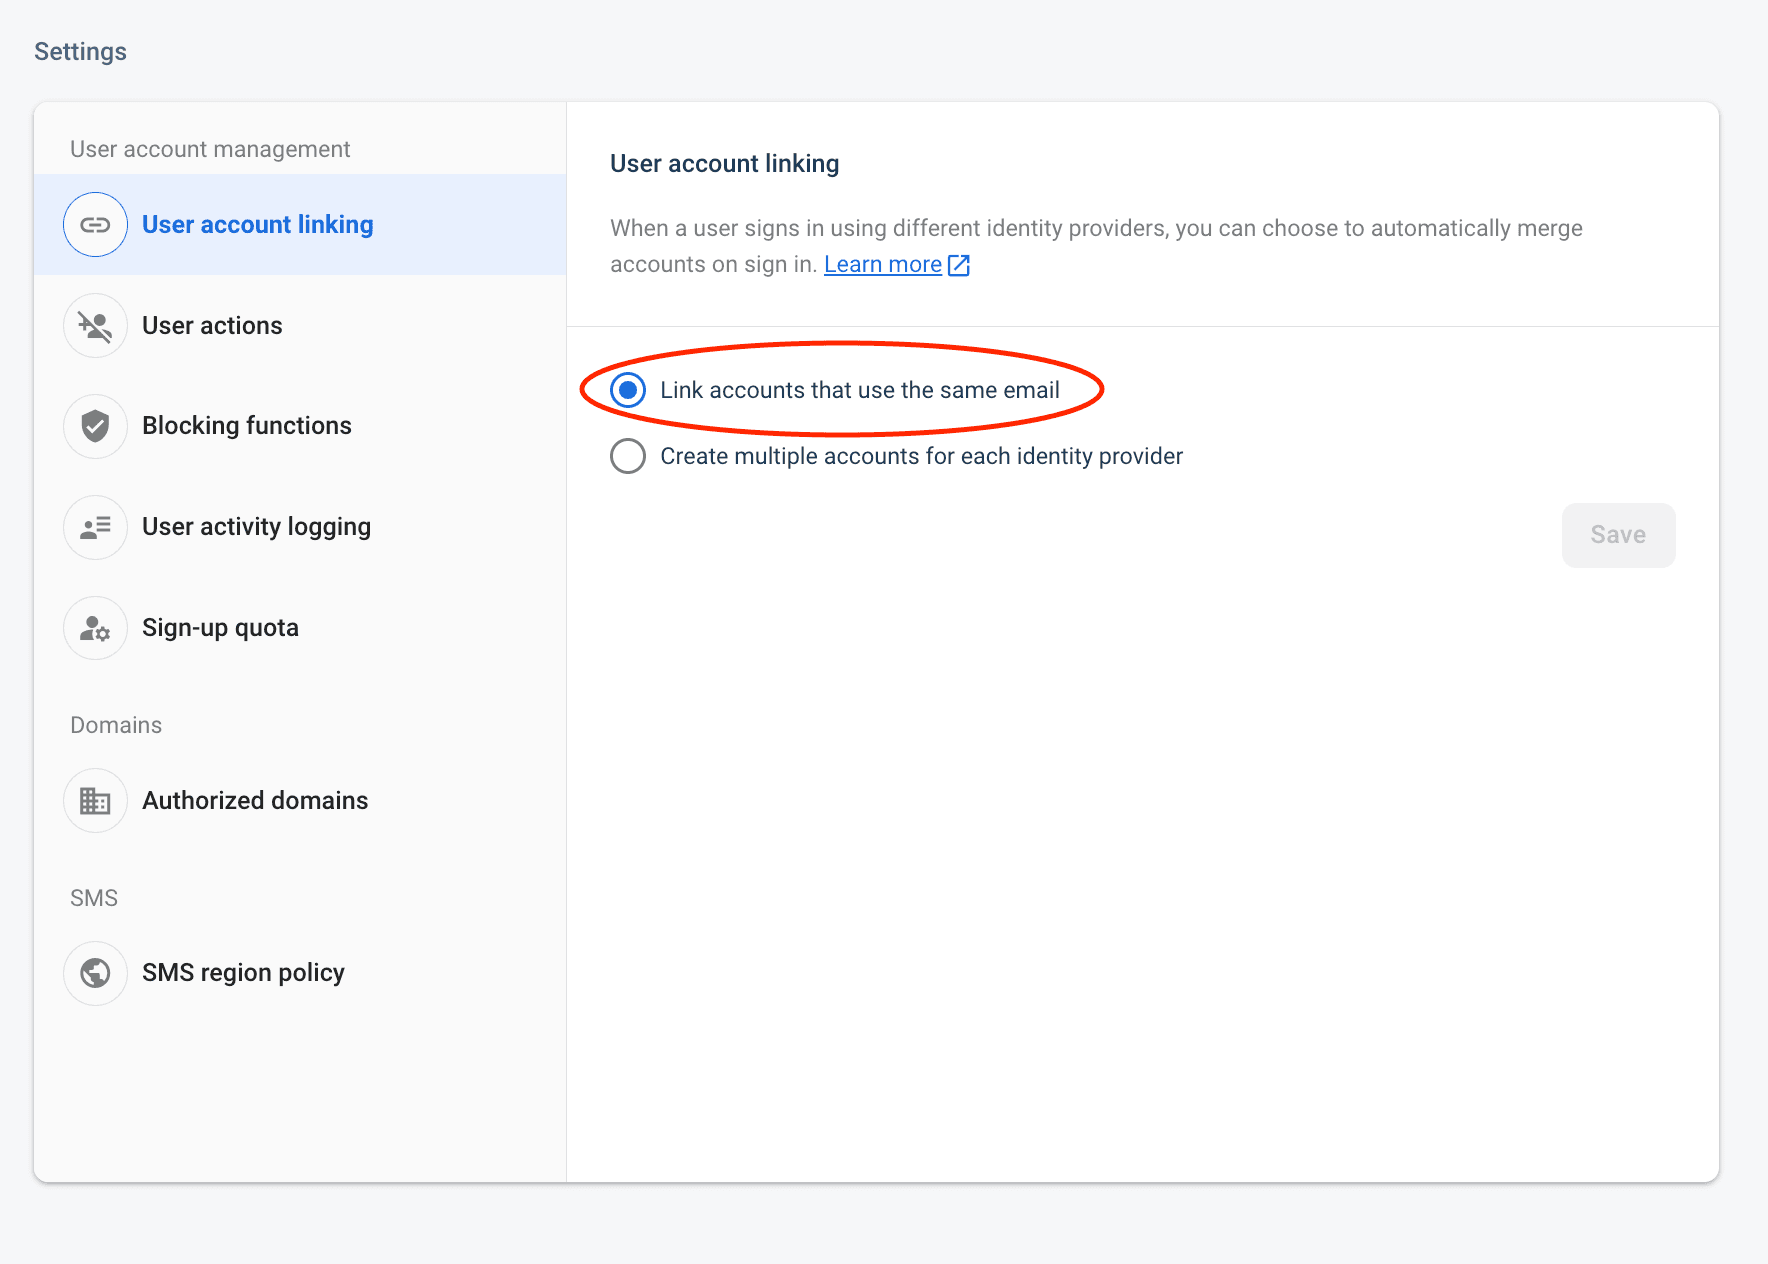
If this is not enabled, whenever you log in via email/password or log in via passkeys, you’ll have two separate accounts with different identity providers, which is not what we want!
Next, depending on how you’ve configured your login page, you'll either use FirebaseUI (which will handle the linking for you) or develop logic in your Firebase project to check for existing accounts and use the linkWithCredential function provided by Firebase to link the two accounts.
User linking with FirebaseUI
If you’re using FirebaseUI, you can try to sign in with either Descope or your email/password right now. Only one user with two identity providers should exist with that email in the Firebase Console. The Firebase user ID stays the same regardless of the identity provider used during sign in.
Since we verified the user’s identity in our Descope Flow by validating the same email that was used in the account linking, the user can safely continue to sign in with passkeys in the future and gain full access to their account.
It’s important to understand that Firebase treats all OIDC providers as federated IdPs, meaning that during the account linking, the original user’s credentials in Firebase will be replaced with the credentials from Descope. If the user attempts to sign in with their email and password again, after creating their passkey with Descope, then this screen will appear instead of a place to enter their password:

Therefore, if you’re using FirebaseUI, you’re all set and ready to deploy passkeys in your application for all users! However, if you’ve built out a custom login page with the SDK functions, read on.
User linking with the SDK
To prevent the replacement of the email/password-based account when signing in with Descope, you will have to manually manage the account linking process, which would look something like this:
User tries to sign in with Descope.
If an account already exists with the same email, Firebase will throw an
auth/account-exists-with-different-credentialerror.You catch this error, get the pending Descope credential from the error object, and save it somewhere (e.g., in your app's state or
localStorage).You then prompt the user to sign in with their email/password (e.g., showing a form or redirecting to FirebaseUI).
Once the user has signed in with their email/password, you get the current user's
UserCredentialobject.Then, you use the
linkWithCredentialmethod to link the Descope credential (which you saved earlier) with the existing account.
The implementation of the merging logic in your application will looks similar to what I have done below in my Login.js:
import React, { useState } from 'react';
import firebase from 'firebase/app';
import 'firebase/auth';
import { useNavigate } from 'react-router-dom';
import EmailPasswordSignIn from './EmailPasswordSignIn';

const Login = () => {
  const [pendingCred, setPendingCred] = useState(null);
  const navigate = useNavigate();

  const signInWithDescope = async () => {
    const provider = new firebase.auth.OAuthProvider('oidc.descope');
    try {
      await firebase.auth().signInWithRedirect(provider);
    } catch (error) {
      if (error.code === 'auth/account-exists-with-different-credential') {
        setPendingCred(error.credential);
      }
    }
  };

  const signInWithEmailPassword = async (email, password) => {
    try {
      const userCred = await firebase.auth().signInWithEmailAndPassword(email, password);
      if (pendingCred) {
        await userCred.user.linkWithCredential(pendingCred);
        setPendingCred(null);
      }
      navigate('/dashboard');
    } catch (error) {
      console.error(error);
      // Handle error
    }
  };

  // EmailPasswordSignIn is a custom login component like FirebaseUI
  return (
    <div>
      {pendingCred ? (
        <EmailPasswordSignIn onSubmit={signInWithEmailPassword} />
      ) : (
        <button onClick={signInWithDescope}>
          Sign in with Descope
        </button>
      )}
    </div>
  );
};

export default Login;
This code also includes the previously mentioned signInWithDescope function, and stores the pending credential information in a React state hook. Once you’ve implemented this login page successfully, your users should be able to use multiple identity providers to log in and access their accounts.
If you’re curious, you can read more about linking user accounts with different authentication methods on the Firebase docs.
Conclusion
As you can now see, Descope provides an easy and flexible way to add custom authentication workflows to existing logins using OIDC. Its seamless integration with Firebase provides a powerful tool for developers who want to maintain control over their authentication processes. Whether you're building a simple login system or a complex multi-step authentication flow, Descope and Firebase make it easier than ever to secure your applications and provide a smooth user experience.
If you’re interested to learn more about OIDC, you visit our Docs page or our Learning Center. If you are a Firebase customer and want to explore adding passkeys to your authentication flow, sign up for our platform and keep this tutorial bookmarked!
If you’ve liked this blog, but you currently use Firebase with a mobile application (Kotlin, Flutter, or Swift), then you can use one of our Descope SDKs to integrate Descope into your application, but still use Firebase as the main identity provider.
Stay tuned for future blogs discussing how to enable Descope in your mobile applications!