
Table of Contents
Don't have the time to read the entire post? Our human writers will be sad, but we understand. Summarize the post with your preferred LLM here instead.
A single AI agent can summarize, analyze, or plan, but it struggles to scale across domains, maintain context, or specialize deeply enough for complex enterprise use cases. Multi-agent systems address these gaps by distributing responsibility across many specialized agents. Each agent receives a defined role and scope, executing its part before results are stitched together.
The CrewAI multi-agent platform structures multi-agent systems much like real-world teams. This design keeps workflows clear, predictable, and scalable, but it also surfaces a real challenge. Once your agents start interacting with external APIs, you need reliable orchestration of authentication, identity, and permissions.
The Descope Agentic Identity Hub solves this through the Model Context Protocol (MCP). Instead of building a REST API that a frontend calls, you expose your CrewAI crew as an MCP server protected by OAuth 2.1. Descope acts as the authorization server, and Google API tokens are stored and vended through Descope Connections, so you never have to manage refresh tokens in your own code.
In this tutorial, we will implement:
A CrewAI crew with two specialized agents: one for Google Calendar, one for Google Contacts
An MCP server that exposes the crew as a single callable tool, protected by OAuth 2.1
The Descope Agentic Identity Hub configured as the authorization server for that MCP server
Descope Connections for Google Calendar and Contacts, so OAuth tokens are securely stored and exchanged without your server ever holding refresh tokens
End-to-end validation using MCP Inspector
You can follow the steps below or check out the finished sample app to see it in action.
Prerequisites
You'll need the following:
A Descope account. If you don't already have one, you can sign up for a Free Forever account.
A Google Cloud project with the Calendar and People (Contacts) APIs enabled
Python 3.10 or higher, with uv for dependency management
npx, for running MCP Inspector
Configure Google OAuth credentials
For each Google API your agents will access, you need to create OAuth credentials in the Google Cloud Console.
Go to APIs & Services > Credentials
Create a new OAuth 2.0 Client ID and select Web application
Do this twice: once for Calendar, once for Contacts
Copy the Client ID and Client Secret for each
You will add the Descope redirect URI as an authorized redirect URI in a moment, once you have it from the Connections setup below
Set up Descope Connections
Connections are how the Agentic Identity Hub stores and vends third-party credentials. Instead of your server managing Google OAuth flows and refresh tokens, Descope holds the tokens and hands out short-lived access tokens on demand.
In the Descope Console, go to Agentic Identity Hub > Connections:
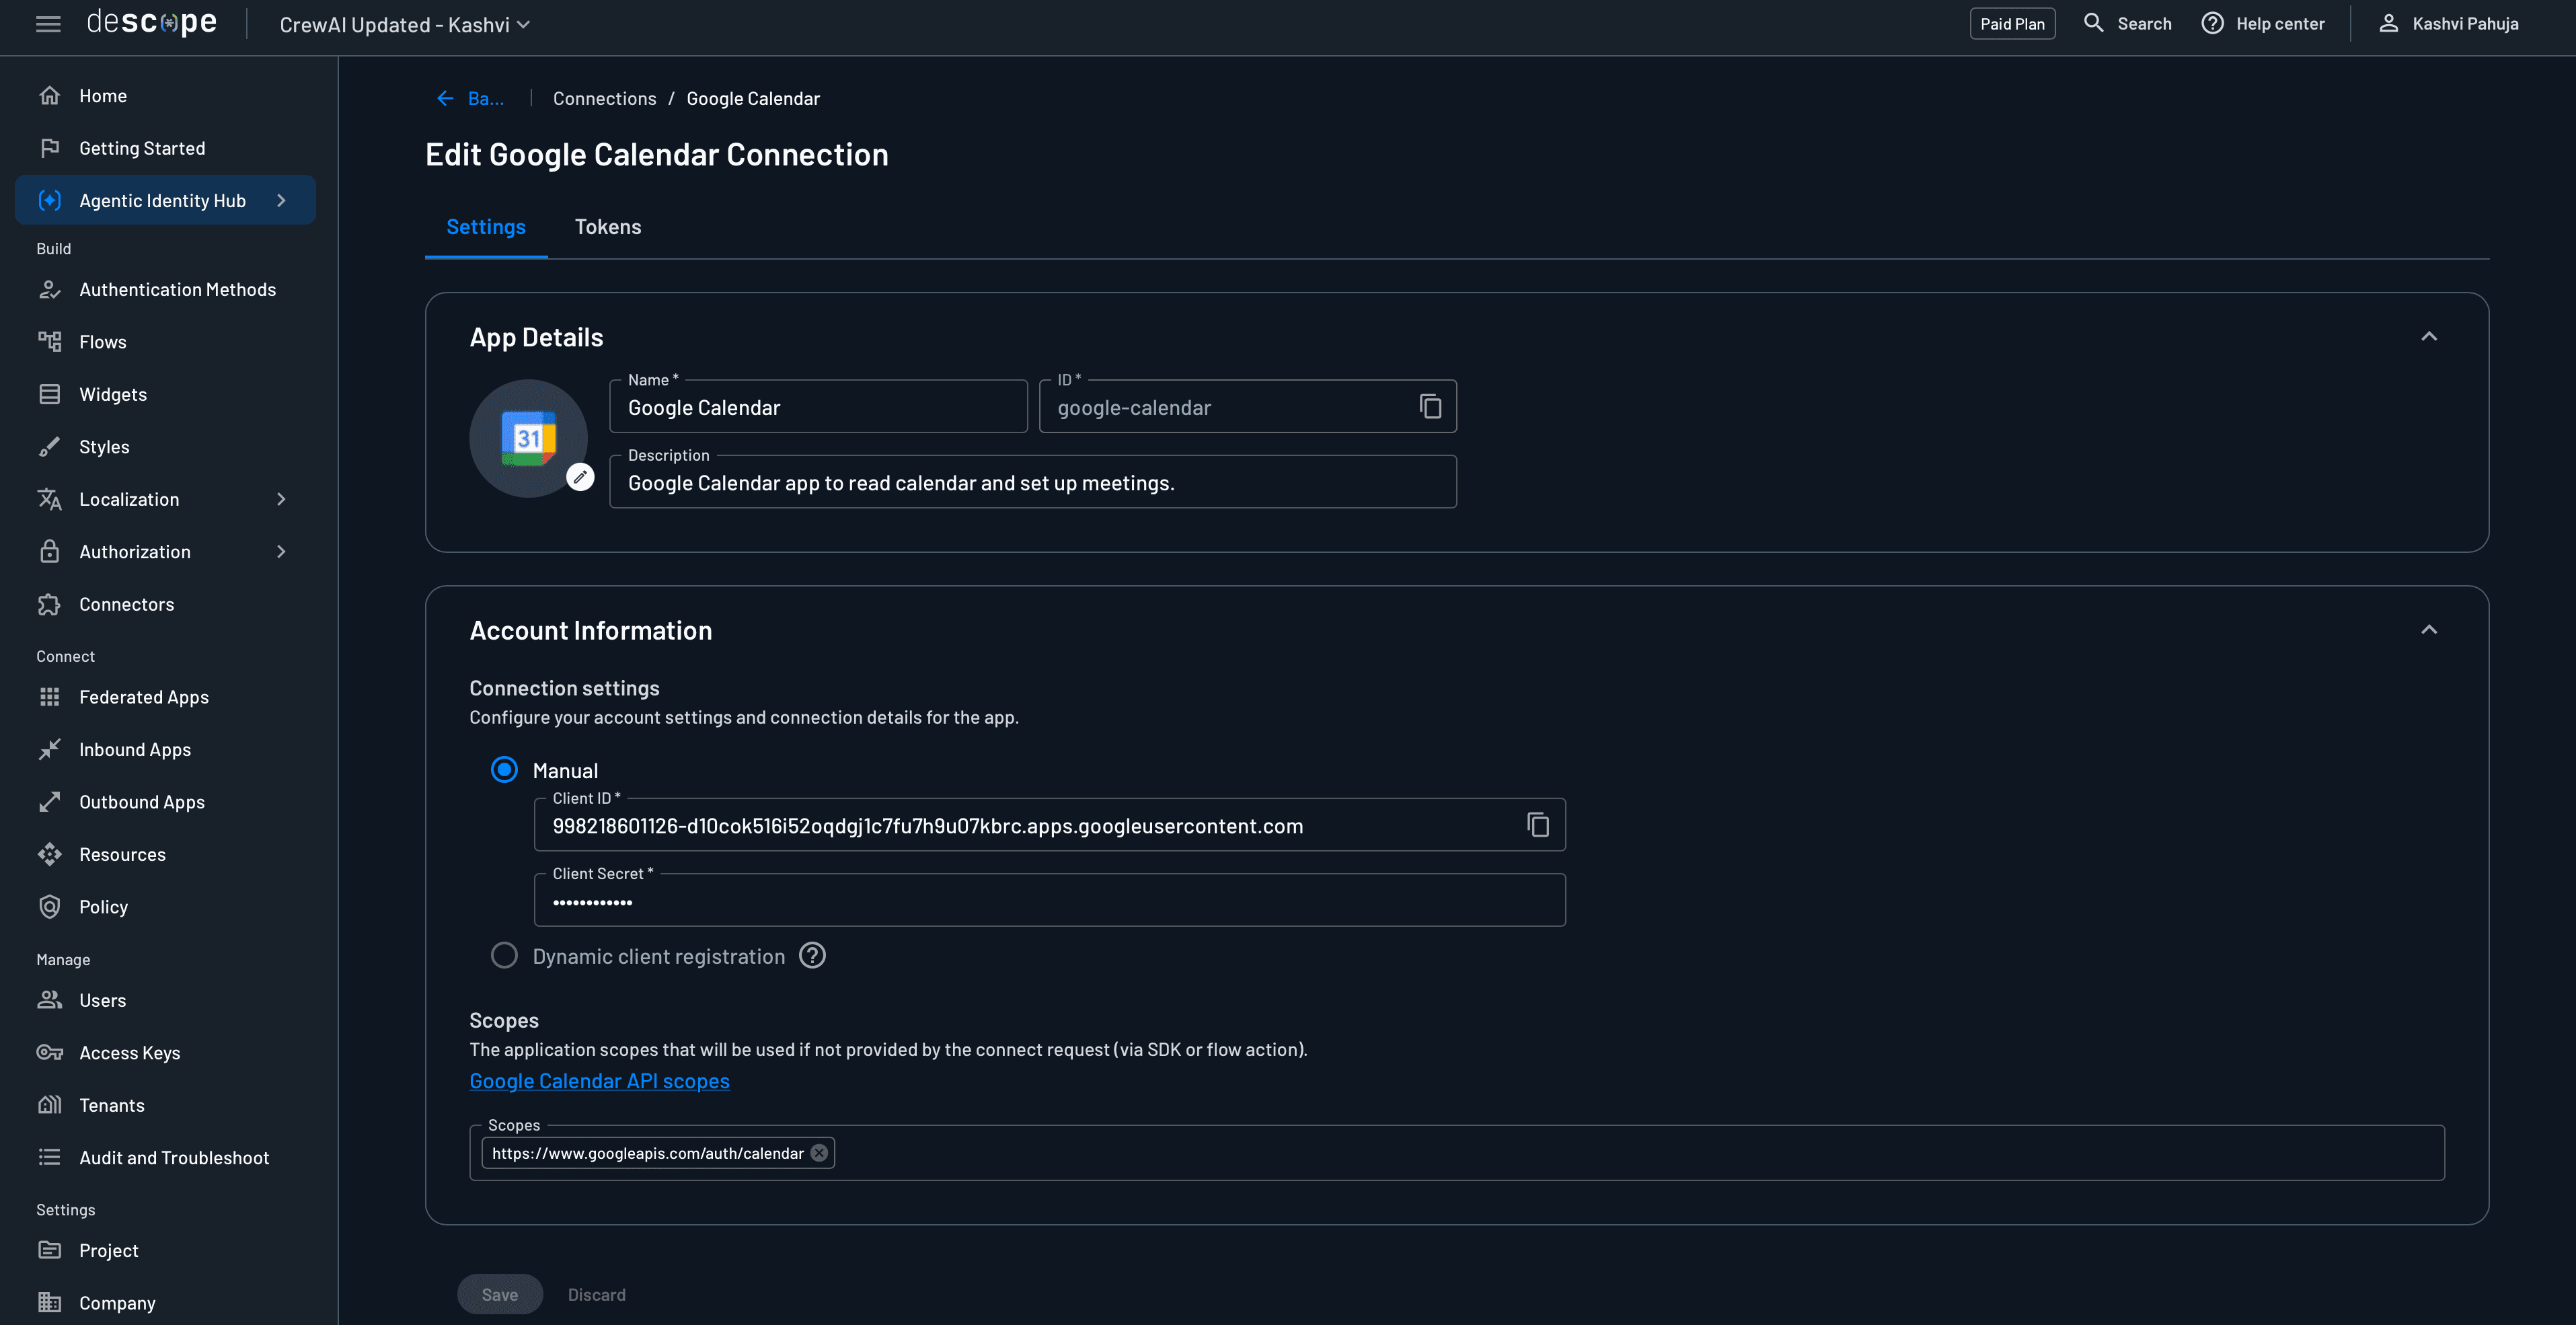
Add a new Connection for Google Calendar
Paste the Client ID and Client Secret from Google
Set the scopes to
https://www.googleapis.com/auth/calendarandhttps://www.googleapis.com/auth/calendar.readonlySet the Connection ID to
google-calendar
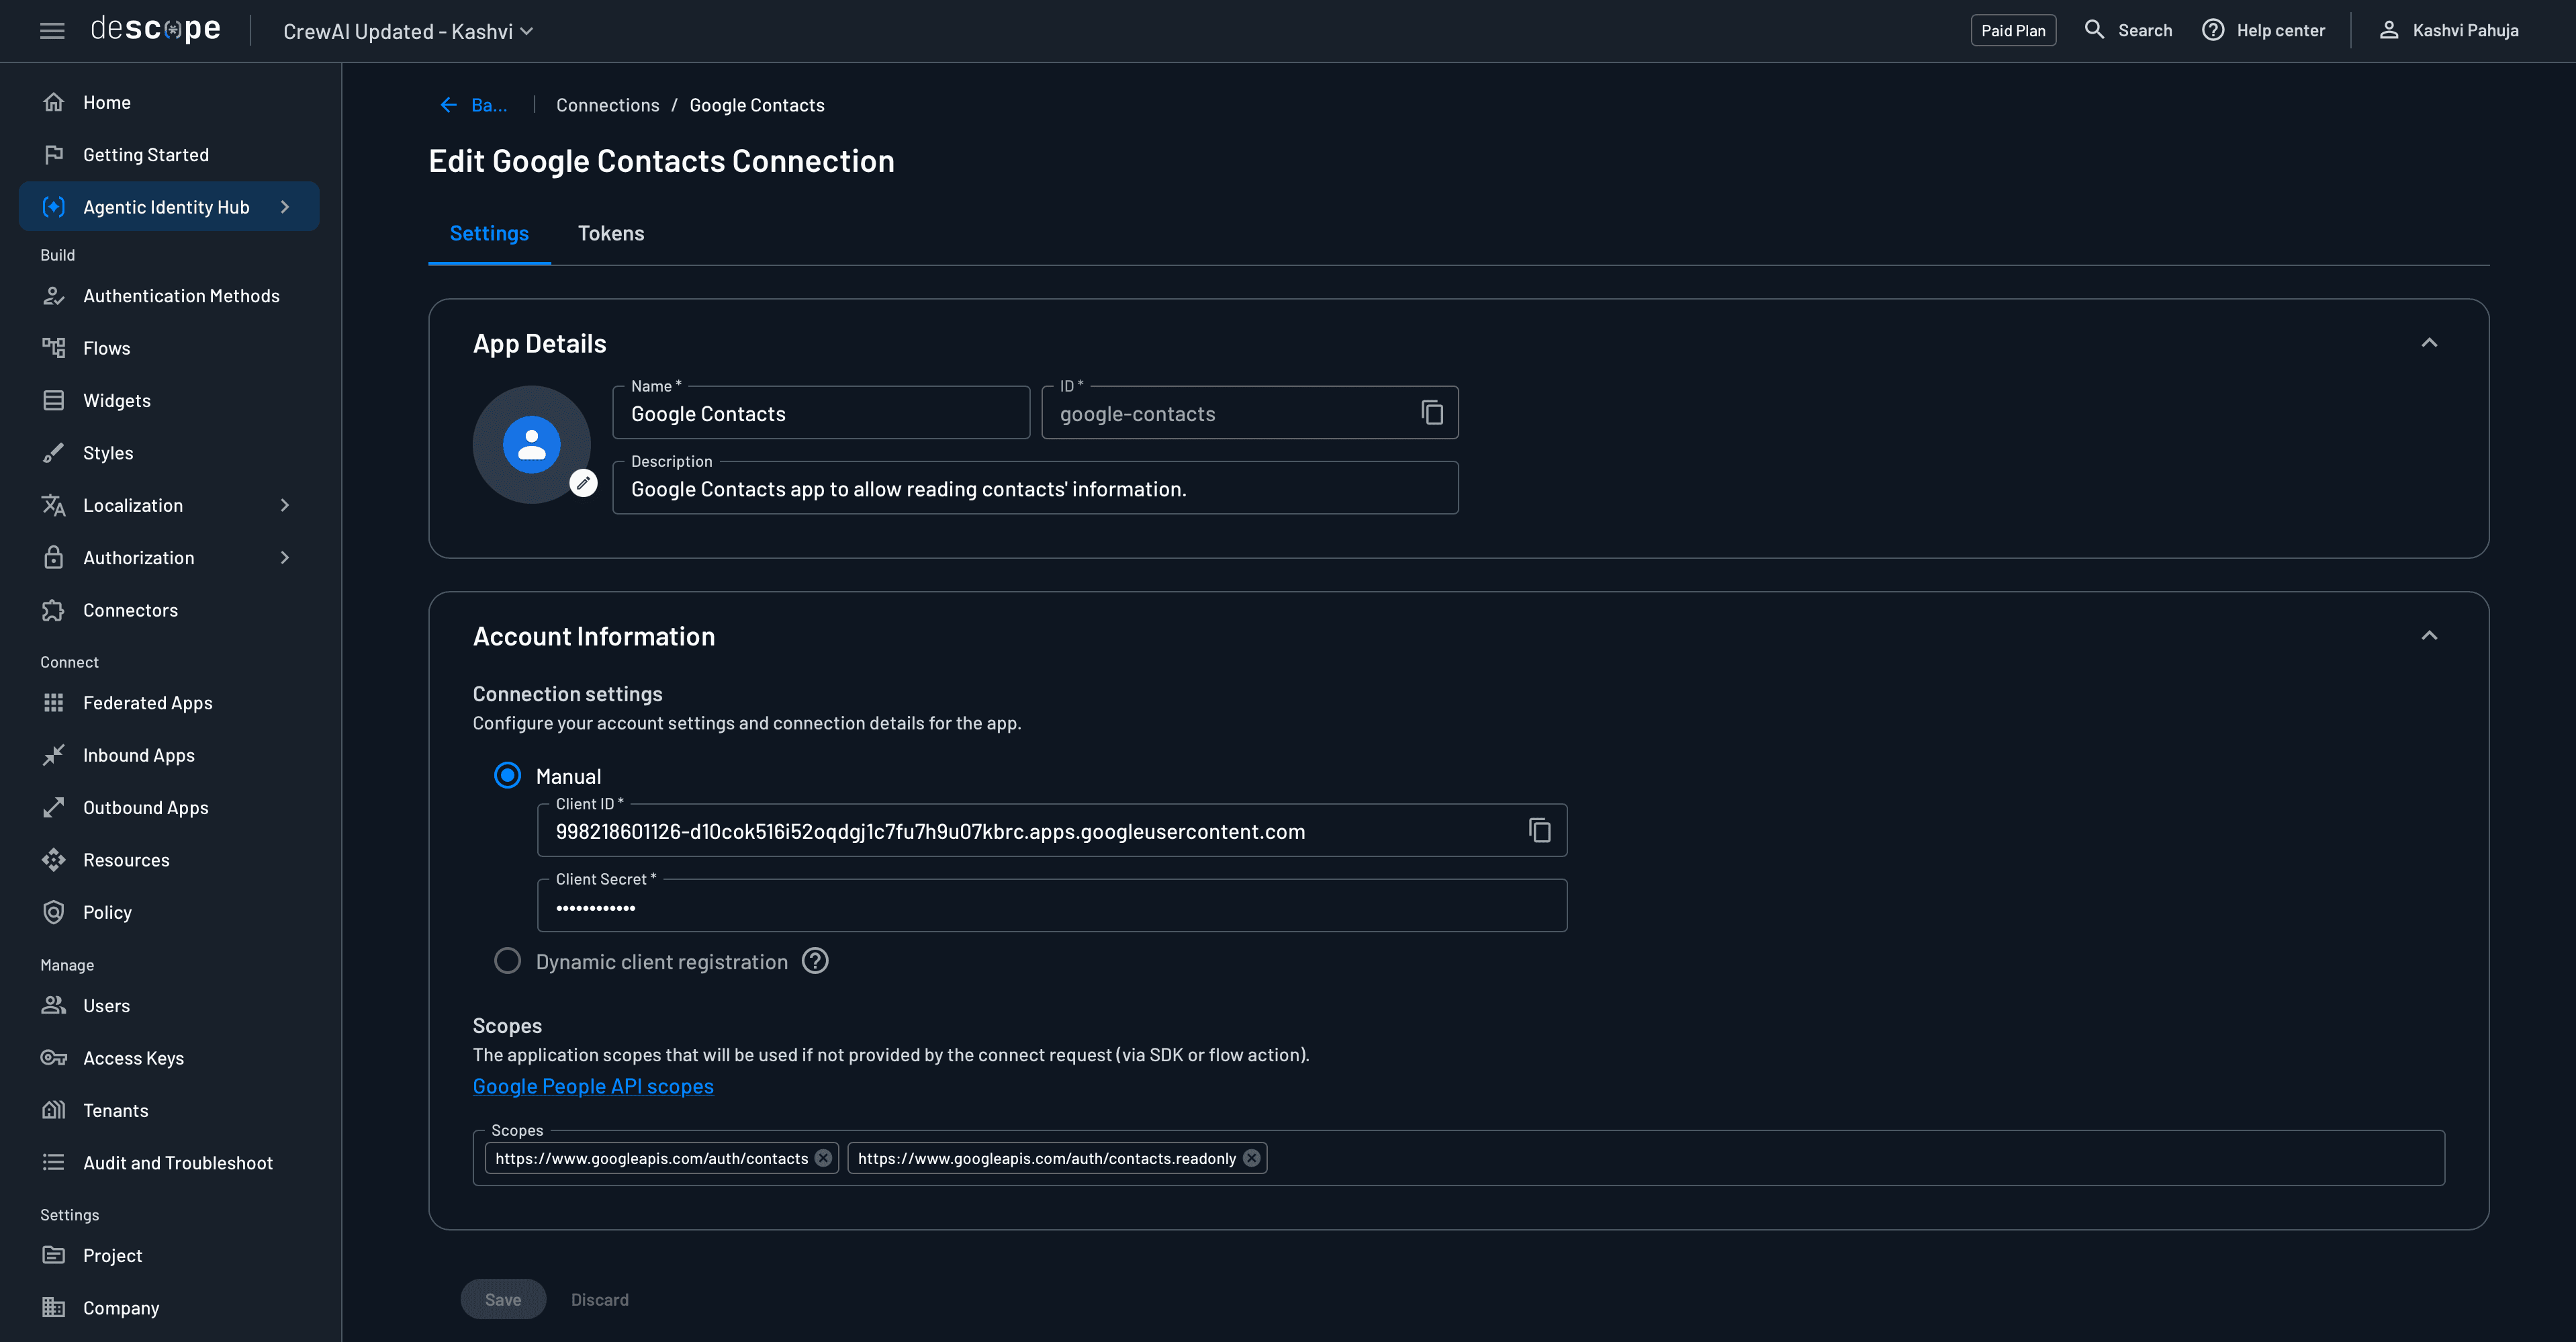
Add a second Connection for Google Contacts
Paste the Client ID and Client Secret
Set the scope to
https://www.googleapis.com/auth/contacts.readonlySet the Connection ID to
google-contacts
Copy the redirect URI that Descope shows you and paste it back into your Google Cloud Console for each credential
Keeping scopes granular at the Connection level ensures each agent is limited to its exact responsibilities. The calendar agent cannot touch contacts, and the contacts agent cannot alter calendar events, and this is enforced at the token level rather than just in code.
You can find more detail in the Creating a Connection guide.
Create an MCP Server Resource in Descope
This step registers your Python server as a protected Resource in the Descope Agentic Identity Hub. A Resource is the API or MCP server that a client requests access to, and Descope acts as the OAuth 2.1 authorization server in front of it.
In the Descope Console, go to Agentic Identity Hub > MCP Servers:
Create a new MCP Server and name it something like
crewai-calendar-contacts
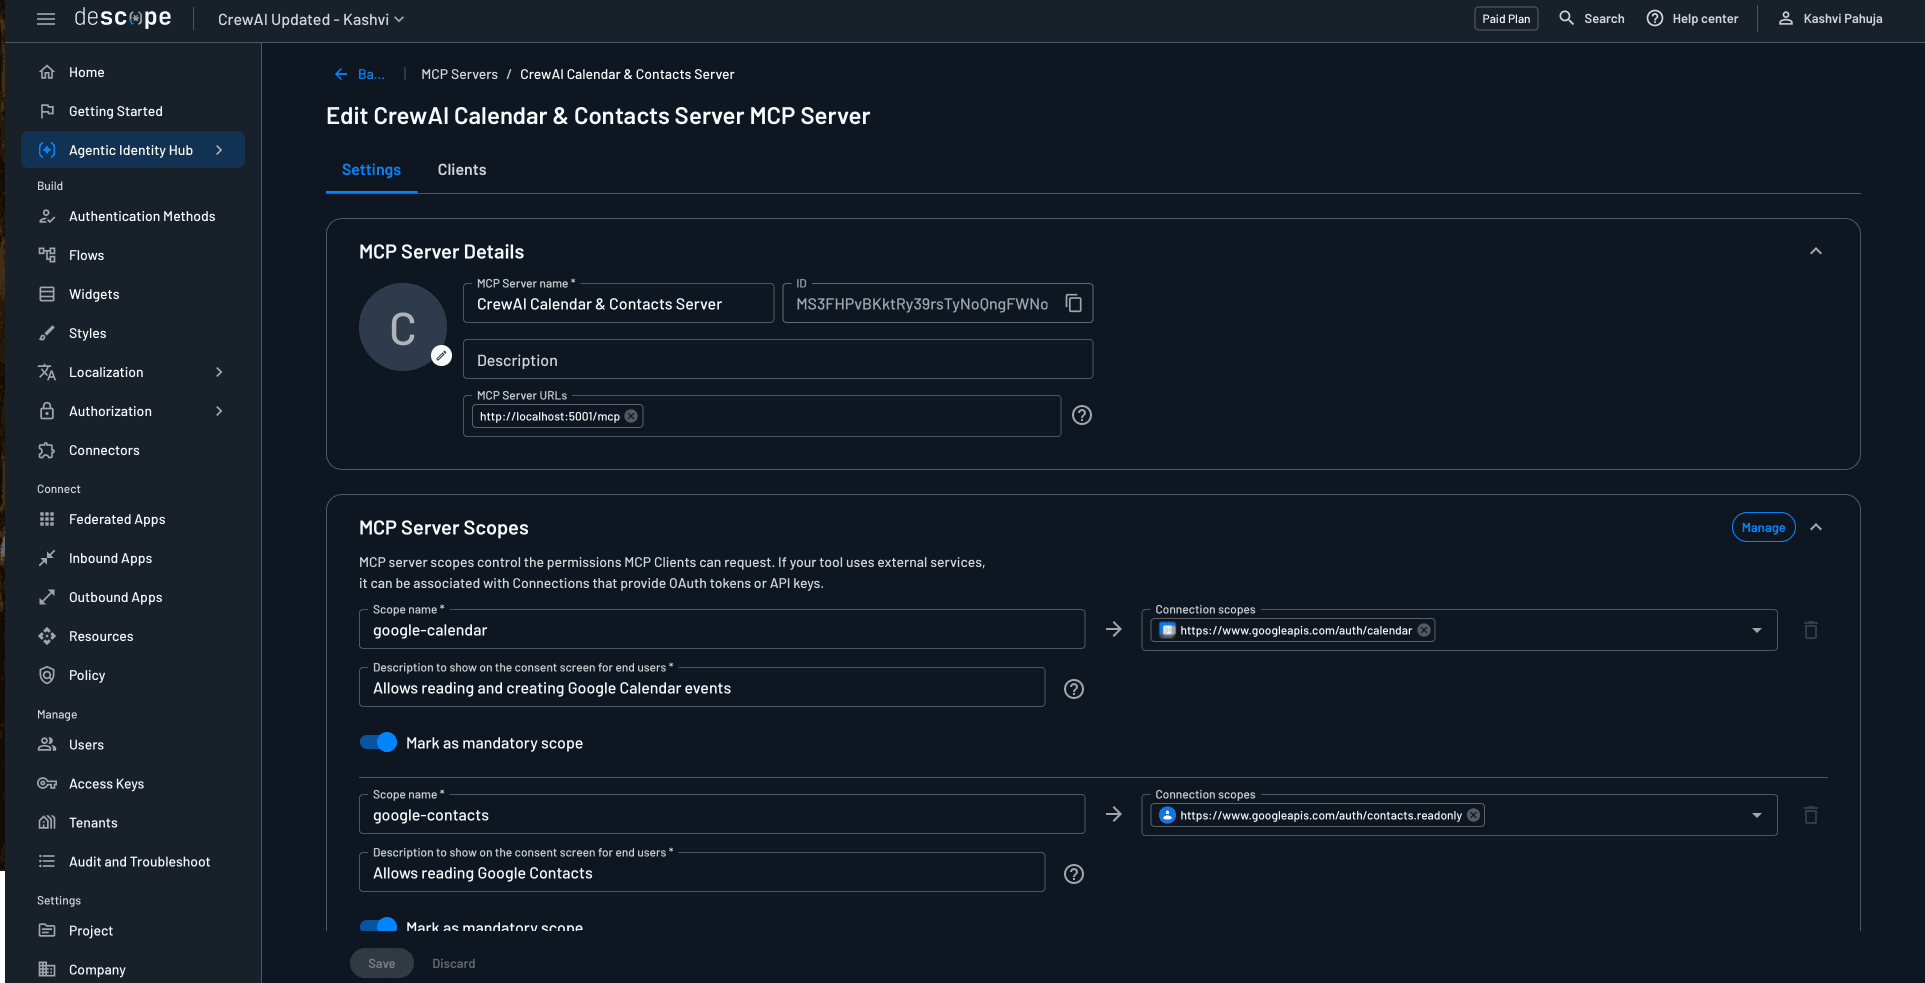
Set the MCP Server URL to your server endpoint, for example
http://localhost:5001/mcpEnable DCR under MCP Client Registration so clients like MCP Inspector can register automatically
Under MCP Server Scopes, add two scopes and map each to the Connection you created earlier:
google-calendar, mapped to the Google Calendar Connection scopesgoogle-contacts, mapped to the Google Contacts Connection scope
Set the User Consent Flow to
inbound-apps-user-consentSave, then copy the MCP Server ID from the server details
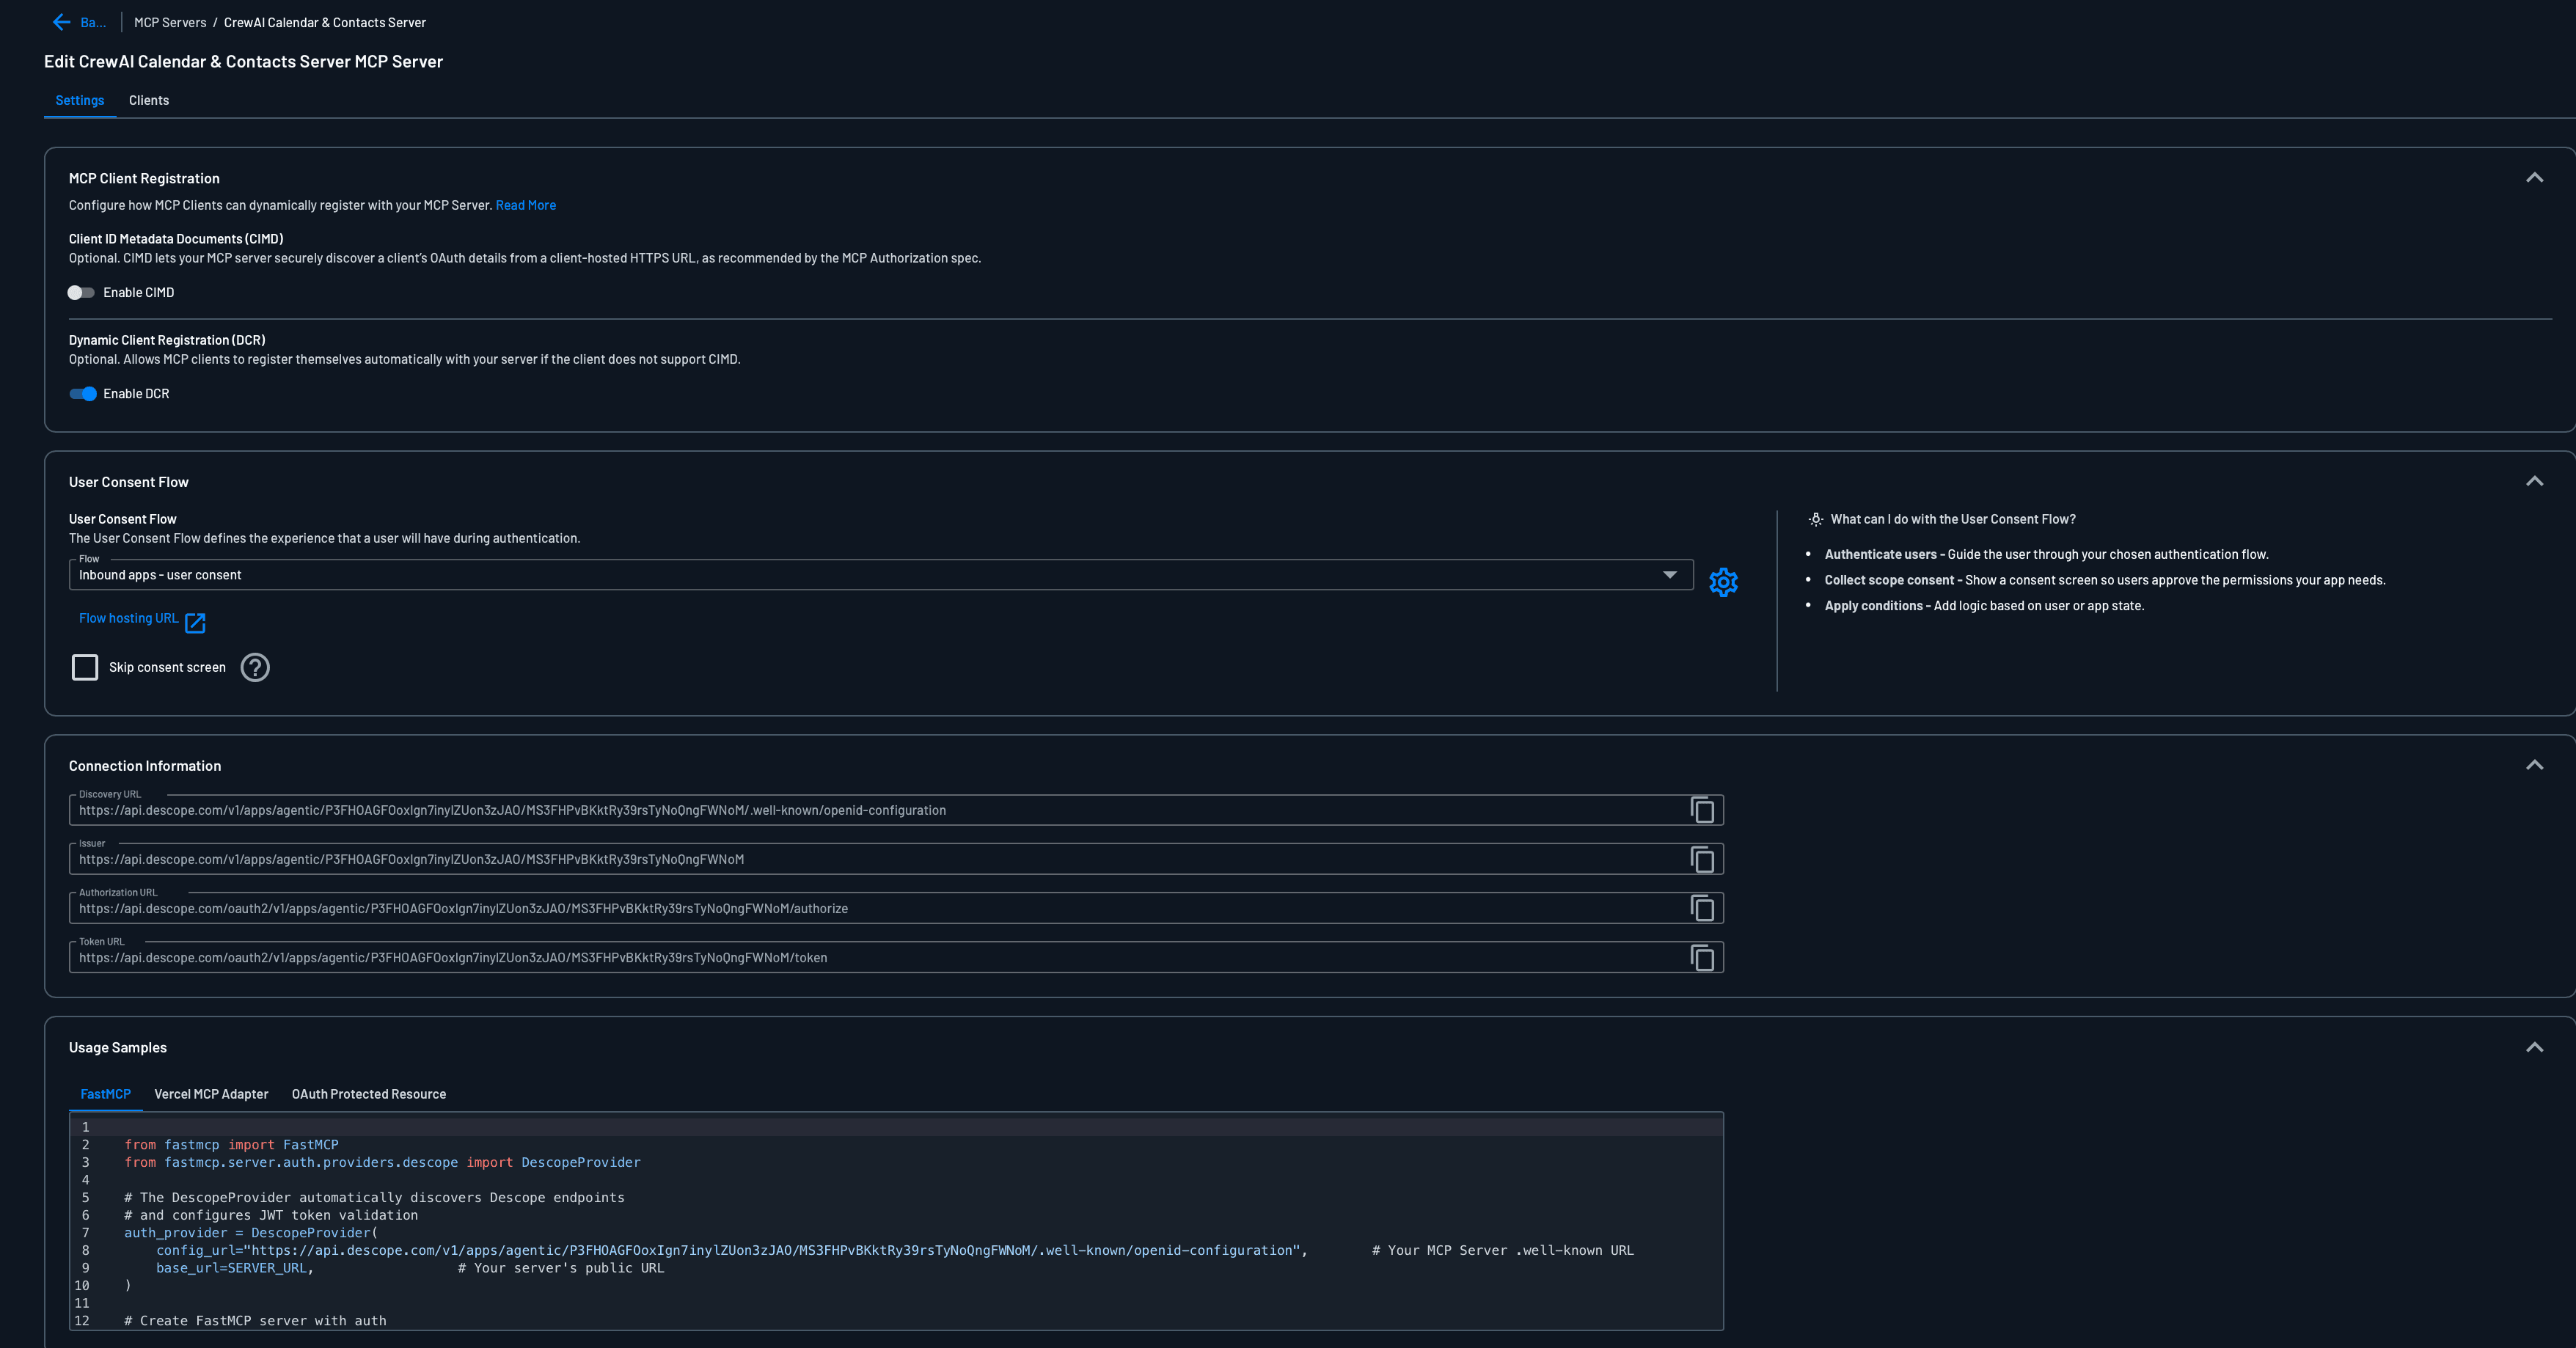
The User Consent Flow is a Descope Flow, which is what lets you insert and customize the consent screen for this scenario. When a user authenticates to the MCP server during the OAuth /authorize step, the flow presents a consent screen showing the scopes the client is requesting, using the human-readable descriptions you set on each MCP Server scope.
The user explicitly approves before any Google Calendar or Contacts access is granted, and that consent is recorded. Because it is a Flow, you can also layer in authentication methods like SSO, passwordless, social login, or MFA and step-up before consent, and add conditional logic based on the user or client. You can read more in the MCP Server Settings documentation.
The authorization server URL for your MCP server follows this format:
https://api.descope.com/v1/apps/agentic/{PROJECT_ID}/{MCP_SERVER_ID}This is the URL that MCP clients use to discover and initiate the OAuth 2.1 flow. You can read more about how scopes map to Connections in the Resources scopes documentation.
Project setup
Clone the sample app and set up your environment:
git clone <repo-url>
cd crewai-app
cp .env.example .env
Fill in your .env file:
DESCOPE_PROJECT_ID=your_project_id
DESCOPE_MANAGEMENT_KEY=your_management_key
MCP_SERVER_ID=your_mcp_server_id
MCP_SERVER_URL=http://localhost:5001
GOOGLE_CALENDAR_ID=primary
ANTHROPIC_API_KEY=your_anthropic_api_key
MODEL=anthropic/claude-opus-4-8
Install dependencies:
uv syncMCP server architecture
The server is a Starlette ASGI app that wraps the CrewAI crew in an MCP tool, protected by OAuth 2.1 bearer auth. Here's how the key pieces fit together.
Token validation
When an MCP client sends a request with an Authorization: Bearer token, the server validates it as a JWT issued by the Descope agentic authorization server. One important detail: agentic tokens must be validated against the agentic JWKS endpoint, which is a different key set from the regular Descope project keys.
_JWKS_CANDIDATES = [
    f"https://api.descope.com/{DESCOPE_PROJECT_ID}/.well-known/jwks.json",
    f"https://api.descope.com/v2/keys/{DESCOPE_PROJECT_ID}",
]
Protected resource metadata
The server exposes /.well-known/oauth-protected-resource/mcp, which MCP clients fetch to discover the authorization server URL and required scopes. This is what kicks off the OAuth flow automatically. You can read more about these in the discovery endpoints documentation.
Tool handler
The single run_crew tool extracts the validated user ID and raw token from the auth context, constructs the crew, and runs it:
@mcp_server.call_tool()
async def call_tool(name: str, arguments: dict):
    access_token_obj = get_access_token()
    raw_token = access_token_obj.token
    user_id = access_token_obj.subject

    crew_instance = DescopeAgenticCrew(user_id=user_id, access_token=raw_token)
    result = await asyncio.to_thread(
        lambda: crew_instance.crew().kickoff(inputs={"user_request": arguments["user_request"]})
    )
    return [TextContent(type="text", text=str(result))]
Agent design and Connection token exchange
The crew has two agents, each bound to a specific task. The contacts_finder agent searches Google Contacts for a person by name. The calendar_manager agent creates a Google Calendar event and can invite attendees.
Neither agent stores API tokens. Instead, each tool calls Descope at runtime to exchange the MCP bearer token for a short-lived Google access token scoped to that specific Connection:
def get_outbound_token(app_id, user_id, access_token):
    url = "https://api.descope.com/v1/mgmt/outbound/app/user/token/latest"
    headers = {
        "Authorization": f"Bearer {project_id}:{access_token}",
    }
    payload = {"appId": app_id, "userId": user_id}
    response = requests.post(url, headers=headers, json=payload)
    return response.json()["token"]["accessToken"]
The app_id is the Connection ID, either google-calendar or google-contacts. Descope validates that the user has authorized that Connection and returns a fresh, scoped Google access token. Your server never stores refresh tokens. The full token fetching reference is in the Fetching Connection Tokens docs.
The crew runs sequentially. First the contacts agent finds the target person's email, then the calendar agent creates the event and adds them as an invitee.
Running and testing
Start the server:
uv run python src/descope_agentic_crew/api.pyLaunch MCP Inspector in a new terminal:
npx @modelcontextprotocol/inspector@latest --transport http --server-url http://localhost:5001/mcpThe Inspector automatically discovers the Descope authorization server from the protected resource metadata, performs Dynamic Client Registration, and walks you through the OAuth flow. Once you are authenticated, go to the Tools tab, select run_crew, and enter a natural language request:
{
  "user_request": "Schedule a meeting with John tomorrow at 2pm"
}
The crew will search Google Contacts for John’s email, then create a Google Calendar event and send him an invite, all within the permission boundaries defined by the Connections.
Orchestrating agent security with Descope
With this setup, you have a secure multi-agent workflow where:
Authentication is protocol-native. OAuth 2.1 is handled by the MCP layer, not custom middleware, so any standards-compliant MCP client works out of the box.
Least-privilege is enforced at the token level. Each agent only ever receives a token scoped to its specific Connection, so the contacts agent cannot get a calendar token and vice versa.
Token management is fully delegated. Descope stores, refreshes, and vends Google tokens, and your server handles none of that lifecycle.
The crew is client-agnostic. Claude Desktop, a VS Code extension, or your own app can all connect to the same MCP server without any changes to the crew logic.
The sample app repo contains the complete codebase and configuration to get started right away.
From here, you can extend this pattern to more agents and more Connections. A sales workflow might pair a CRM-enrichment agent with a calendar agent to book qualified meetings automatically. A support workflow could combine a customer-lookup agent with a scheduling agent for automated follow-ups. Each new Connection inherits the same least-privilege model, and CrewAI handles the orchestration regardless of how many agents join the crew.
You might also explore adding new agents tied to other APIs, integrating project management or finance systems, or experimenting with CrewAI’s orchestration features for more complex collaborations. In short, this foundation gives you a practical way to scale multi-agent systems securely, while Descope handles the identity and access challenges behind the scenes.
Sign up for a free Descope account and visit our documentation to get started with the Agentic Identity Hub today! Have questions? Book time with our auth experts for a live demo.