

Table of Contents
Don't have the time to read the entire post? Our human writers will be sad, but we understand. Summarize the post with your preferred LLM here instead.
This tutorial was written by Sesethu Mhlana, a software engineer with a passion for developing innovative solutions for web and desktop applications. Connect with him on LinkedIn to see more of his work!
In modern React applications, simplifying user authentication without compromising security is key. Magic link authentication provides an elegant solution by allowing users to log in using a secure, passwordless link sent to their email. With no passwords to remember or store, this method reduces friction for users while making life easier for the IT department.
In this tutorial, we’ll walk you through integrating React magic link authentication with Descope. As an added bonus, we'll also show you how to implement role-based access control (RBAC) for fine-grained user management.
By the end of this guide, you’ll have:
A working passwordless login system using magic link authentication
A seamless authentication flow in your React app
Basic implementation of RBAC for managing user permissions
Understanding magic link authentication in React
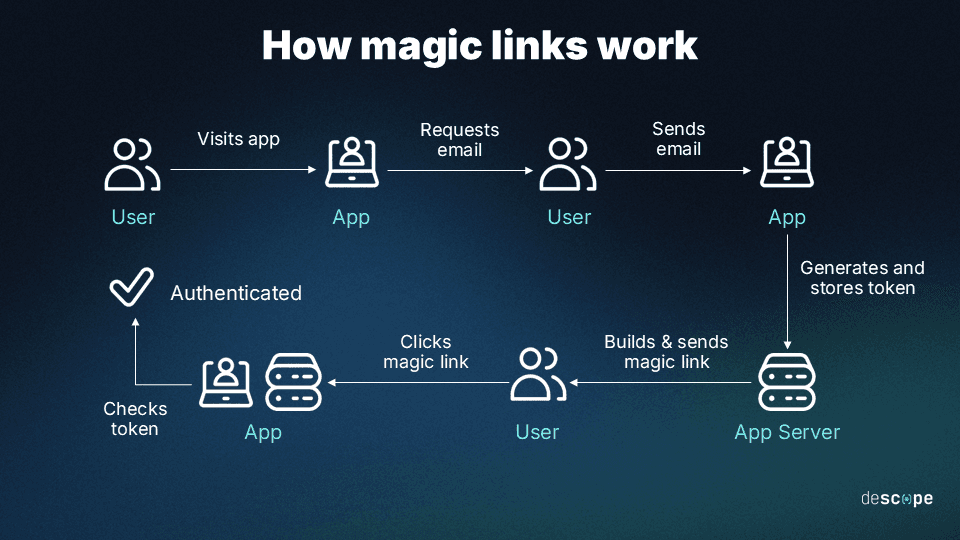
Magic link authentication offers a seamless, secure login method for React apps by allowing users to log in without passwords. The process begins when a user enters their email on your React app’s login screen. From there, the server generates a unique token and sends it to the user’s email as a magic link. When the user clicks the link, they’re redirected back to the app, where the server verifies the token. If the token is valid, the user is authenticated and logged in—no password required. This system relies on email for verification, combining convenience with security.
React magic link set up step by step
To integrate magic link authentication in your React app, you need to set up a system where users can log in via magic links sent to their email. After that, you can control access to different parts of the app based on the roles assigned to users.
In this tutorial, you’ll create a recipe app that fetches recipes from DummyJSON and displays them to logged-in users. Using RBAC (which we’ll set up later), you’ll then control which information about the recipes is displayed based on the user’s role.
Before you start, you need to create a Free Forever Descope account that allows you to build and test your app before going to production. You’ll use this account throughout the tutorial.
Descope is a React authentication provider that streamlines authentication with secure, passwordless methods, adaptive MFA and more. With a drag & drop editor, you can implement robust, customizable auth flows with minimal coding, getting both security and a smooth user experience.
Read more: Add Authentication & Authorization to a React App With Descope
Create the React application
First, create a new React app using the create-react-app command:
npx create-react-app descope-appAfter the project is created, install the Descope package using the following command:
npm i @descope/react-sdkConfigure an authentication flow on Descope
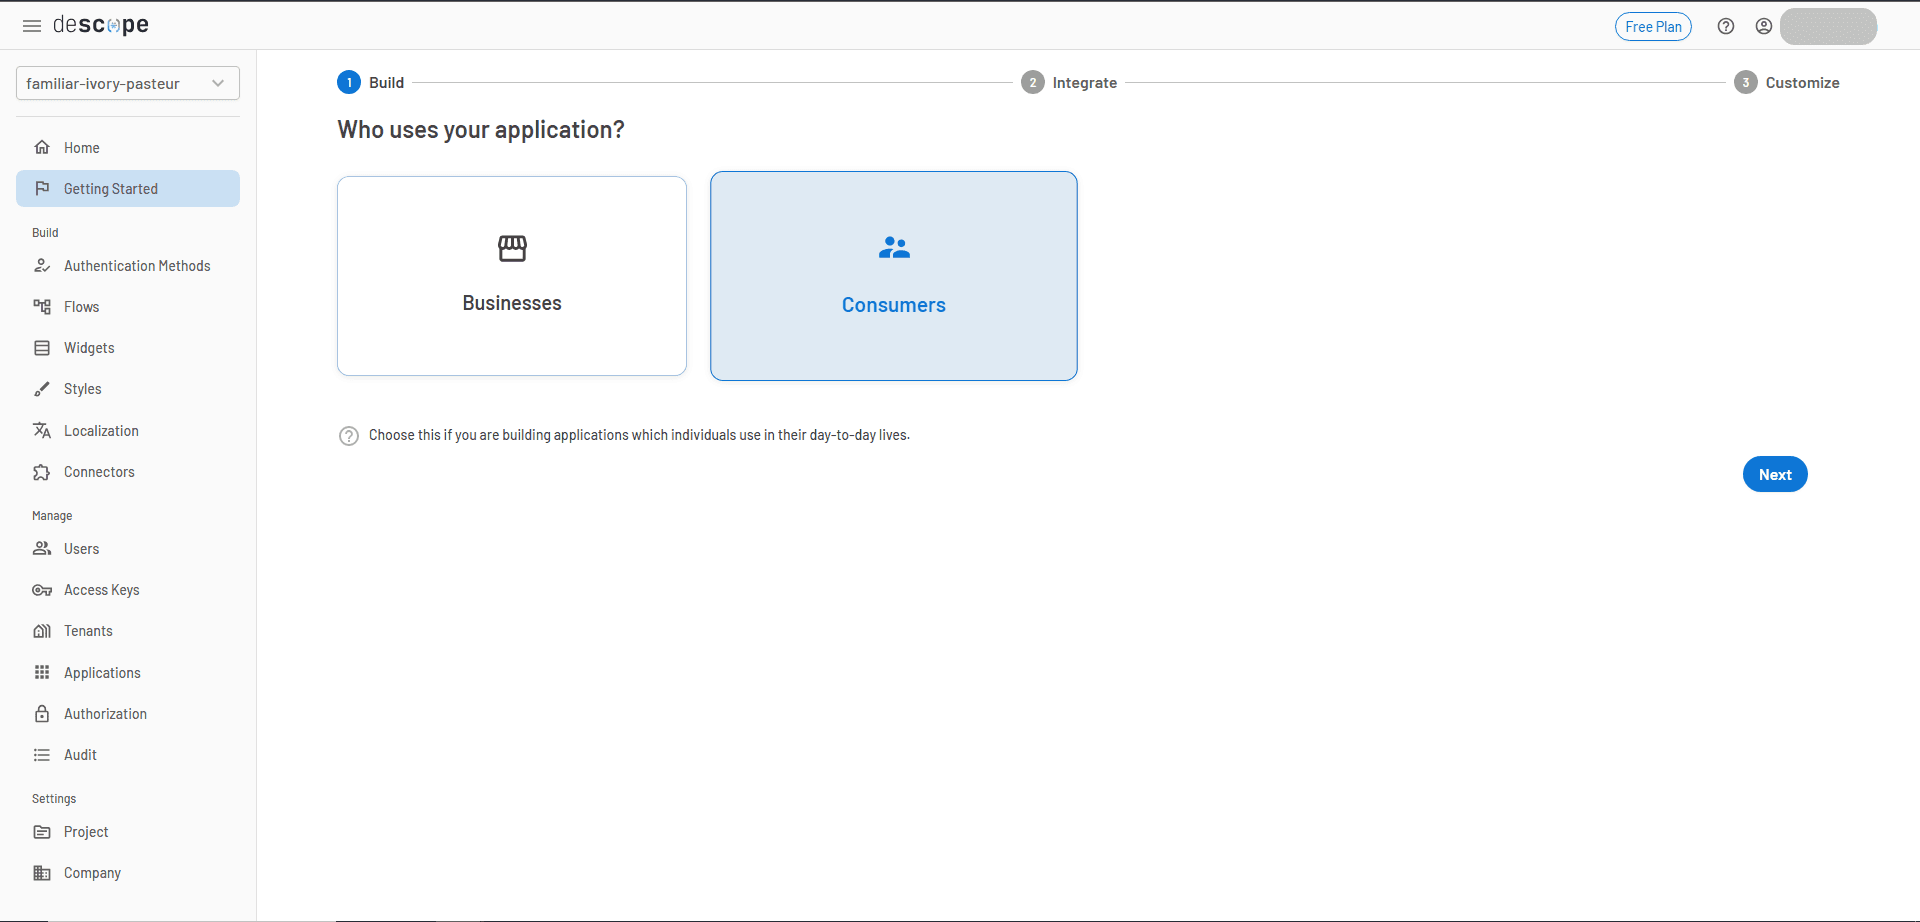
To integrate Descope into your project, you need to configure an authentication flow using the developer console. Sign in to Descope. This will take you to the developer console. Once there, click on Getting Started and select Consumers:
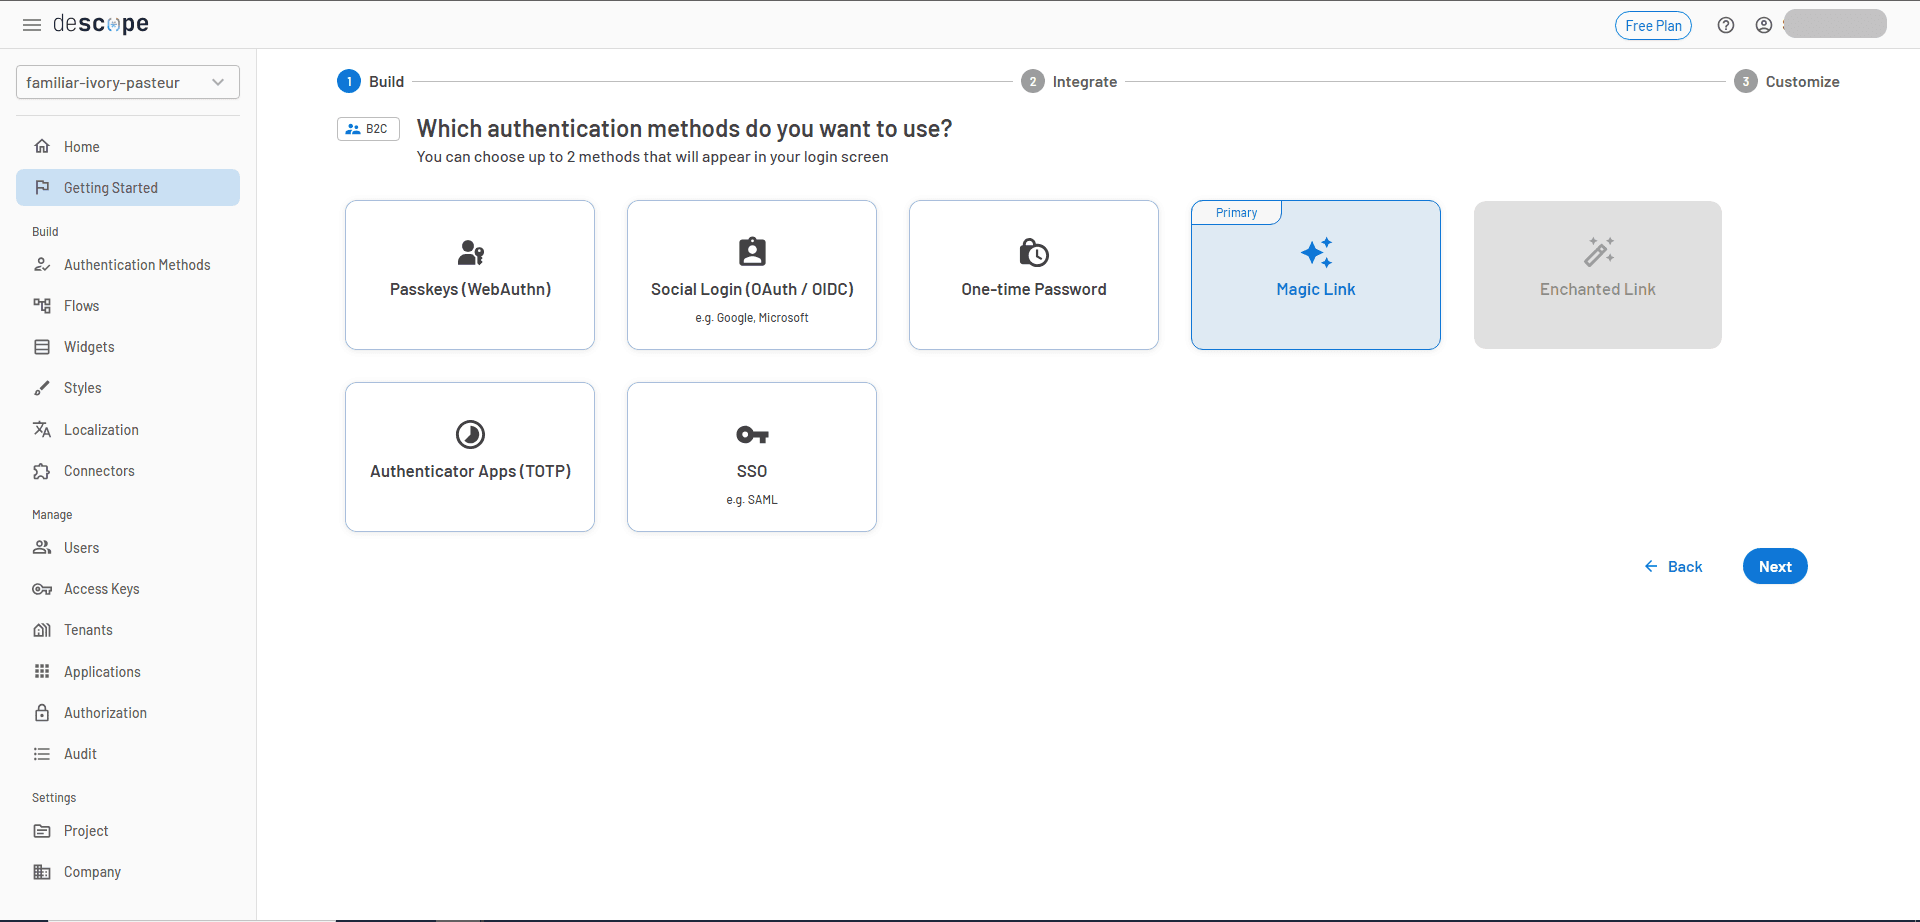
Click Next and choose Magic Link as the form of authentication:
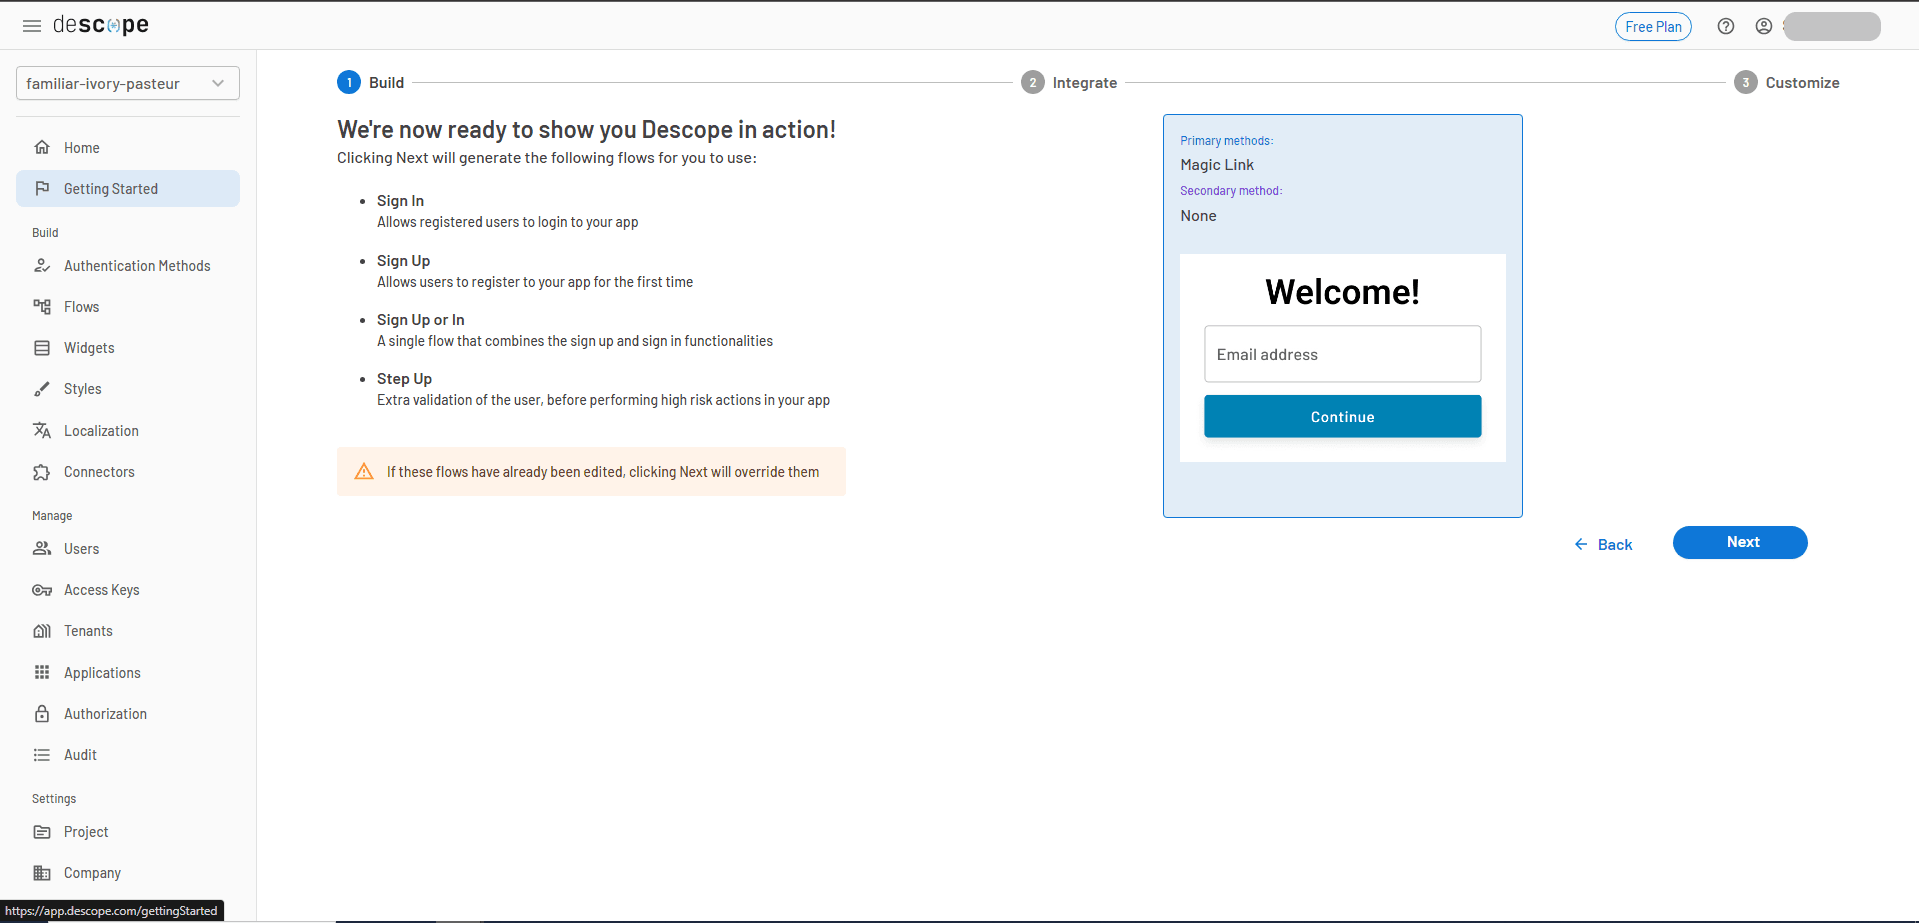
Choose Go ahead without MFA, as you won’t be using it for this tutorial. You can always set up MFA later. Then, you’ll see a preview of the selected options:
To integrate the authentication flow into your project, wrap your entire application with <AuthProvider> component. In index.js, replace the existing code with the following to set up the SDK and include the necessary project ID (found in the developer console):
import React from 'react';
import ReactDOM from 'react-dom/client';
import App from './App';
import { AuthProvider } from '@descope/react-sdk';

const root = ReactDOM.createRoot(document.getElementById('root'));
root.render(
    <React.StrictMode>
        <AuthProvider
            projectId='<your-descope-project-id>'
        >
            <App />
        </AuthProvider>
    </React.StrictMode>
);
You now have easy access to the logged-in user via the user object.
With the authentication flow now integrated, modify App.js to configure the Descope authentication flow for your React app:
import './App.css';
import { useDescope, useSession, useUser } from '@descope/react-sdk'
import { Descope } from '@descope/react-sdk'
import { React, useEffect, useState } from 'react';
function App() {
const { isAuthenticated, isSessionLoading } = useSession()
const { user, isUserLoading } = useUser()
const { logout } = useDescope()
// State property to store the recipes
const [recipes, setRecipe] = useState([]);
// Fetch the recipes and store them in the recipe state property
const fetchRecipes = async () => {
await fetch("https://dummyjson.com/recipes")
.then((response) => response.json())
.then((results) => {
setRecipe(results.recipes);
})
.catch(error => console.error(error));
}
useEffect(() => {
fetchRecipes();
}, []);
const handleLogout = () => {
logout()
};
return <>
// Log a message if the authentication succeeds or fails
{!isAuthenticated &&
(
<div style={{ display: "flex", justifyContent: "center" }}>
<div style={{ width: "400px" }}>
<Descope
flowId="sign-up-or-in"
onSuccess={(e) => console.log(e.detail.user)}
onError={(e) => console.log('Could not log in!')}
/>
</div>
</div>
)
}
{
(isSessionLoading || isUserLoading) && <p>Loading...</p>
}
{!isUserLoading && isAuthenticated &&
(
<div style={{padding:"0 0 3rem 3rem"}}>
<p>Hello {user.name}</p>
<button onClick={handleLogout}>Logout</button>
<div style={{padding:"1rem 0 0 0"}}>Here are some delicious recipes:</div>
{recipes.length > 0 &&
<>
{recipes.map((recipe) => {
return (
<div key={recipe.id}>
<h1>{recipe.name}</h1>
<p>Ingredients: {recipe.ingredients.join(', ')}.</p>
{recipe.instructions.map((instruction, index) => {
return (<p key={index}>{instruction}</p>)
})}
</div>
)
})}
</>
}
</div>
)}
</>;
}
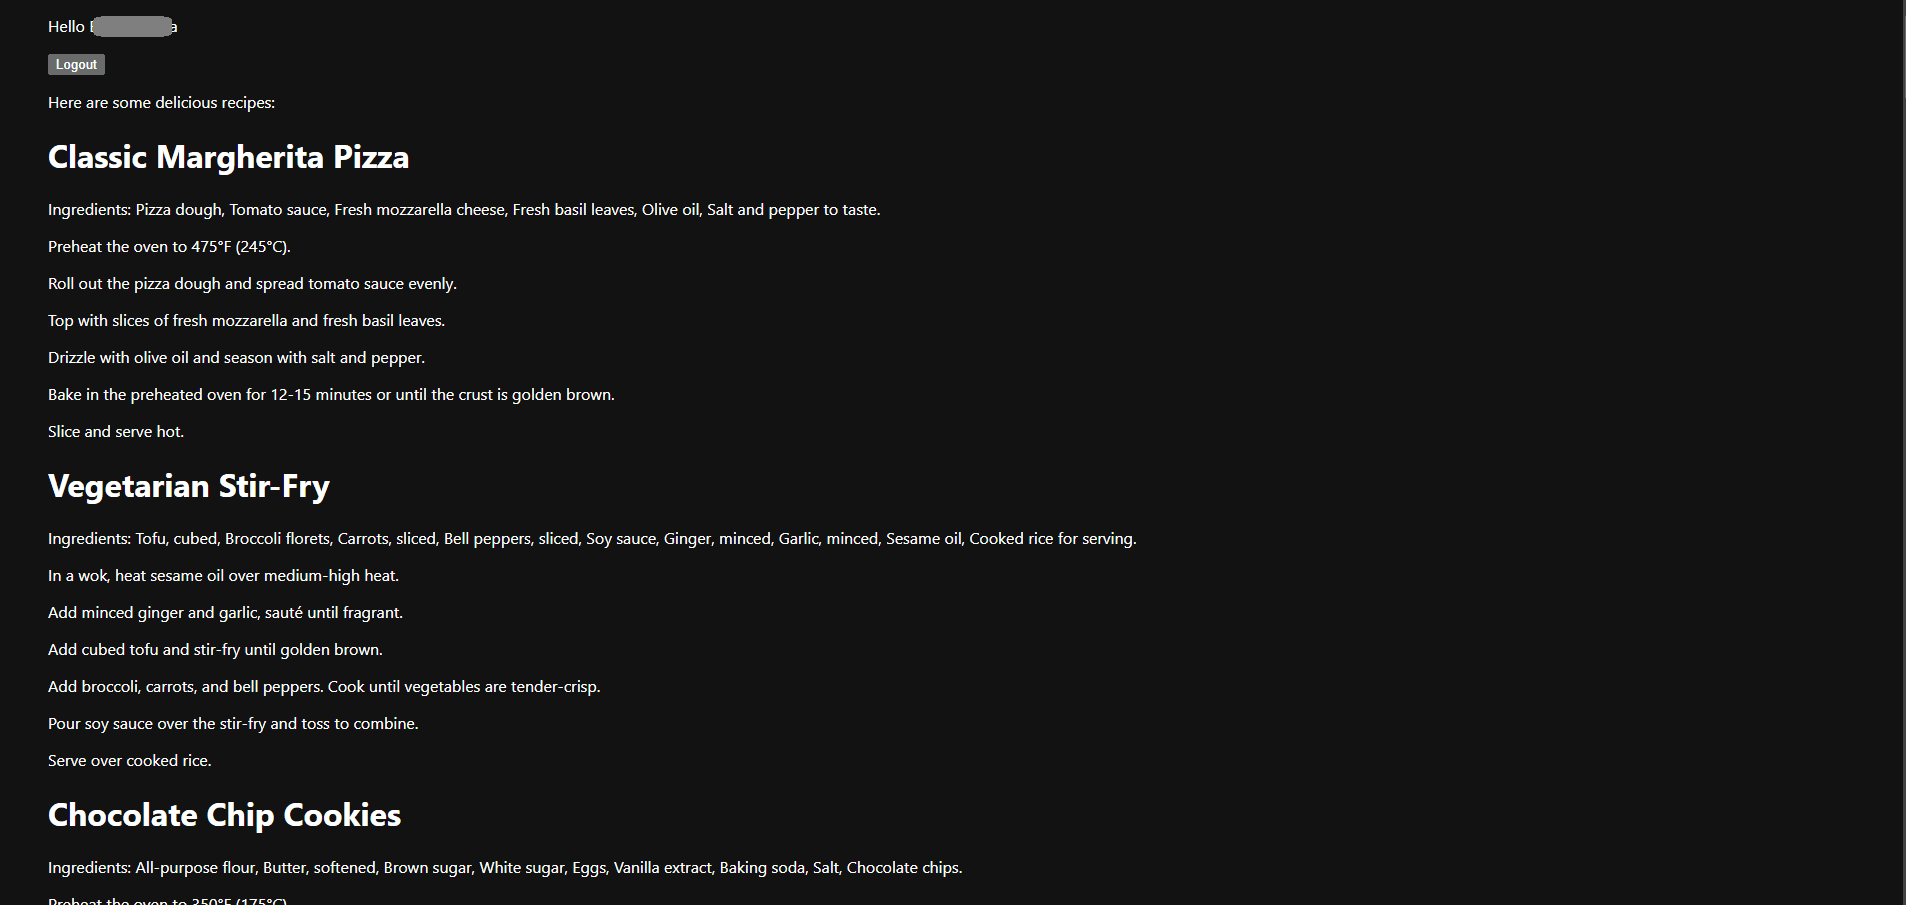
export default App;After the user successfully logs in, the application fetches recipes from the DummyJSON API and displays them. The user's information is stored in the user object, allowing you to access details like the user's name and customize the app accordingly.
Now that the authentication flow is set up, navigate to your project directory using the following command:
cd descope-appAnd then run the application using this command:
npm startAfter successfully compiling, open the URL displayed in the terminal (usually http://localhost:3000/). You’ll see the login screen:
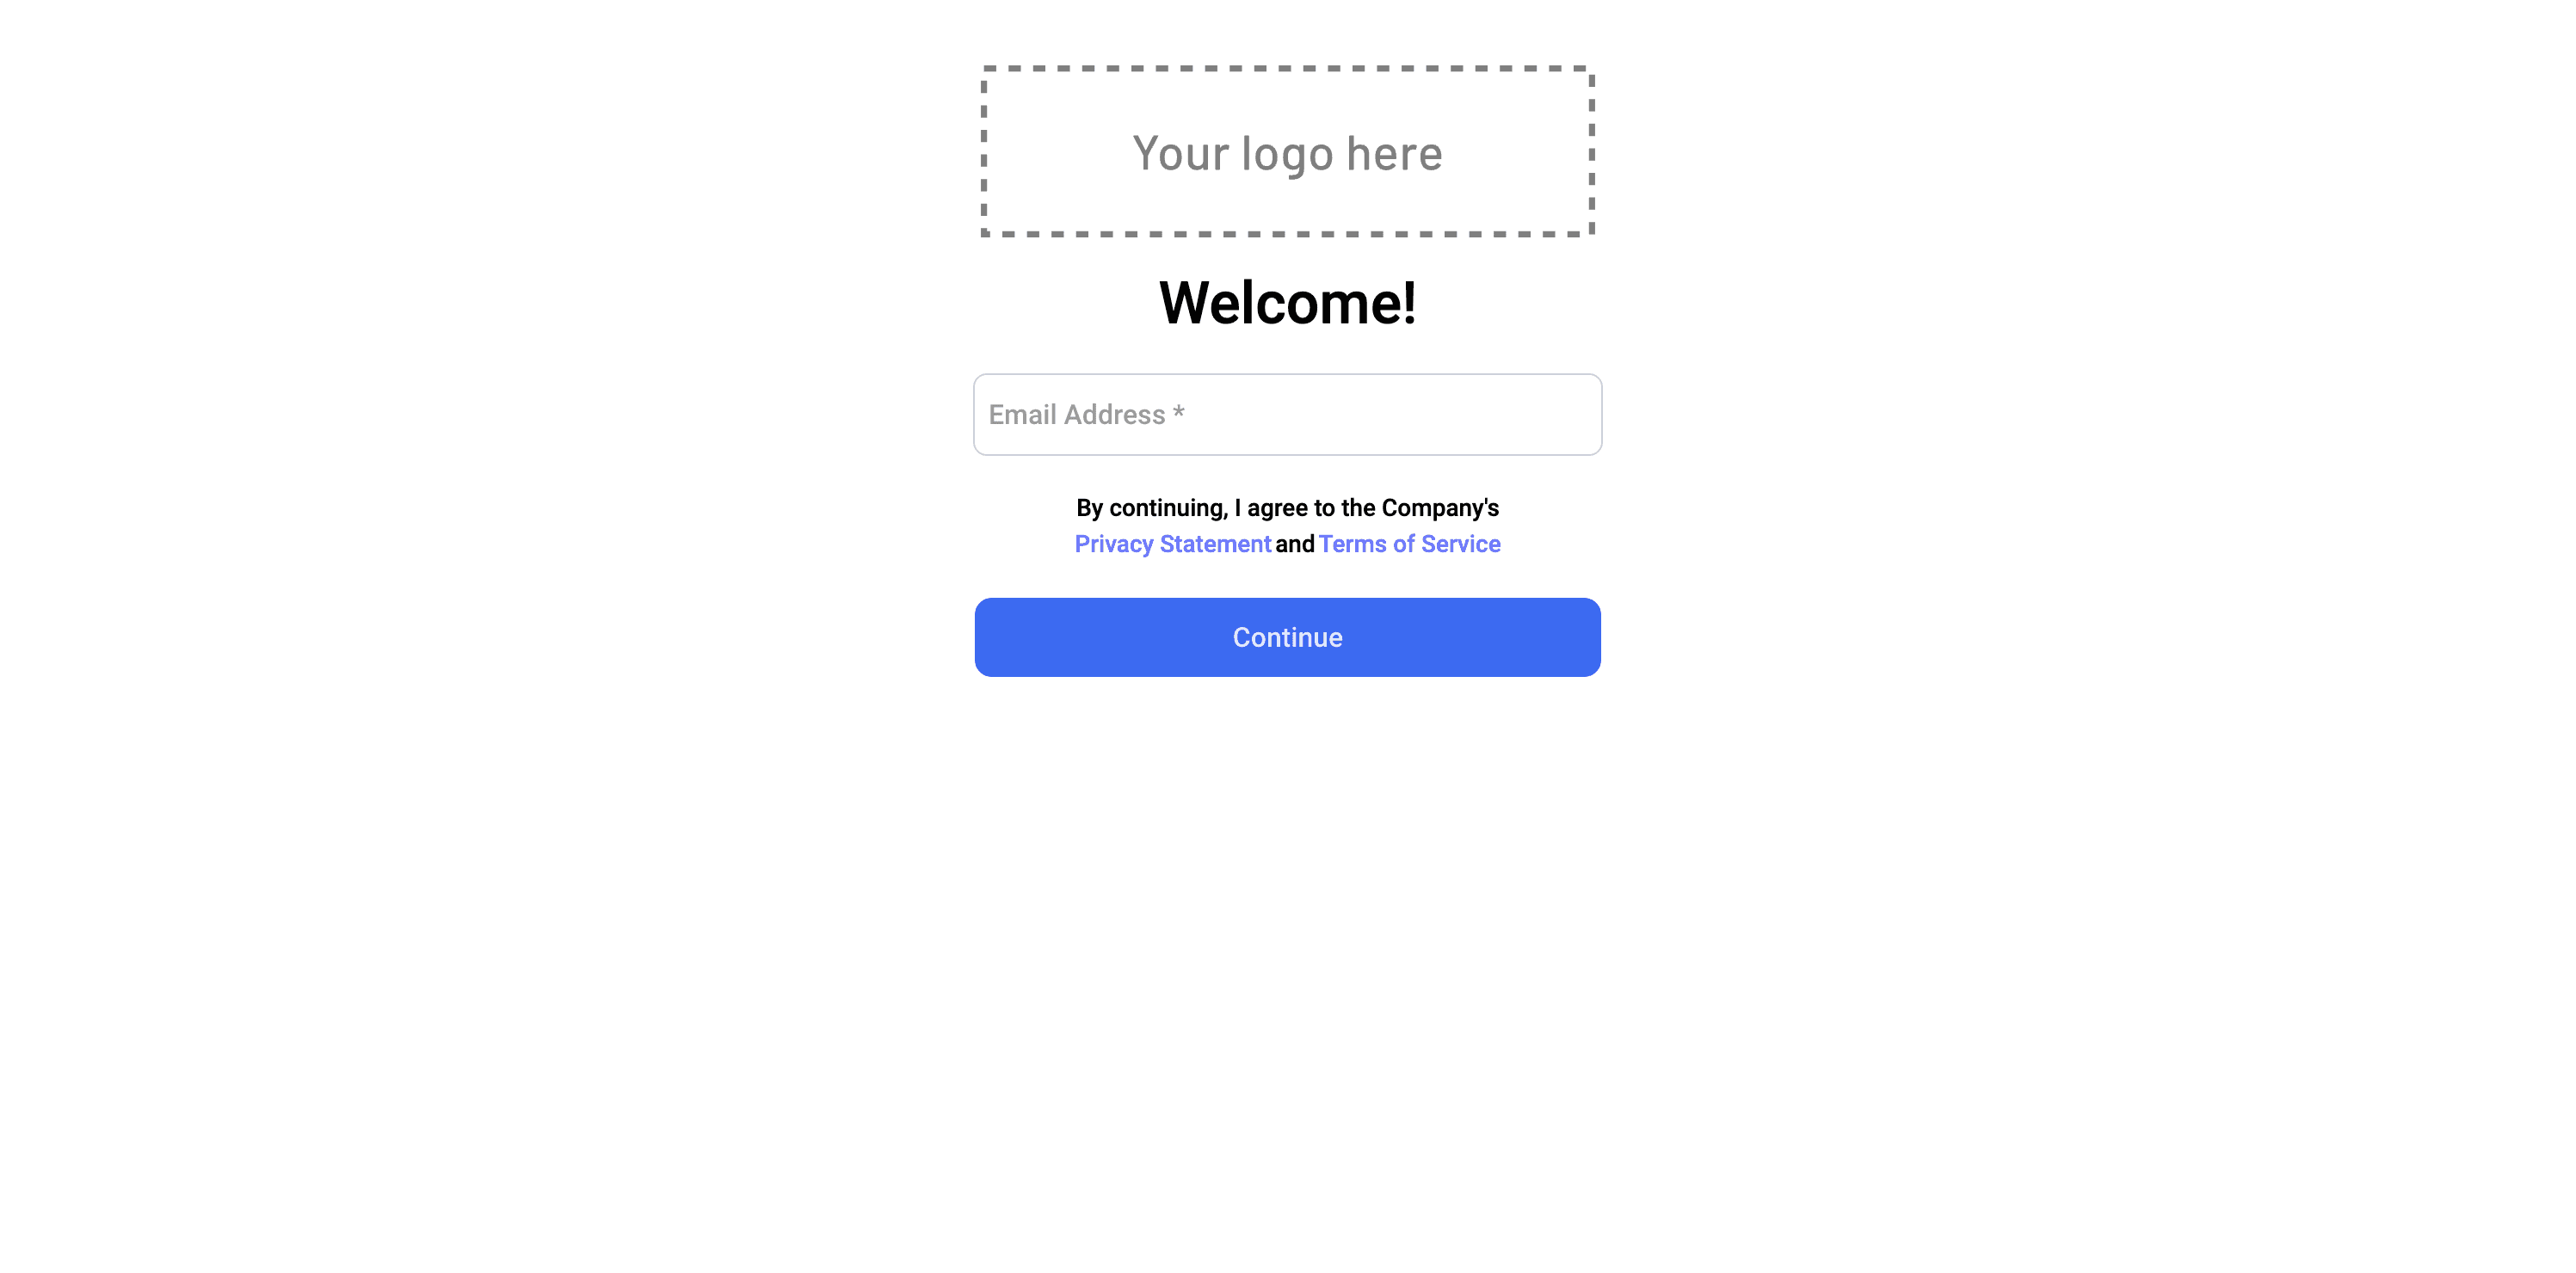
Enter the email address and click on Continue. You will receive a magic link in your inbox. Click the link, and you will be authenticated and redirected to the application. Once authenticated, the recipes will be visible:
Implement RBAC in React
Now that the user can see the recipes, you can configure RBAC to control which data is accessible to specific users.
RBAC is a method of regulating access to resources by assigning users to roles, which are defined by specific permissions related to job functions. This simplifies user management and enhances security by adhering to the principle of least privilege. You can learn more in Descope’s RBAC documentation.
Define user roles
To implement RBAC in your React app, the first step is to define user roles in the Descope console. For this tutorial, we’ll create two roles: Chef and User.
The User role can only list the recipes.
The Chef role can list recipes as well as view detailed information, like ingredients and instructions.
In the Descope console, navigate to the Authorization page.
Click + Role to add a new role.
Fill in the following details:
Name: Chef
Description: A chef who will view all recipes, including ingredients and instructions.
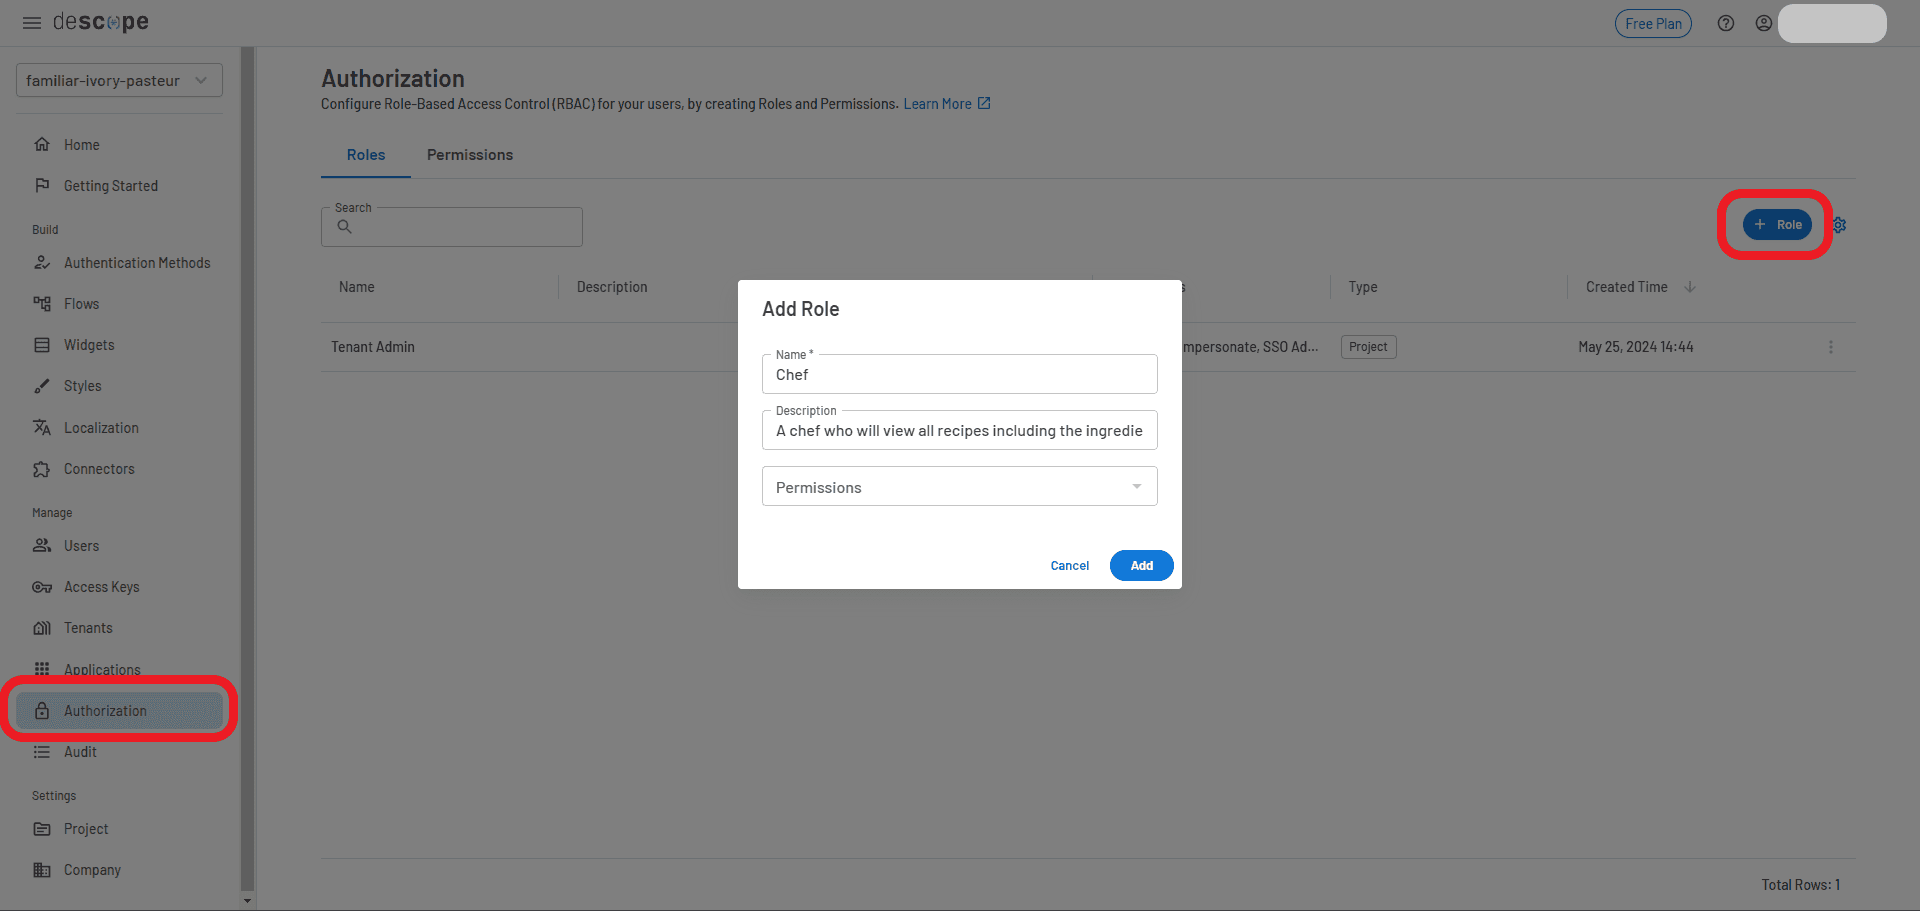
Leave the permissions as they are.
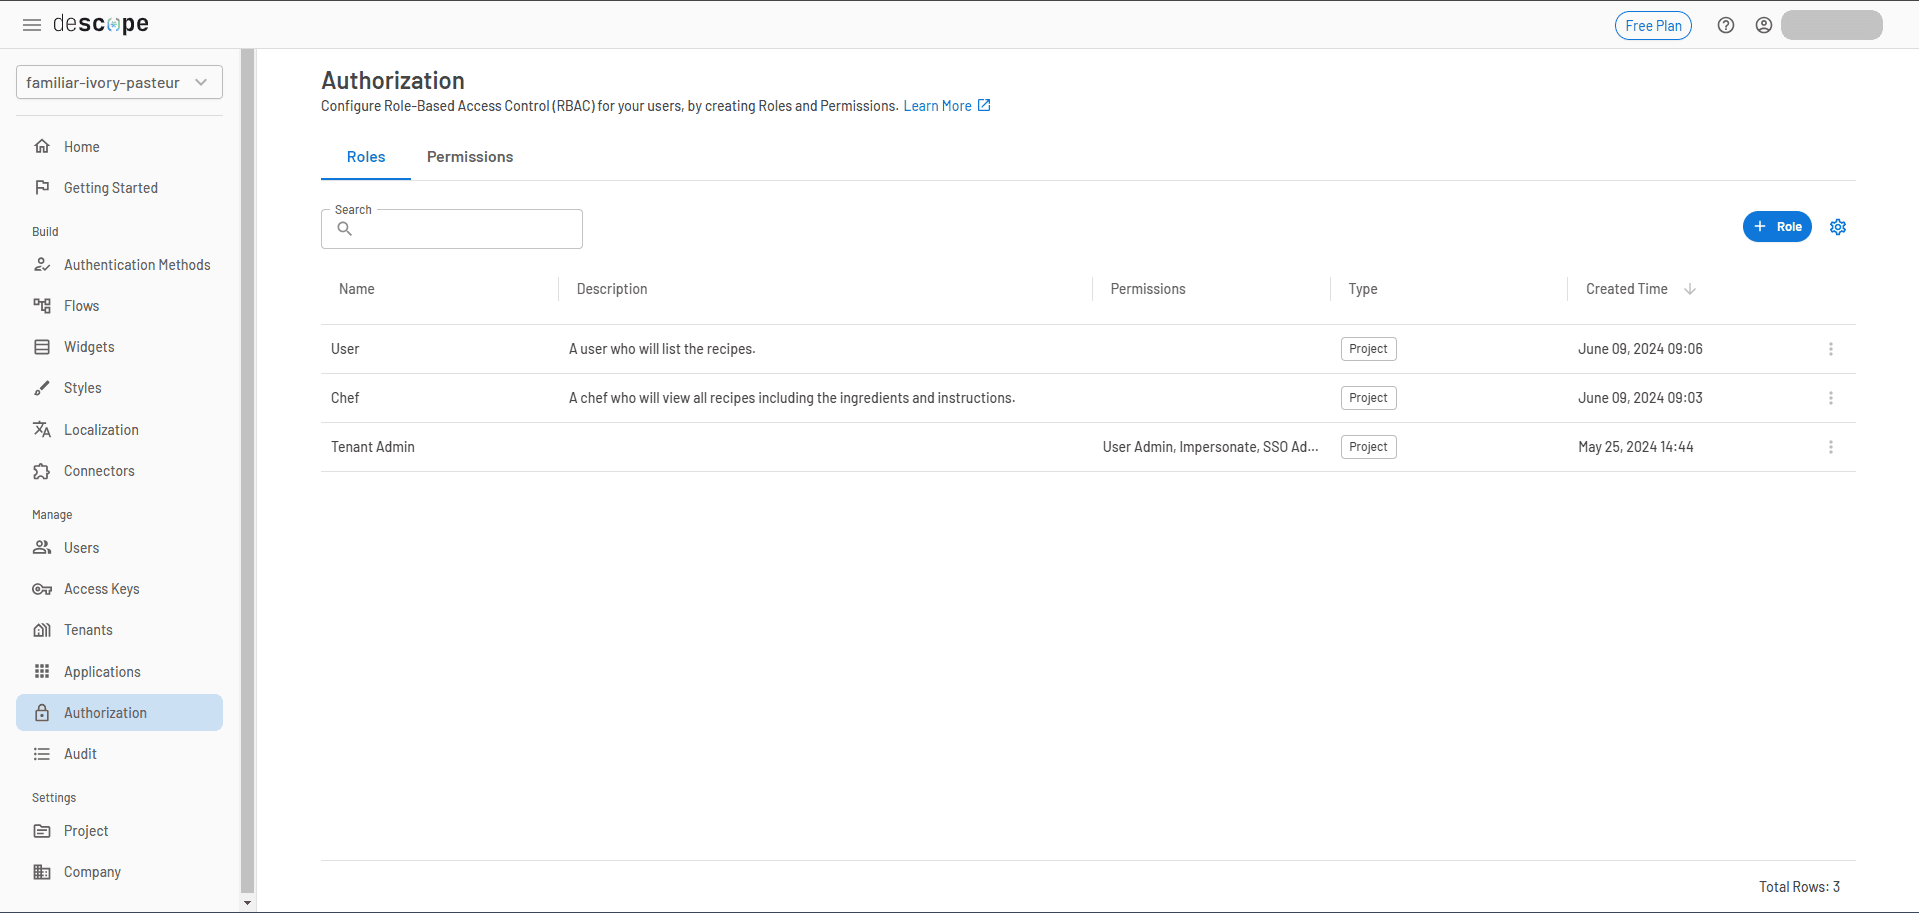
Then add another role for the user:
Name: User
Description: A user who can list recipes only.
Now you should have two roles created.
Assign roles to users
To assign a role to a user:
Navigate to Users in the Descope console.
Find the user you want to assign a role to, then select Edit.
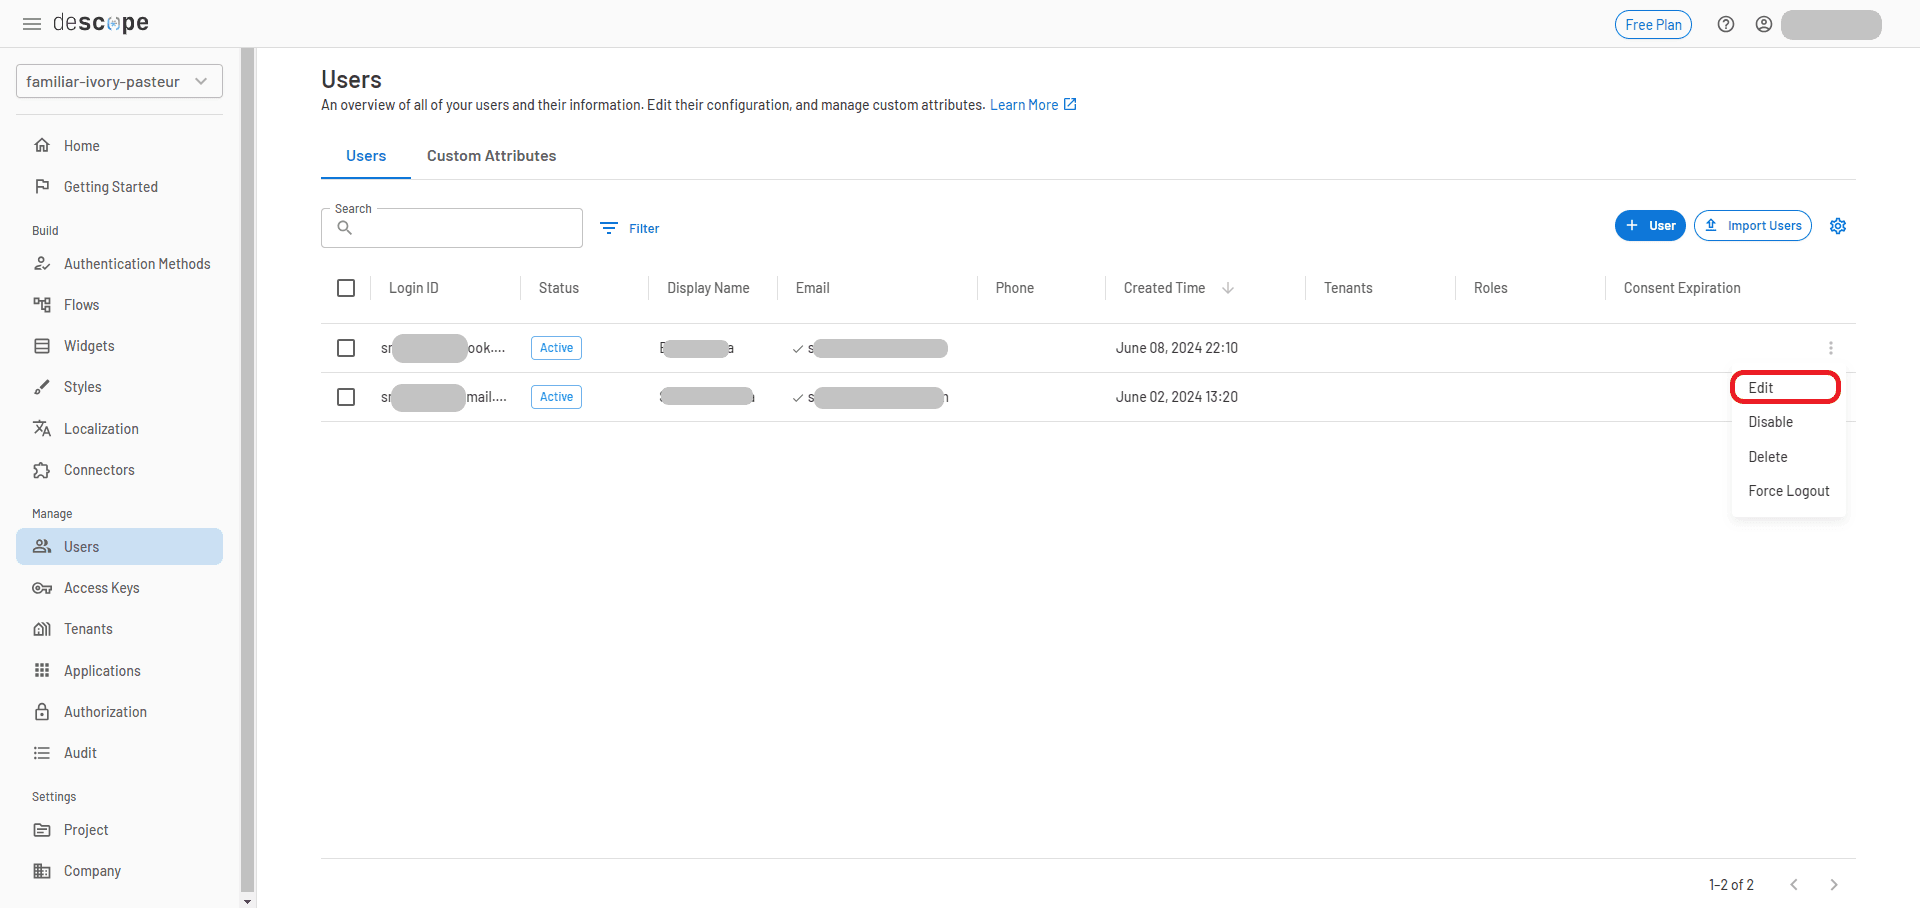
In the modal that appears, go to the Authorization section and select the Chef role from the Roles drop-down.
Click Save.
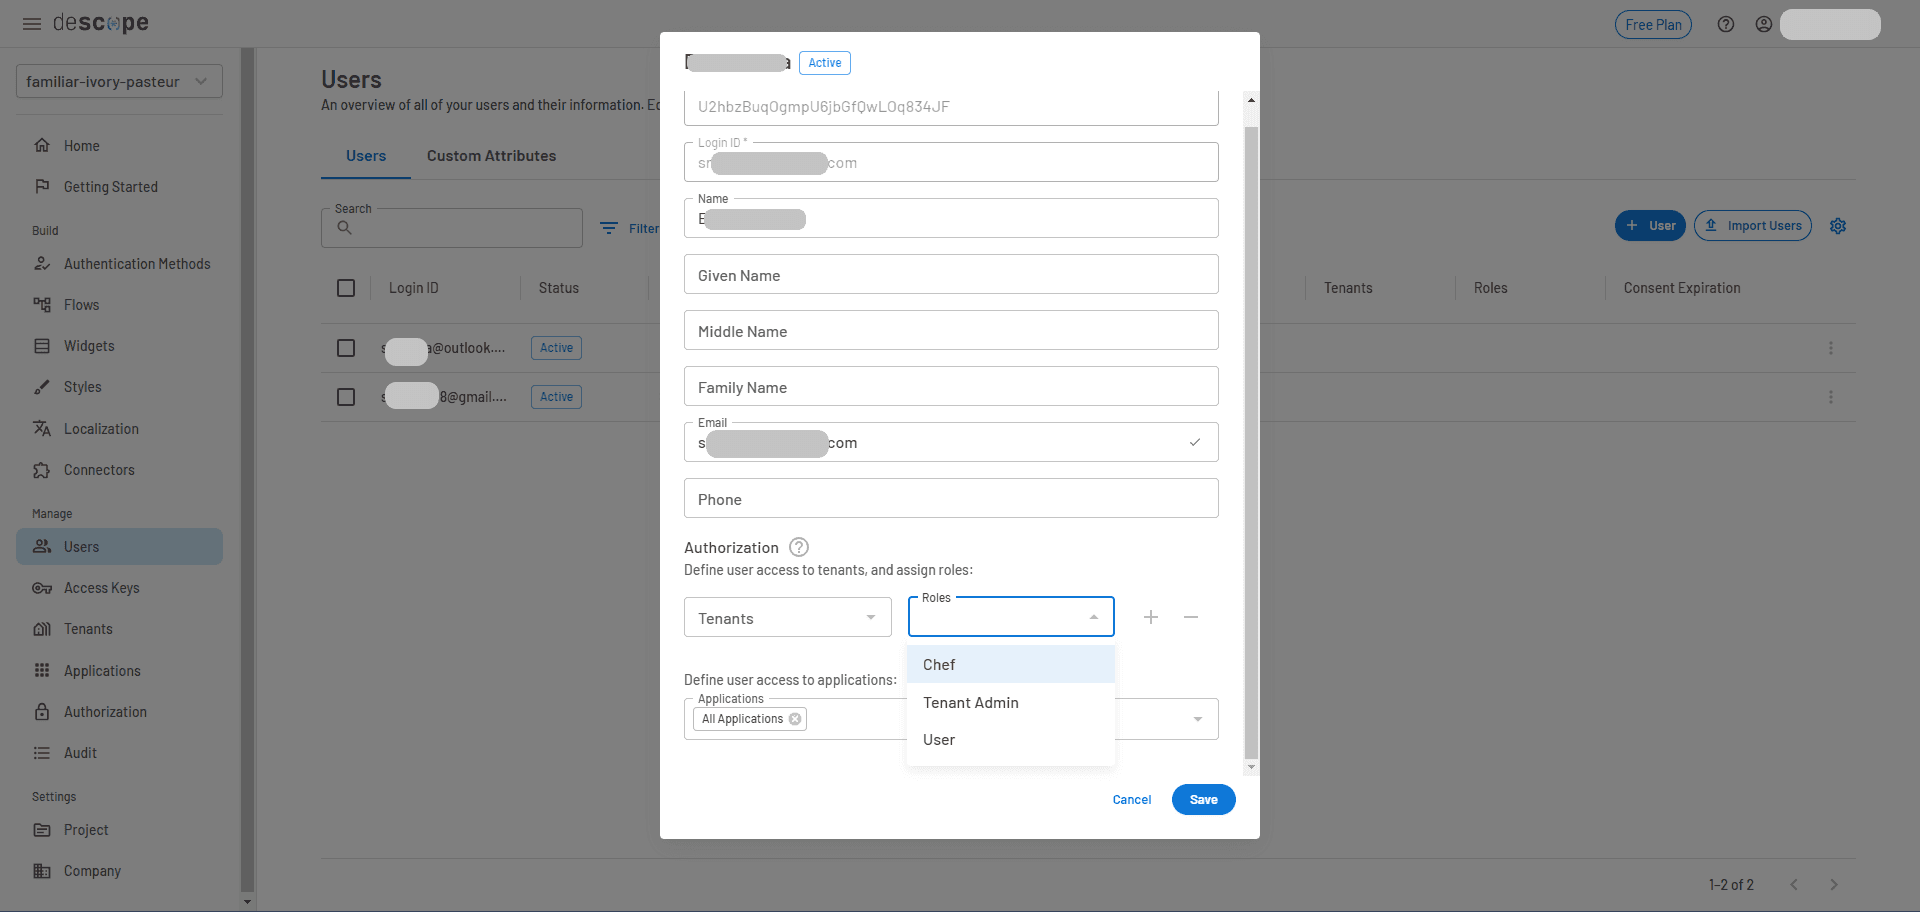
You have now assigned a role to the user.
Implement roles in your React app
Now that the roles are defined, let’s integrate them into your app.
Create a new file called roles.js and define the roles as follows:
export const roles = {
    USER: 'User',
    CHEF: 'Chef'
};
Then, update App.js to conditionally render certain details about the recipes based on the assigned user role:
import './App.css';
import { useDescope, useSession, useUser } from '@descope/react-sdk'
import { Descope } from '@descope/react-sdk'
import { React, useEffect, useState } from 'react';
import { roles } from './roles';

function App() {
  const { isAuthenticated, isSessionLoading } = useSession()
  const { user, isUserLoading } = useUser()
  const { logout } = useDescope()

  const [recipes, setRecipe] = useState([]);

  const fetchRecipes = async () => {
    await fetch("https://dummyjson.com/recipes")
        .then((response) => response.json())
        .then((results) => {
          setRecipe(results.recipes);
        })
        .catch(error => console.error(error));
  }

  useEffect(() => {
    fetchRecipes();
  }, [isAuthenticated, user]);

  const handleLogout = () => {
    logout()
  };

  return <>
    {!isAuthenticated &&
      (
        <Descope
          flowId="sign-up-or-in"
          onSuccess={(e) => console.log(e.detail.user)}
          onError={(e) => console.log('Could not log in!')}
        />
      )
    }

    {
      (isSessionLoading || isUserLoading) && <p>Loading...</p>
    }

    {!isUserLoading && isAuthenticated &&
      (
        <div style={{padding:"0 0 3rem 3rem"}}>
          <p>Hello {user.name}</p>
          <button onClick={handleLogout}>Logout</button>
          {(user.roleNames.includes(roles.CHEF) || user.roleNames.includes(roles.USER)) &&
            <div>
              <div style={{padding:"1rem 0 0 0"}}>Here are some delicious recipes:</div>

              {recipes.length > 0 &&
                <>
                  {recipes.map((recipe) => {
                    return (
                      <div key={recipe.id}>
                        <h1>{recipe.name}</h1>

                        {
                          user.roleNames.includes(roles.CHEF) &&
                          <>
                            <p>Ingredients: {recipe.ingredients.join(', ')}.</p>
                            {recipe.instructions.map((instruction, index) => {
                              return (<p key={index}>{instruction}</p>)
                            })}
                          </>
                        }
                      </div>
                    )
                  })}
                </>
              }
            </div>
            }
        </div>
      )}
  </>;
}
export default App;
How this works:
The roles.js file stores the roles and can be easily imported into your application.
The code checks the user.roleNames from the user object, and based on the assigned role (either Chef or User), it conditionally renders the recipe details.
Users can see only the recipe titles, while Chefs can view both the recipe titles and the full details, including ingredients and instructions.
This setup uses RBAC to manage access to different parts of the app, ensuring that only users with the Chef role can view detailed recipe information, while others are limited to basic recipe listings.
Other link-based auth options with Descope
Descope, a CIAM platform, offers several alternatives to magic link authentication for React apps, each providing unique benefits.
Discover more: Adding OAuth 2.0 to React for Authentication & Authorization
Enchanted links
Enchanted links are an enhanced version of traditional magic links. These unique, single-use links are sent via email for authentication. The key difference? They allow users to initiate the login process on one device and authenticate by clicking the link on another device.
Once the user clicks the correct link from a set of three options, their session on the original device is validated, and they’re logged in. Enchanted links can be used for both new user sign-ups and existing user logins.
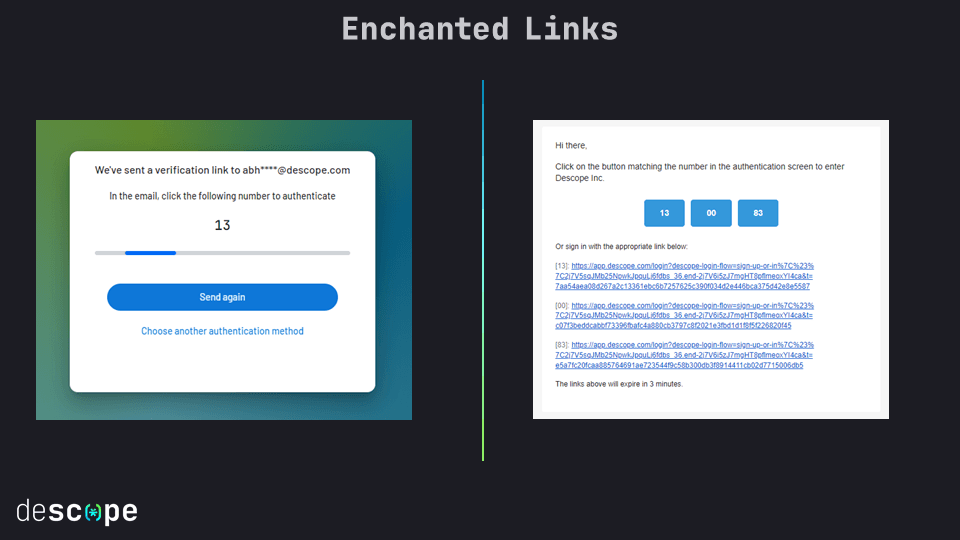
Learn more about customizing enchanted links with Descope Flows here.
Embedded links
Embedded links generate unique tokens. These tokens can be sent via email, SMS, or even used programmatically without clicking a link, similar to enchanted links.
The token is authenticated using the magic link verification function. It’s created with the Descope SDK on the backend (such as Node.js), then sent to the user. After clicking, the token is sent back to the backend for verification.
Learn how to implement embedded links with Descope Flows here.
Simple React magic link implementation with Descope
In this article, you’ve learned how to implement a seamless magic link authentication flow in your React app. You’ve also seen how to assign user roles and control access based on those roles. By eliminating password management challenges, magic links improve user adoption and conversion rates. This approach also simplifies authentication for developers, reducing infrastructure and development overhead.
Descope makes magic link integration easy with visual workflows that speed up both setup and ongoing modifications to your authentication flows.
Have questions about Descope? Book time with our experts.