

Table of Contents
This tutorial was written by Kevin Kimani, a passionate developer and technical writer who enjoys explaining complicated concepts in a simple way. You can check out his GitHub or X account to connect and see more of his work!
User authentication in React Native applications validates the identity of users who interact with your application. This can involve a combination of credentials, such as username and password; biometric data, such as fingerprints or face scans; or social login with providers like Google and GitHub.
Using traditional authentication methods, like password-based authentication, can introduce unwanted complexities in the implementation and security of your React Native application. Building features such as user registration, login, session management, and password resets from scratch usually involve complex logic that can lead to longer development times and increased chances of bugs. These features may also require significant expertise in cryptography and security best practices to ensure the integrity and confidentiality of sensitive user information.
Building authentication for your application in-house can further intensify these complexities for the following reasons:
Maintenance overhead: You are responsible for maintaining and updating the authentication codebase as the application’s authentication needs evolve.
Security risks: You need a great understanding of security principles and best practices. Without proper expertise, your system can be vulnerable to attacks by malicious actors.
Delayed development: You’ll have to divert time and focus away from building your application’s core features. You may end up spending more time resolving authentication-related issues that have already been fixed by existing solutions.
In this article, you will learn how to add user authentication to a React Native application with Descope. Additionally, you will learn how to implement role-based access control (RBAC) and conditionally render in-app data based on the role of the user.
Prerequisites
Before starting, you need the following to complete this tutorial:
A React Native development environment set up.
Node.js v18 and Yarn installed on your local machine.
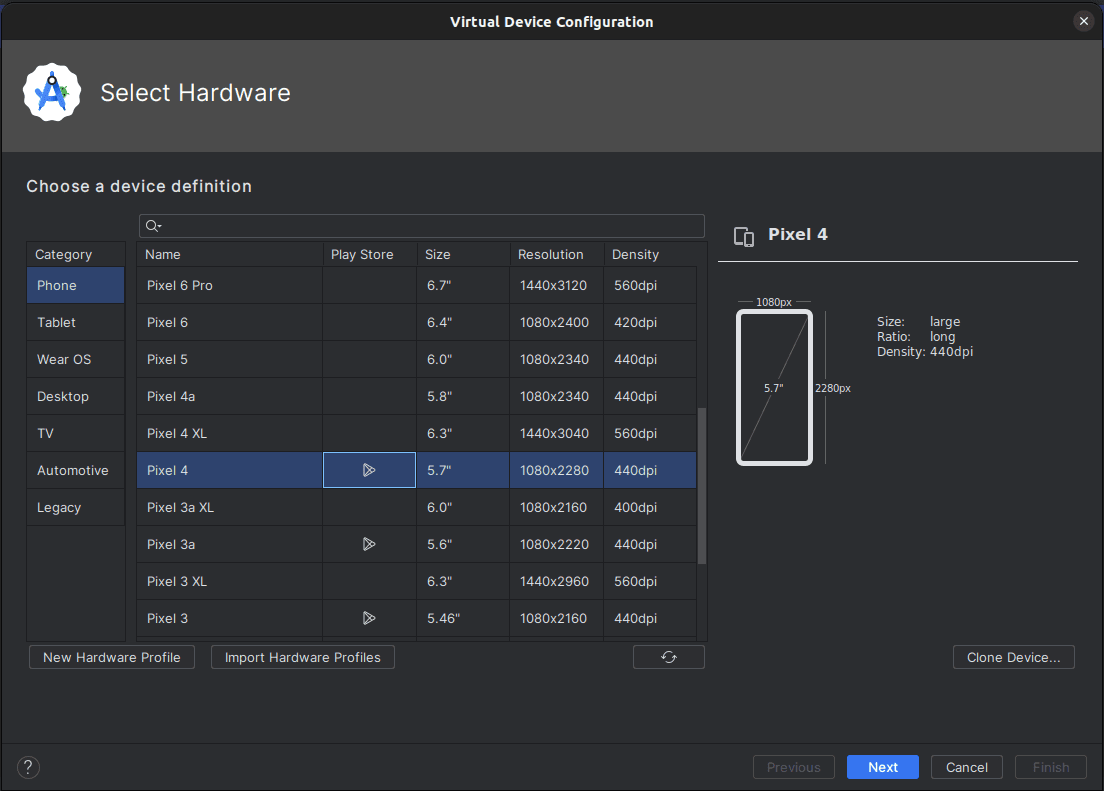
An emulator with Google Play Store support (indicated by the Google Play icon when creating a new emulator device). This guide uses Pixel 4:
Note: Make sure that you set up a screen lock for your emulator. For this guide, the emulator has a PIN set up.
A free GitHub account.
The Git CLI installed on your local machine.
A free Descope account and a basic understanding of how to customize Descope flows.
A Gmail account. Make sure you are signed into the Gmail account on the emulator.
To demo how to implement RBAC and render in-app data based on the user’s role, this guide uses a simple blogging platform with a couple of posts. Each post has a title, body, and published status, which is a Boolean indicating whether a post has been published or not.
Through Descope, you create two roles: editor and viewer. Editors can access all the posts and toggle the published status. Meanwhile, viewers are able to view only the published posts. For authentication in the app, you will use passkeys / Web Authentication (WebAuthn) as the primary authentication method with an email one-time password (OTP) as a fallback (multi-factor authentication or MFA).
With Descope providing the authentication and user management functionalities, a custom backend will serve the posts to the users based on their roles.
Creating a Descope Project
With your Descope account ready, you can log in to your console and follow the Getting Started guide to create a project.
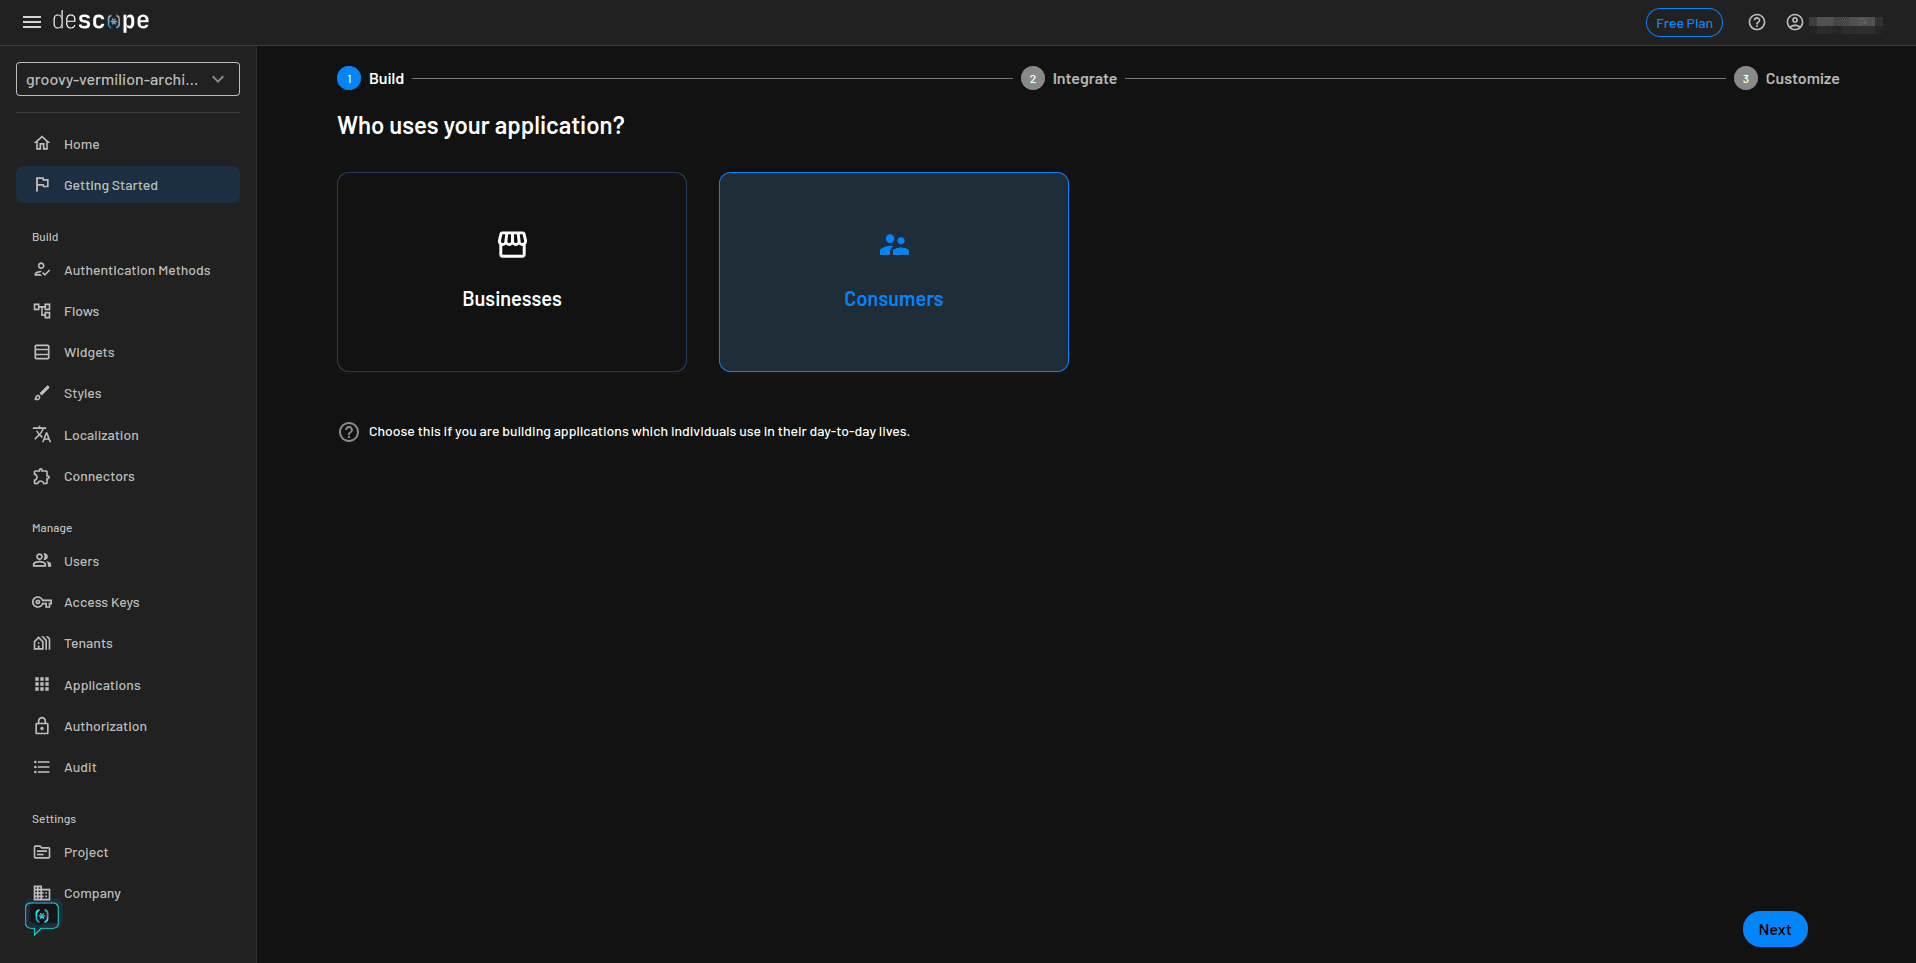
Under Who uses your application?, choose Consumers as you are building an application that will be used by individuals, and click Next:
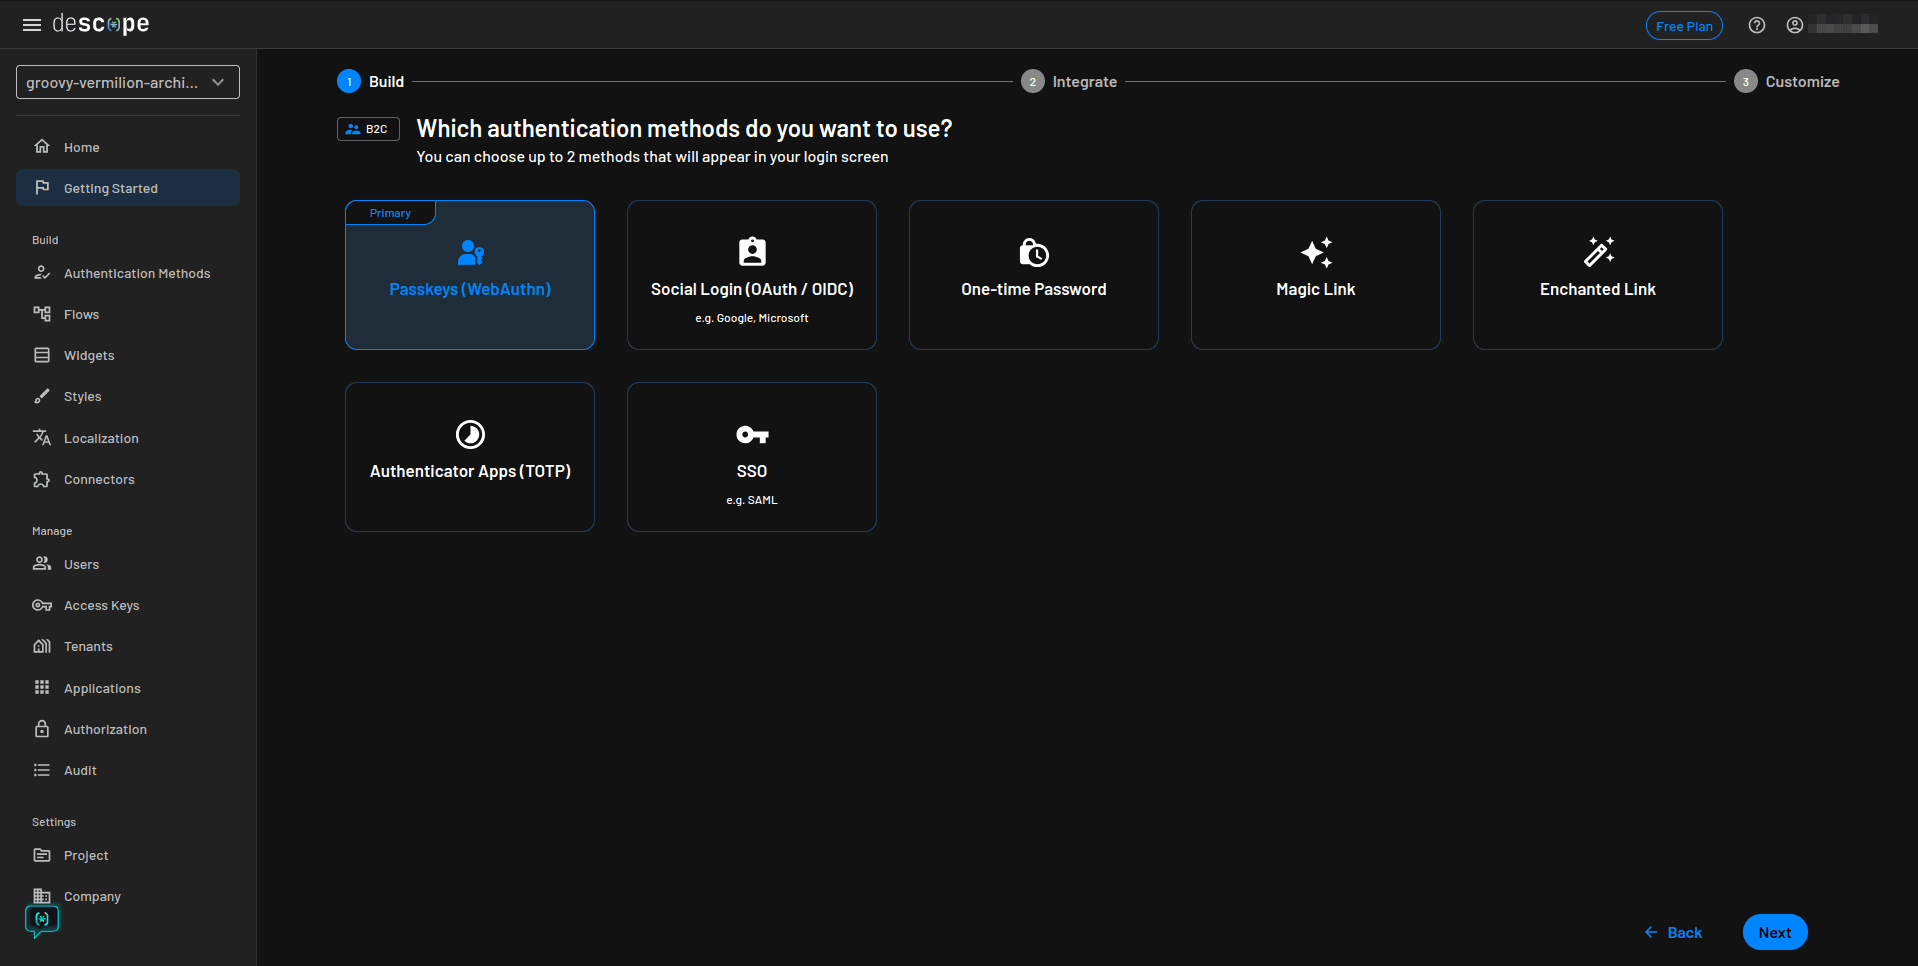
For the authentication method, choose Passkeys (WebAuthn) and click Next:
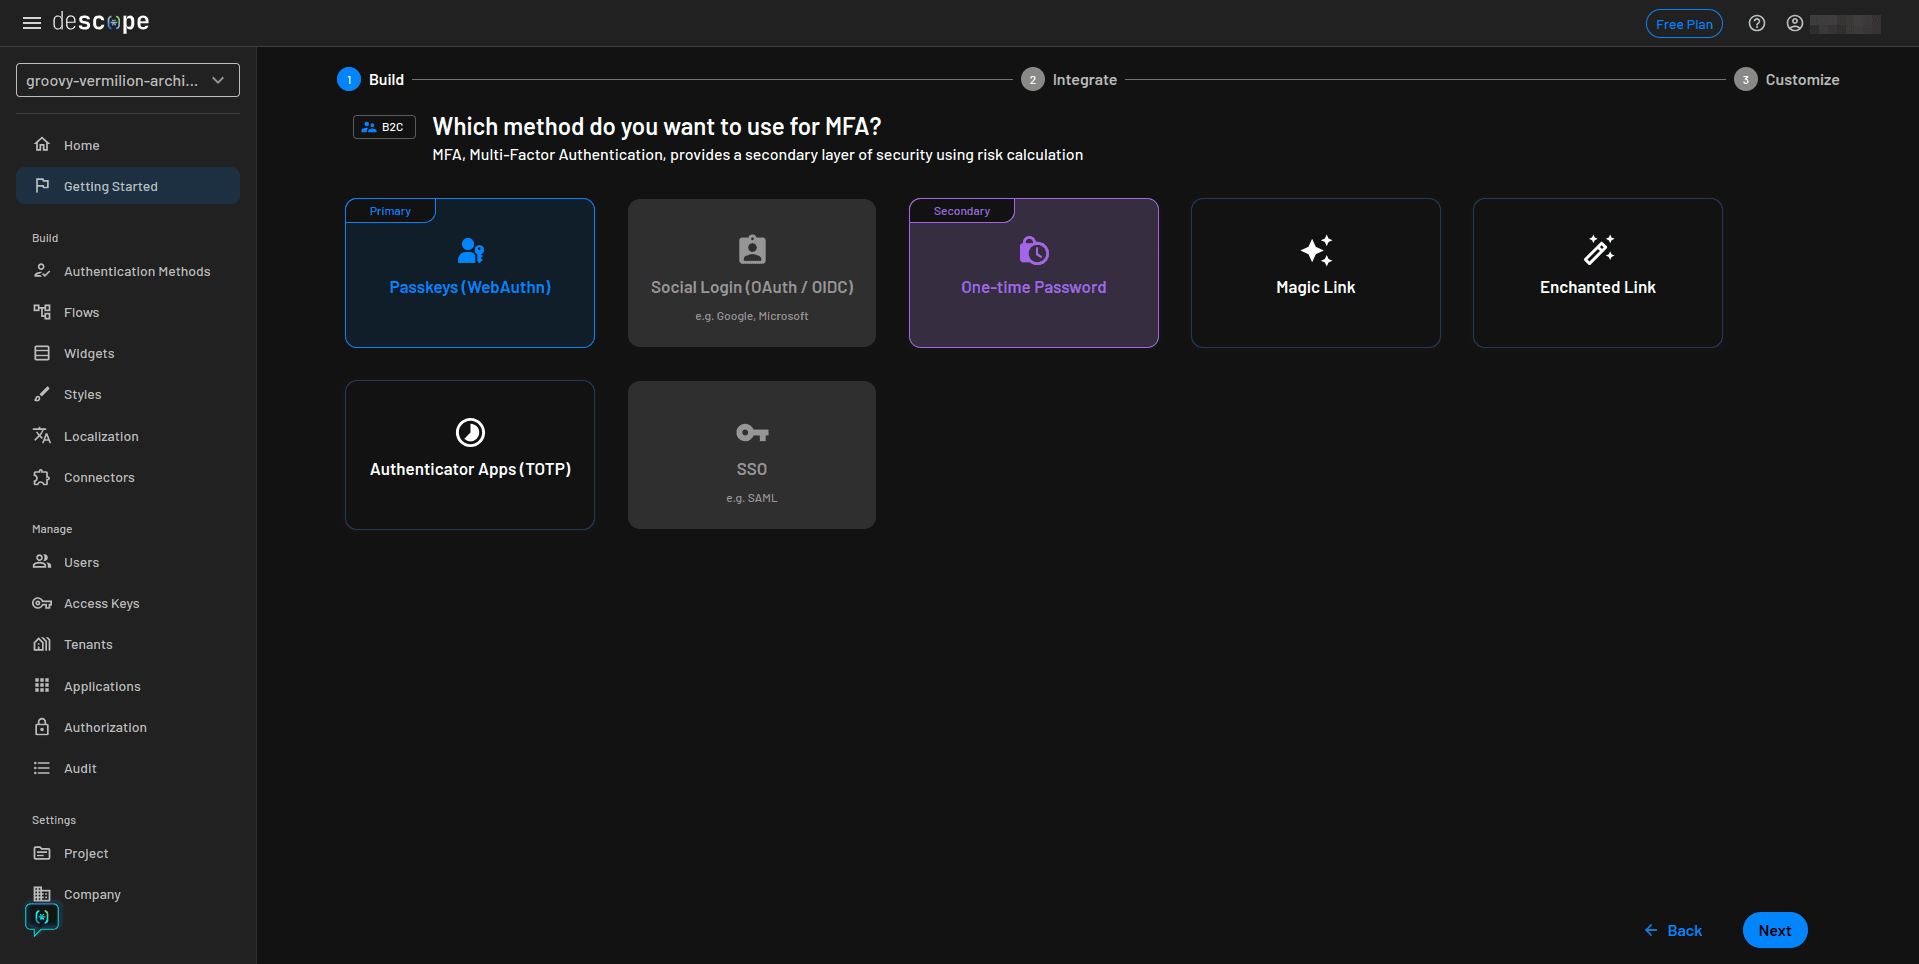
Select One-time Password as the MFA method and click Next:
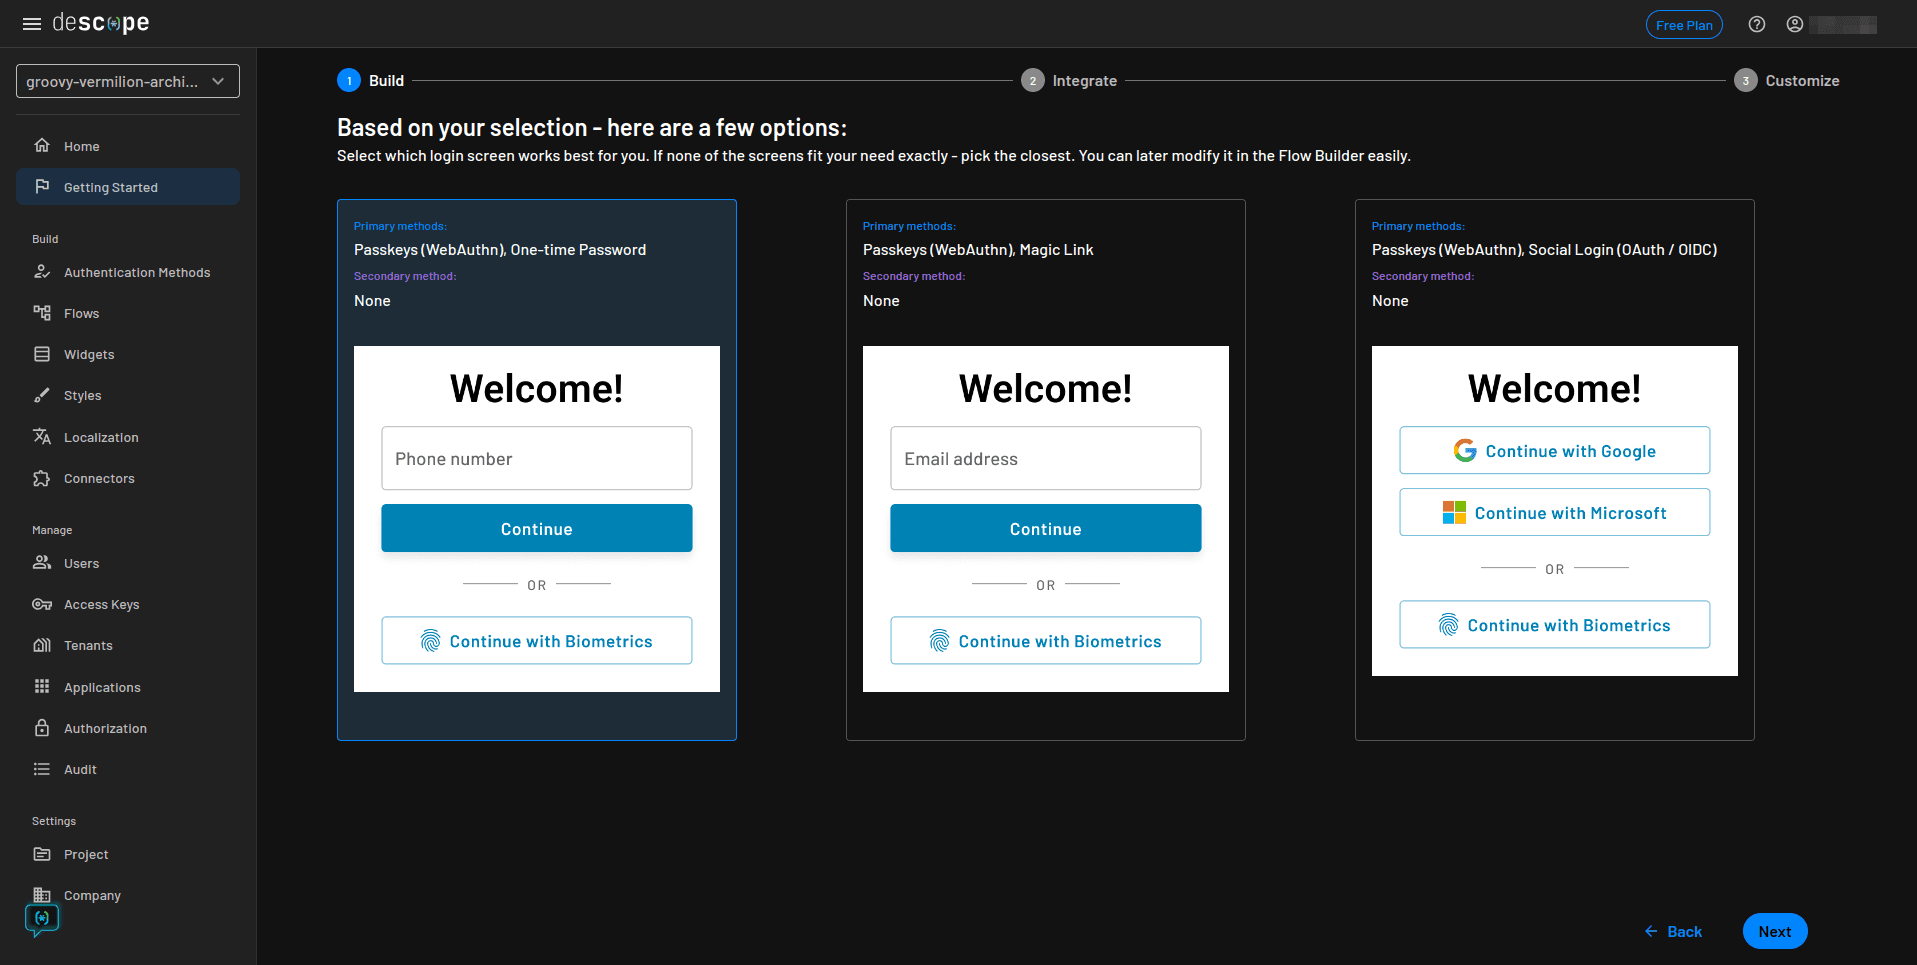
On the next page, select the first login screen option and click Next. You can modify the appearance of the screen later:
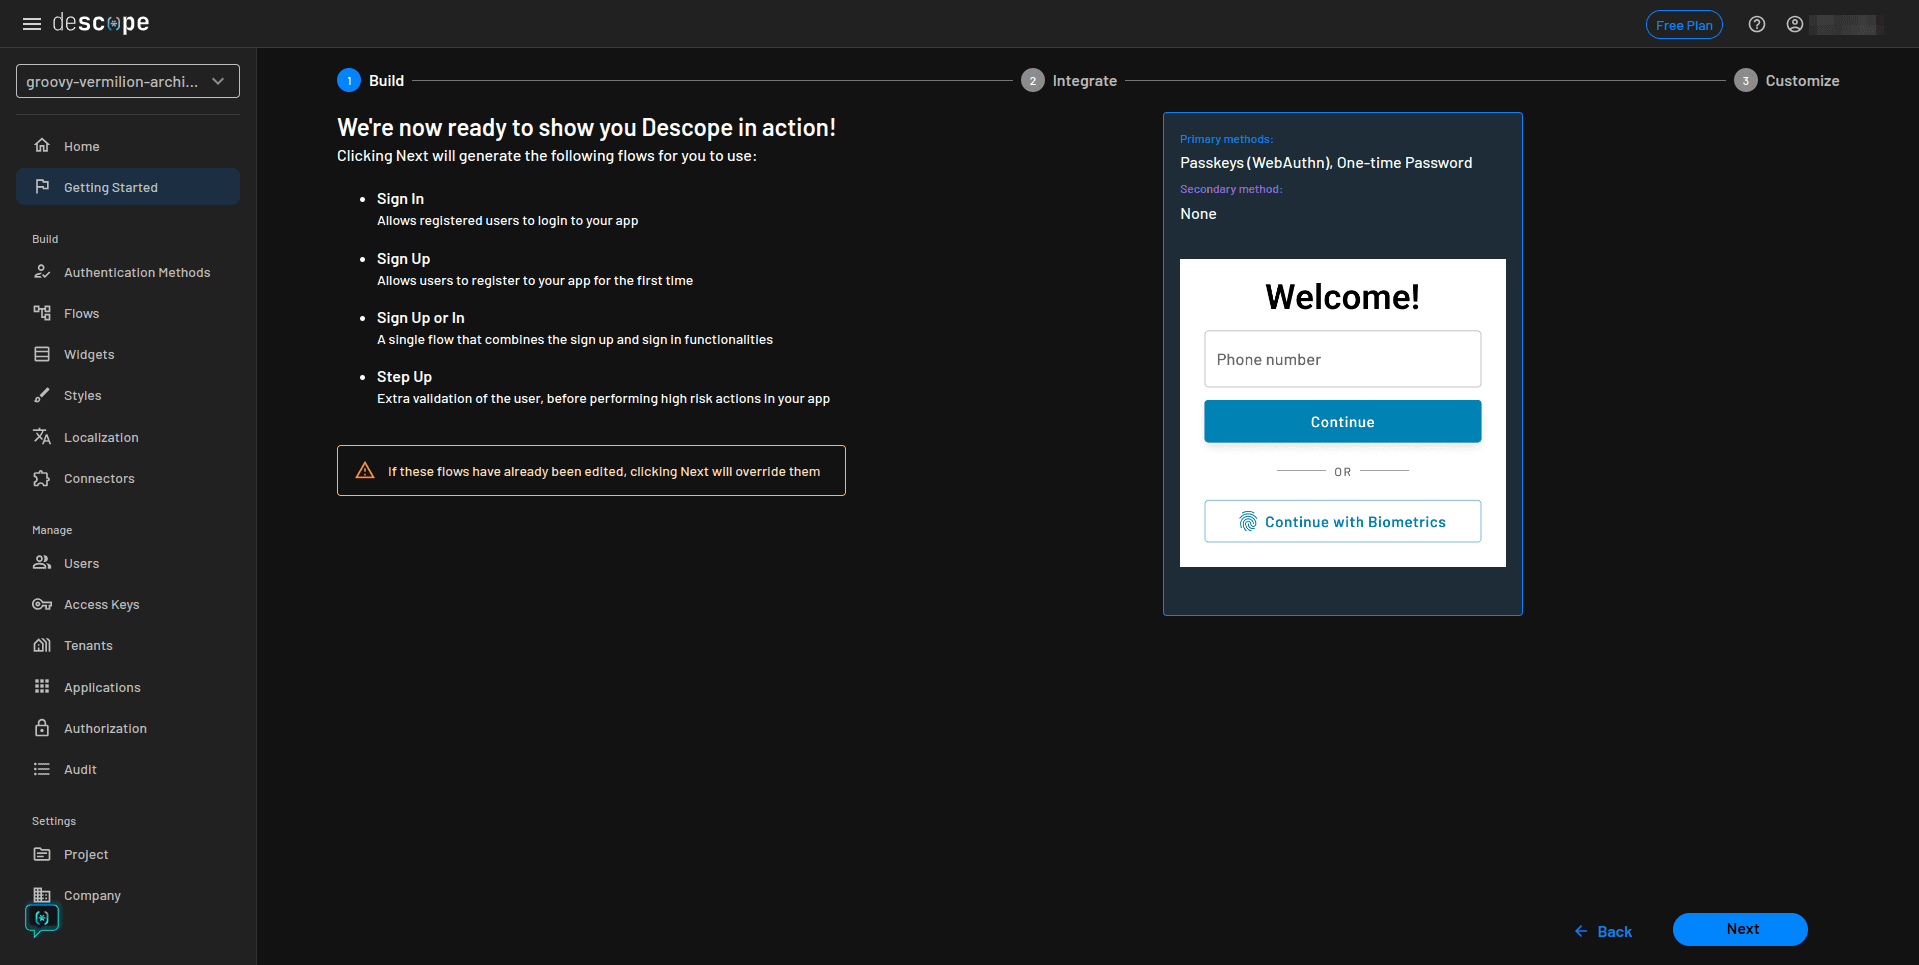
The next screen allows you to preview the generated authentication pages and the flows that are created for your project. Click Next to generate the flows:
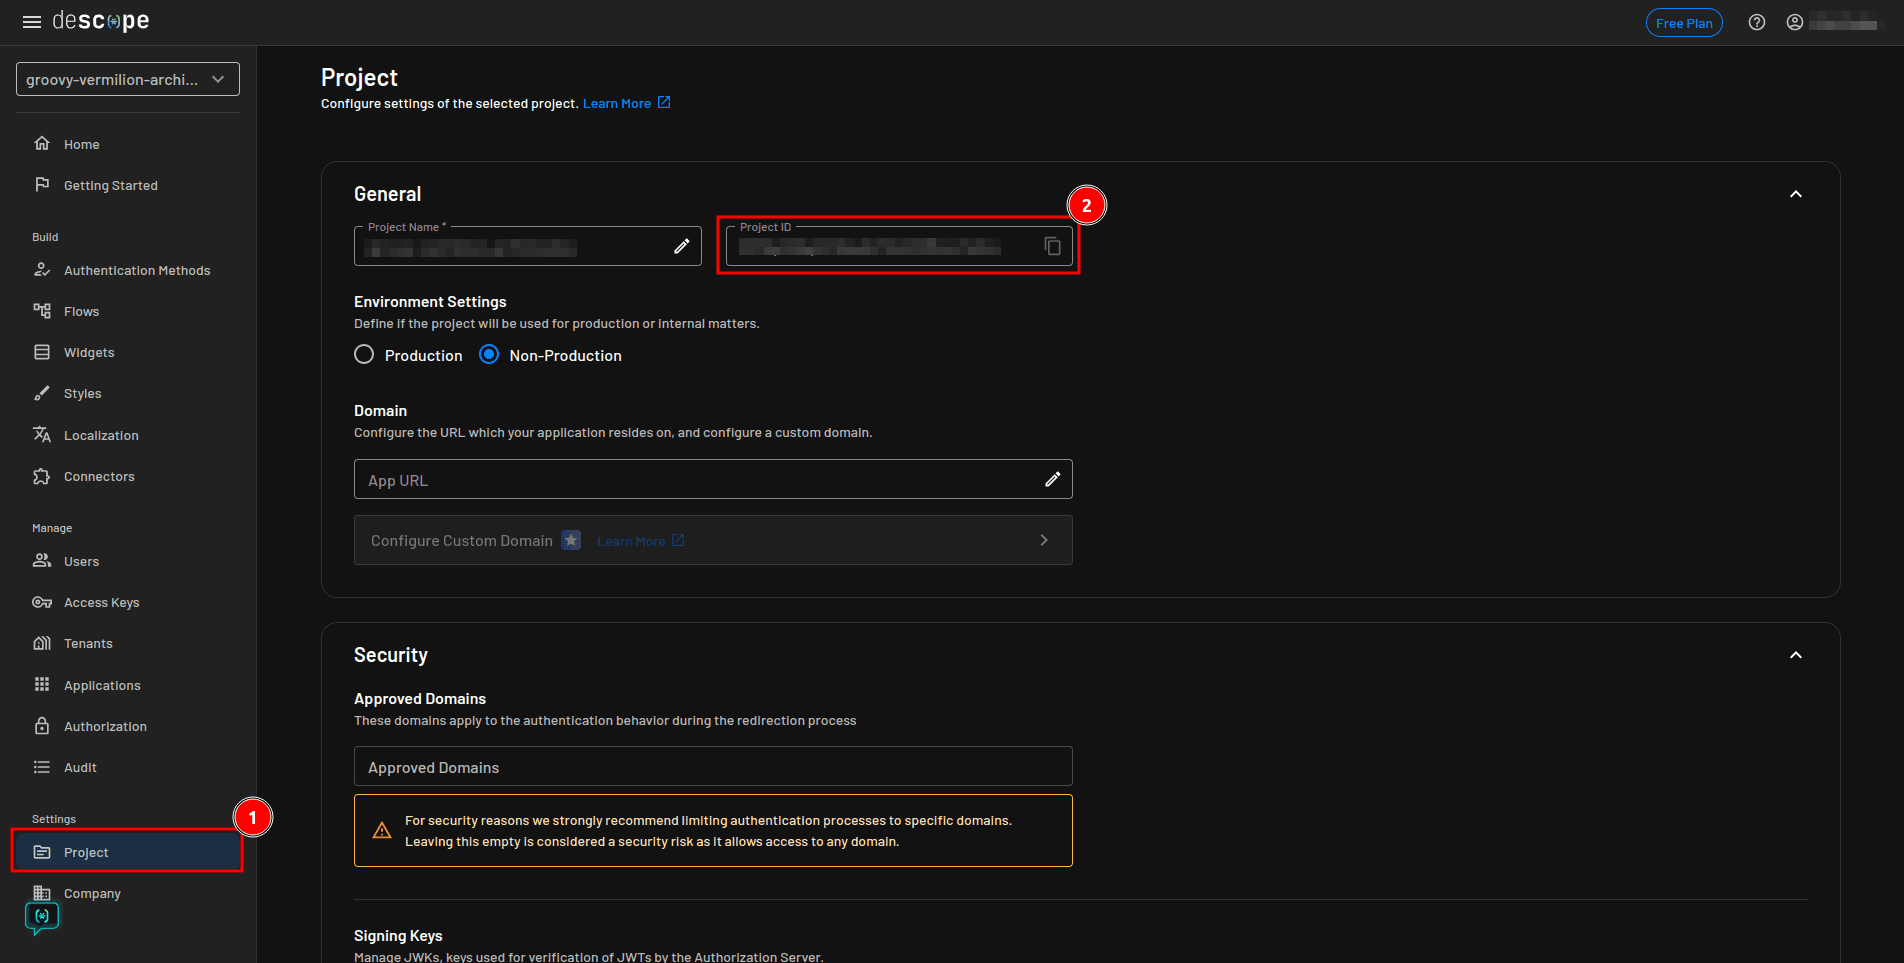
Once the flows are generated, select Project from the sidebar and copy your project ID from the Project page:
You’ll come back to the Descope console later on to modify the flows. For now, let’s move on to setting up the backend.
Setting up the backend
To keep the focus on the Descope and React Native integration, you can clone the pre-prepared backend code from GitHub to your local machine using this command:
git clone https://github.com/kimanikevin254/descope-react-native-auth.git --branch server-code --single-branchHere’s a simplified explanation of the files in the server folder that are most relevant to this tutorial:
index.js: This file initializes an Express server to handle the requests from the React Native application. It also initializes a Descope client instance (descopeClient) through the Descope SDK for Node.js that interacts with the Descope API to validate the user’s session token. Prisma ORM is also initialized in this file to handle interactions with the SQLite database (dev.db), which is stored in theprismafolder. Two API routes are defined in this file:/and/toggle-publish. The/route retrieves posts based on user roles; editors can see both published and unpublished posts, while viewers can access only published ones. The/toggle-publishroute ensures that only editors can toggle the published status of a post.utils/extractAndValidateToken.js: The code in this file extracts the session token from the request headers and uses the Descope client instance to validate the token.utils/generatePosts.js: This file utilizes the Prisma ORM to interact with the SQLite database and inserts four posts into the database. It defines an array of post objects containing titles, bodies, and published statuses. The code then iterates through each post and inserts it into the database.prisma/schema.prisma: This defines the data model for your application.
Now that you know what the code does, you can continue with the backend setup. Execute these commands to navigate into the project’s server folder and install all the dependencies:
cd descope-react-native-auth/server

yarn
Create a .env file in the server folder and add the following code:
DATABASE_URL="file:./dev.db"
DESCOPE_PROJECT_ID=<YOUR-DESCOPE-PROJECT-ID>
Note: Make sure you replace
<YOUR-DESCOPE-PROJECT-ID>with the project ID that you obtained in the previous section.
To map the data model defined in the prisma/schema.prisma file to the SQLite database, execute this command:
npx prisma migrate dev --name initExecute the following command to populate the database with some data:
node utils/generatePosts.jsThe backend is now fully set up. You can run the development server using this command:
yarn devModifying auth flows
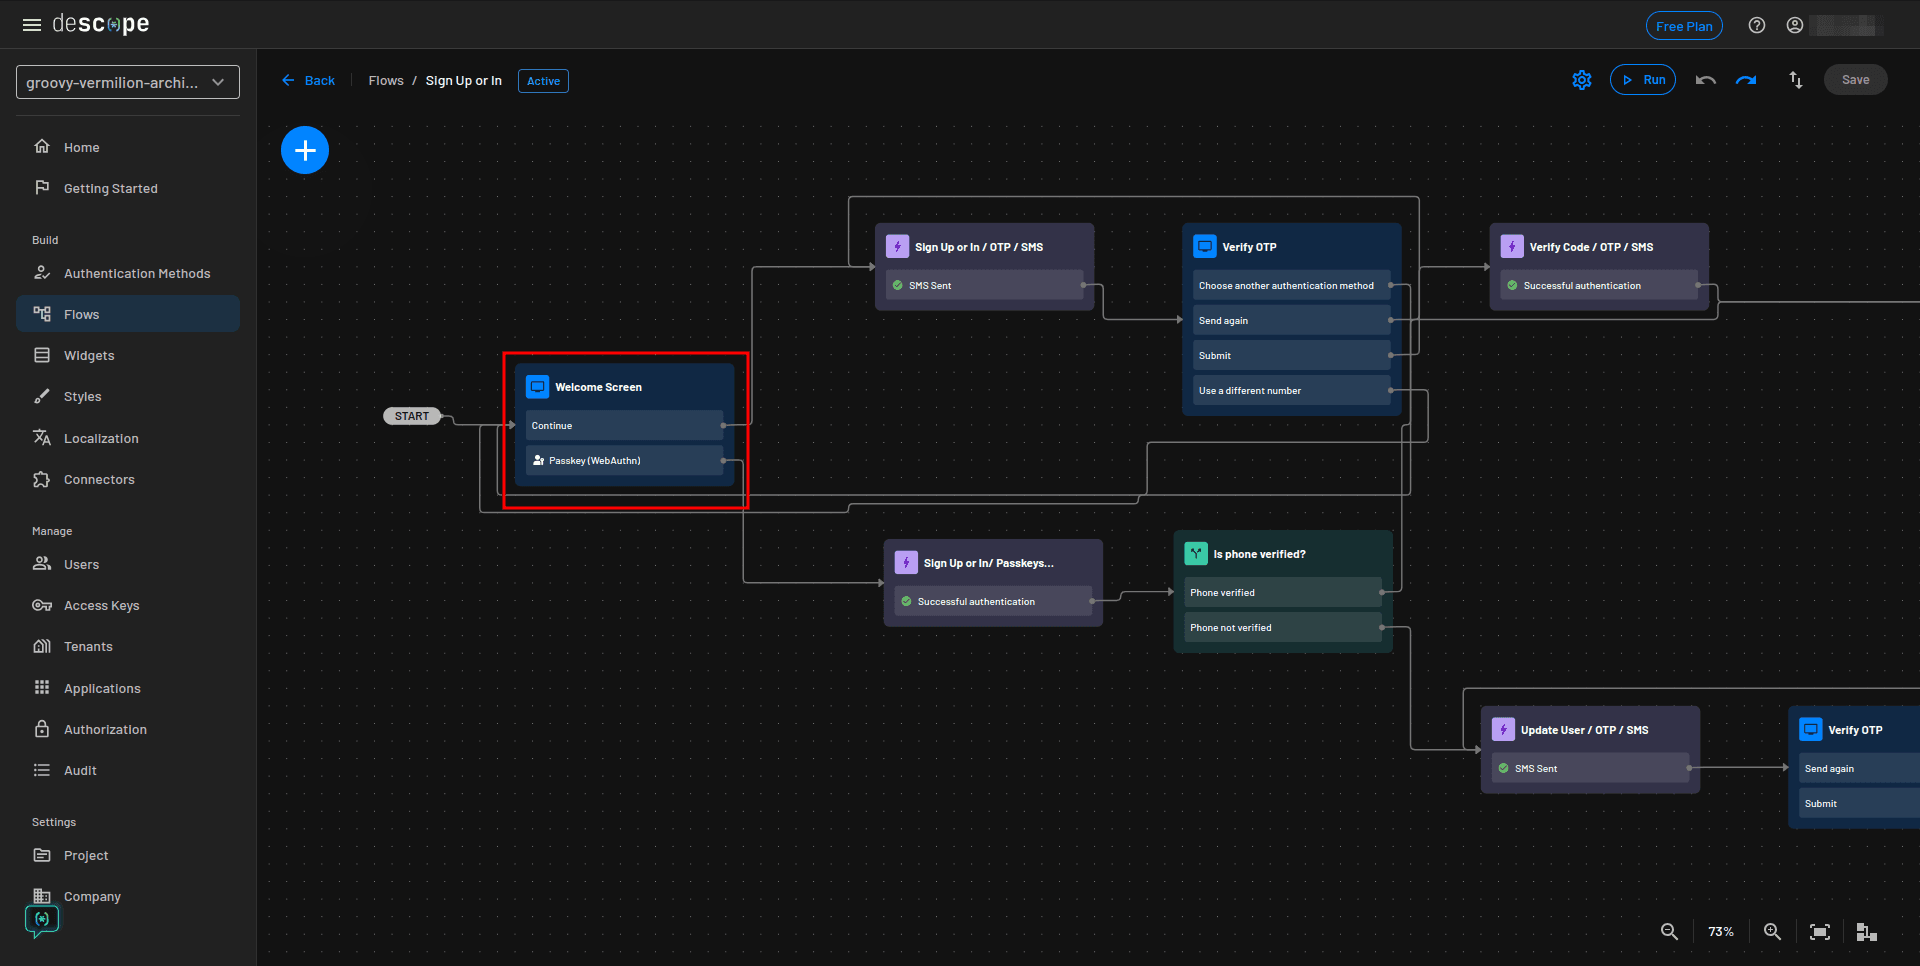
Return to your Descope console, select Flows from the sidebar, and click the sign-up-or-in flow to open the flow details page:

Currently, the flow uses SMS OTP as the fallback MFA. You need to modify it to use email OTP as the fallback MFA.
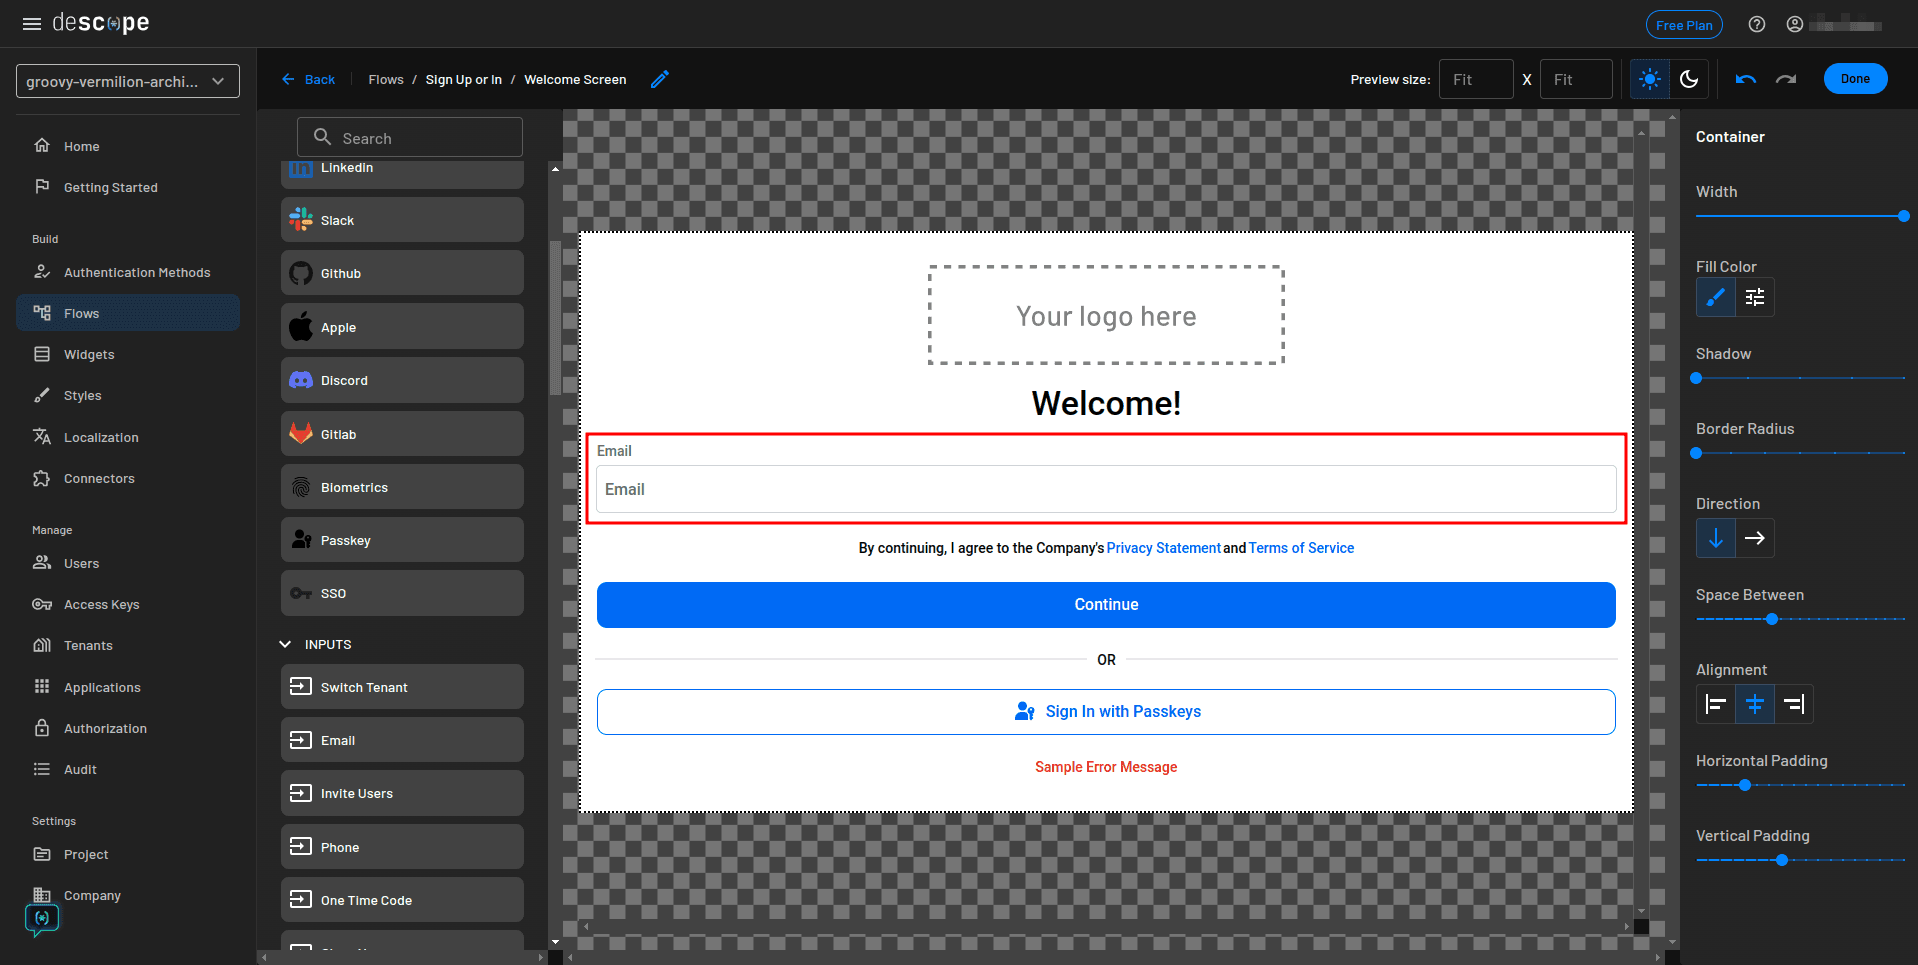
Begin by double-clicking the Welcome Screen to open it in design mode:
Replace the phone number input with an email input and click Done in the top-right corner:
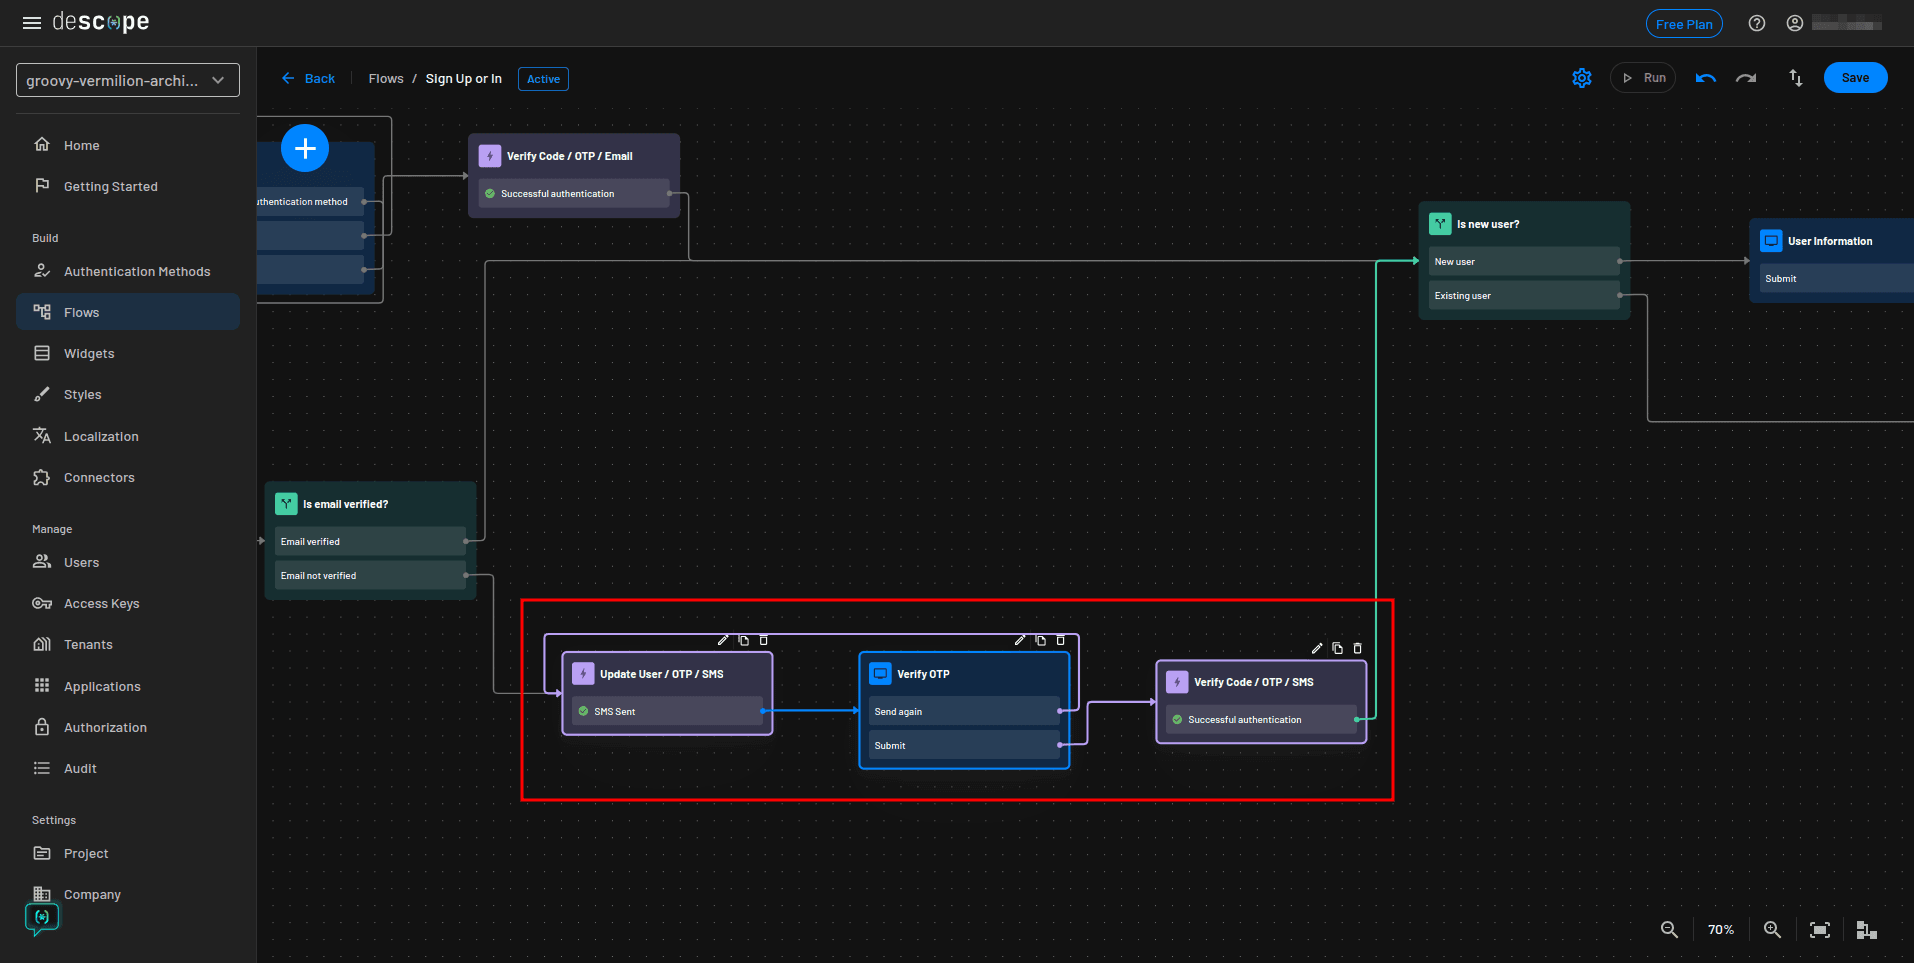
You now need to update the flow’s OTP verification method from SMS to email. To do so, delete the Sign Up or In / OTP / SMS action, the Verify OTP screen, and the Verify Code / OTP / SMS action, as highlighted here:
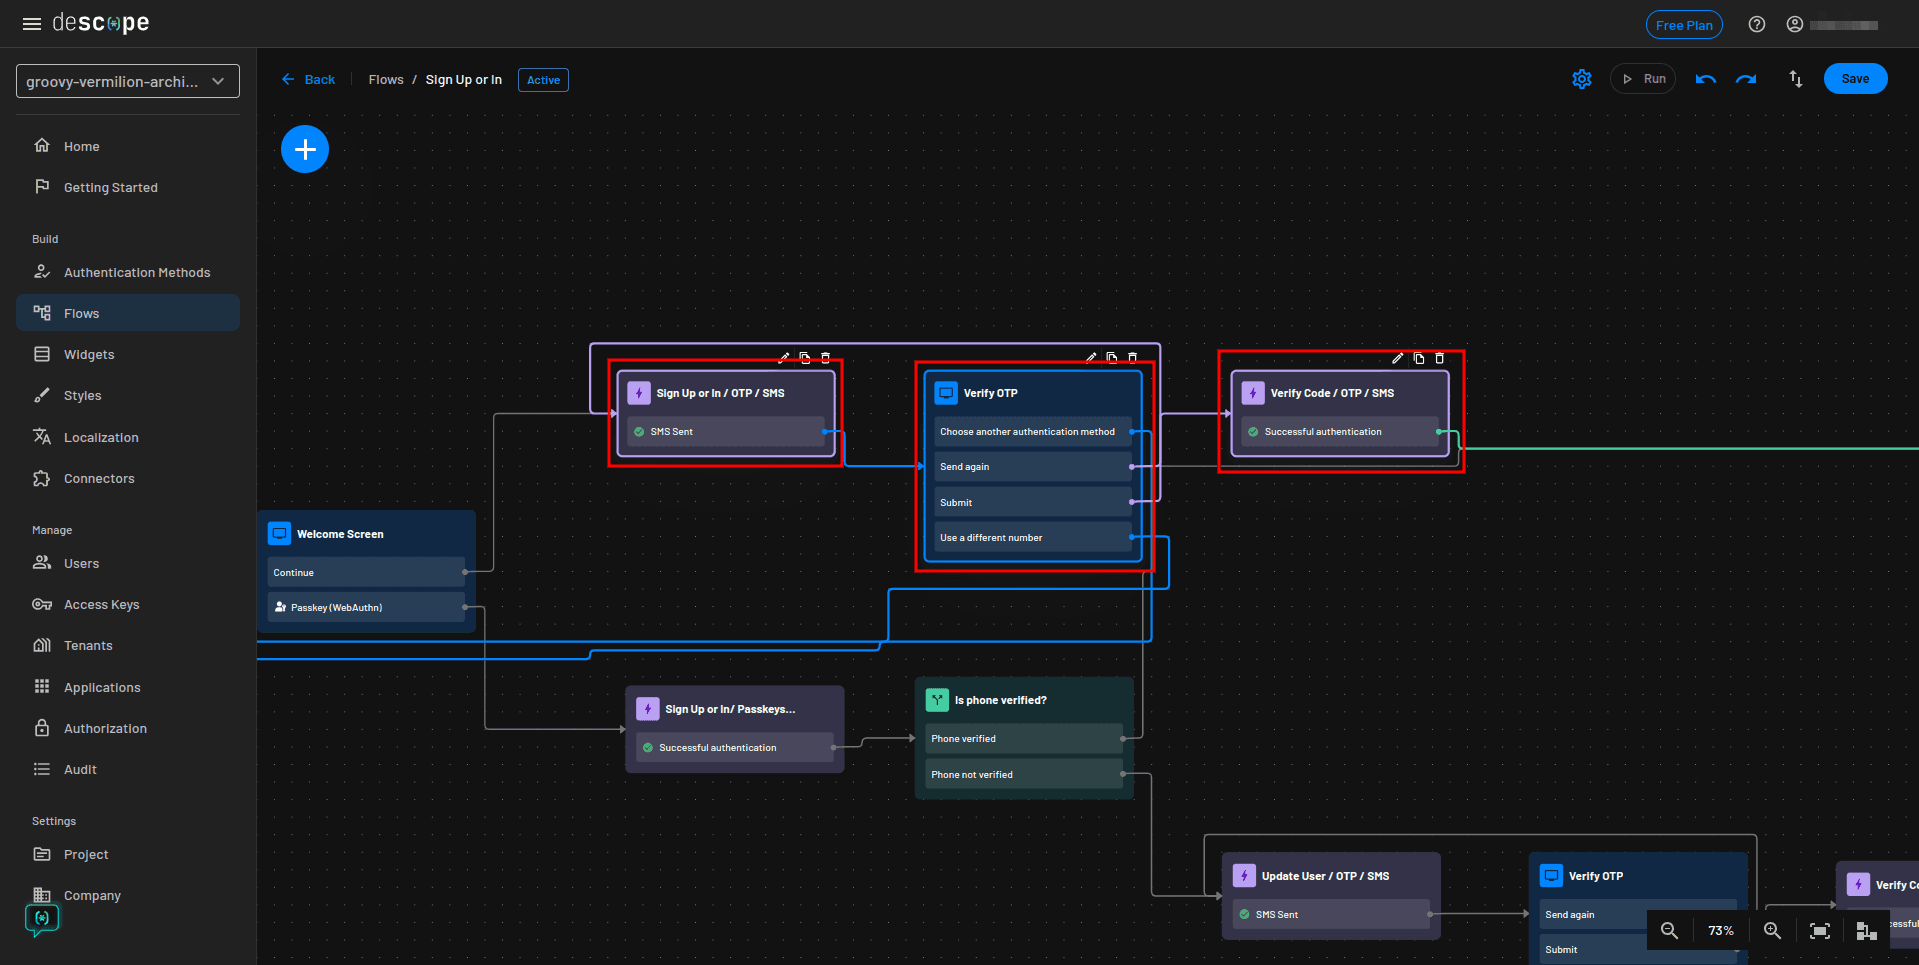
Add the email OTP verification method by clicking the + icons and selecting Action:

From the Add Action modal, select Sign Up or In / OTP / Email and add the action where you deleted the SMS OTP one. Make sure to connect to the other screens, conditions, and actions as necessary.
The updated part of your flow should now be connected to the Welcome Screen and Is new user? condition:
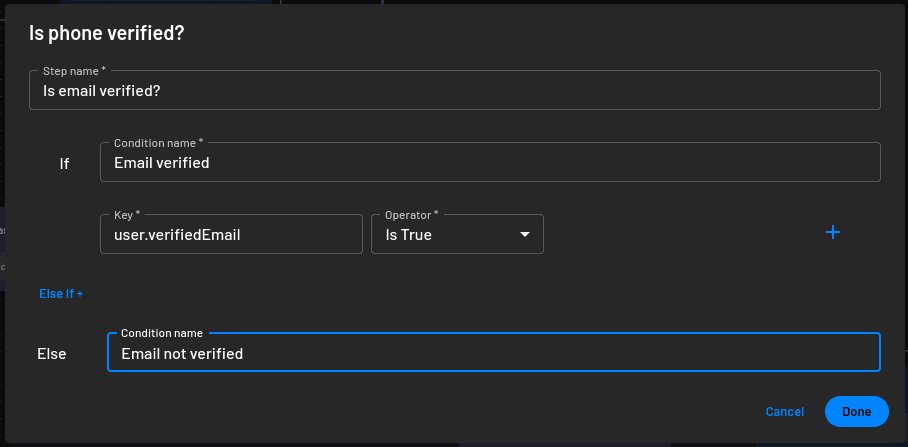
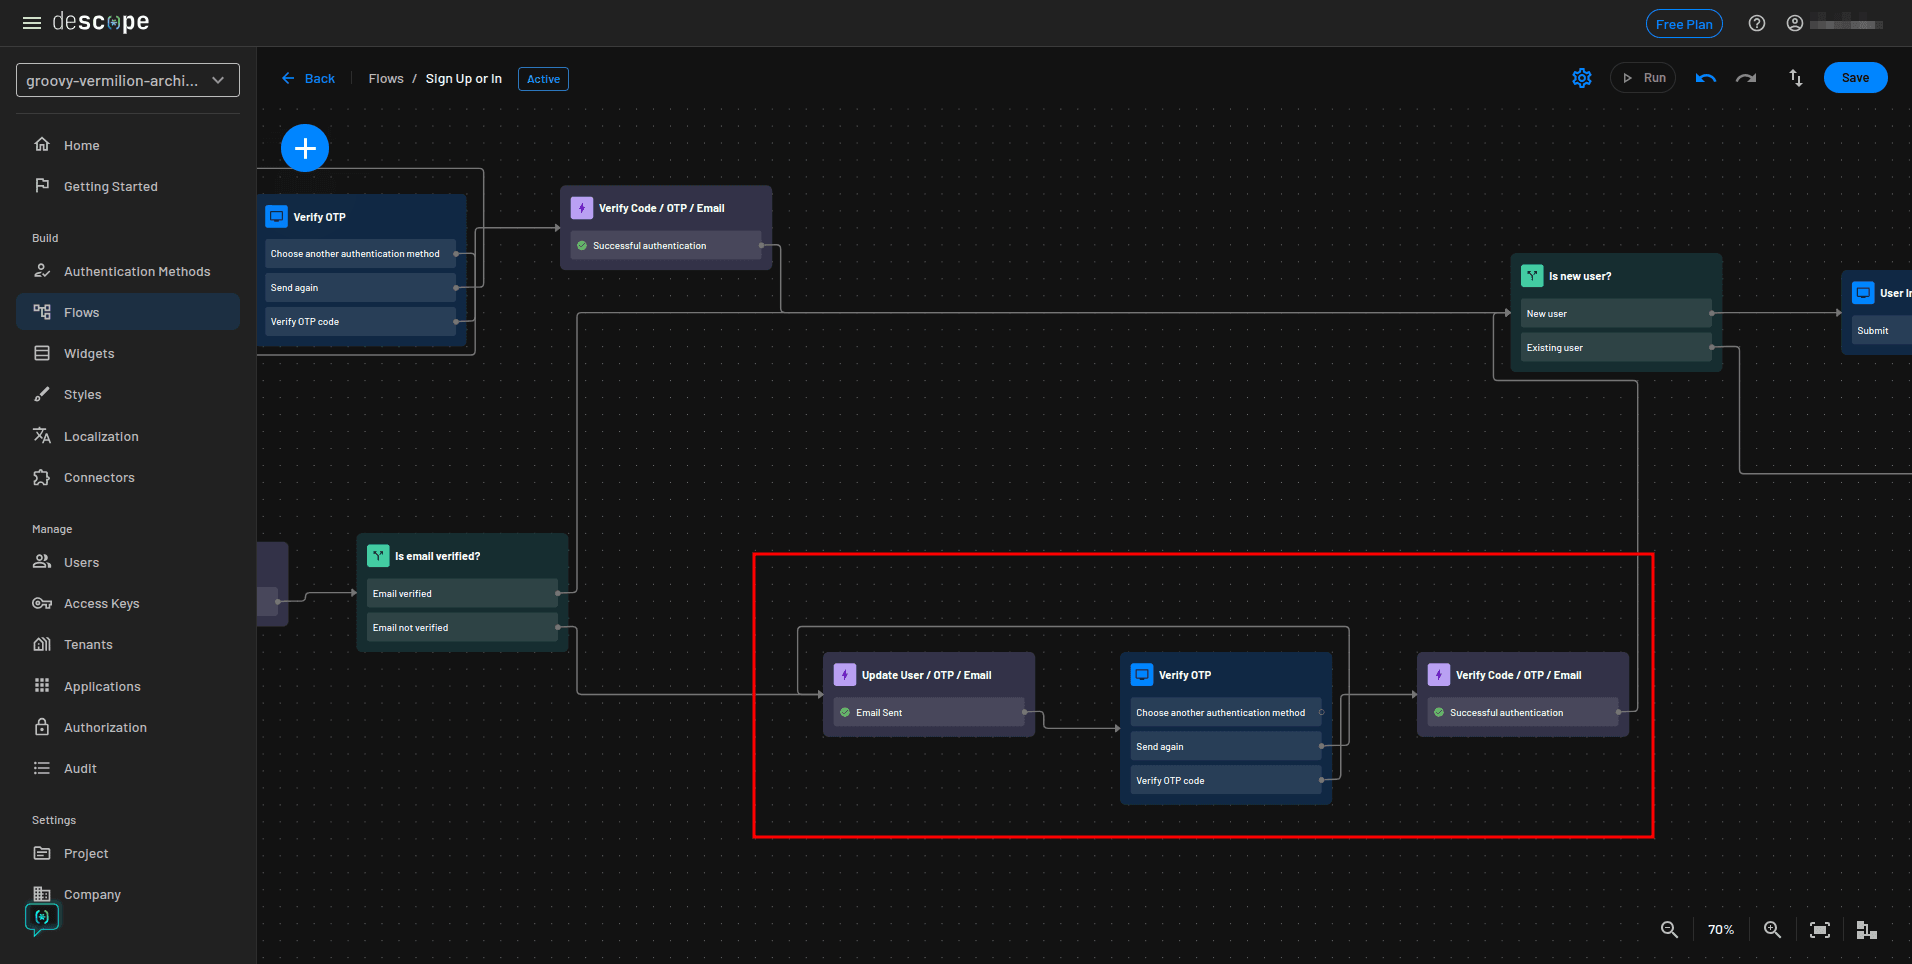
You now need to update the Is phone verified? condition as you are now using email verification. Open it in design mode and use Is email verified? as the Step name. Also, change the If and Else If condition names to Email verified and Email not verified, respectively. Lastly, change the key for the If condition to user.verifiedEmail and click Done:
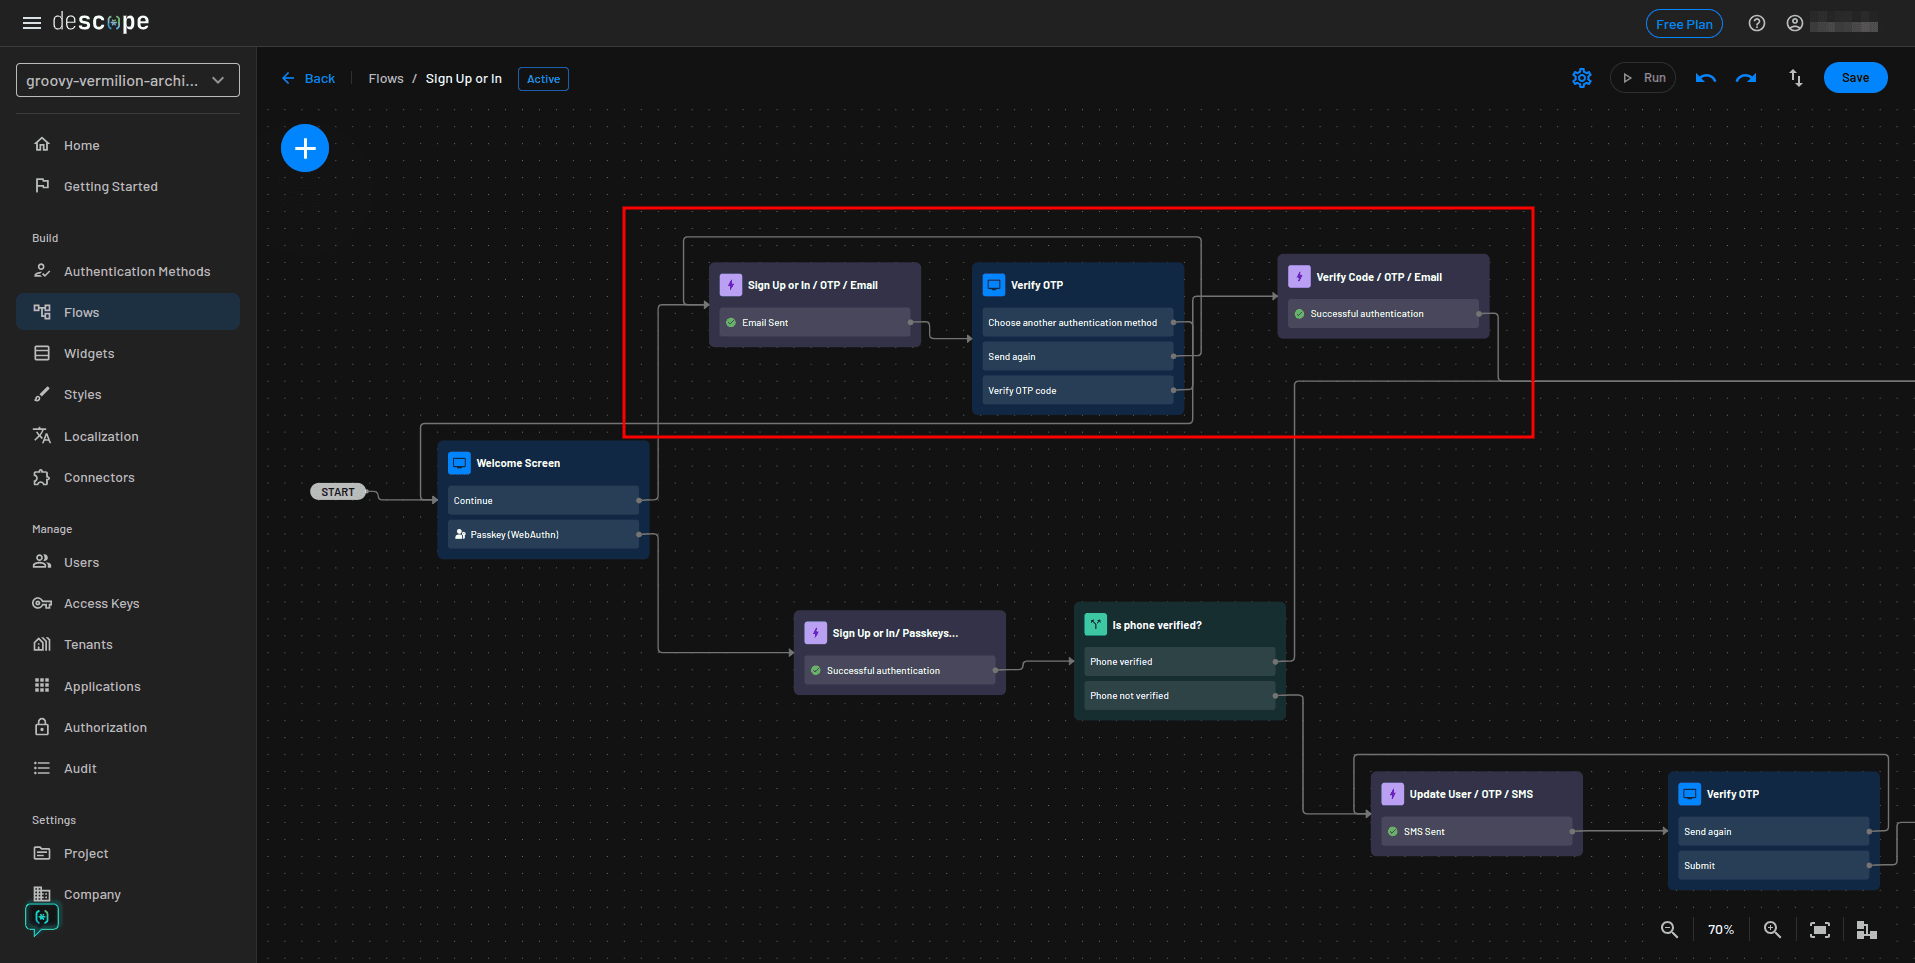
Finally, update the highlighted section of the flow to use email OTP like you did in the previous step. The only difference is to make sure you choose the Update User / OTP / Email from the Add Action modal:
The updated part of the flow should now use an email OTP to verify the user’s email address:
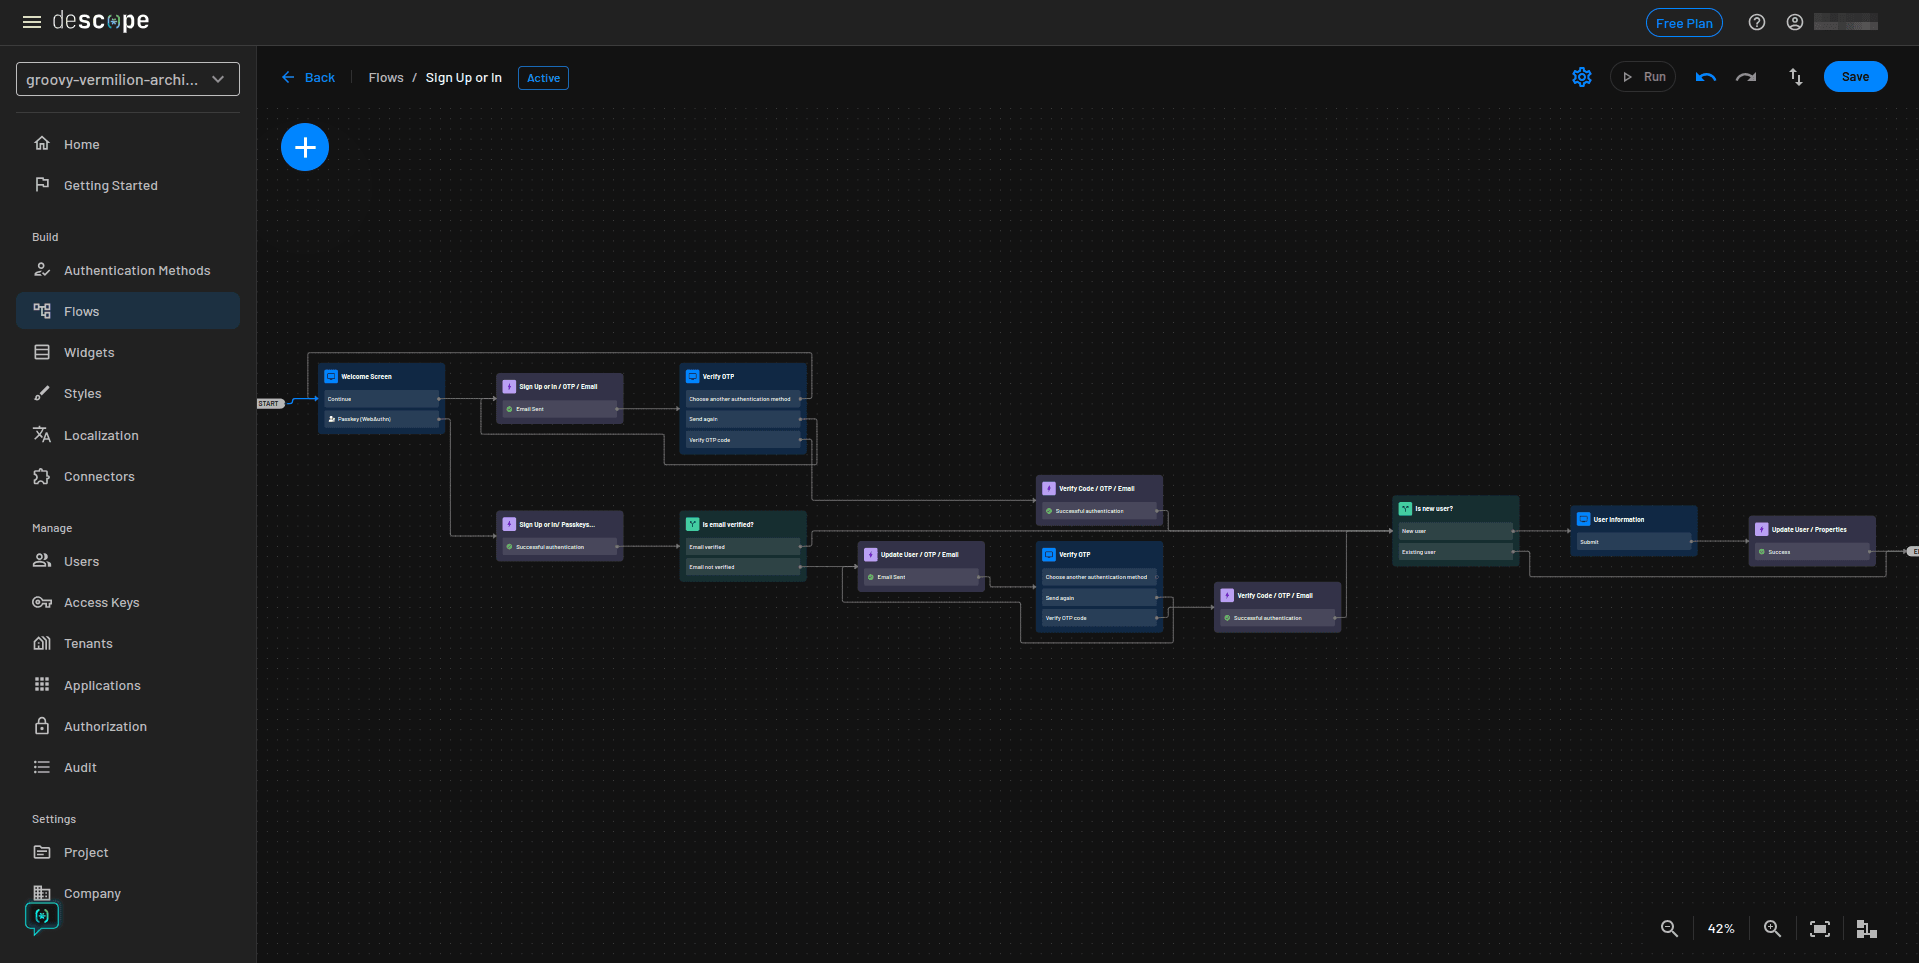
Here is a preview of the complete flow:
Save the flow and proceed to the next section.
Setting up roles
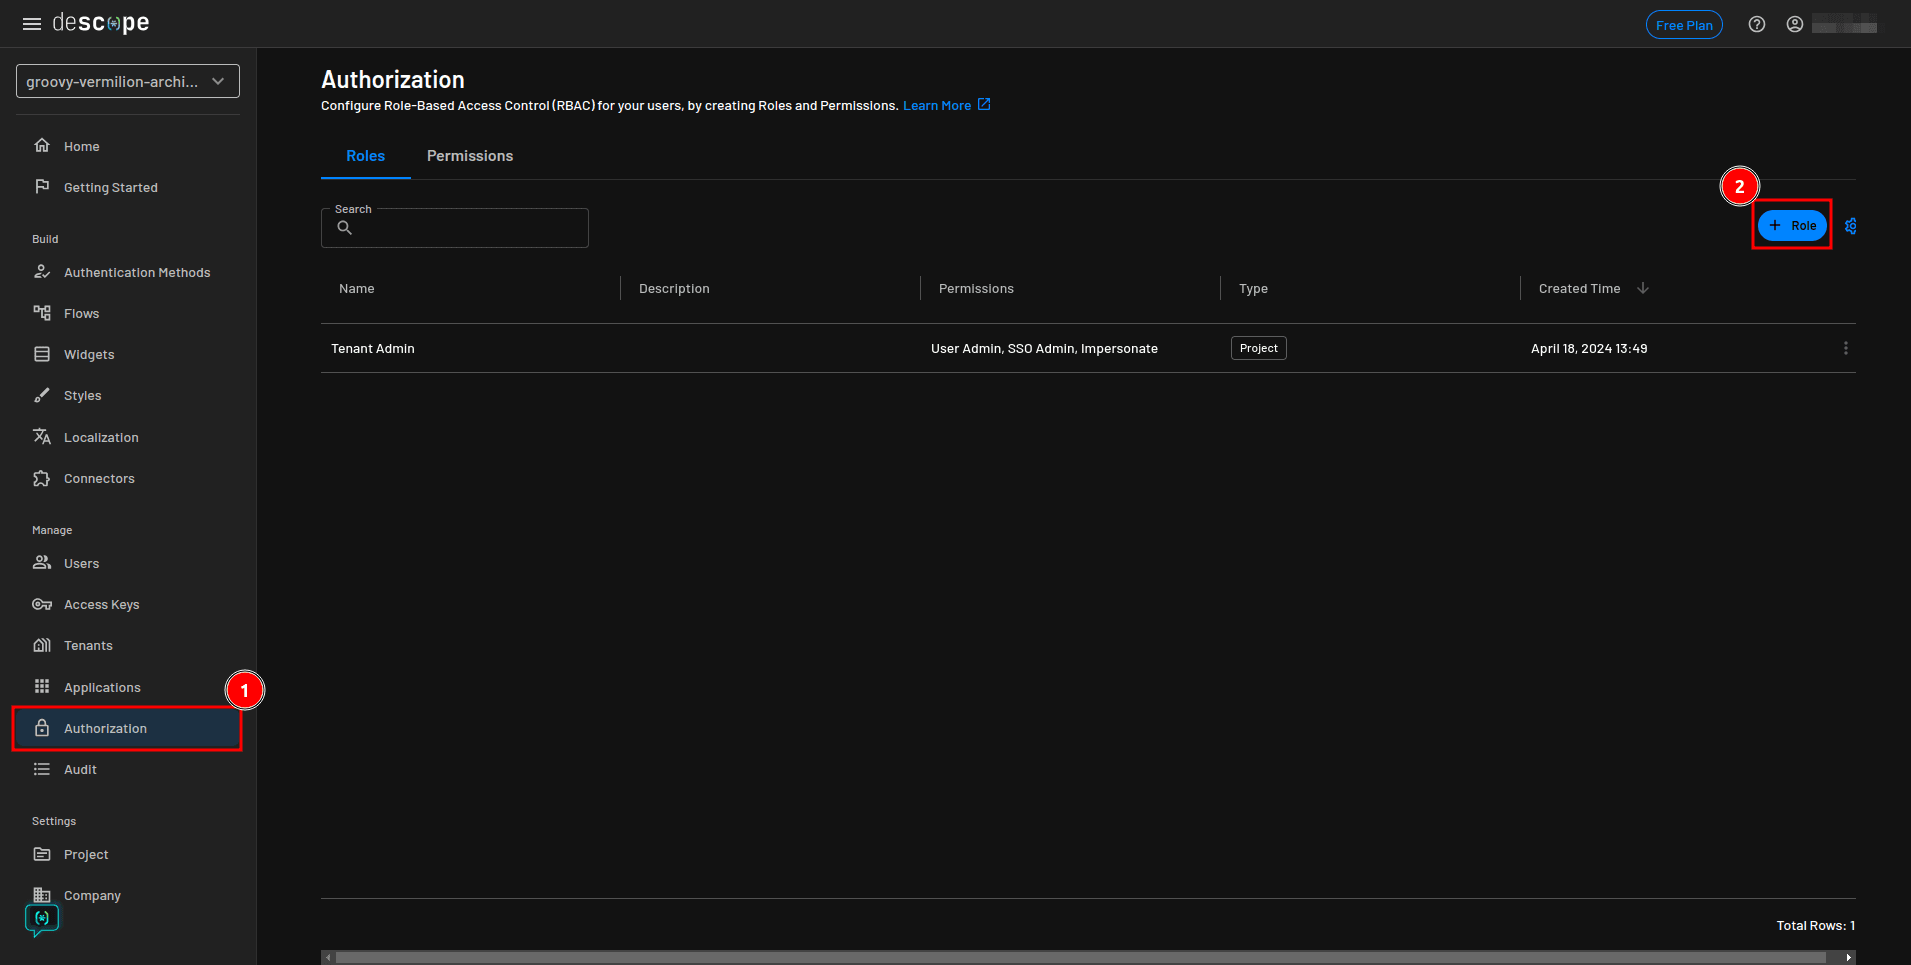
You can now continue to set up your application’s two roles, editors and viewers, in the Descope console. From the console sidebar, select Authorization and click the + Role button:
In the Add Role modal, enter editor as the Name and Can access all posts and toggle their published status as the Description:
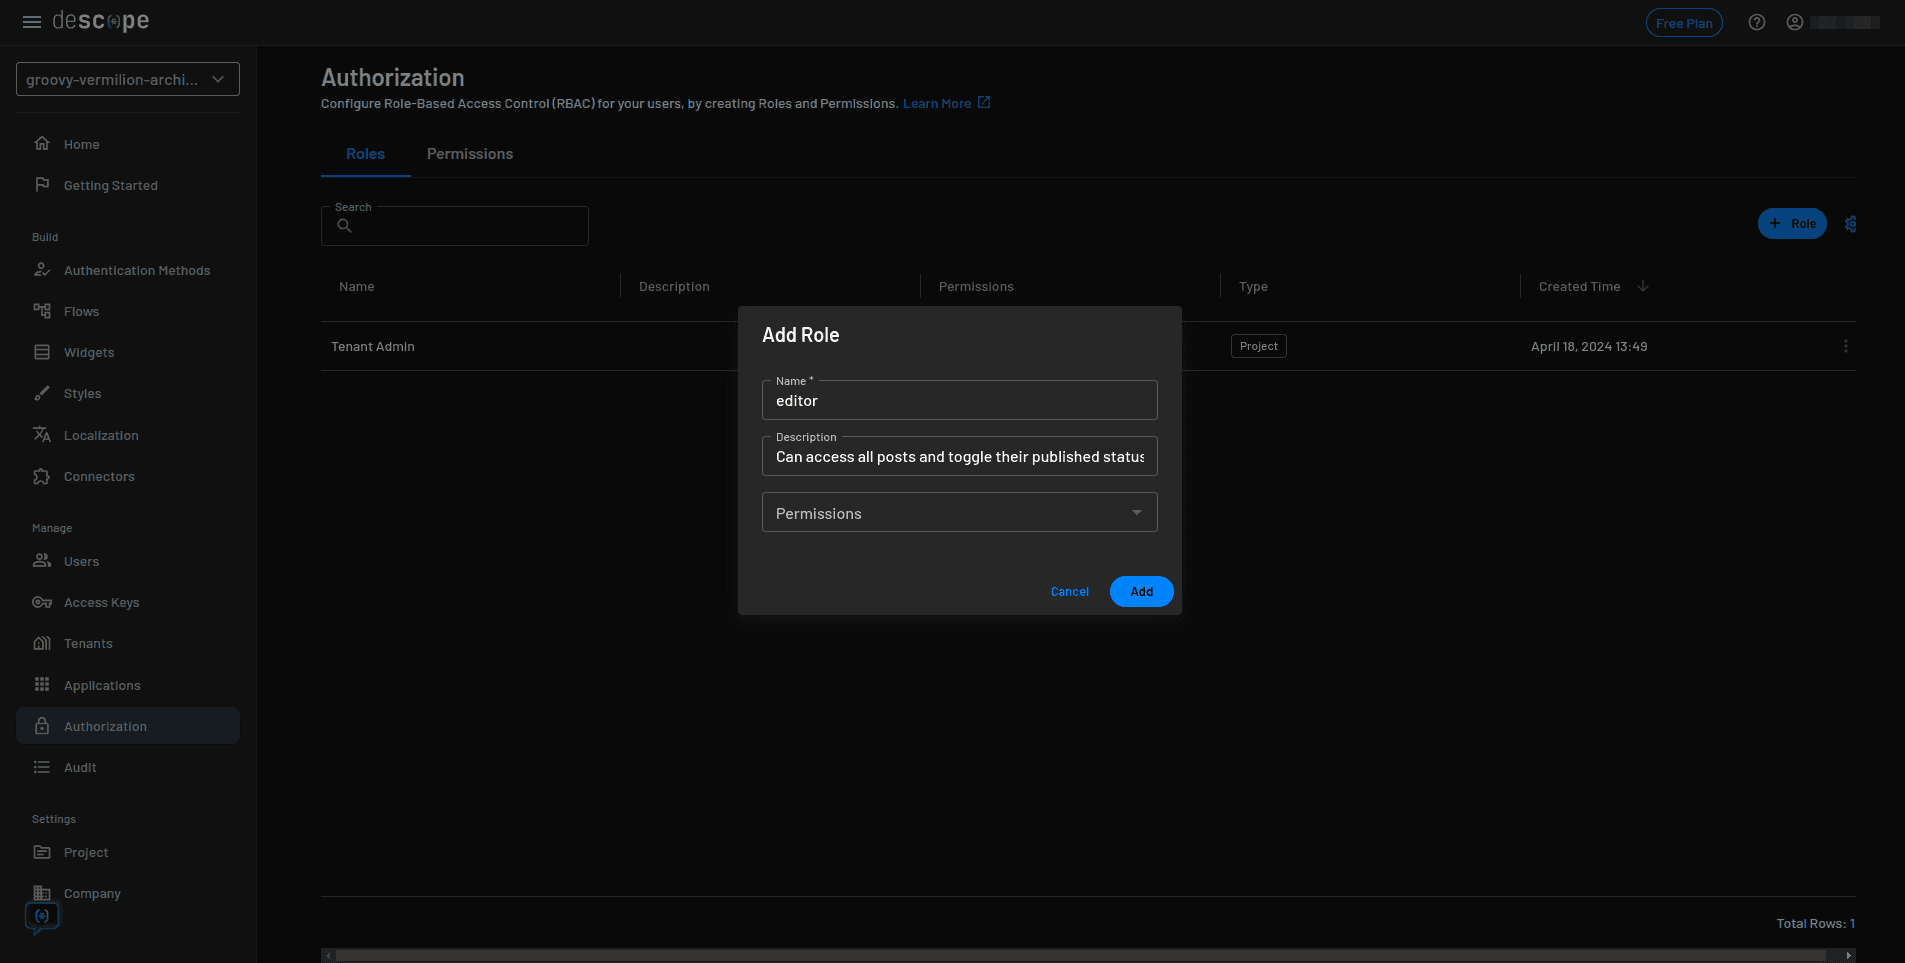
Repeat the same process and create a role for the viewer. Enter viewer as the Name and Can only access published posts as the Description.
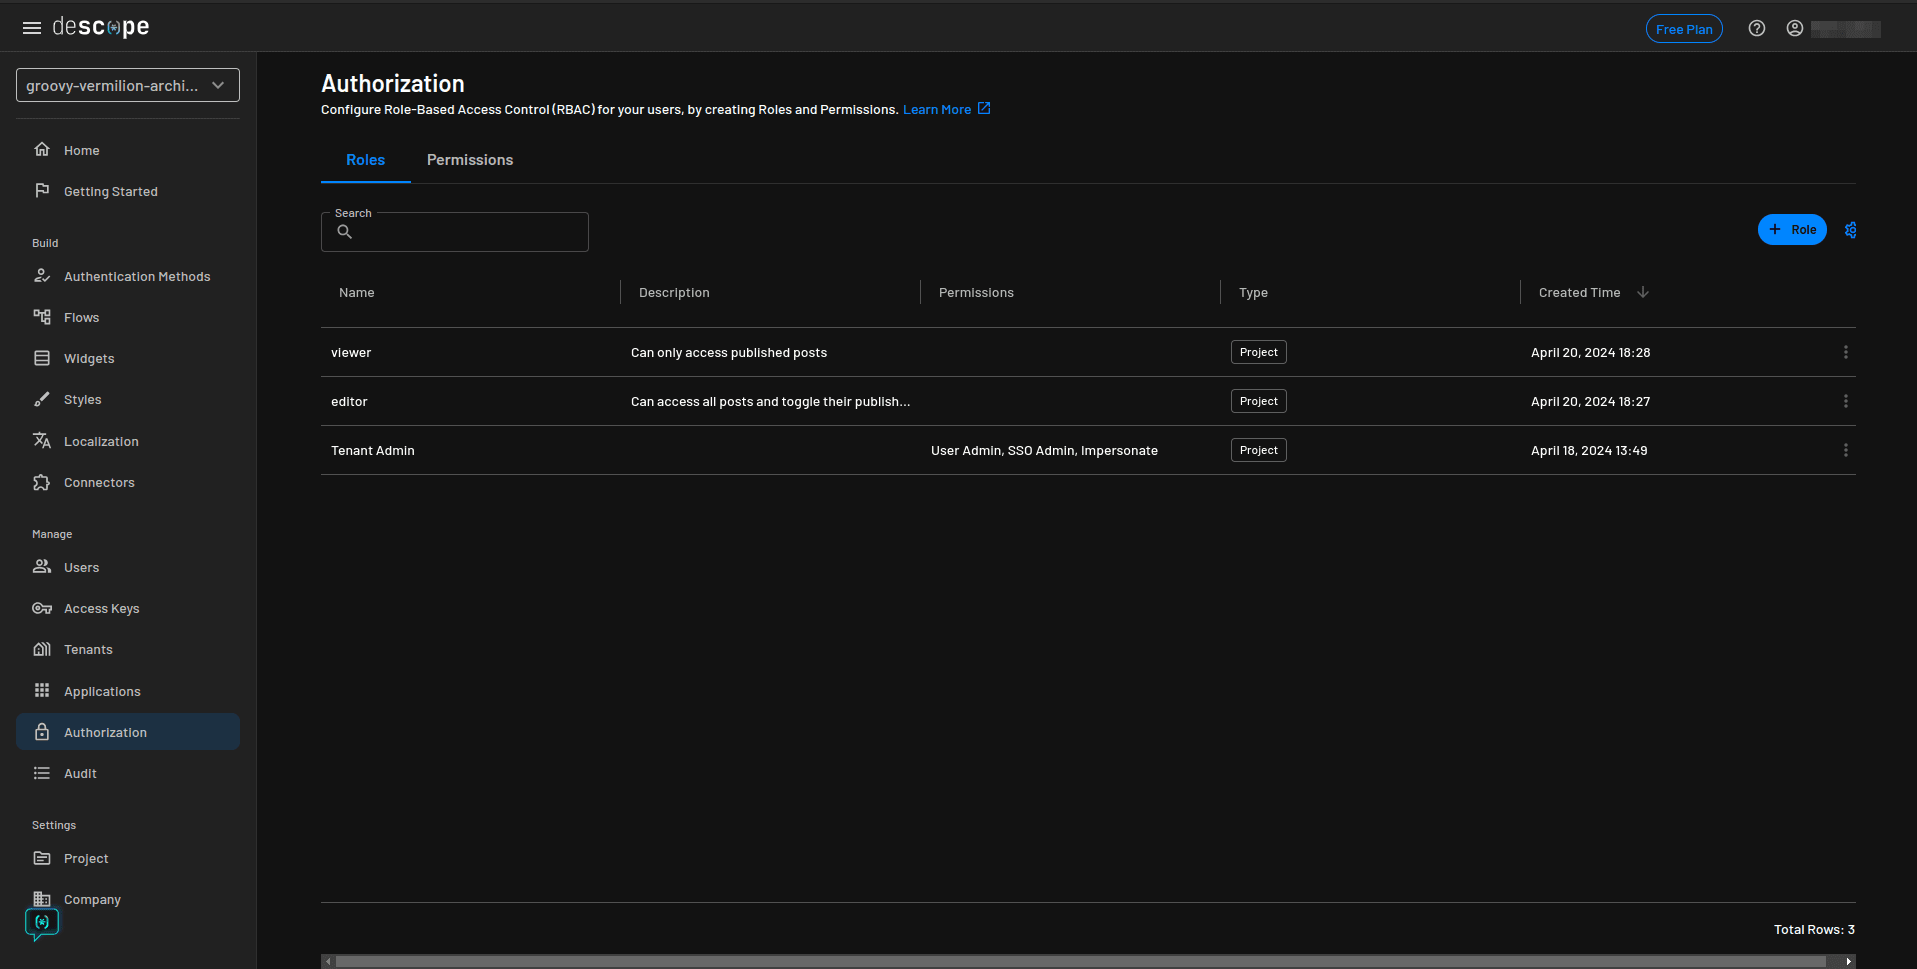
The Authorization page should now display the two roles you just added:
You’ll assign these roles to the users later on.
Integrating React Native with Descope
With the server, flows, and roles set up, you can now create the React Native application and integrate Descope.
Implementing authentication with Descope
Here, you will use Descope to handle your app’s authentication and conditionally render in-app data based on the role of the currently logged-in user.
Start by executing the following command in the project root folder to initialize a React Native application:
npx react-native@latest init DescopeReactNativeAuthcd into the React Native application folder and install the Descope React Native SDK using the following commands:
cd DescopeReactNativeAuth

yarn add @descope/react-native-sdk
Rename the App.tsx file to App.js. You will use JavaScript in this guide. Then open the file and replace the existing code with the following:
import React from "react";
import { SafeAreaView, StatusBar } from "react-native";
import { AuthProvider } from "@descope/react-native-sdk";
import Flow from "./components/Flow";

function App() {
    return (
     <AuthProvider projectId="<YOUR-DESCOPE-PROJECT-ID>">
         <SafeAreaView style={{ flex: 1, padding: 10 }}>
                <StatusBar barStyle="light-content" />
                <Flow />
         </SafeAreaView>
     </AuthProvider>
    );
}

export default App;
This code imports the Descope React Native SDK and wraps the app with the authentication provider. This activates the SDK.
Create a new file named components/Flow.js and add the following code to handle the authentication and the display of posts:
import { useFlow, useDescope, useSession } from "@descope/react-native-sdk";
import React, { useCallback, useEffect, useState } from "react";
import {
    Alert,
    Button,
    Linking,
    SafeAreaView,
    ScrollView,
    Text,
    TouchableOpacity,
    View,
} from "react-native";
import DetailsModal from "./DetailsModal";
import { styles } from "../styles";

export default function Flow() {
    const [posts, setPosts] = useState(null);
    const [selectedPost, setSelectedPost] = useState(null);

    const flow = useFlow();
    const { session, clearSession, manageSession } = useSession();
    const { logout } = useDescope();

    return (
     <SafeAreaView style={styles.container}>
         {session ? (
             <View style={styles.loggedInContainer}>
                 <DetailsModal
                     selectedPost={selectedPost}
                     setSelectedPost={setSelectedPost}
                     session={session}
                     togglePostPublish={togglePostPublish}
                 />

                 <View style={styles.header}>
                     <Text style={styles.headerText}>
                         Hello, {session.user.name.split(" ")[0]}
                     </Text>
                     <TouchableOpacity
                         style={styles.logoutButton}
                         onPress={handleLogout}
                     >
                         <Text style={styles.logoutText}>Log out</Text>
                     </TouchableOpacity>
                 </View>

                 <Text style={styles.sectionTitle}>Available Posts</Text>

                 <ScrollView style={styles.scrollView}>
                     {posts &&
                         posts.map((post) => (
                             <TouchableOpacity
                                 key={post.id}
                                 onPress={() => setSelectedPost(post)}
                                 style={styles.postContainer}
                             >
                                 <Text style={styles.postTitle}>
                                     {post.title}
                                 </Text>
                                 {session.user.roleNames.includes(
                                     "editor"
                                 ) && (
                                     <Text style={styles.editorPostInfo}>
                                         {post.published
                                             ? "Published"
                                             : "Not published"}
                                     </Text>
                                 )}
                             </TouchableOpacity>
                         ))}
                 </ScrollView>
             </View>
         ) : (
             <View style={styles.loggedOutContainer}>
                 <Text style={styles.welcomeText}>Welcome!</Text>
                 <Button onPress={startFlow} title="LOG IN" />
             </View>
         )}
     </SafeAreaView>
    );
}
This component initializes the state variables using useState to manage posts and selected posts. It also utilizes the Descope React Native SDK hooks (useFlow, useSession, and useDescope) to handle authentication-related functionality. Within the render method, it conditionally renders data based on whether there is an active session.
If there is an active session, the component displays a header with the user’s name, a logout button, and a list of the posts fetched from the backend based on the user’s role. If the user has the editor role, it also displays a badge that shows the post’s published status. It also renders a modal that displays a post’s details when a user taps on a certain post. If there is no active session, the component displays a welcome message and a login button.
Let’s add the functions that are called in the render method. Begin by adding the startFlow function that allows the user to sign up or log in:
const startFlow = async () => {
    try {
     const resp = await flow.start(
         "https://auth.descope.io/<YOUR-DESCOPE-PROJECT-ID>?flow=sign-up-or-in",
         "<YOUR-APP-LINKING-URL>"
     );
     await manageSession(resp.data);
    } catch (error) {
     console.log("Start flow error:", error);
    }
};
This function initiates the authentication process with the provided flow URL. The flow.start() method presents the flow screens that you defined earlier in a sandboxed browser view. Once the user completes the authentication process, it returns a JSON Web Token (JWT) response. This method takes in the flow URL (where the flow is hosted) and an optional app link URL if you are targeting the Android OS. Once the flow.start() function returns the JWT, you call the manageSession() function with the returned data to set an active user’s function.
Remember to replace <YOUR-DESCOPE-PROJECT-ID> with the Descope project ID that you obtained earlier. You will replace <YOUR-APP-LINKING-URL> with the appropriate value after you set up app linking.
Add the following useEffect hook that handles the app links:
useEffect(() => {
    Linking.addEventListener("url", async (event) => {
     if (event.url.includes("<YOUR-APP-LINKING-URL>")) {
         try {
             await flow.exchange(event.url);
         } catch (error) {
             console.log(error);
         }
     }
    });

    return () => {
     Linking.removeAllListeners("url");
    };
}, [flow]);
Inside the hook, you set up an event listener for incoming app-linking events. When an app link with the type url occurs, the callback function checks if the URL contains your app linking URL. If it does, you invoke the flow.exchange() method with the event.url as the argument. This function exchanges the URL for a JWT response.
Note: You will replace
<YOUR-APP-LINKING-URL>later.
Next, add the handleLogout() function that allows the user to log out of your application:
const handleLogout = useCallback(() => {
    logout();
    clearSession();
}, [logout]);
This code invokes two functions: logout() to invalidate the current JWTs and clearSession() to set the session variable to undefined.
Fetching posts from the server
With all the authentication-related functionality set up, you can now add the function responsible for fetching the posts from the server:
const fetchPosts = async () => {
    try {
     const res = await fetch("http://<YOUR-IP-ADDRESS>:3000", {
         headers: {
             Authorization: `Bearer ${session.sessionJwt}`,
         },
     });

     const data = await res.json();

     if (!res.ok) {
         // If the response status is not in the range 200-299, throw an error
         throw new Error(data.message);
     } else {
         setPosts(data.posts);
     }
    } catch (error) {
     console.log("Error", error.message);

     if (error.message === "Session expired") {
         Alert.alert("Session expired", "Please log in", [
             // Redirect to the unauthenticated user's screen
             {
                 text: "Cancel",
                 onPress: () => {
                     logout();
                     clearSession();
                 },
                 style: "cancel",
             },
             // Start the login flow
             {
                 text: "LOG IN",
                 onPress: () => {
                     logout();
                     clearSession();
                     startFlow();
                 },
                 style: "default",
             },
         ]);
     }
    }
};
This function initiates a fetch request to the provided server endpoint. The request includes an Authorization header that contains a session JWT token for authentication. Upon receiving the response, it parses the JSON data. If the response is successful (res.ok), it updates the component’s state with the fetched posts using the setPosts function. However, if an error occurs during the fetch operation, the catch block is triggered, and it checks if the error indicates a session expiration.
If the session has expired, it displays an alert prompting the user to log in again. The alert provides options to either cancel the action, which logs out the user and clears the session, or start the login flow again.
Note: Make sure you replace
<YOUR-IP-ADDRESS>with your computer’s IP address.
Add this useEffect to make sure that the posts are fetched only when there is an active session:
useEffect(() => {
    if (session) {
     fetchPosts();
    }
}, [session]);
Adding post details screen and editor actions
As the introduction says, the editors need to be able to toggle a post’s published status. To support this functionality, add the following function to the same file:
const togglePostPublish = async () => {
    try {
     const res = await fetch(
         "http://<YOUR-IP-ADDRESS>:3000/toggle-publish",
         {
             headers: {
                 Authorization: `Bearer ${session.sessionJwt}`,
                 "Content-Type": "application/json",
             },
             method: "POST",
             body: JSON.stringify({ postId: selectedPost.id }),
         }
     );

     const data = await res.json();

     if (!res.ok) {
         throw new Error(data.message);
     }

     // Update selected post with the new data. This will help to update the editor actions buttons.
     setSelectedPost(data.updatedPost);

     // Fetch updated posts
     fetchPosts();
    } catch (error) {
     console.log(error);
    }
};
Note: Make sure you replace
<YOUR-IP-ADDRESS>with your computer’s IP address.
Next, create a new file named DetailsModal.js in the components folder and add the following code that displays the post details as well as buttons to manage posts for the editors:
import {
    Alert,
    Modal,
    ScrollView,
    Text,
    TouchableOpacity,
    View,
} from "react-native";
import { styles } from "../styles";

export default function DetailsModal({
    selectedPost,
    setSelectedPost,
    session,
    togglePostPublish,
}) {
    return (
     <Modal
         animationType="fade"
         visible={selectedPost !== null}
         onRequestClose={() => setSelectedPost(null)}
     >
         {selectedPost && (
             <View style={styles.modalContainer}>
                 {session.user.roleNames.includes("editor") && (
                     <View style={styles.editorActionsContainer}>
                         <Text style={styles.sectionTitle}>
                             Editor Actions
                         </Text>
                         <View style={styles.actionButtonsContainer}>
                             <TouchableOpacity
                                 onPress={() => togglePostPublish()}
                                 style={styles.actionButton}
                             >
                                 <Text style={styles.actionButtonText}>
                                     {selectedPost.published
                                         ? "Unpublish"
                                         : "Publish"}
                                 </Text>
                             </TouchableOpacity>

                             <TouchableOpacity
                                 style={styles.actionButton}
                                 onPress={() =>
                                     Alert.alert(
                                         "Editor alert",
                                         "You are an editor. You can edit this post"
                                     )
                                 }
                             >
                                 <Text style={styles.actionButtonText}>
                                     Edit
                                 </Text>
                             </TouchableOpacity>
                         </View>
                     </View>
                 )}

                 <View style={styles.modalHeader}>
                     <Text style={styles.modalTitle}>
                         {selectedPost.title}
                     </Text>
                     <TouchableOpacity
                         style={styles.closeButton}
                         onPress={() => setSelectedPost(null)}
                     >
                         <Text style={styles.closeButtonText}>Close</Text>
                     </TouchableOpacity>
                 </View>

                 <ScrollView contentContainerStyle={styles.scrollContainer}>
                     <Text style={styles.modalBody}>
                         {selectedPost.body}
                     </Text>
                 </ScrollView>
             </View>
         )}
     </Modal>
    );
}
This component is responsible for displaying the details of the selected post. It receives props such as selectedPost, setSelectedPost, session, and togglePostPublish. The modal is conditionally rendered based on whether a post is selected (selectedPost !== null). If the user has an editor role (session.user.roleNames.includes('editor')), additional editor actions, such as publishing, unpublishing, and editing the post, are displayed.
Styling the application
Lastly, create a styles.js file in the React Native application root folder and add the following code to style the application:
import { StyleSheet } from "react-native";

const styles = StyleSheet.create({
    container: {
     flex: 1,
    },
    loggedInContainer: {
     flex: 1,
     backgroundColor: "#fff",
    },
    loggedOutContainer: {
     flex: 1,
     justifyContent: "center",
     alignItems: "center",
     backgroundColor: "#fff",
    },
    header: {
     flexDirection: "row",
     justifyContent: "space-between",
     alignItems: "center",
     backgroundColor: "#fff",
     paddingHorizontal: 16,
     paddingVertical: 12,
     borderBottomWidth: 1,
     borderBottomColor: "#ccc",
    },
    headerText: {
     fontSize: 18,
     fontWeight: "bold",
    },
    logoutButton: {
     paddingHorizontal: 12,
     paddingVertical: 8,
     borderRadius: 6,
     backgroundColor: "#f00",
    },
    logoutText: {
     color: "#fff",
     fontSize: 16,
     fontWeight: "bold",
    },
    sectionTitle: {
     fontSize: 18,
     fontWeight: "bold",
     textAlign: "center",
     marginTop: 8,
    },
    scrollView: {
     flex: 1,
     paddingHorizontal: 16,
     paddingTop: 12,
     backgroundColor: "white",
    },
    postContainer: {
     marginBottom: 8,
     padding: 12,
     backgroundColor: "#f9f9f9",
     borderRadius: 8,
     shadowColor: "#000",
     shadowOffset: {
         width: 0,
         height: 2,
     },
     shadowOpacity: 0.25,
     shadowRadius: 4,
     elevation: 2,
    },
    postTitle: {
     fontSize: 16,
     fontWeight: "bold",
    },
    editorPostInfo: {
     fontSize: 12,
     marginTop: 2,
     backgroundColor: "green",
     alignSelf: "flex-start",
     paddingHorizontal: 3,
     paddingVertical: 1,
     borderRadius: 5,
     color: "white",
    },
    welcomeText: {
     fontSize: 20,
     marginBottom: 20,
    },
    modalContainer: {
     flex: 1,
     backgroundColor: "#fff",
    },
    modalHeader: {
     width: "100%",
     flexDirection: "row",
     justifyContent: "space-between",
     gap: 10,
     alignItems: "center",
     backgroundColor: "#f0f0f0",
     paddingVertical: 10,
     paddingHorizontal: 20,
    },
    modalTitle: {
     fontSize: 20,
     fontWeight: "bold",
     flex: 1,
    },
    closeButton: {
     backgroundColor: "#f00",
     paddingVertical: 8,
     paddingHorizontal: 16,
     borderRadius: 5,
    },
    closeButtonText: {
     color: "#fff",
     fontSize: 16,
     fontWeight: "bold",
    },
    editorActionsContainer: {
     marginTop: 20,
     paddingHorizontal: 20,
    },
    sectionTitle: {
     fontSize: 18,
     fontWeight: "bold",
     marginBottom: 10,
     textAlign: "center",
    },
    actionButtonsContainer: {
     flexDirection: "row",
     justifyContent: "center",
     gap: 30,
    },
    actionButton: {
     backgroundColor: "#007bff",
     borderRadius: 5,
     paddingVertical: 10,
     paddingHorizontal: 20,
     marginBottom: 10,
    },
    actionButtonText: {
     color: "#fff",
     fontSize: 16,
     fontWeight: "bold",
    },
    scrollContainer: {
     flexGrow: 1,
     paddingHorizontal: 20,
     paddingTop: 10,
    },
    modalBody: {
     fontSize: 16,
     lineHeight: 24,
    },
});

export { styles };
Setting up app linking for Android OS
In the previous section, you left a few placeholders for <YOUR-APP-LINKING-URL>. In this section, you’ll create the app-linking URL and replace the placeholders with the actual values.
An Android app link is a special type of deep link that allows website URLs to automatically launch an activity in your application without requiring further input from the user. Android app links leverage the Digital Asset Links API to verify that your application has permission from the website to automatically open links for that specific domain.
You initially need to declare an association between your website and the Android application’s intent filters by hosting a Digital Asset Links JSON file at https://<YOUR-DOMAIN>/.well-known/assetlinks.json. The assetlinks.json file should take the following format:
[
    {
     "relation": ["delegate_permission/common.handle_all_urls"],
     "target": {
         "namespace": "android_app",
         "package_name": "<YOUR-APPLICATION-ID>",
         "sha256_cert_fingerprints": ["<YOUR-APP-SHA256-FINGERPRINT>"]
     }
    }
]
You can use the Google Statement List Tester and Generator to generate and test your Digital Asset Links JSON file.
Make sure you replace <YOUR-APPLICATION-ID> with your app’s application ID, which you can find in the android/app/build.gradle file. Next, execute the following command in the terminal to generate your app’s SHA256 fingerprint:
keytool -list -v -keystore android/app/debug.keystoreIn the terminal prompt, enter android as the keystore password. Once the certificate fingerprints are generated, copy the value of the SHA256 fingerprint and replace the <YOUR-APP-SHA256-FINGERPRINT> placeholder with it.
You can host the assetlinks.json file on any site as long as it’s publicly available at https://<YOUR-DOMAIN>/.well-known/assetlinks.json. This guide uses GitHub Pages.
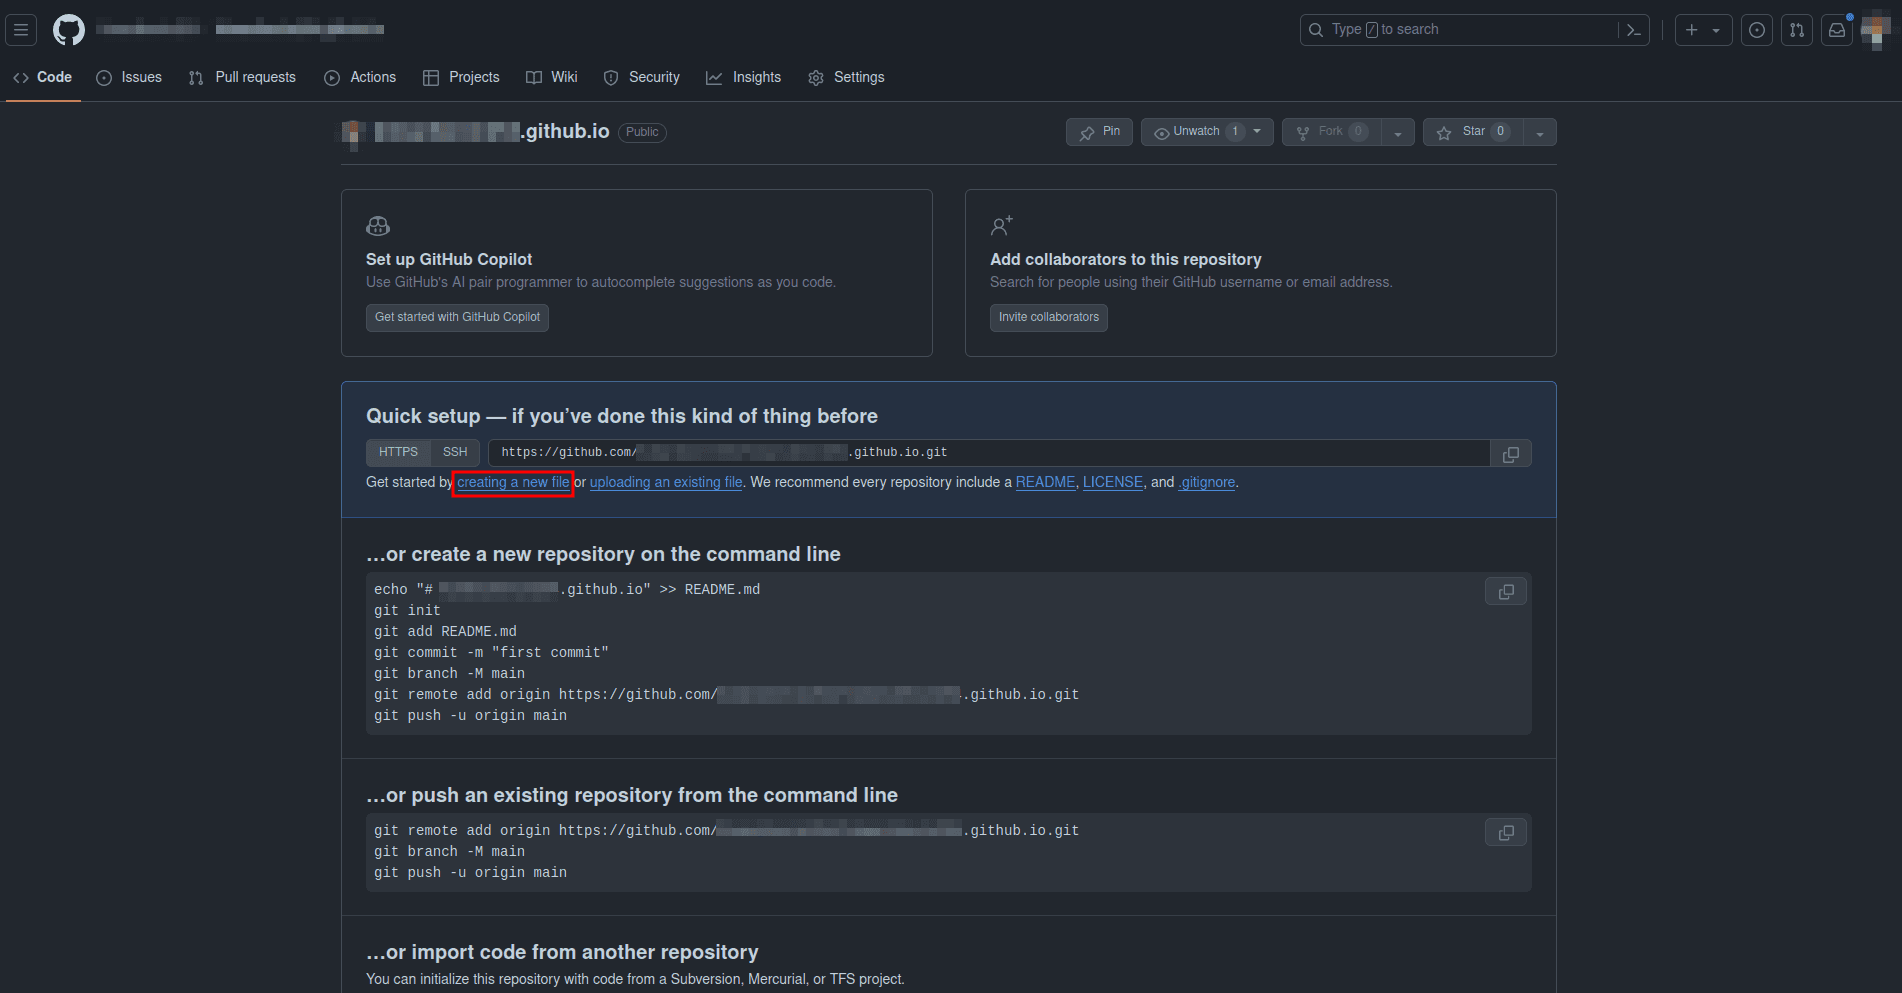
Navigate to the Create a new repository page on GitHub and create a public repository with the name <YOUR-GITHUB-USERNAME>.github.io. Make sure you replace <YOUR-GITHUB-USERNAME> with your GitHub username.
Once the repo is created, select creating a new file:
Provide the file name as index.html, add the following code, which adds some content for the site, and commit changes:
<!DOCTYPE html>
<html lang="en">
    <head>
     <meta charset="UTF-8" />
     <meta name="viewport" content="width=device-width, initial-scale=1.0" />
     <title>Document</title>
    </head>
    <body>
     <h1>Descope React Native Auth</h1>
    </body>
</html>
Next, add a new file named .well-known/assetlinks.json to the same repo and add the contents of the assetlinks.json file that you created earlier:
[
    {
     "relation": ["delegate_permission/common.handle_all_urls"],
     "target": {
         "namespace": "android_app",
         "package_name": "com.descopereactnativeauth",
         "sha256_cert_fingerprints": [
             "FA:C6:17:45:DC:09:03:78:6F:B9:ED:E6:2A:96:2B:39:9F:73:48:F0:BB:6F:89:9B:83:32:66:75:91:03:3B:9C"
         ]
     }
    }
]
Note: Your SHA256 fingerprint might be different.
In the same repo, create a new file named _config.yml and add the following content to include the .well-known directory in the Jekyll build process:
include: [".well-known"]With all the files created, GitHub automatically deploys the website. You can confirm this by navigating to https://<YOUR-GITHUB-USERNAME>.github.io. You can also confirm that the assetlinks.json file is publicly accessible by navigating to https://<YOUR-GITHUB-USERNAME>.github.io/.well-known/assetlinks.json.
You’ll use https://<YOUR-GITHUB-USERNAME>.github.io as the app-linking URL. At this point, you can go back to the components/Flow.js file and replace all the app link URL placeholders with this value.
The next step is to add intent filters for the app link verification. Open the android/app/src/main/AndroidManifest.xml file and the following intent filter just before the closing </activity> tag:
<intent-filter android:autoVerify="true"> <!-- autoVerify required for app links -->
    <action android:name="android.intent.action.VIEW" />
    <category android:name="android.intent.category.DEFAULT" />
    <category android:name="android.intent.category.BROWSABLE" />
    <data android:scheme="https" android:host="<YOUR-GITHUB-USERNAME>.github.io" />
</intent-filter>
Note: Make sure you replace
<YOUR-GITHUB-USERNAME>with your GitHub username.
App linking is now fully set up in your application.
Testing the application
Before you can test the application, open the android/build.gradle file and change the minSdkVersion from 21 to 23:
minSdkVersion = 23Next, make sure the Express server is running by executing the following commands in the terminal in the project root folder:
cd server

yarn dev
In another terminal, execute the following commands to start the React Native Metro server:
cd DescopeReactNativeAuth

yarn start
Next, make sure your emulator is running and execute the following command in a separate terminal to start the Android app on the emulator:
cd DescopeReactNativeAuth

yarn android
Demoing the app
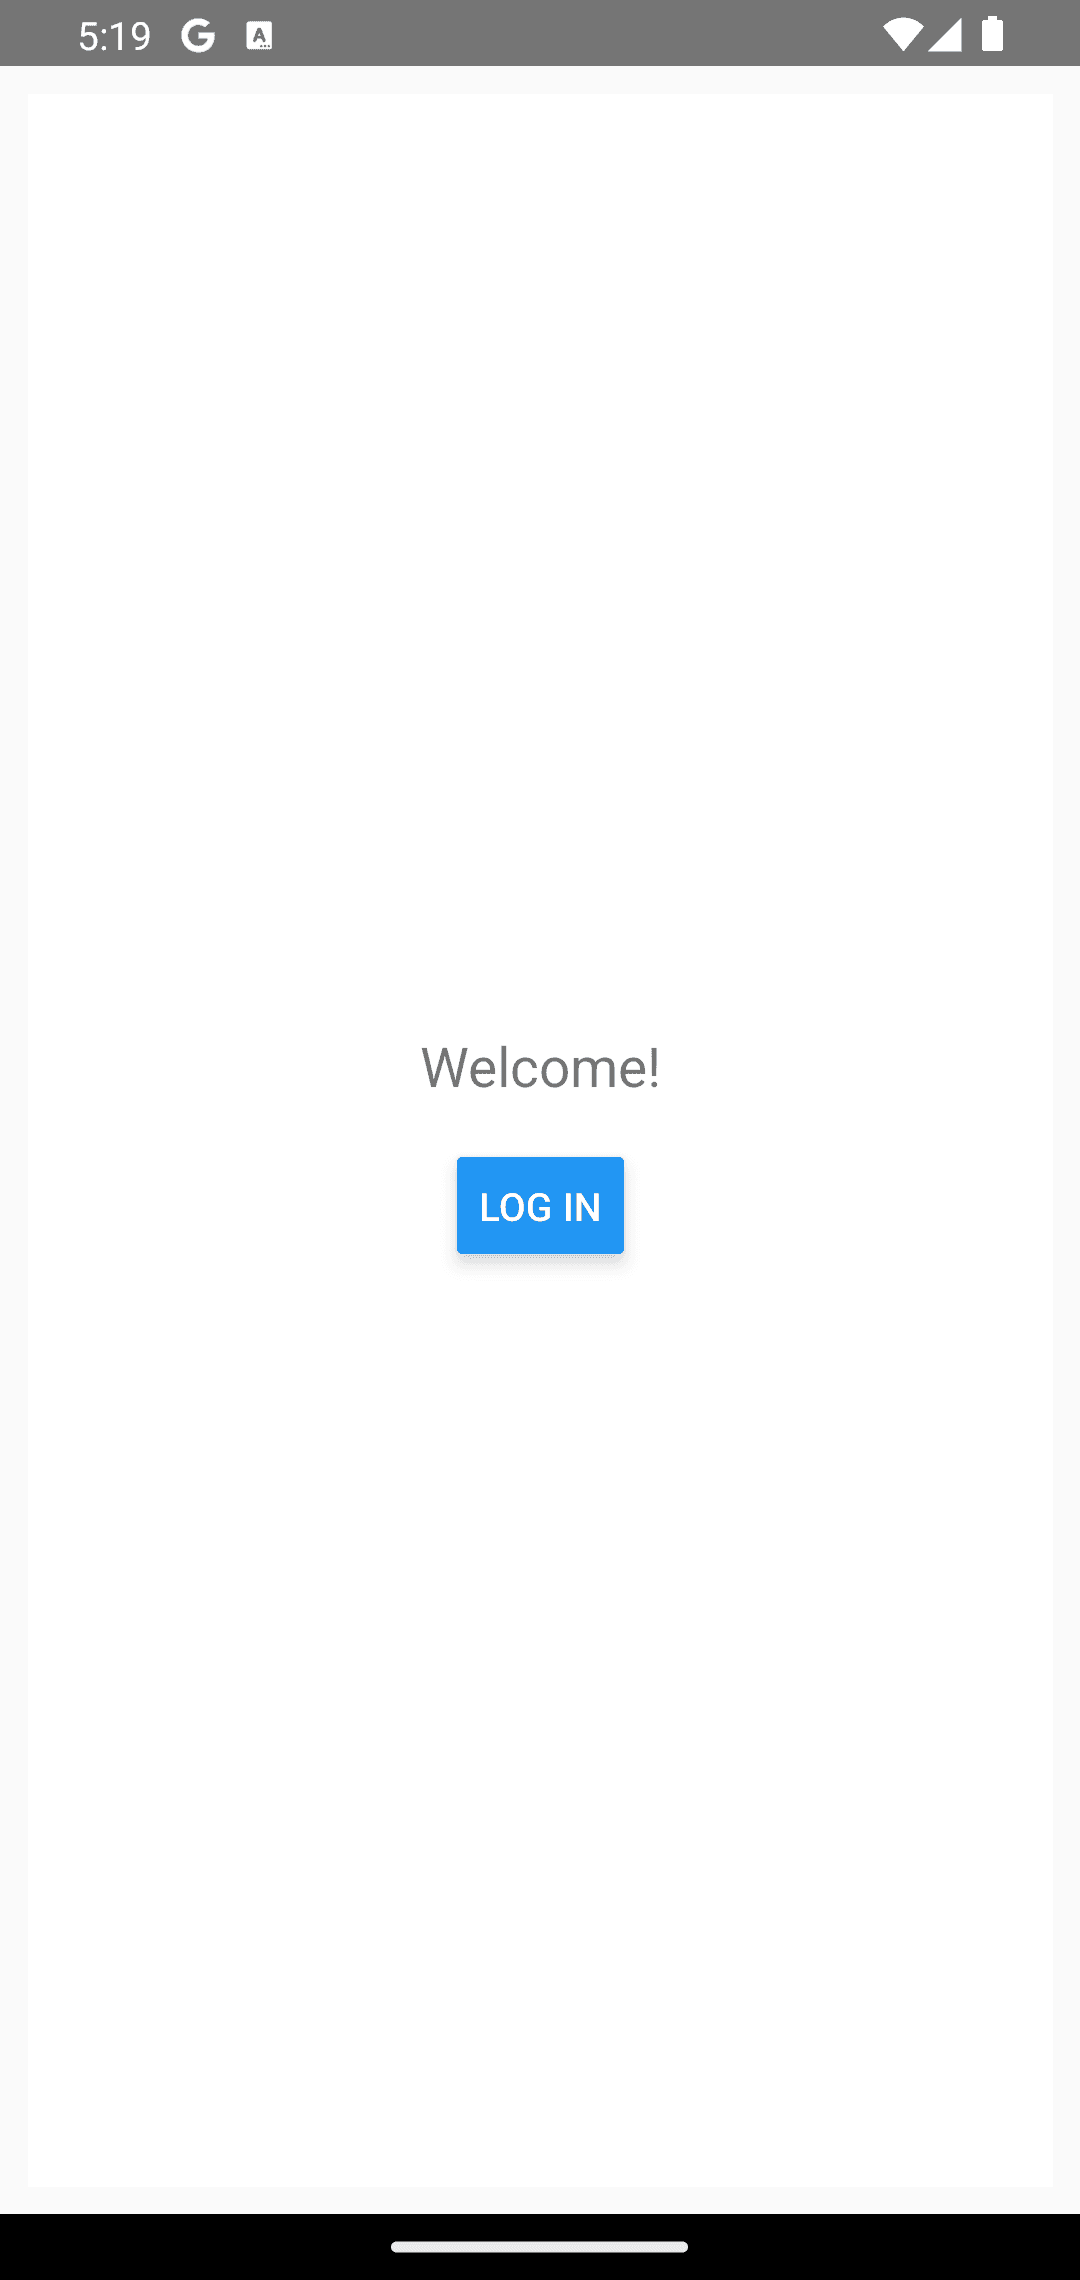
Once the app starts, you should see the Welcome Screen:
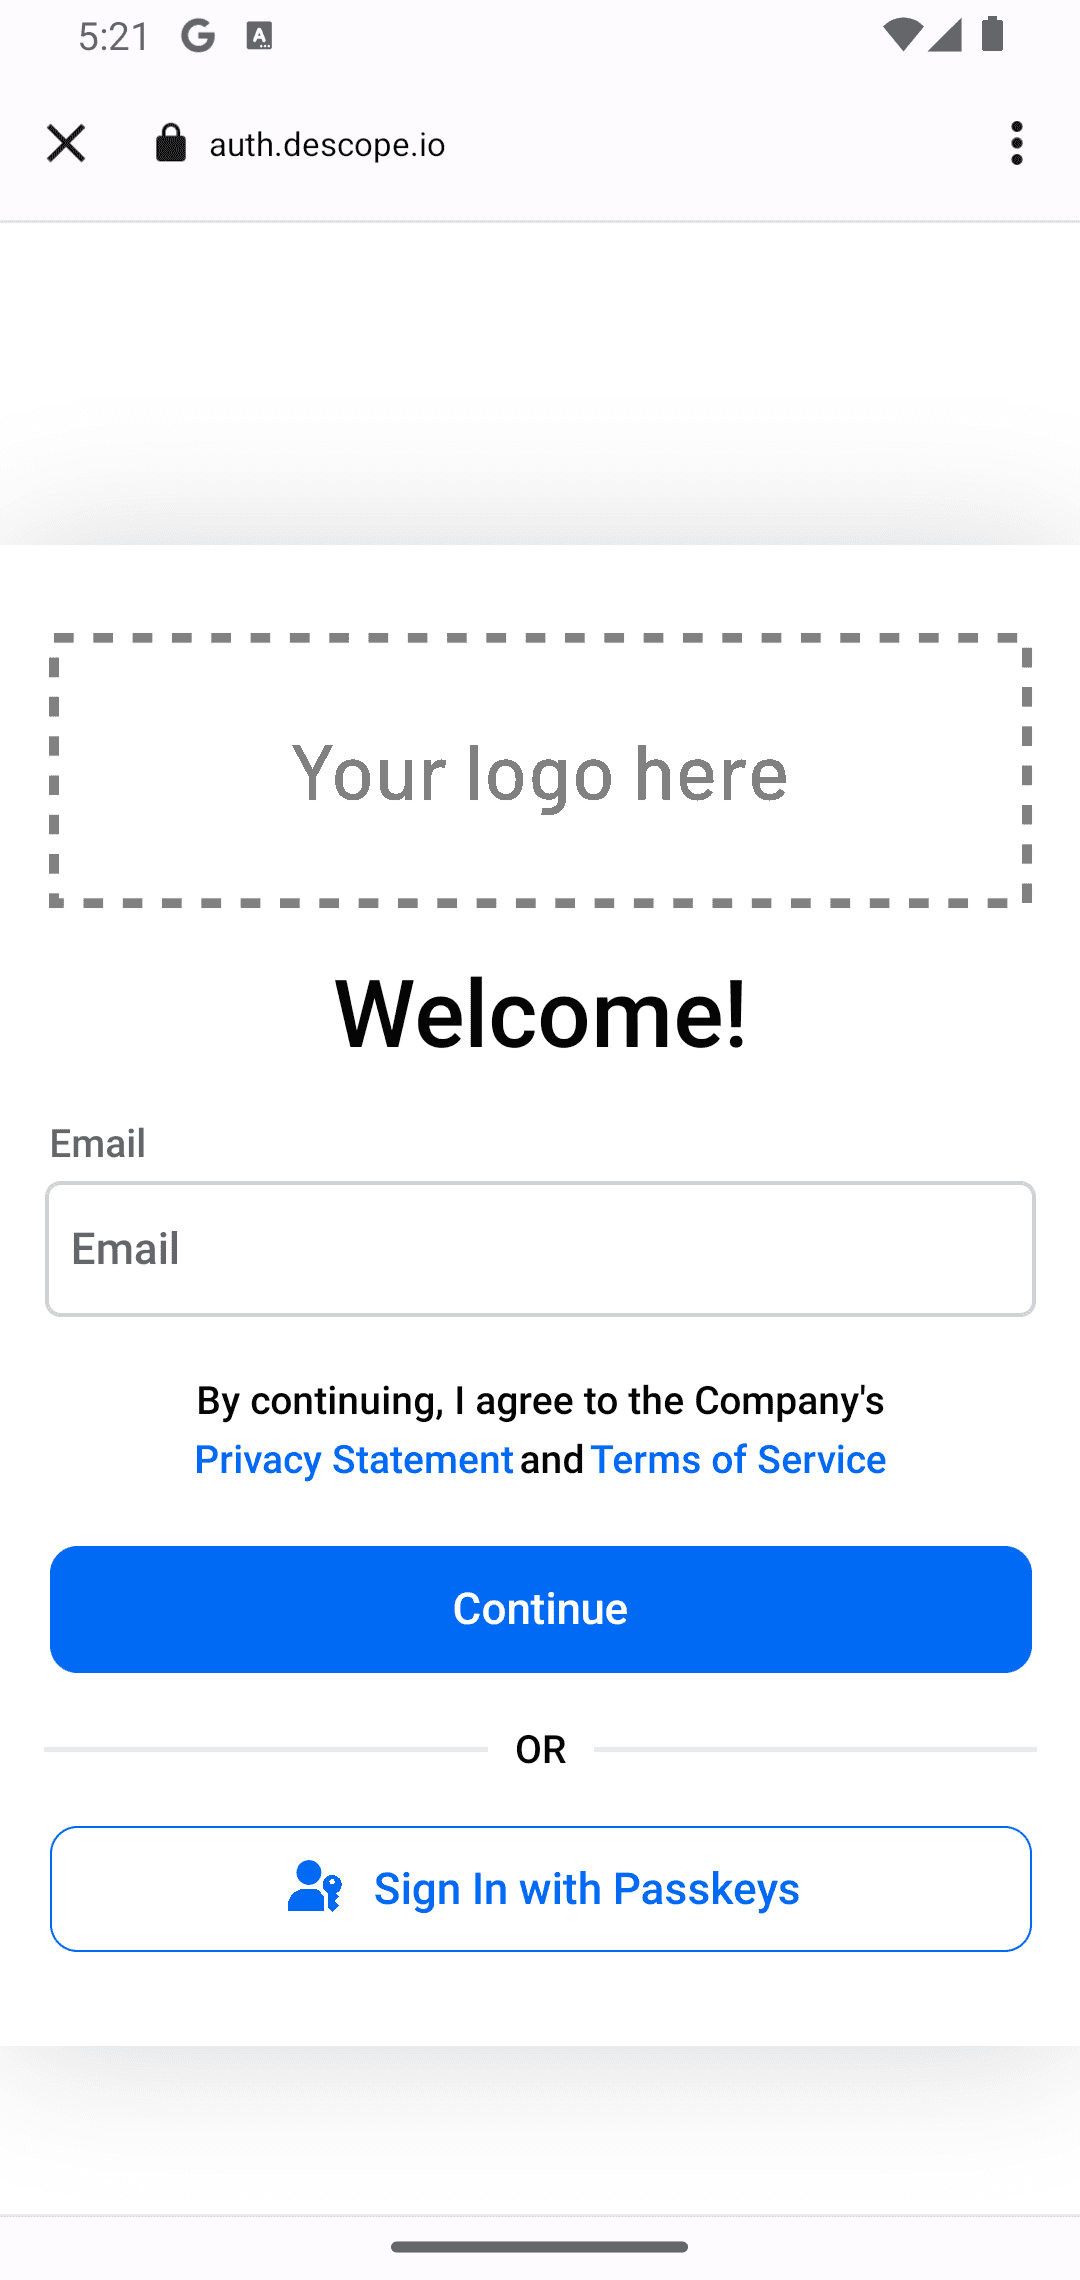
Click the LOG IN button to sign up / log in to the app. On the authentication page, input your email address and click Sign In With Passkeys:
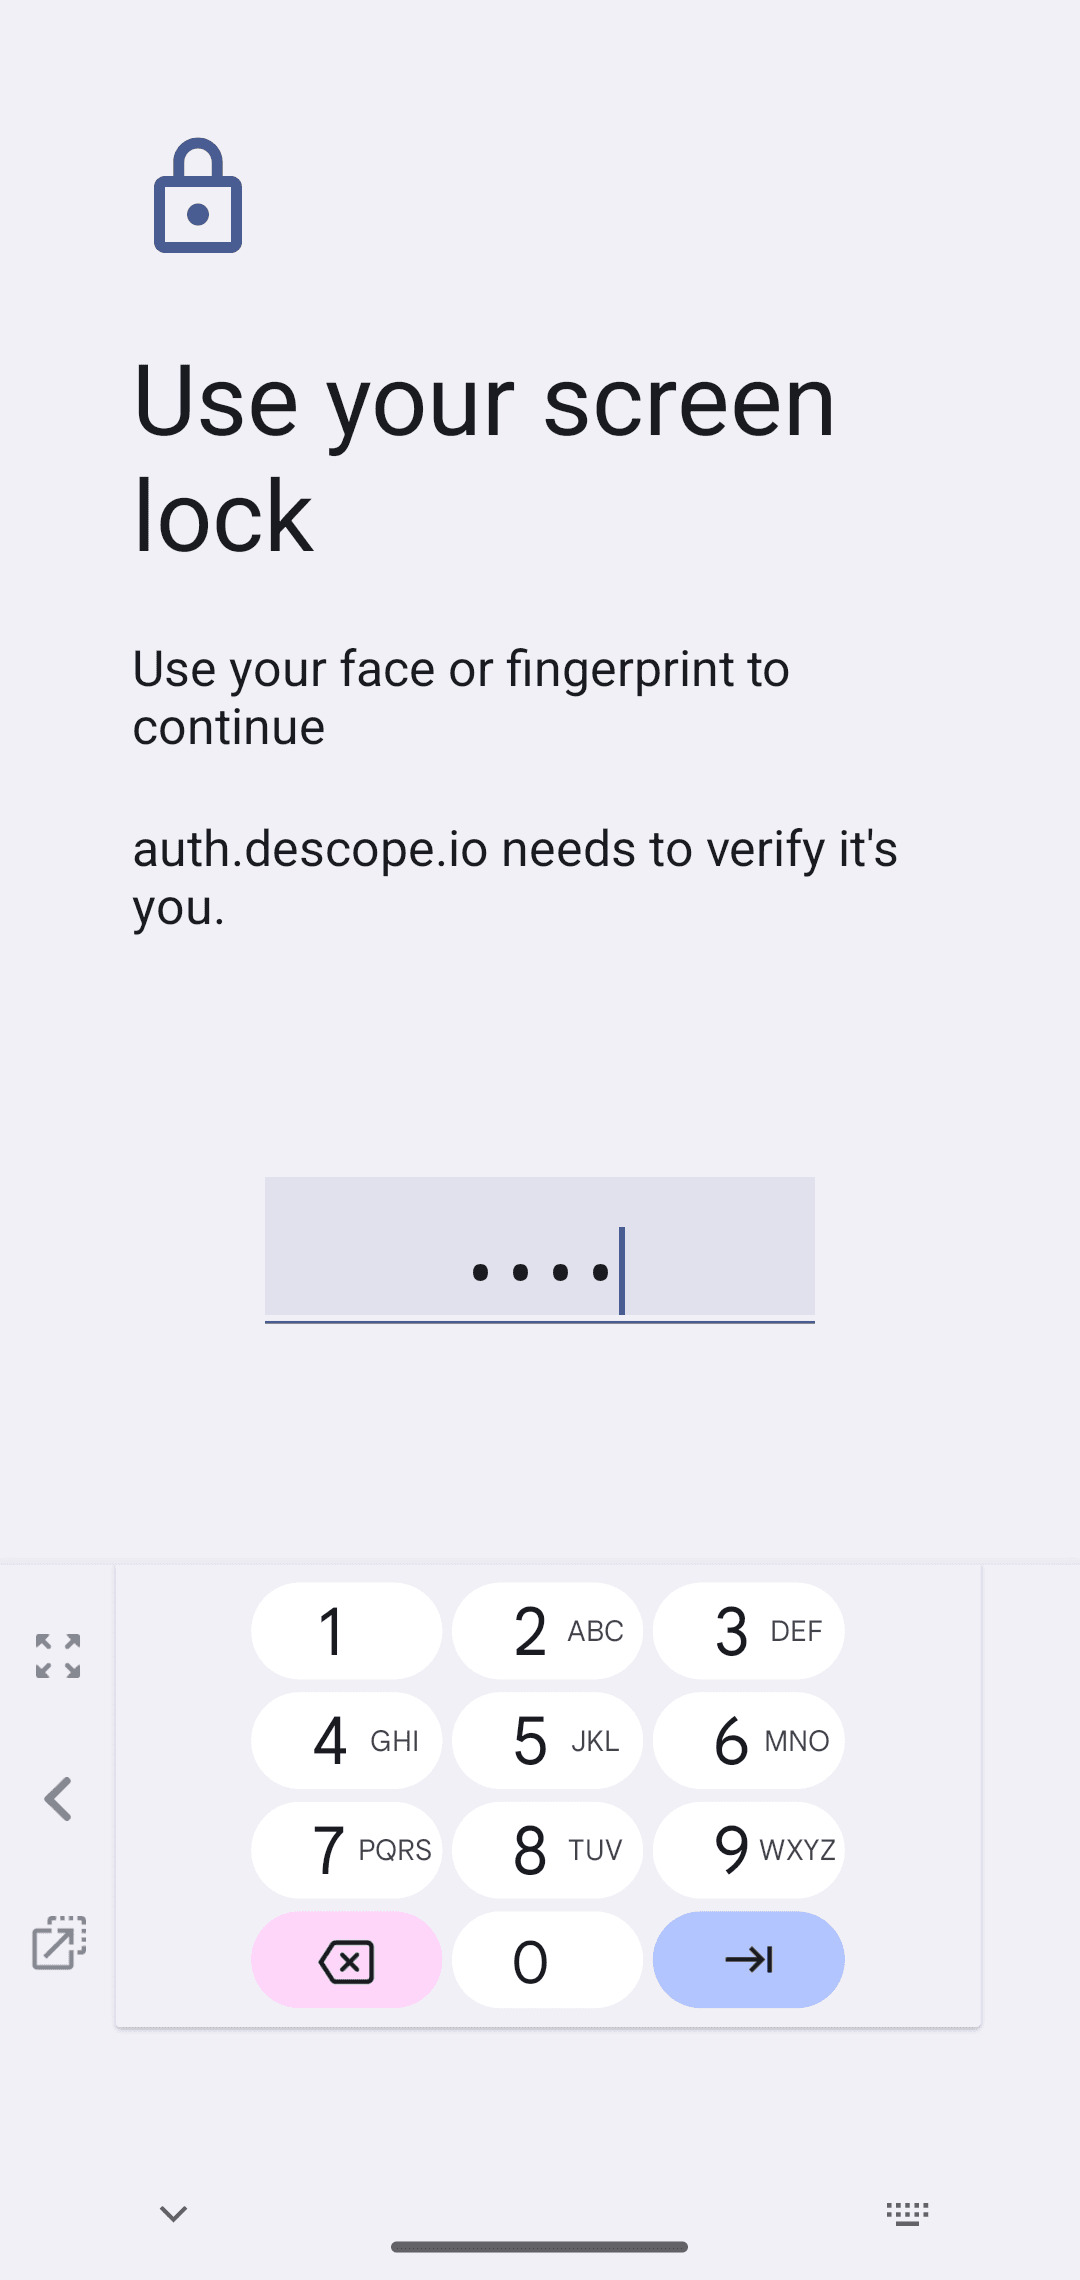
Choose a device for your passkey and provide the passkey:
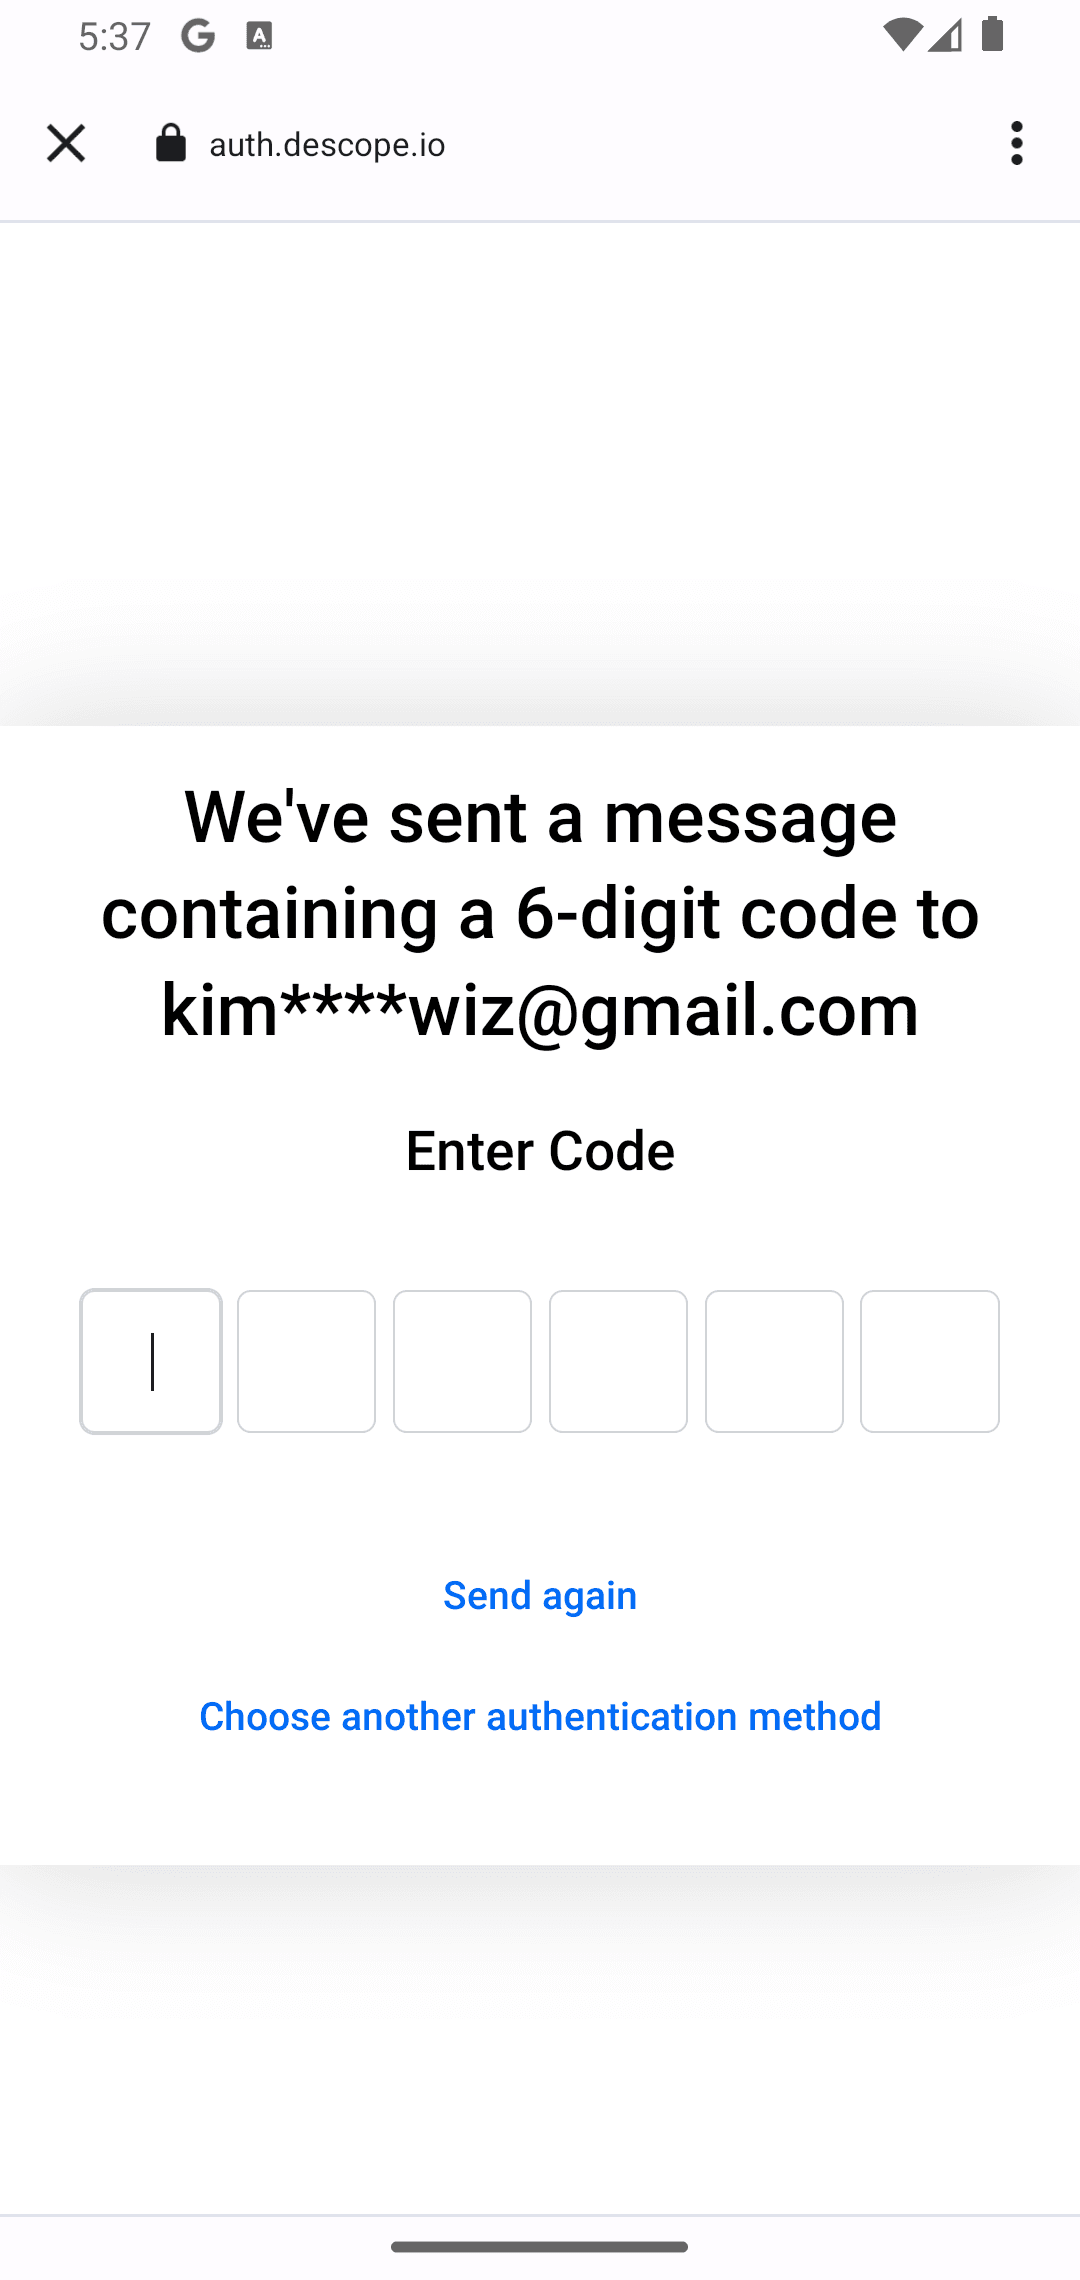
Descope sends an OTP to the provided email address, and then you are prompted to provide the OTP:
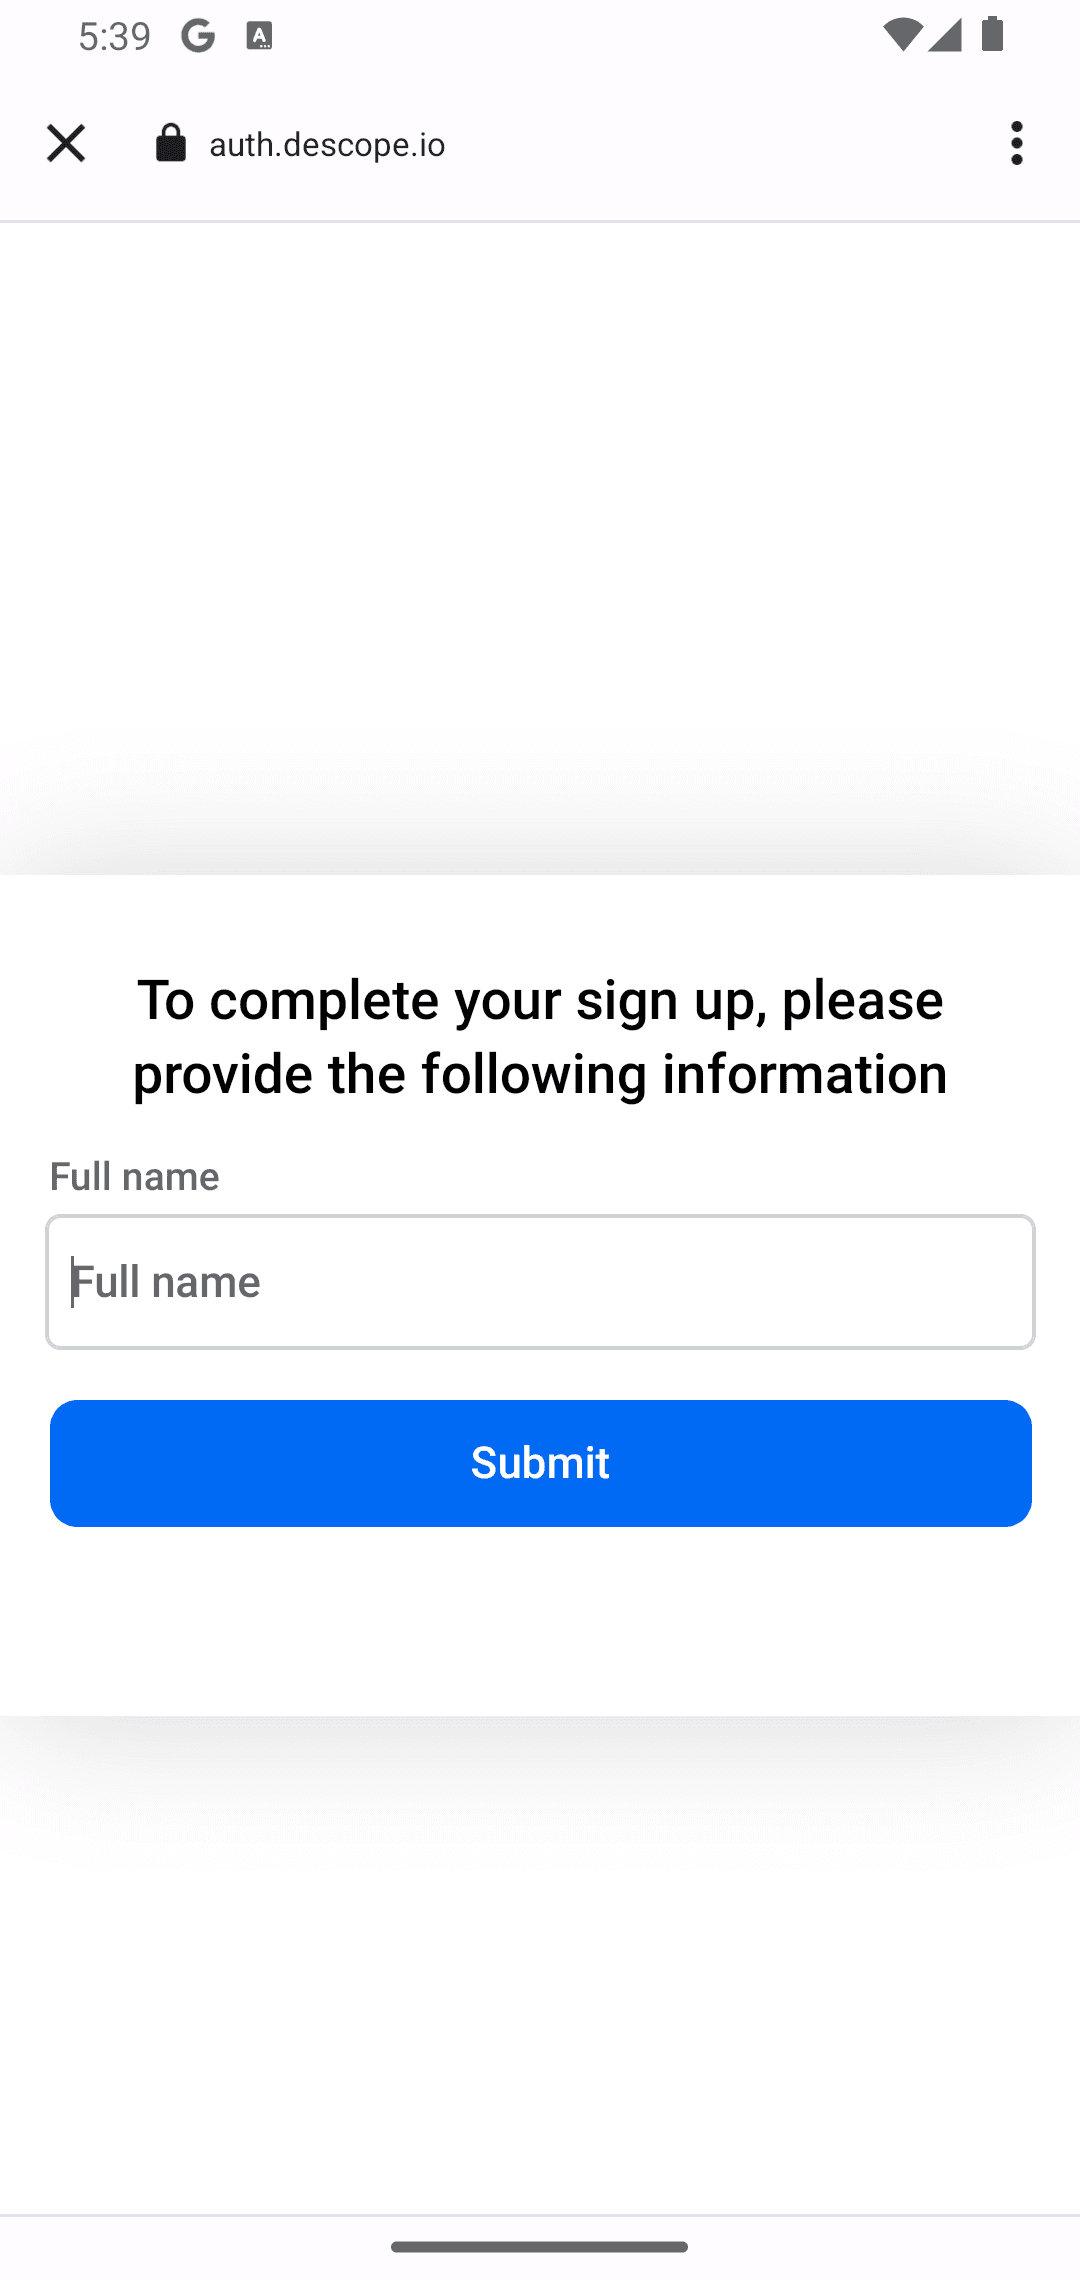
Since this is your first time signing up, you are asked to provide your full name:
After providing your full name, you are navigated back to the app:
You can now log out of the app and navigate to the Descope console to assign a role to the user. On the Descope console, select Users from the sidebar and edit the details of the user you just registered:
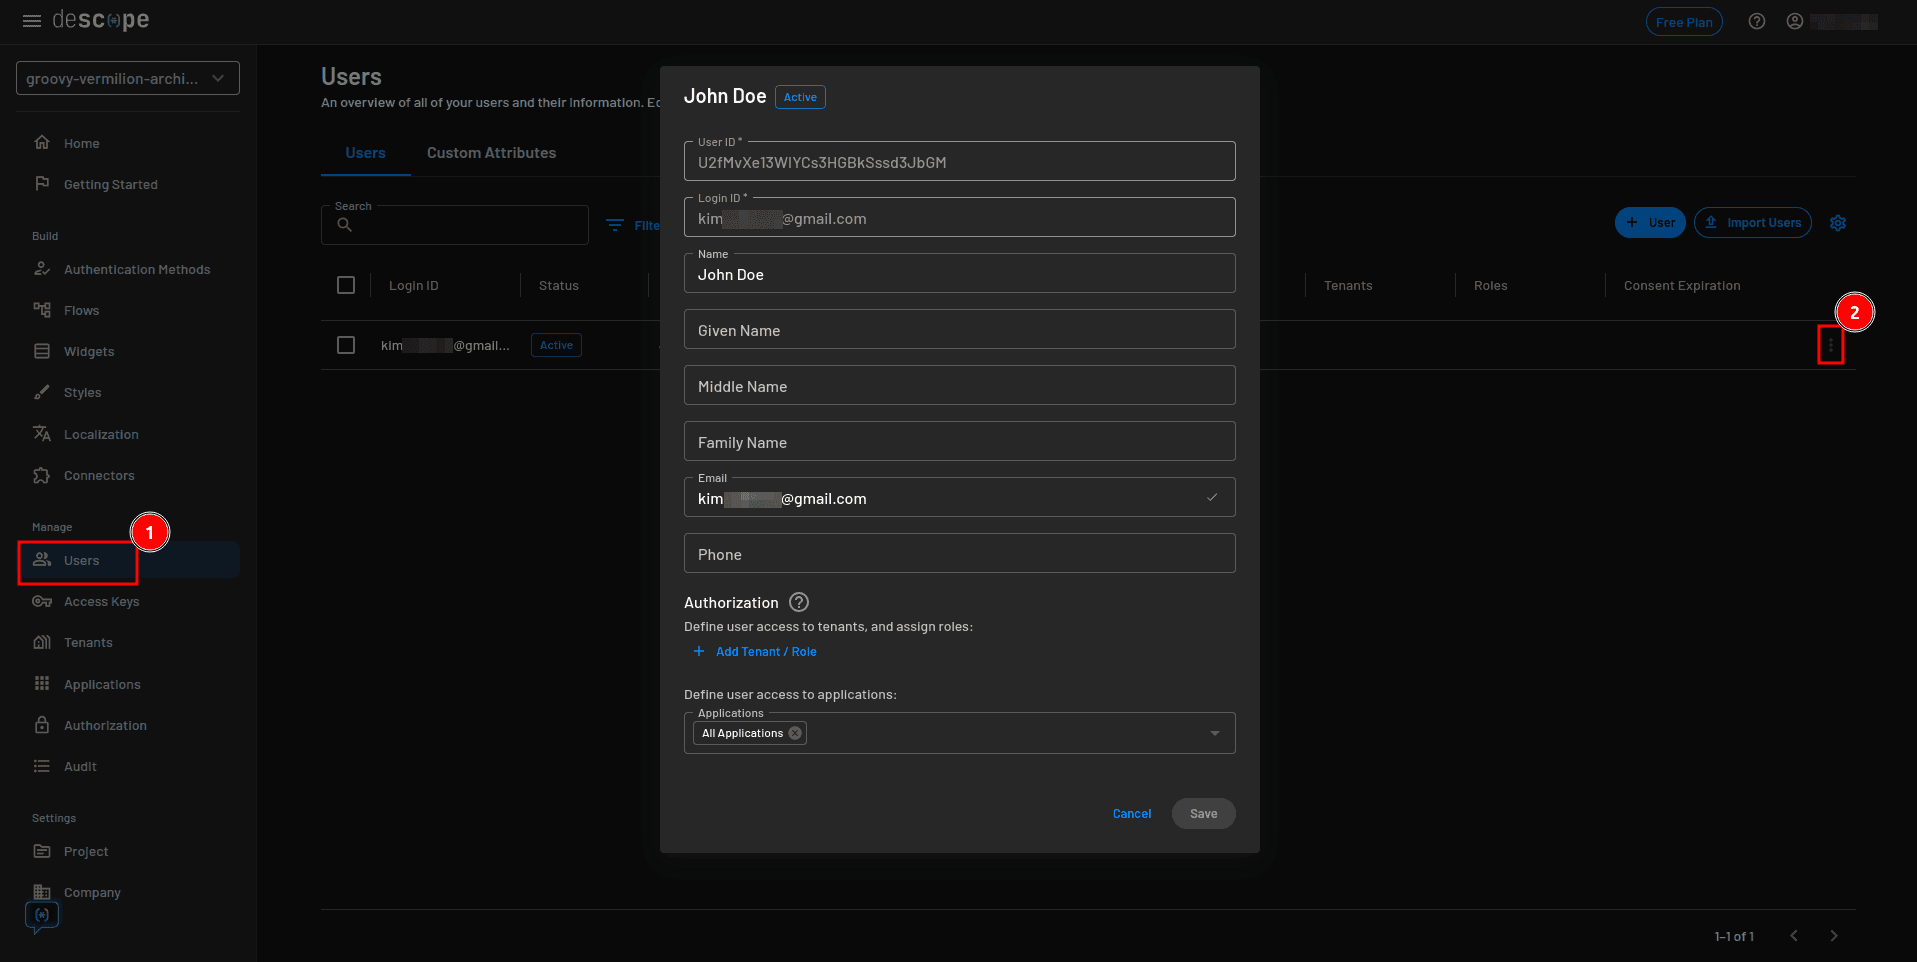
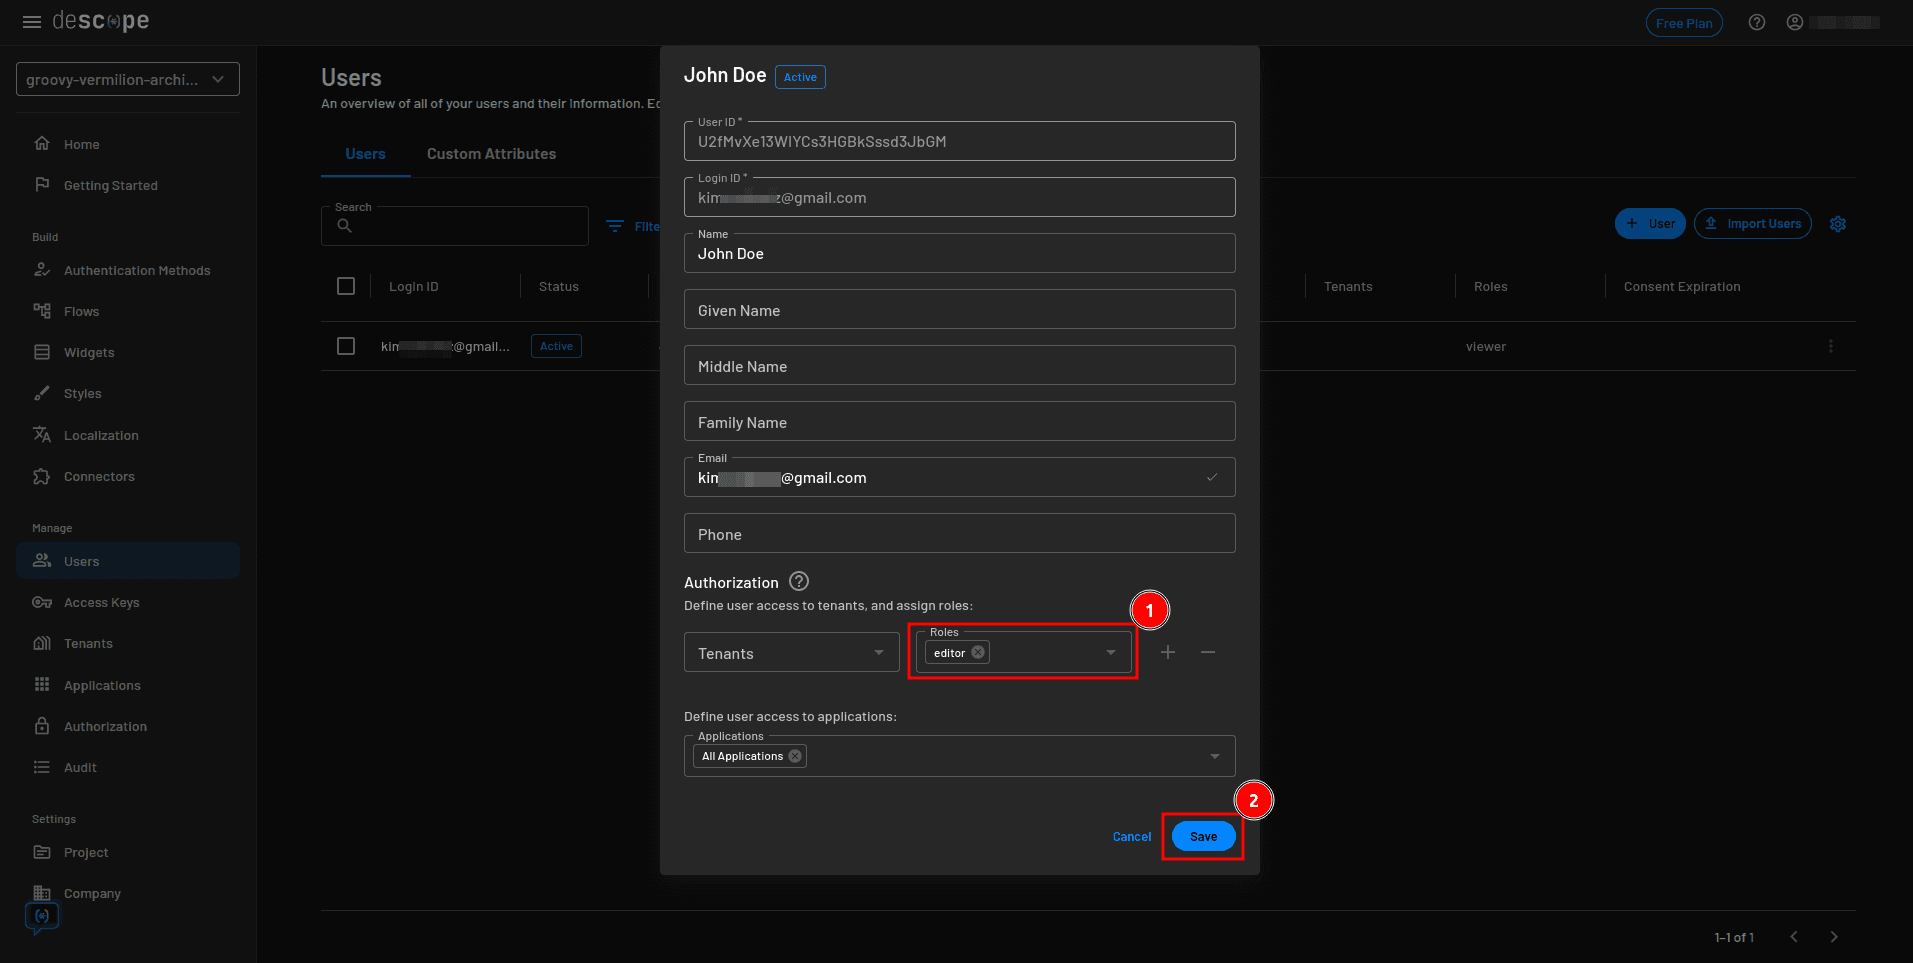
On the user details modal, select + Add Tenant / Role, add the Editor role to the user, and click Save:
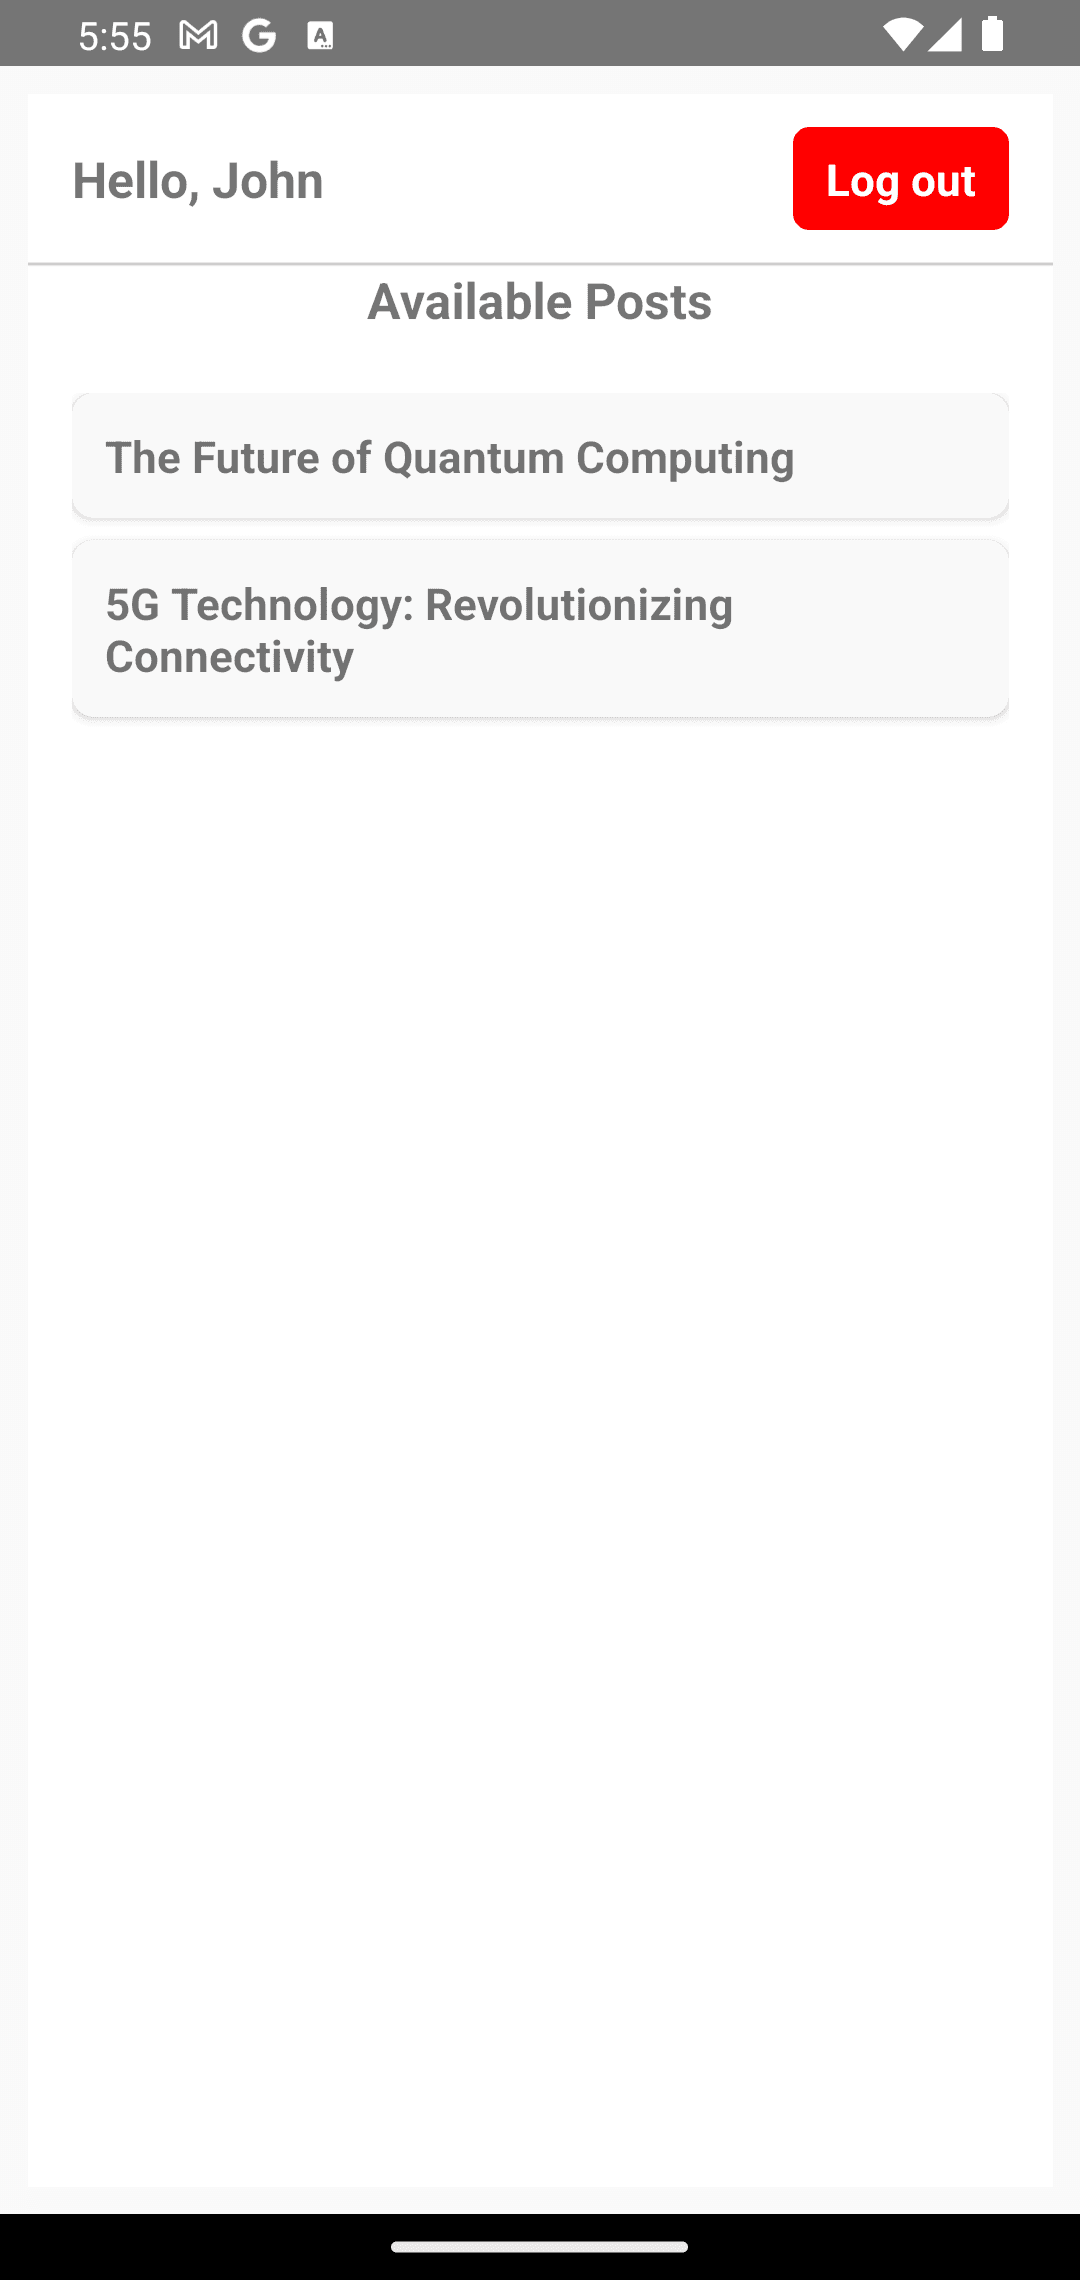
Log in to the app again. You will now be able to see all four posts as well as their published status:
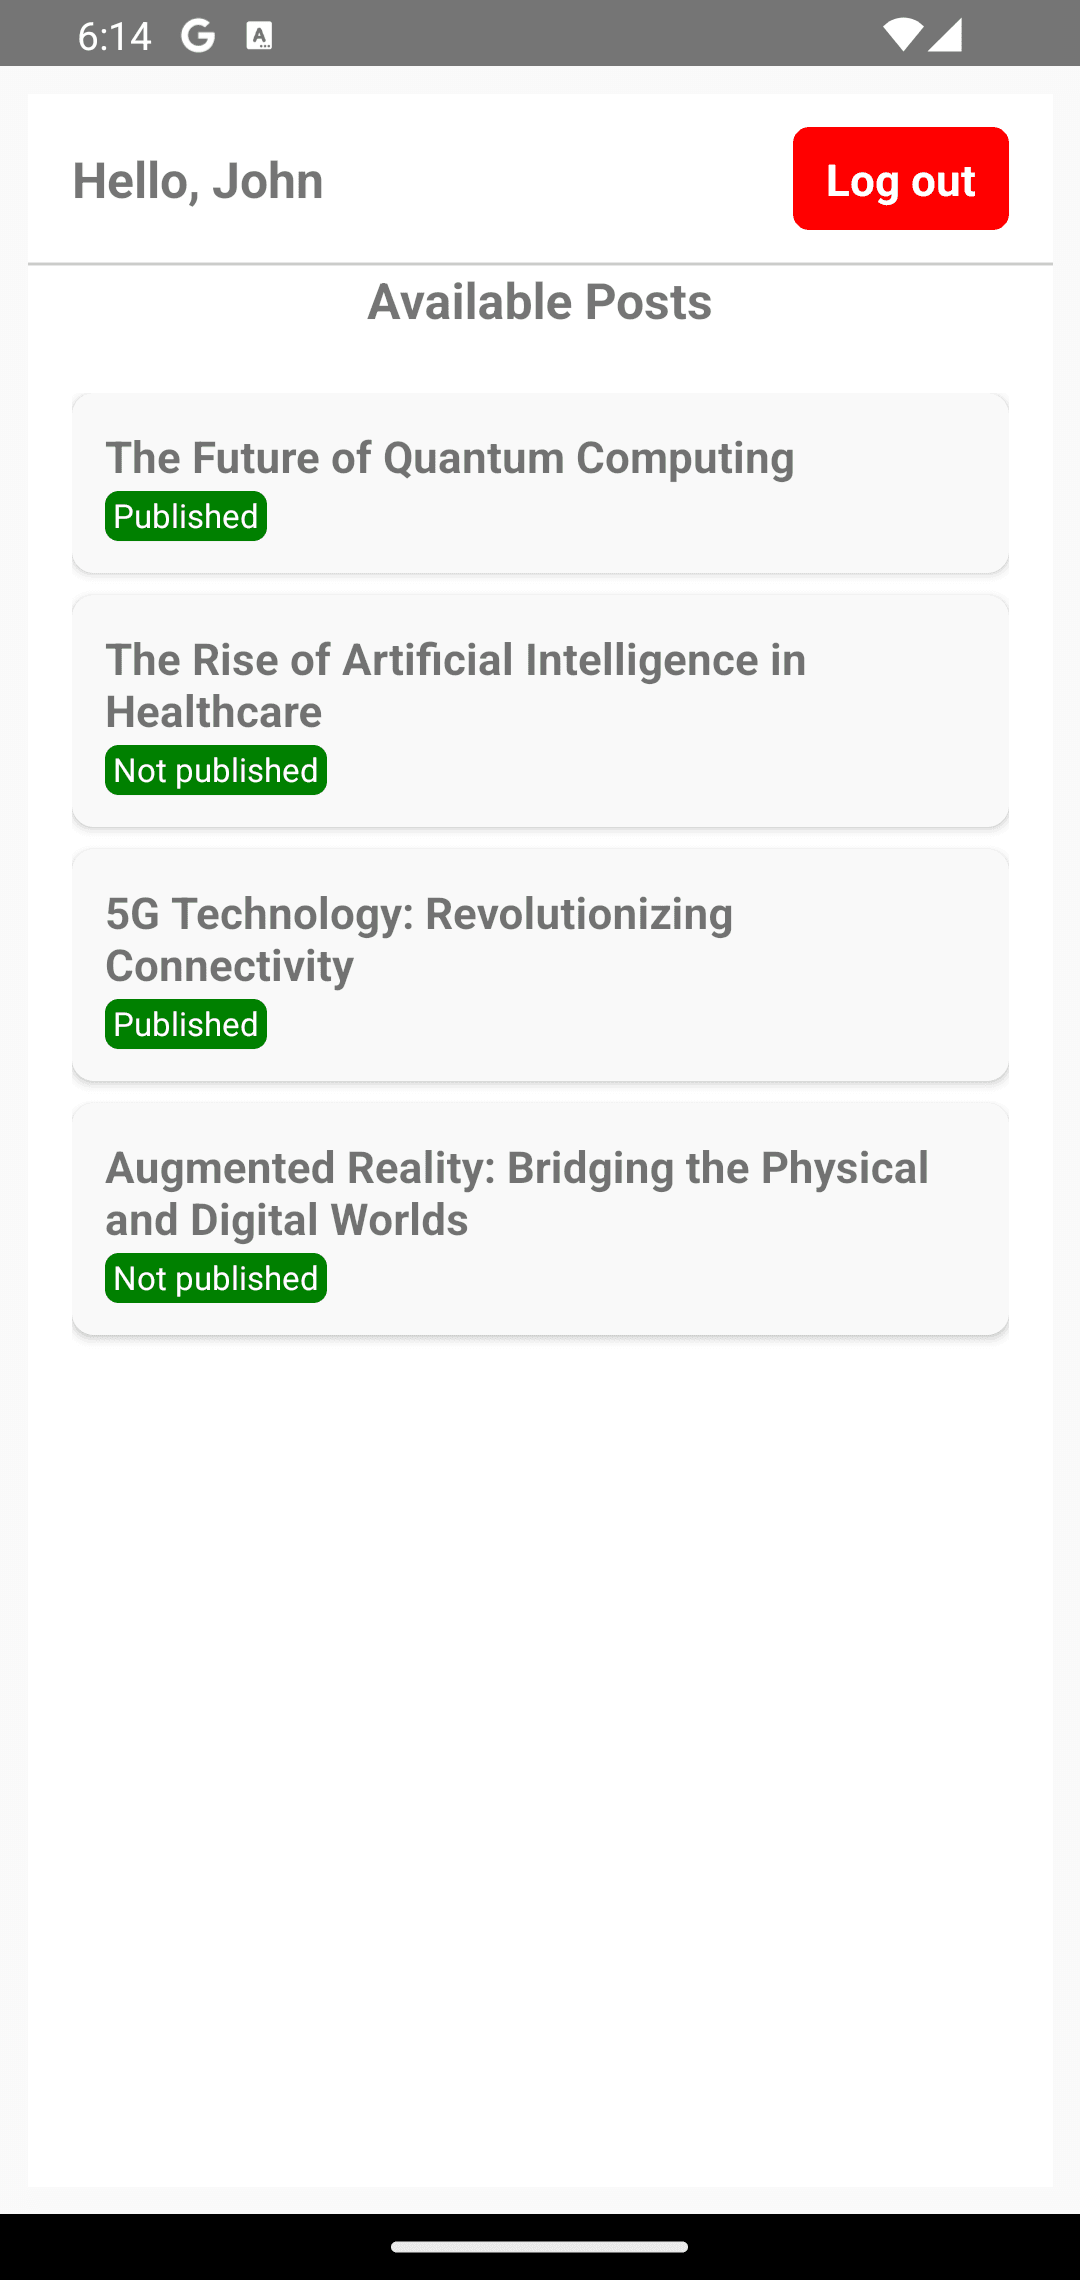
You can select a published post to see the post details, as well as the buttons to publish/unpublish and edit a post. Select the Unpublish button to unpublish the post:

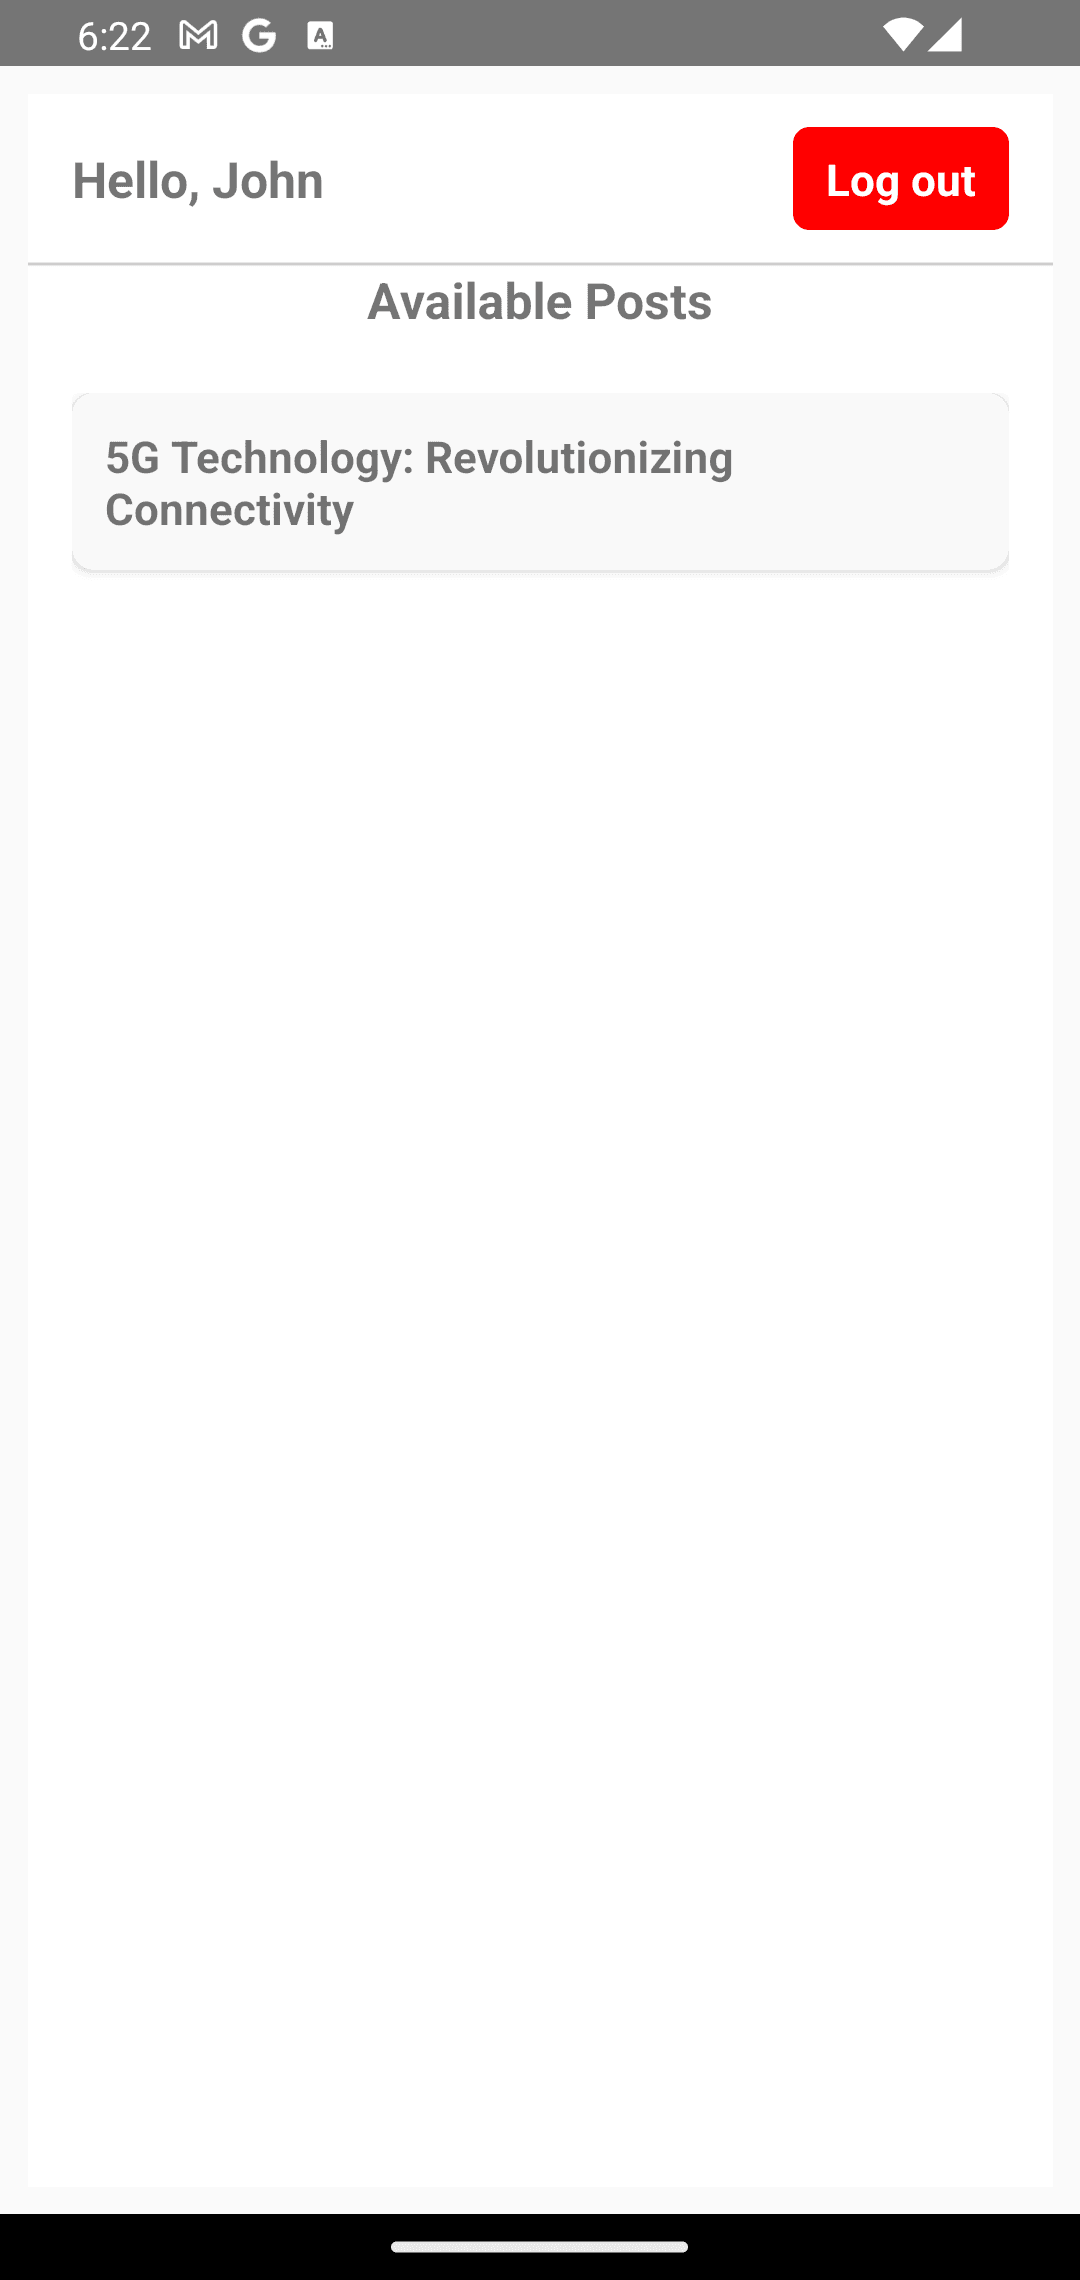
Now, log out of the application, go to the Descope console, and change the user’s role to viewer. Then log back into the application. Now, you can access only a single post:
This confirms that the RBAC implementation is working as expected.
You can access the full code for the project on GitHub.
Conclusion
In this guide, you learned about the complexities associated with traditional authentication methods in React Native applications, such as the need to keep updating your codebase to accommodate the changing authentication needs, understanding security intricacies, and diverting focus from building the app’s core functionality.
You overcame these challenges by integrating Descope into your React Native application to simplify the process for customizing your app’s authentication flows and setting up RBAC.
Descope is a leading customer authentication and identity management platform that allows you to use no-code workflows to design your application’s user authentication process. With Descope, you can easily add passwordless authentication, MFA, fraud prevention, single sign-on (SSO), and much more to your application. Try Descope for your authentication needs today!