
Table of Contents
Building your own authentication system offers flexibility, but it often struggles to keep up with modern security and user experience needs. Rather than investing significant engineering effort to upgrade these legacy systems, it’s often easier to layer in a platform like Descope. With Descope Flows, you can add MFA, risk-based checks, and modern login methods without ripping out your existing login logic.
In this blog, we’ll walk through how to integrate Descope into an existing homegrown auth system. One of the easiest ways to integrate Descope into your existing login system is via OAuth, which lets you redirect to a hosted MFA step without rebuilding your auth flow.
Learn more about adding MFA to your app with Descope
The authentication & authorization flow
OAuth is a popular way to integrate authentication because it lets you rely on another service (like Google or GitHub) to handle identity, instead of having to manage it yourself inside your application.
The main benefits are:
The ability to easily manage redirects
Establishing a trusted and safe standard for redirecting/authenticating across apps, providers, and domains
Acting as a clean bridge between the login point, the provider (i.e., Descope), and your system
We chose magic link authentication because it offers a smoother and more secure login experience compared to traditional OTPs. Instead of asking users to type in a code, we simply email them a link: one click and they’re in. Meanwhile, magic links are single-use and expire quickly, making them harder to misuse.
Here’s a high-level overview of how this works, with both authentication and authorization steps:
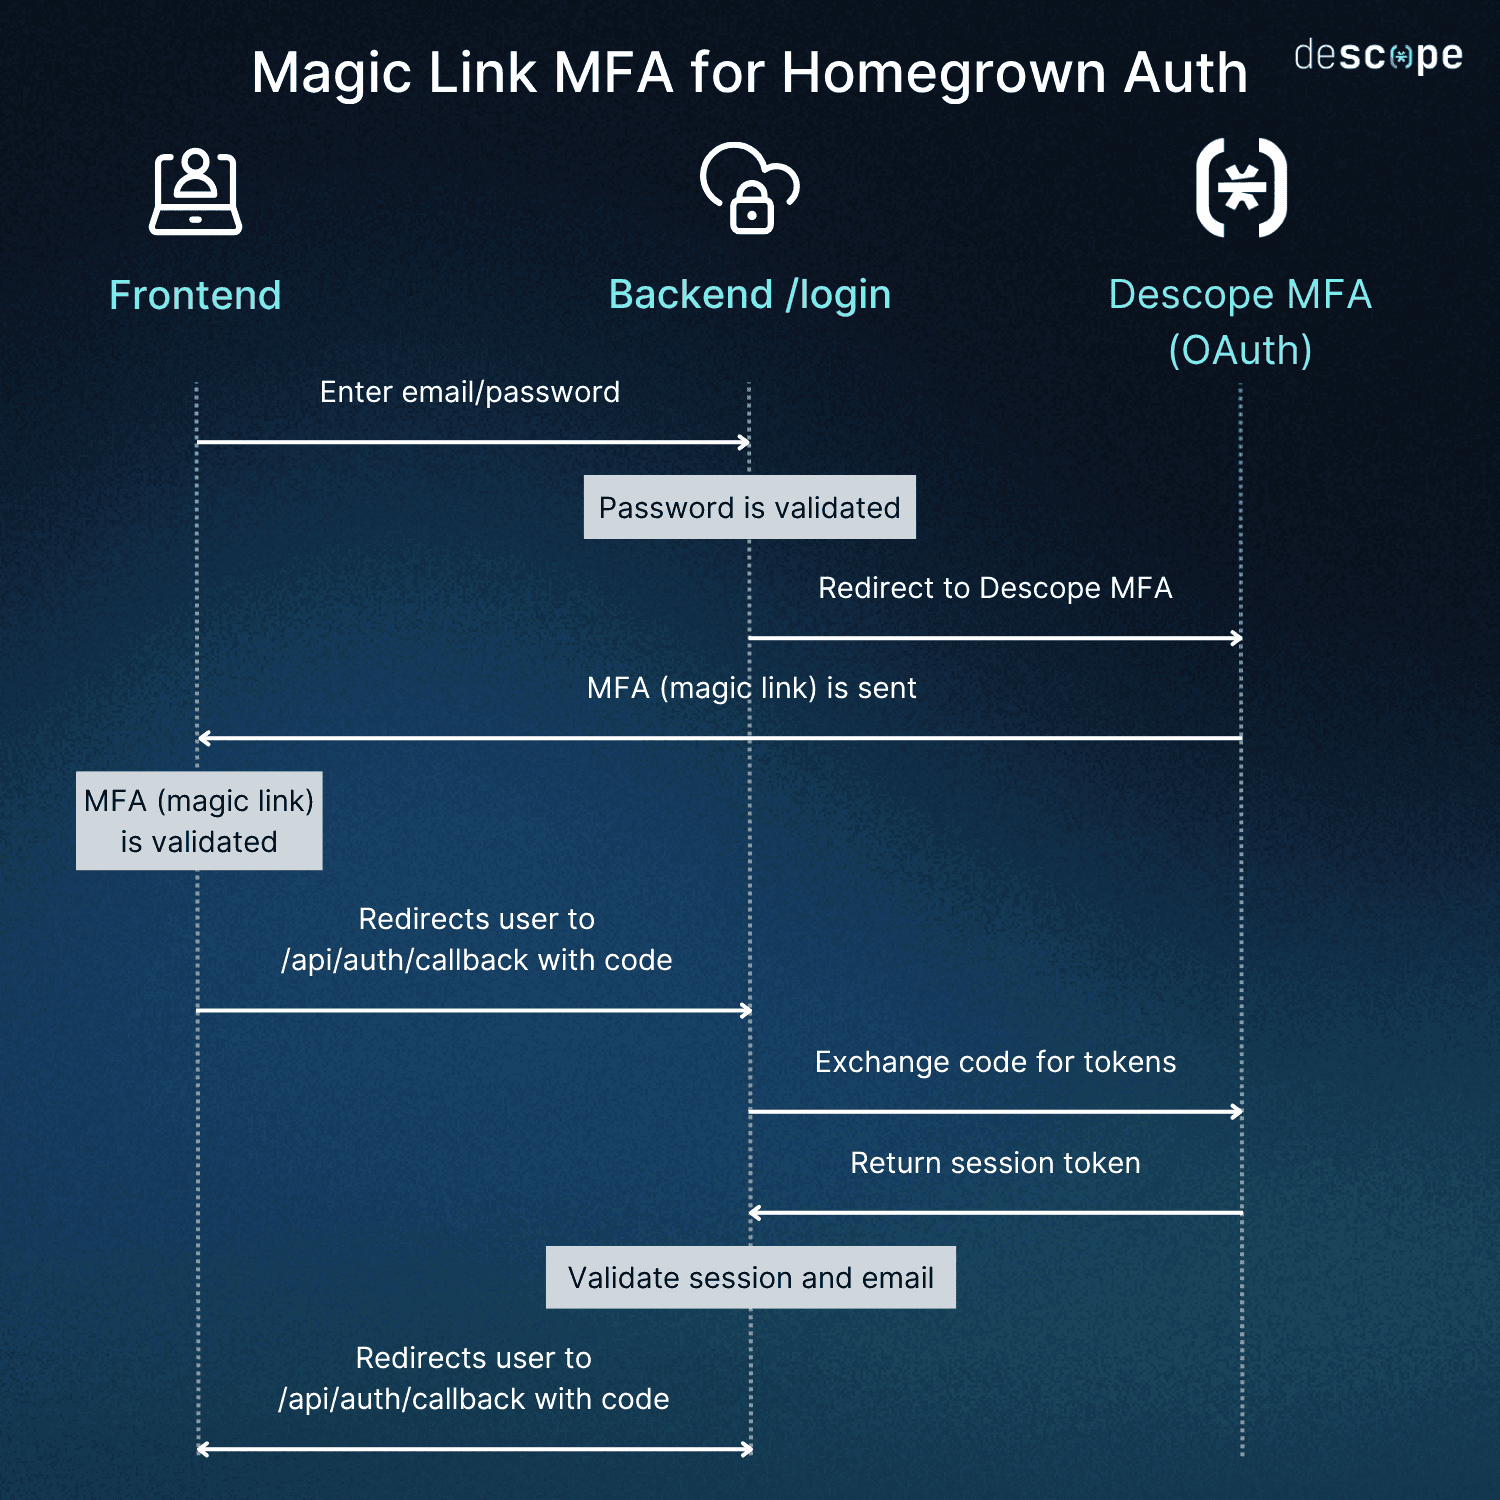
Initial login: The user submits their email and password to the backend via the frontend.
Password validation: The backend validates the submitted password credentials.
OAuth redirect: If the password is valid, the backend redirects the user to Descope's MFA service to begin the multi-factor authentication process.
MFA initiation: Descope MFA sends a magic link to the user (typically via email or SMS).
Magic link validation: The user clicks the magic link, and Descope validates the MFA token/link.
Callback redirect: After successful MFA validation, Descope redirects the user back to the backend's callback endpoint (/api/auth/callback) with an authorization code.
Code exchange: The backend exchanges the authorization code with Descope for access tokens.
Session token creation: Descope returns a session token to the backend.
Session and email validation: The backend validates the session token and confirms the user's email/identity with Descope.
Login completion: The existing login process completes, and the user is logged into the application with full authentication and MFA verification.
At this stage, the user is successfully signed in as they would normally be and can use all the APIs with existing session token as you would expect.
Code walkthrough
Let’s start by validating credentials, then trigger Descope’s OAuth flow to initiate MFA, handle the callback, and finally secure protected routes using a verified session.
Validate credentials
When the user logs in with an email and password, we validate the credentials. If valid, we generate a Descope OAuth URL and send it back to the frontend.
app.post('/api/auth/login', async (req: Request, res: Response) => {
  const { email, password } = req.body;

  if (password === 'password') {
    try {
      const redirectUrl = await getOidcRedirectUrl(email);
      res.json({ redirectUrl });
    } catch (error) {
      res.status(500).json({ message: 'Error getting redirect URL' });
    }
  } else {
    res.status(401).json({ message: 'Invalid credentials' });
  }
});
Starting the OAuth flow
We’re using Descope’s SDK to initiate an OAuth flow. The login_hint improves both user experience and security by pre-filling the user’s email in the Descope MFA flow, reducing friction and input errors. It also ensures the MFA step is tied to the same identity verified earlier, helping prevent session confusion or spoofing.
In our case, we manually initiate the login flow and use Descope as an OAuth-based identity provider. To support this, you’ll configure your application to treat Descope as a custom OAuth provider — initiating the flow and handling the callback accordingly.
const getOidcRedirectUrl = async (userEmail: string) => {
  const redirectUrl = process.env.DESCOPE_REDIRECT_URL || '';
  const response = await descopeClient.oauth.start('Descope', redirectUrl);
  return response.data.url + `&login_hint=${userEmail}`;
};
Callback endpoint
When Descope completes the MFA process, it redirects back with a code or an error. We validate these parameters before proceeding.
app.get('/api/auth/callback', async (req: Request, res: Response) => {
  const { code, error } = req.query;

  if (error) {
      console.error('OAuth error:', error);
      return res.status(400).json({ message: `Authentication failed: ${error}` });
    }

  if (!code || typeof code !== 'string') {
      console.error('No code provided in callback');
      return res.status(400).json({ message: 'No authorization code provided' });
    }

  // Proceed to token exchange...
});
Exchange the code for a token
We exchange the code for a refresh token, then validate it to ensure the session is legitimate. This gives us access to the user’s identity information.
  const tokenResponse = await descopeClient.oauth.exchange(code);

    if (!tokenResponse.ok) {
      console.error('Token exchange failed:', tokenResponse.error);
      return res.status(401).json({ message: 'Failed to exchange authorization code' });
    }

    // Get the session token from the response
    const sessionToken = tokenResponse.data?.refreshJwt;
    if (!sessionToken) {
      console.error('No session token in response:', tokenResponse.data);
      return res.status(401).json({ message: 'No session token received' });
    }

    // Validate the session token
    const sessionValidation = await descopeClient.validateSession(sessionToken);

    console.log('Session validation response:', sessionValidation);
In this case, we are issuing a custom JWT after validating Descope’s session. However, you can use whatever session management method works best for your system, whether that’s a JWT or another type of token. This allows you to maintain full control over session management.
This endpoint demonstrates how to use the verified JWT to authorize protected routes.
app.get('/api/protected', authenticateToken, (req: AuthenticatedRequest, res: Response) => {
  res.json({ message: 'This is a protected route', user: req.user });
});
MFA use cases with Descope Flows
The range of MFA use cases you can build with Descope Flows is diverse and robust, especially when you layer in conditional logic.
For example, you check a user's geolocation during login and customize the experience based on their country. If the user is signing in from Brazil (where the messaging app WhatsApp is more popular than SMS), the flow could offer Sign in with WhatsApp and enforce MFA before granting access. For users from other countries, the flow could follow a different path like sending an OTP via SMS or email.
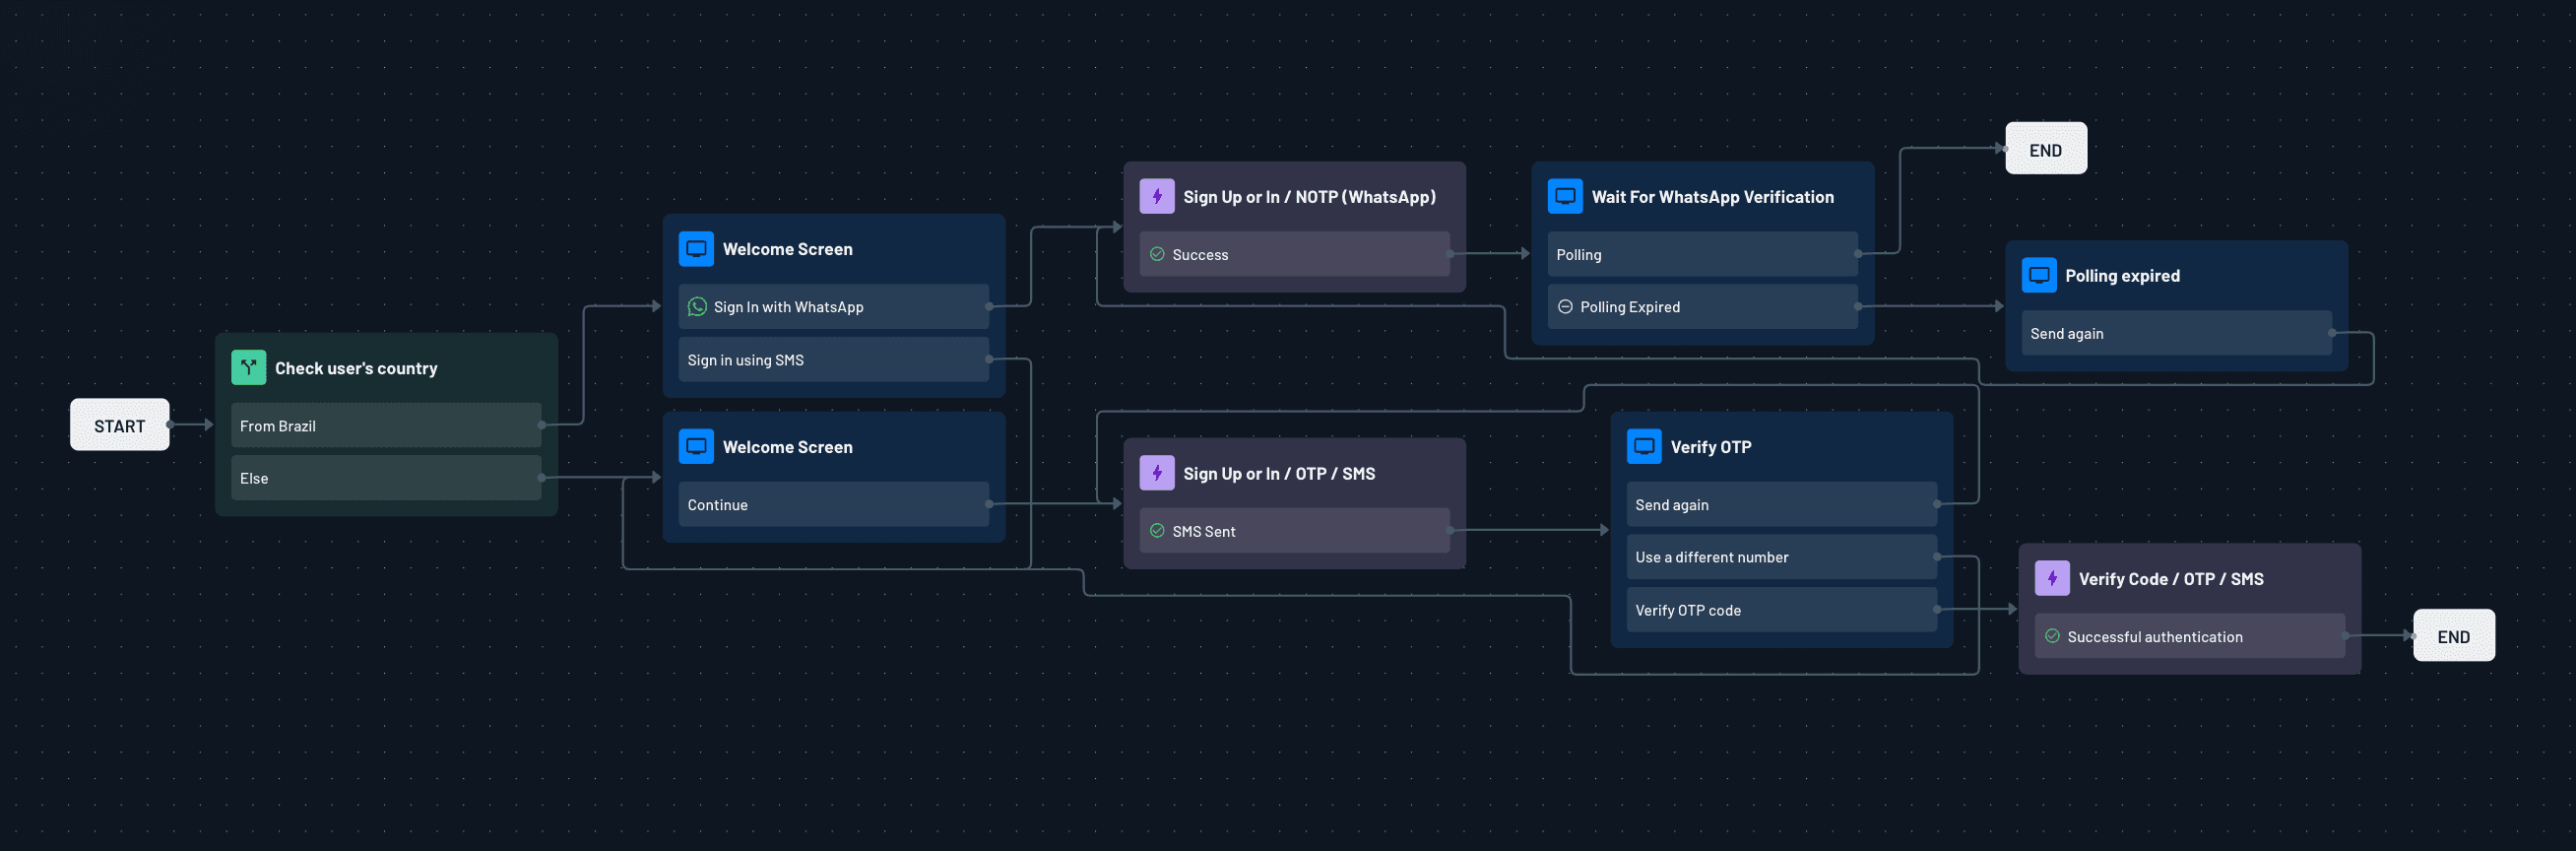
If you'd like to support additional authentication methods such as OTP, TOTP, or other second factors, make sure that the user's email is verified first in the flow. Since the email serves as the primary identifier (and is passed as the login hint), verifying it ensures you can safely and reliably layer other authentication factors on top of it.
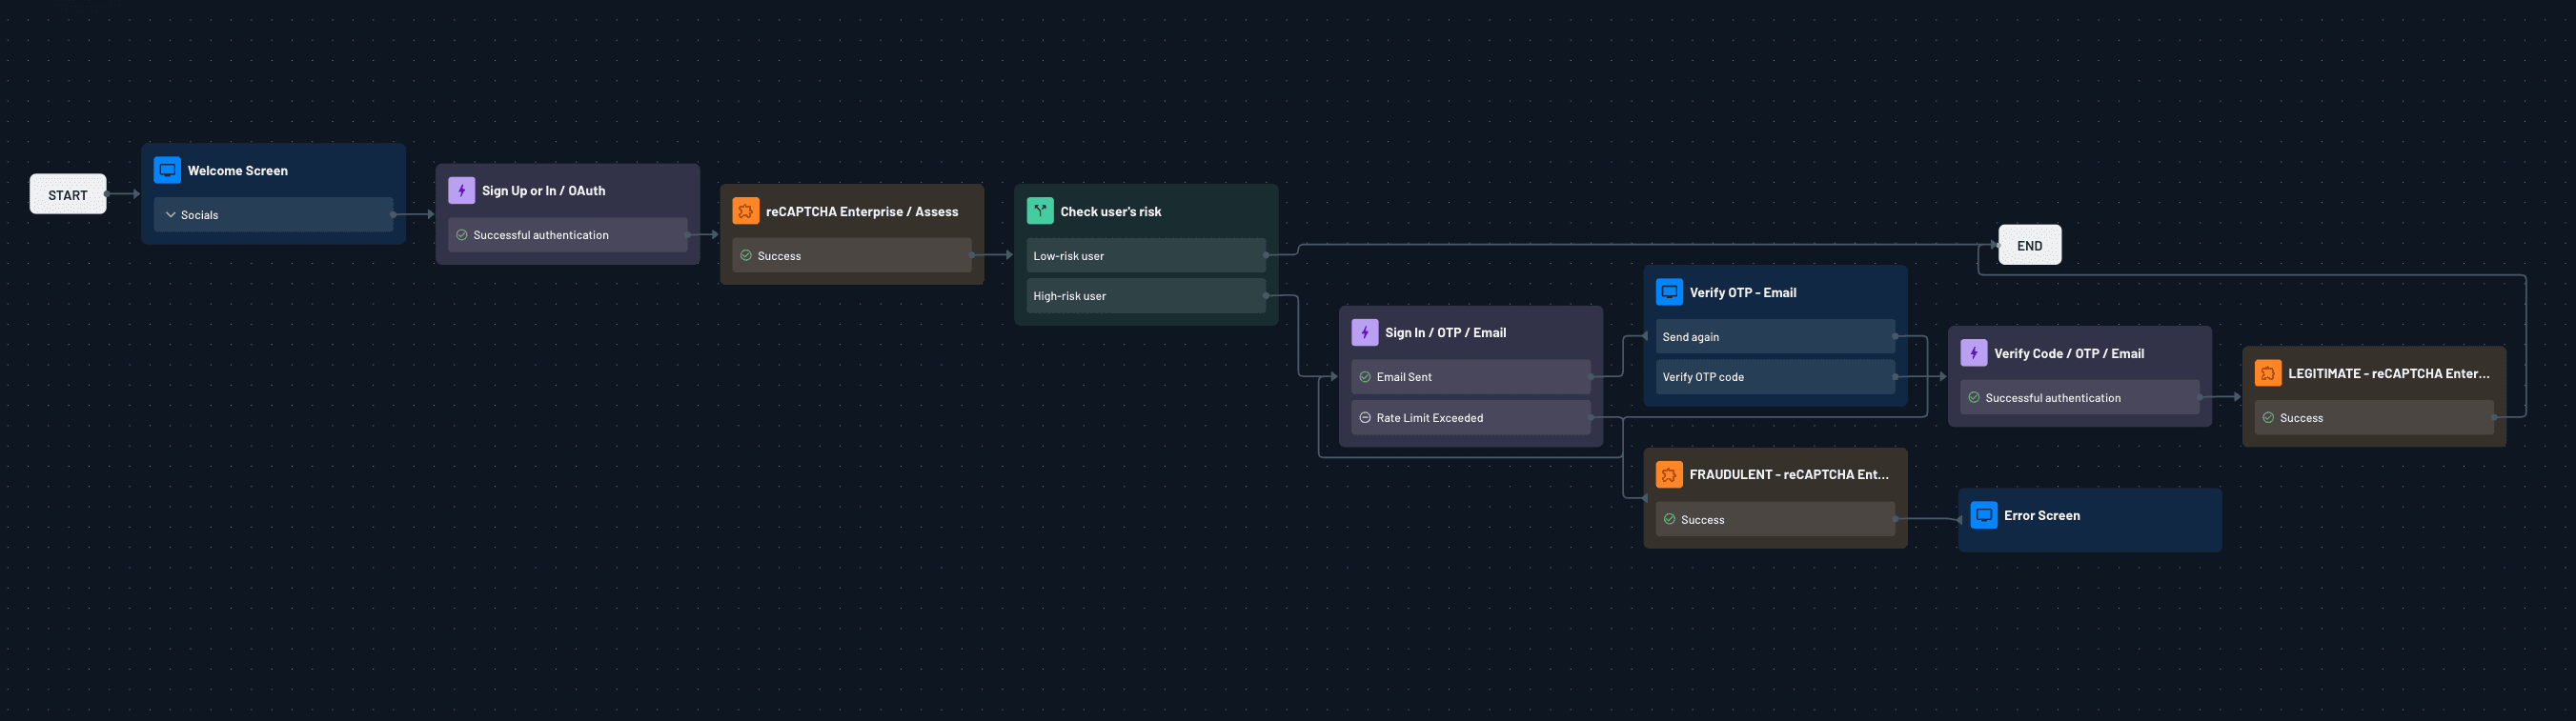
Descope’s Flow Template Library includes a prebuilt flow that incorporates Google reCAPTCHA Enterprise to detect automated login attempts. This flow adds a security layer before MFA is even triggered. When a user signs in, reCAPTCHA evaluates the request and dynamically determines whether to proceed with login, step up to MFA, or block the attempt altogether—all without changing your backend code.
These kinds of flows make it easy to tailor security and user experience based on context, all without touching your code.
Descope makes adding MFA to homegrown auth simple
Many internal apps and legacy systems still rely on username/password logins — a method that quickly becomes complex when trying to add modern authentication. Instead of building everything yourself (OTP handling, brute-force protection, password resets, rate limiting, etc.), Descope simplifies and strengthens your auth flows:
With just a few lines of code, Descope strengthens the security of a traditional authentication system by adding modern MFA through Descope. This hybrid approach keeps your homegrown auth logic intact, while delegating high-risk components like MFA, phishing resistance, and brute-force protection to a specialized, secure provider like Descope.
Homegrown auth systems can seamlessly integrate Descope to receive a wide range of benefits:
Modern auth made simple: Easily add magic links, passkeys, and MFA without complex backend changes.
Risk-based authentication: Use connectors like Google reCAPTCHA Enterprise, Arkose Labs, and Forter to assess login risk and dynamically trigger step-up authentication.
Bot & fraud protection: Automatically evaluate login attempts using behavioral signals (via reCAPTCHA Enterprise) and assign risk scores.
Adaptive flows: Build flexible user journeys that adjust based on real-time threat data, all in Descope Flows with no backend rewrites needed.
Plug-and-play security layer: Descope sits on top of your existing auth system, offering a clean, secure, and easy-to-update MFA and risk-based auth layer.
Explore everything Descope has to offer by signing up for a Free Forever account, then get connected with like-minded builders in our dev community, AuthTown.
Have an upcoming auth modernization project, or looking to augment your homegrown system? Book a demo with our team to learn more.