
Table of Contents
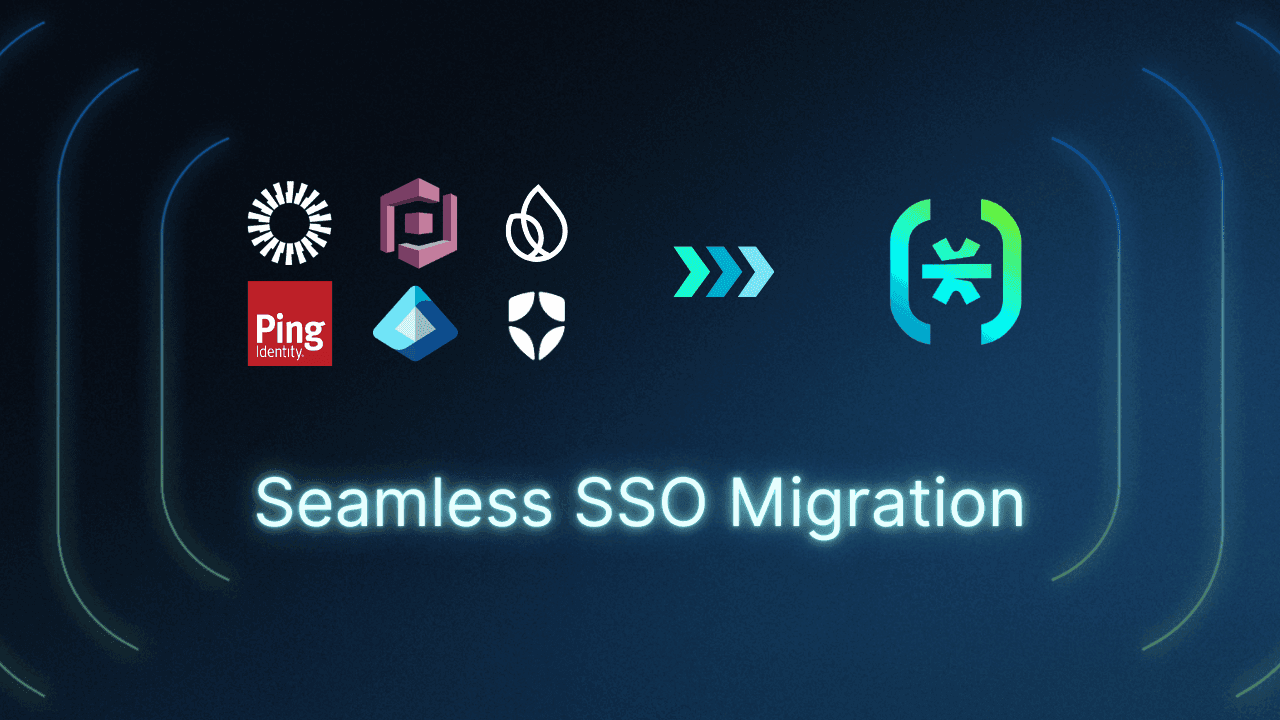
Single sign-on (SSO) simplifies user authentication by allowing individuals to access multiple domains using a single credential or authentication method. However, each SSO tenant is typically an entire organization with its own discrete configuration, which presents a challenge when switching providers. Typical SSO migrations require these tenants to manually reconfigure on their end, a process that demands coordination with customer IT teams who are already stretched thin.
Descope provides a migration method that eliminates this reconfiguration. Through a combination of DNS redirection and Descope Flows (or the relevant SDK), your organization can move existing SSO customers to Descope without any modifications on their end.
This guide walks through the implementation using Auth0 and WorkOS as examples for the incumbent provider, and also covers migration from homegrown auth systems.
Descope SSO migration overview
The migration process follows these straightforward steps:
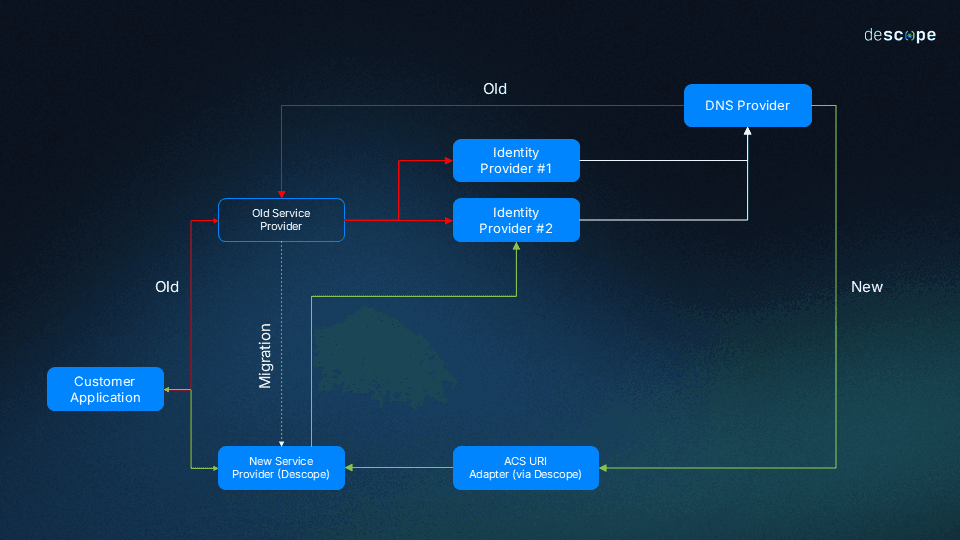
When an end user starts SSO authentication, Descope creates a relay state.
The user is redirected to the identity provider (IdP), where authentication proceeds normally.
After successful authentication, the IdP response returns to the same service provider (SP) ACS URL that was previously configured in the IdP’s settings.
Using a DNS provider, this response is redirected to Descope, passing all necessary parameters to complete the authentication.
Descope processes the response and authenticates the user.
The user is successfully authenticated and logs in.
The transition happens through DNS redirection rather than coordinated reconfiguration for each of your SSO customers. Your existing IdP relationships remain intact while Descope assumes the SP role.
This guide walks through the migration process from both Auth0 and WorkOS as service providers and Okta as the IdP. If you’re using a different SP or IdP, visit the SSO migration documentation page for more generalized steps.
SCIM migration
If your IdP provisions users via SCIM, Descope can proxy SCIM requests alongside SSO during the migration. SCIM proxying is configured per-project in the same DNS redirect infrastructure covered below. The Cloudflare Work and AWS Lambda sections each include SCIM-specific configuration steps.
Prerequisites
Before you begin, be sure you have:
Administrative control over your DNS settings: Your organization must have the authority to modify DNS settings (e.g., creating redirects, workers) for the domain configured in your existing SSO implementation.
A Descope account: If you don’t already have a Descope account, sign up for free. Note that SSO migration is available for Growth tier customers and above.
An Auth0 or WorkOS account with SSO enabled: This guide assumes you are using Auth0 or WorkOS configured with a domain you control and Okta as the IdP.
Implement SSO authentication with Descope Flows
Start by setting up SSO authentication on Descope. This initial step prepares Descope to receive authentication requests and ultimately replace the service provider. Creating the flow first ensures Descope can support your specific use case before moving to the DNS redirect configuration.
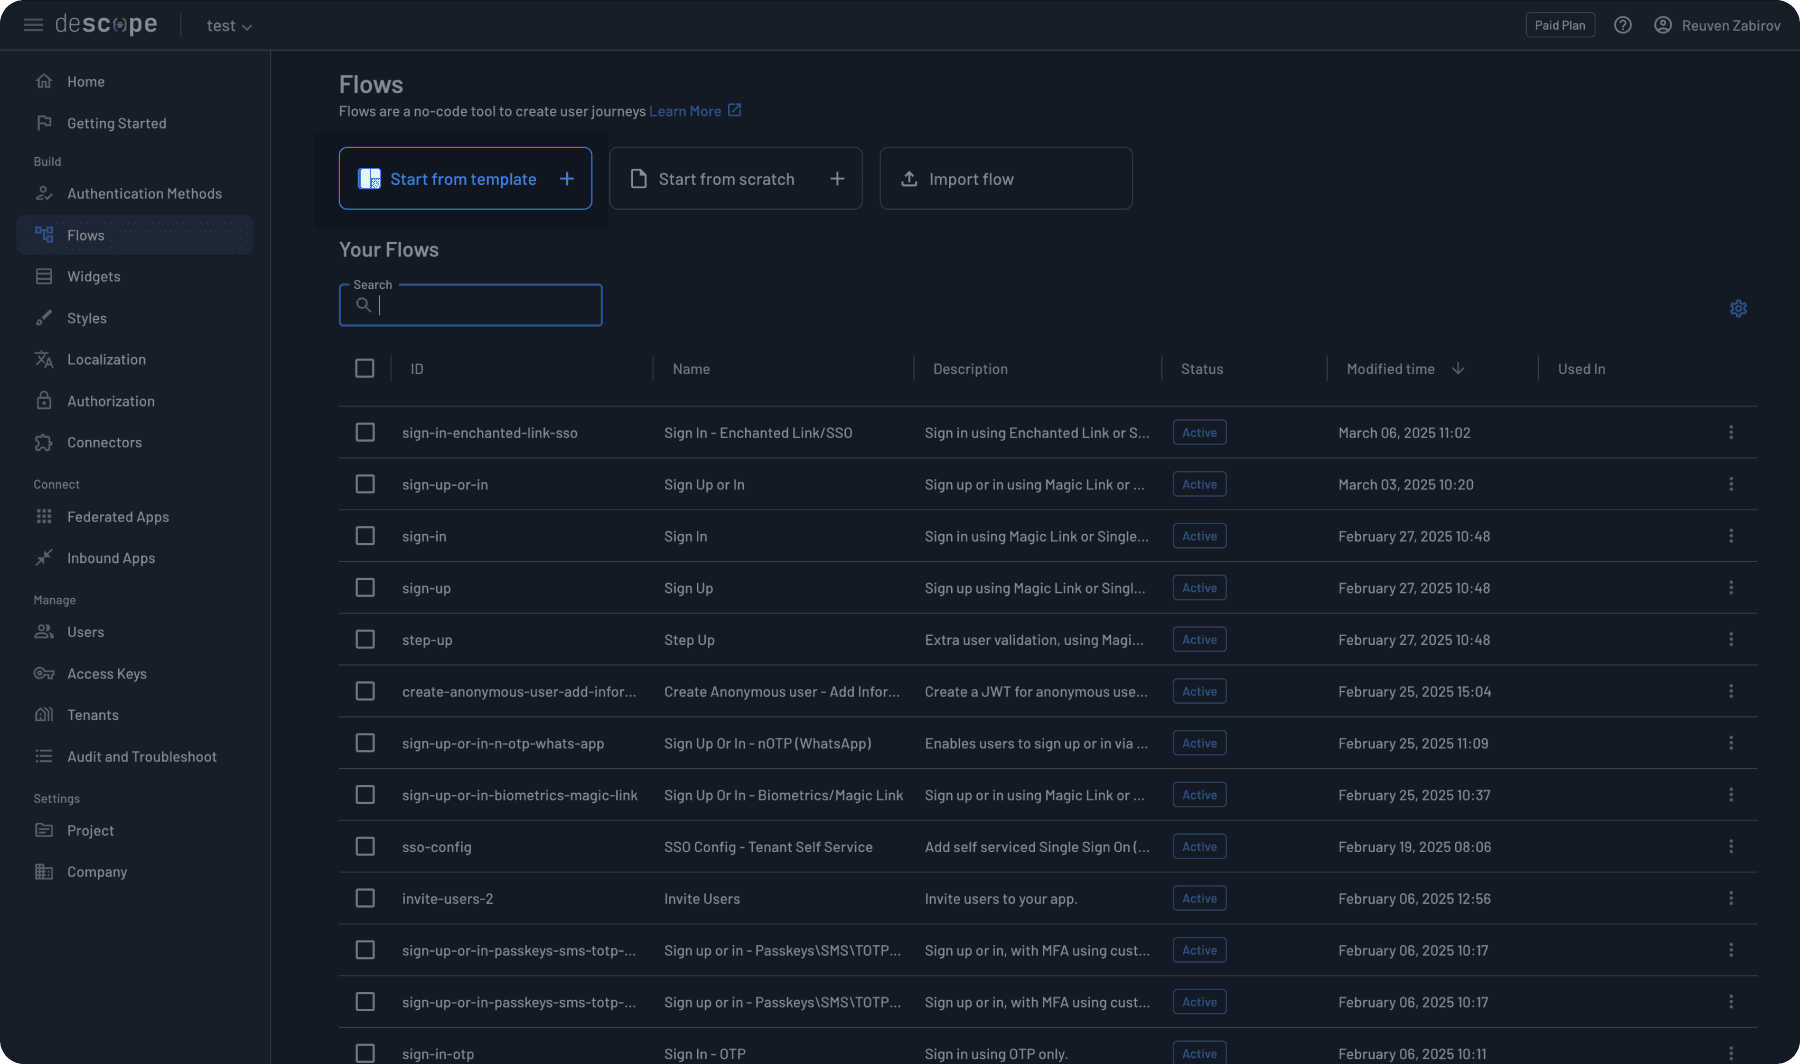
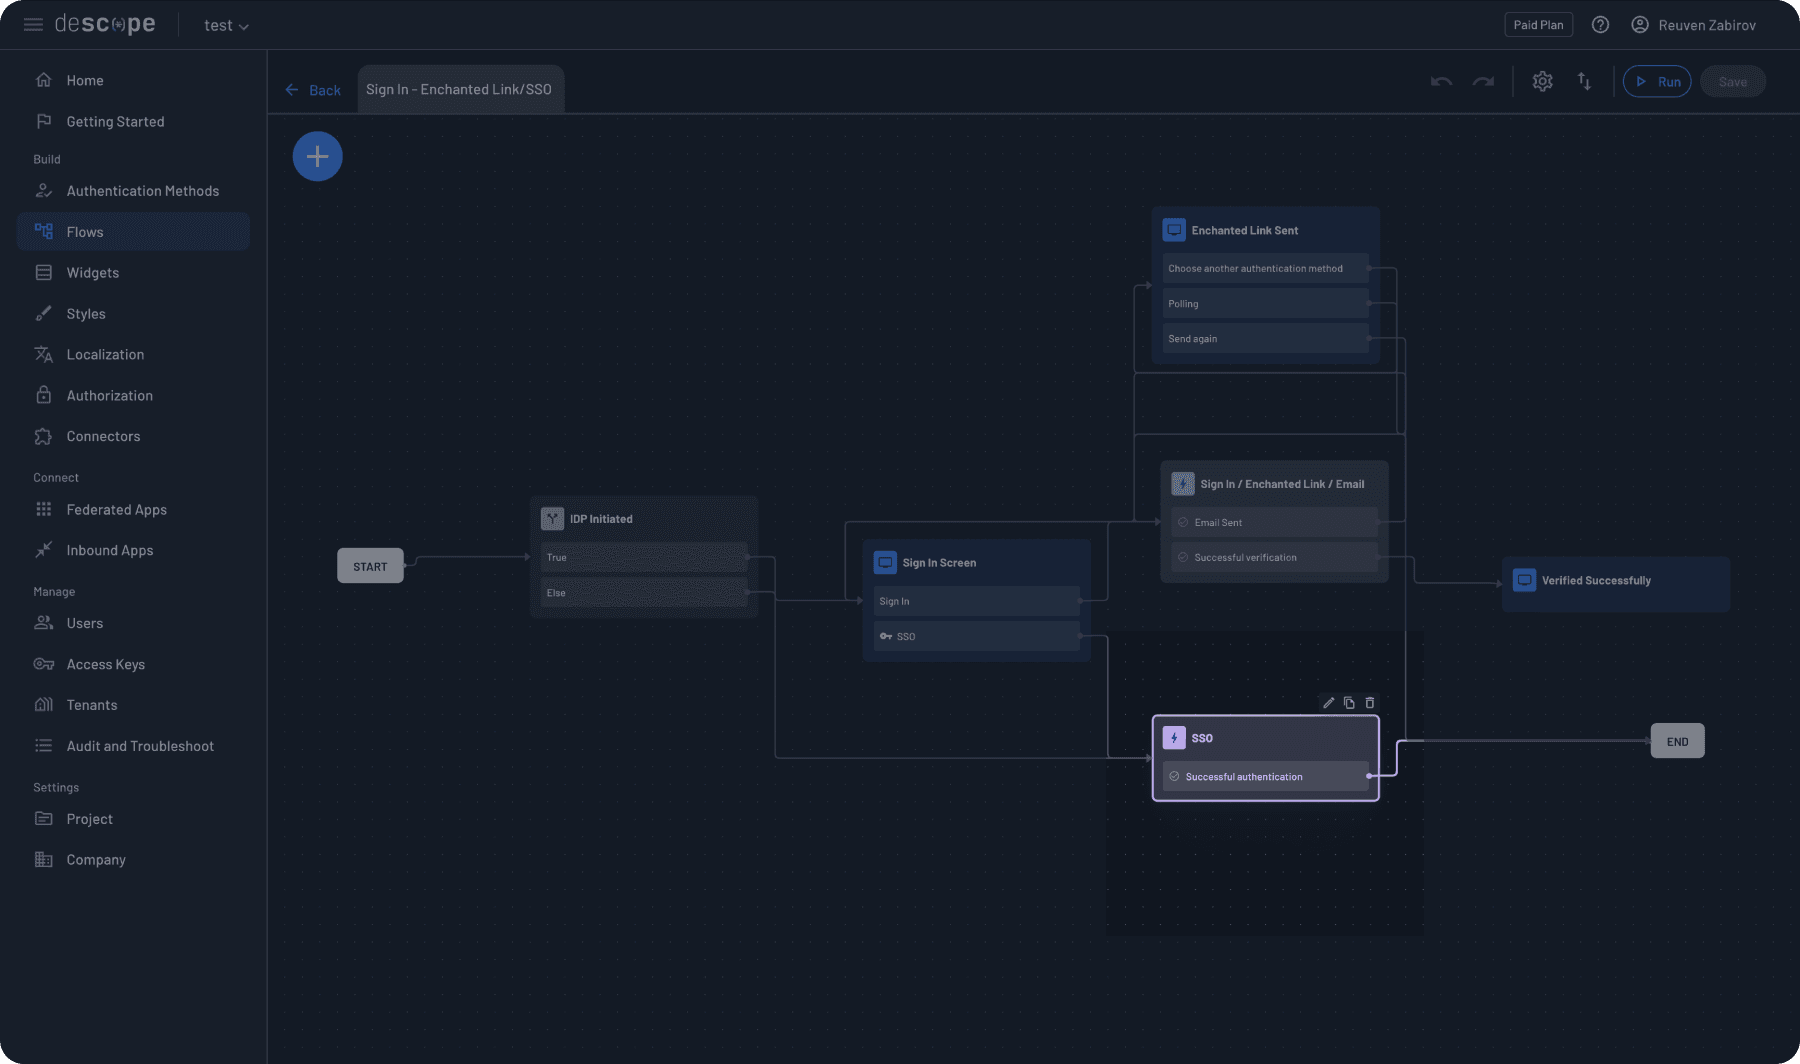
You can set up SSO authentication using either Descope Flows or an SDK. From the left-hand navigation menu on the Descope Console, go to the Flows page, then click on the Start From Template button.
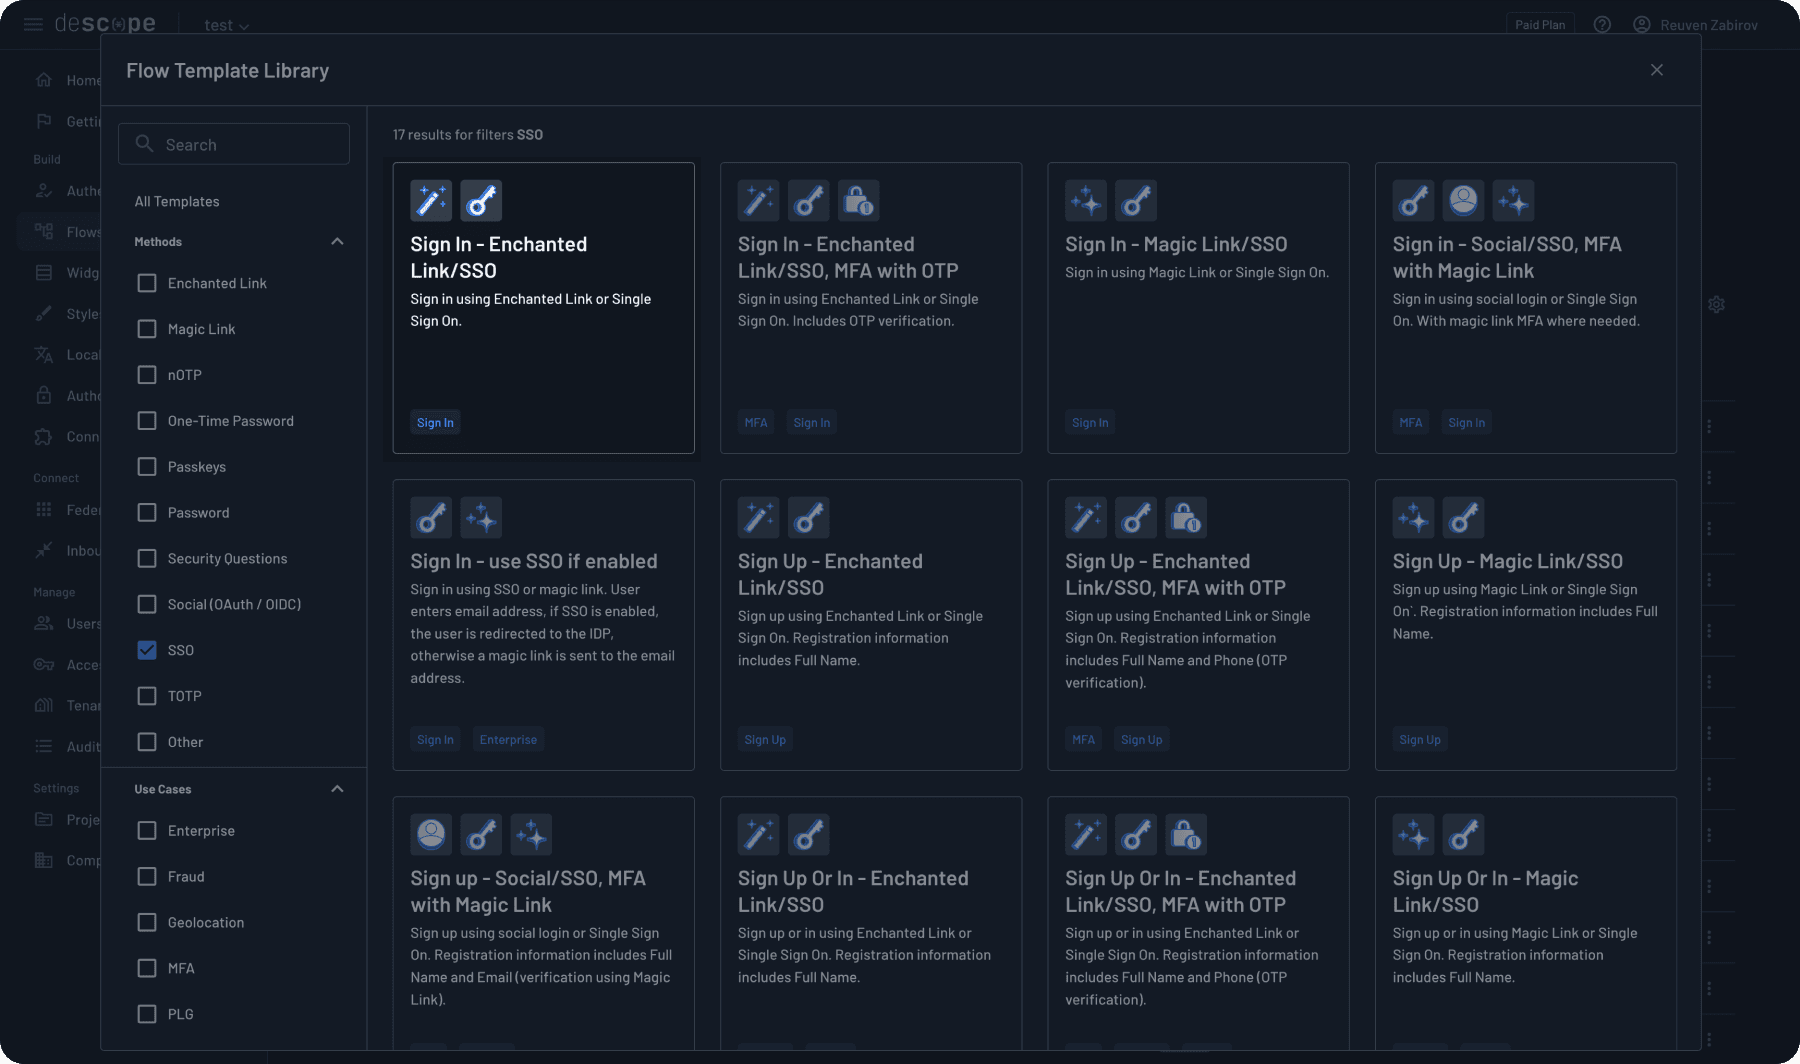
Filter by SSO and select an appropriate template. For this demonstration, we’ll use “Sign In - Enchanted Link/SSO.” Note that many options are available, so select the one that suits your organization’s needs.
There are a few components of the flow worth highlighting. First, the flow starts with a condition called “IdP Initiated,” which handles scenarios where users begin their login process from the identity provider side rather than your application.
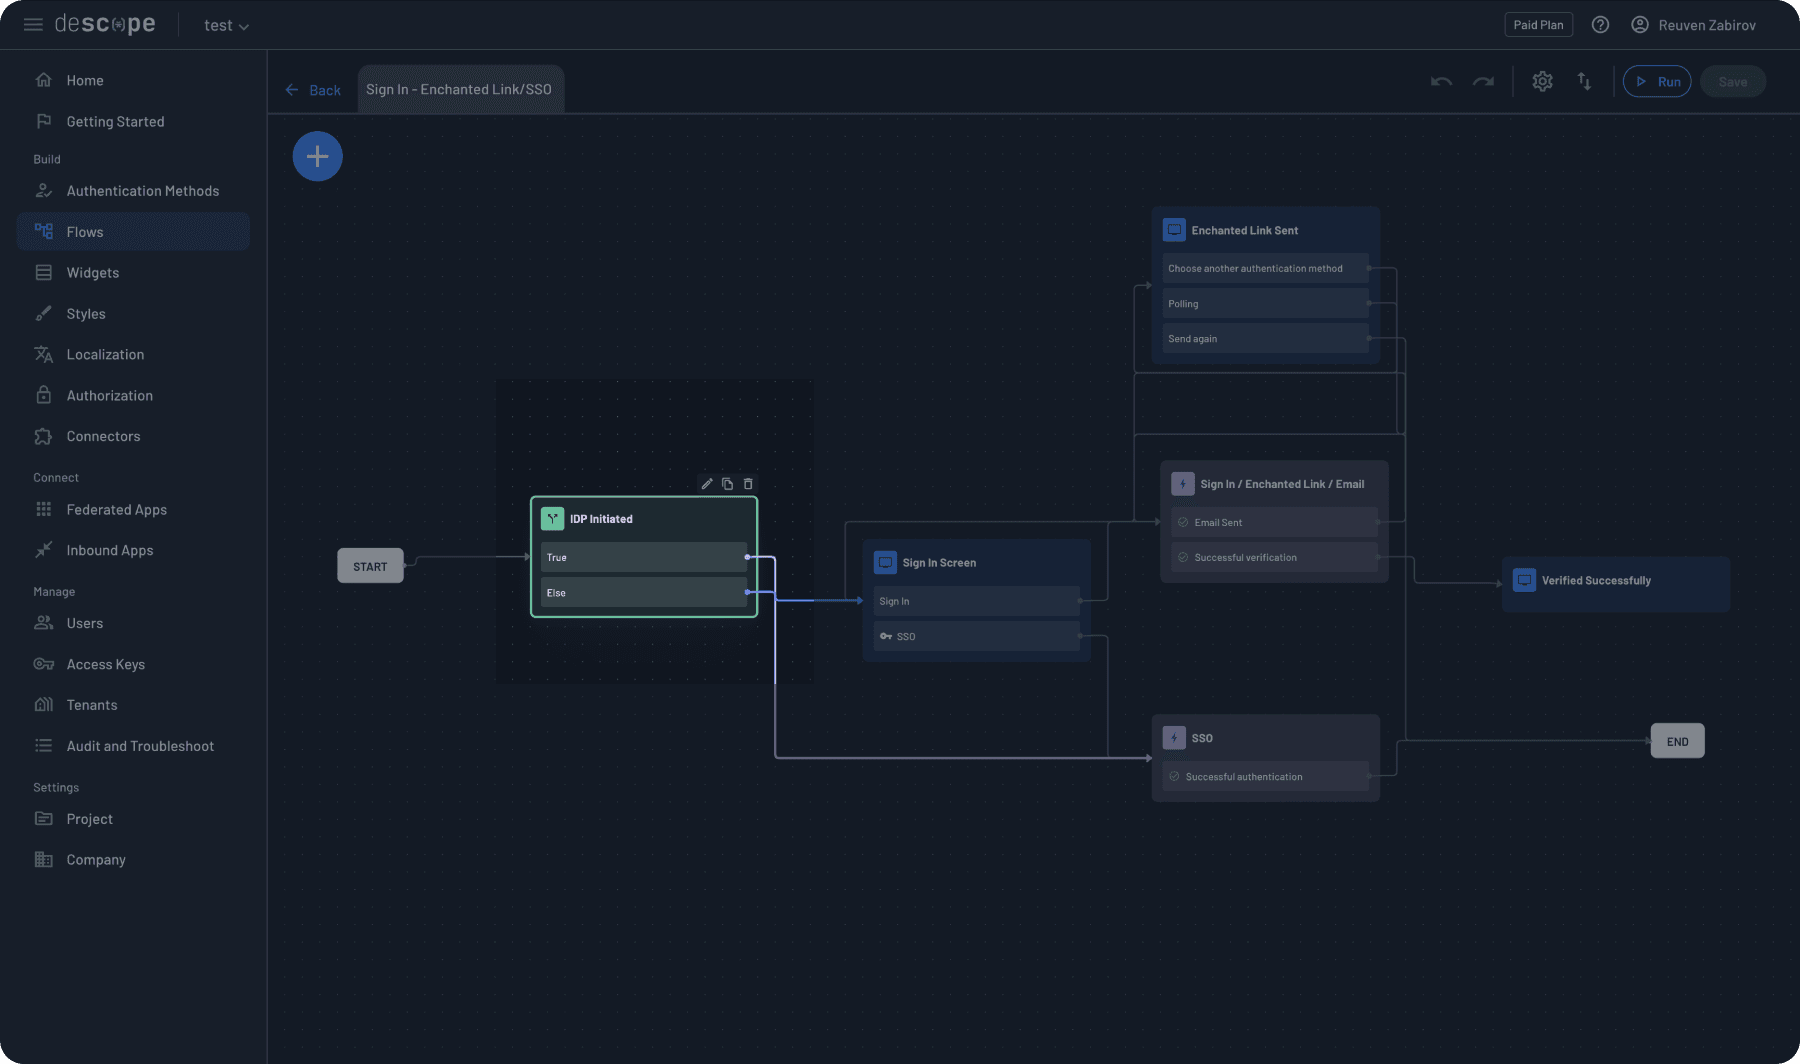
The flow checks whether the authentication request originated from an IdP and routes it accordingly.
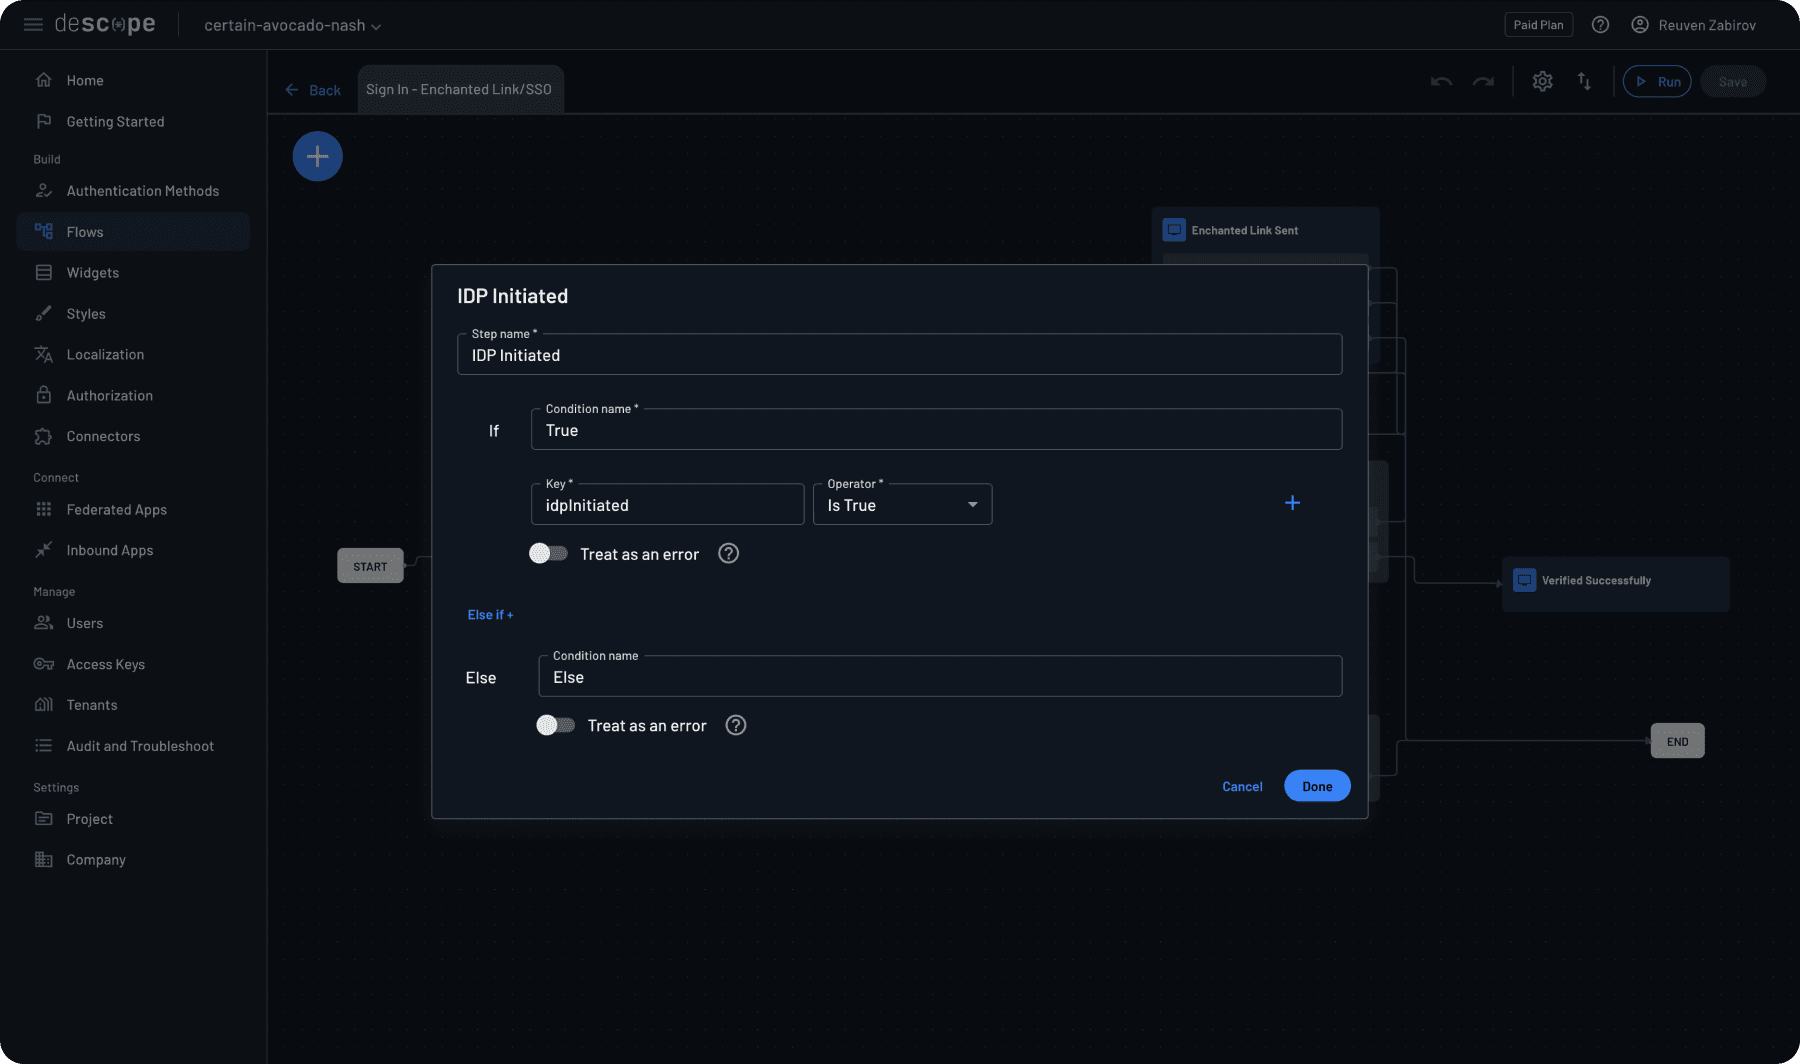
If the authentication starts from your application, the “Sign In Screen” task displays the login interface.
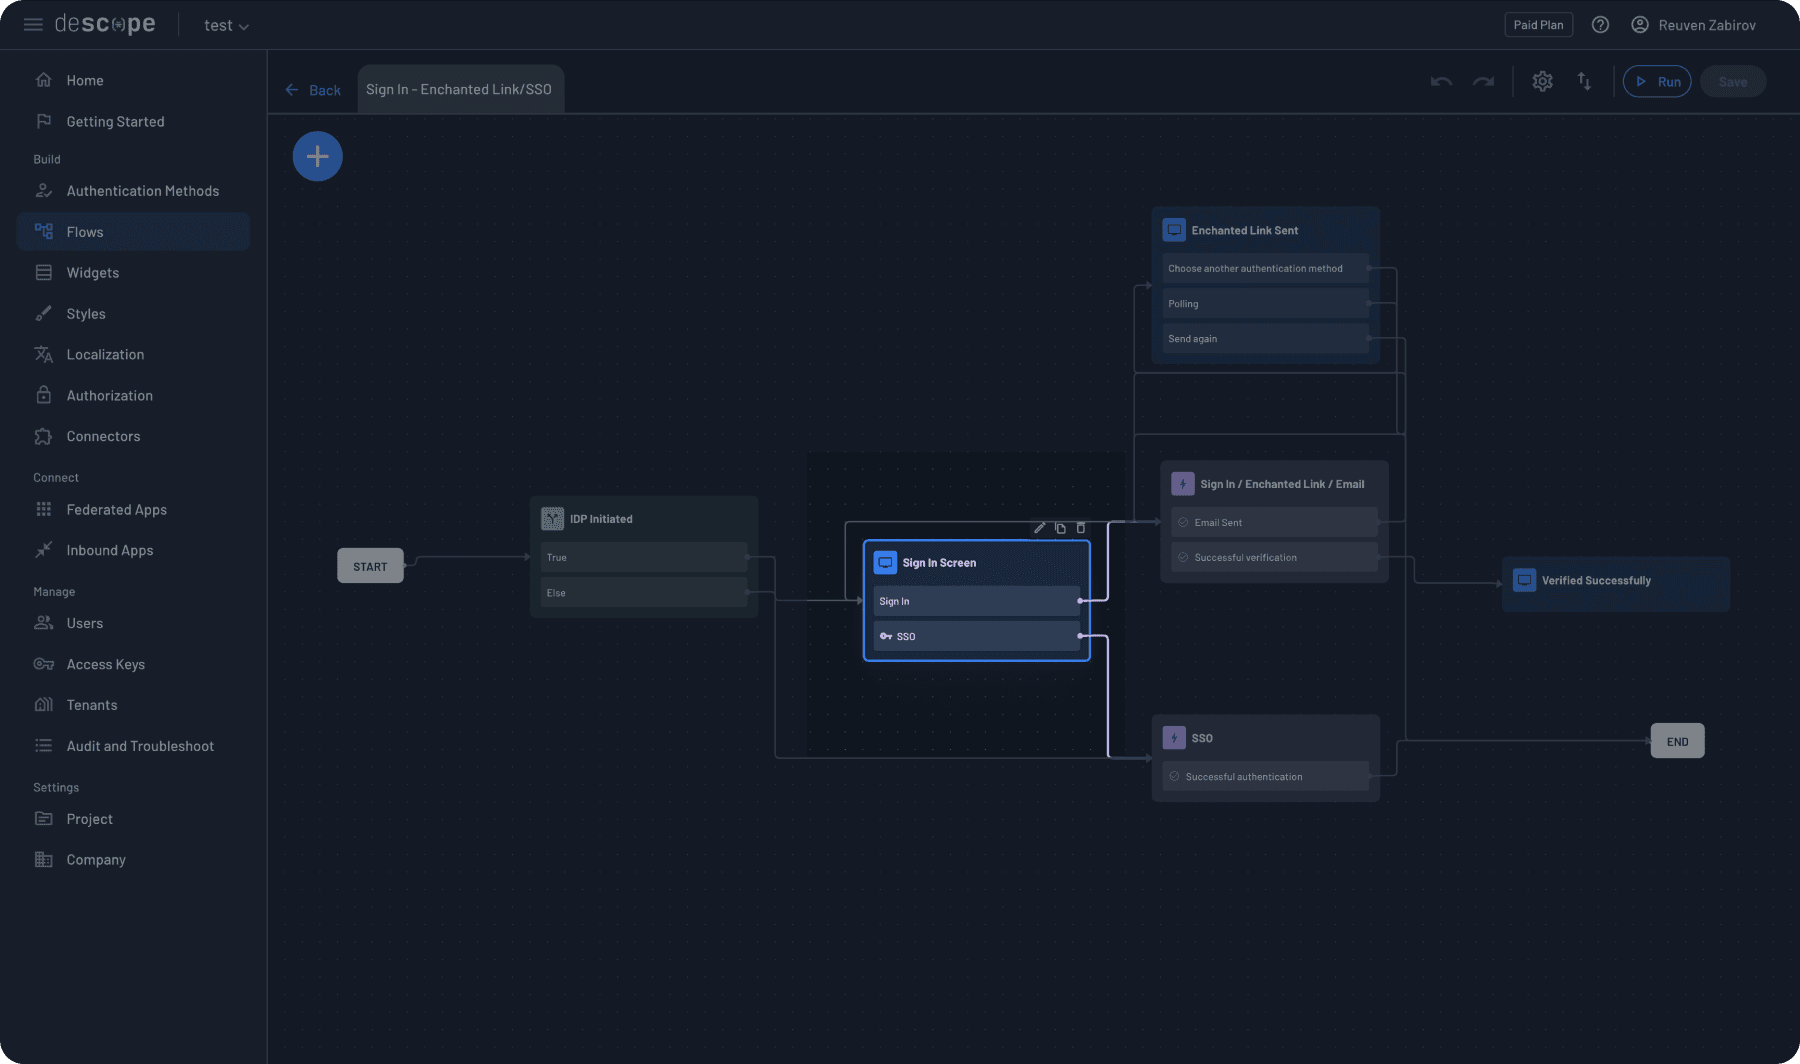
The “SSO Flow” task manages the actual SSO authentication process, handling the communication between your application, Descope, and the IdP.
To implement this flow in your application, add the following code snippet from the Getting Started page:
{/* The code below includes your Project ID */}
<AuthProvider projectId="<project-id>">
<Descope
flowId="sign-up-or-in"
theme="light"
onSuccess={(e) => {
console.log(e.detail.user.name)
console.log(e.detail.user.email)
}}
onError={(err) => {
console.log("Error!", err)
}}
/>
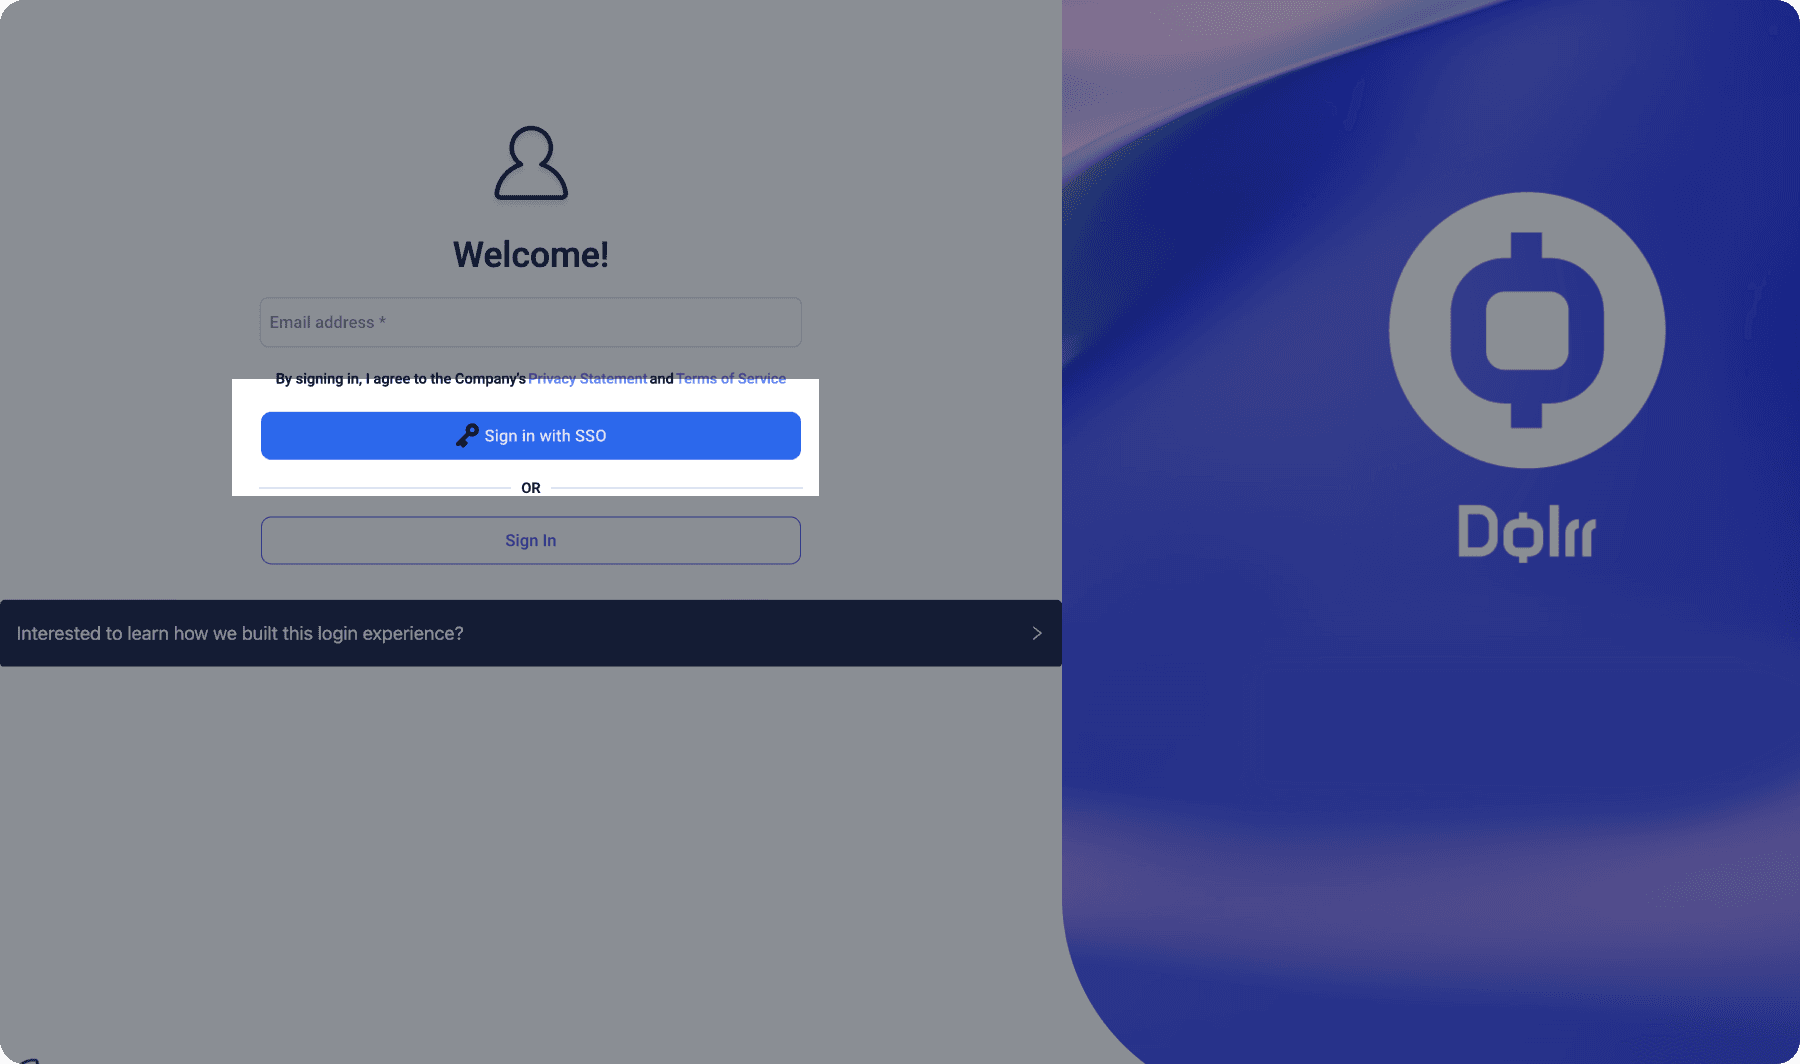
</AuthProvider>When properly implemented, your users will see a login screen with an SSO option, as shown in this example from Descope’s B2B sample app.
Read more about the capabilities of SSO, tenants and identity orchestration in Descope Flows.
Set up Descope tenants with SSO settings using the SDK
Next, we must create or update the necessary tenants in Descope to match our migration configuration. We’ll be using the Descope Node SDK in this example, but Descope supports a wide range of backend SDKs.
If you haven’t created one already, adding a customer tenant using the SDK is simple:
import DescopeClient from '@descope/node-sdk';

const descopeClient = DescopeClient({ projectId: '', managementKey:''});

const tenant = await descopeClient.management.tenant.create('tenant-id', ['mydomain.com'])
SAML-specific configuration steps With Auth0
The following steps are only needed for configurations using SAML. If your implementation will use OIDC, skip to the next section.
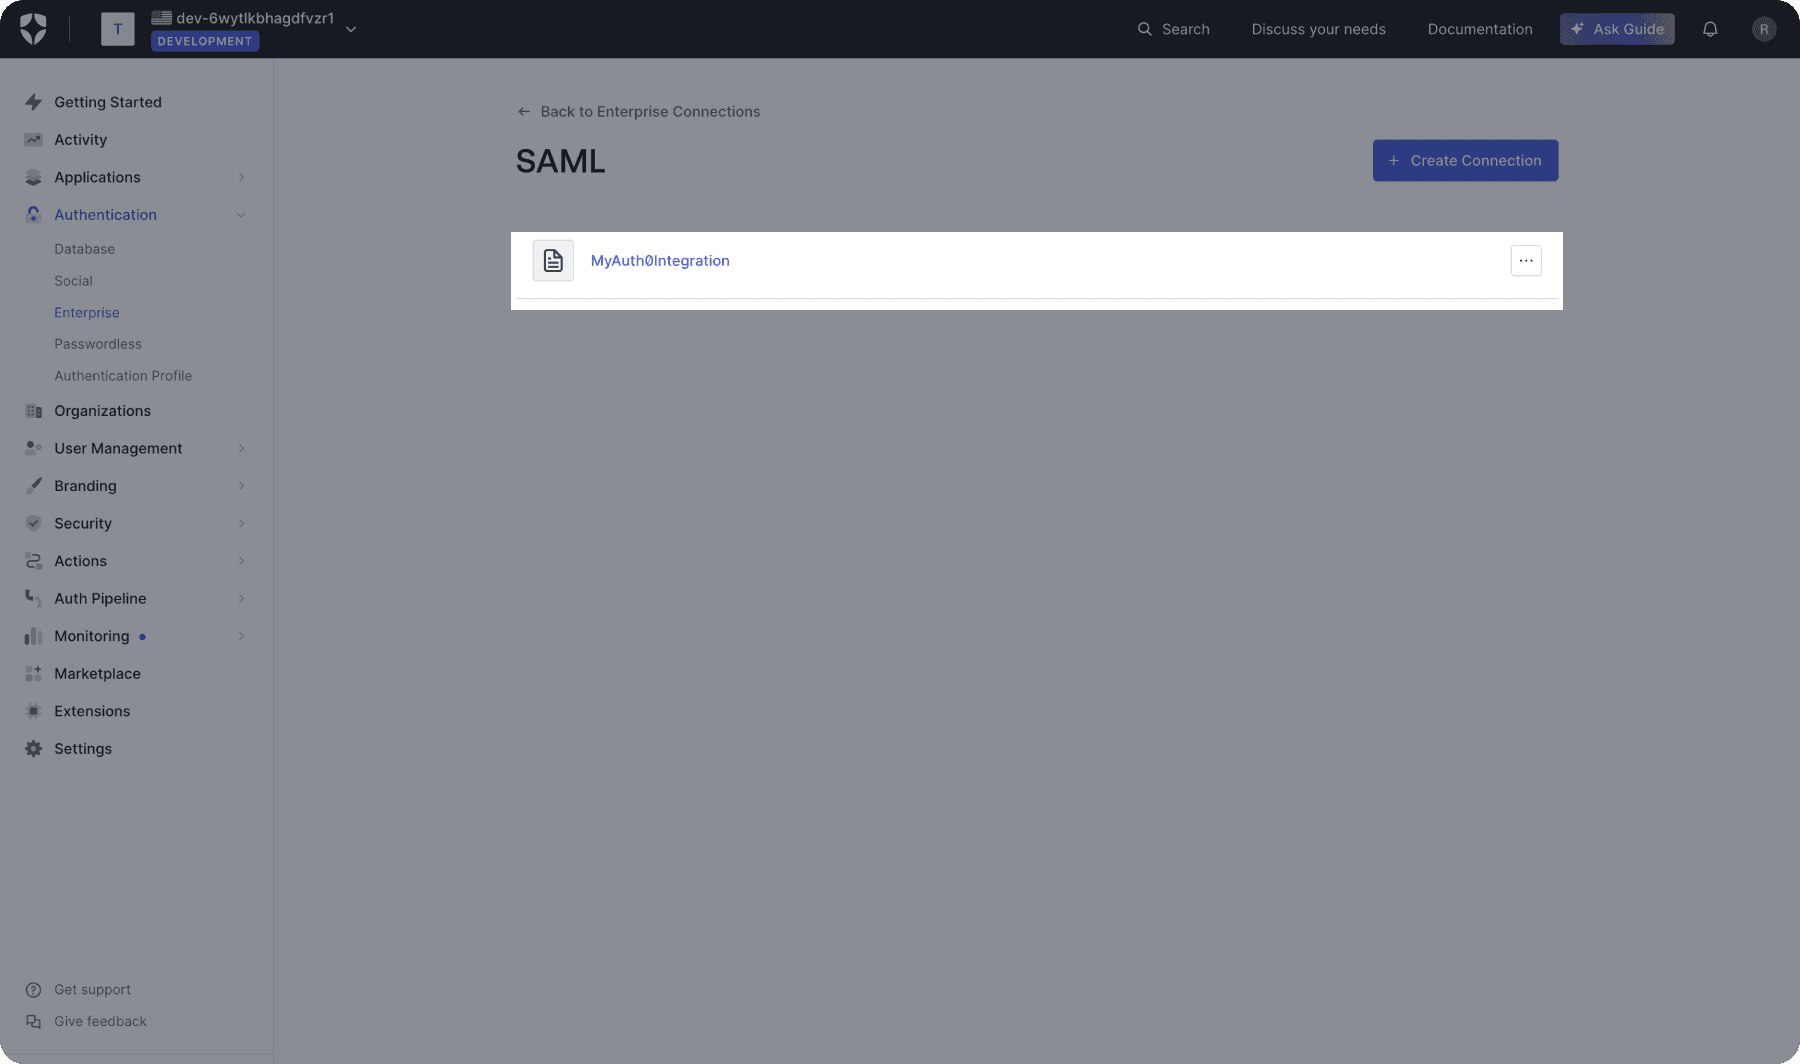
For SAML configurations, we’ll need to gather the necessary information about the IdP (Okta) and the SP (Auth0).
From the Auth0 Developer Console, select the relevant Okta App integration, and copy the following values: idpURL, entityID, and idpCert, OR just idpMetadataUrl.
From the Auth0 Dashboard, go to Authentication > Enterprise.
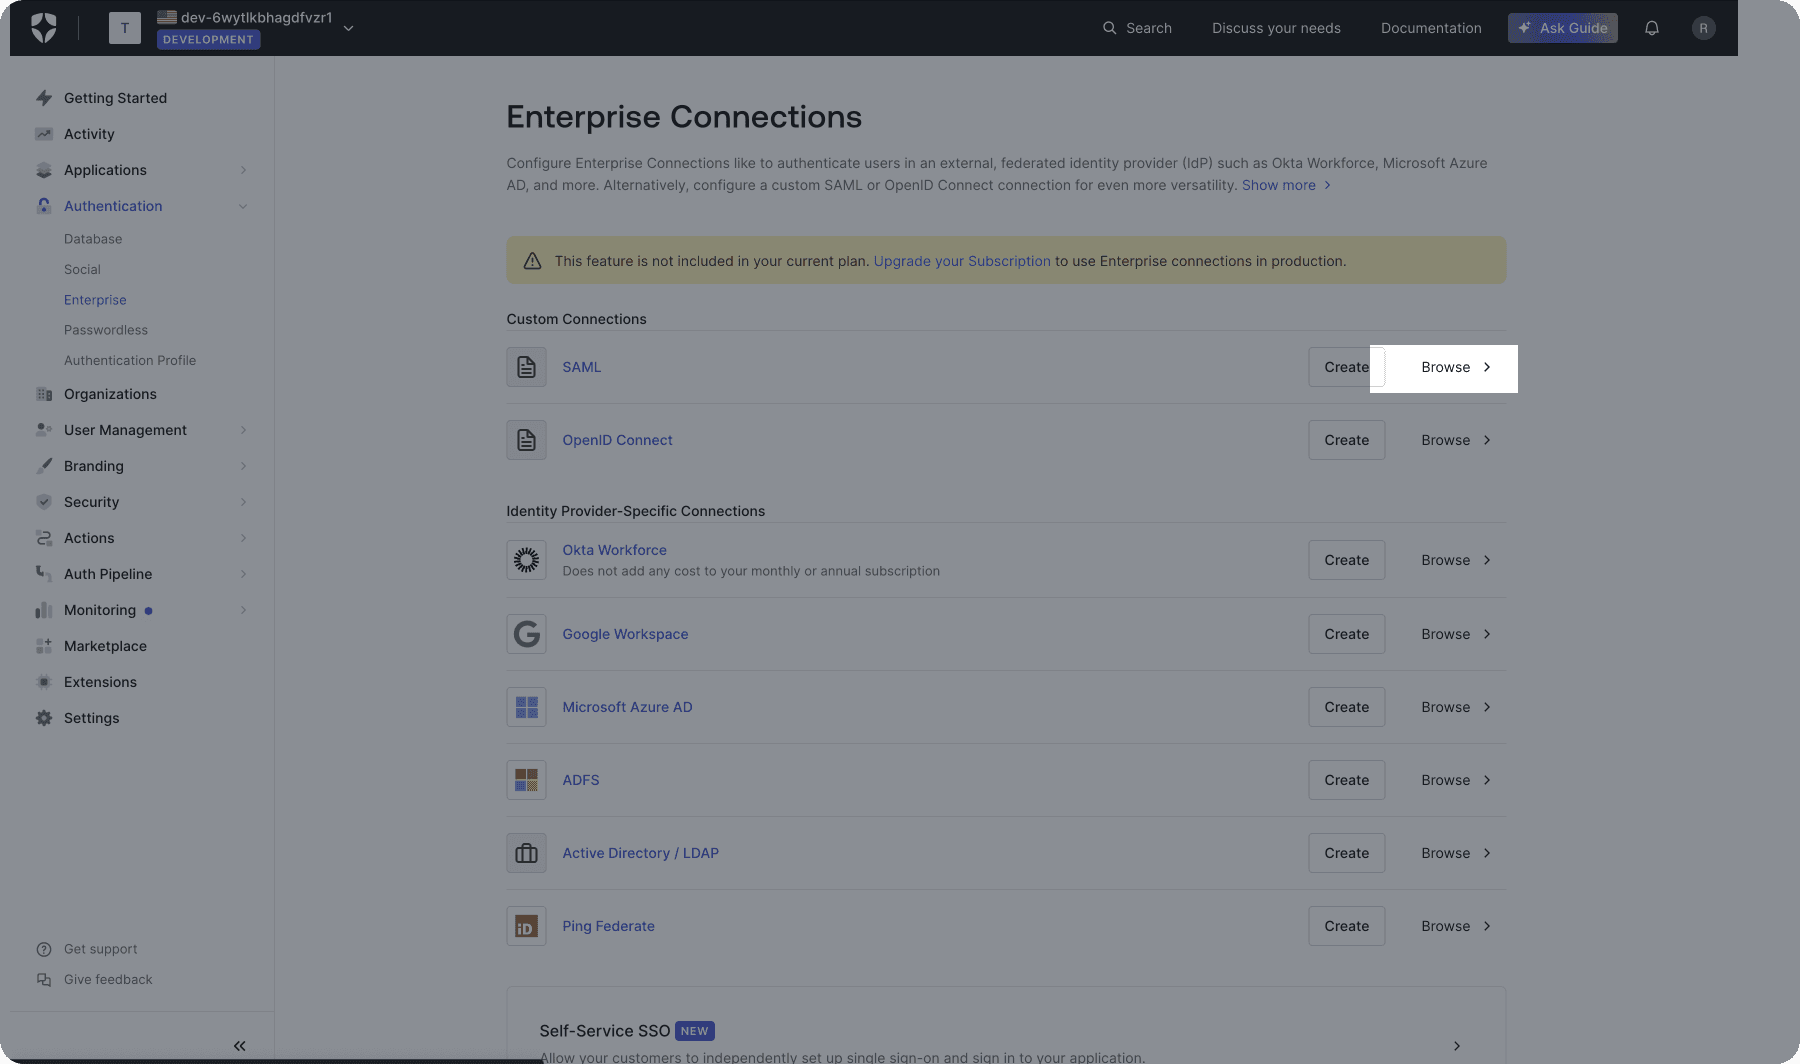
Select a connection type, then copy the spEntityId and spAcsUrl values.
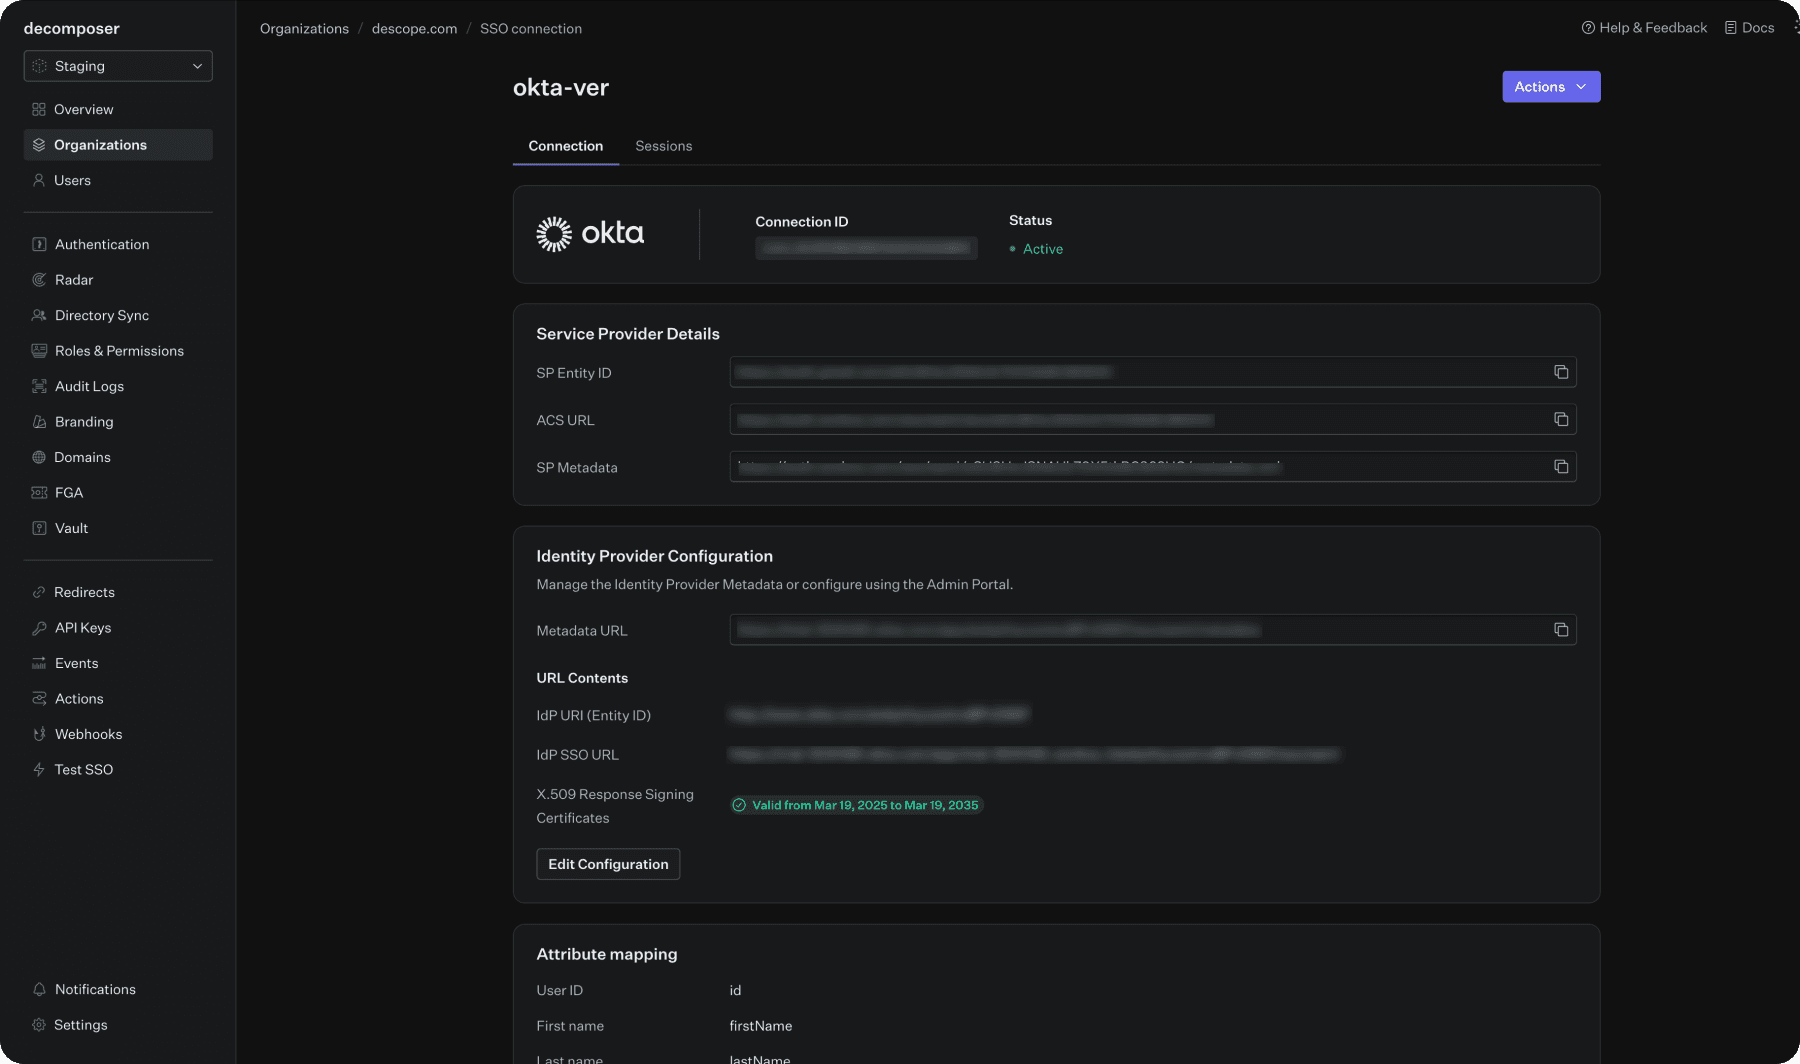
SAML-specific configuration steps with WorkOS
The following steps are only needed for configurations using SAML. If your implementation will use OIDC, skip to the next section.
From the WorkOS Dashboard, go to Organization > select the designated organization to migrate.
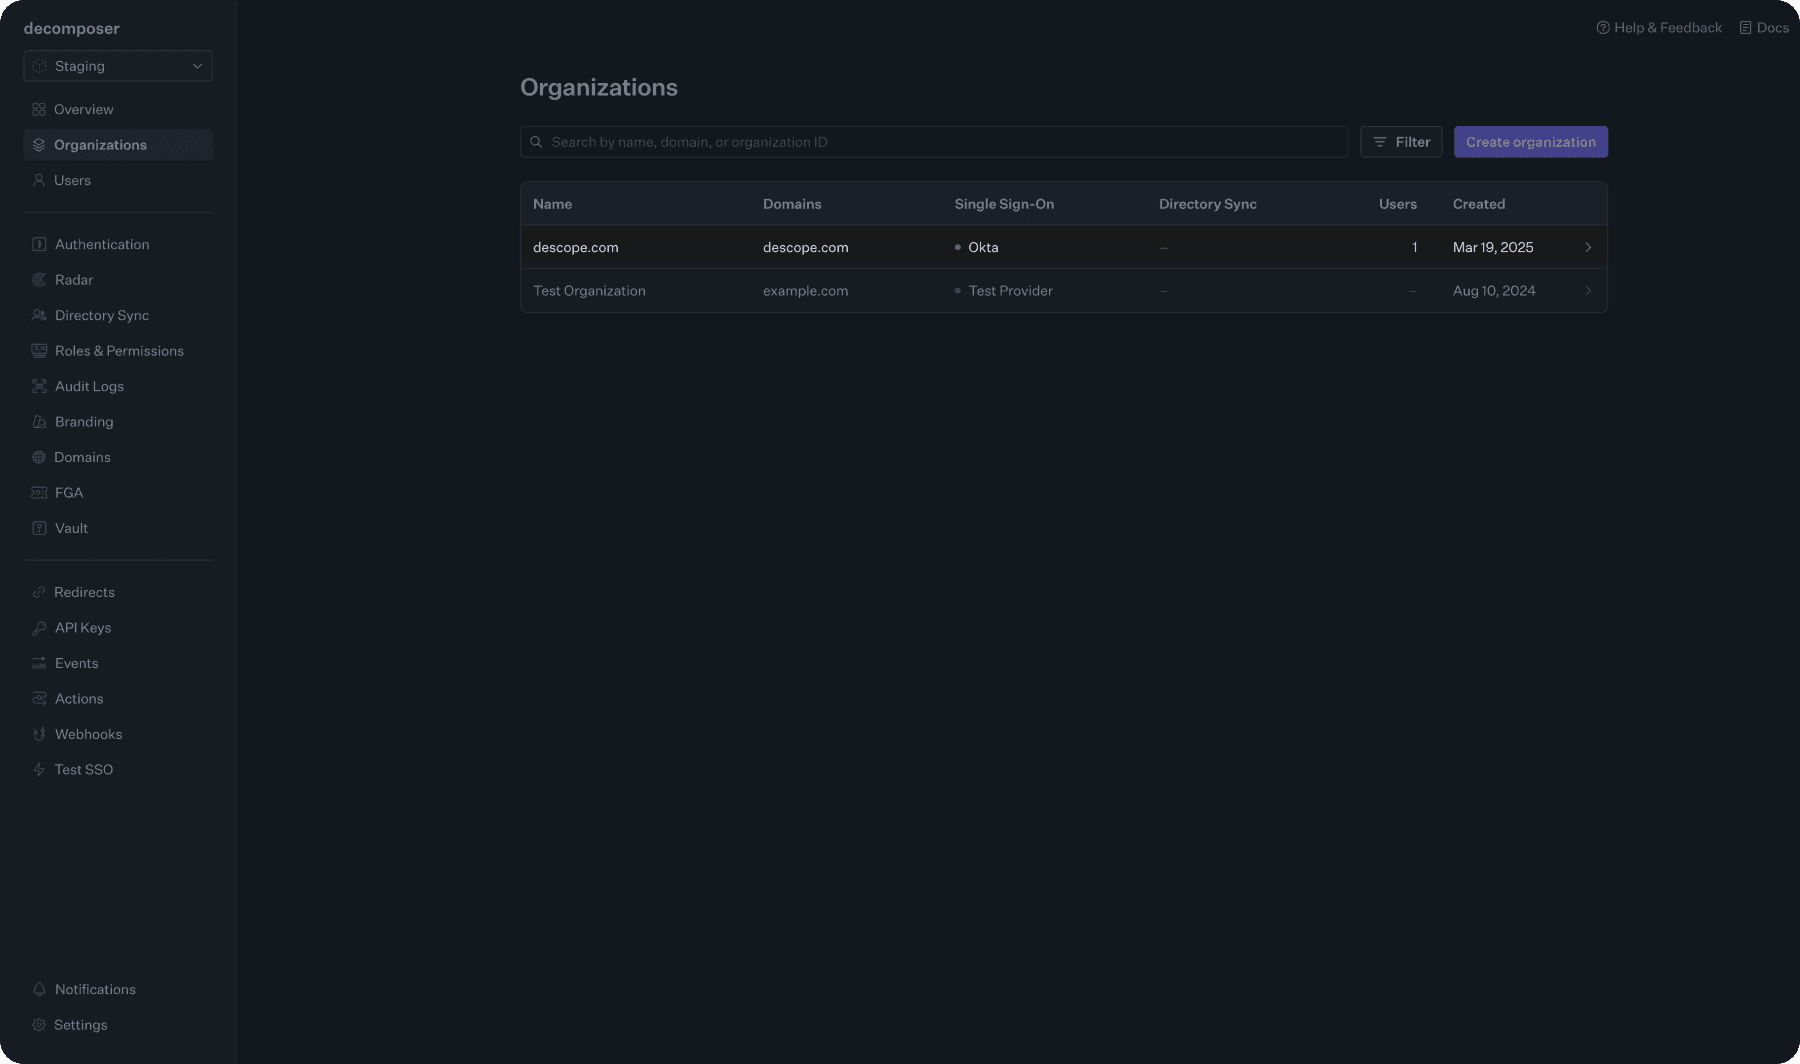
Select the connection by clicking View connection.
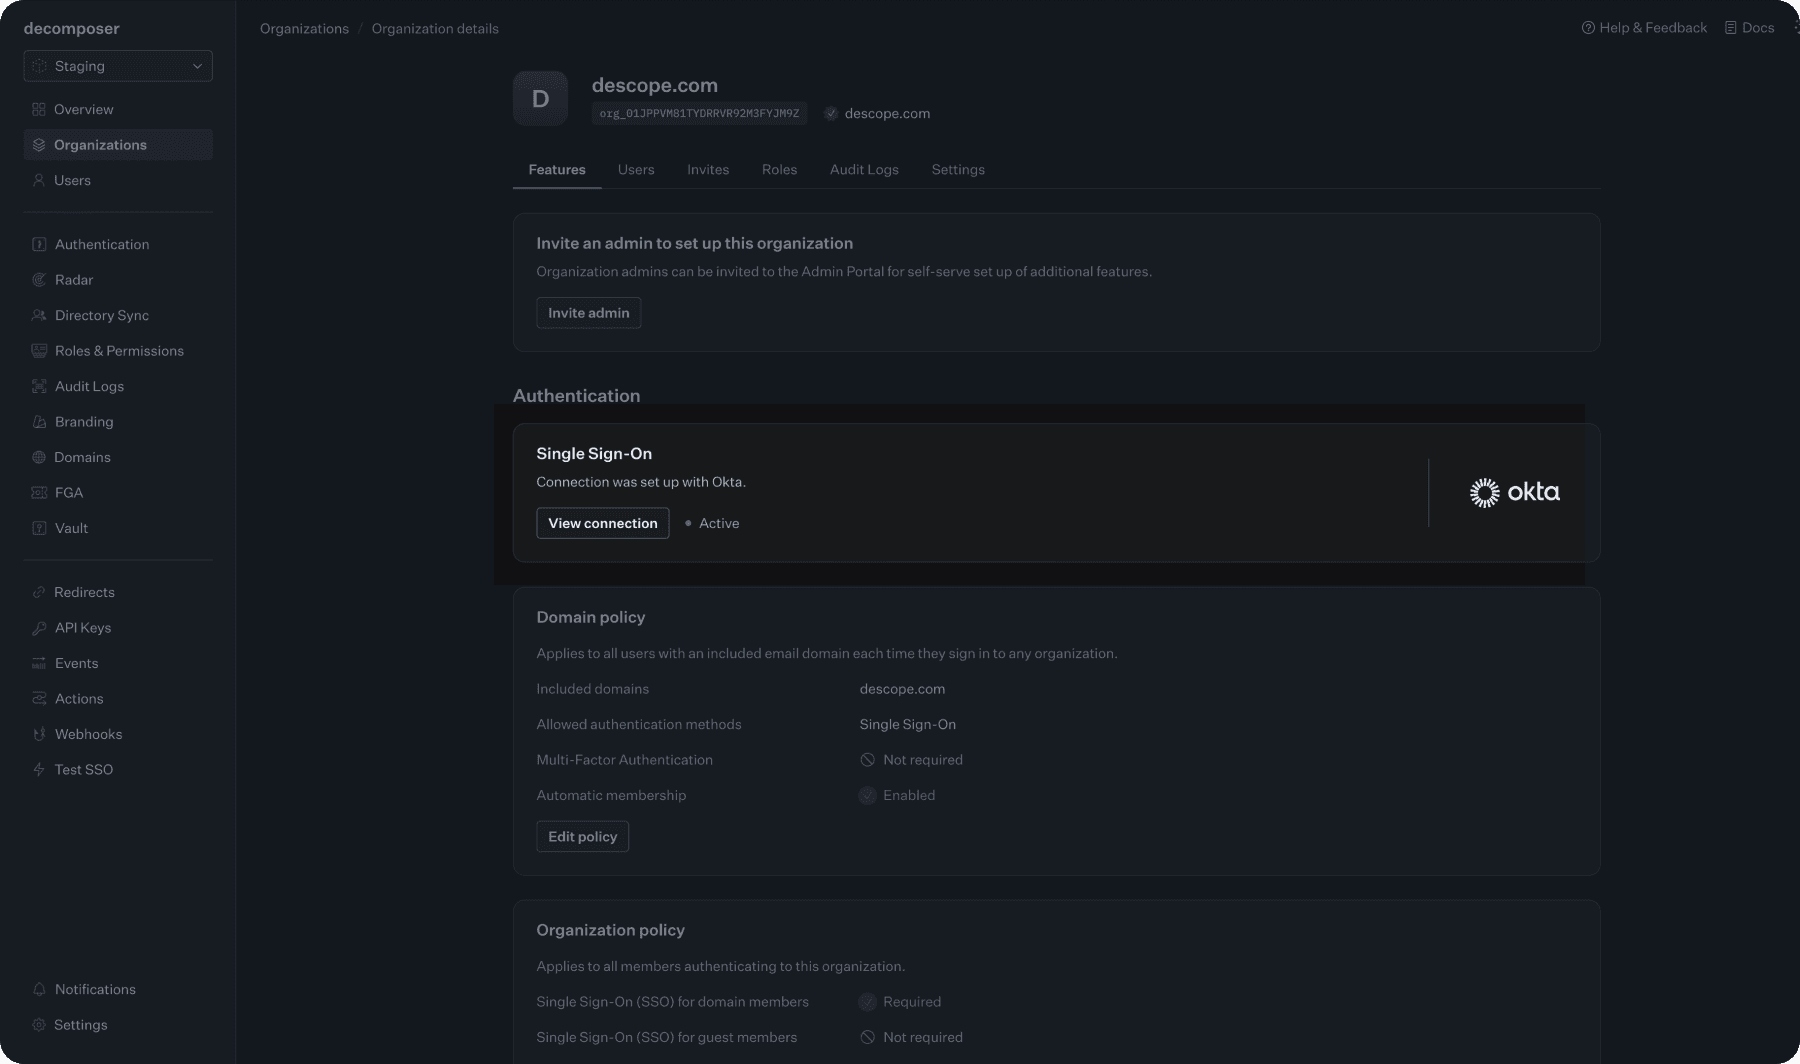
Copy the necessary variables:
Under Service Provider Details -
SP Entity ID,ACS URL,SP MetadataUnder Identity Provider Configuration -
Metadata URL
Now, use the information you’ve collected to configure SSO settings for your tenant.
For WorkOS use the configureSAMLByMetadata variant.
Configuring tenant SSO settings for SAML
Use the information you’ve collected from either Auth0 or WorkOS to configure SSO settings for your tenant. For WorkOS use the configureSAMLByMetadata variant.
// You can get SSO settings for a specific tenant ID
const ssoSettings = await descopeClient.management.sso.loadSettings("tenant-id")


// You can configure SSO settings manually by setting the required fields directly
const tenantId = 'tenant-id' // Which tenant this configuration is for
const idpURL = 'https://idp.com'
const entityID = 'my-idp-entity-id'
const idpCert = '<your-cert-here>'
const redirectURL = 'https://my-app.com/handle-sso' // Global redirect URL for SSO/SAML
const domains = ['tenant-users.com'] // Users authentication with this domain will be logged in to this tenant
// "Extra" Settings for SSO Migration Handling
const spAcsUrl = "https://domain.com/saml"
const spEntityId = "my-custom-entity-id"
await descopeClient.management.sso.configureSAMLSettings(tenantID, {idpURL, entityID, idpCert, spAcsUrl, spEntityId}, redirectURL, domains)


// Alternatively, configure using an SSO metadata URL
await descopeClient.management.sso.configureSAMLByMetadata(tenantID, {idpMetadataUrl: 'https://idp.com/my-idp-metadata', spAcsUrl, spEntityId}, redirectURL, domains)
The configuration above accomplishes two things: setting up Descope to communicate with your customer’s existing Okta IdP using the same parameters they’ve already established, and using the spAcsUrl and spEntityId values from Auth0 or WorkOS to tell Descope how to interpret the SAML response coming from Okta.
OIDC-specific configuration steps
For OIDC configurations, the process is similar, but there are no special migration-specific parameters required. Simply ensure that all parameters match exactly what the customer had previously configured in Auth0 or WorkOS.
Set up the DNS redirect with Cloudflare
This section configures DNS redirection using Cloudflare. While these steps are specific to Cloudflare, you can adapt them for other DNS providers. AWS Route 53 and Lambda alternative is covered in the next section.
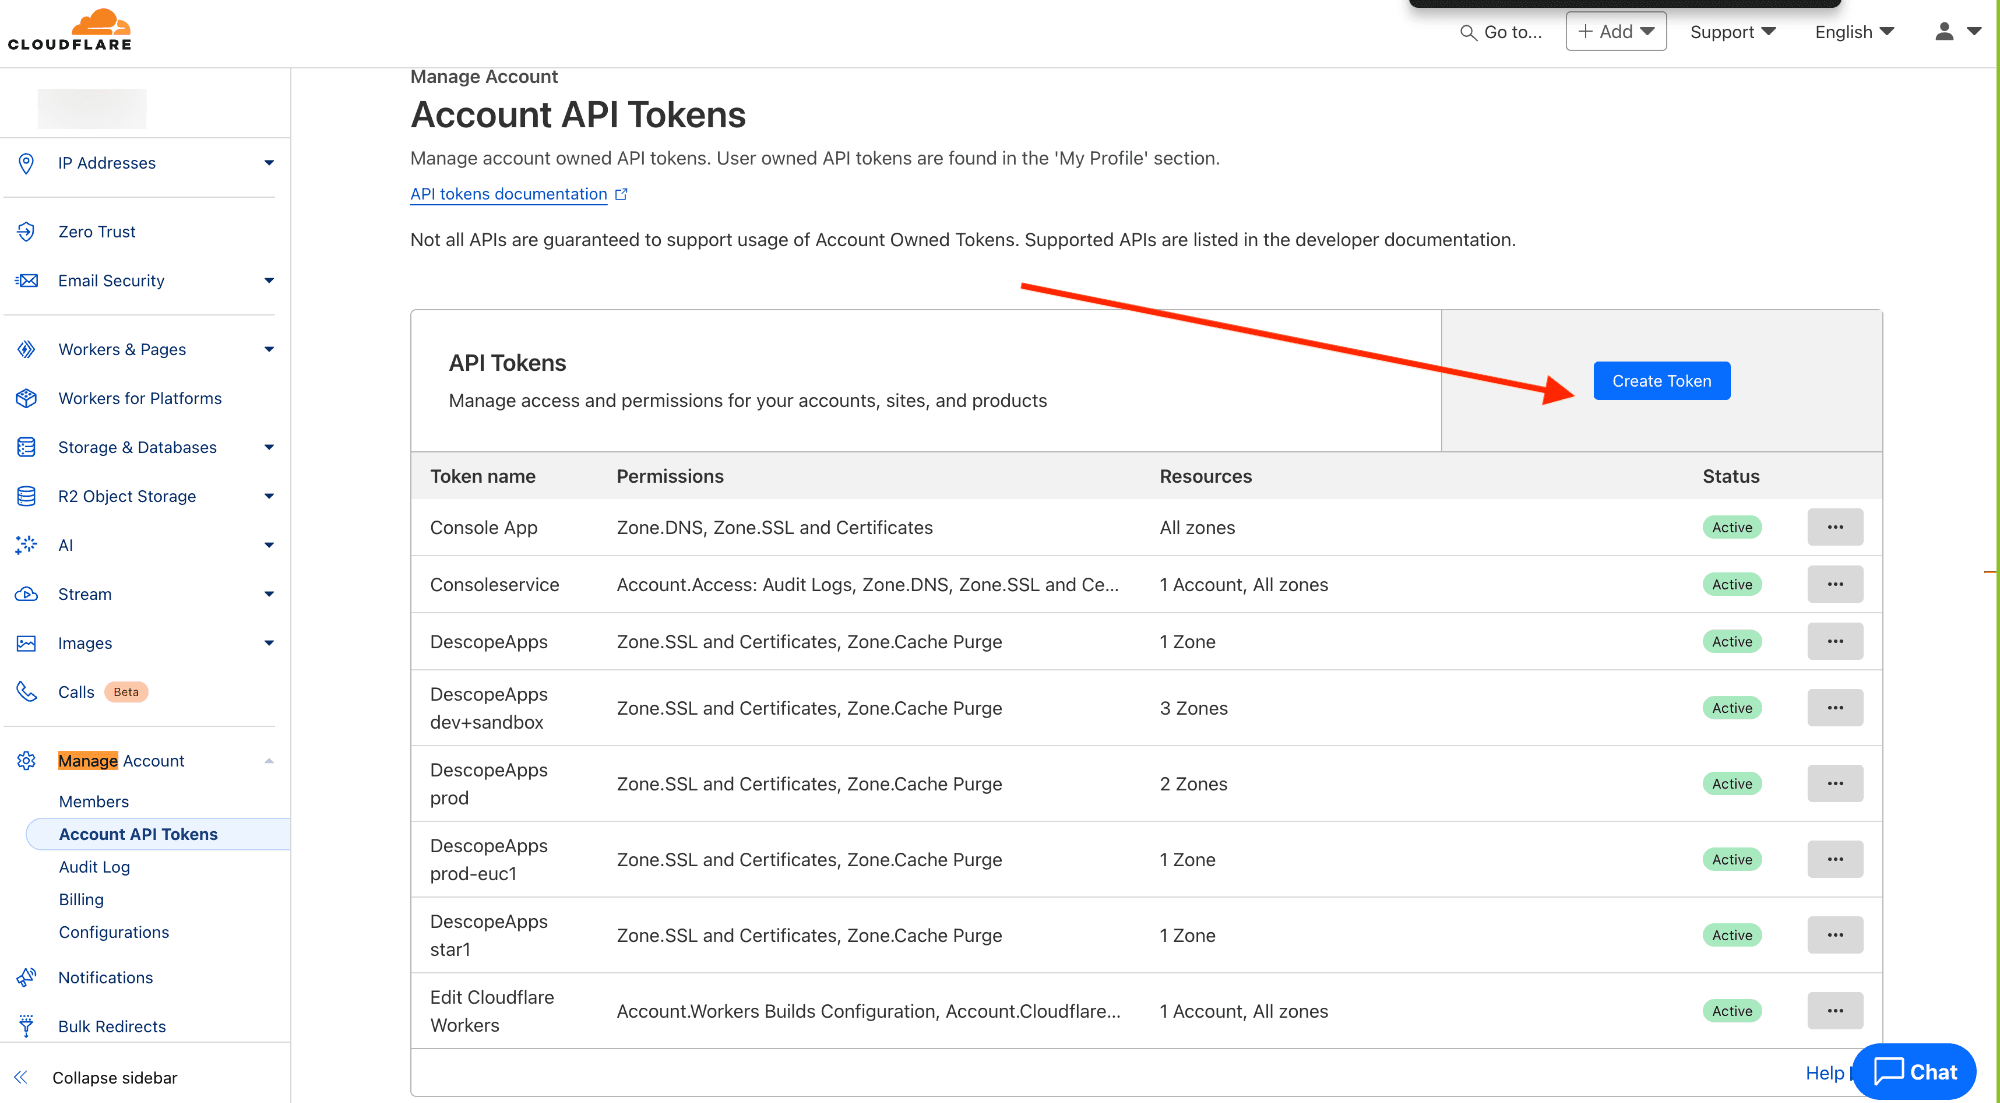
Create a Cloudflare API token
Go to the Cloudflare Dashboard, then create an account-level token by clicking on Account API Tokens > Create Token.
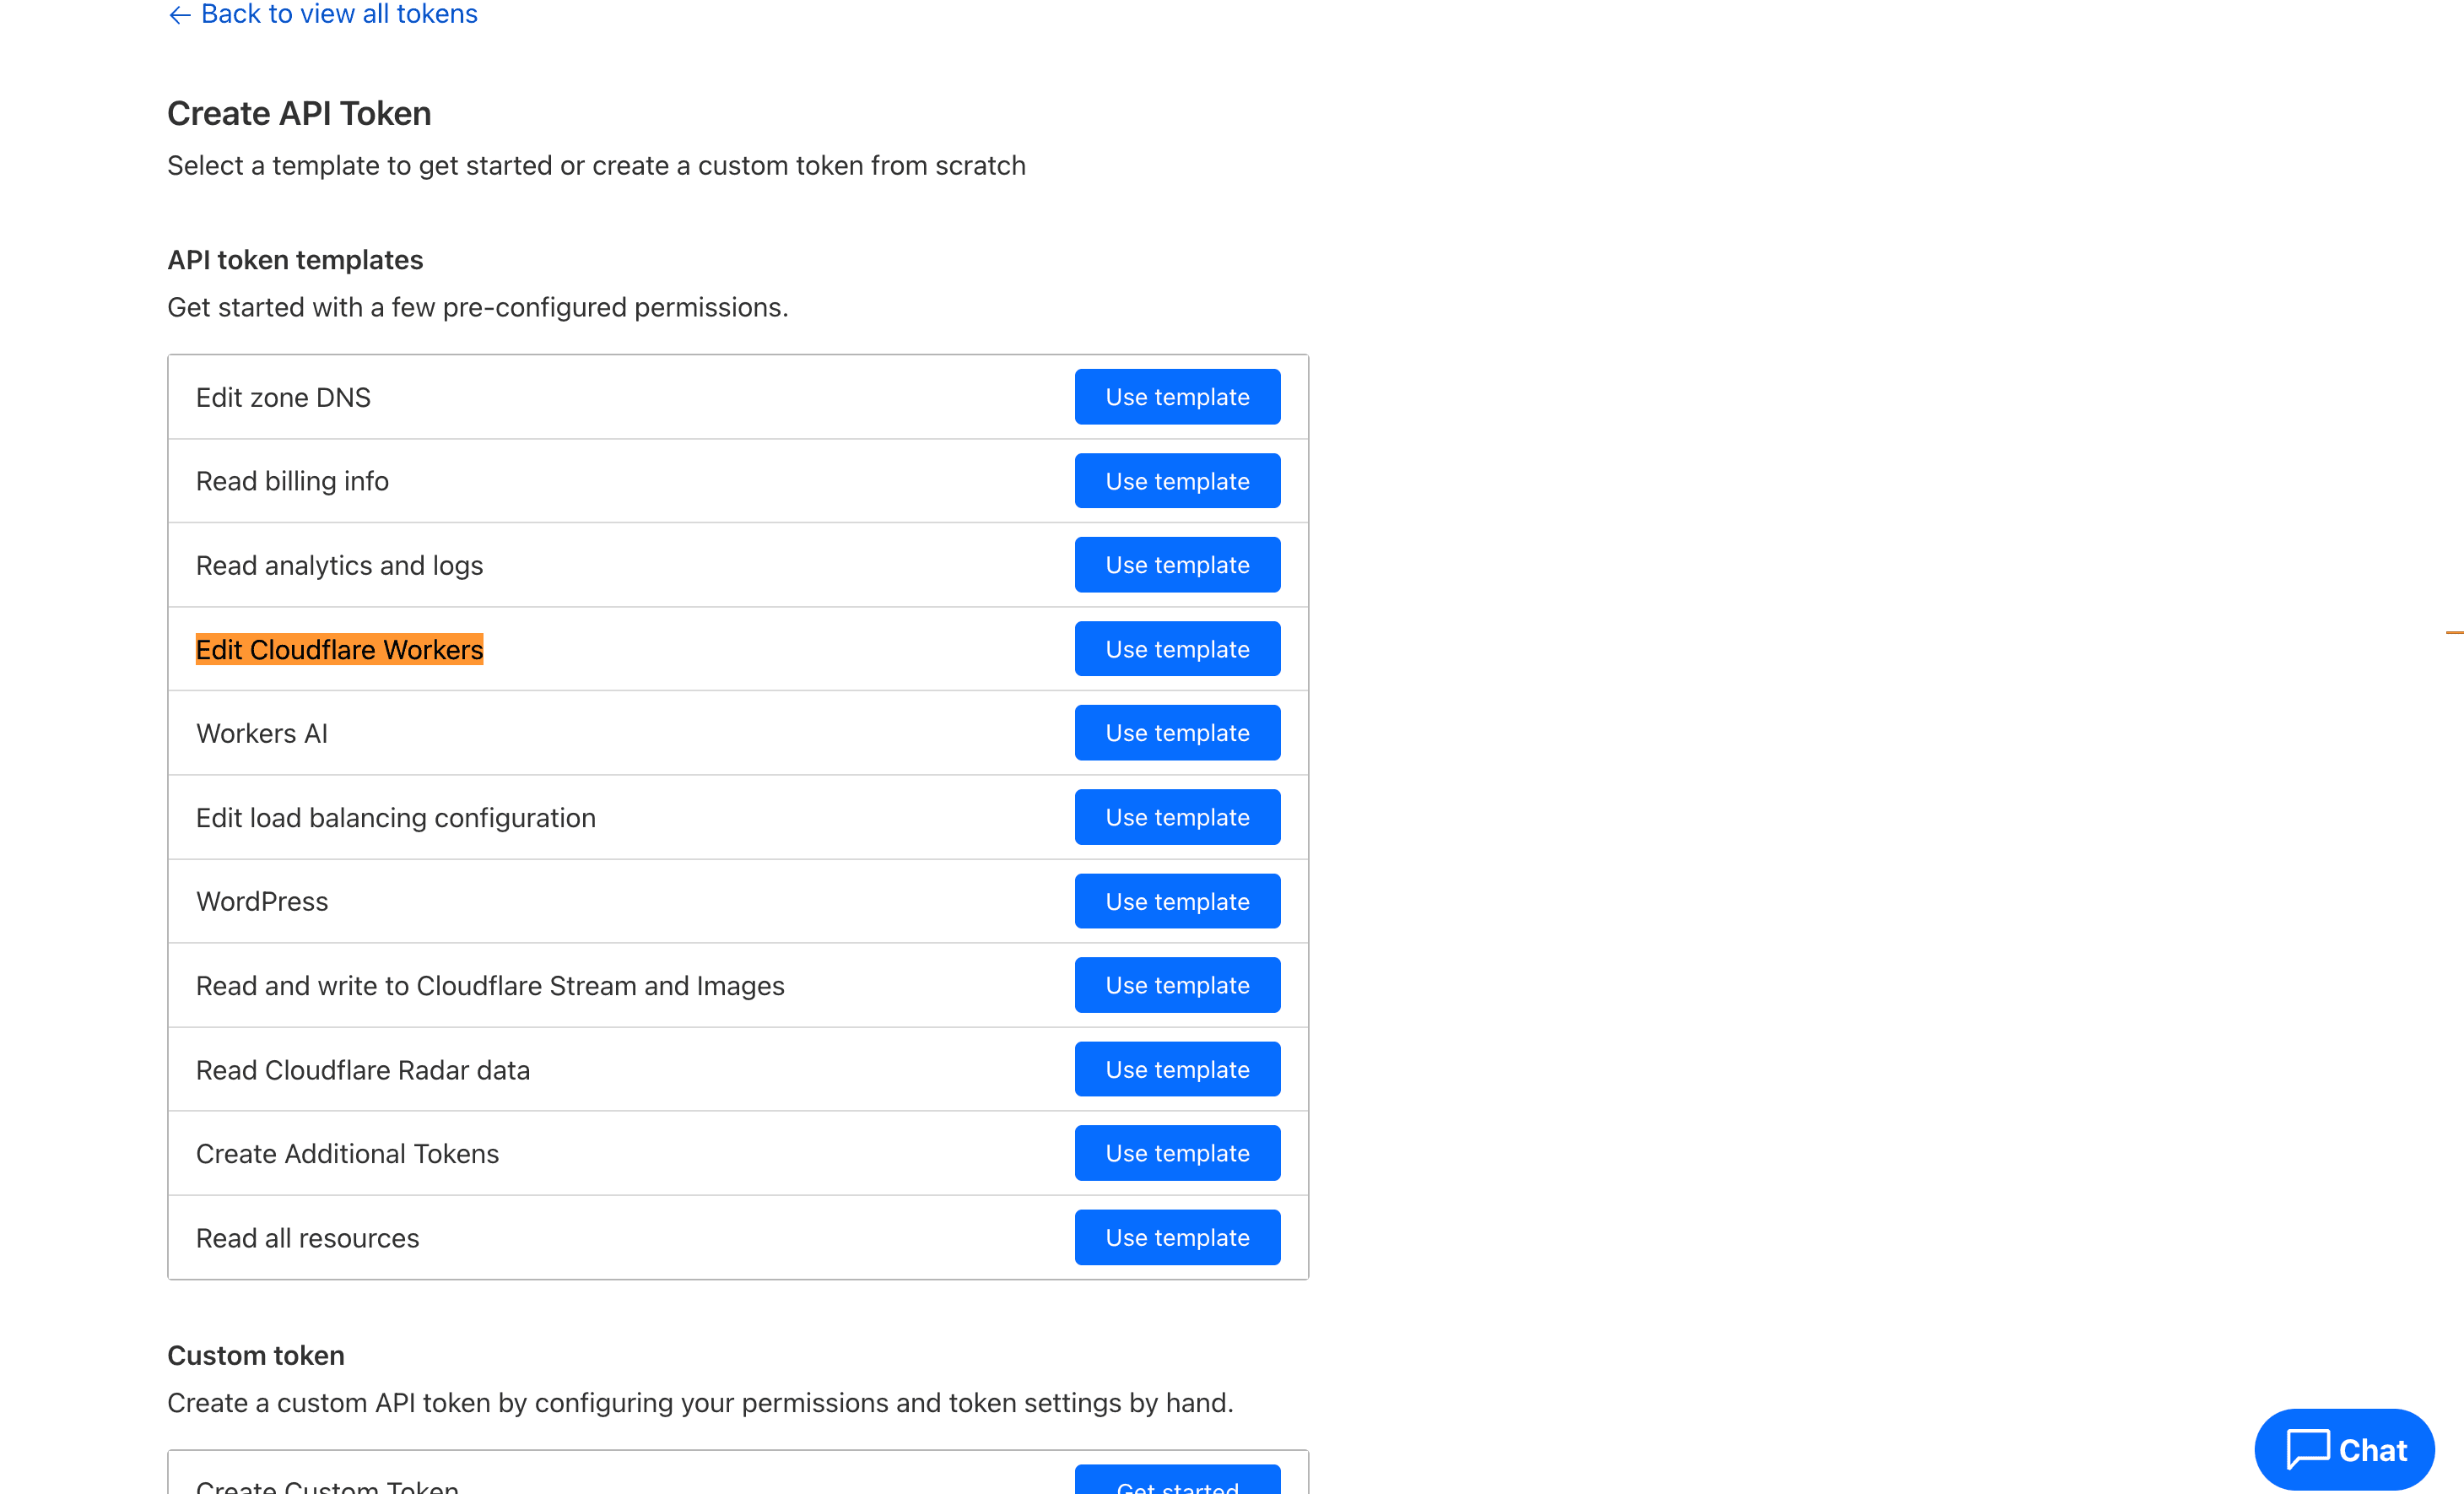
Next, select Use Template for the “Edit Cloudflare Workers” option.
Copy the created token and export it as an environment variable locally:
export CLOUDFLARE_API_TOKEN=<CLOUDFLARE_TOKEN>Clone the worker template from our official GitHub repository.
Configure the worker
First, set the route(s) in wrangler.toml so the worker intercepts traffic for your auth hostname:
[[routes]]
pattern = "login.myapp.com/*"   # your old auth ACS hostname
zone_name = "myapp.com"         # the Cloudflare-managed zone

# Add additional [[routes]] blocks for multiple domains
Next, configure projectConfig.json, which maps each incoming hostname to its Descope project. Each entry has a top-level sso and scim block:
{
  "login.myapp.com": {
    "newCname": "auth.myapp.com",
    "projectId": "YOUR_DESCOPE_PROJECT_ID",
    "sso": {
      "enabled": true,
      "logOnly": false
    },
    "scim": {
      "enabled": false,
      "logOnly": false,
      "tenants": {
        "<connection_id>": {
          "tenantId": "<descope_tenant_id>",
          "token": "Bearer <projectId>:<descope_scim_token>"
        }
      }
    }
  }
}
The table below lists fields, their default values, and descriptions:
Field | Default | Description |
|---|---|---|
| api.descope.com | Your Descope custom domain (e.g. auth.myapp.com) |
| required | Your Descope project ID from the console |
| true | Enable or disable SSO proxying for this hostname |
| false | Logs the intended rewrite but forwards original request. Safe for pre-cutover validation. |
| false | Enable SCIM proxying. Intercepts /scim/v2/... paths and forwards to Descope. |
| false | When true, logs the intended rewrite but forwards the original request unchanged — useful for validating detection before going live |
| "*" | "*" = proxy all requests, forwarding the original Authorization header as-is; map = per-tenant token swap (see below) |
A single worker instance can serve multiple domains and Descope projects. Add additional entries to projectConfig.json and additional [[routes]] blocks in wrangler.toml.
Enable SCIM proxying (optional)
If your IdP provisions users via SCIM, enable it in the scim block of projectConfig.json. SCIM tokens can be generated in the Descope Console under Access Keys.
"scim": {
  "enabled": true,
  "logOnly": false,
  "tenants": {
    "con_OVM407qBECcvwRSG": {
      "tenantId": "T2abc123",
      "token": "Bearer <projectId>:<scimToken>"
    }
  }
}
Deploy the worker
Run the following command inside the cloned repository folder:
npm i && npm run deployYou should now be able to see the worker in the Cloudflare dashboard.

Tip: Set sso.logOnly to true to validate detection logic without affecting real traffic. The worker logs what it would rewrite but forwards the original request unchanged. Flip to false once confirmed.
Set up the DNS redirect with AWS Route 53 and Lambda
If you are not using Cloudflare, you can achieve the same DNS redirection using AWS Route 53 and a Lambda function behind an API gateway. This approach uses cookie-based routing rather than DNS-level interception: a cooke (sso-adapter=true) flags requests that should be proxied to Descope, while all other traffic passes through to the legacy provider.
Deploy the Lambda function
Create a new Lambda function (Node.js 18+) and set the following environment variables:
Variable | Description |
|---|---|
| Your Descope project API URL, e.g. https://api.euc1.descope.com |
| Your existing auth system base URL |
Add the following handler code:
const https = require('https');
const url   = require('url');

const DESCOPE_API_URL = process.env.DESCOPE_API_URL || 'https://api.euc1.descope.com';
const LEGACY_API_URL  = process.env.LEGACY_API_URL  || 'https://your-legacy-auth.myapp.com';

exports.handler = async (event) => {
  const { httpMethod: method, path, multiValueQueryStringParameters: query,
          multiValueHeaders: headers, body, isBase64Encoded } = {
    method: 'GET', path: '/', query: {}, headers: {}, body: '',
    ...event,
  };

  const queryString = Object.keys(query).length > 0
    ? '?' + Object.keys(query).map(k => `${k}=${query[k]}`).join('&')
    : '';

  // Route based on sso-adapter cookie
  let targetUrl = `${LEGACY_API_URL}${path}${queryString}`;
  if (headers.cookie && headers.cookie[0].includes('sso-adapter=true'))
    targetUrl = `${DESCOPE_API_URL}${path}${queryString}`;

  const forwardHeaders = { ...headers };
  forwardHeaders.host = url.parse(targetUrl).hostname;
  delete forwardHeaders['accept-encoding'];

  const response = await makeRequest({
    method, url: targetUrl, headers: forwardHeaders,
    body: isBase64Encoded ? Buffer.from(body, 'base64').toString('utf8') : body,
  });

  const contentType = response.multiValueHeaders['content-type']?.[0] || '';
  const isBinary = contentType.includes('image/') ||
                   contentType.includes('application/octet-stream');

  return {
    statusCode: response.statusCode,
    multiValueHeaders: {
      ...response.multiValueHeaders,
      'x-sso-adapter': ['true'],
      'x-target-url': [targetUrl],
    },
    body: isBinary
      ? Buffer.from(response.body, 'binary').toString('base64')
      : response.body,
    isBase64Encoded: isBinary,
  };
};
Set up API Gateway
Create an API Gateway (HTTP API) and configure it to proxy all requests to the Lambda function:
Create a new HTTP API or REST API in API Gateway.
Set up a proxy integration pointing to your Lambda function (
{proxy+}route).Enable binary media types if your auth system serves non-text responses.
Attach a custom domain in API Gateway matching your old auth subdomain (e.g.
login.myapp.com), backed by an ACM certificate.
Your certificate must cover the old auth subdomain. Request it in the same AWS region as your API Gateway (or us-east-1 for CloudFront-based setups).
Update your DNS record
In Route 53 (or your equivalent DNS provider), update the record for your old auth subdomain:
Open the Route 53 console and navigate to the hosted zone for your root domain.
Locate the existing record for your auth subdomain (e.g.
login.myapp.com).Update it to an A Alias record pointing to your API Gateway custom domain. On non-AWS providers, use a CNAME pointing to the API Gateway domain.
Note: Set TTL to 60 seconds before updating the DNS record so you can roll back quickly if needed. Restore to your normal value (300-3600s) after the migration is stable.
Verify the proxy
Make a test request to your old auth domain and confirm the
x-sso-adapter: trueandx-target-urlresponse headers appear.Without the cookie, verify traffic is forwarded to your legacy system.
Set the
sso-adapter=truecookie in your browser and repeat. Confirm traffic now reaches Descope.
Cutover and rollback
Once validated, shift all traffic to Descope by setting sso-adapter=true for all sessions:
Server-side: Set the cookie on all new session responses from your auth service.
Client-side: Deploy a client update that sets the cookie on app load.
Hard cutover: Update the Lambda env var
LEGACY_API_URLto point to Descope directly and remove the routing logic entirely.
Note: The cookie-based routing gives you an instant rollback path at any point. Removing or unsetting the sso-adapter=true cookie immediately routes affected sessions back to the legacy system, with no DNS changes or redeployment required.
Test the integration
After configuring either the Cloudflare Worker or the AWS Lambda proxy, test the integration with internal accounts first. If there are errors in the configuration, end users won’t notice any disruption.
We recommend migrating customers gradually. For example, transition smaller subset of customers over time to ensure the migration happens behind the scenes without users noticing any changes to their login experience.
While testing the integration, you should receive an Okta login prompt.
A successful integration will generate users associated with the tenant in your Descope project.

Migrating from a homegrown auth system
If you’re running a custom-built authentication system rather than a commercial provider like Auth0 or WorkOS, the migration follows the same DNS redirection pattern with a few additional considerations. In addition to the general prerequisites listed above, you will need:
Your existing SAML or OIDC configuration parameters: Since there’s no vendor dashboard to export from, you’ll need to locate the
spEntityId,spAcsUrl, IdP metadata URL, and any attribute mappings in your own codebase or configuration.A Descope project with a custom domain: Follow the custom domain setup instructions to configure your Descope project before proceeding.
Migration steps
Extract your current SSO configuration. Identify the SAML or OIDC parameters your system currently uses to communicate with each customer’s IdP.
Create Descope tenants with matching configurations. Follow the same SDK-based tenant creation and SAML/OIDC configuration steps described in the provider-specific sections above. The
spAcsUrlandspEntityIdmust match the values your customers’ IdPs already have configured.Set up your DNS proxy. Deploy either the Cloudflare Worker or the AWS Lambda proxy using the instructions in the previous sections.
Run user and tenant migrations. If your homegrown system maintains its own user store, migrate existing user records to Descope. See the user migration documentation for bulk import options.
Perform the cutover. Use the same gradual migration approach described in in the testing section above: start with internal accounts, expand to a small subset of tenants, and widen coverage as each batch is verified. Monitor authentication logs in the Descope Console to confirm successful logins before expanding further.
Next steps with Desope SSO migration
This guide covered the end-to-end process for migrating SSO tenants to Descope from commercial providers or a homegrown system, all without requiring tenant admin coordination. While this guide focused on migrating from Auth0 and WorkOS, the process adapts to other service providers, meaning virtually any organization can benefit from Descope’s new approach.
Ready to bring your SSO into a comprehensive CIAM environment with drag & drop simplicity? Book a demo with our customer identity experts, or join our developer community, AuthTown.