
Table of Contents
Don't have the time to read the entire post? Our human writers will be sad, but we understand. Summarize the post with your preferred LLM here instead.
Firebase Auth already handles sessions, Firestore rules, and user records in iOS apps. However, it lacks a seamless login experience. Adding passkeys, social logins, or OTPs forces you to wire extra SDKs, build more UI, and use browser redirects that break the native flow.
Descope's external tokens close that gap without asking you to rebuild anything. You run a Descope flow for the actual authentication, and when it finishes Descope mints a Firebase custom token tied to that user. Hand the token to signIn(withCustomToken:) and you get a Firebase session: the same UID, the same security rules, and the same backend you already deployed.
This guide walks through the iOS build in Swift, from adding the SDKs and initializing both frameworks to running a Descope flow in SwiftUI and exchanging the returned token for a Firebase session that reads a protected Firestore document.
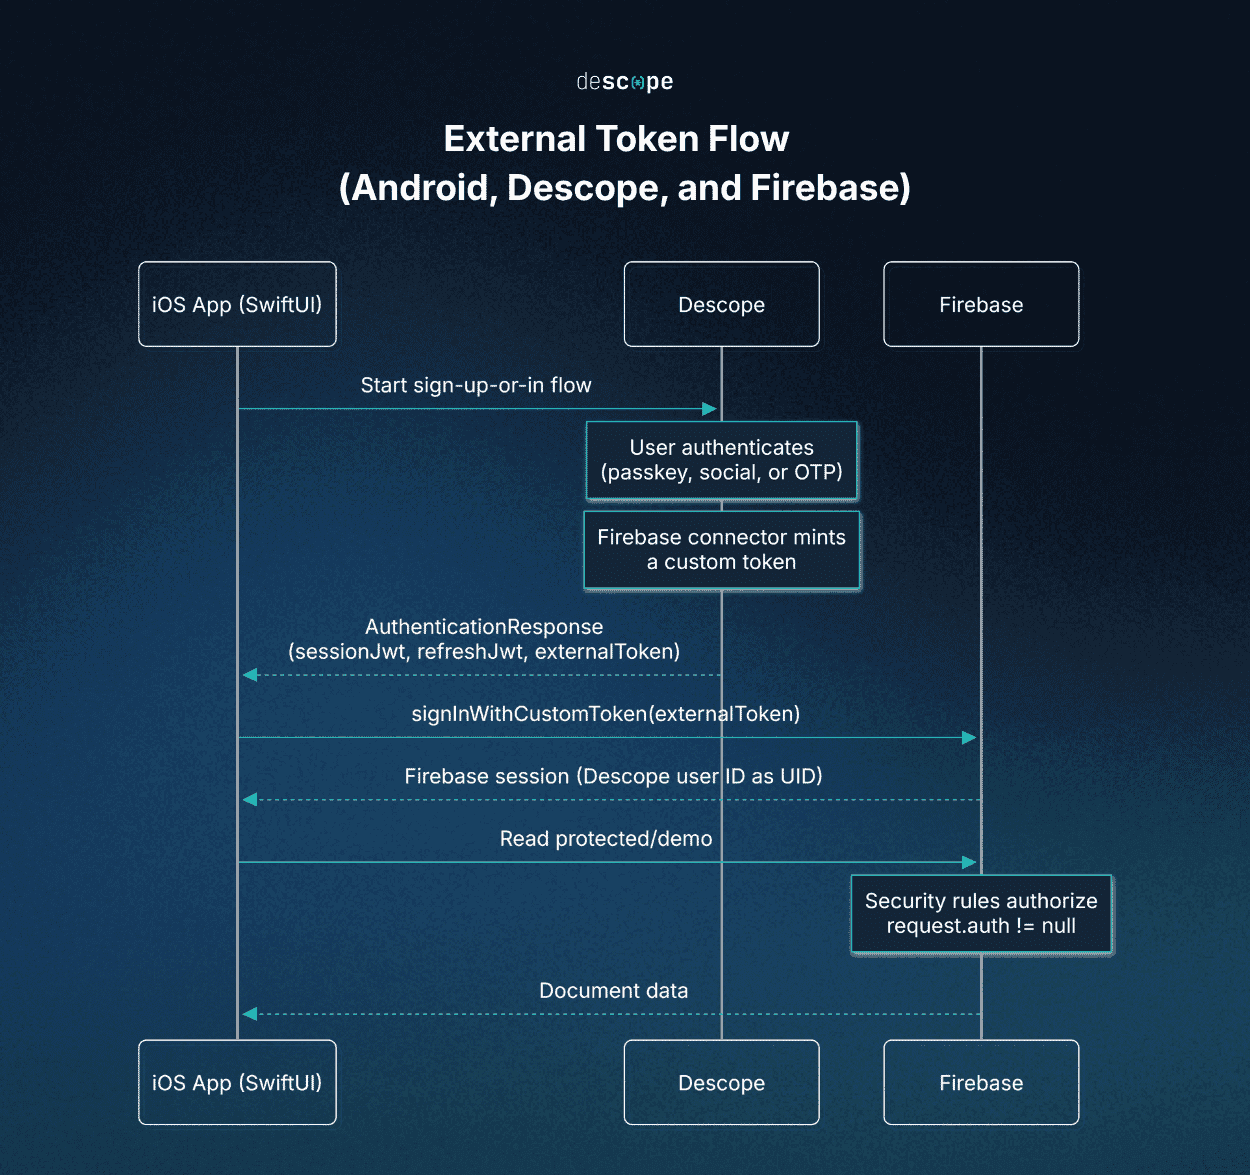
How the external token flow works
Firebase custom tokens let Firebase trust external authentication. Normally, you'd need to build a custom backend to mint these, but Descope's connector handles it for you.
At the end of a login, Descope generates a custom token and returns it in the externalToken response field. Your iOS app reads this field and passes it directly to Firebase via signIn(withCustomToken:). The Descope user ID becomes the Firebase UID, meaning your existing Firebase collections and security rules continue working without any changes.
Prerequisites
Have the following ready before you start:
A Descope account and project.
A Firebase project with Firestore enabled.
Xcode 16 or later, targeting iOS 16 or later. iOS 16 is also the minimum for passkeys.
Working familiarity with SwiftUI.
Step 1: Build the Descope login flow
Descope ships a sign-up-or-in flow by default, and that's all you need to follow along. Your app launches it from a URL scoped to your project:
https://api.descope.com/login/<projectId>?flow=sign-up-or-inDrop in your own project ID and the flow is ready to run. If you want to add other authentication methods like OTP or social login, or rearrange the ones already there, you can do that anytime in the Descope console without touching any of the app code that comes next.
Step 2: Connect Firebase with a token connector
This is the step that removes the need for a backend of your own. The connector holds your Firebase Console service account credentials and mints custom tokens on Descope's side, so your app never has to call the Firebase Admin SDK directly.
Setting it up takes three moves:
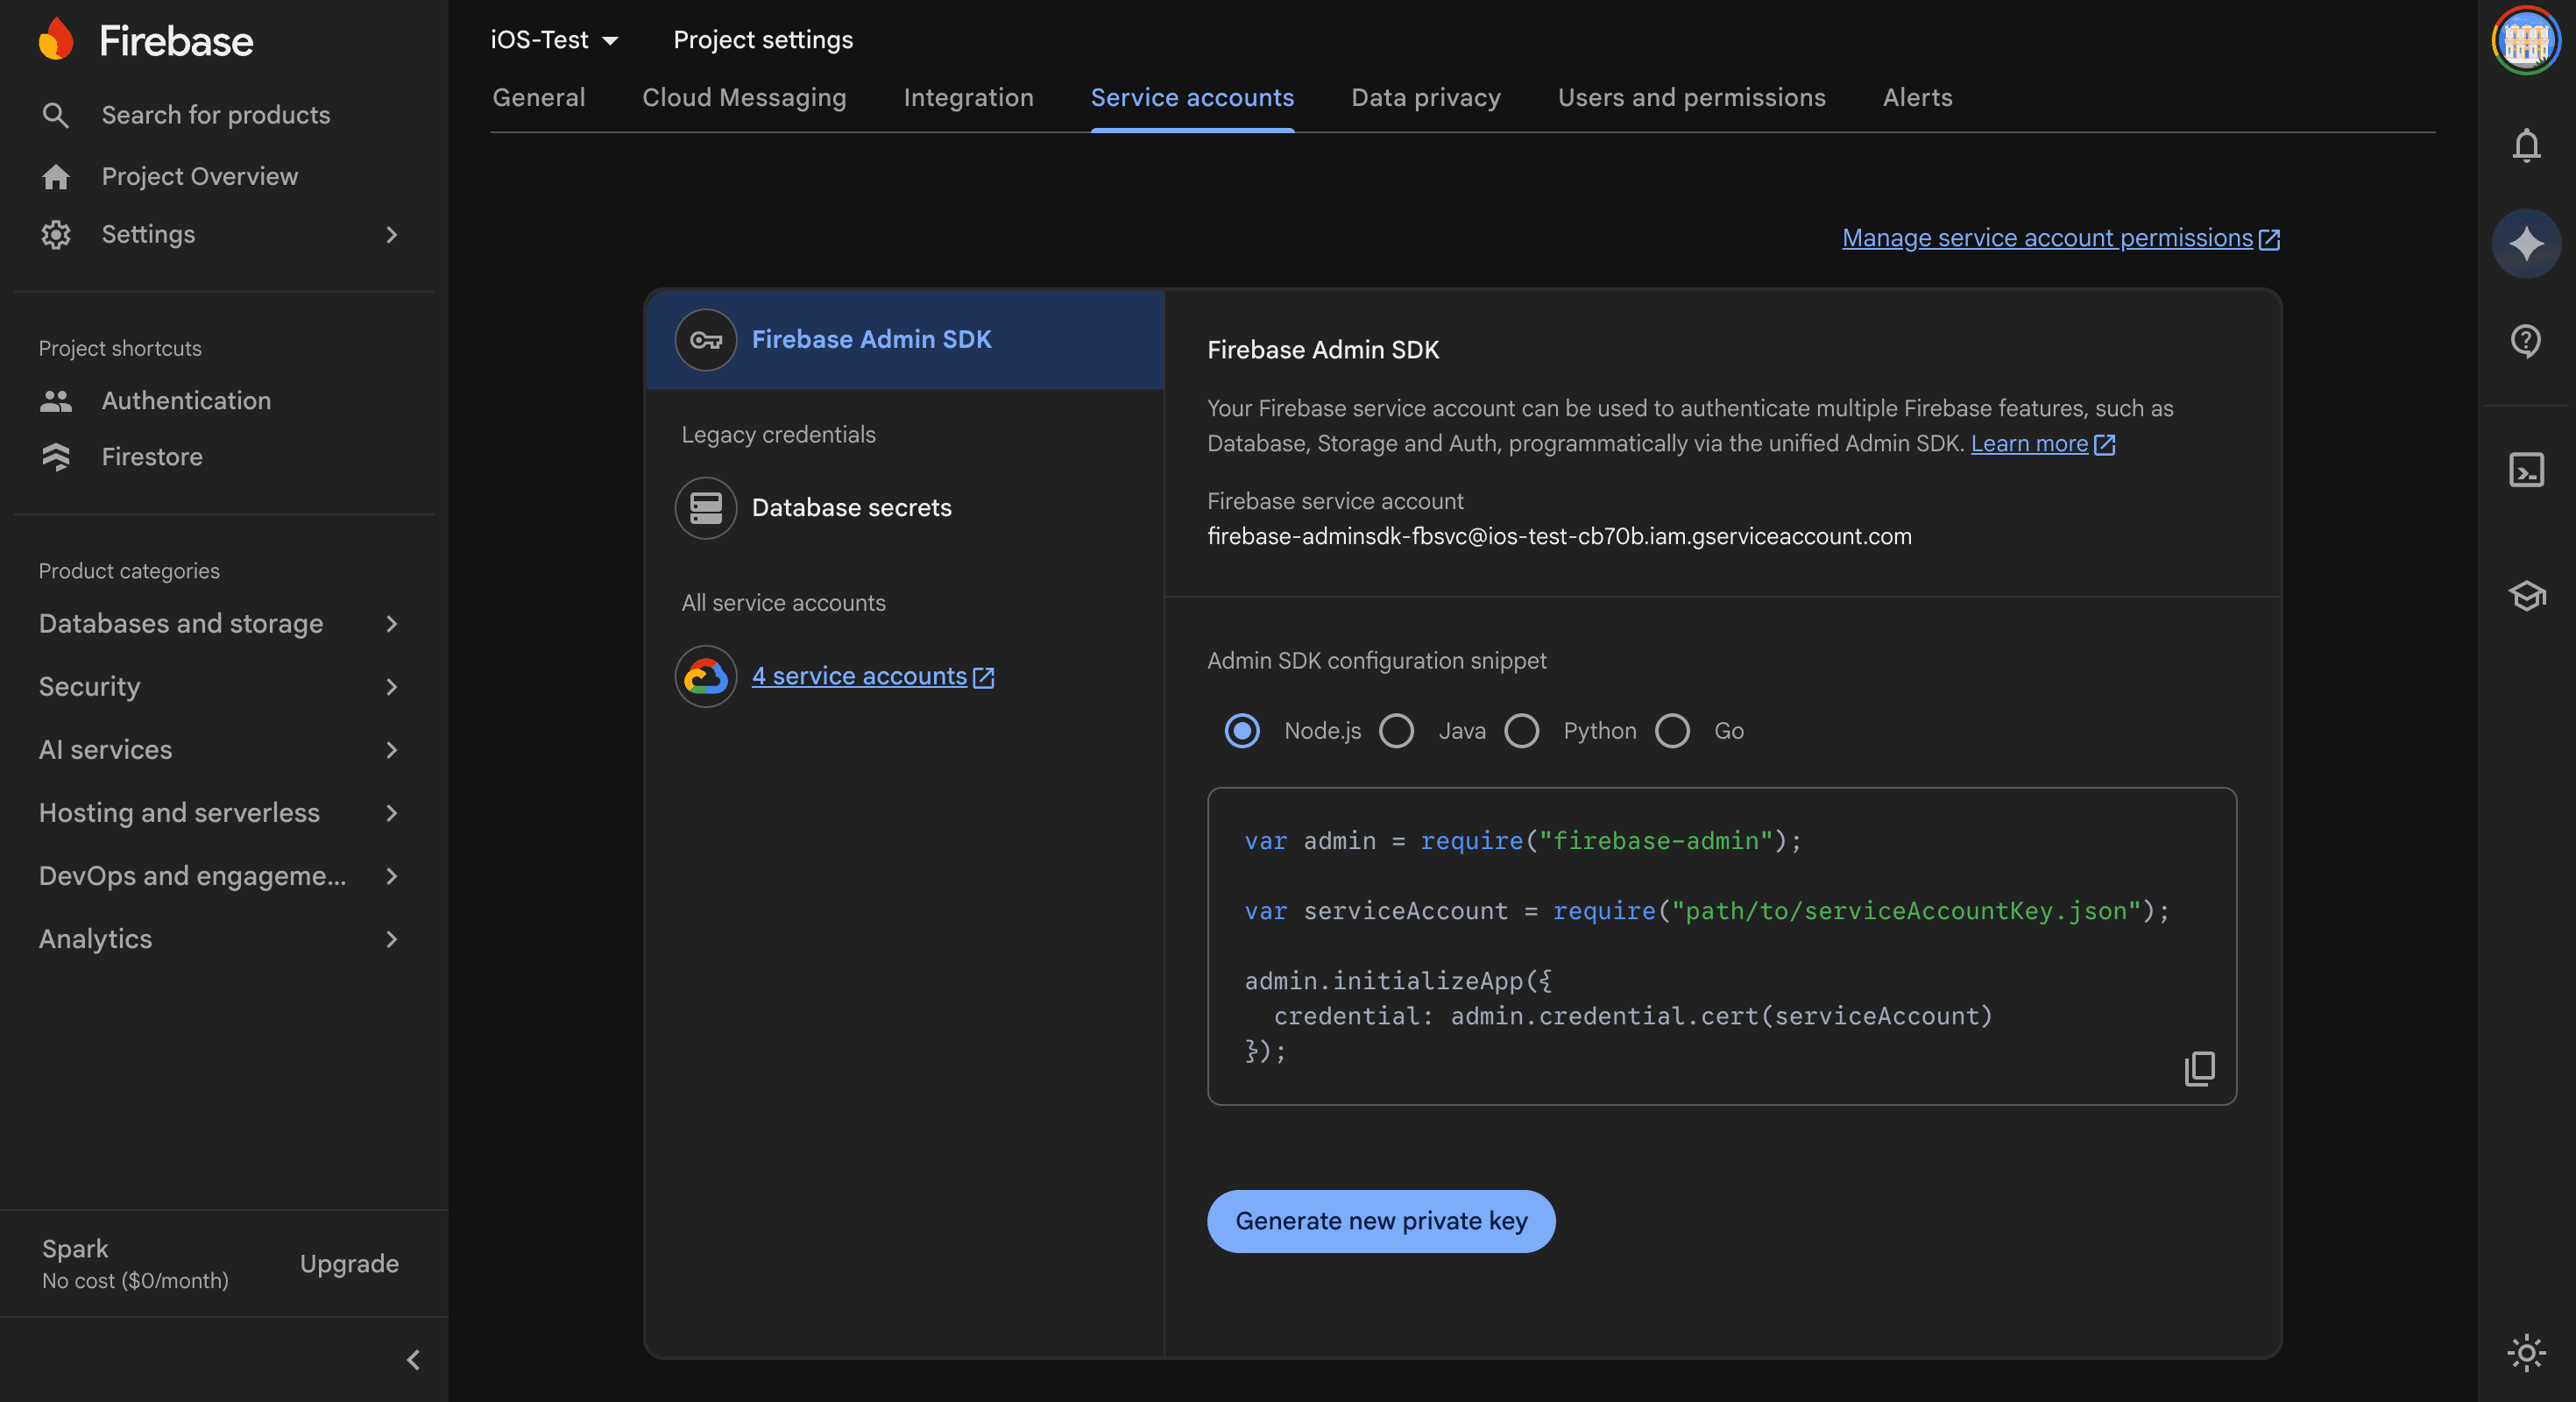
In the Firebase console, go to Project settings > Service accounts > Generate new private key and download the service account JSON file.
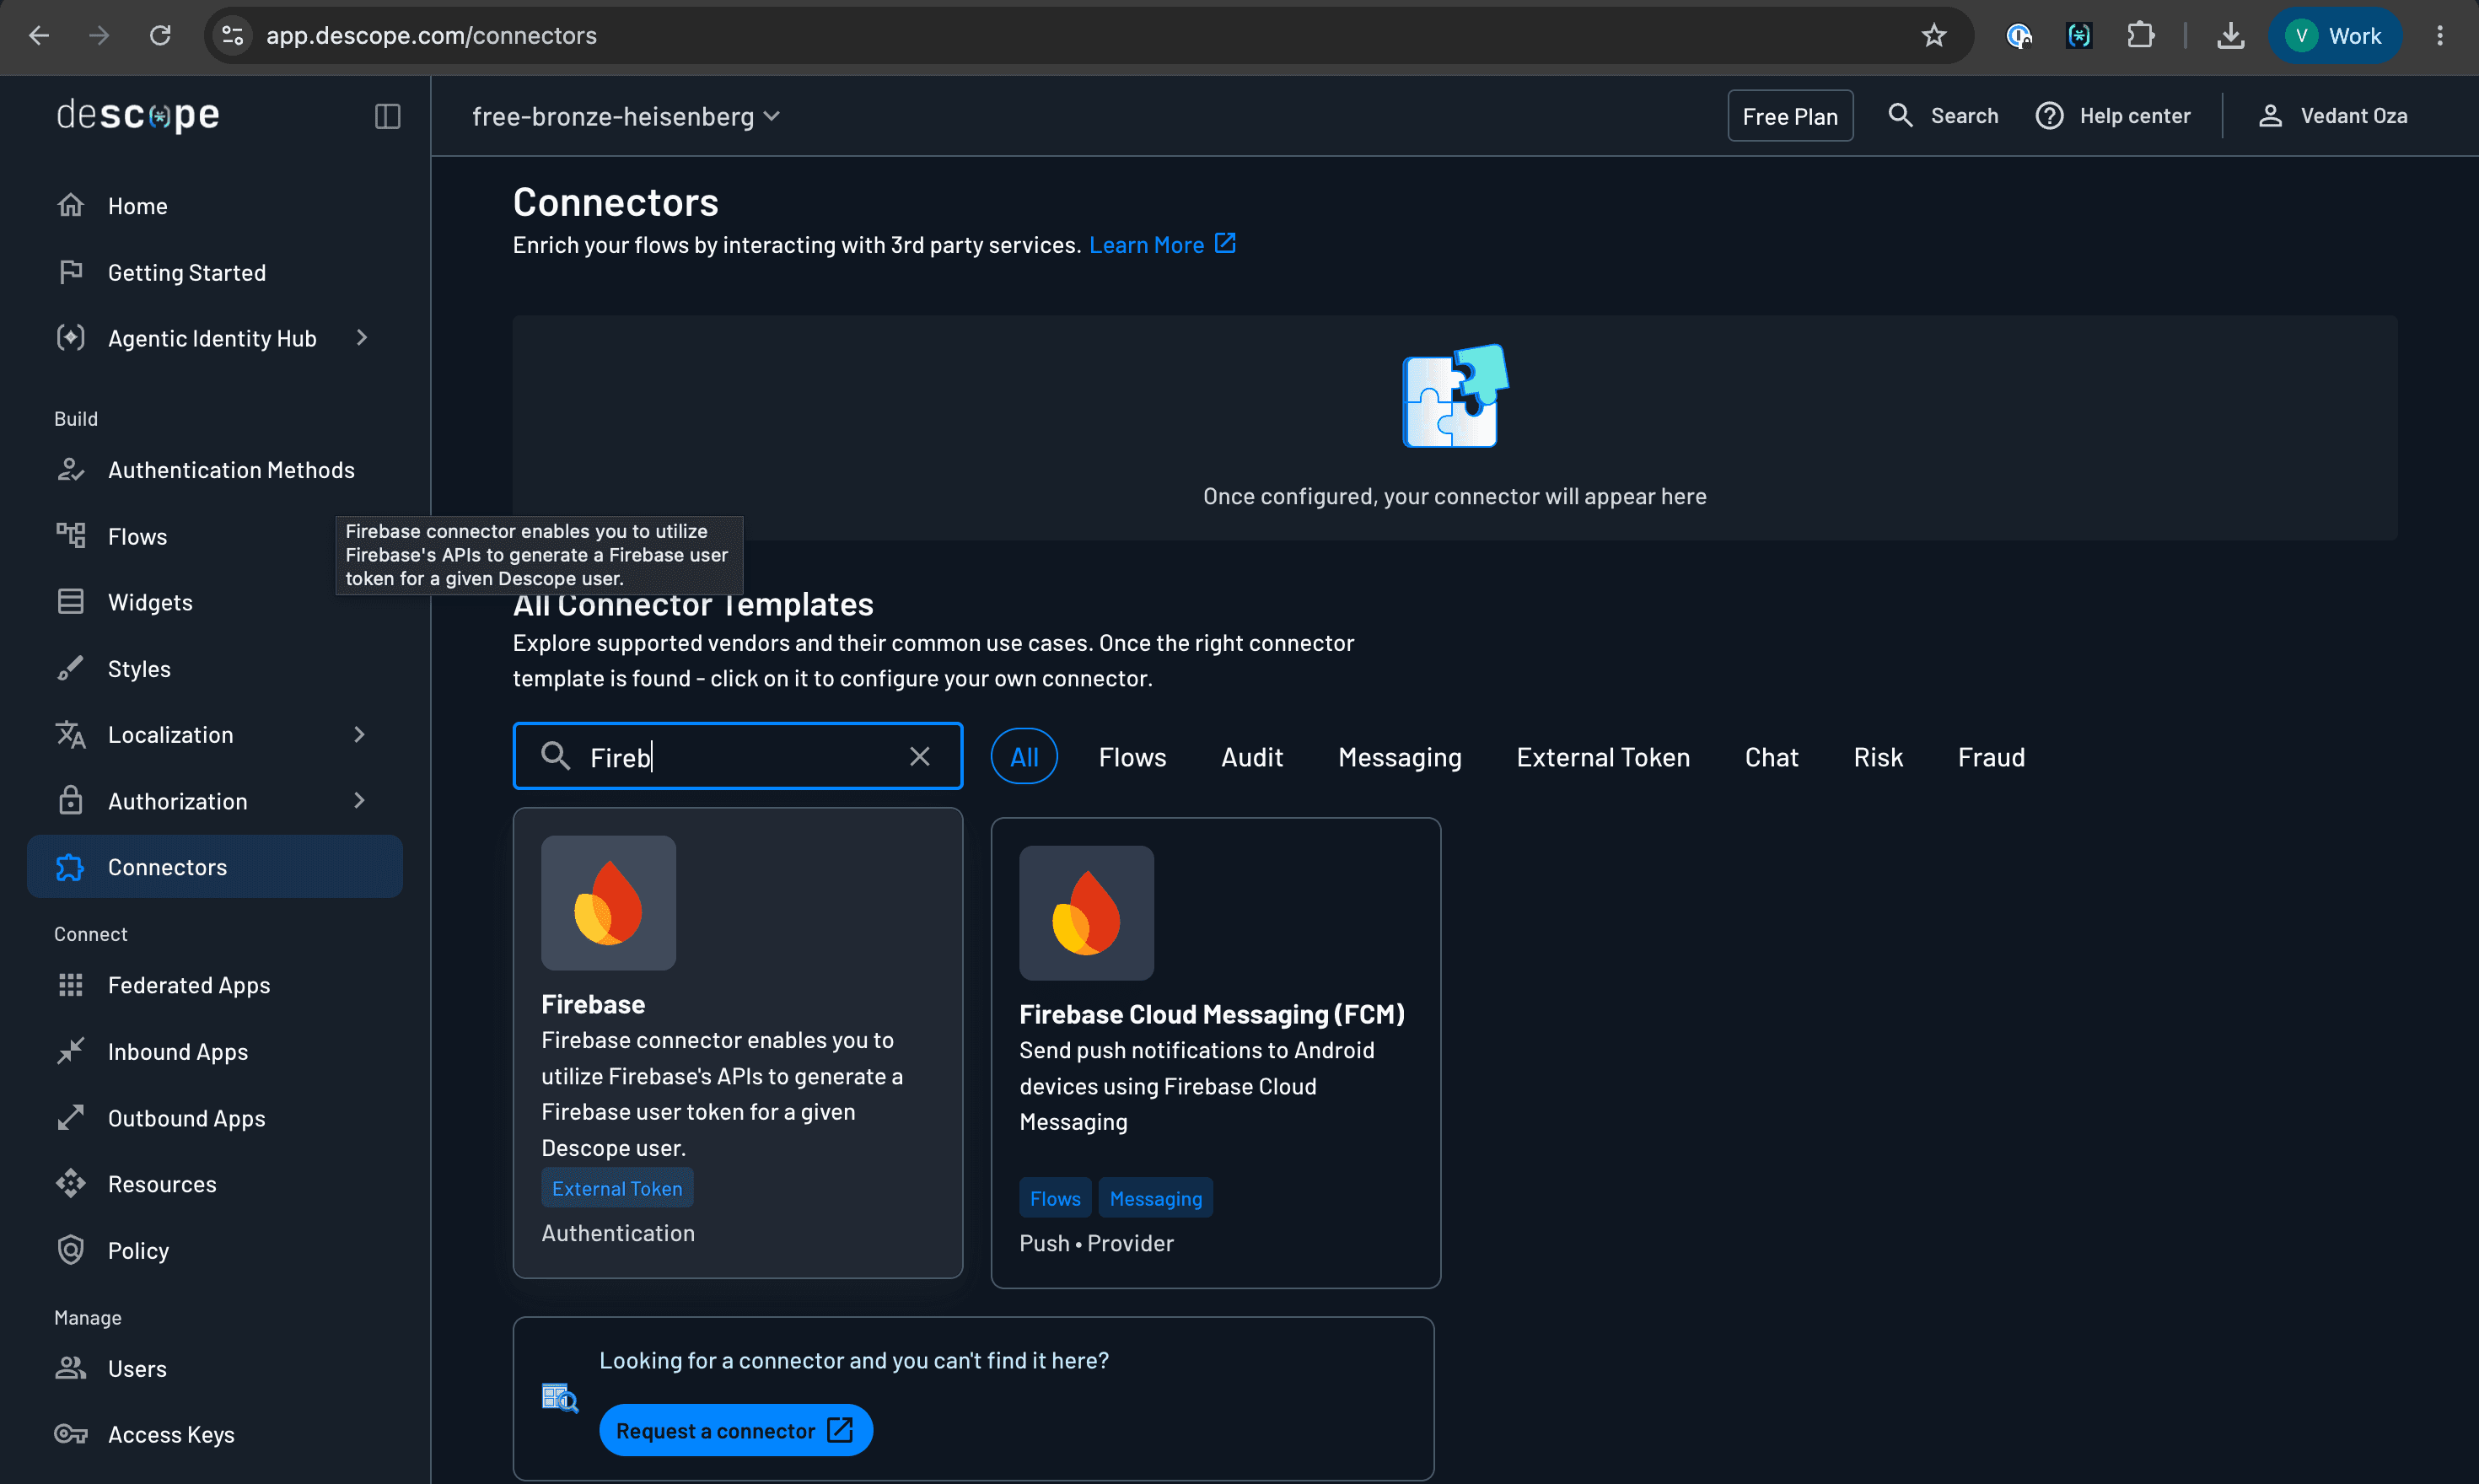
In the Descope console, open Connectors, create a Firebase token connector, and paste in the contents of that JSON file.
Turn on external token generation under Project Settings > Session Management and select the connector you just created. This makes every completed flow return a Firebase custom token.
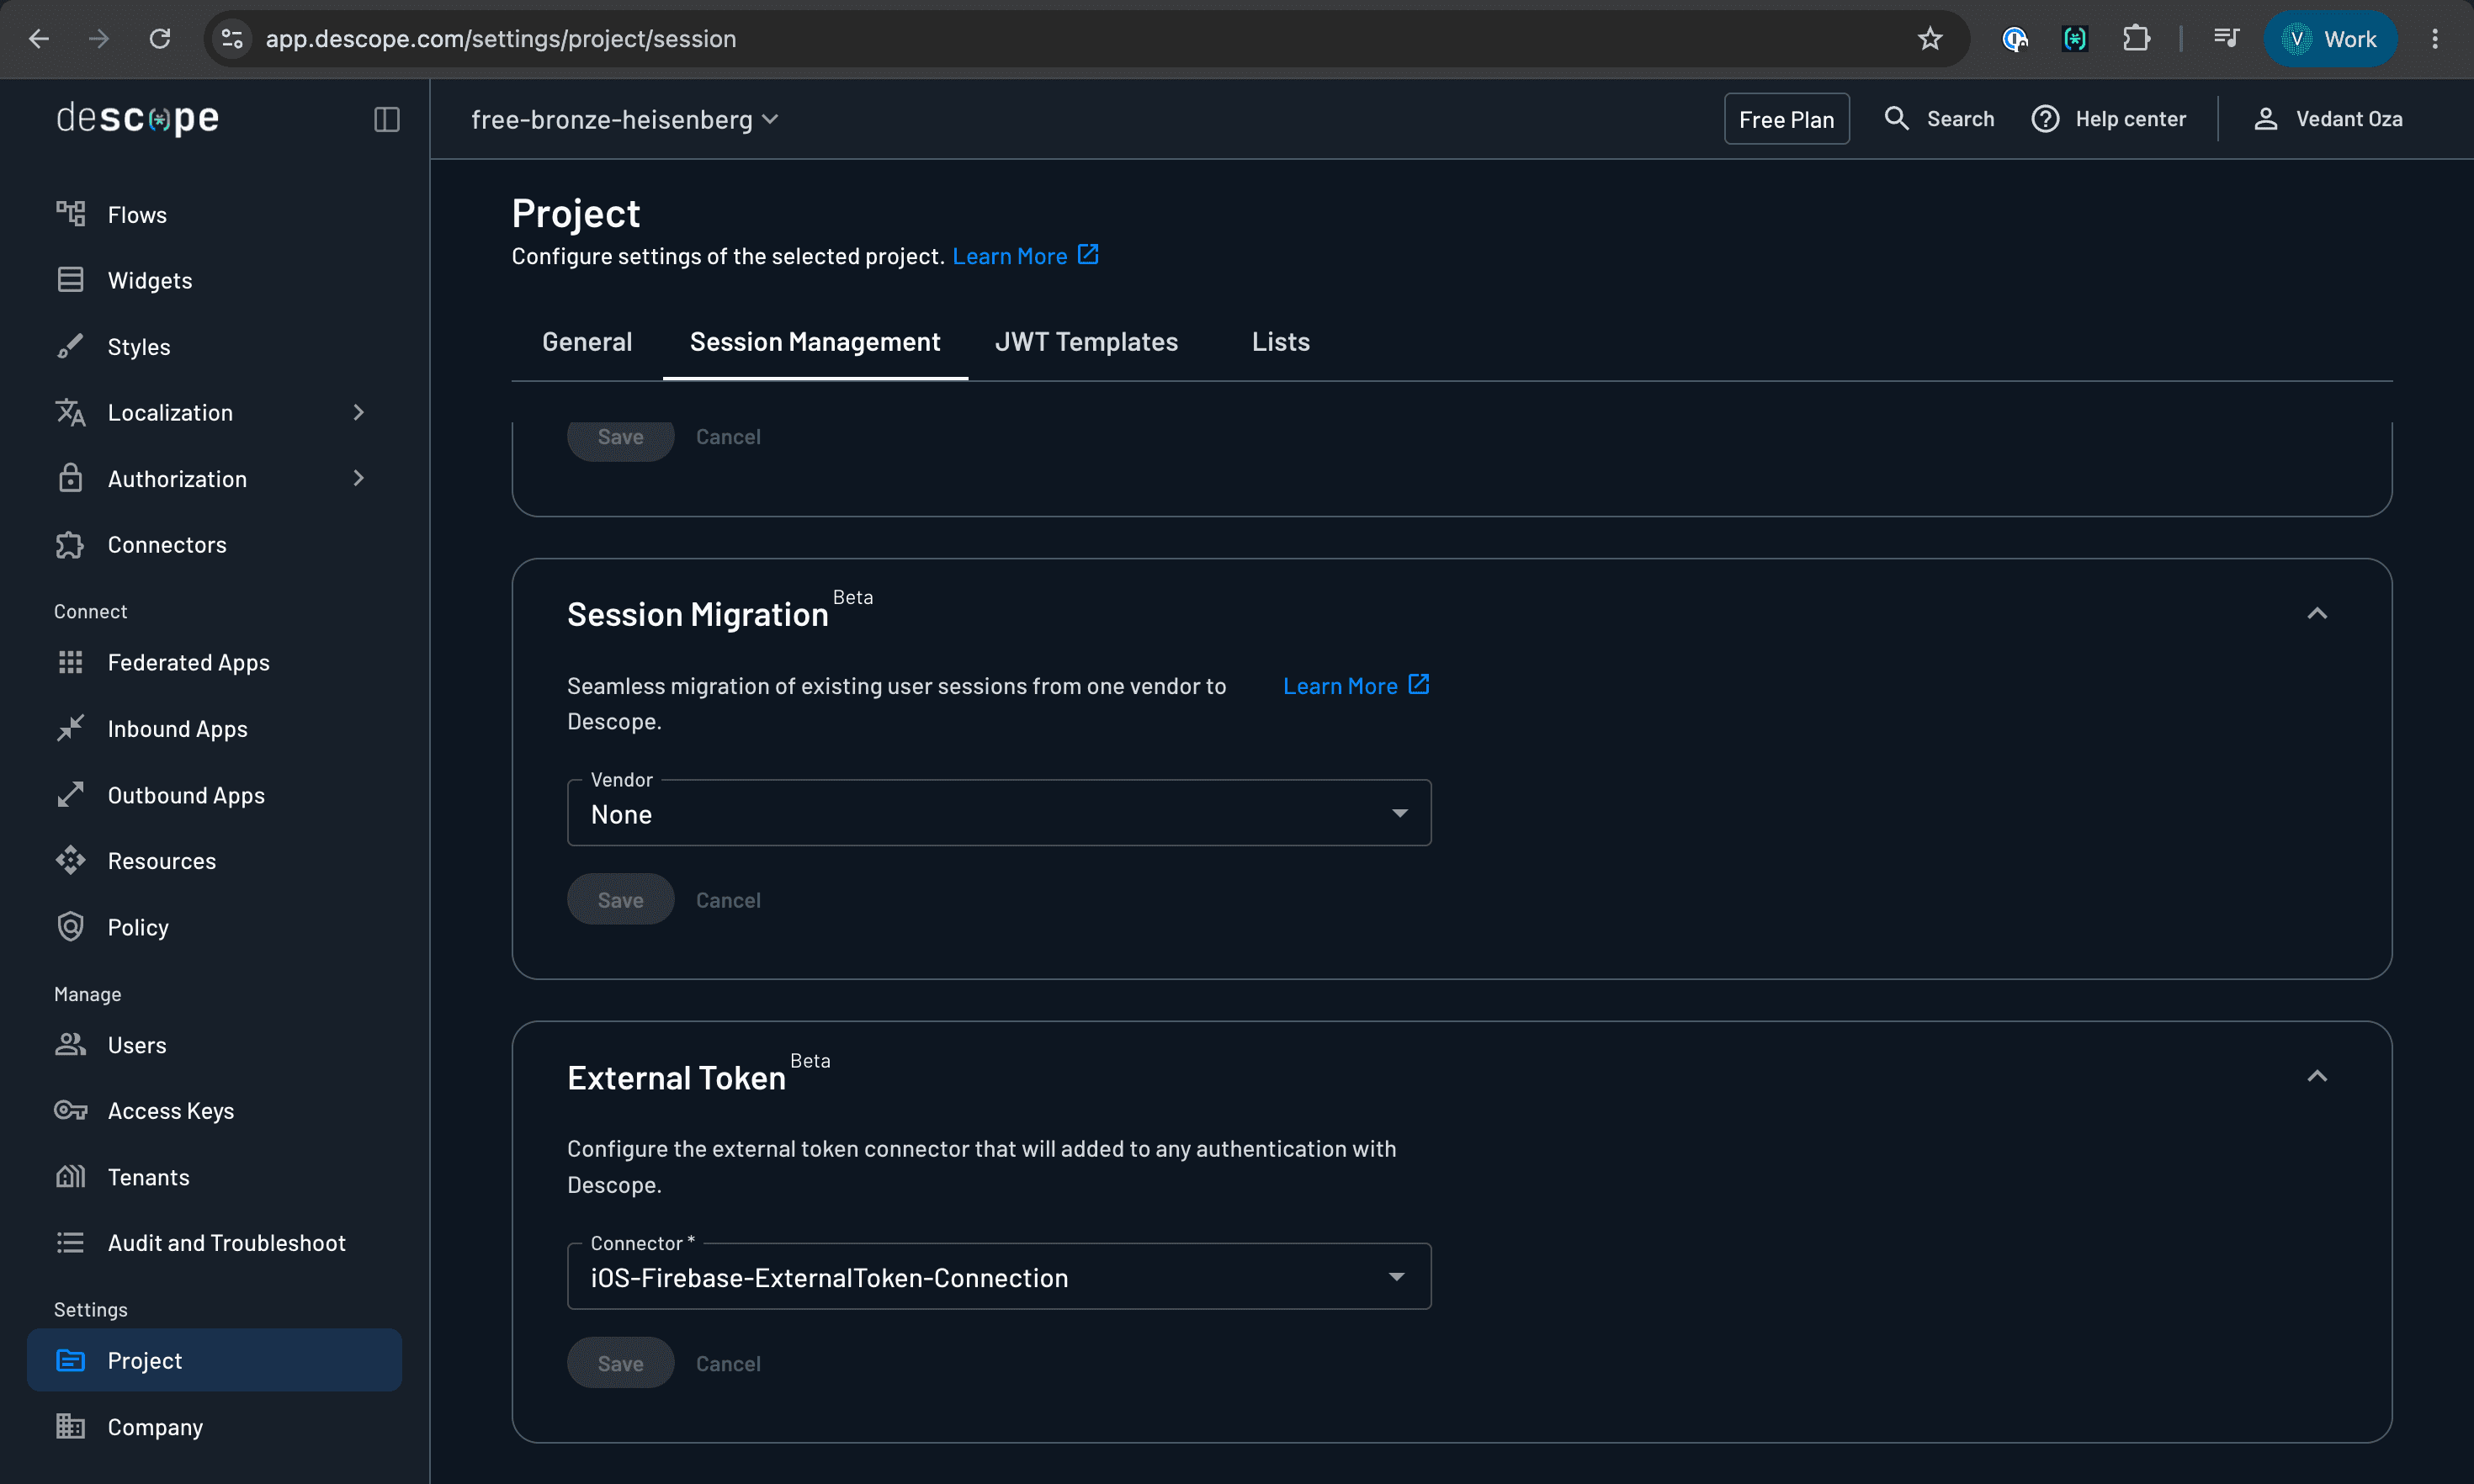
That last toggle is what makes every completed flow return a Firebase token. From there, each authentication response carries the minted token next to the Descope session:
{ "sessionJwt": "...", "refreshJwt": "...", "externalToken": "<firebase custom token>", "...": "..." }The externalToken field (the minted Firebase custom token) is the value the app reads once login finishes.
Step 3: Add the SDKs to your Xcode project
iOS lets you add SDKs with Swift Package Manager, directly inside Xcode. There are two packages to bring in and one configuration file to drop into the project.
Add the Descope and Firebase packages
In Xcode, open File > Add Package Dependencies. Add the Firebase iOS SDK first by pasting its repository URL:
https://github.com/firebase/firebase-ios-sdkWhen Xcode asks which products to include from the Firebase package, choose FirebaseAuth and FirebaseFirestore. Those are the only two this app uses; the Firebase package ships many more products, and you can leave the rest unchecked.
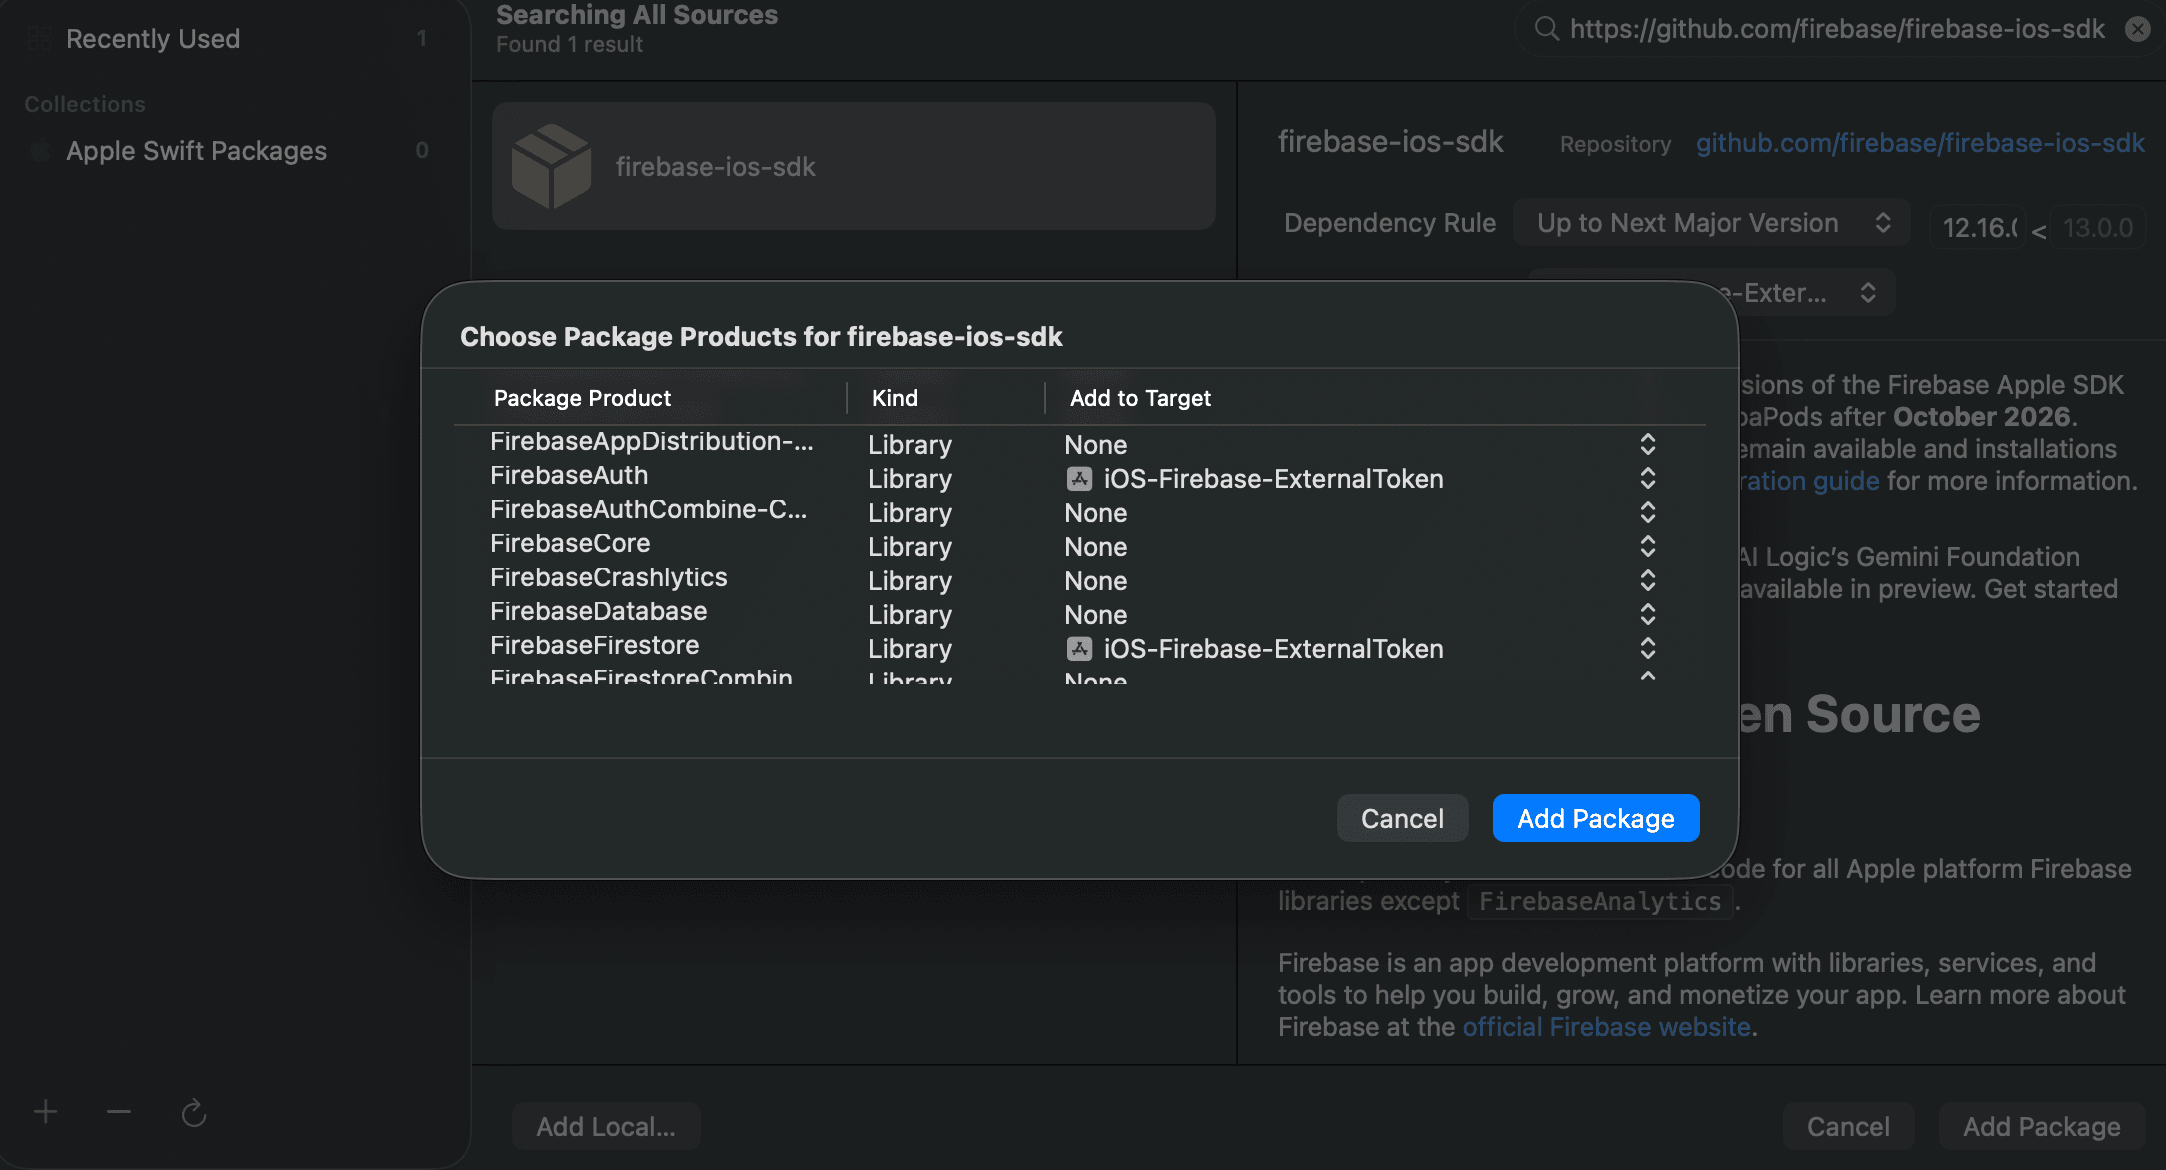
Then repeat the same step for the Descope Swift SDK:
https://github.com/descope/descope-swiftAdd the Firebase configuration file
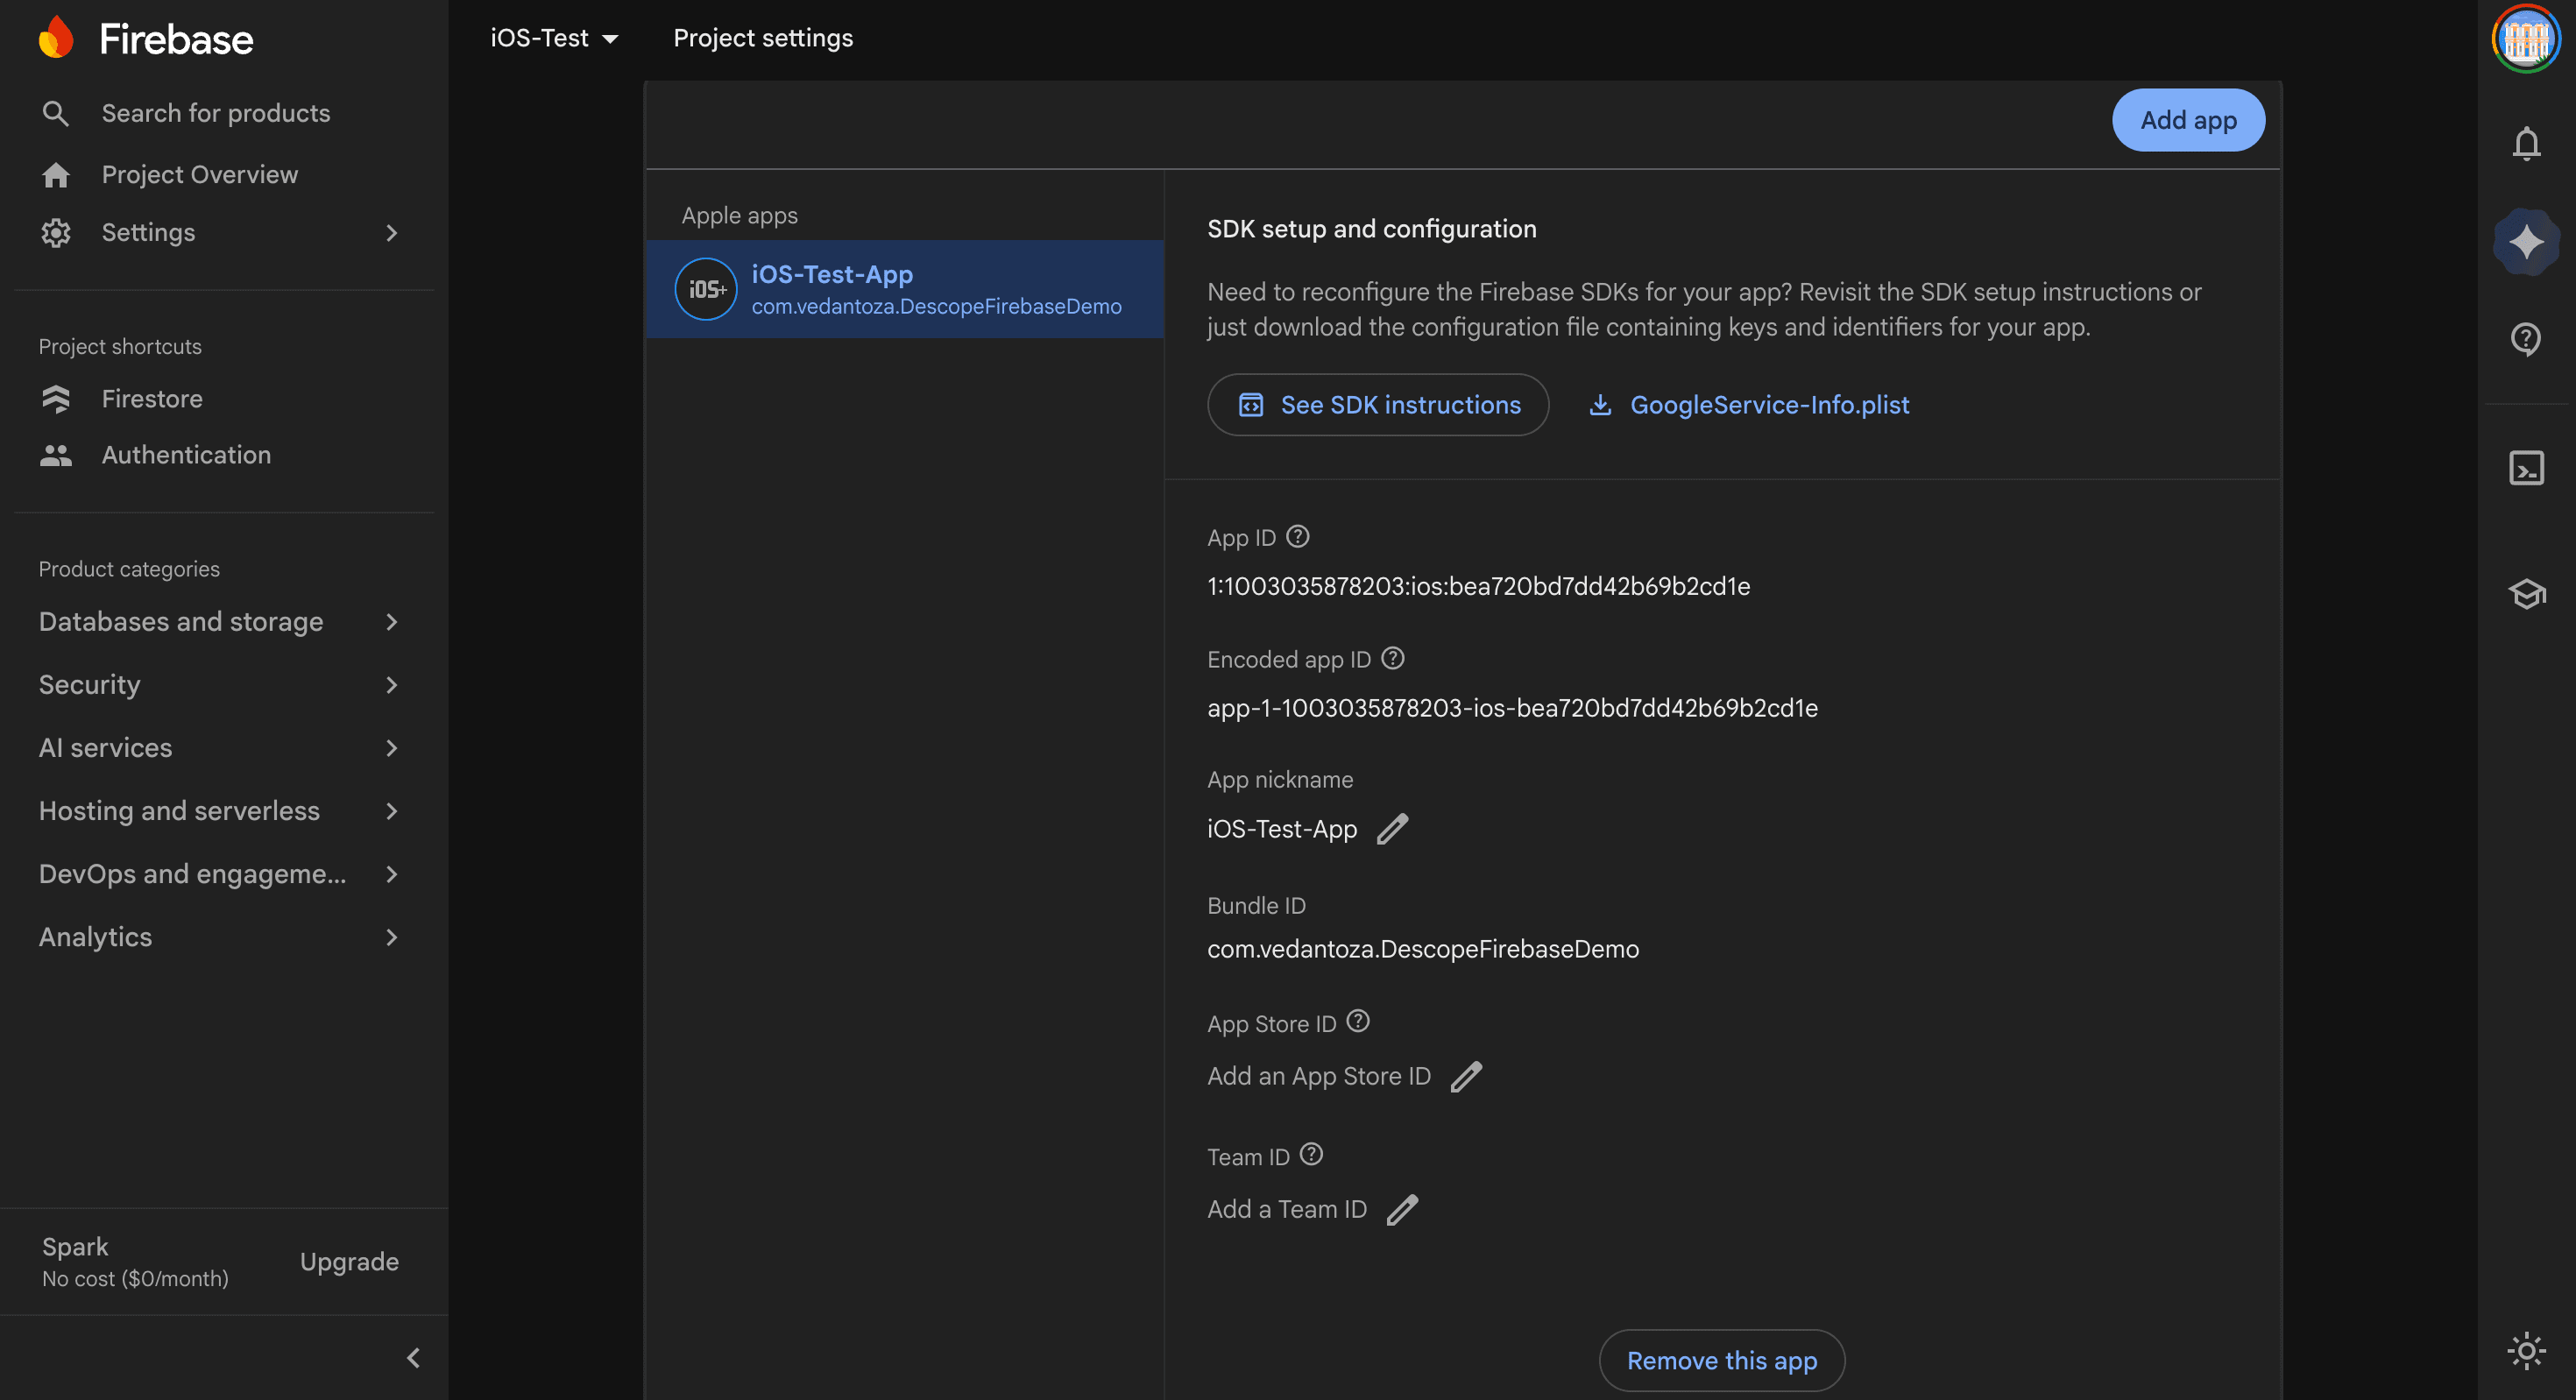
Firebase needs a config file to know which project it belongs to. In the Firebase console, open Project Settings > Your apps, register an iOS app with your bundle identifier, and download the generated GoogleService-Info.plist. Drag it into the Xcode project navigator and drop it under your project folder.
Step 4: Initialize Firebase and Descope
Both SDKs are initialized once at launch. Since a SwiftUI app has no classic launch entry point, route it through an app delegate:
import SwiftUI
import FirebaseCore
import DescopeKit
let descopeProjectId = "<your-project-id>"
class AppDelegate: NSObject, UIApplicationDelegate {
    func application(_ application: UIApplication, didFinishLaunchingWithOptions launchOptions: [UIApplication.LaunchOptionsKey: Any]? = nil) -> Bool {
        FirebaseApp.configure()
        Descope.setup(projectId: descopeProjectId)
        return true
    }
}
FirebaseApp.configure() initializes Firebase from your GoogleService-Info.plist. For Descope, add your own project ID to descopeProjectId so Descope.setup(projectId:) points to the SDK at your project. Then attach the delegate to the app with @UIApplicationDelegateAdaptor:
@main
struct DemoApp: App {
    @UIApplicationDelegateAdaptor(AppDelegate.self) var appDelegate
    var body: some Scene {
        WindowGroup {
            RootView()
        }
    }
}
Step 5: Run the flow and capture the external token
DescopeFlowViewController is a UIKit view controller, so to use it in SwiftUI you wrap it in a UIViewControllerRepresentable. The wrapper starts the flow once and forwards the result through a coordinator implementing DescopeFlowViewControllerDelegate:
final class Coordinator: NSObject, DescopeFlowViewControllerDelegate {
    private let onSuccess: (AuthenticationResponse) -> Void
    private let onFailure: (DescopeError) -> Void
    init(onSuccess: @escaping (AuthenticationResponse) -> Void, onFailure: @escaping (DescopeError) -> Void) {
        self.onSuccess = onSuccess
        self.onFailure = onFailure
    }
    func flowViewControllerDidFinish(_ controller: DescopeFlowViewController, response: AuthenticationResponse) {
        onSuccess(response)
    }
    func flowViewControllerDidFail(_ controller: DescopeFlowViewController, error: DescopeError) {
        onFailure(error)
    }
   // flowViewControllerDidUpdateState, flowViewControllerDidBecomeReady, and
    // flowViewControllerDidCancel can stay empty. flowViewControllerShouldShowURL
    // must return a Bool — return true lets links open in the system browser.
    // See DescopeFlowRepresentable.swift in the sample project for the full implementation.

}
flowViewControllerDidFinish hands back an AuthenticationResponse on success; flowViewControllerDidFail delivers a DescopeError otherwise.
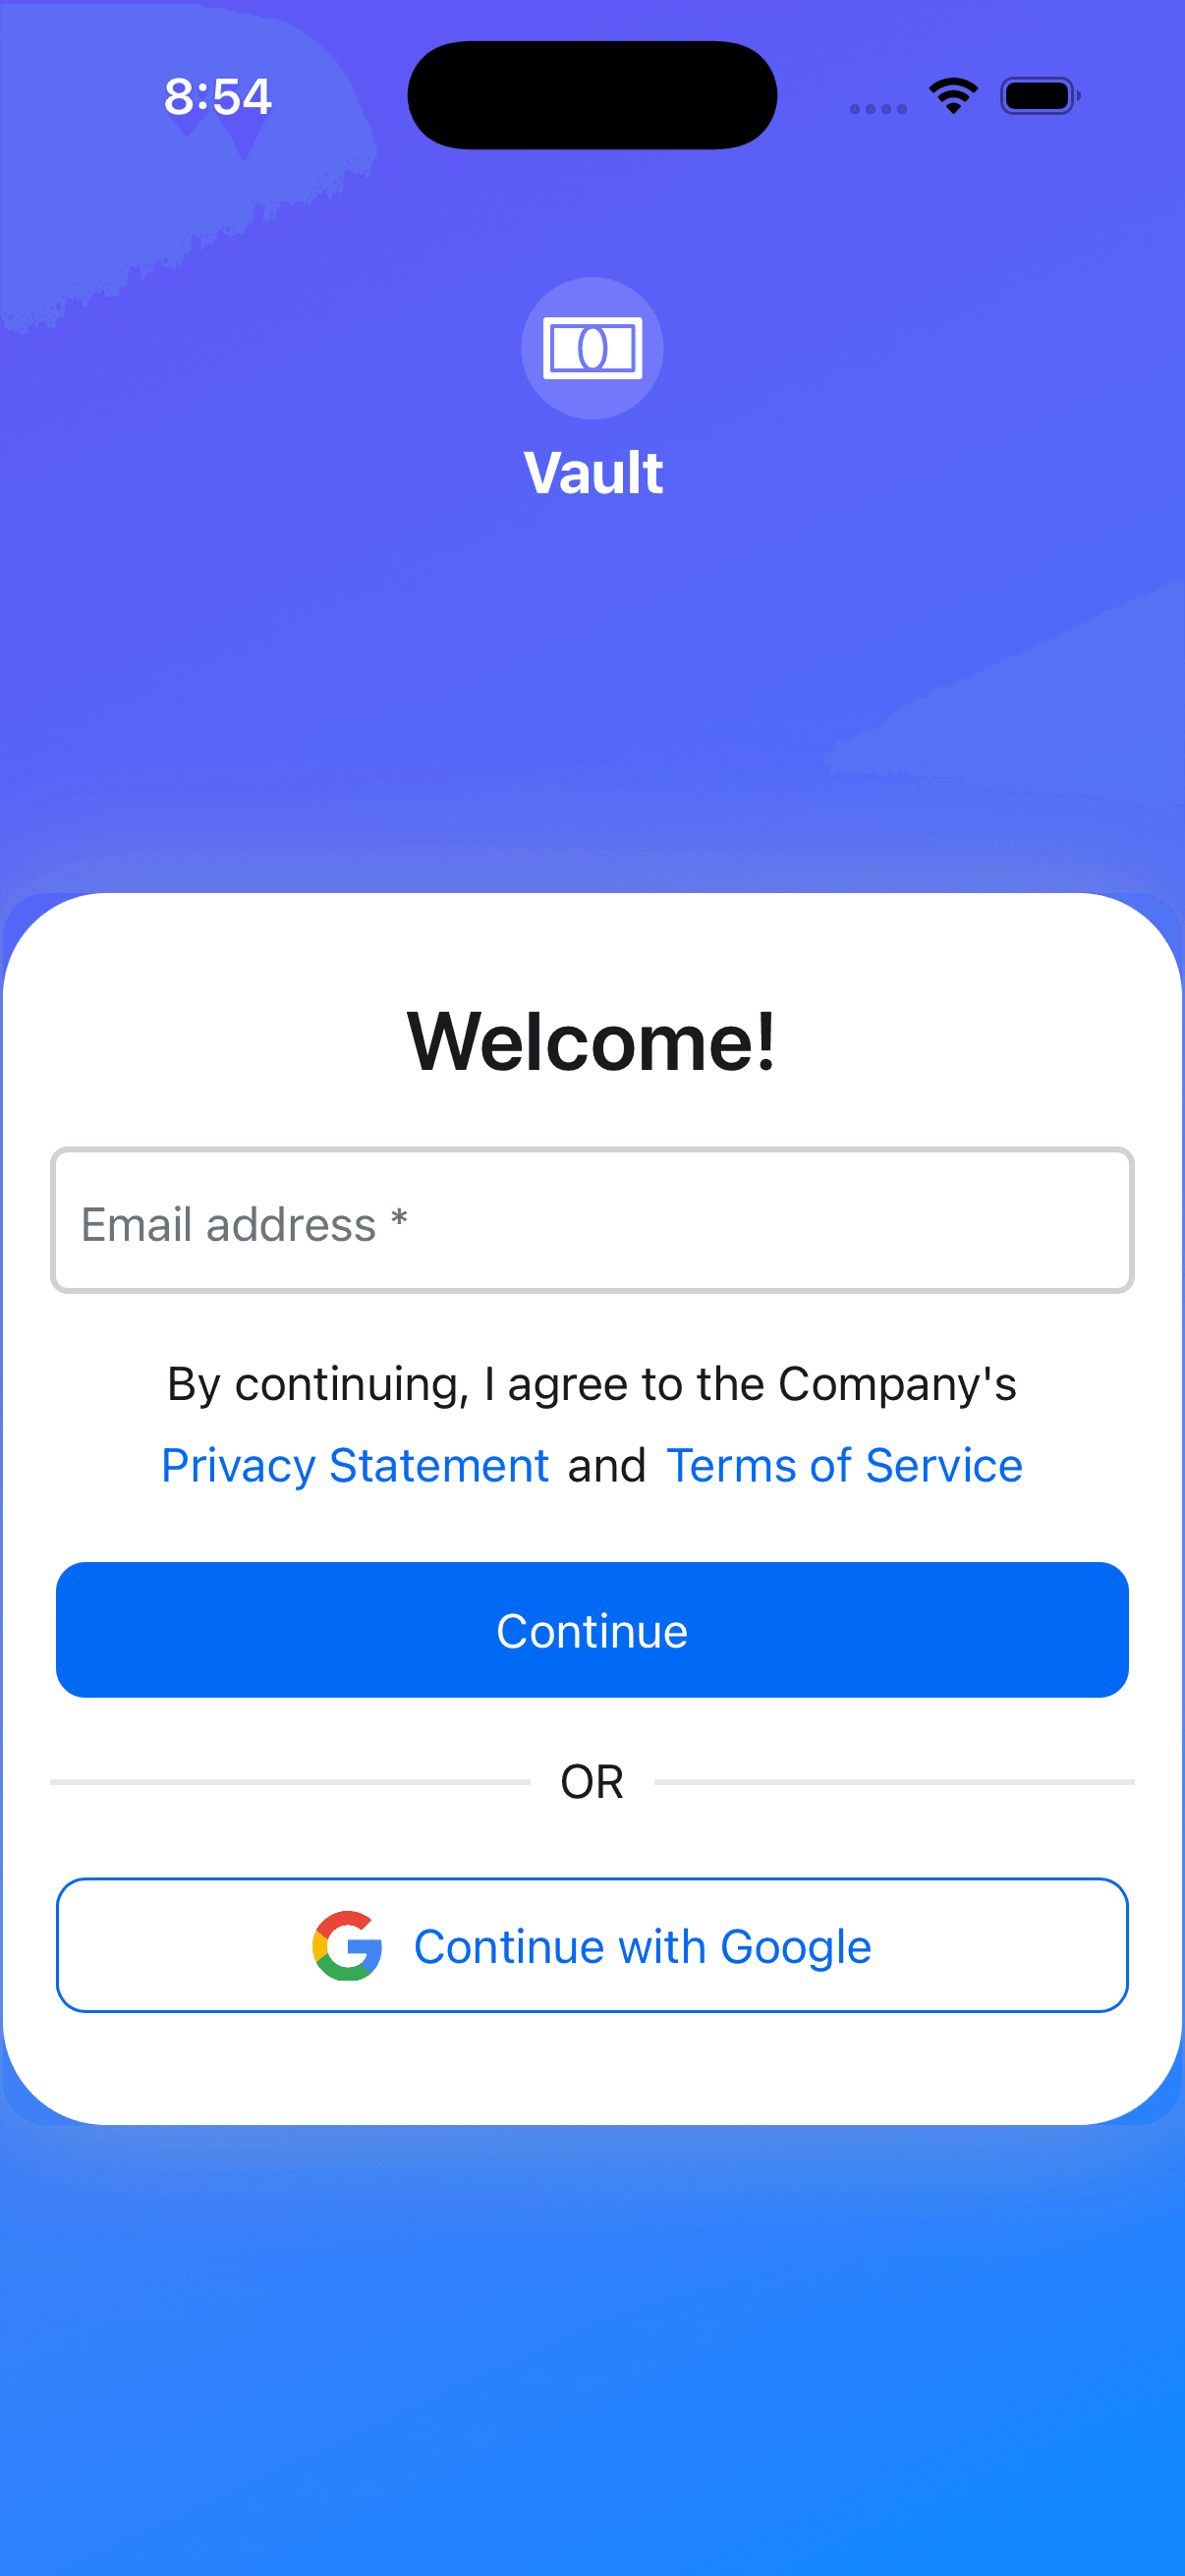
Keep the minted token in a plain in-memory variable. It's short lived (about an hour) and doesn't need to be persisted; if it's gone, the user logs in again:
var firebaseExternalToken: String?LoginView presents the flow in a fullScreenCover and captures the token on success:
.fullScreenCover(isPresented: $isPresentingFlow) {
    let flowURL =
"https://api.descope.com/login/\(descopeProjectId)?flow=sign-up-or-in"
    DescopeFlowRepresentable(
        flow: DescopeFlow(url: flowURL),
        onSuccess: { response in
Descope.sessionManager.manageSession(DescopeSession(from: response))
            firebaseExternalToken = response.externalToken
            isPresentingFlow = false
            onLoginSuccess()
        },
        onFailure: { _ in
            errorMessage = "Something went wrong, please try again"
            isPresentingFlow = false
        }
    )
    .ignoresSafeArea()
}
Step 6: Sign in to Firebase and read a protected resource
With the token in memory, Firebase sign-in is a single call. Exchange the externalToken for a real Firebase session, then use the signed-in user's UID to read that user's own data:
import FirebaseAuth
import FirebaseFirestore
enum FirebaseDemo {
    static func loadDashboard() async throws -> (uid: String, data: [String: Any]) {
        guard let customToken = firebaseExternalToken else {
            throw DemoError.missingExternalToken
        }
        let result = try await Auth.auth().signIn(withCustomToken: customToken)
        let uid = result.user.uid
        let snapshot = try await Firestore.firestore()
            .collection("dashboards")
            .document(uid)
            .getDocument()
        return (uid, snapshot.data() ?? [:])
    }
    static func signOutOfFirebase() {
        try? Auth.auth().signOut()
    }
}
signIn(withCustomToken:) validates the token and opens a Firebase Auth session whose uid matches the Descope user's ID. That same uid is the key into exactly one Firestore document, dashboards/{uid}, so every signed-in user reads and writes their own data, not a document shared by everyone who happens to log in.
Guard dashboards/{uid} with a rule that only lets a user touch their own document:
rules_version = '2';
service cloud.firestore {
  match /databases/{database}/documents {
    match /dashboards/{userId} {
      allow read, write: if request.auth != null && request.auth.uid == userId;
    }
  }
}
Publish it from the Firebase console's Firestore Database > Rules tab.
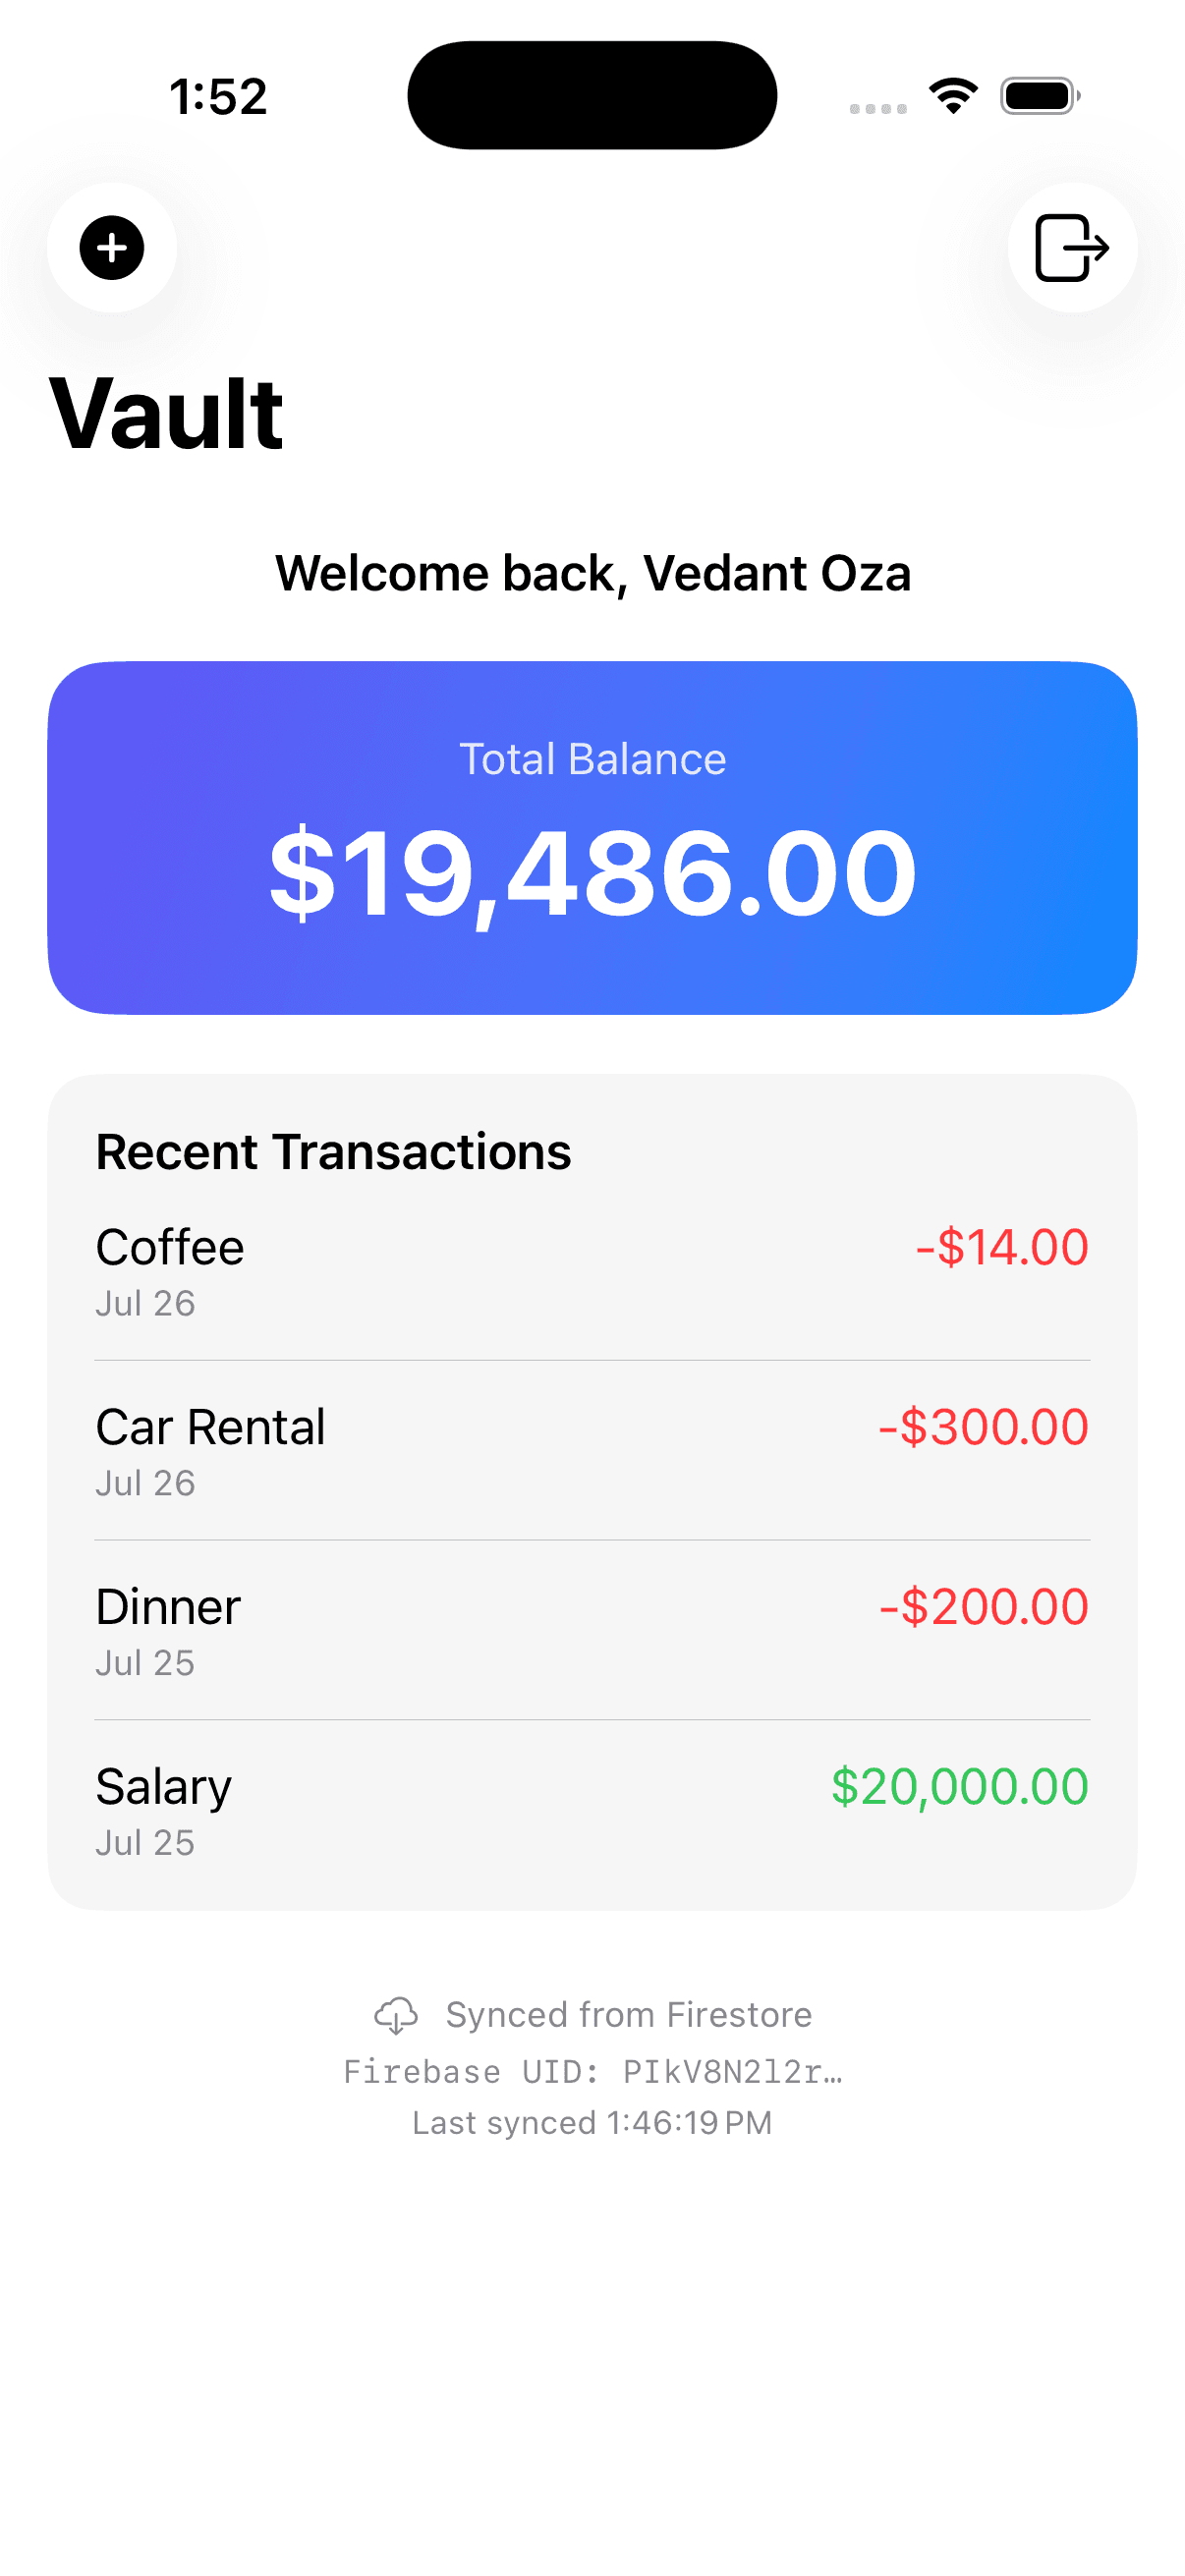
Because Descope's external token connector already minted a Firebase custom token during the flow, there's no separate Firebase sign-in for the user to go through. The same person who just authenticated with Descope is signed in to Firebase too, automatically, the moment the dashboard appears. The proof is right there on screen: the signed-in Firebase UID and a "last synced" timestamp sit alongside the balance and transactions. Edit a value directly in the Firebase console, pull to refresh, and watch it update in the app in real time, that's the tell that this is a real round trip. The sample project also includes a working example of writing back to Firestore from the app, if you want to go beyond read-only.
A full Firebase session, not just Firestore
Firestore is only the example this guide uses. signIn(withCustomToken:) opens a real Firebase Auth session, not a Firestore-scoped one, so the signed-in user carries across every Firebase product that honors Firebase Auth. The same session authorizes Realtime Database rules, Cloud Storage rules, and callable Cloud Functions, all keyed to the same UID the token established.
Build your own app
You now have a modern iOS login experience while Firebase stays exactly as you built it. Descope runs the authentication, the Firebase connector mints a custom token during the flow, and signIn(withCustomToken:) turns that token into a Firebase session your existing security rules already understand. Passkeys, social login, and OTP all come through the same flow, with no auth backend of your own to stand up or maintain.
To build it yourself, create a free Descope account, set up a Firebase token connector, and point the sample project at your own Descope and Firebase credentials. The external token generation docs cover the connector configuration in full, and the sample project has the complete Swift app to clone and run.