
Table of Contents
Don't have the time to read the entire post? Our human writers will be sad, but we understand. Summarize the post with your preferred LLM here instead.
Google Cloud's Identity-Aware Proxy (IAP), often called GCP IAP, secures access to your cloud applications and virtual machines. It checks the identity behind every request before that request reaches your app. IAP verifies Google identities on its own, but signing users in through an outside identity provider requires a bridge.
Descope Federated Apps close that gap. Descope handles the sign-in, and a Workforce Identity Pool maps the claims it issues onto Google Cloud Identity and Access Management (IAM) identities. From there, IAM decides who reaches which route, all without adding a single line of authentication code to the app itself.
This guide deploys Release Console, a small internal deploy dashboard, behind IAP. The demo video below shows two users signing in to the same unmodified app. By using a single Descope claim to handle permissions, IAP restricts access to the /deploy page to release managers, while viewers are blocked before the request reaches the app:
At a glance
Google Cloud IAP can sign users in through Descope by way of Workforce Identity Federation, which maps the claims Descope issues onto Google Cloud IAM identities.
Because access decisions happen in IAP and IAM before a request reaches the app, the protected app needs no authentication code at all.
A role stored as a Descope custom attribute travels to Google Cloud as a custom claim, where IAM bindings use it to allow or block specific URL paths.
Workforce pools are scoped to a Google Cloud organization, and connecting a pool to IAP for Cloud Run is a Preview feature available only through the gcloud CLI or the API.
Users pick up their current role each time they sign in, so changing a role in Descope changes their access without a redeploy.
How GCP IAP works as a reverse proxy
A reverse proxy sits in front of your application to intercept all incoming requests. Instead of connecting directly to your backend, clients talk to the proxy, which decides whether to forward or block each request. An authorizing reverse proxy focuses on access control, verifying user identity and permissions so unauthorized traffic never touches your application.
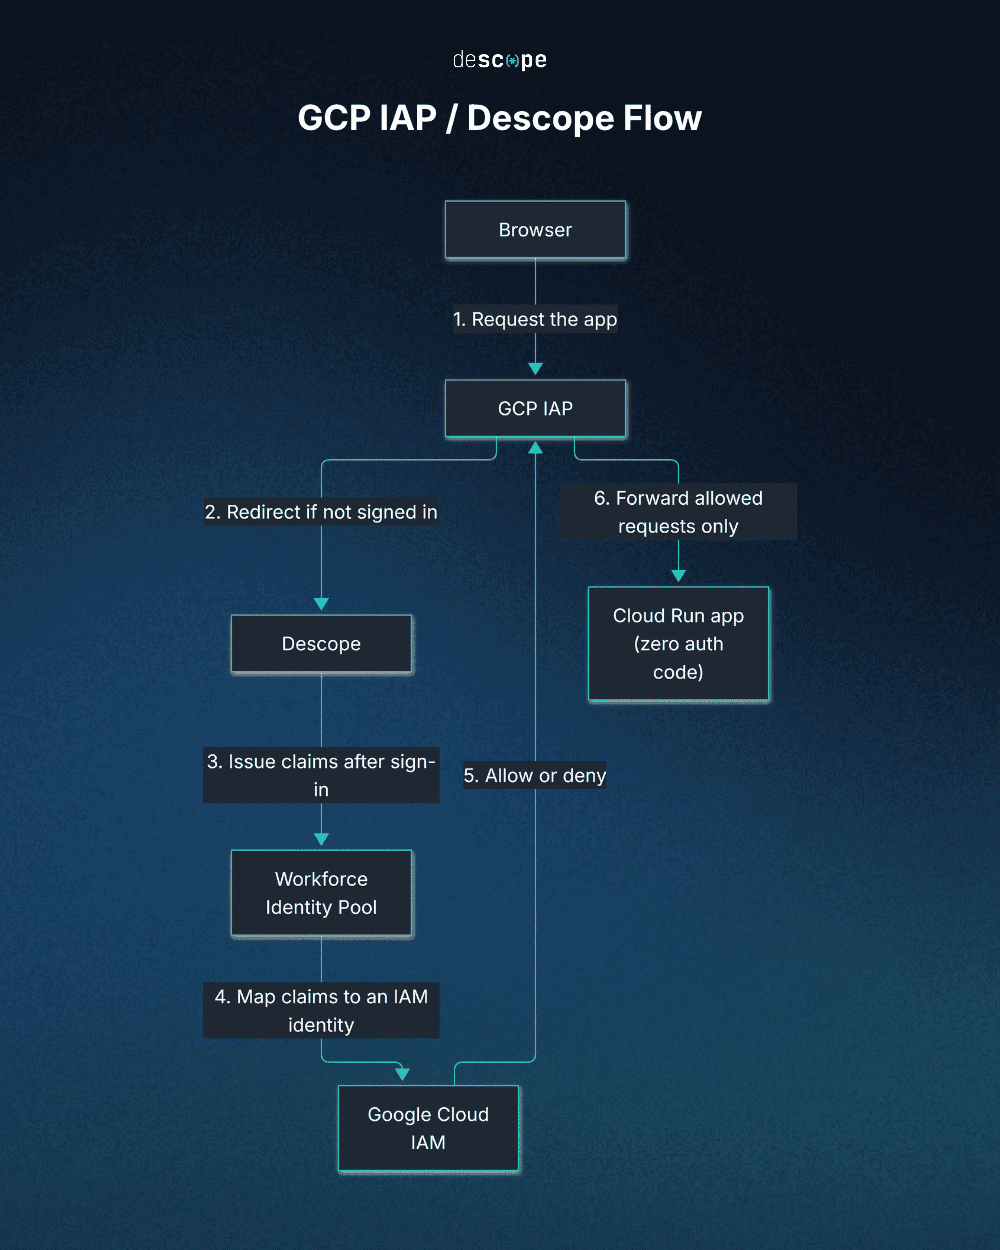
IAP runs inside Google's frontend serving infrastructure, before traffic reaches your application. When a request arrives for a resource IAP protects, Google's serving layer hands it to IAP first. If the caller isn't signed in, IAP redirects them to your identity provider. If they're signed in but not authorized for that resource, IAP returns an access-denied page. Either way, the request stops at IAP, and your application only ever receives traffic IAP has already checked and approved.
Connecting Descope to IAP through Workforce Identity Federation
Workforce Identity Federation is how Google Cloud accepts federated authentication from third-party identity providers like Descope. A Workforce Identity Pool holds the connection to Descope, and an attribute mapping turns the claims Descope issues into Google Cloud IAM identities, such as google.subject (the user's unique ID in Google Cloud) and google.groups (the groups the user belongs to, which IAM can grant access to as a set). Because those claims become IAM principals, you can grant or deny access with ordinary IAM roles, the same way you would for any other Google Cloud identity. That's what makes it possible to add Descope in front of an app without changing the app itself: the authorization decision happens entirely in IAM, before the request ever arrives.
Prerequisites
You'll need the following:
A Google Cloud organization above your project. Workforce Identity Federation pools are org-scoped, so a standalone project can't create one. If you don't already have an organization, you can set up a free one through Cloud Identity Free using any domain you control.
Org-level IAM roles that let you create a Workforce Pool and configure IAP:
roles/iam.workforcePoolAdminandroles/iap.admin. Organization Administrator alone doesn't include these, so you may need to grant them to yourself even as the org's creator.A Google Cloud project under that organization, with billing enabled and the IAM, IAP, Cloud Run, Artifact Registry, and Cloud Build APIs turned on.
The
gcloudCLI, installed and authenticated (Cloud Shell works too).A Descope project on any plan.
Node.js 18 or later and npm, if you want to run the sample app locally before deploying it.
With the prerequisites in place, the rest of this guide puts IAP in front of your application.
Setting up Descope as the OIDC provider
With Federated Apps, Descope acts as an OpenID Connect (OIDC) identity provider for outside services. Here, when a user tries to access Google Cloud, Google Cloud relies on Descope to verify who they are and handle the sign-in. Setting one up is what gives Workforce Identity Federation something to point at.
Creating the Federated App
In the Descope Console, go to Connect > Federated Apps and click + App. (Adding apps requires Pro+. On the Free plan, open the default OIDC app and skip to step 3.)
Select Generic OIDC Application as the app type.
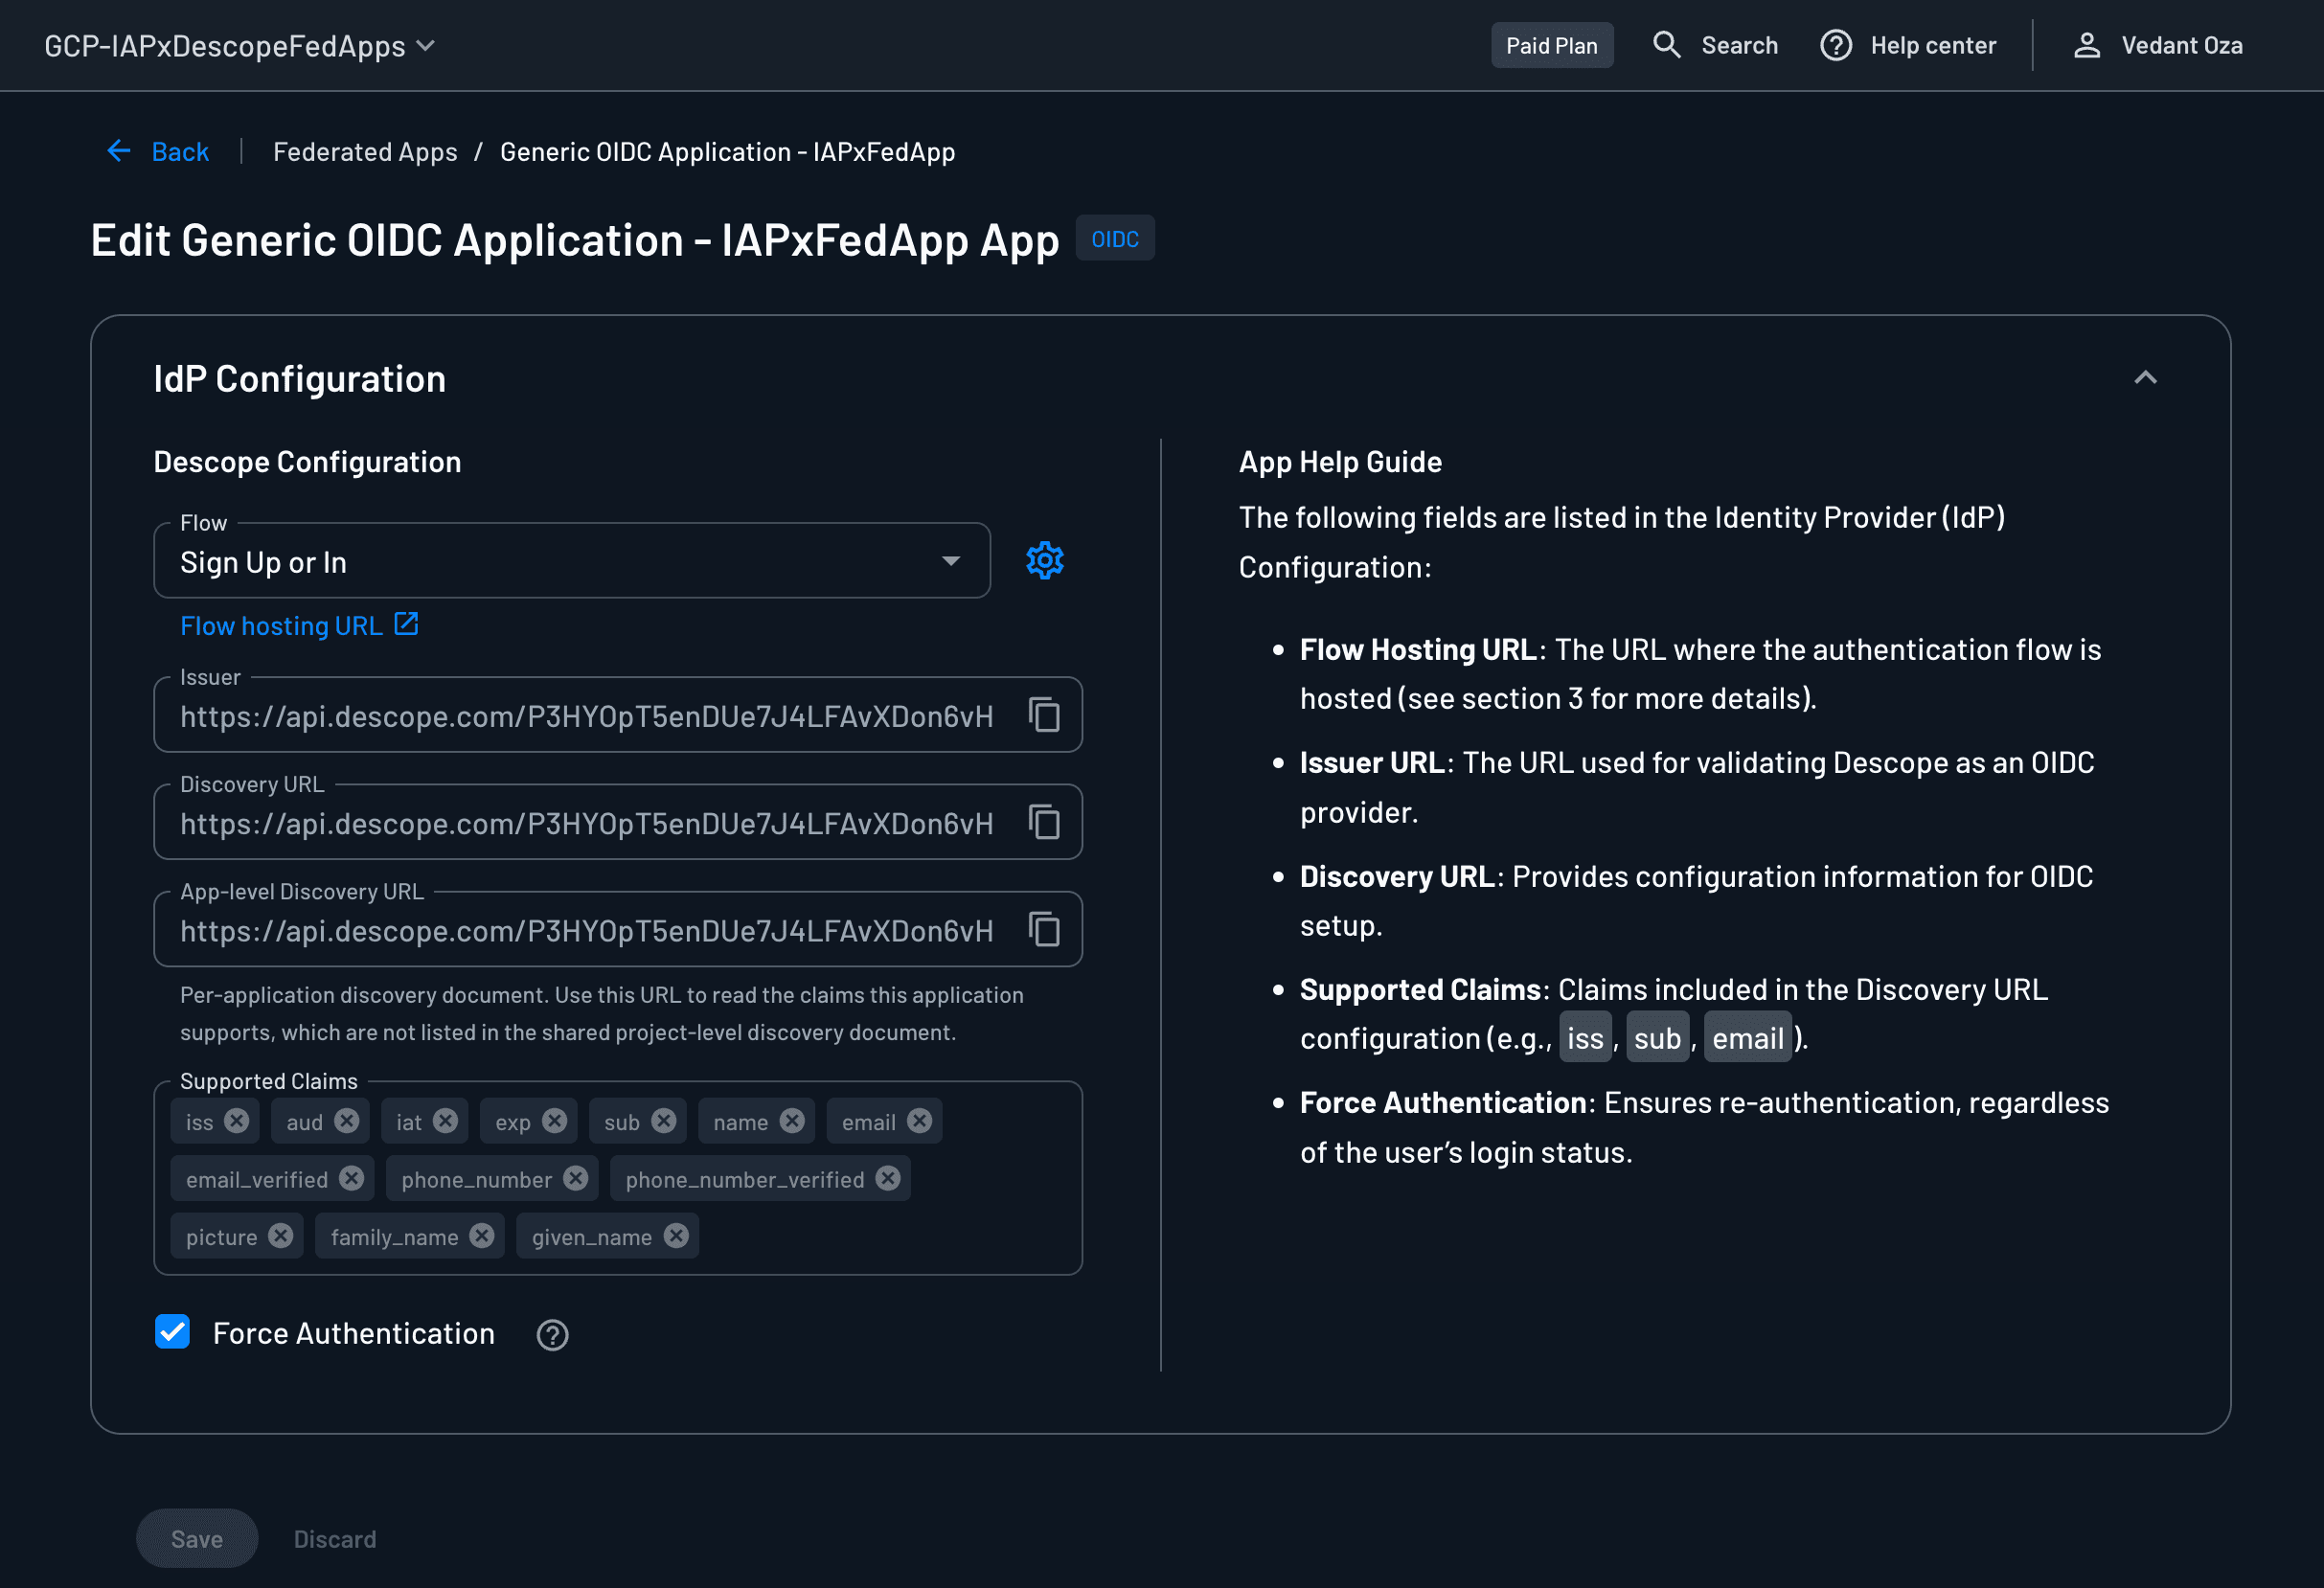
On the app's edit page, go to the SP Configuration section and set Client Authentication to Confidential. This gives the app its own client ID and secret instead of reusing your Descope project ID.
Copy the Issuer URL from the IdP Configuration section, and the Client ID and Client Secret from the Client Authentication block. Save all three, since you'll paste them into the Workforce Identity Pool provider in the next section.
Still in IdP Configuration, check Force Authentication so Descope asks for credentials on every sign-in instead of reusing an existing session, and each sign-in picks up the user's current role.
Click Save.
Adding custom attributes
A custom attribute is a field you define on a user, like a role, department, or group, and what it holds is entirely your call. Once you add them to the token as custom claims in the next step, Google Cloud IAM can use them to enforce access.
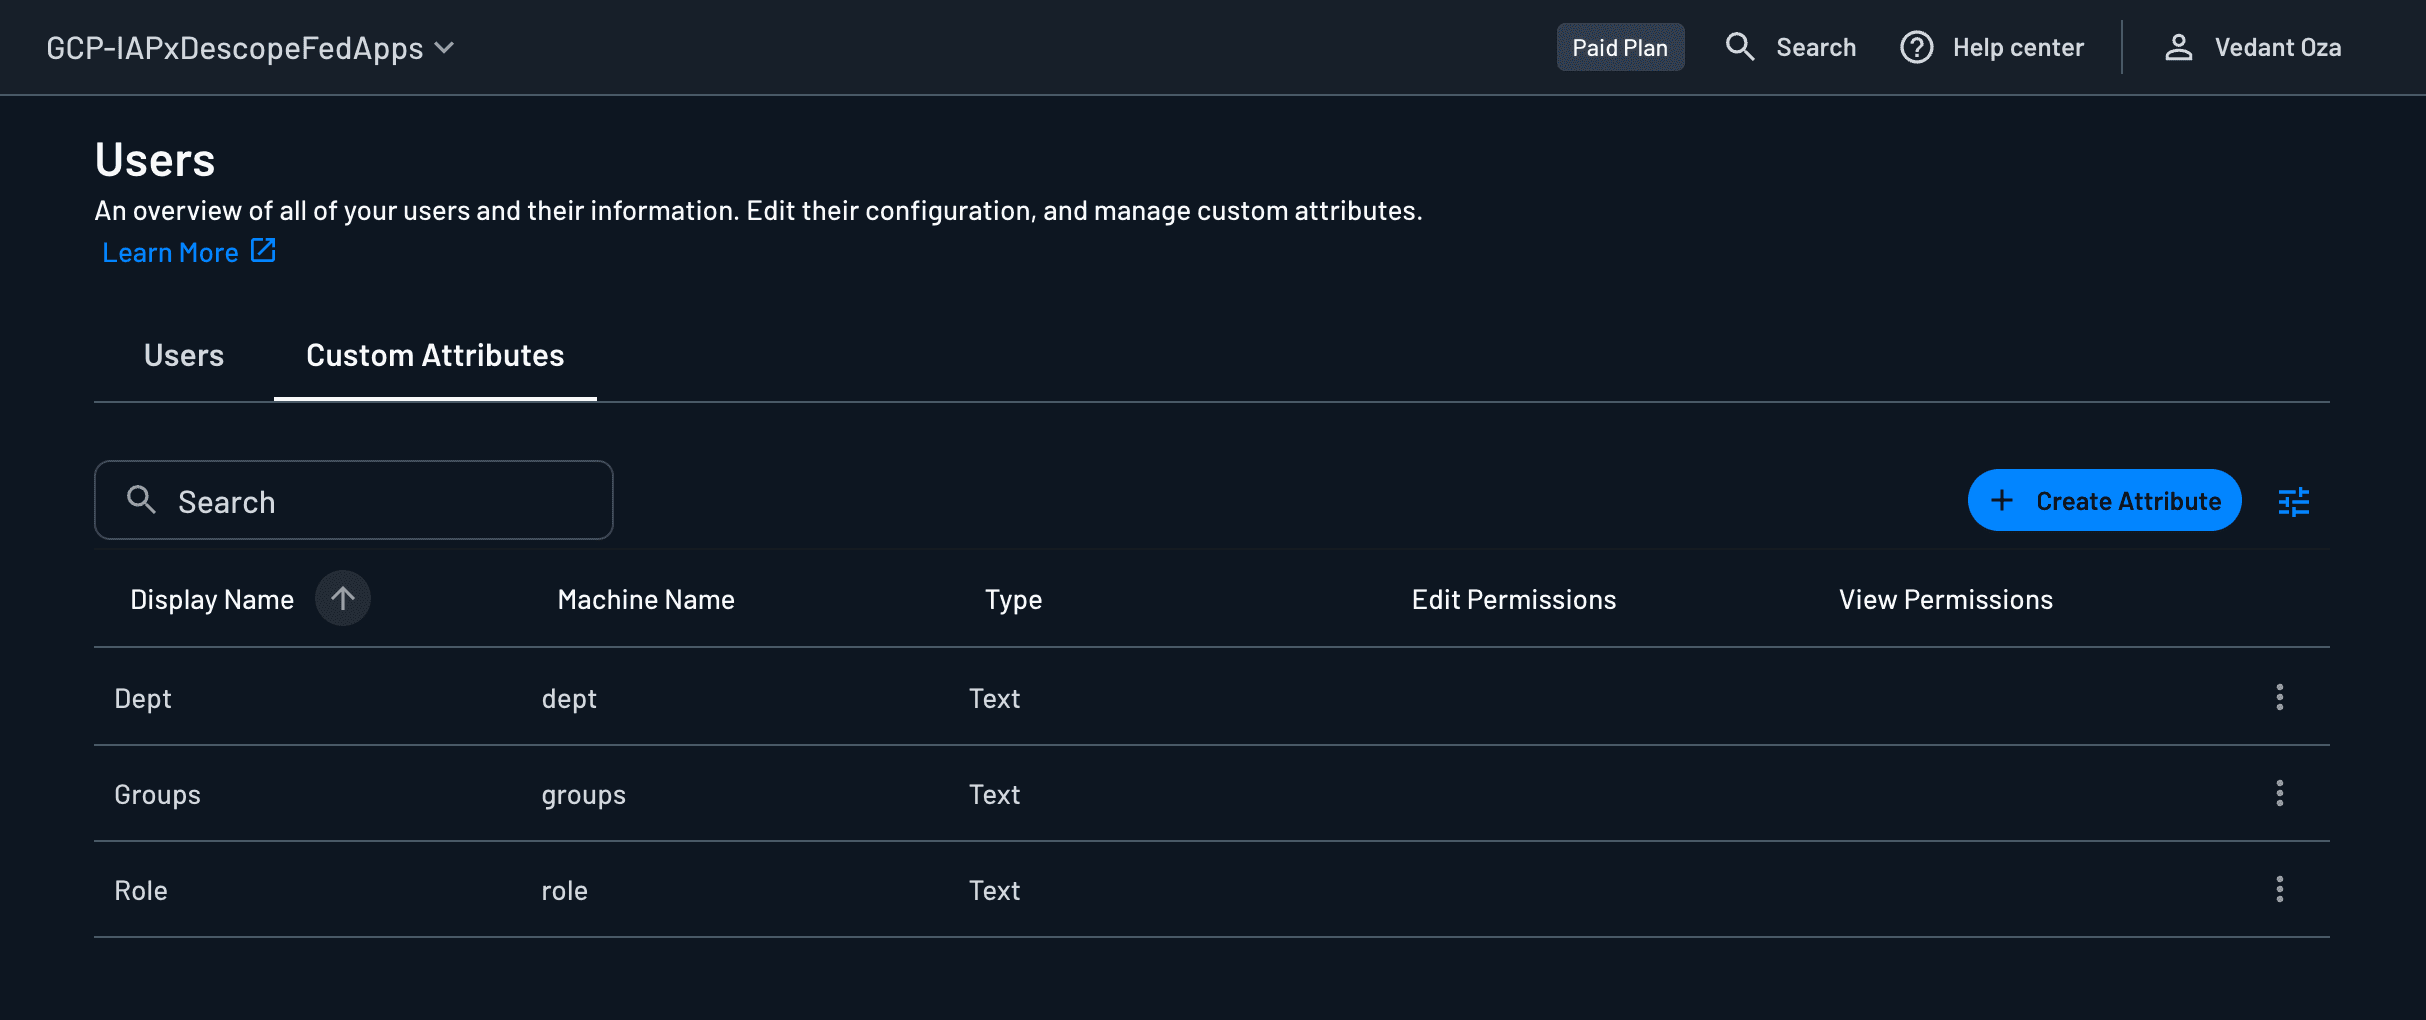
Create three under Manage > Users > Custom Attributes, all Text: Role, Dept, and Groups. The Role attribute drives access in this guide: the IAM bindings later check it to decide who reaches /deploy and /admin. The Dept and Groups attributes show that any other attribute travels the same path into Google Cloud, ready for a binding whenever you need one. Descope's user management supports custom attributes as text, numeric, boolean, date, month-day, single select, or multi select, with multi select arriving as an array.
Then create a few test users under Manage > Users and set each one's Role to viewer, release-manager, or admin. The IAM bindings later in this guide give each of those roles a different level of access.
Adding custom claims to the JWT template
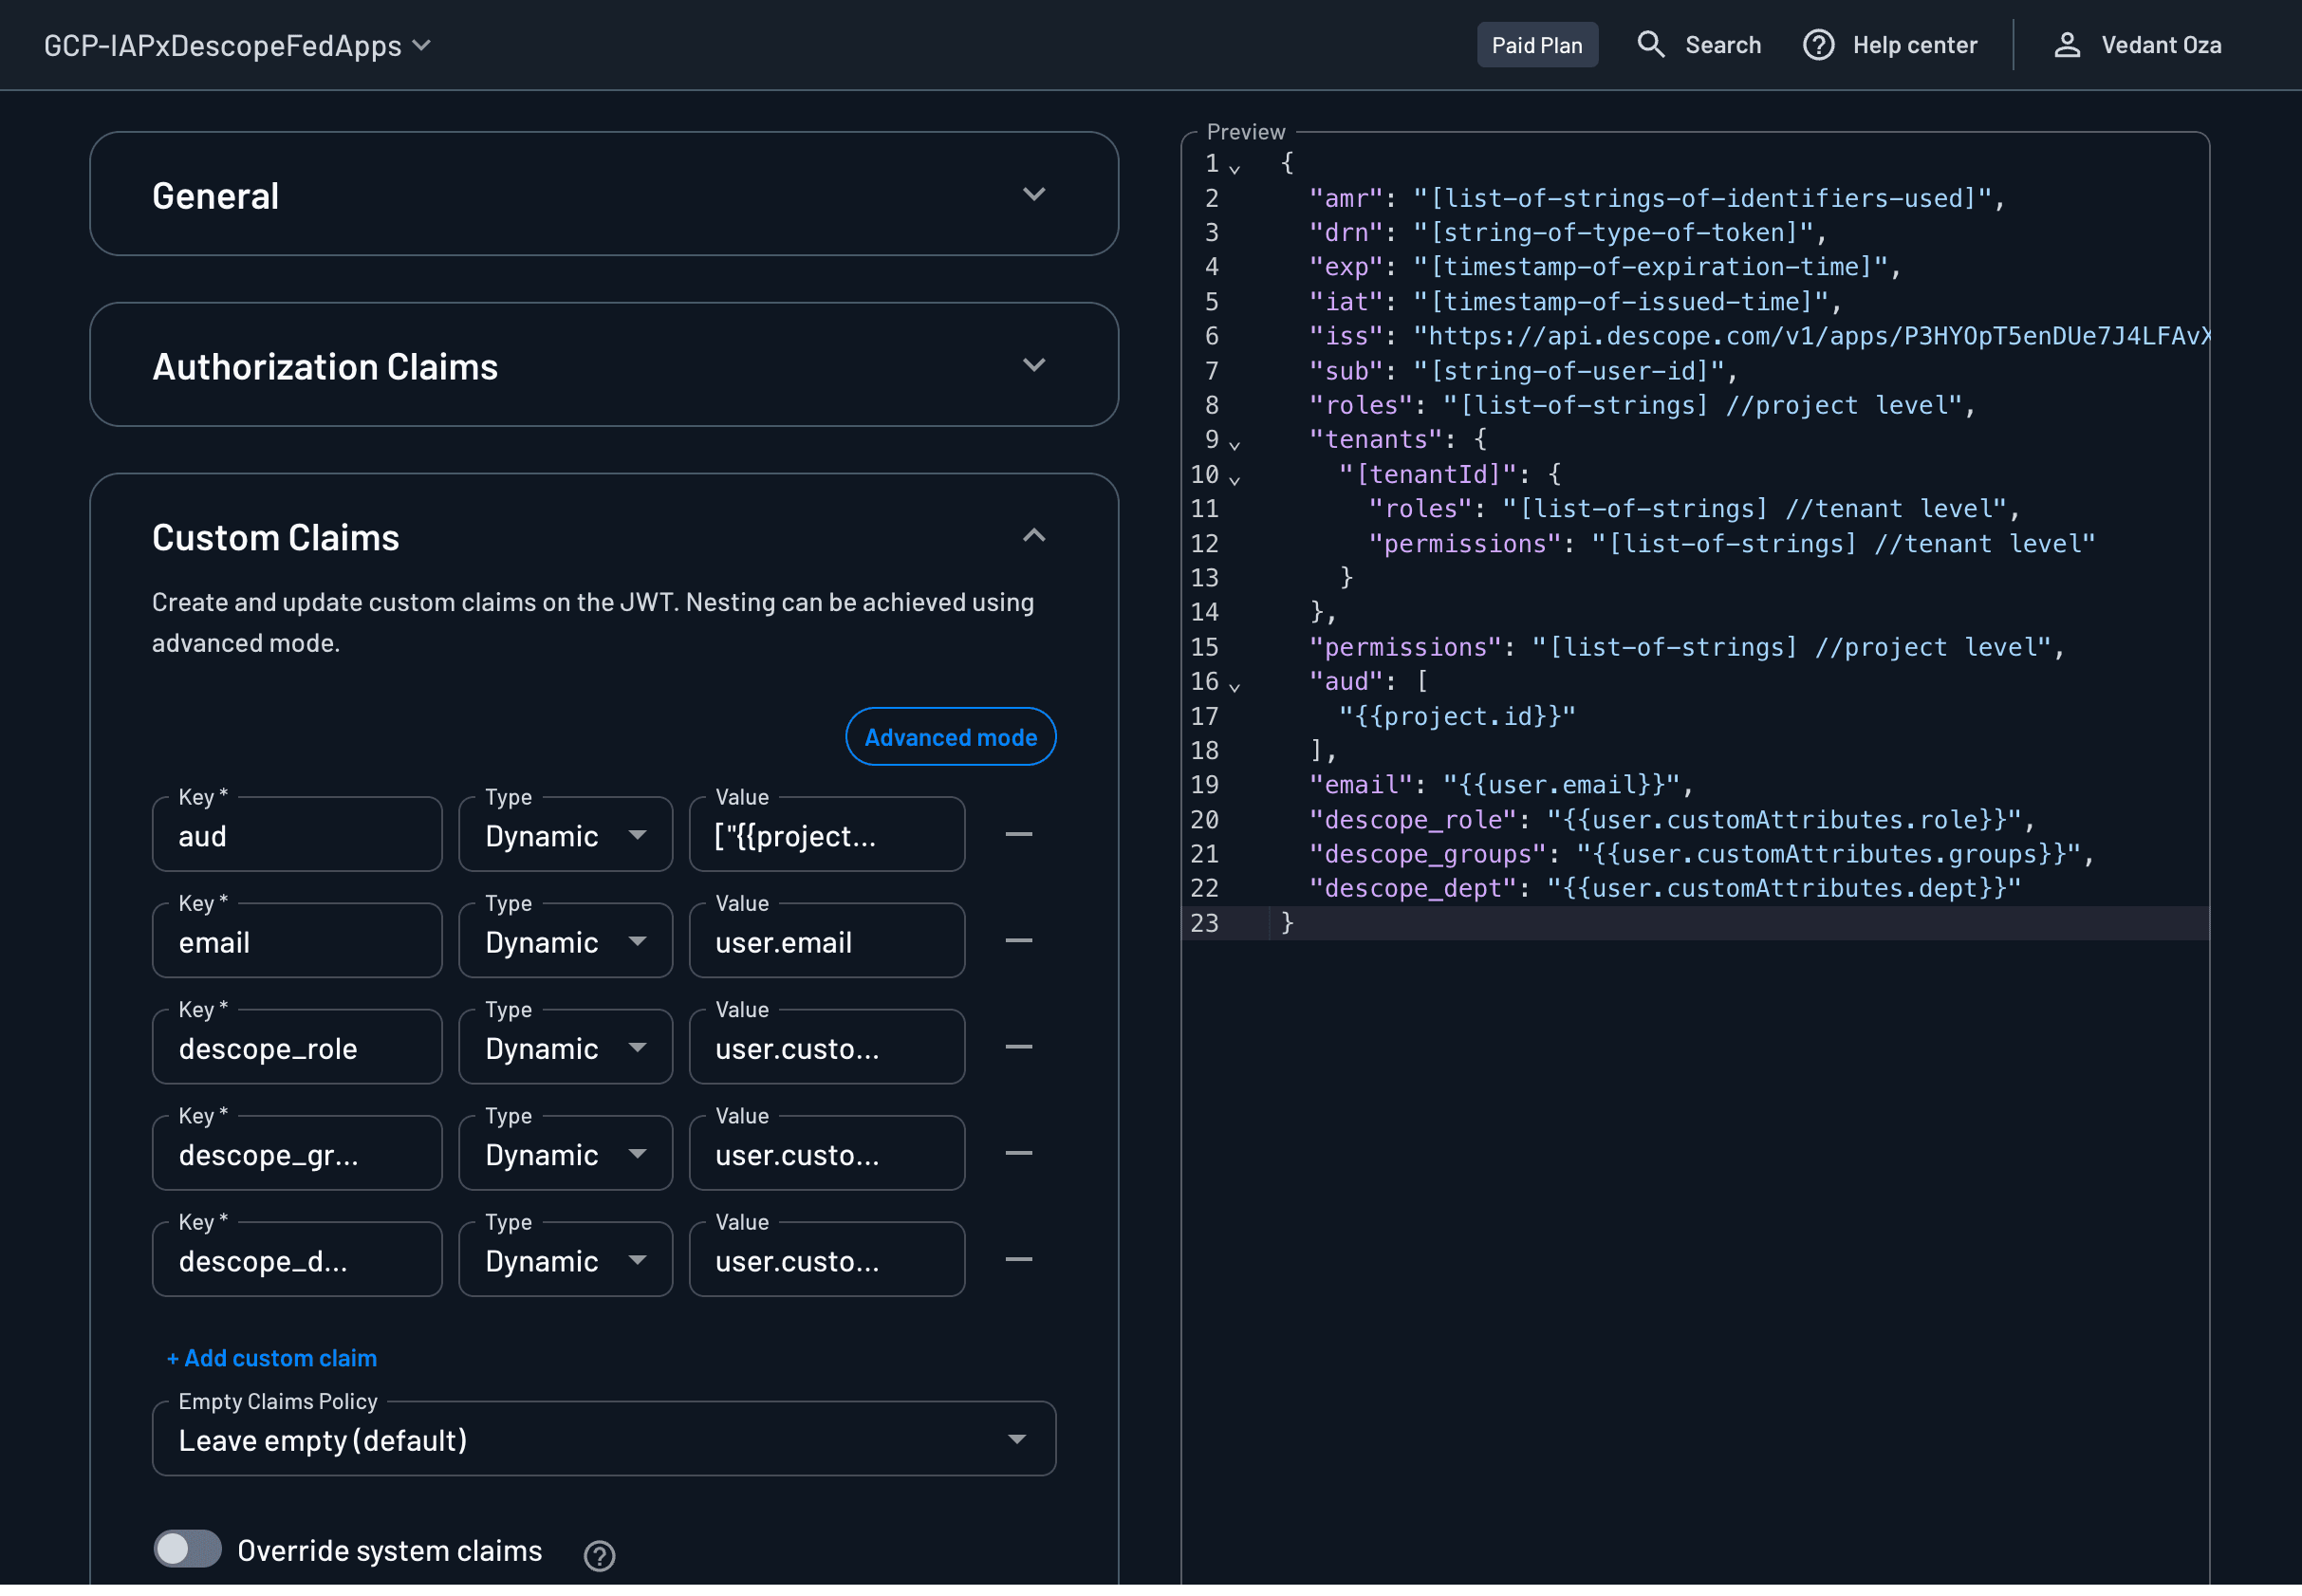
Custom claims are extra key-value pairs added to a token beyond its standard fields, letting you carry information like a user's role inside the JSON Web Token (JWT) itself. To add them, go to Settings > Project > JWT Templates and open Default OIDC compliant User JWT. In the Custom Claims section, add three claims, each with Type set to Dynamic and a Value pointing at the attribute you just created:
descope_role, with the valueuser.customAttributes.roledescope_groups, with the valueuser.customAttributes.groupsdescope_dept, with the valueuser.customAttributes.dept
The Preview panel on the right shows the rendered JWT as you edit it. Before moving on, confirm all three claims appear alongside the standard ones. Each should render like "descope_role": "{{user.customAttributes.role}}". These three claims are what the Workforce Identity Pool maps into a Google Cloud IAM identity next.
Connecting Google Cloud to Descope's claims
With Descope's Federated App ready, the mapping happens entirely on Google's side, inside Workforce Identity Federation. It's a two-part setup: a Workforce Identity Pool, and inside it, a provider that points at Descope.
Creating the pool and provider
1. In Google Cloud, go to IAM and admin > Workforce identity pools and click Create pool. Name it descope-workforce-pool-demo and save. The commands later in this guide use this name, so if you pick a different one, swap it in wherever it appears.
2. Add a provider to the pool. For Select a provider vendor, choose Generic identity provider. For the authentication protocol, choose OpenID Connect (OIDC).
3. Under Create a provider, name it descope-oidc and add a description, then paste in the Issuer URL and Client ID you copied from Descope's Federated App.
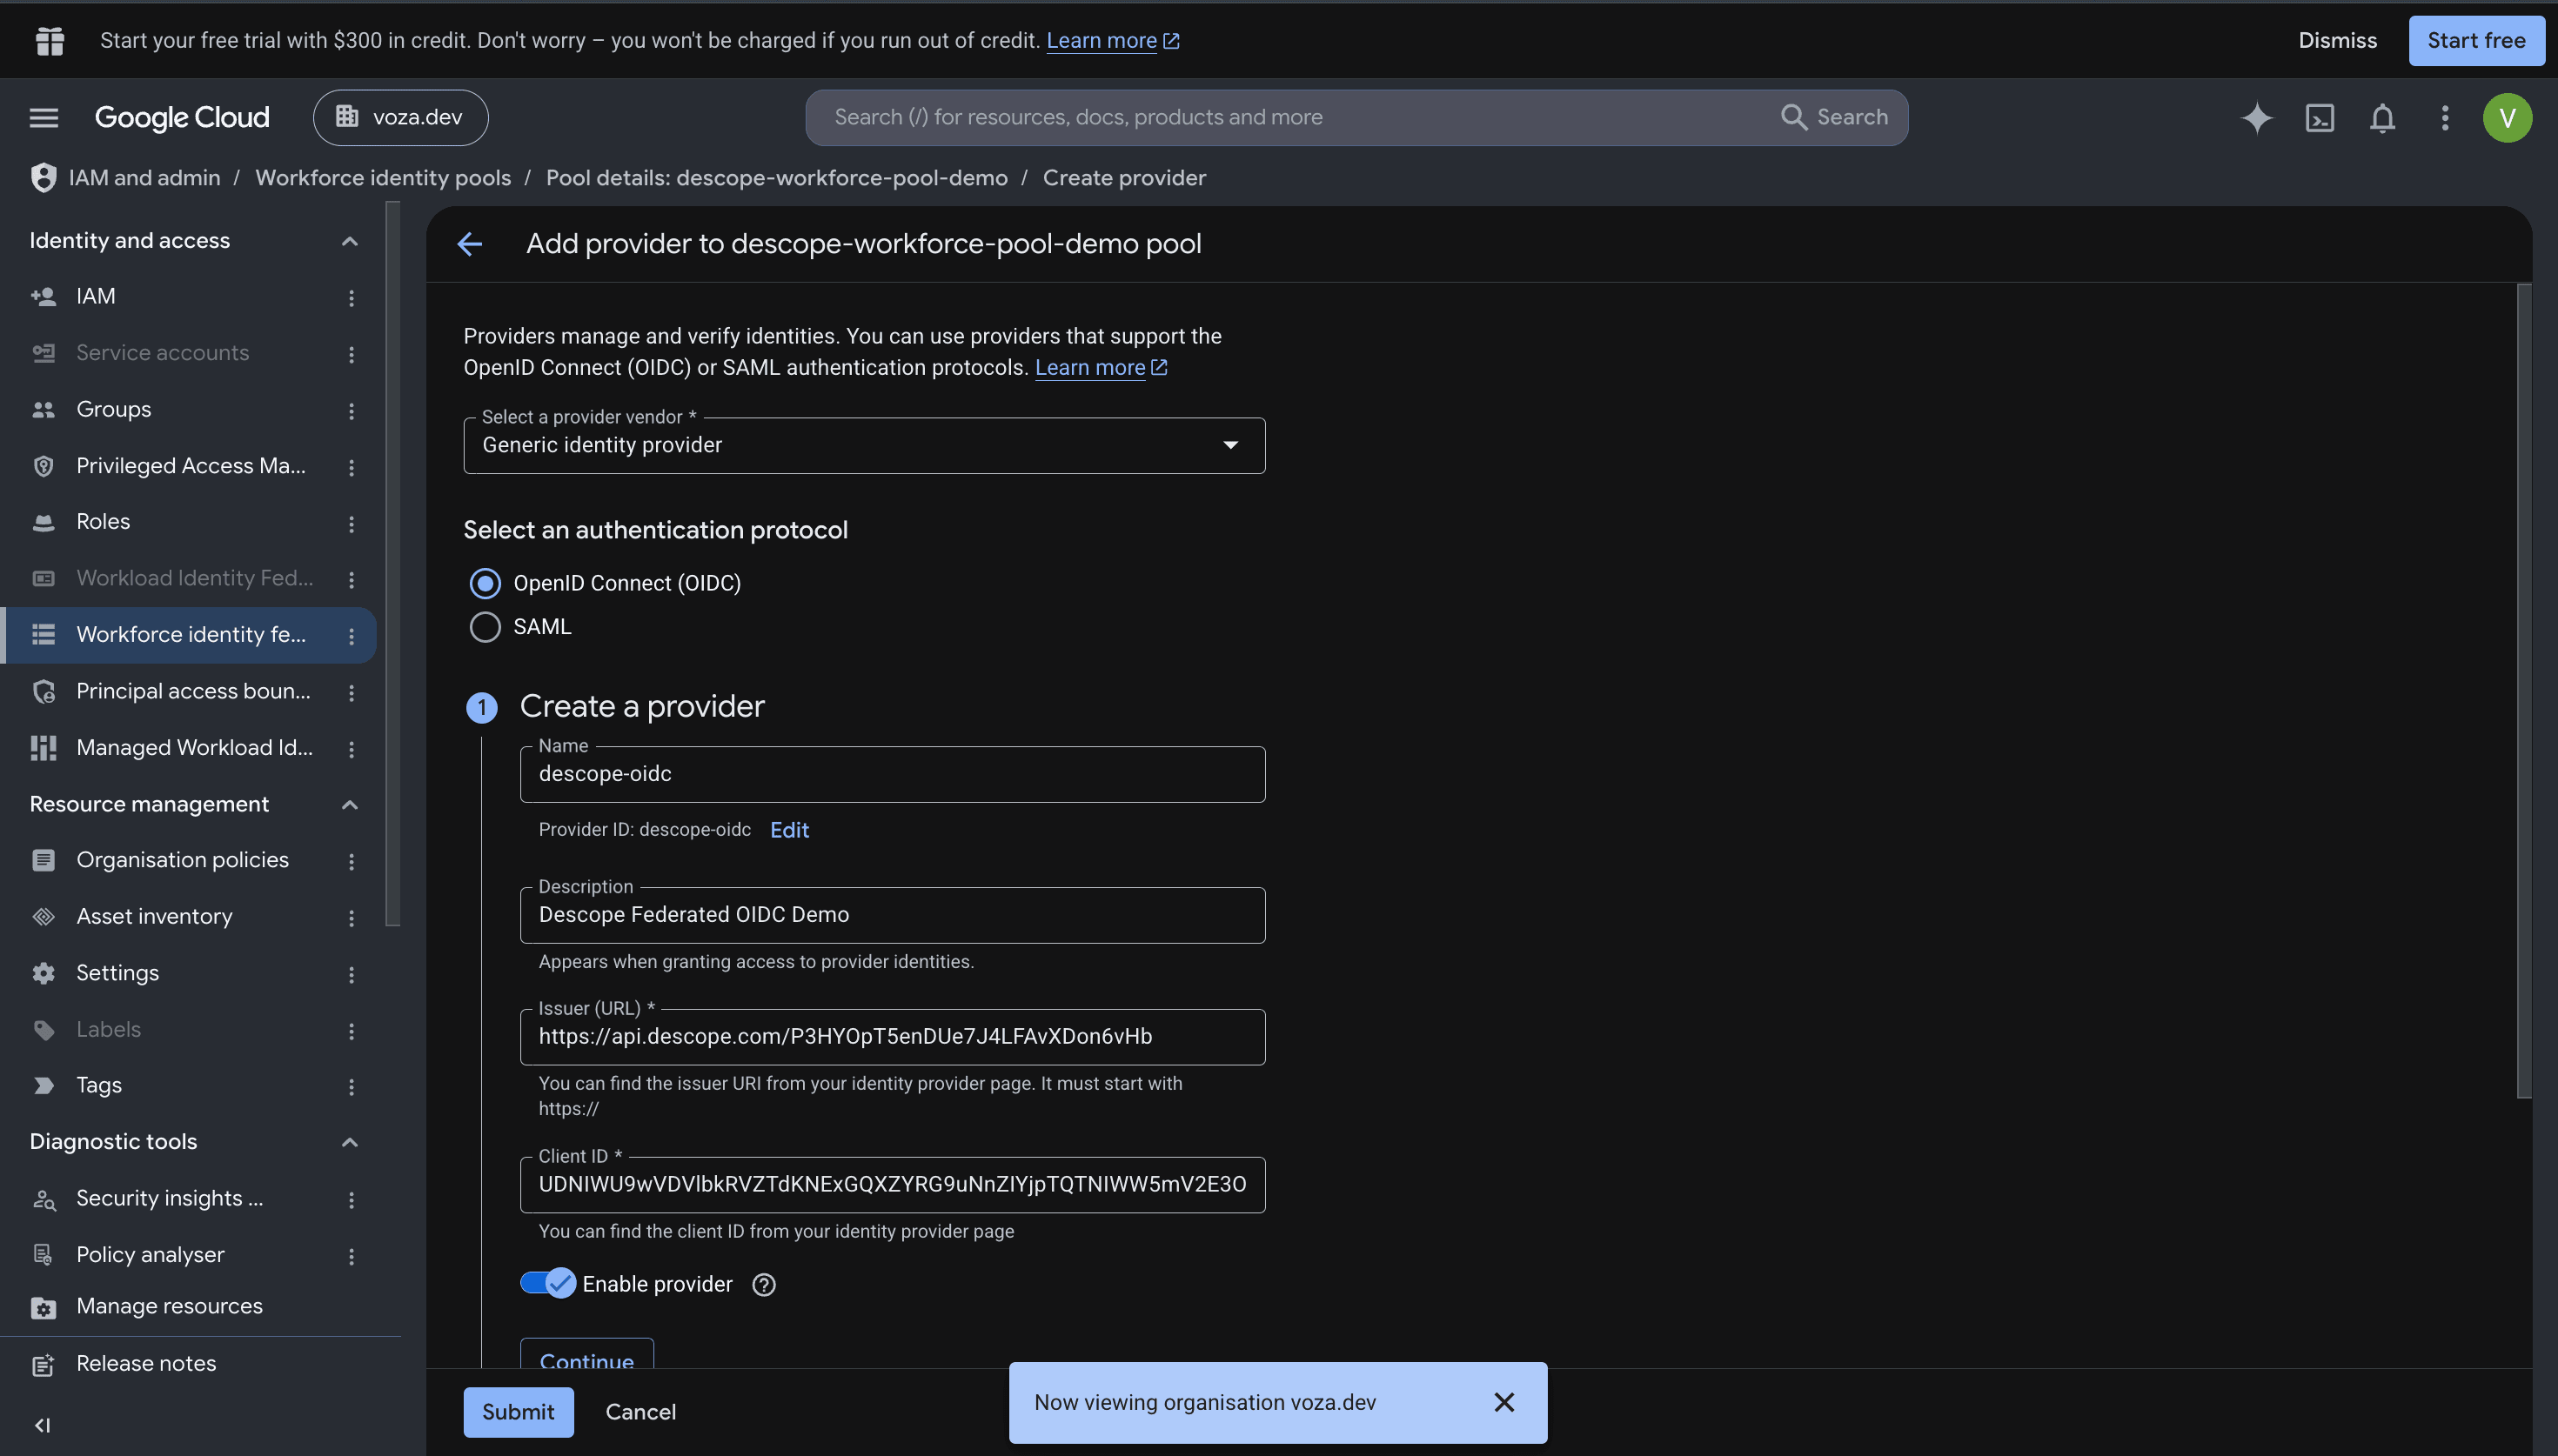
4. The next step, Share your provider information with IdP, shows the redirect URL Google uses as the callback for this provider. Note its domain, auth.cloud.google, then click Continue.
5. Descope only redirects users to domains on your project's Approved Domains list, so add Google's callback domain there. In a separate tab, open the Descope Console, go to Project Settings > General > Security > Approved Domains, and add auth.cloud.google.
6. Under Configure OIDC web sign-in, set Flow type to Code and Assertion claims behavior to User info and ID token. That second setting tells Google to also pull the user's profile from Descope's userinfo endpoint and merge it with the ID token, which is where Descope's custom claims show up. Paste in the Client secret from Descope's Federated App.
7. Continue to Configure provider, the attribute mapping step, covered next.
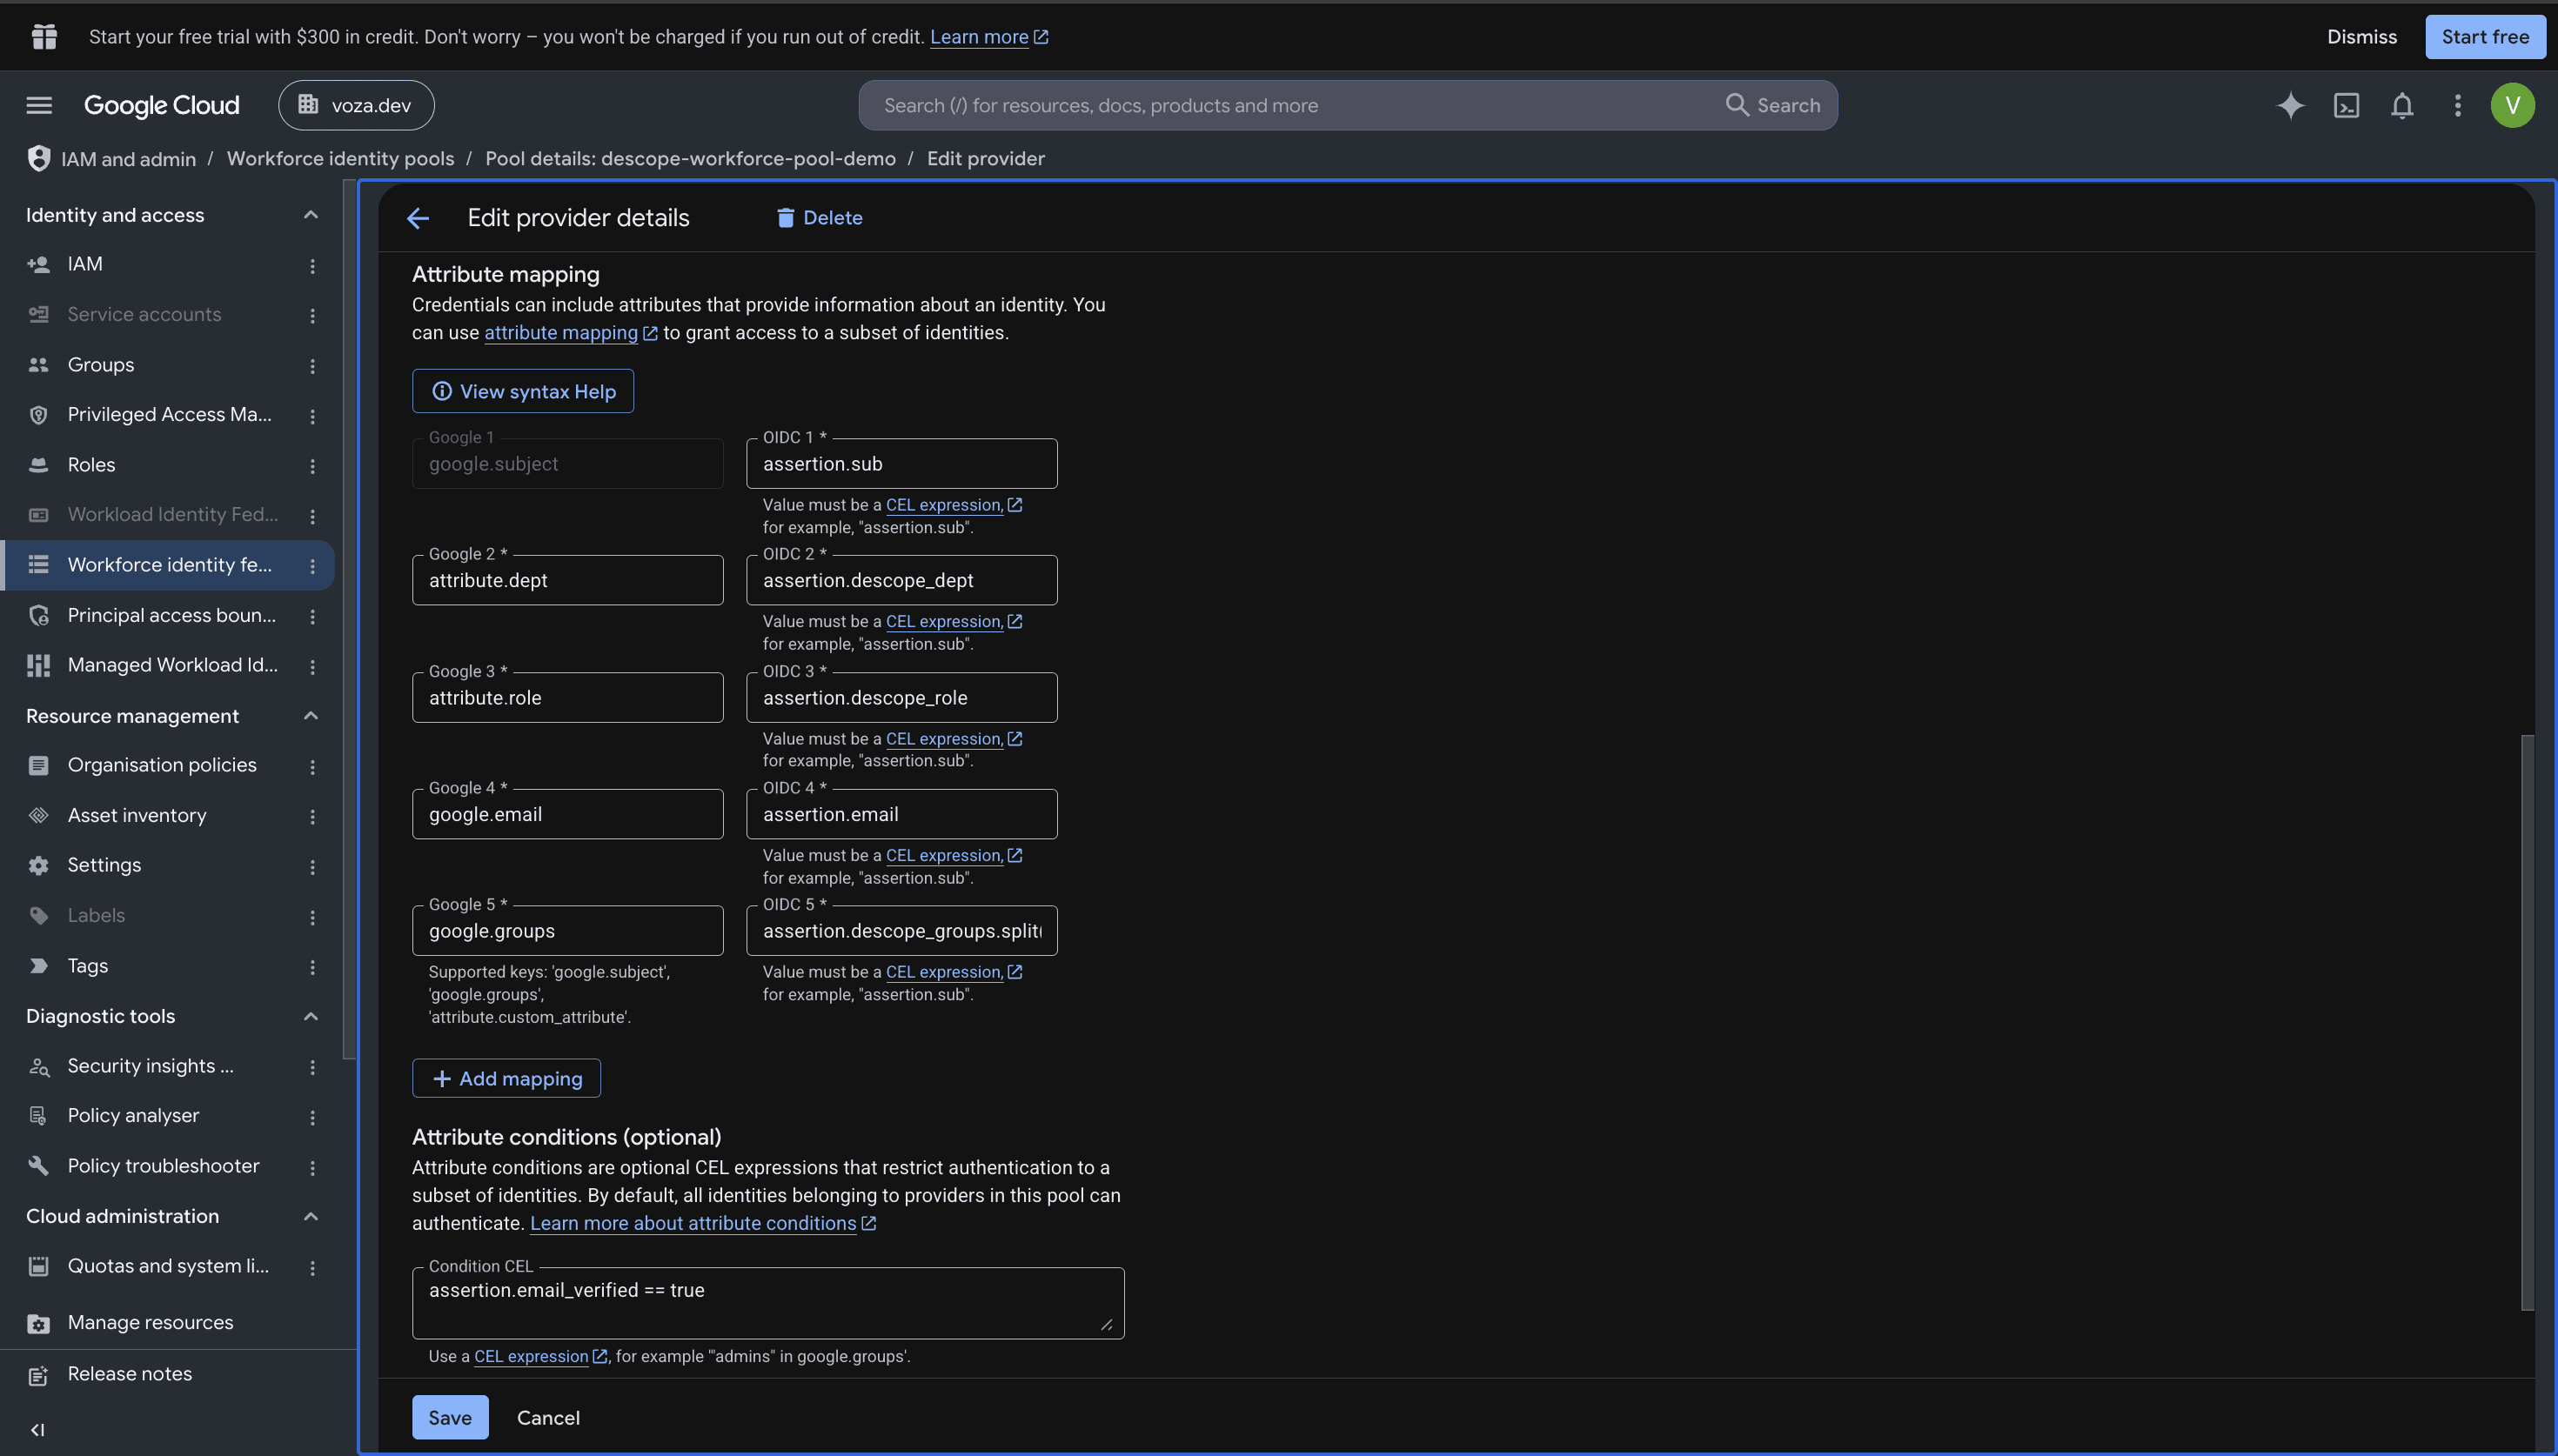
The attribute mapping
This is where a Descope claim becomes a Google Cloud identity. Each row maps a Google attribute to a Common Expression Language (CEL) expression. Google evaluates each expression against the token Descope issued, which the mapping refers to as assertion.
Google attribute | CEL expression |
|---|---|
google.subject | assertion.sub |
google.email | assertion.email |
google.groups | assertion.descope_groups.split(",") |
attribute.role | assertion.descope_role |
attribute.dept | assertion.descope_dept |
The google.subject and google.email attributes become the identity's Google Cloud principal and email. The custom attribute.role and attribute.dept attributes can be referenced directly in IAM bindings. The google.groups mapping needs .split(",") because Descope's descope_groups claim is a comma-separated string, and Google expects an array.
Below the mappings, under Attribute conditions, enter assertion.email_verified == true in the Condition CEL field, then click Save. This condition blocks any Descope user without a verified email from signing in, whatever their role claims.
Now the provider has to request Descope's custom claims scope. That takes a follow-up CLI command:
gcloud iam workforce-pools providers update-oidc descope-oidc \
  --workforce-pool=descope-workforce-pool-demo \
  --location=global \
  --web-sso-additional-scopes="descope.custom_claims"
This command makes Google Cloud request the descope.custom_claims scope during authentication. Without it, custom claims like descope_role, descope_groups, and descope_dept are left out of the assertion, and your attribute mappings silently evaluate to empty.
Deploying to Cloud Run and switching on IAP
With Descope and the Workforce Pool both configured, the last piece is standing up the app itself and connecting IAP to everything you just built. Most of this happens in the console.
Deploying the app and turning on IAP
You configure IAP directly within Cloud Run's authentication settings during deployment, setting up the app and proxy together in a single step. Release Console keeps its data in Firestore, so create that database first if you haven't already: Firestore > Create database, in Native mode and in the same region you're deploying to.
Cloud Run runs the app as the Compute Engine default service account, which newer projects no longer give broad permissions by default. Grant it Firestore access, or the deployed app won't be able to read its data:
gcloud projects add-iam-policy-binding PROJECT_ID \
  --member="serviceAccount:PROJECT_NUMBER-compute@developer.gserviceaccount.com" \
  --role="roles/datastore.user"
Then deploy the app:
Fork the Release Console repository to your own GitHub account.
In the Cloud Run console, click Deploy container > Service.
Name the service
release-consoleand set the region tous-central1. The commands later in this guide use both, so if you pick different values, swap them in wherever they appear.Select Continuously deploy from a repository (source or function), choose Developer Connect, and click Set up with Developer Connect. When GitHub opens, click Authorize, then install Google Cloud Developer Connect on your personal account. Choose Only select repositories, pick your fork, and click Install. Back in the console, select your fork as the repository.
Under Build configuration, leave Build type set to Dockerfile (the repo includes one at its root), then click Save.
Under Authentication, select Require authentication, then select Identity-Aware Proxy (IAP). Cloud Run should never be reachable without going through IAP. If your project's OAuth consent screen isn't configured yet, you'll be prompted to set it up before continuing.
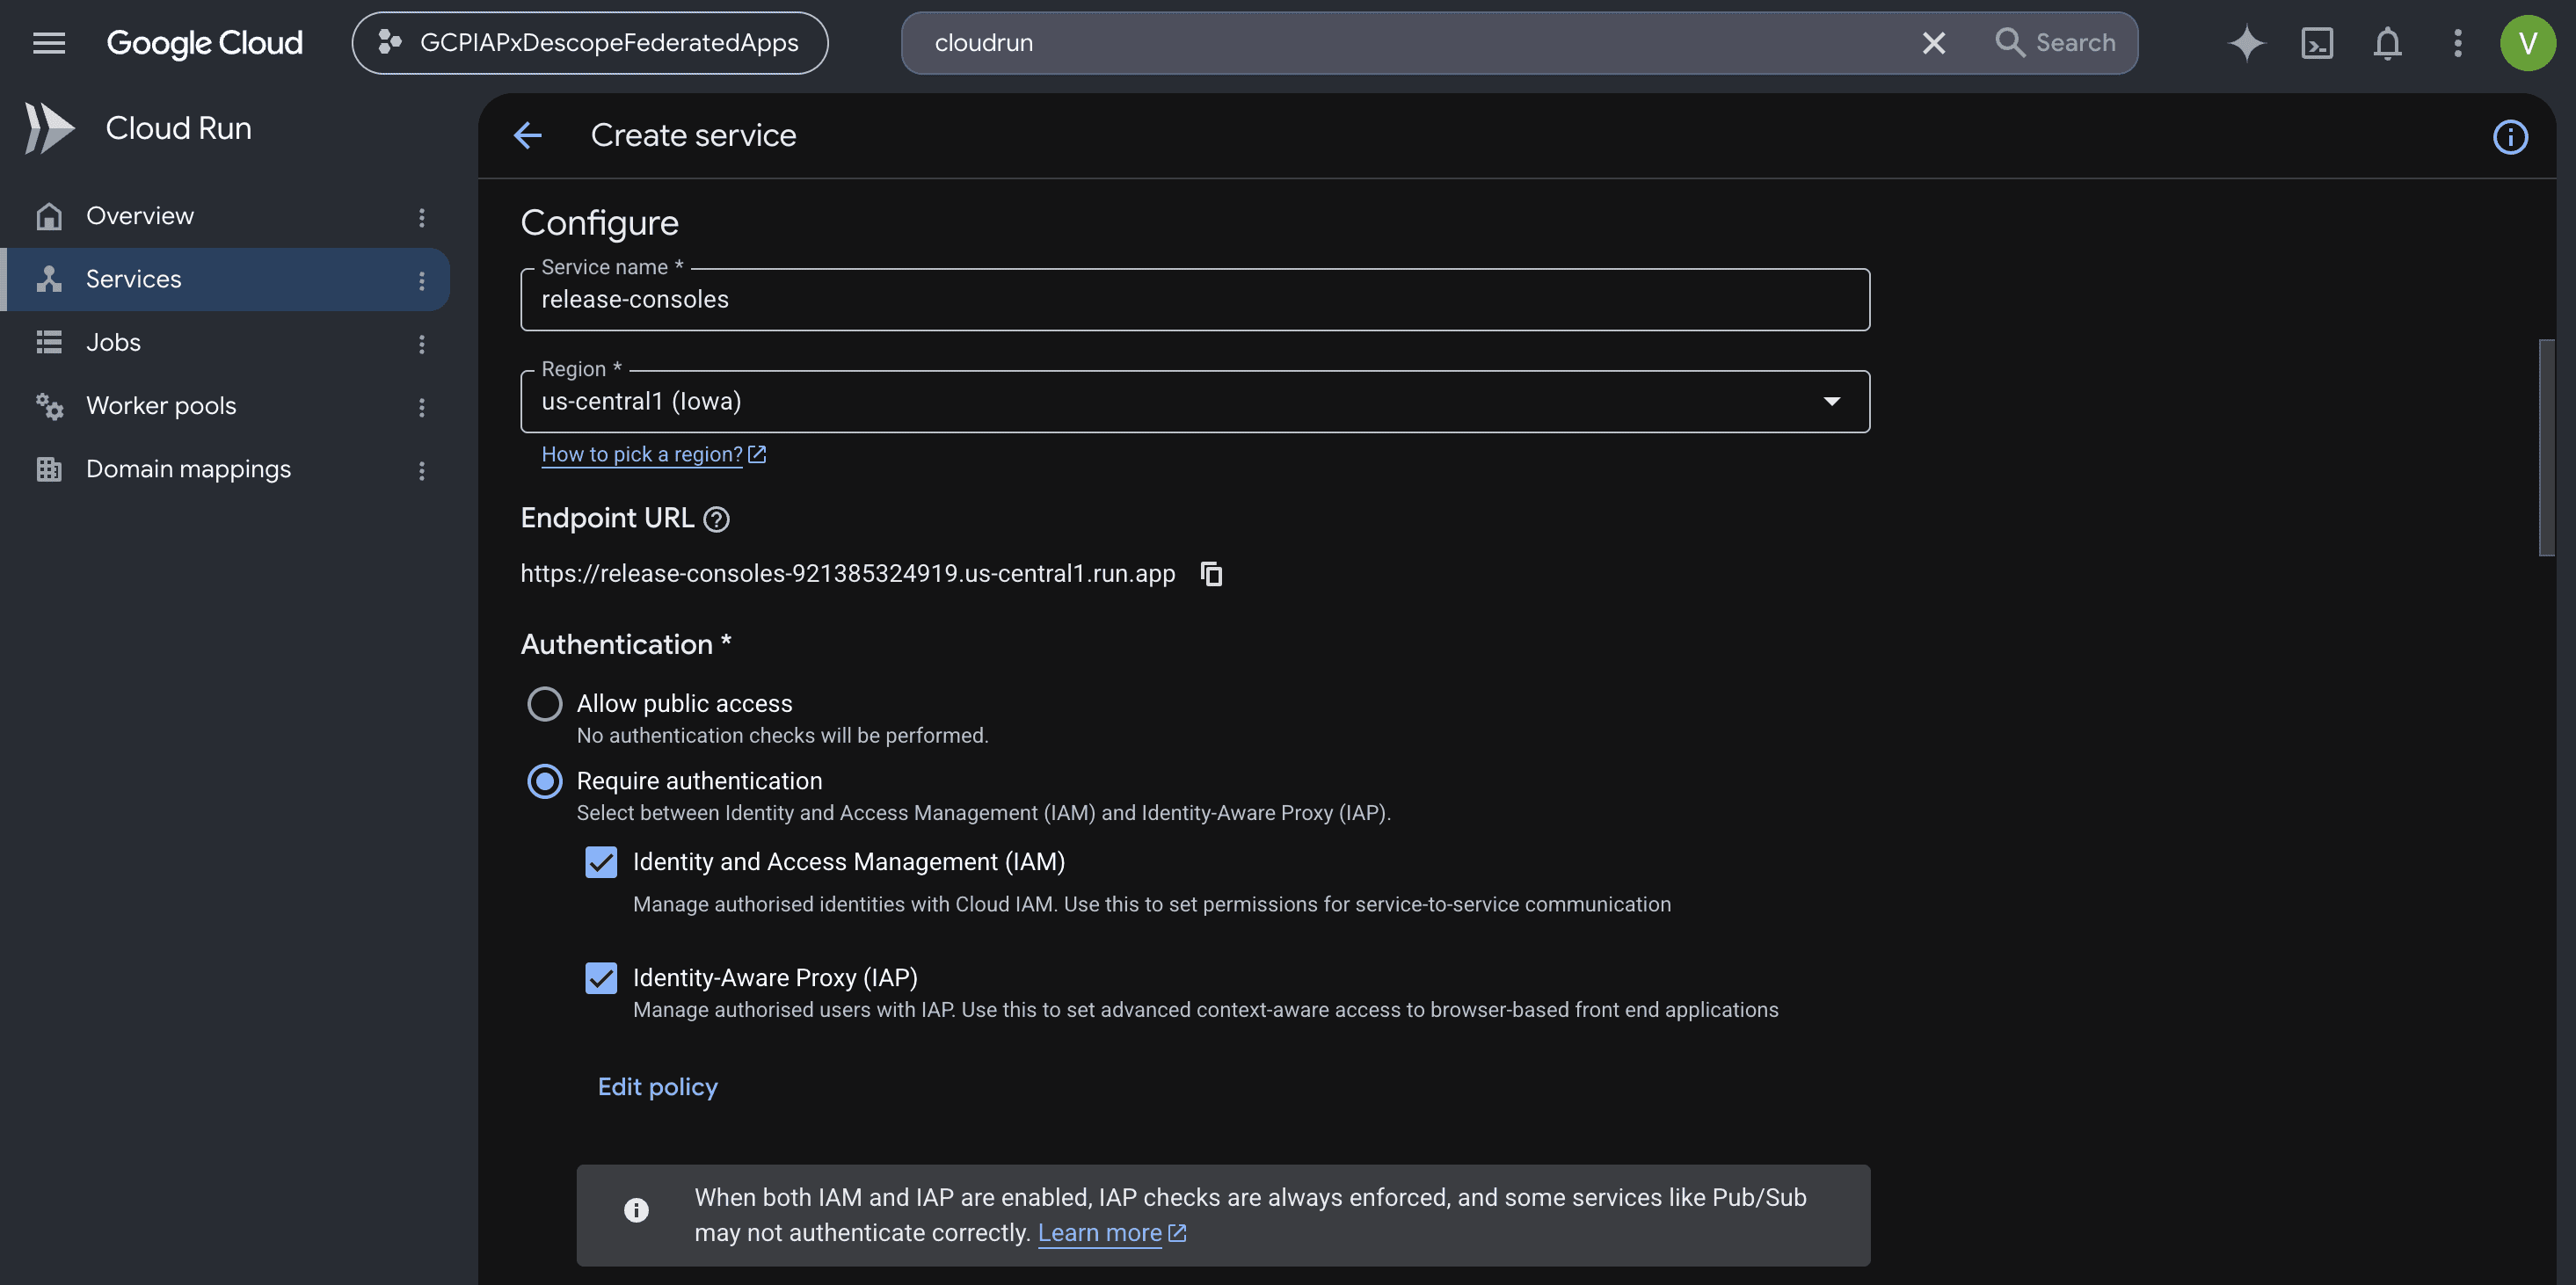
If your service is already deployed, the same setting lives on the service itself: go to Cloud Run, select the service, open the Security tab, select Require authentication, choose Identity-Aware Proxy (IAP), and click Save.
Expand Containers, volumes, networking, security and add the environment variable
DATA_BACKEND=firestore. Without it, the app falls back to its in-memory store.Click Create. Cloud Build packages and pushes the container for you, so you don't need a local Docker daemon.
Once the service is live, seed Firestore once so the dashboard isn't empty. Cloud Shell already has credentials, so it's the simplest place to do this. In a local terminal, run
gcloud auth application-default loginfirst. Then clone your fork and run the seed script:
git clone https://github.com/YOUR_GITHUB_USERNAME/gcp-iap-sample-app.git
cd gcp-iap-sample-app
npm install
export GOOGLE_CLOUD_PROJECT=PROJECT_ID
node scripts/seed-firestore.js
This populates the service registry and environment policy the dashboard displays.
Where the Cloud Run Invoker permission comes from
IAP doesn't send end users directly to your container. Instead, it acts as a proxy: IAP checks who the user is, and if they're allowed in, its own Google-managed service agent (service-PROJECT_NUMBER@gcp-sa-iap.iam.gserviceaccount.com) makes the call to Cloud Run on their behalf.
For this handoff to work, that IAP service agent must have permission to call your service:
Console setup: Enabling IAP through the Google Cloud console grants this Cloud Run Invoker permission automatically. If users sign in successfully but land on a blank page or an error, check this binding on your service's Permissions tab first.
CLI setup: Enabling IAP with
gcloudrequires granting this permission manually. In a new Google Cloud project, create IAP's service agent before binding the role:
gcloud beta services identity create \
  --service=iap.googleapis.com \
  --project=PROJECT_ID

gcloud run services add-iam-policy-binding release-console \
  --region=us-central1 \
  --member="serviceAccount:service-PROJECT_NUMBER@gcp-sa-iap.iam.gserviceaccount.com" \
  --role="roles/run.invoker"
Connecting the Workforce Pool to IAP isn't available in the console. Google's documentation covers enabling IAP and granting access on the IAP page, but updating IAP's settings with a workforce identity configuration works only through gcloud or the API. For Cloud Run services, this setting is in Preview, so keep that in mind before relying on it in production.
To talk to the Workforce Pool during sign-in, IAP needs a dedicated OAuth client, separate from Descope's client ID and secret.
Because Google's redirect URI includes the OAuth client's generated ID, you set up the client in two passes: first create it with a placeholder URI, then update the URI once the ID exists. The last command creates the client secret:
gcloud iam oauth-clients create iap-descope \
  --location=global \
  --client-type=CONFIDENTIAL_CLIENT \
  --allowed-scopes="https://www.googleapis.com/auth/cloud-platform" \
  --allowed-grant-types="authorization_code_grant" \
  --allowed-redirect-uris="https://example.com"

CLIENT_ID=$(gcloud iam oauth-clients describe iap-descope \
  --location=global --format="value(clientId)")

gcloud iam oauth-clients update iap-descope \
  --location=global \
  --allowed-redirect-uris="https://iap.googleapis.com/v1/oauth/clientIds/${CLIENT_ID}:handleRedirect"

gcloud iam oauth-clients credentials create iap-descope-cred \
  --oauth-client=iap-descope \
  --location=global
Save the clientSecret that the last command prints, along with your CLIENT_ID. You'll need both for the next step.
Finally, create an iap_settings.yaml file that maps IAP to your Workforce Pool and OAuth client, replacing CLIENT_ID and CLIENT_SECRET with the values you saved:
access_settings:
  identity_sources: ["WORKFORCE_IDENTITY_FEDERATION"]
  workforce_identity_settings:
    workforce_pools: ["locations/global/workforcePools/descope-workforce-pool-demo"]
    oauth2:
      client_id: "CLIENT_ID"
      client_secret: "CLIENT_SECRET"
Then apply the file to your Cloud Run service:
gcloud iap settings set iap_settings.yaml \
  --resource-type=cloud-run \
  --region=us-central1 \
  --service=release-console
If you visit your Cloud Run URL now, you'll land directly on Descope's login screen. That redirect confirms IAP, Workforce Identity Federation, and Descope are connected.
Sign in and you'll be denied access at this point. That's expected: IAP now knows who you are, but nothing has told it what you're allowed to reach.
Configuring path-based access via IAM
Now that Descope claims are mapped to Google Cloud IAM attributes, you can enforce path-level authorization using IAM bindings. Together, the three bindings below turn the Descope role claim into role-based access control by path.
1. Grant base access (exclude restricted routes)
Grant all authenticated Descope users access to general application routes while explicitly blocking access to /deploy and /admin:
gcloud iap web add-iam-policy-binding \
  --resource-type=cloud-run \
  --service=release-console \
  --region=us-central1 \
  --member="principalSet://iam.googleapis.com/locations/global/workforcePools/descope-workforce-pool-demo/*" \
  --role="roles/iap.httpsResourceAccessor" \
  --condition='expression=!request.path.startsWith("/admin") && !request.path.startsWith("/deploy"),title=base-access-paths'
2. Scope deployment access to release managers
Allow users holding the release-manager role claim in Descope to access the /deploy route:
gcloud iap web add-iam-policy-binding \
  --resource-type=cloud-run \
  --service=release-console \
  --region=us-central1 \
  --member="principalSet://iam.googleapis.com/locations/global/workforcePools/descope-workforce-pool-demo/*" \
  --role="roles/iap.httpsResourceAccessor" \
  --condition='expression=!request.path.startsWith("/admin") && !request.path.startsWith("/deploy"),title=base-access-paths'
3. Grant unrestricted access to admins
Grant users with the admin role claim full access across all paths. Once conditional bindings exist in an IAP policy, gcloud requires you to pass --condition=None explicitly for unconditional bindings:
gcloud iap web add-iam-policy-binding \
  --resource-type=cloud-run \
  --service=release-console \
  --region=us-central1 \
  --member="principalSet://iam.googleapis.com/locations/global/workforcePools/descope-workforce-pool-demo/attribute.role/admin" \
  --role="roles/iap.httpsResourceAccessor" \
  --condition=None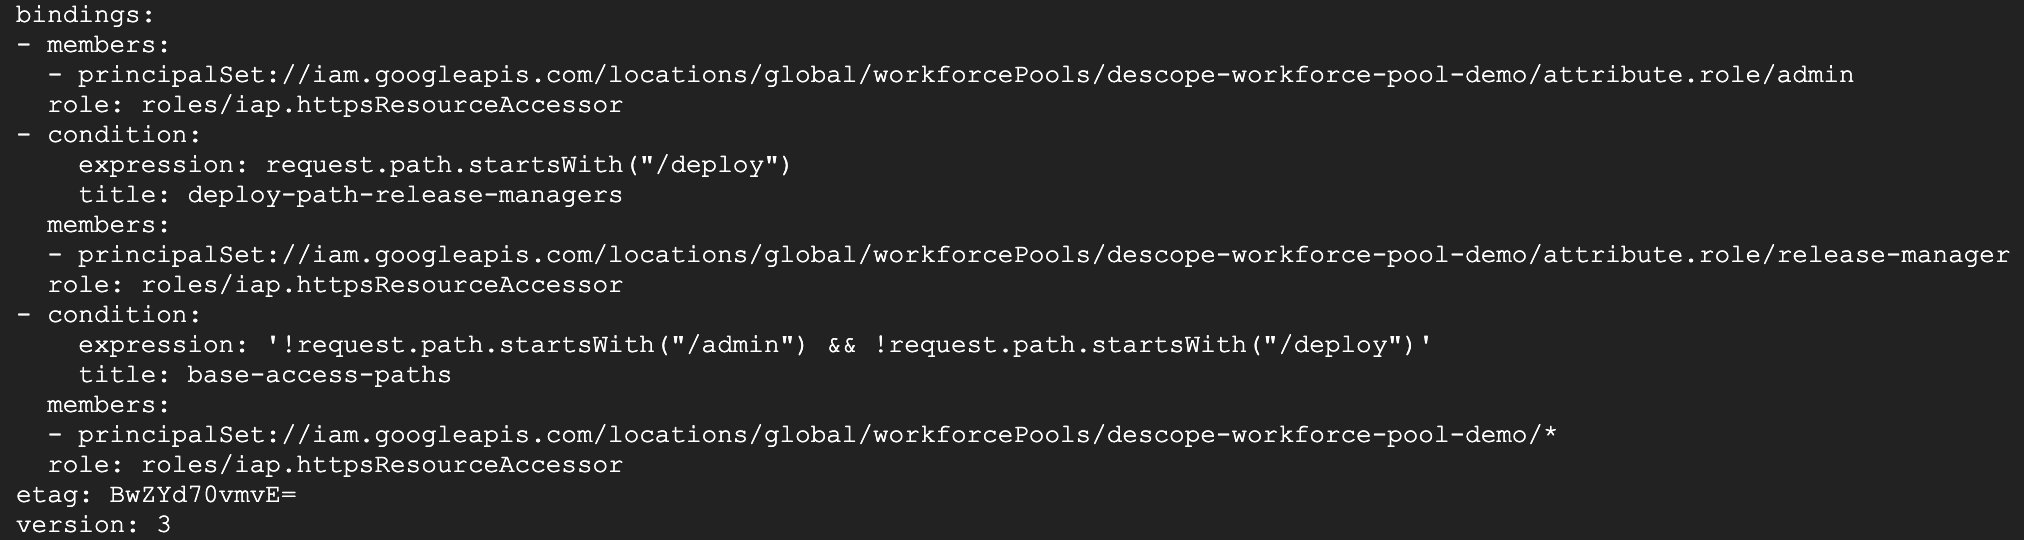
How the bindings combine
IAM bindings are additive, so each matching condition expands a user's access:
Viewers (
viewer, or any signed-in user without a higher role) can reach the landing page (/), service overview (/overview), and release history (/releases). Requests to/deployor/adminget IAP's access-denied page and never reach your Cloud Run container.Release managers (
release-manager) can reach the base routes as well as/deploy.Admins (
admin) can reach all paths, including/admin.
Where each part of the setup lives
Everything in this setup lives in Descope and Google Cloud. Descope handles sign-in and issues tokens with custom claims, Workforce Identity Federation maps those claims to IAM attributes, and IAM bindings enforce access by path. Because both authentication and authorization happen upstream at the proxy layer, the application itself stays unchanged.
The full source is in the Release Console repo on GitHub. Descope's identity federation connects to other services the same way, and the Federated Apps documentation covers the OIDC configuration in more depth.
To try it yourself, sign up for a Free Forever Descope account. If you have questions as you build, ask them in AuthTown.