
Table of Contents
Don't have the time to read the entire post? Our human writers will be sad, but we understand. Summarize the post with your preferred LLM here instead.
Amazon Cognito is a widely used authentication and user management service that enables developers to add user sign-up, sign-in, and access control to web and mobile applications. However, relying on password-based authentication in Amazon Cognito can lead to user friction, especially when passwords are forgotten, not to mention the increased risk of credential stuffing and account takeovers.
To reduce these risks and improve user experience, Descope now supports OIDC federated authentication. This makes it easy to add passkeys to Amazon Cognito user pools, enabling secure, passwordless login without requiring changes to your app’s core code.
In this guide, you’ll learn how to enable Amazon Cognito passkeys with Descope, allowing your users to authenticate more securely and conveniently — no passwords required.
Benefits of adding passkeys to AWS Cognito
Here’s what this integration enables when you add passkeys to Amazon Cognito using Descope:
Simplified user management: Descope acts as an OIDC provider, allowing users to authenticate with passkeys while Amazon Cognito manages the user pool and device syncing. This offloads identity complexity from your team and speeds up development.
Enhanced security: By introducing Amazon Cognito passkeys, you eliminate passwords from the authentication flow. This reduces the risk of breaches, account takeovers, and other password-based attacks.
Improved user experience: Passkeys offer a fast, seamless login experience across devices. No more forgotten passwords — just tap and go. This makes users more likely to return and stay engaged.
Read more: Passkeys vs Passwords: What’s the Difference?
How adding passkeys to AWS Cognito with Descope works
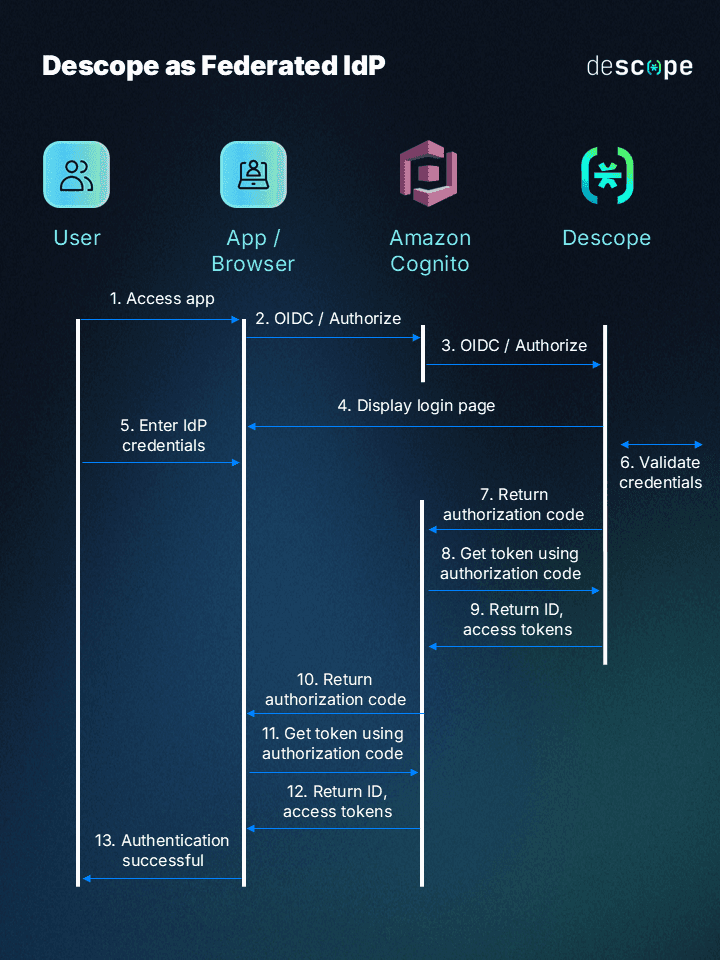
Using OpenID Connect (OIDC), Descope serves as a federated identity provider that handles passkey-based user authentication. Amazon Cognito continues to act as the primary identity provider and stores user identity data.
When you add passkeys to Amazon Cognito through Descope, new users are automatically added to the user pool upon registration. For existing users who want to switch from password-based sign-in to passkeys, an AWS Lambda function is used to merge user identities while preserving roles and permissions.
The flow diagram below illustrates this process:
From a developer’s perspective, the integration is lightweight and requires minimal ongoing configuration. This lets your team focus more on product innovation instead of user authentication logic.
Now that we’ve covered the why and how, let’s walk through the steps to set this up in your own user pool.
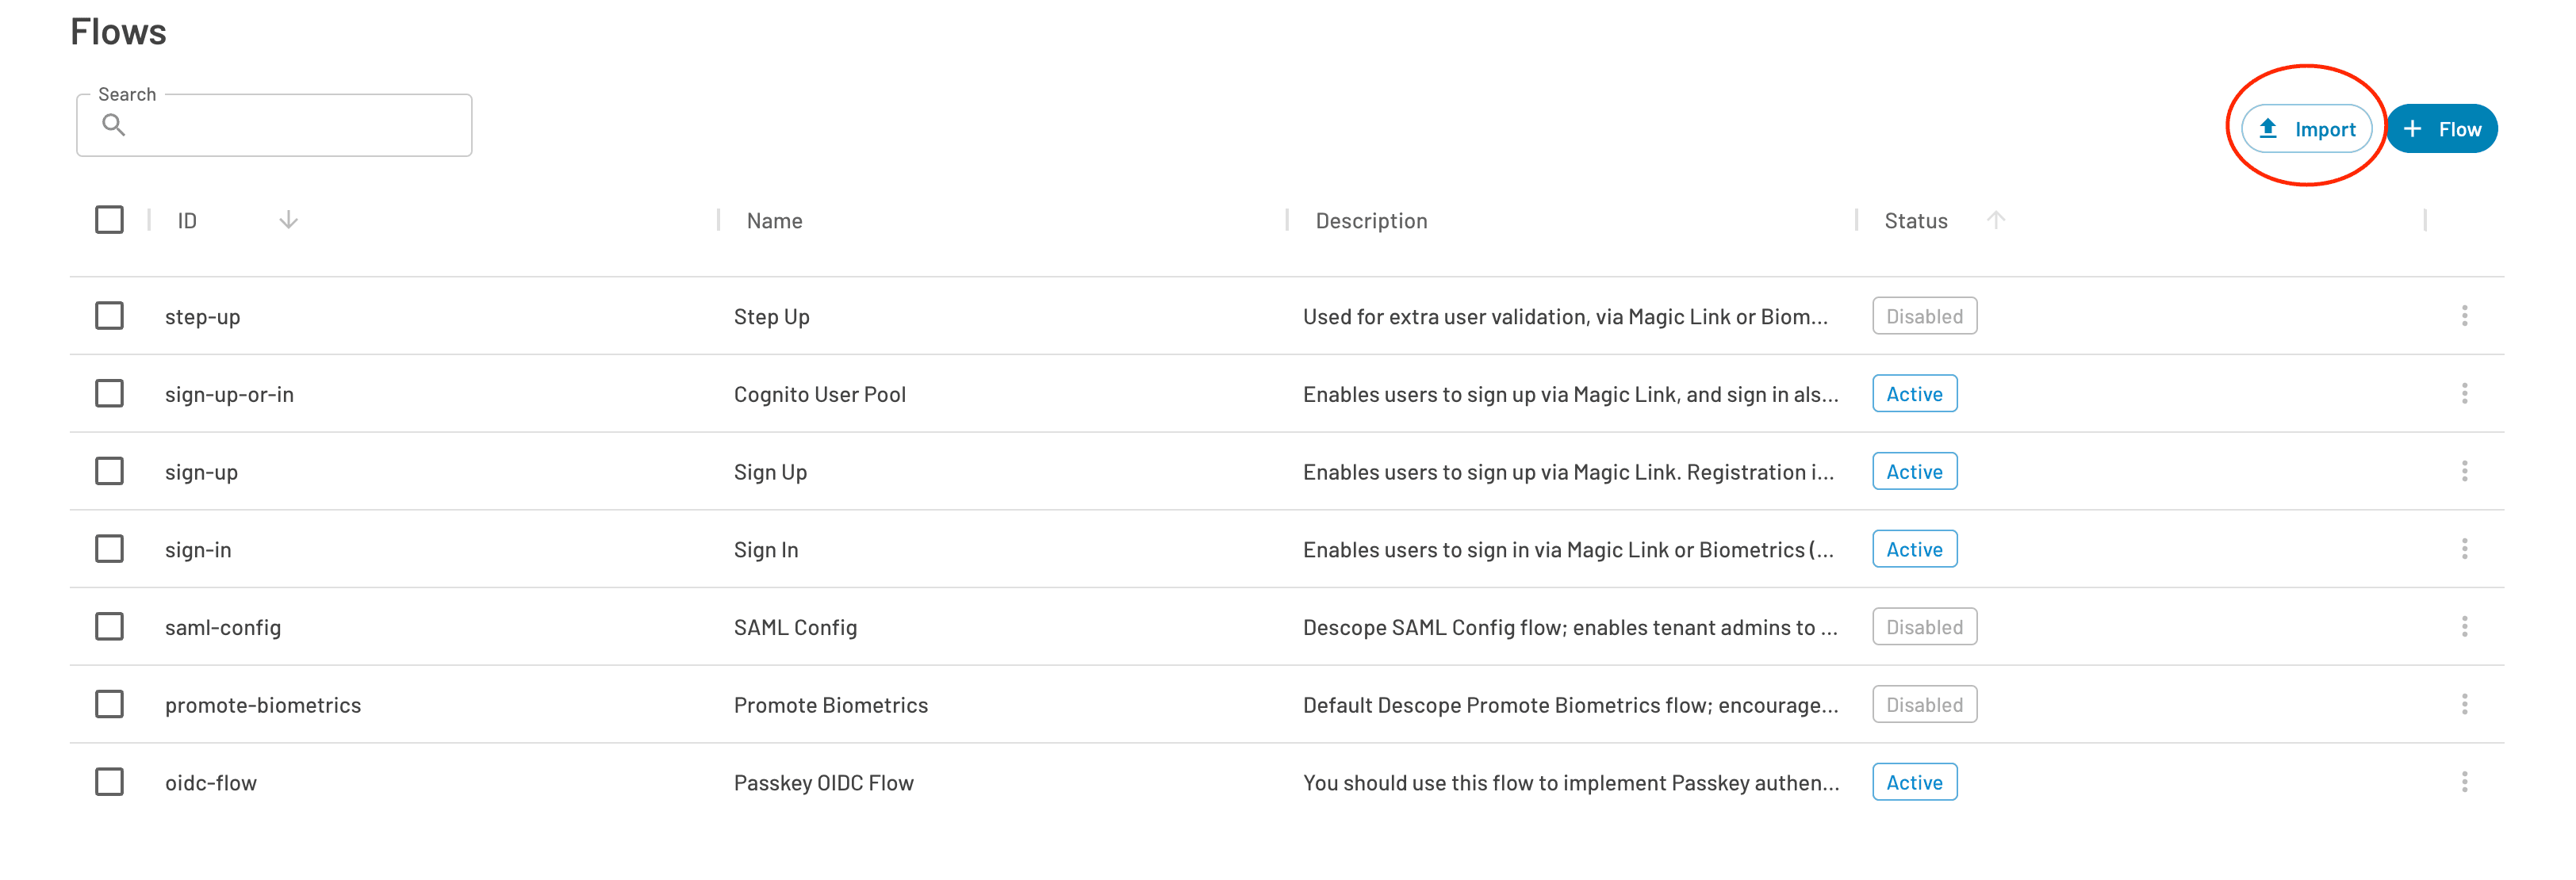
Setting up your Descope Flow
Descope Flows are drag & drop workflows that let you implement authentication with minimal code. In this section, we’ll walk through how to build a Flow that enables secure Amazon Cognito passkeys authentication.
To get started, download the oidc-flow JSON file from our sample app repository and import it into your Descope project. This specific Flow ensures that the user and their email are always verified — a critical step when using passkeys for authentication.
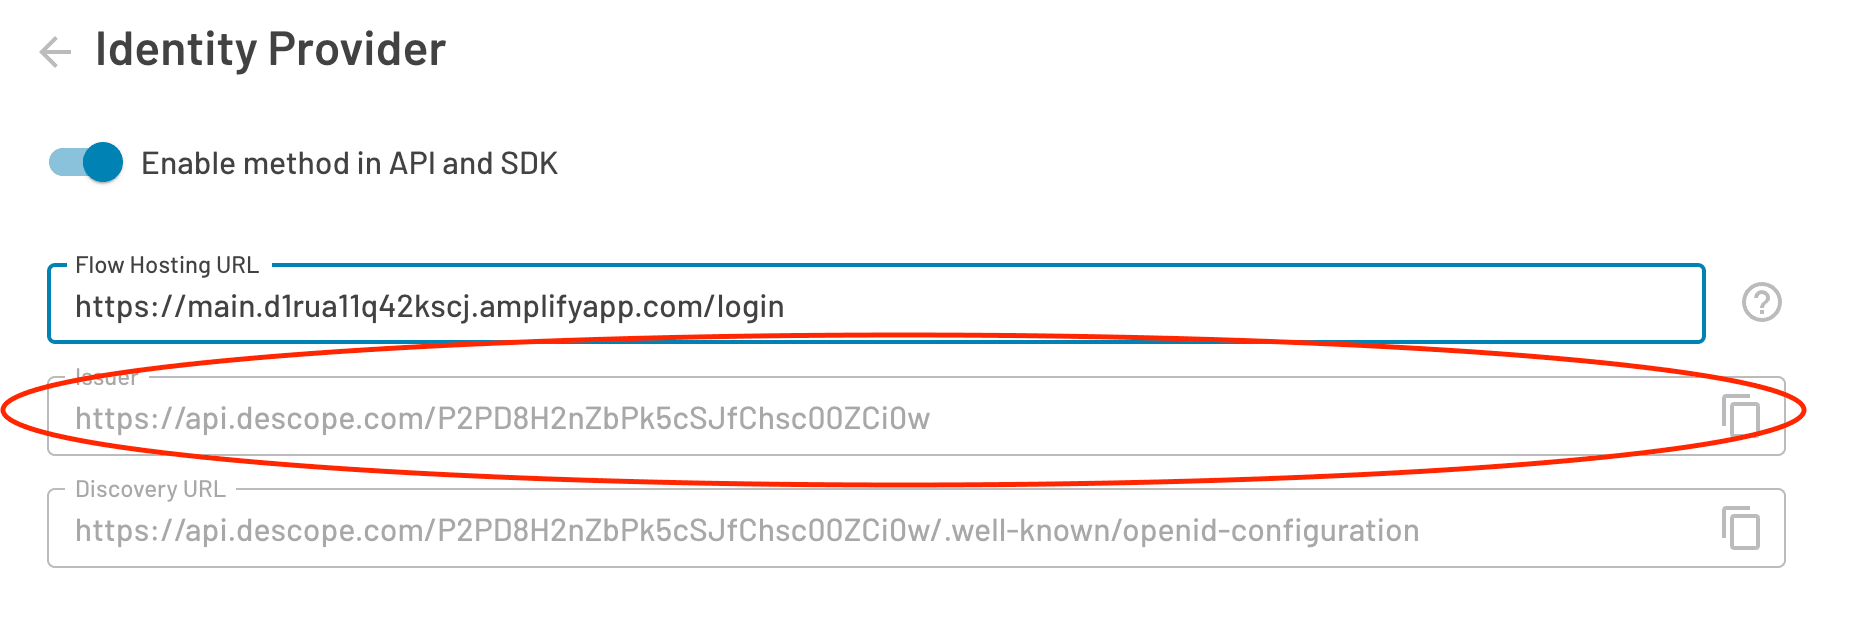
You’ll also need to embed the Flow component in your application using either React or an HTML Web Component. In the Descope Console, specify where the component is hosted. This is important because Amazon Cognito will need to know where to redirect users when they choose Login with Passkeys on your main login screen.
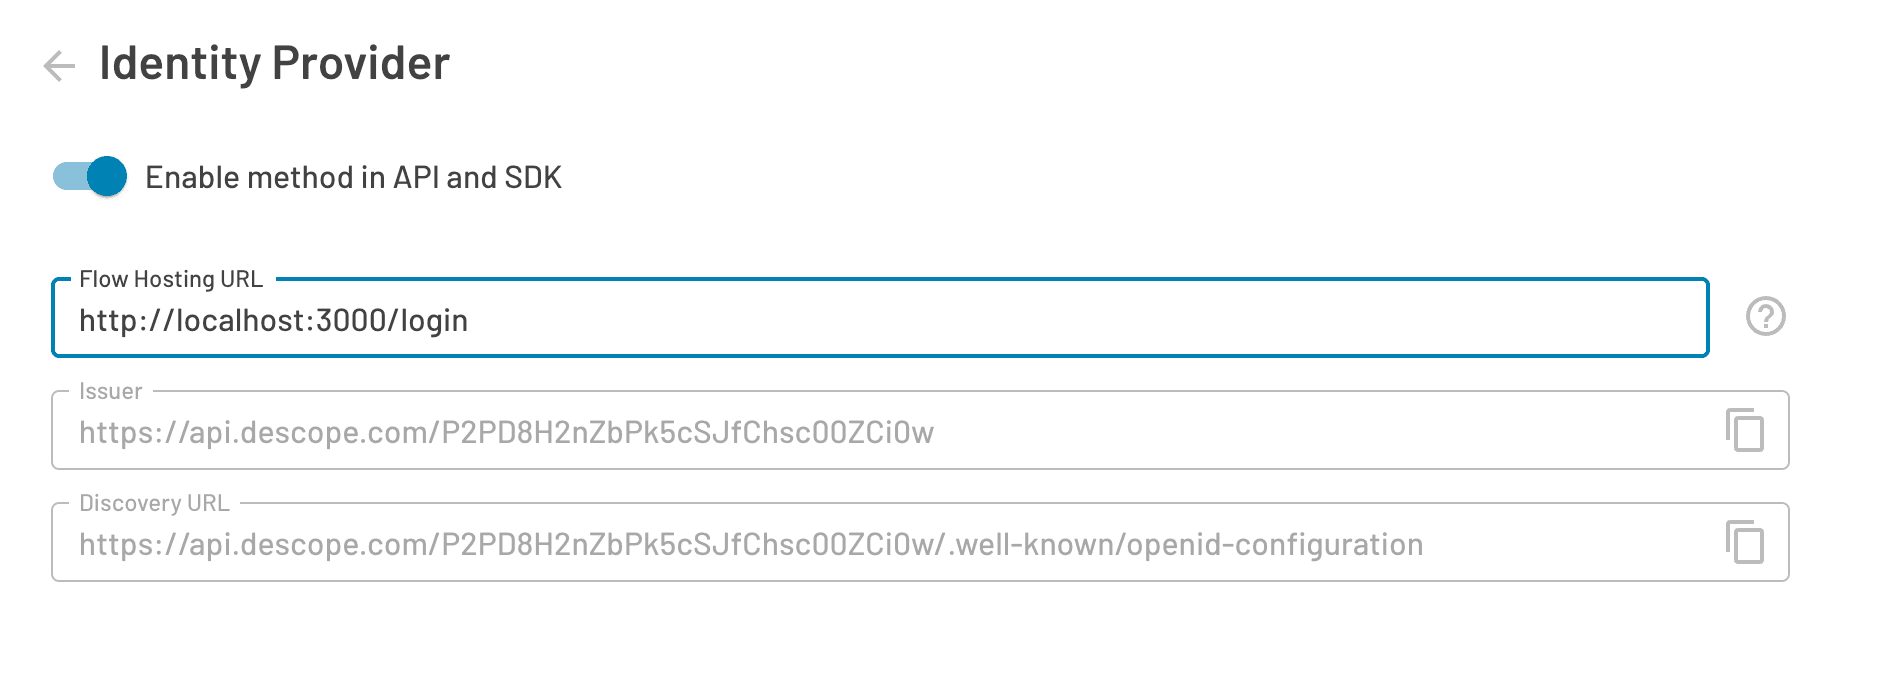
Note: Keep this page open — you’ll need these details in the upcoming steps.
If you want to customize the UI of the passkey login screen, you can do so in the Flow Editor. Once your Flow is complete and your redirect URL is configured, you’re ready to connect Descope to Amazon Cognito as an external identity provider.
Descope as an external OIDC provider
To add passkeys to Amazon Cognito using Descope, you’ll need to set up Descope as an external identity provider via OIDC.
Start by creating a user pool in Amazon Cognito if you haven’t already. Most readers likely have one configured, but if not, make sure the user pool requires the email attribute:

And that sign-in with email is enabled:

Once your user pool is ready, follow these steps to configure Descope as an external OIDC provider:
First, in the Descope Console, go to Authentication Methods → SSO → OpenID Connect. Collect and input the following values:
Provider Name: Descope
Client ID: Your Descope Project ID (found under Project)
Client Secret: API key generated under Access Keys
Issuer URL: Found on the Authentication Methods screen, this includes all OIDC standard metadata for the authentication process. If you’re using a CNAME, use your custom domain instead of api.descope.com. Example:
https://example.company.com/<Project ID>
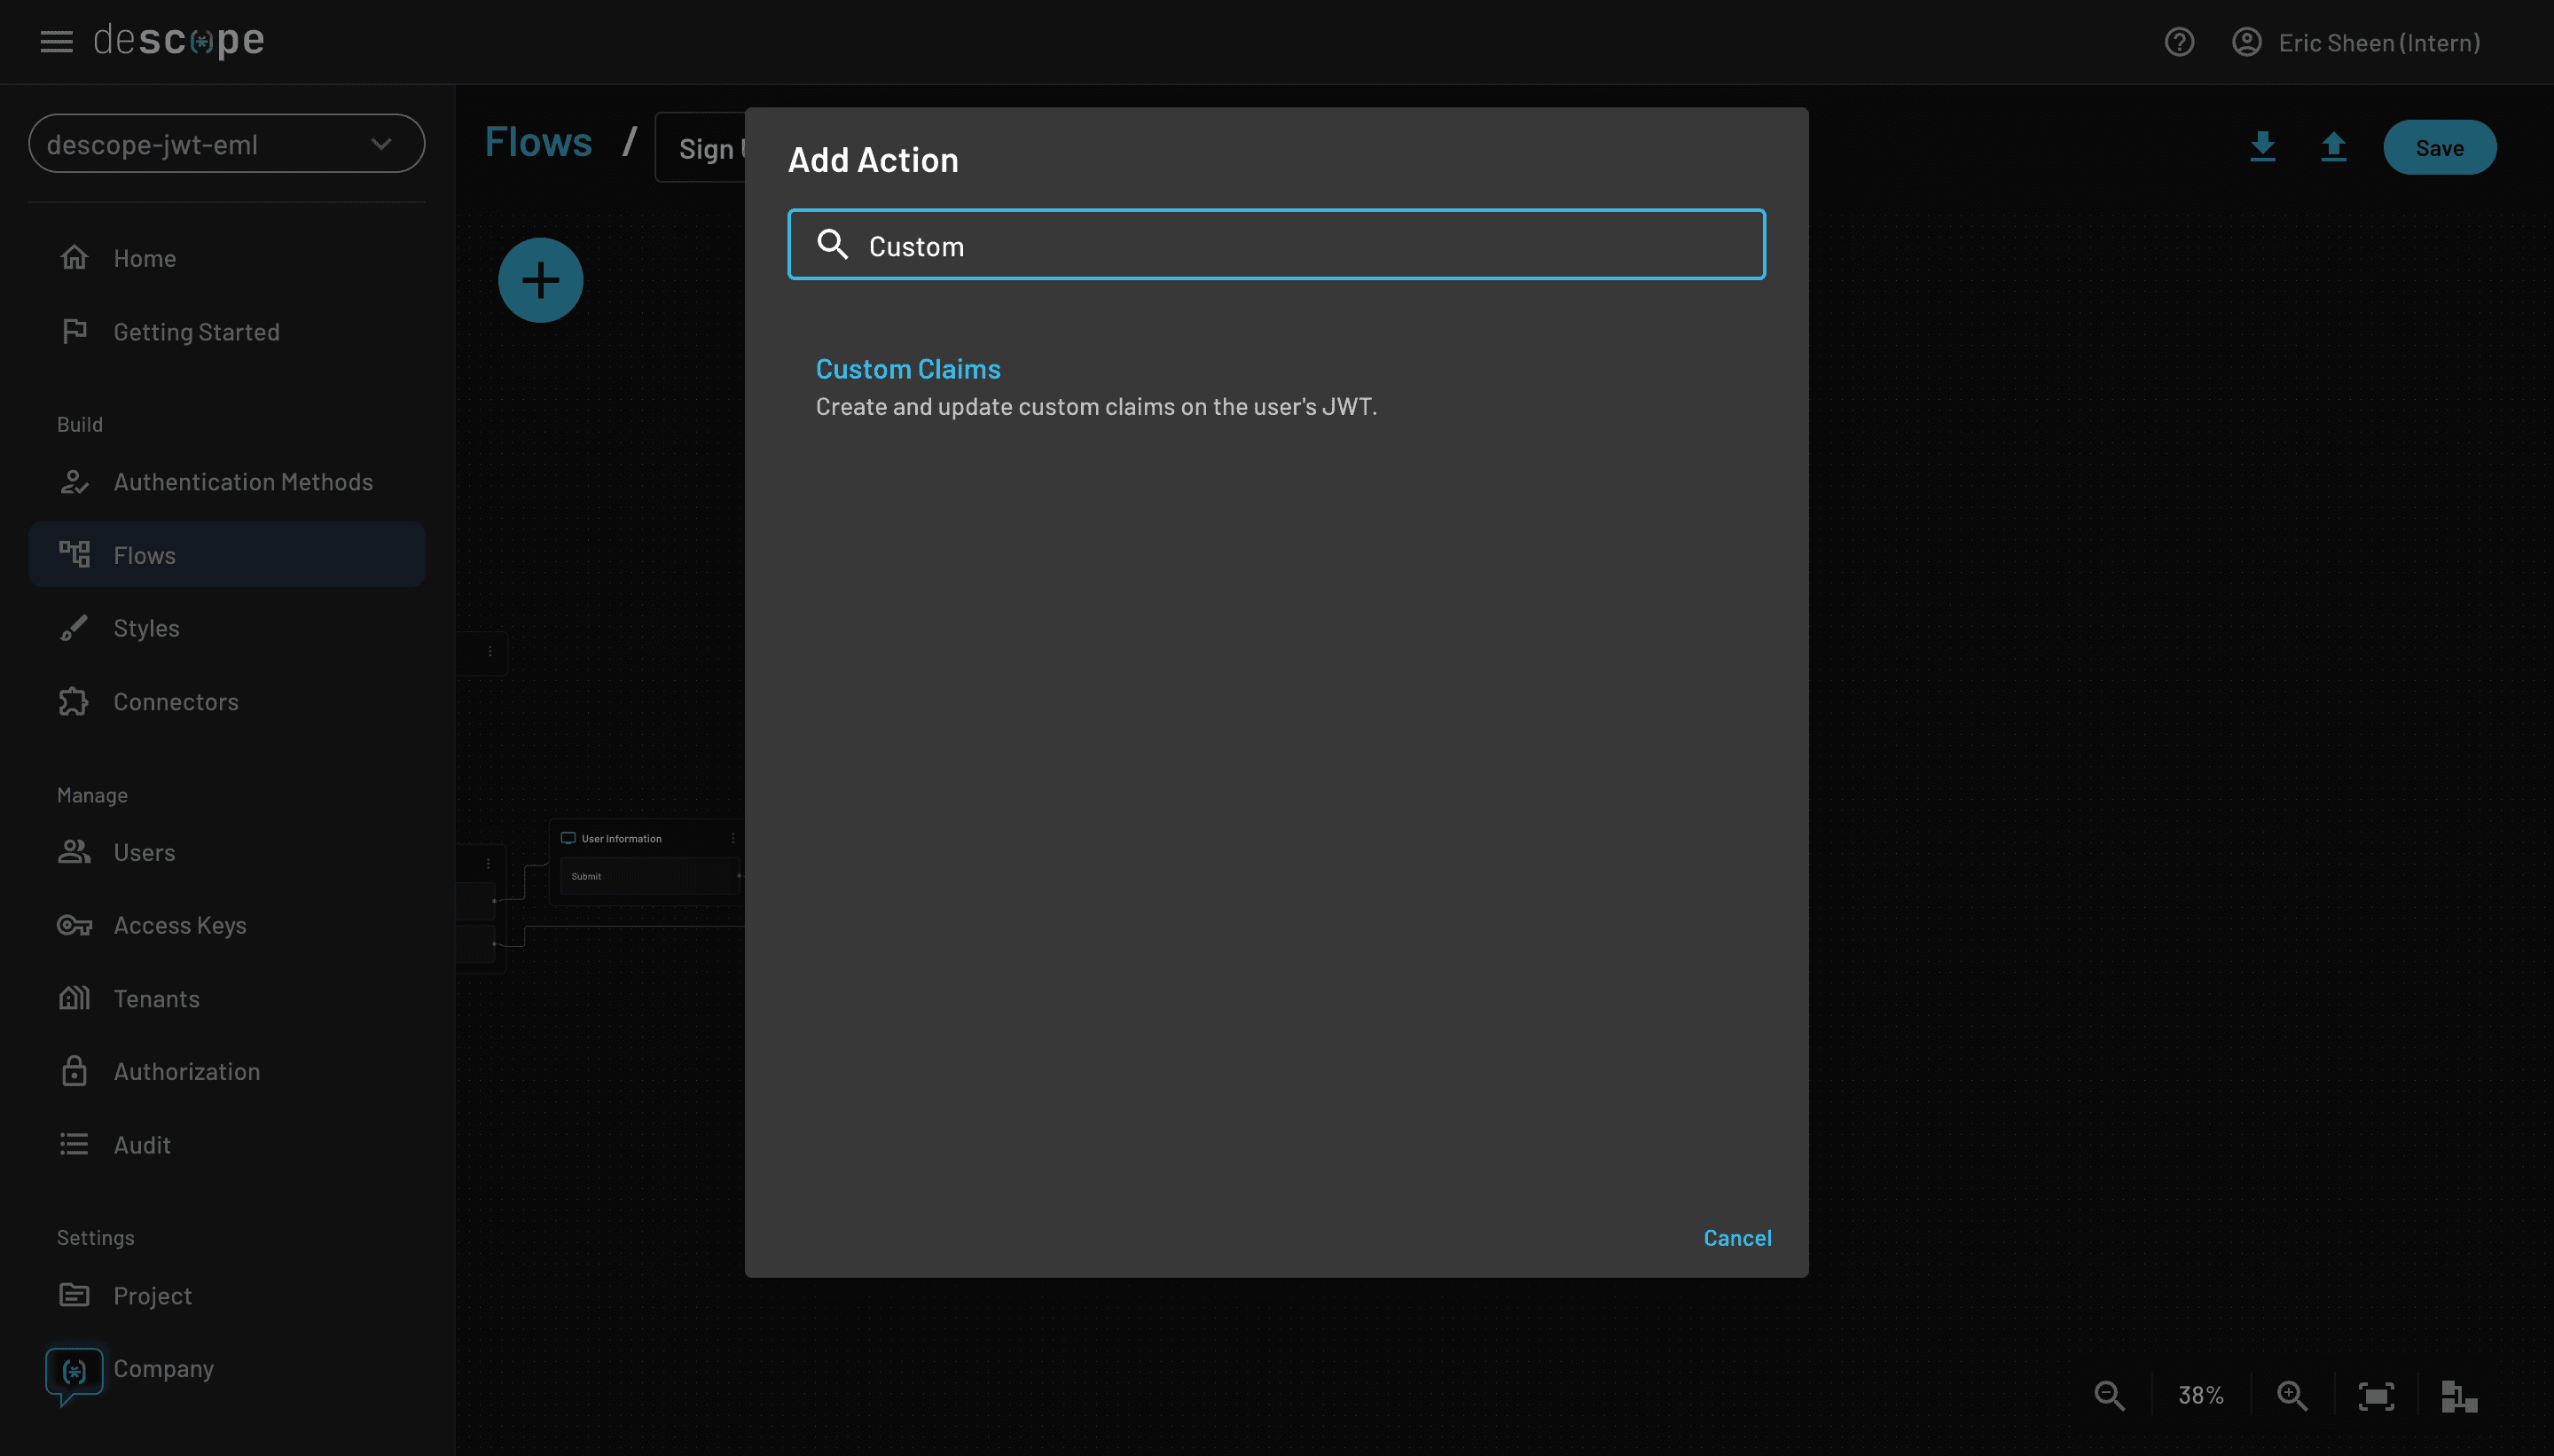
Second, under Authorized Scopes, add: openid profile email descope:custom_claims. The descope:custom_claims scope enables roles, tenants, and other custom attributes to be returned in the JWT and passed to Cognito.
Third, set the Attribute Request Method to GET. You don’t need to add an Identifier. At this point, your configuration screen should look something like this:
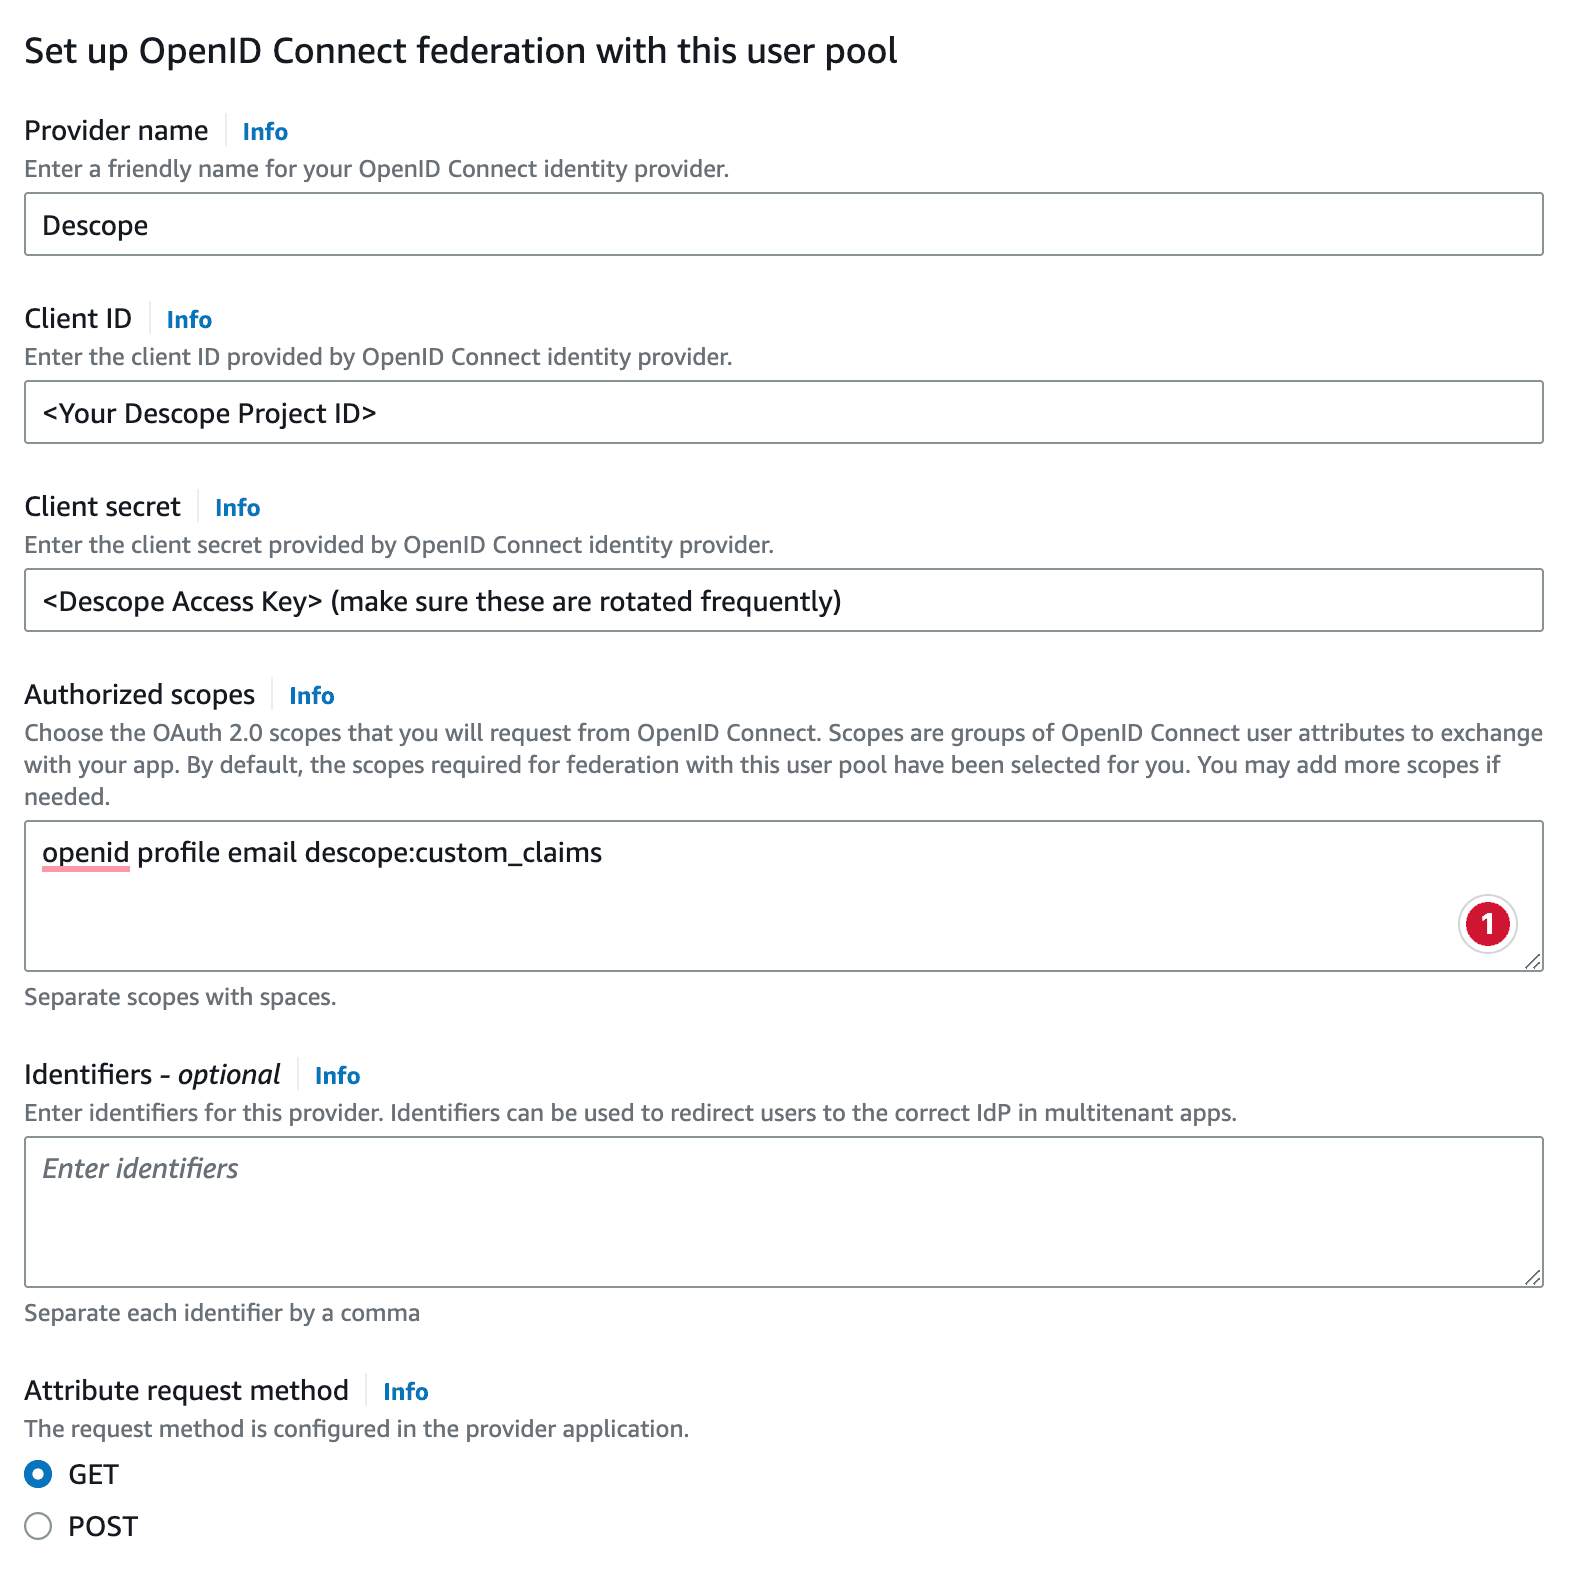
Fourth, under Retrieve OIDC Endpoints, select the Auto fill through Issuer URL option and paste in the Issuer URL you got from the Console in step 2:
Finally, map the attributes between Descope and Amazon Cognito in the following fashion:
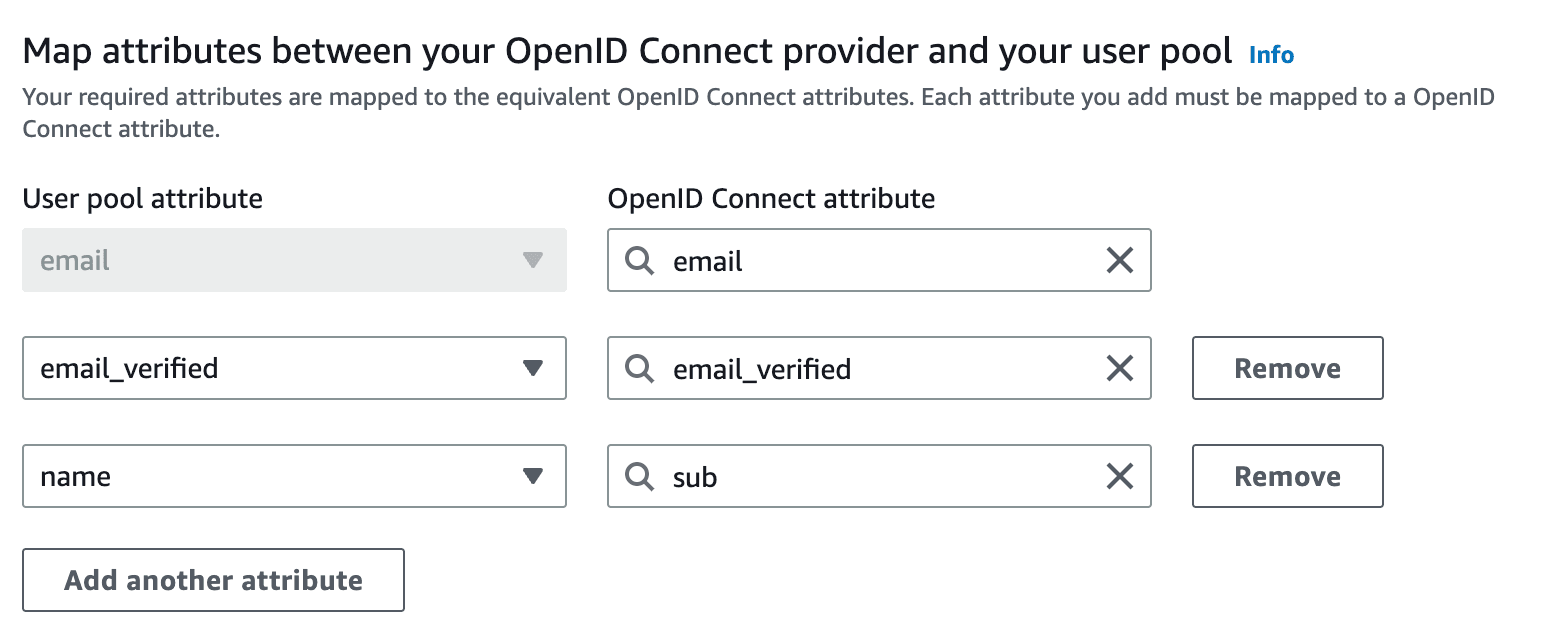
You can modify the custom claims returned after authentication if needed. Make sure the keys in your Flow’s Custom Claim action match those mapped here.
If you’re using the Cognito Hosted UI, should now see a Sign in with Descope option automatically:
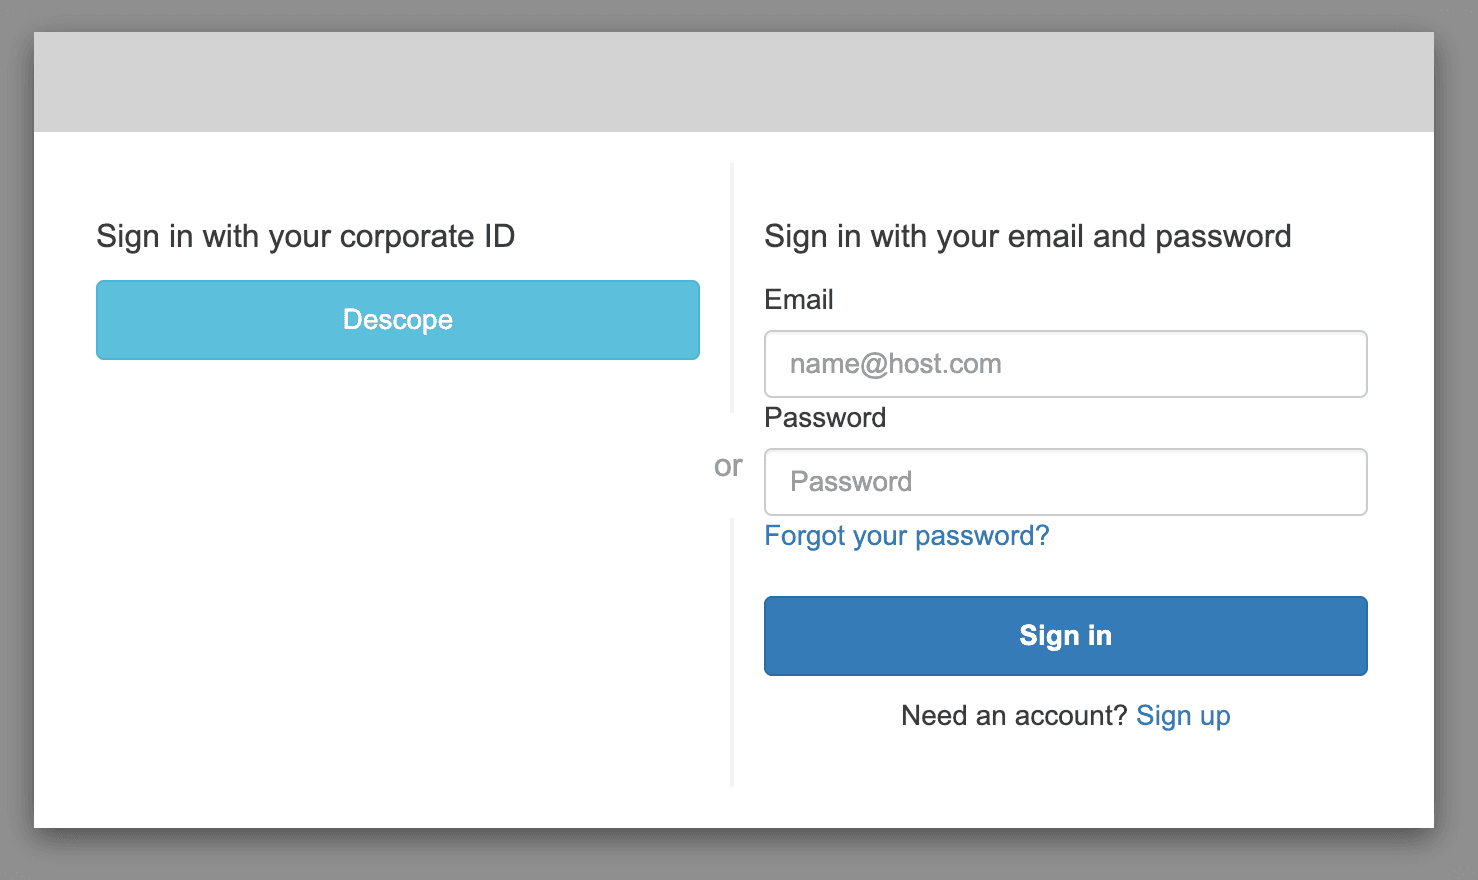
However, if you’re using a custom UI as most apps do, then you’ll need to add a Descope login button to redirect users to the embedded Flow component. To do this, make sure that your button hits the Cognito OAuth /authorize endpoint to trigger the OIDC login flow.
Here’s the basic structure: https://<user pool name>.auth.<aws region id>.amazoncognito.com/oauth2/authorize?
With the query parameters:
identity_provider=Descope (OIDC Provider Name set in Cognito)&redirect_uri=<Redirect URI (when login is successful)>&response_type=CODE&client_id=<Cognito App Client ID>&scope=email openid phone
You can learn more about how to configure the OAuth /authorize endpoint in the Amazon Cognito Documentation.
Once this is configured, your users can log in with passkeys via Descope and all OIDC logic will run behind the scenes. Users can also continue logging in with any traditional methods still supported in your user pool.
So we’re done right? Well, almost…
Setting up an AWS Lambda trigger
When you add passkeys to Amazon Cognito using Descope, you’re introducing a federated identity provider into your authentication flow. However, this means that Amazon Cognito may treat Descope-authenticated users as entirely new accounts even if their email matches an existing user.
To prevent duplicate users and ensure role/permission continuity, you’ll need to set up an AWS Lambda trigger that merges identities based on email.
Follow these steps to configure the user merge:
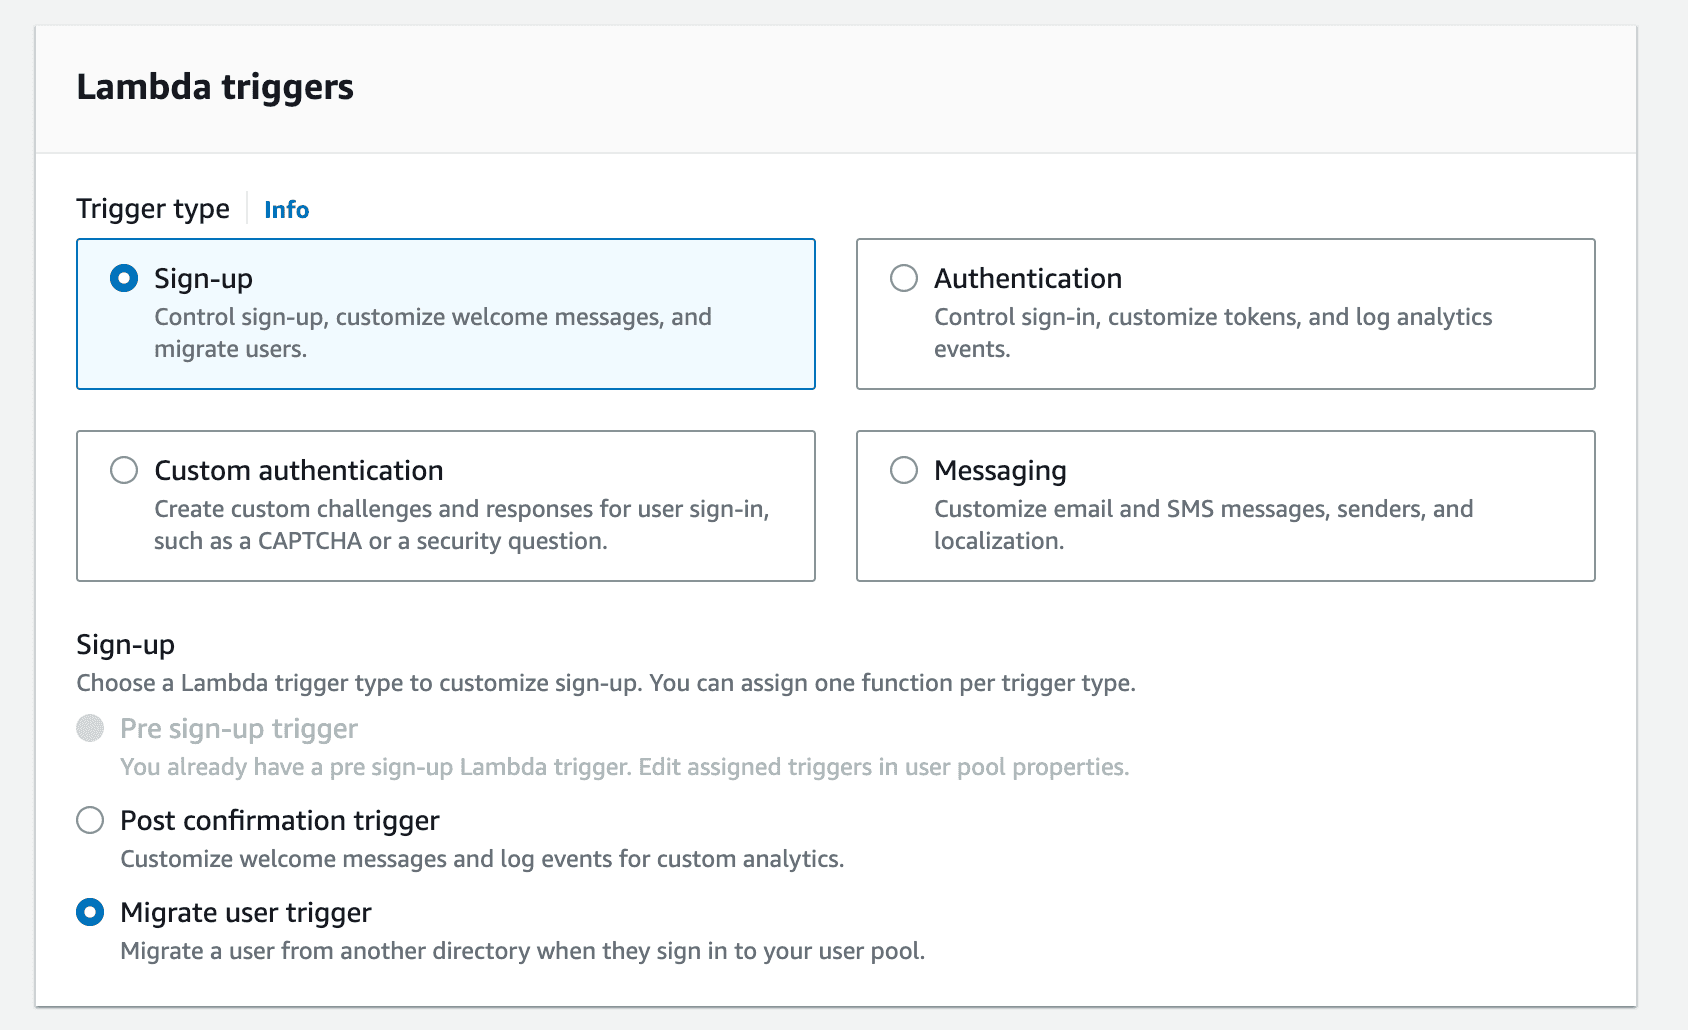
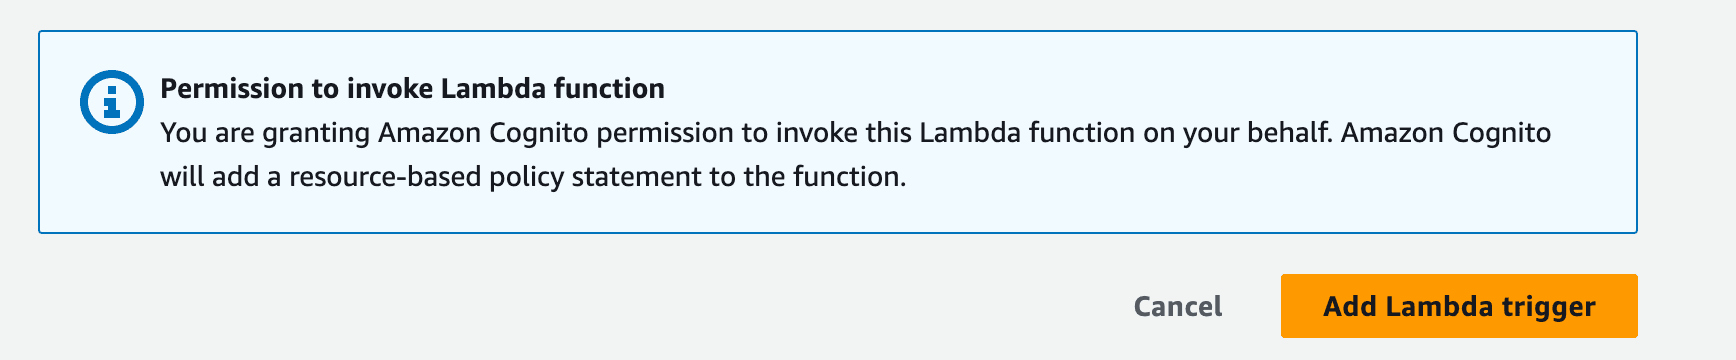
Go to the User Pool Properties tab in your Amazon Cognito dashboard. Under Lambda Triggers, select Add Lambda Trigger (this opens in a new tab).
Configure your Lambda trigger to look like the screenshot below, and then select Create a Lambda Trigger:
Click Create Function in the top right corner, and use the following settings:
Function name:
OIDC_USER_MERGERuntime: Select Python
After creating the function, scroll to the Code section and paste the snippet below. This function looks for users with the same email and links them together, allowing seamless login via Descope or Cognito. It also logs useful event data to CloudWatch:
import boto3

client = boto3.client('cognito-idp')

def lambda_handler(event, context):
    print("Event: ", event)
    email = event['request']['userAttributes']['email']

    # Find a user with the same email
    response = client.list_users(
        UserPoolId=event['userPoolId'],
        AttributesToGet=[
            'email',
        ],
        Filter='email = "{}"'.format(email)
    )

    print('Users found: ', response['Users'])

    for user in response['Users']:
        provider = None
        provider_value = None
        # Check which provider it is using
        if event['userName'].startswith('descope_'):
            provider = 'Descope'

            provider_value = event['request']['userAttributes']['name']

        print('Linking accounts from Email {} with provider {} provider_value {} '.format(
            email,
            provider,
            provider_value
        ))

        # If the signup is coming from a social provider, link the accounts
        # with admin_link_provider_for_user function
        if provider and provider_value:
            print('> Linking user: ', user)
            print('> Provider Id: ', provider_value)
            response = client.admin_link_provider_for_user(
                UserPoolId=event['userPoolId'],
                DestinationUser={
                    'ProviderName': 'Cognito',
                    'ProviderAttributeValue': user['Username']
                },
                SourceUser={
                    'ProviderName': provider,
                    'ProviderAttributeName': 'Cognito_Subject',
                    'ProviderAttributeValue': provider_value
                }
            )

    # Return the event to continue the workflow
    return event
Finally, go back to the original tab where you began the Lambda setup, confirm the new trigger is selected, and click Add Lambda Trigger to apply it to your user pool:
We’re almost there! Now all we have to do is make sure that the Lambda trigger has the correct permissions configured to be able to access the user identities through the SDK.
Adding permissions for Lambda trigger
To successfully merge users when you add passkeys to Amazon Cognito, your Lambda function needs the proper IAM permissions to access and update user identities.
Without these permissions, merging users during attempts to log in with Descope will fail due to permission issue.
To resolve this, you have to create a new identity permissions policy in the AWS IAM Console, and make sure that Lambda trigger role is assigned to that new policy.
Follow these steps:
Go to the IAM Console, select Policies, and click on the blue Create New Policy button in the top right hand corner.
Under Select a Service, select Cognito User Pools.
Grant permission to all necessary Cognito actions. In most cases, you only need access to your specific
userpoolARN. For testing or broad access, you may initially allow access to all.
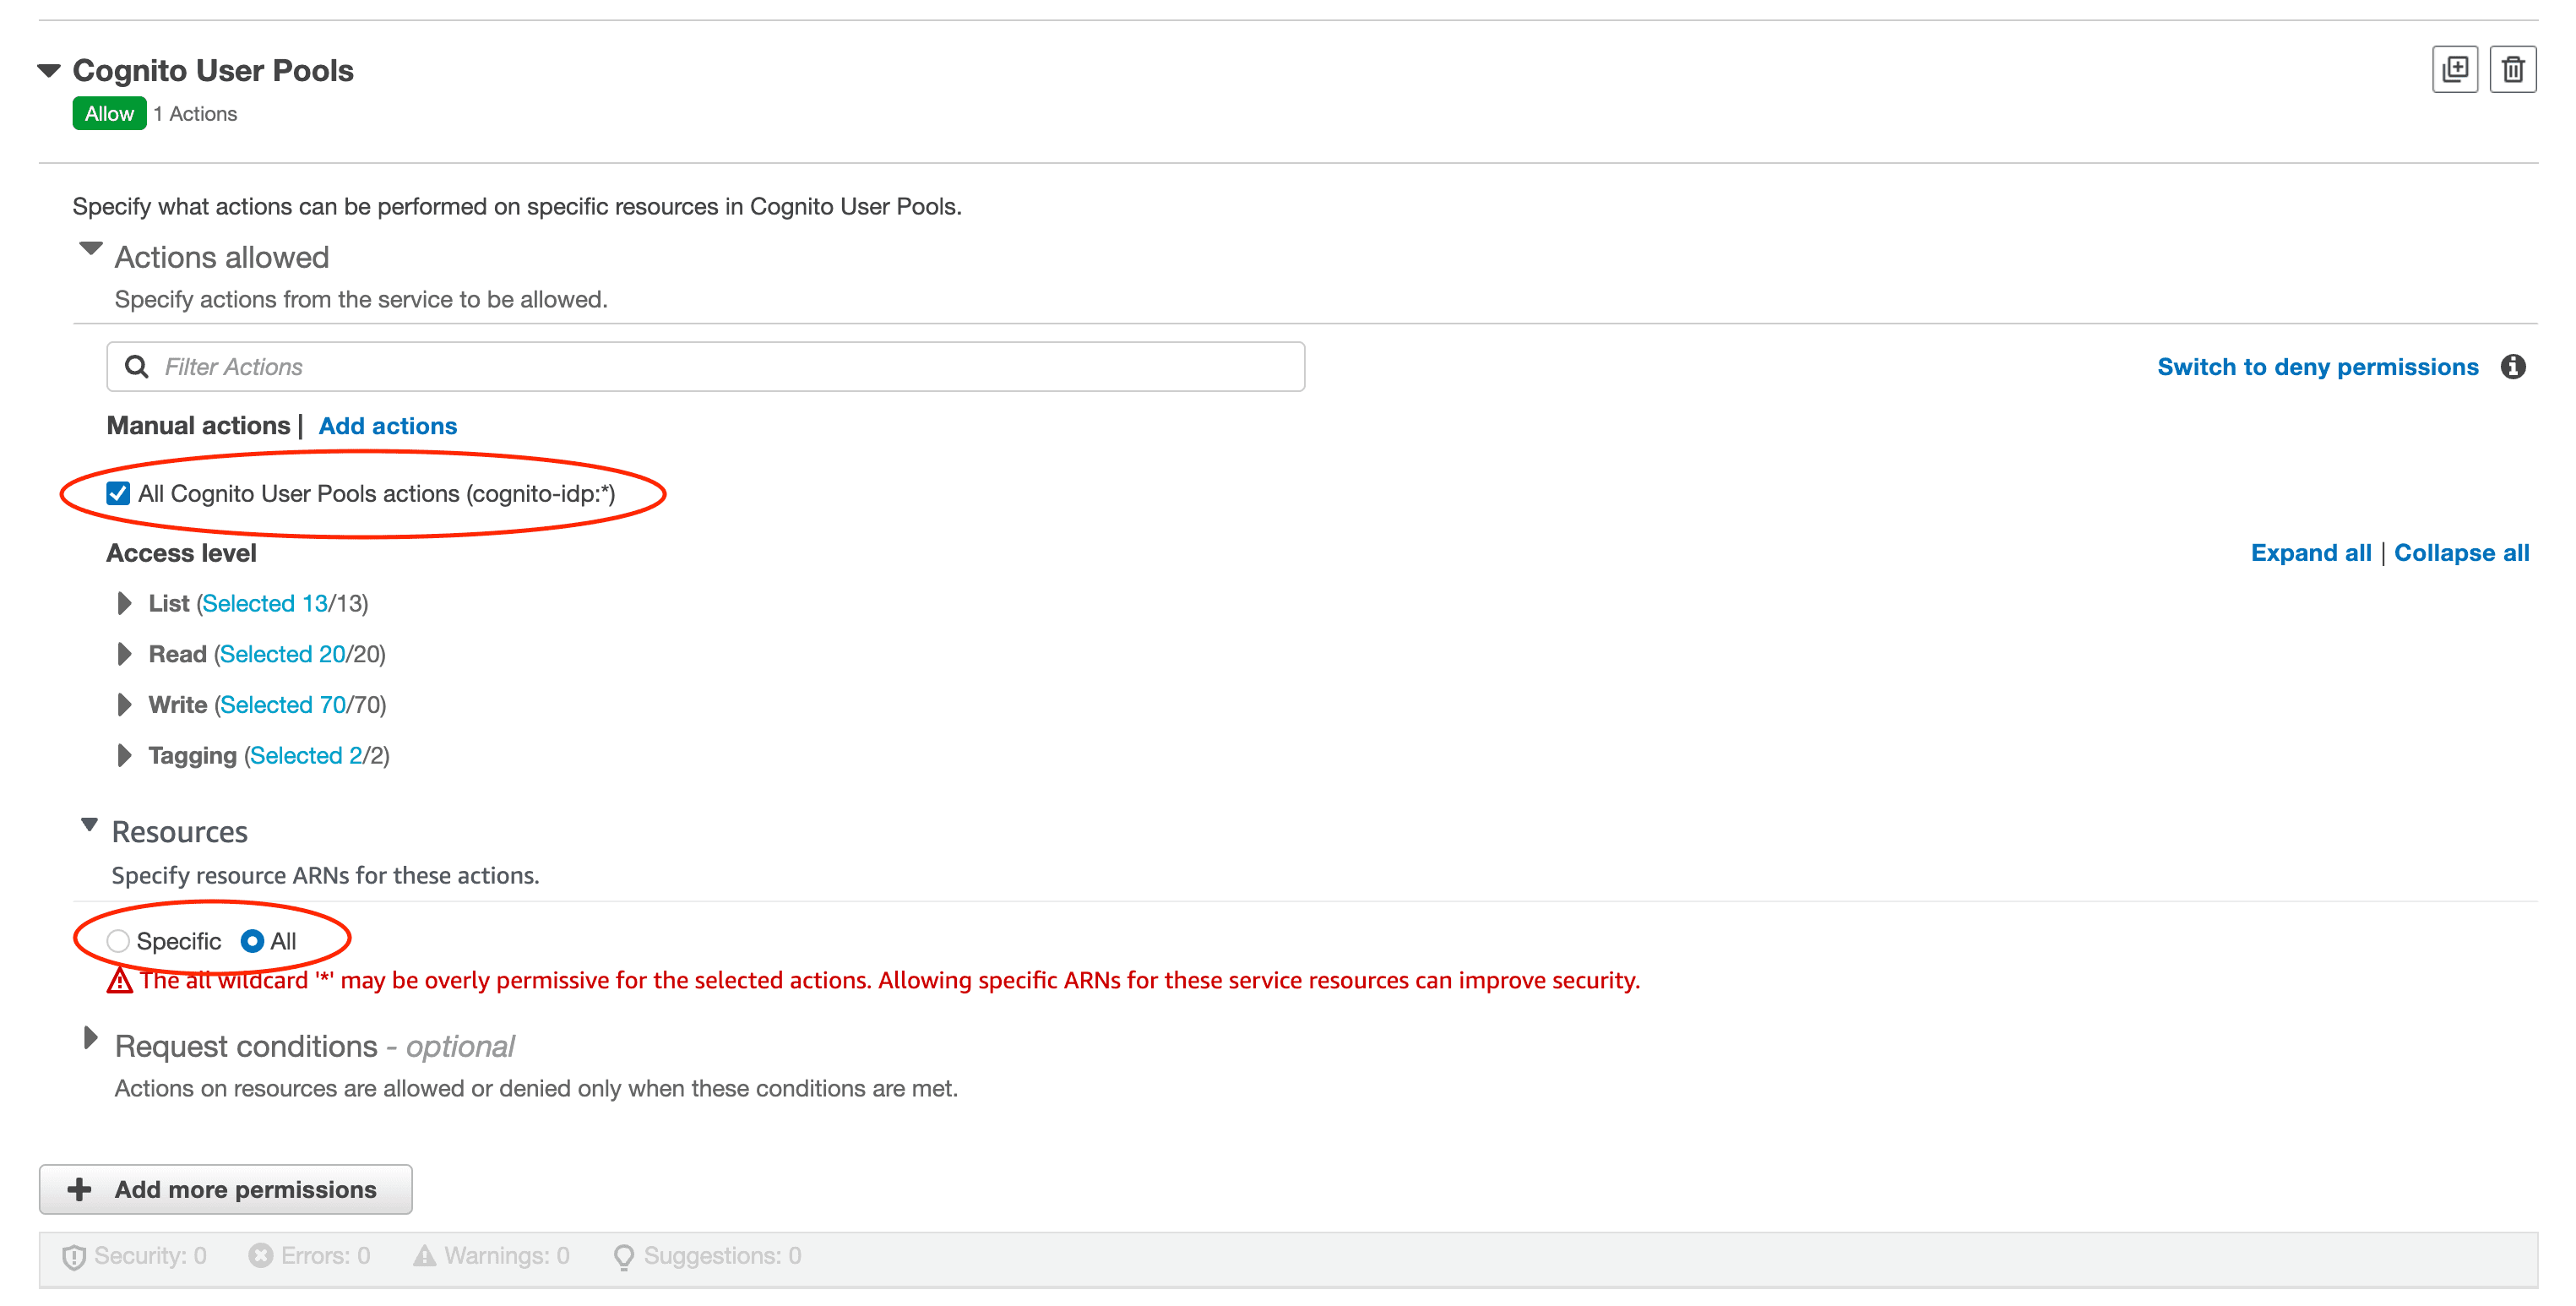
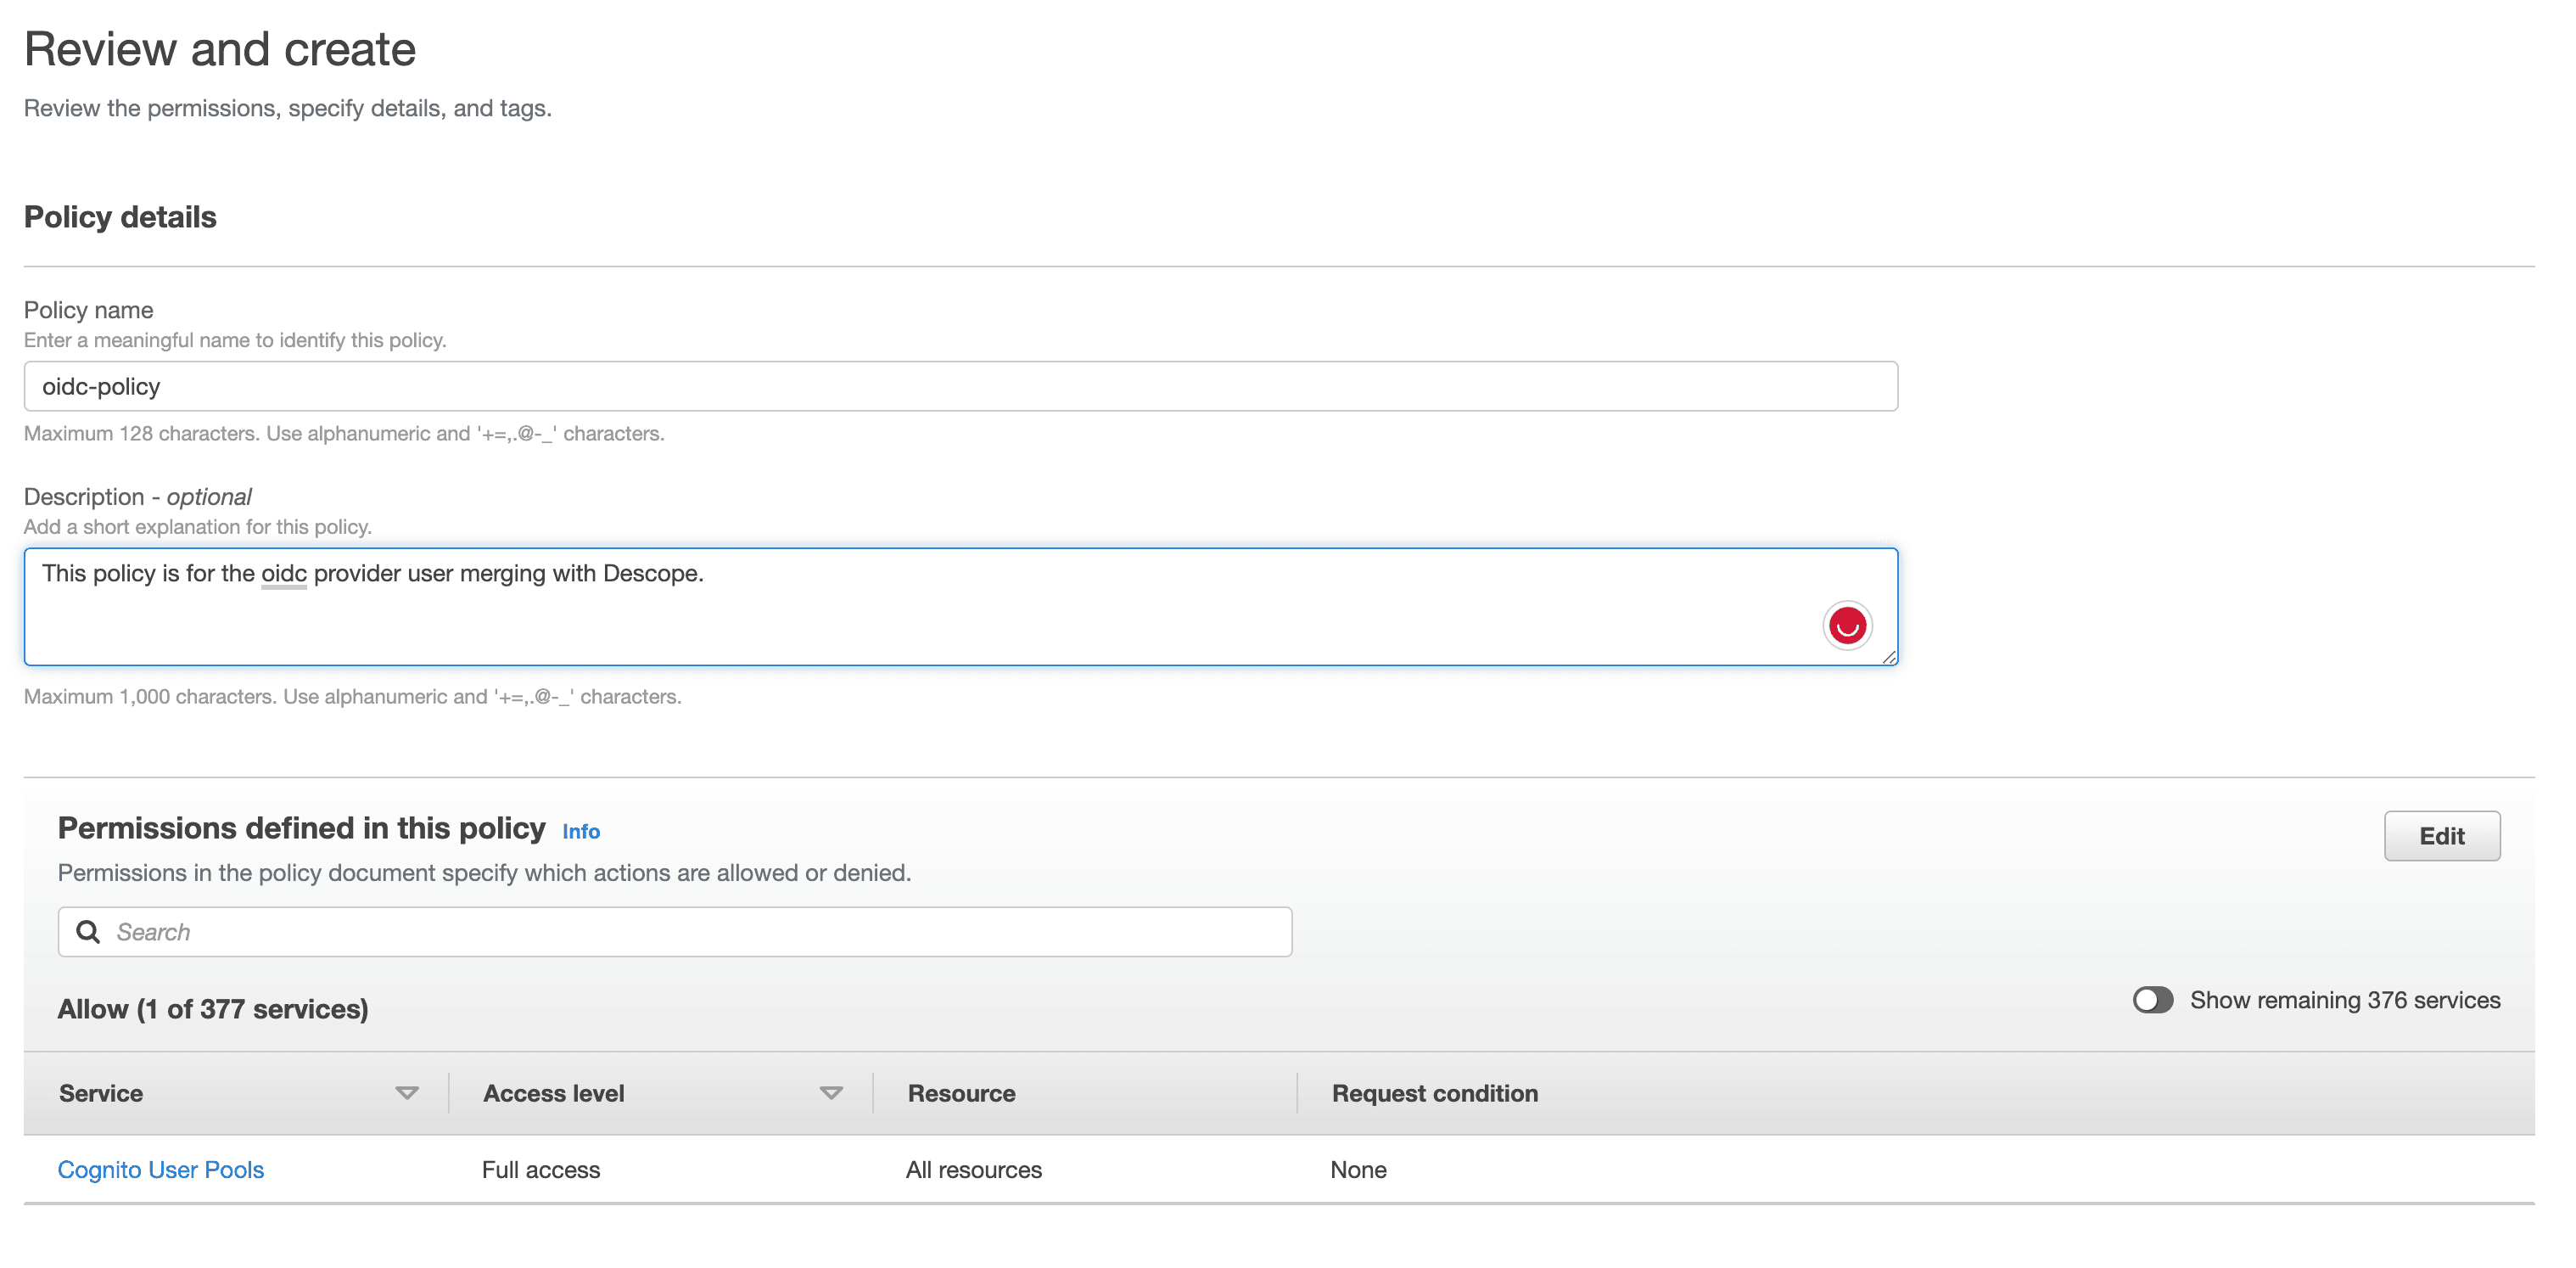
Click Next, name your policy, add a description, and click Create Policy.
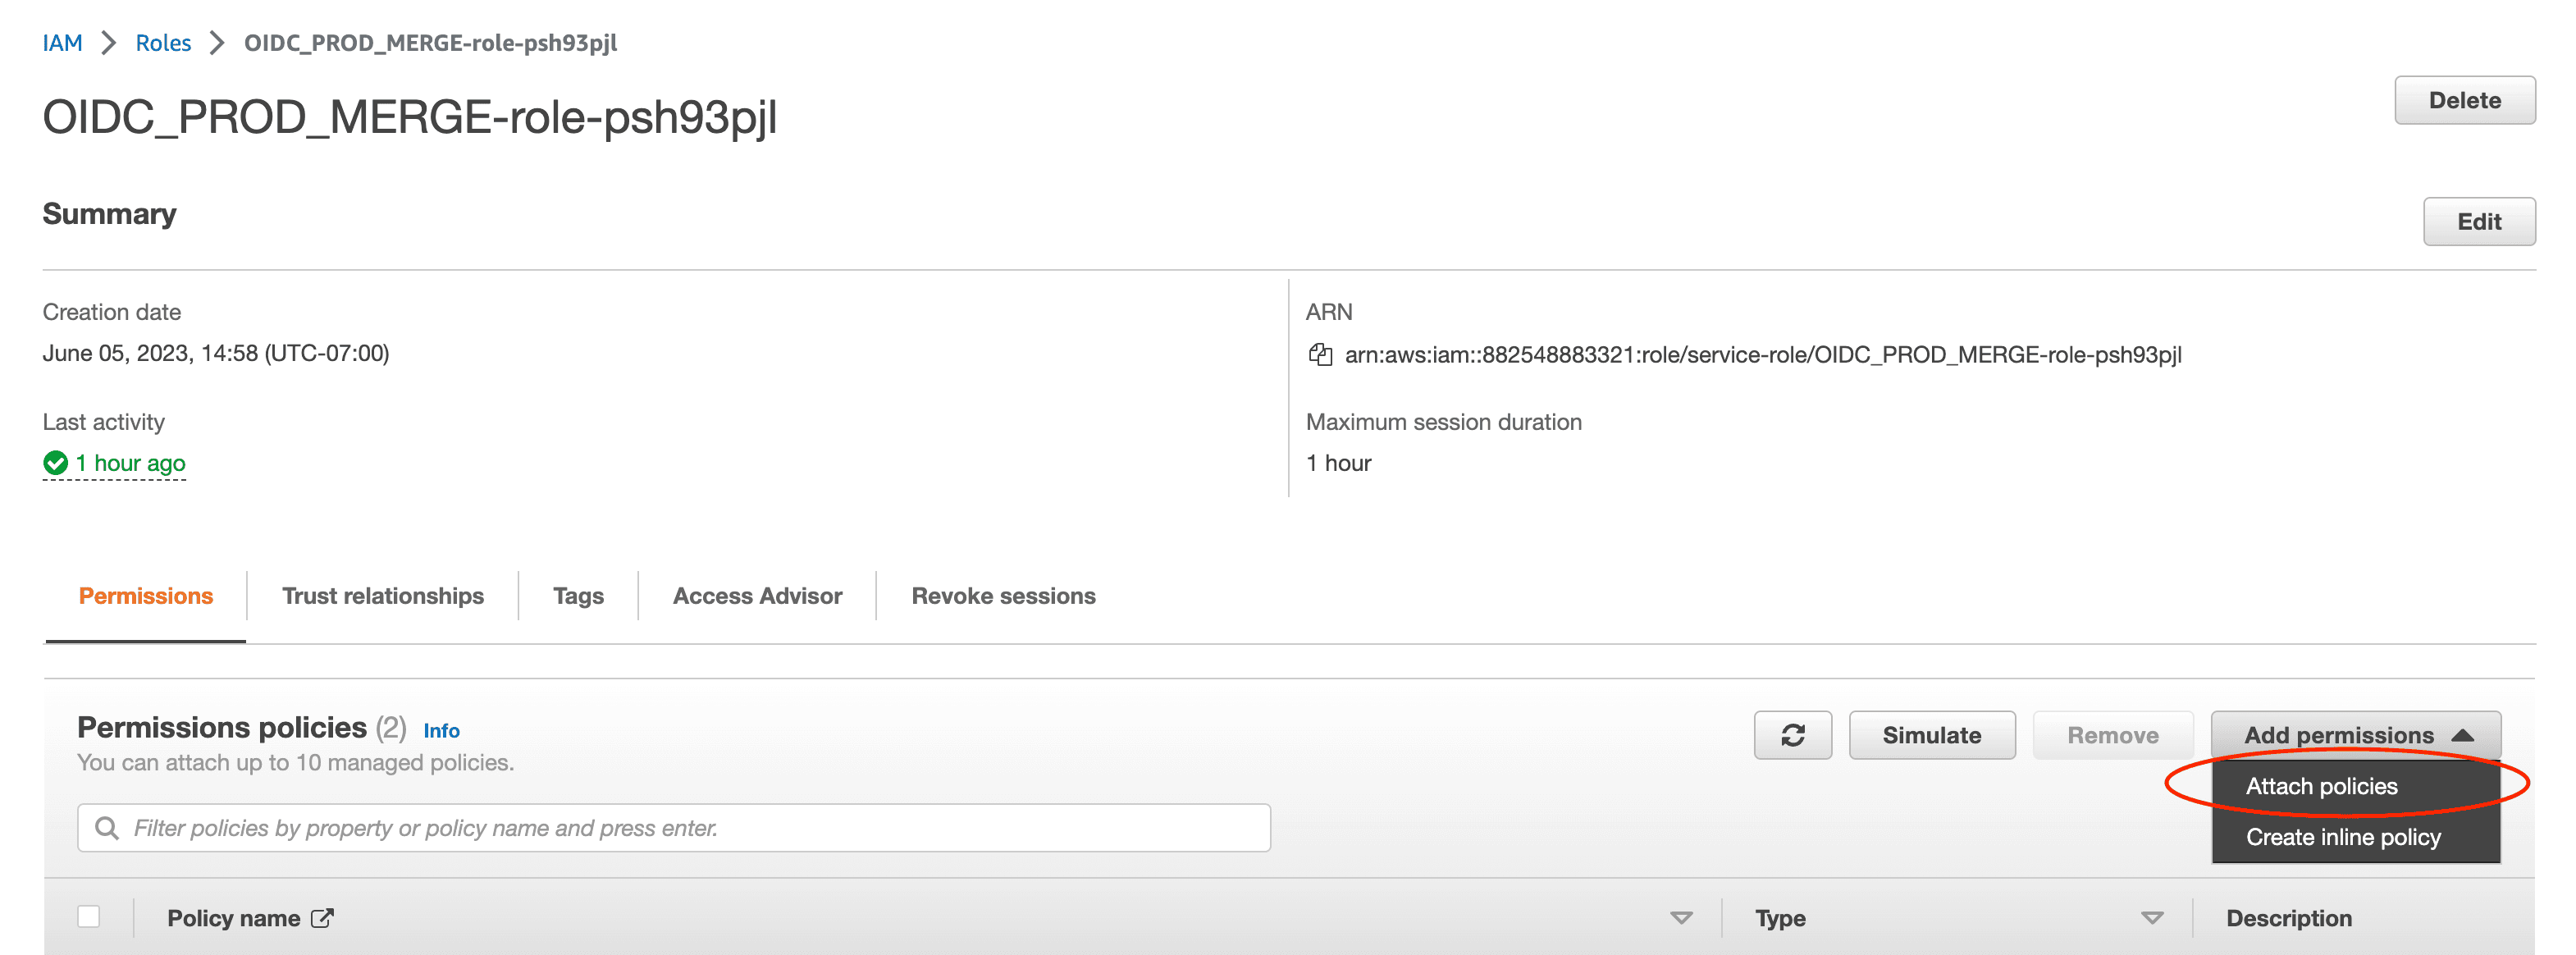
Now head to the Roles section of the IAM Console, and search for the role tied to your Lambda trigger (e.g. the
OIDC_PROD_MERGE) and select it.

Click Attach policies, find the policy you just created, and add it to the role.
Once attached, your Lambda trigger will have full access to user identity data via the Cognito SDK, allowing it to link Descope users with their Cognito counterparts during sign-in.
Descope will automatically check whether a user already exists in your Amazon Cognito user pool, using their verified email tied to biometrics. If a match is found, user identities are merged seamlessly, preserving roles, permissions, and settings.
There’s no added security risk here. Since Descope enforces email verification whenever passkeys or biometrics are used, a malicious user can’t spoof access with someone else’s email. The Flow simply won’t complete unless verification succeeds.
With this integration, you can add passkeys to Amazon Cognito and deliver a fast, frictionless, and secure login experience — no passwords, no compromises.
If you’re interested in seeing how this is implemented in a sample React application, check out our sample app on GitHub.
Got questions or stuck on a step? Join us in AuthTown, our open developer community where we talk authentication, share tips, and help each other build better login experiences.
Descope: beyond Amazon Cognito passkeys
Descope is a drag & drop CIAM platform that helps developers ship secure login flows with ease. From passkeys and magic links to social login, MFA, and session management — Descope offers a full suite of passwordless options designed to reduce user friction and improve security.
If you are an Amazon Cognito customer and want to explore more about authentication in AWS SaaS apps, sign up for a Free Forever account or book a demo with our experts.