
Table of Contents
Don't have the time to read the entire post? Our human writers will be sad, but we understand. Summarize the post with your preferred LLM here instead.
Writing MCP (Model Context Protocol) tools is the easy part of shipping an MCP server. A tool is a function with a typed schema, and even a novice developer can have five of them humming away locally in the span of an afternoon.
Where things get tough is proving who is allowed to call those tools. MCP clients connect over OAuth, and that means someone has to issue tokens, verify them on every request, and map each user to their permissions. There's a good chance that someone is you, and you're currently hand-rolling an OAuth server just to ship a handful of tools.
This guide will walk you through a better, less-manual path: scaffolding a Next.js MCP server, wiring up Descope so token issuance and discovery are handled for you, and gating each tool on the claims in the JWT. Along the way, we'll cover the patterns we reuse across projects and the problems that cost teams the most time and effort.
Why auth is the hardest part of MCP
An MCP (Model Context Protocol) server exposes tools that an AI assistant can call on behalf of a user. You define the tools, you control who can call them, and the AI handles the UX of invoking them naturally in conversation. Think of it as a typed, auth-aware API bridge between an LLM and a third-party service.
That “auth-aware” part is, however, where the real effort lives. MCP clients connect over OAuth, and the spec expects your server to sit behind a real authorization server. It needs to issue tokens, expose the discovery endpoints clients look for, and encode each user's permissions into the claims. That's not a trivial middleware box to tick. A full OAuth 2.0 / OIDC authorization server is its own second system you'd have to build, secure, and operate alongside the server you actually started with.
That's the gap Descope fills: a drop-in inbound OAuth/OIDC provider that handles token issuance, discovery, and scope-to-role mapping for you, so your server only has to verify tokens rather than issue them. The rest of this walkthrough is that division of labor in practice: Descope owns issuance, your server owns enforcement.
The stack at a glance
Layer | Tool | Notes |
|---|---|---|
Framework | Next.js App Router | Route handler at app/api/[transport]/route.ts |
MCP Layer | mcp-handler | createMcpHandler + withMcpAuth |
Auth | Descope | Inbound app, OIDC discovery, JWKS verification |
Token Verification | jose | Validates JWTs locally against Descope JWKS |
Input Validation | zod | Schemas for tool input parameters |
Local Testing | mcp-remote | OAuth proxy between Claude Desktop and localhost |
Deploy | Vercel | Works out of the box with Next.js |
The third-party services (Slack, GitHub, Linear, etc.) are just a fetch call inside your tool handler. The pattern is identical regardless of what you’re integrating with.
Prerequisites
Node.js 18 or later, with
npmandnpxon your pathA Descope project: the Free Forever tier covers everything in this tutorial
A Vercel account for deployment
Claude Desktop (or another MCP client) for testing the OAuth flow end to end
Note: Descope has integrations on the Vercel Marketplace for both user auth and MCP auth. Use them to take advantage of one-click setup, environment variable syncs, and unified billing with Vercel
How the pieces fit together
Before the build steps, here’s the system from a bird’s eye view. This traces a request from the client down to the third-party API:
MCP Client (Claude Desktop, Cursor, etc.)
        │
        │  OAuth via mcp-remote (local) or direct (hosted)
        ▼
Descope (OAuth authorization server)
        │  Issues JWT with scopes + roles + custom claims
        ▼
Your MCP Server (Next.js on Vercel)
        ├── verifyToken()  ← validates JWT against the Descope JWKS
        └── Tool handlers ← check authInfo.scopes / roles / email
        │
        │  API calls (REST, GraphQL, etc.)
        ▼
Third-Party Service (Slack, GitHub, Linear, Jira, ...)
Building the server, step by step
The following nine steps walk through the setup and configuration for an auth-aware MCP server with Next.js and Descope.
Step 1: Scaffold a Next.js app
npx create-next-app@latest your-mcp-server --typescriptThe MCP handler lives at app/api/[transport]/route.ts. The [transport] dynamic segment is required: mcp-handler uses it to negotiate the transport type.
Step 2: Install dependencies
npm install mcp-handler @modelcontextprotocol/sdk jose zodStep 3: Create an MCP Server Resource in Descope
This is the piece that saves you from writing an OAuth server yourself. In the Descope Console, go to Resources and create a new MCP Server Resource—it stands up a full OAuth 2.0 / OIDC authorization server that issues tokens to your MCP clients. The same Resource also appears under MCP Servers in the Agentic Identity Hub, which is where you'll manage connected clients and policies later. Out of the box you get:
A hosted authorization server: Token issuance, the /authorize and /token endpoints, and the login UI, all managed. You never touch OAuth internals.
OIDC discovery: A
.well-knownendpoint your server reads at startup to resolve the issuer and JWKS URI (this is what Step 4 consumes).A JWKS endpoint: The public keys your server verifies tokens against locally, so you're not making a network call to validate every request.
MCP scopes: define custom scopes (
mcp:read,mcp:write) directly on the Resource, then use Policies to control which users or agents can receive them.Client registration: MCP clients like Claude Desktop register themselves rather than using a pre-shared client ID. Descope supports both CIMD and DCR, so new clients can onboard without you hand-provisioning credentials for each one.
Then wire it up:
From the Resource's Usage Samples section, copy the Well-Known URL—your server uses it to discover the issuer and JWKS endpoint.
Set the MCP Server URL (the token audience) to your Vercel URL, or
http://localhost:3000for local dev.Define your MCP scopes (e.g.
mcp:read,mcp:write) and the Policies that map user roles to them.
Step 4: Set up OIDC discovery
Fetch the issuer and JWKS from Descope's discovery doc at startup. Cache it so you don't hit the endpoint on every request:
const DESCOPE_WELL_KNOWN_URL = process.env.DESCOPE_WELL_KNOWN_URL!;

let authConfigPromise: Promise<{ issuer: string; jwks: any }> | null = null;

const getAuthConfig = () => {
  if (!authConfigPromise) {
    authConfigPromise = fetch(DESCOPE_WELL_KNOWN_URL)
      .then(r => r.json())
      .then(cfg => ({
        issuer: cfg.issuer,
        jwks: createRemoteJWKSet(new URL(cfg.jwks_uri)),
      }))
      .catch(err => { authConfigPromise = null; throw err; });
  }
  return authConfigPromise;
};
Step 5: Implement token verification
This is the function withMcpAuth calls on every request. It takes the bearer token off the request, verifies it against the JWKS you cached in Step 4, and returns the scopes and claims your tool handlers will check.
const verifyToken = async (req: Request, bearerToken?: string) => {
  if (!bearerToken) return undefined; // → 401
  try {
    const { issuer, jwks } = await getAuthConfig();
    const { payload } = await jwtVerify(bearerToken, jwks, {
      issuer,
      ...(EXPECTED_AUDIENCE ? { audience: EXPECTED_AUDIENCE } : {}),
    });
    const scopes = (payload.scope as string ?? "").split(" ").filter(Boolean);
    const roles = Array.isArray(payload.roles) ? payload.roles
      : payload.roles ? [payload.roles] : [];
    return {
      token: bearerToken,
      scopes,
      clientId: (payload.azp as string) ?? "",
      extra: { userId: payload.sub, roles, email: payload.email },
    };
  } catch { return undefined; } // → 401
};

const authHandler = withMcpAuth(handler, verifyToken, {
  required: true,
  resourceMetadataPath: "/.well-known/oauth-protected-resource",
});

export { authHandler as GET, authHandler as POST };
Step 6: Register your tools
Each tool is registered with a scope requirement baked into its handler. The pattern below shows both cases: a read-only tool with no inputs, and a write tool with a typed input schema enforced by zod.
const handler = createMcpHandler((server) => {
  // Tool with no inputs
  server.registerTool(
    "list_items",
    { description: "List items. Requires mcp:read scope." },
    async (extra) => {
      if (!extra.authInfo?.scopes?.includes("mcp:read")) {
        return { content: [{ type: "text", text: JSON.stringify({ error: "insufficient_scope" }) }], isError: true };
      }
      // call your API here
    }
  );

  // Tool with typed inputs
  server.registerTool(
    "create_item",
    {
      description: "Create an item. Requires mcp:write scope.",
      inputSchema: { name: z.string(), description: z.string().optional() }
    },
    async ({ name, description }, extra) => {
      if (!extra.authInfo?.scopes?.includes("mcp:write")) {
        return { content: [{ type: "text", text: JSON.stringify({ error: "insufficient_scope" }) }], isError: true };
      }
      // call your API here
    }
  );
}, undefined, { basePath: "/api", verboseLogs: true, maxDuration: 800 });
Step 7: Configure environment variables
Pull the well-known URL and audience from the Resource you created in Step 3, and add whatever token your tool handlers need to call the underlying third-party service.
# Required
DESCOPE_WELL_KNOWN_URL=https://api.descope.com/v1/apps/agentic/{projectId}/{appId}/.well-known/openid-configuration

# Your service's API token (Slack bot token, GitHub PAT, etc.)
YOUR_SERVICE_TOKEN=...

# Required in production: binds tokens to this server
EXPECTED_AUDIENCE=https://your-app.vercel.app
Step 8: Test locally with Claude Desktop
Claude Desktop needs mcp-remote as a proxy to handle the OAuth flow against your localhost server.
Add to claude_desktop_config.json:
{
  "mcpServers": {
    "my-mcp": {
      "command": "/path/to/npx",
      "args": ["-y", "mcp-remote", "http://localhost:3000/api/mcp"]
    }
  }
}
Get the full npx path with which npx. Restart Claude Desktop after editing. On the first connection, mcp-remote opens a browser tab for Descope login, complete it and the token is cached.
Step 9: Deploy to Vercel
vercel --prodSet all env vars in the Vercel dashboard. Update EXPECTED_AUDIENCE to your production URL and update the Descope MCP Server Resource’s audience to match.
Three guard patterns for gating tools
There are three patterns that we’ve used across the MCP projects so far. Pick what fits your security model. The key idea: the check in your handler only works because Descope put the claim in the JWT. Each pattern is a console-config half and a code half.
Scope check, the most common. Gate by OAuth scope in the JWT:
if (!extra.authInfo?.scopes?.includes("mcp:read")) return denied("insufficient_scope");Role check. Gate by user role from Descope:
const roles = extra.authInfo?.extra?.roles as string[] ?? [];
if (!roles.includes("admin")) return denied("admin role required");
Email domain check. Gate by email claim, useful for internal tools:
const email = extra.authInfo?.extra?.email ?? "";
if (!email.endsWith("@yourcompany.com")) return denied("company email required");
These compose; a privileged tool might require both a scope and a role. And note the division of labor: Descope decides who gets which claims, your server decides which claims a tool requires. The server-side check is your enforcement point; the console is where the grants live.
How Descope's AuthTown MCP server uses this pattern
Everything up to this point has used a generic list_items / create_item server. So, what does it look like when we put some more "active" tools to use? Descope's MCP server for the AuthTown dev community uses the same auth layer from Steps 4 and 5, and only the tool handlers differ.
AuthTown is where Descope users and the Descope team talk to each other. Customers and developers ask questions and get answers from the Descope chatbot and from support staff, across public channels like Ask-A-Descoper and private channels belonging to individual customer companies. The MCP server puts that workspace in reach of an assistant.
Two requests account for most of the usage:
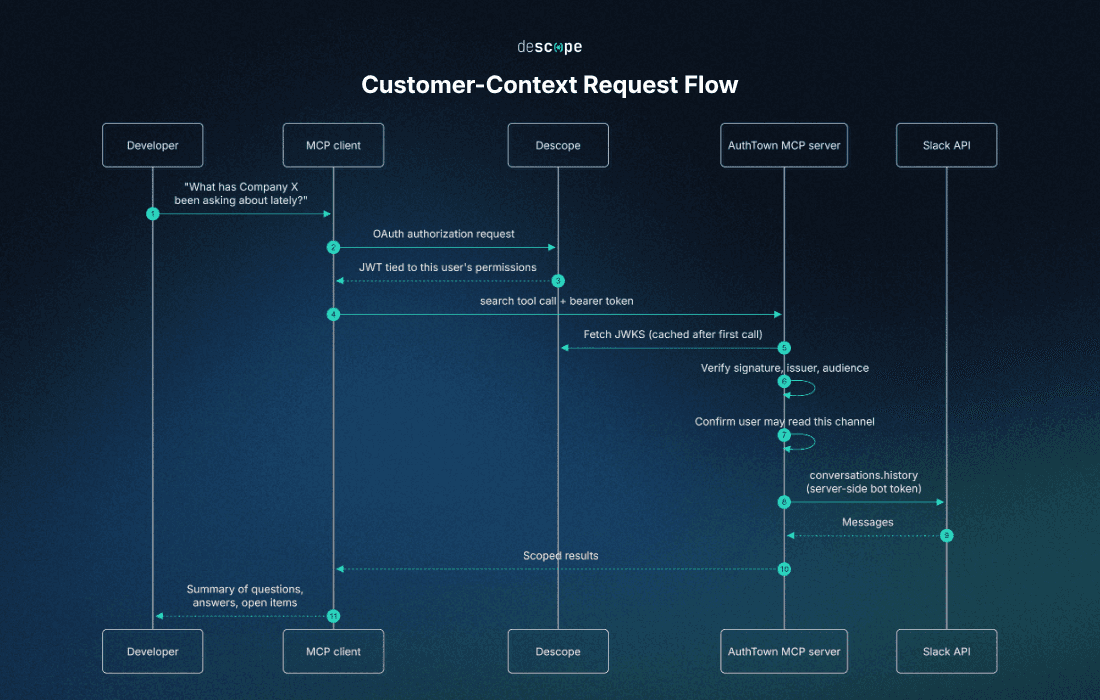
Customer context: A developer asks what a particular customer has been raising lately, the assistant searches the company's private channel, and the server returns the recent questions along with the responses from the chatbot or support.
Documentation coverage: The same search runs across the public channels instead, aggregating recurring questions so they can be checked against the docs to find where coverage is thin.
With the broader Slack platform rules, a bot can only read channels it has been invited to, so conversations.history returns nothing for the rest of the workspace no matter what the JWT says. And Slack's native search.messages endpoint accepts user tokens but not bot tokens, so search is implemented as conversations.history plus keyword filtering inside the handler.
The reason for auth here isn't just gatekeeping sensitive data, though. The request carries a Descope-issued JWT tied to a specific person, so the server can confirm that whoever is asking holds the permissions to see that customer's channel, and results come back scoped to the channels that person is allowed to read.
A static API key would behave very differently. Anyone who obtained it would inherit the same access, and the server would have no way to tell who was behind a given request. Implementing proper auth on this MCP server delivers on two fronts: access control and accountability. We know who made a request, and we can confirm they had permission to get the output. That's not something you could do with a shared service account or shared credentials.
Here is the customer-context request, end to end:
Tips before you get started
MCP auth is a moving target in more ways than one, with an agile spec that evolves rapidly and identity scaffolding that pulls from niche modalities. Here are a few tips that will hopefully save you time before you dive in with your own build:
A deprecated SDK method that takes tools down with it
The MCP SDK deprecated server.tool() in favor of server.registerTool(), and the deprecated method throws errors that can leave tools in a faulty state. The new signature takes an options object as its second argument, holding description and inputSchema, so the migration is mechanical once you know it is needed. If you own MCP code written against an earlier SDK, make sure to review for this potential failure point. And make sure to always build from the most recent SDK.
Stale tokens make permissions look broken
mcp-remote caches tokens on disk, which is convenient until you start testing permissions. During local testing for the AuthTown MCP server, the cache held a previous user's token, so requests came through carrying the wrong permissions. The symptom is genuinely confusing, because the code is correct and the Descope configuration is correct, but the behavior still doesn't match either of them. Once we traced it to the cache, the fix was straightforward enough; but, do yourself a favor and clear the cache before any test that involves a permission change.
Process habits worth adopting early
Fetch the Descope discovery document once, at module level, as the Step 4 code does. It rarely changes, and fetching it inside the request handler adds a round trip to every tool call while discarding the key cache that createRemoteJWKSet maintains internally. Reset the promise in the .catch so a single failed fetch doesn't leave a rejected promise cached until the next deploy.
And during development, log extra.authInfo?.scopes and the roles on every tool call. The log shows what the token actually contains rather than what you assume it contains, which is usually the fastest answer to why a tool is returning 401.
Try it yourself
Most of the distance between an MCP server that runs on your laptop and one that you can hand to real users is auth. With the MCP auth spec, that might sound like setting up an entire secondary system even more complex than the server you just built. But the kicker is that none of that needs to be hand-rolled.
With Descope issuing tokens and serving discovery, the server you actually build is the part you can focus on: the tools, the user interaction, and getting results. Scaffold the Next.js handler, point it at your MCP Server Resource’s well-known URL, verify the tokens locally against the JWKS, and gate each tool on the claims Descope put in the JWT.
Everything in this walkthrough works on a Descope Free Forever account. You can create an MCP Server Resource in the Descope Console and have a working authorization server before your first deploy. The MCP auth docs go deeper into configuration and Policies, and if you’re starting from an existing local server instead of a fresh build, our guide for adding auth and remote support to a local MCP server will guide you through it.
Hit a gotcha we didn’t? Come tell us about it in AuthTown, our developer community. Want to pick the minds of Descope’s auth experts? Book a demo to chat over your MCP and agentic identity needs.