
Table of Contents
Don't have the time to read the entire post? Our human writers will be sad, but we understand. Summarize the post with your preferred LLM here instead.
This tutorial was written by Manish Hatwalne, a developer with a knack for demystifying complex concepts and translating "geek speak" into everyday language. Visit Manish's website to see more of his work!
Giving an AI agent access to external systems turns it from a conversational tool into a software operator that can call APIs, query databases, execute commands, read and write files, and interact with SaaS platforms on your behalf. That expanded reach, however, raises a foundational security question: where do credentials live, and how do you keep an agent from accessing more than any given task actually requires?
Most early agent implementations don't answer that question well. Environment variables, local config files, and hardcoded keys with broad permissions are common shortcuts that quietly accumulate into real operational risk. With increased agentic autonomy, these approaches become harder to manage: secrets are difficult to rotate, access boundaries drift, and there's often no practical way to audit what the agent did or why.
LlamaIndex provides a structured, composable framework for building agents that reason over data and invoke tools with precision. To handle the identity and credential layer, this tutorial integrates LlamaIndex with Descope's Agentic Identity Hub, a platform built specifically for securing agentic workflows. Descope brings verified session tokens with scopes, secure credential storage through Connections, and centralized audit logging into a single managed layer.
The first tutorial in this series built a "daily planner" agent using the Claude Agent SDK. If you prefer LlamaIndex for its flexibility, including the ability to use any underlying LLM, this second tutorial is for you. You'll learn how to build a working agent that authenticates with multiple external services using Descope-managed credentials, operates under a verified session identity, and keeps per-tool access boundaries intact without touching your codebase for secrets.
Secure agent architecture with Descope and LlamaIndex
The architectural diagram below shows the two core security flows in this setup: the agent establishing its own verified identity, and the tools retrieving the right credentials to reach external services on the user's behalf via Descope.
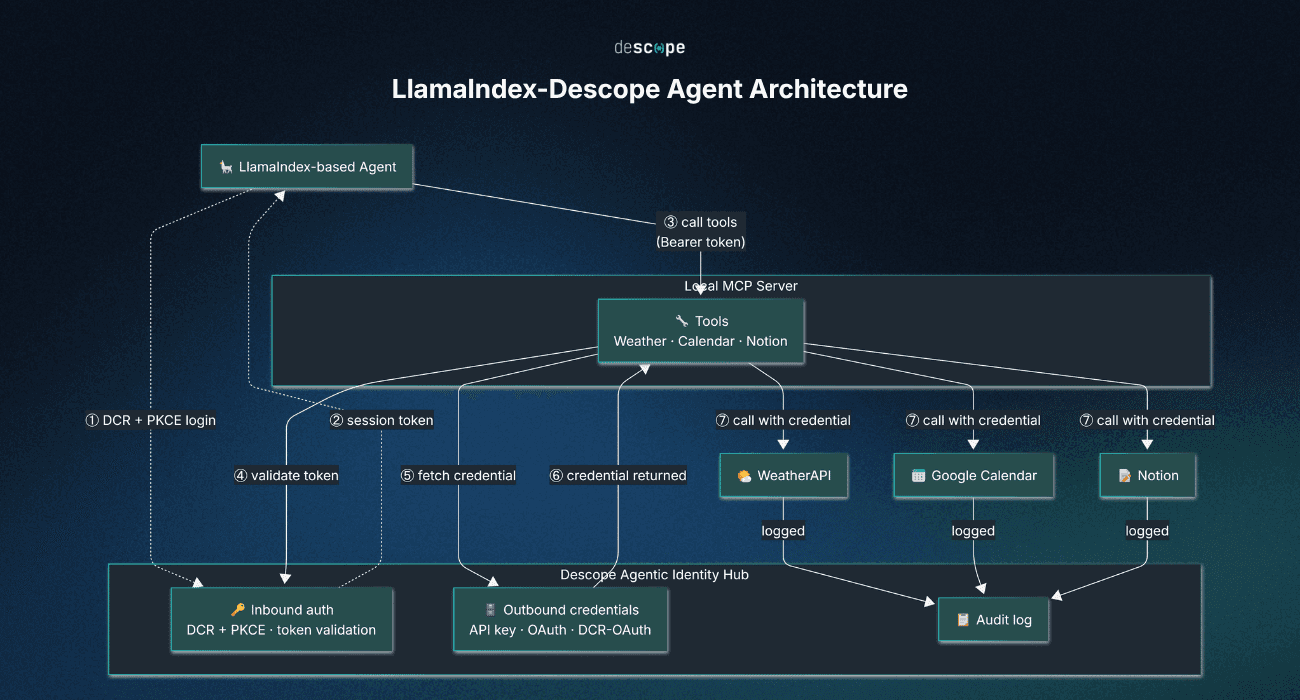
The inbound layer covers how the agent establishes its identity with the local MCP server. At startup, the agent completes a DCR + PKCE login flow with Descope and receives a session token. That token is sent as a Bearer header on every tool call, and the MCP server checks it with Descope before proceeding.
The outbound layer covers how the MCP server reaches third-party services on the user's behalf. Once a tool call clears validation, the server requests the appropriate credential from Descope: a static API key for WeatherAPI, an OAuth token for Google Calendar, and a DCR-based OAuth token for Notion. The agent has no visibility into any of these credentials. They’re fetched from Descope by the MCP server at runtime, scoped to the current request, and discarded when no longer needed.
Note: This separation keeps the agent's own identity apart from the credentials it borrows on the user's behalf. The agent authenticates once at startup and carries a verified identity for the duration of its session. External credentials are brokered on demand, scoped to a specific user identity, and never stored in the codebase or surfaced to the agent. If a credential hasn't been stored yet (that is, if the relevant service is not yet connected and authorized), the tool returns an authorization link rather than throwing an error, letting the user complete the connection and re-run the agent. This design also means the same agent can serve multiple users, with Descope managing each user's OAuth tokens independently.
Setup and prerequisites
The demo agent works with three external services, chosen specifically to cover the range of credential types you're likely to encounter in real-world agentic workflows:
WeatherAPI.com: A public weather API authenticated with a static API key
Google Calendar: Your personal calendar, accessed via OAuth
Notion: A workspace document created through the Notion MCP server, accessed via Dynamic Client Registration (DCR)
The agent's task is straightforward:
You ask the agent to plan your day. It fetches the local weather (static API key), retrieves your schedule from Google Calendar (OAuth), and drafts a plan page in Notion (DCR).
All three credentials are stored in Descope's Connections vault. The agent pulls them from Descope at runtime, which means your repository and local environment stay completely free of sensitive keys and tokens.
You'll need the following to complete the tutorial:
Python 3.11+ and pip
A Descope account with a project named
Descope-Llama-Agent. Sign up here. Keep your Management Key and Project ID ready.An OpenAI API key. Get one here.
A WeatherAPI key. The free tier works fine. Get one here.
A Google Cloud project with the Calendar API enabled and an OAuth 2.0 client configured.
A Notion account. No manual OAuth app setup is needed since Notion's MCP server handles client registration automatically via DCR.
Project structure
Clone or download the GitHub repository and set up your environment:
cd Descope-LlamaIndex-Agent
python -m venv venv
source venv/bin/activate  # On Windows: venv\Scripts\activate
pip install -r requirements.txt
The repository is organized as follows:
Descope-LlamaIndex-Agent/
├── get_user_token.py      # OAuth flow to authenticate user with Descope MCP app
├── mcp_server.py          # FastMCP server exposing 3 tools
├── run_llama_agent.py     # LlamaIndex agent that calls the MCP server
├── settings.py            # Contains different URLs required for this project
├── requirements.txt       # Dependencies
├── .gitignore             # Git ignore file
├── .env.example           # Environment variables (see below)
└── README.md              # Project information
Add credentials
Rename .env.example to .env and populate it with your values:
# Change it as per your MCP server URL
MCP_SERVER_URL=http://127.0.0.1:8000

# Add relevant credentials below
DESCOPE_PROJECT_ID=your_descope_project_id
DESCOPE_MANAGEMENT_KEY=your_descope_management_key
DESCOPE_MCP_SERVER_CONFIG_URL=your_mcp_server_config_url

# OpenAI key used by the LlamaIndex agent
OPENAI_API_KEY=your_openai_api_key
The DESCOPE_MCP_SERVER_CONFIG_URL value comes from the Descope MCP server setup covered later in this tutorial. You can leave it blank for now and return to fill it in once that step is complete.
Descope Connections: the credential vault
Descope Connections is where your MCP server fetches credentials at runtime: API keys, OAuth tokens, and DCR-based credentials. They're managed centrally, scoped to individual users, and kept completely separate from your codebase.
Static API key connection
Open your Descope project (Descope-Llama-Agent) and head to Agentic Identity Hub > Connections. Click + Connection, pick Custom API Key App from the library, and give it the name weather-api and the ID weather-api-key. Your MCP server will use that connection ID to retrieve the key at runtime.
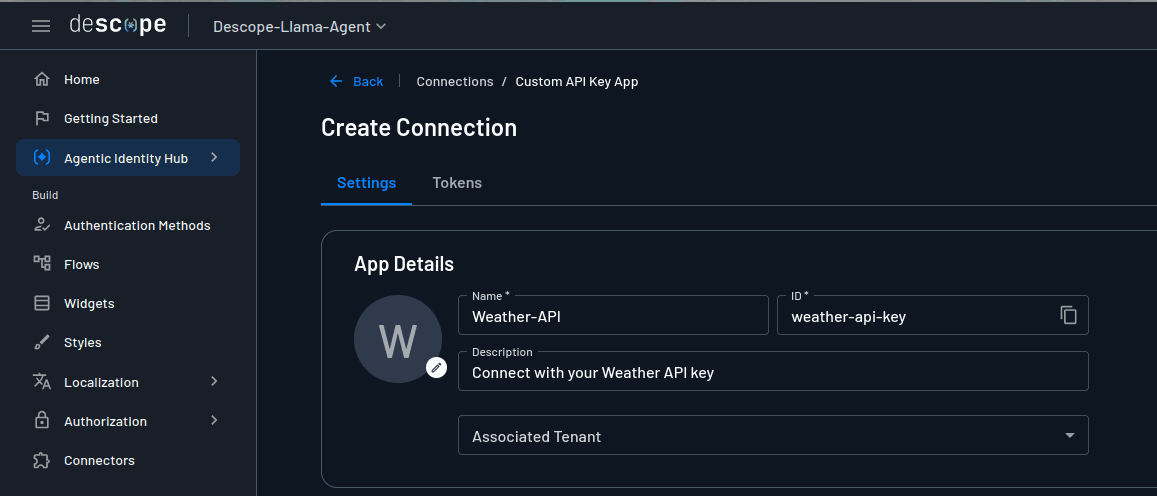
Here is how the MCP tool fetches it:
token_resp = descope_client.mgmt.outbound_application.fetch_token(
    app_id="weather-api-key",
    user_id=user_id,
)
api_key = token_resp.get("token", {}).get("accessToken")
The app_id tells Descope which Connection to look up, and user_id ties the credential to a specific user. Storing the actual key value requires a Descope Flow, which is covered later in this tutorial.
Note: Per-user credential isolation is the primary reason to use Connections over environment variables. When multiple users each bring their own API key for a paid service, a single shared environment variable simply can't model that. Descope Connections store each user's key separately, and that isolation becomes indispensable once OAuth tokens enter the picture, since those tokens are always tied to the individual who authorized them.
Custom OAuth app: Google Calendar
You'll need your Client ID and Client Secret from Google Cloud to configure Calendar access. The Google Calendar quickstart guide walks through the full process. The steps relevant to this tutorial are:
Create a Google Cloud project at console.cloud.google.com and enable the Google Calendar API under APIs & Services.
Configure an OAuth consent screen with 'External' audience, adding your email as a test user. Testing mode is sufficient for this tutorial.
Add the scope
https://www.googleapis.com/auth/calendar.readonlyunder Data Access. This restricts the agent to reading calendar events with no write access.Create a Web Application OAuth client under Google Auth Platform and register Descope's callback URL (
https://api.descope.com/v1/outbound/oauth/callback) as an authorized redirect URI.Copy the Client ID and Client Secret for use in the next step.
In your Descope project, go to Agentic Identity Hub > Connections, click + Connection, and select Google Calendar. Choose Manual under connection settings, paste in the Client ID and Client Secret, and add https://www.googleapis.com/auth/calendar.readonly under Scopes. Create the connection and note its ID (google-calendar).
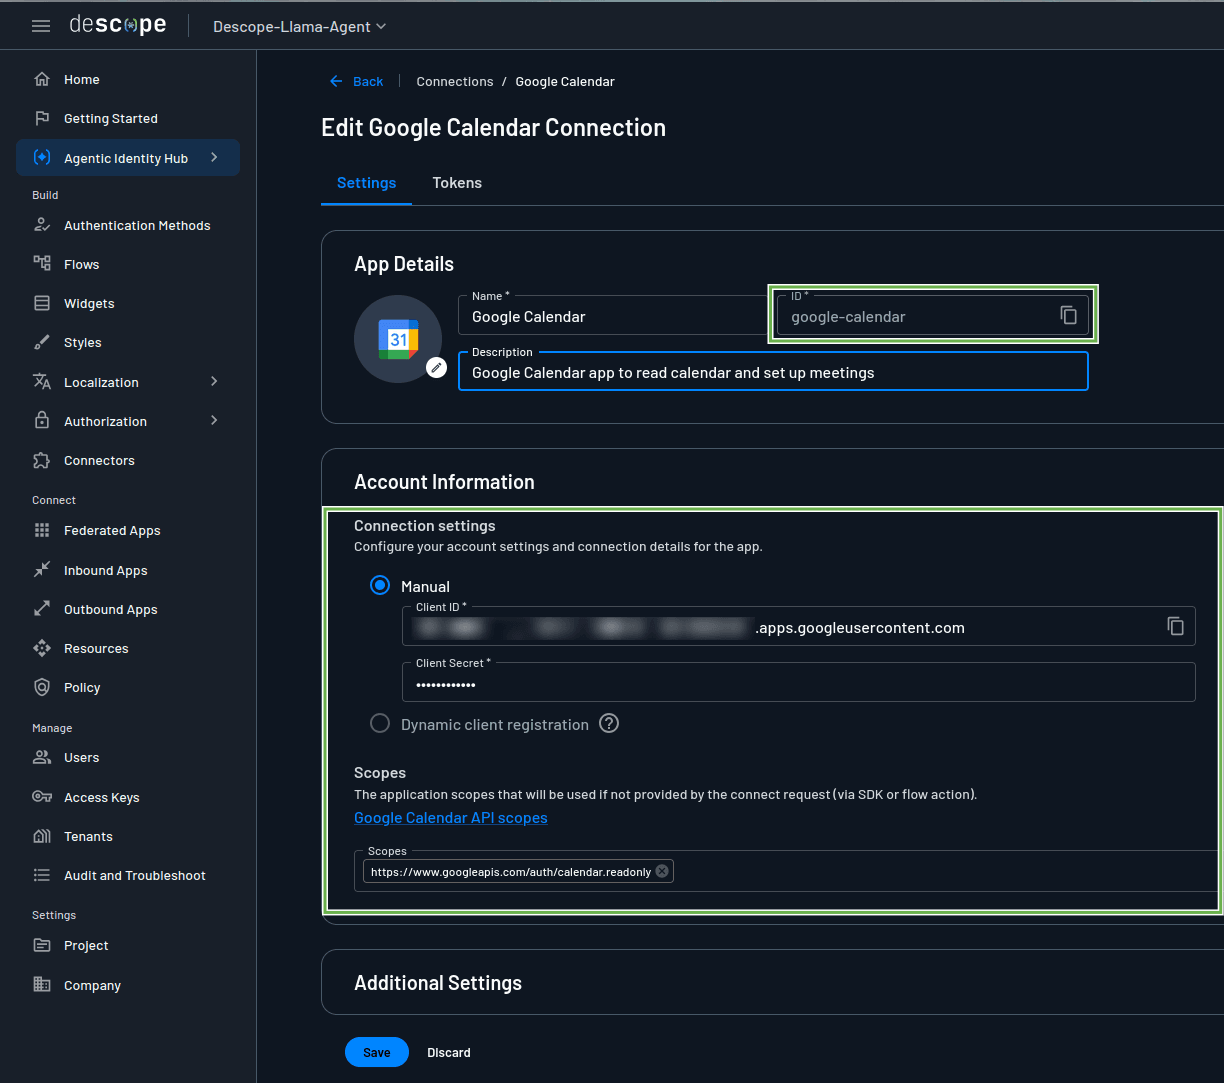
Once users have authorized access, their tokens will appear under the Tokens tab next to the Connection settings.
Retrieving a user's OAuth token at runtime looks like this:
token_resp = descope_client.mgmt.outbound_application.fetch_token(
    app_id="google-calendar",
    user_id=user_id,
)
access_token = token_resp.get("token", {}).get("accessToken")
The user_id is extracted from the bearer token the agent sends with each request. Descope handles token refresh automatically, so your MCP server never needs to manage token expiry.
Note: The agent isn't accessing Google Calendar for itself but on behalf of a real person. That distinction drives the entire credential design. A static shared token would collapse all users into a single calendar view, which is both incorrect and a privacy problem. Scoping each token to a
user_idmeans the agent sees exactly what that user authorized, nothing more.
DCR-registered third-party MCP server: Notion
Notion's Connection setup is simpler than Google Calendar's because Notion's MCP server supports Dynamic Client Registration (DCR). There is no OAuth app to create, no client credentials to copy, and no redirect URIs to configure manually. All you need is a Notion account registered under the same email address you use for agent authorization.
In your Descope project, go to Agentic Identity Hub > Connections, click + Connection, and select Notion. Under connection settings, choose Dynamic client registration. Descope pre-fills the Authorization URL with https://mcp.notion.com/sse. Click Create and Register and note the connection ID (notion).
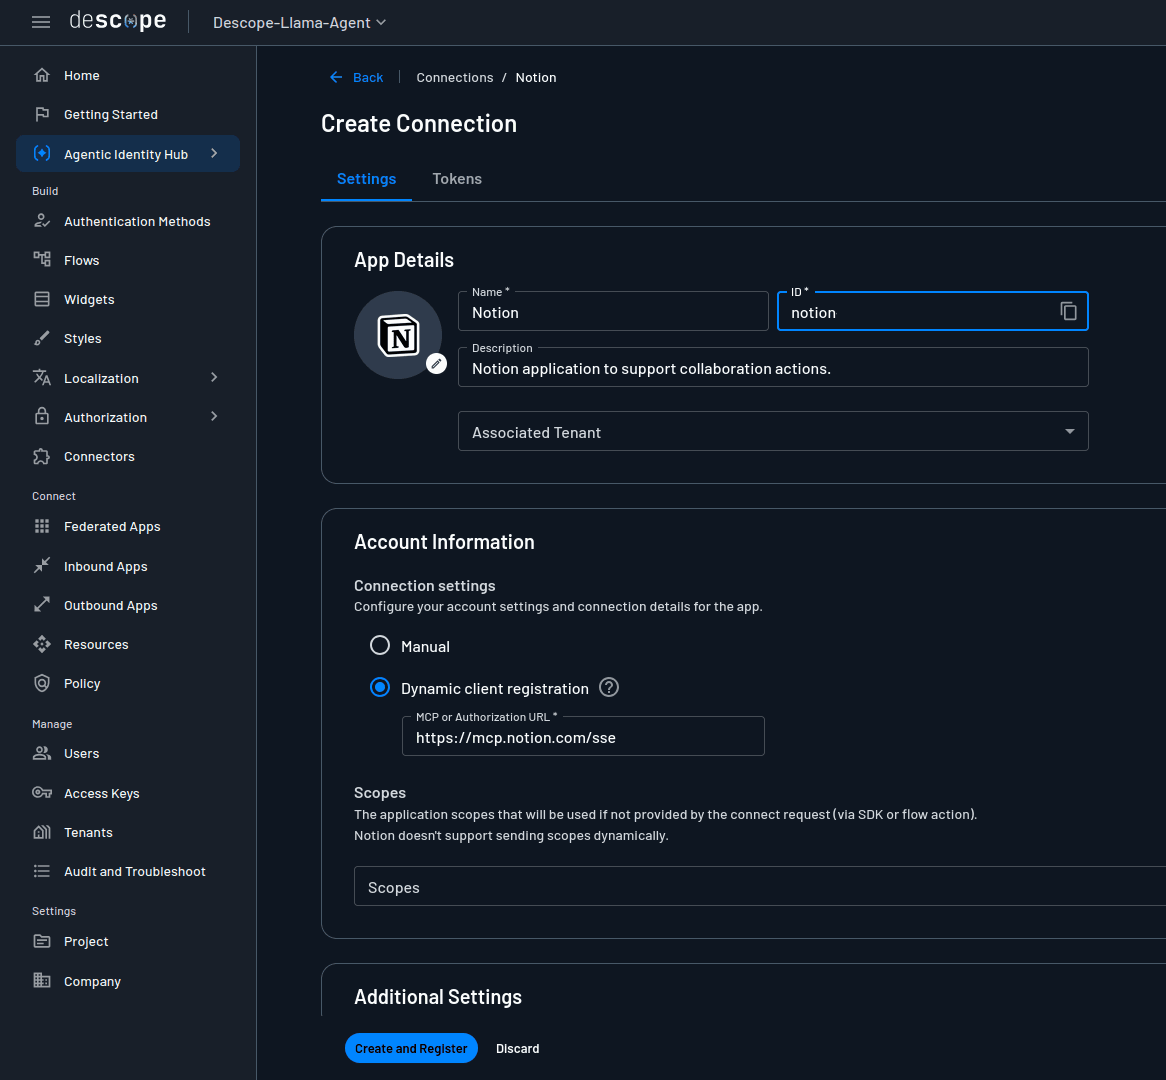
Token retrieval follows the same pattern used for the other connections:
token_resp = descope_client.mgmt.outbound_application.fetch_token(
    app_id="notion",
    user_id=user_id,
)
access_token = token_resp.get("token", {}).get("accessToken")
Why is Notion so much less work to set up? With conventional OAuth, you register a client with the provider, receive a client ID and secret, and manually configure redirect URIs before a single token can flow. DCR automates that registration step entirely. When the MCP client starts up, it sends a registration request to Notion's MCP server, which responds with a fresh client ID and secret on the spot. The user then sees a standard OAuth consent screen, grants access to their Notion workspace, and Descope stores the resulting token. Every subsequent request is brokered silently, with no repeat consent prompts. For providers that support it, DCR reduces OAuth integration from a multi-step configuration exercise to a single click.
Configuring the MCP server in Descope
For any agent to authenticate with your MCP server, you need to register that server in Descope. This allows the server to verify who is calling it and enforce the right access boundaries.
MCP server representation
From the left sidebar in your Descope project, go to Agentic Identity Hub > MCP Servers and click + MCP Server. Set it up as your mh-agent-tools server:
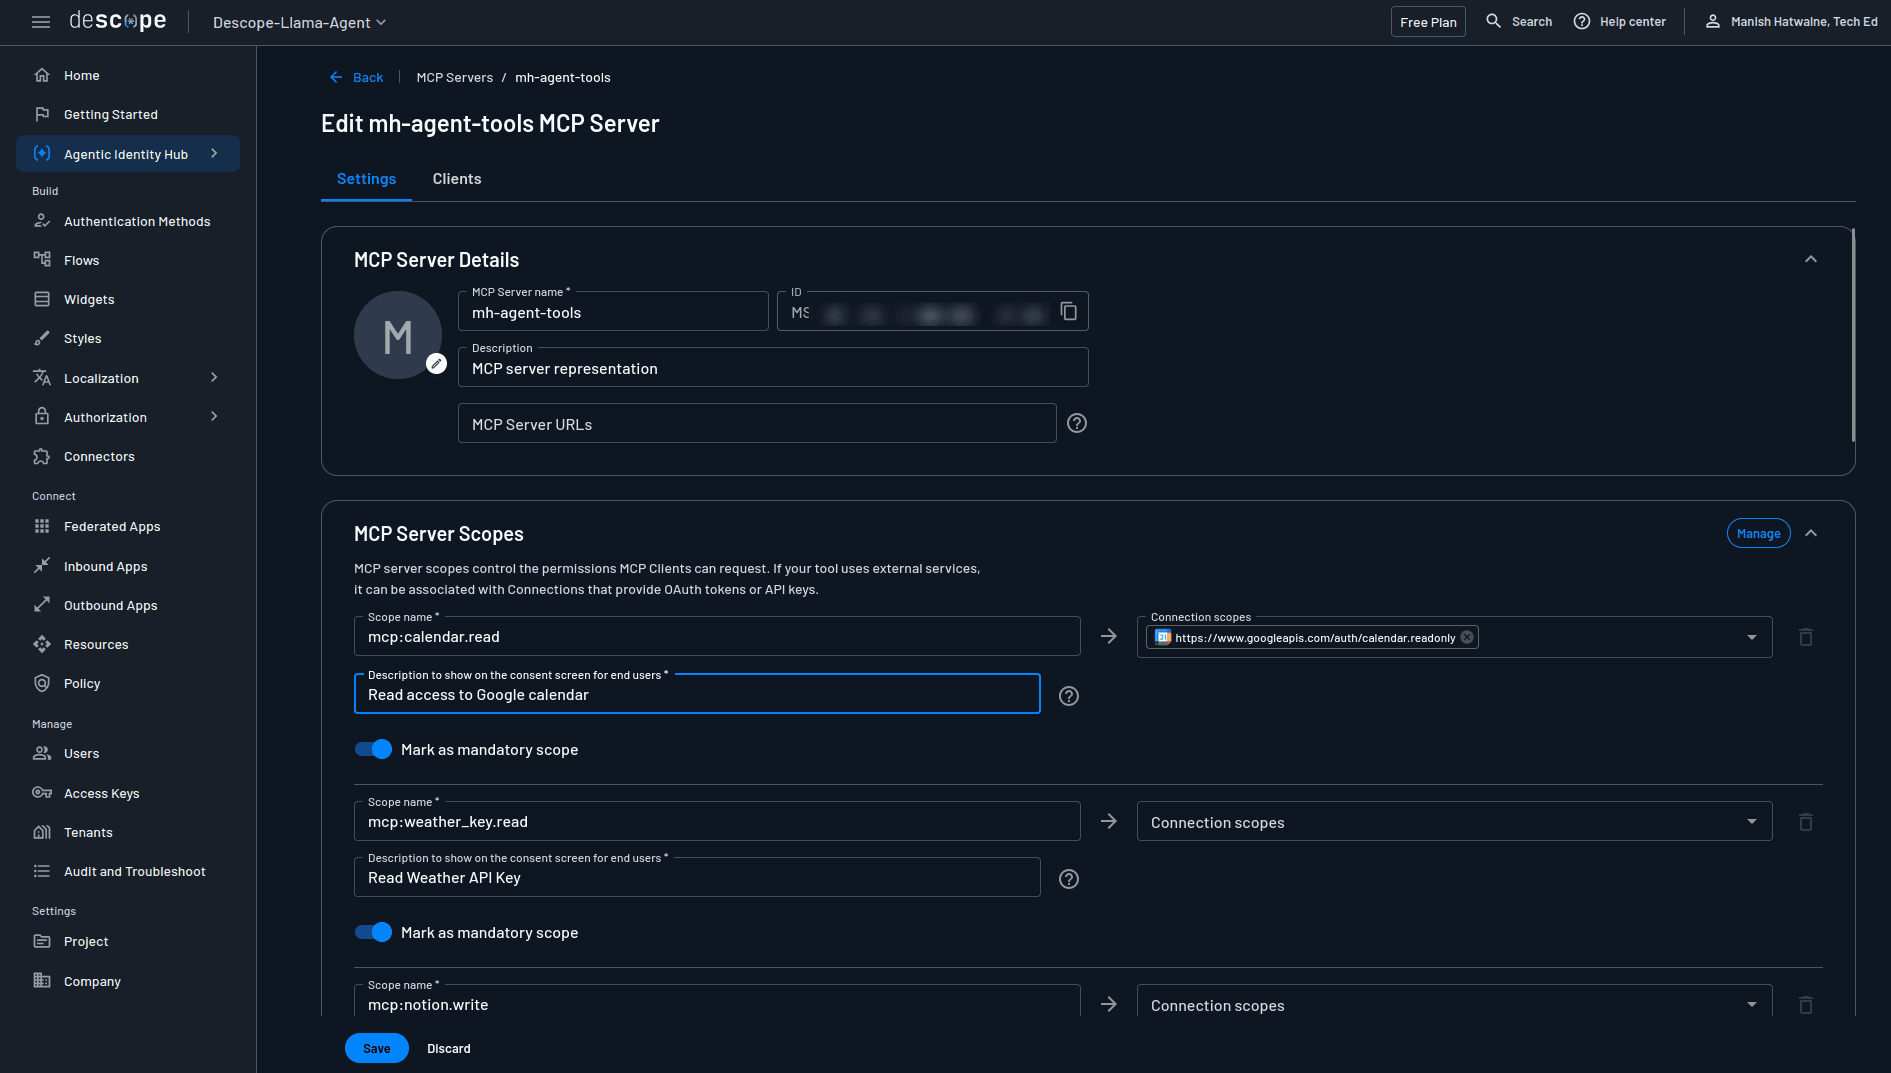
Add the following scopes and mark each one as mandatory: mcp:calendar.read (connection scope: https://www.googleapis.com/auth/calendar.readonly), mcp:weather_key.read, and mcp:notion.write. These scopes define a hard ceiling on what each tool can do. No matter what the agent is instructed to do, it can't exceed the permissions these scopes define.
Scroll to Connection Information and copy the Discovery URL, which takes this form:
https://api.descope.com/v1/apps/agentic/{project_id}/{MCP_server_id}/.well-known/openid-configuration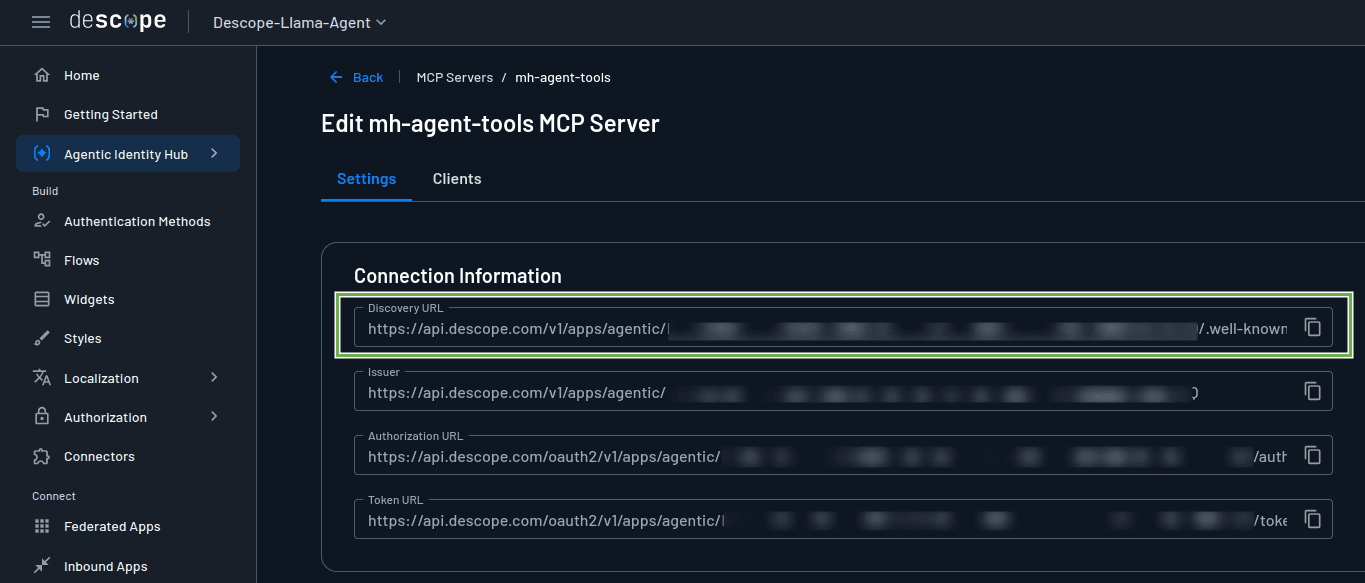
Paste this value into your .env file as DESCOPE_MCP_SERVER_CONFIG_URL. At startup, the agent uses this URL to register itself dynamically with Descope and take on an agentic identity tied to the authorizing user. Each user who runs and authorizes the agent gets a separate entry: if you authorize it for a dozen users, a dozen distinct identities will appear under Agentic Identity Hub > Agentic Identities in your Descope project.

Note: An agentic identity only appears in this list after the agent has been run and authorized at least once for that user.
Building the MCP server
With Descope configured, the next step is building the MCP server (mh-agent-tools) that exposes three tools to the agent: Weather, Google Calendar, and Notion.
Every tool in this server follows a consistent pattern: check that the caller holds the right scope, retrieve the user's credential from Descope's Connections vault, and call the external service. A missing credential never causes a hard failure. Instead, the tool returns an authorization link the user can follow to connect the service, after which they can simply re-run the agent.
The server is built with FastMCP, which has built-in support for Descope as an auth provider. This setup is minimal:
from fastmcp.server.auth.providers.descope import DescopeProvider

# Initialize Descope auth provider to validate incoming tokens and identify users
auth_provider = DescopeProvider(
    config_url=DESCOPE_MCP_SERVER_CONFIG_URL,
    base_url=MCP_SERVER_URL,
)

# Create the MCP server instance with the Descope auth provider
mcp = FastMCP("mh-agent-tools", auth=auth_provider)

# .....

mcp.run(transport="http")
The server runs over HTTP, so any MCP client, including the Descope LlamaIndex agent, connects to it via HTTP transport.
The agent calls these tools using a bearer access token, a JWT issued by Descope after the user completes the OAuth authorization flow. The server also logs credential retrieval outcomes and external service responses at each step, giving you a clear audit trail of which user triggered which tool and what happened.
The weather tool
Here is the full weather tool implementation:
@mcp.tool(auth=require_scopes("mcp:weather_key.read"))
async def get_weather(city: str) -> str:
    """Get today's weather for a given city using WeatherAPI.com.
    Returns current conditions and temperature.

    Args:
        city: The city to get weather for.
    """
    logger.info(f"Inside get_weather...")
    user_id = current_user_id()

    try:
        token_resp = descope_client.mgmt.outbound_application.fetch_token(
            app_id="weather-api-key",
            user_id=user_id,
        )
        api_key = token_resp.get("token", {}).get("accessToken")
        if not api_key:
            raise KeyError("`accessToken` not found in Descope connection: `weather-api-key`")
        logger.info(f"get_weather: Obtained weather API Key for user {user_id}: {api_key[:5]}...")
    except AuthException as e:
        logger.exception(f"get_weather: Error fetching token for user {user_id}: {e}")
        # Show flow URL for storing API keys if token fetch fails (e.g. API key not stored yet)
        return (
            "Weather API key not available yet. Open this link to add your "
            f"Weather API key: {WEATHER_CONNECT_FLOW_URL}\n\n"
            "Then re-run this request."
        )

    async with httpx.AsyncClient(timeout=CONNECTION_TIMEOUT) as client:
        resp = await client.get(
            WEATHER_API_URL,
            params={"q": city, "key": api_key},
        )

    if resp.status_code != 200:
        logger.error(f"Weather API error for city {city}: {resp.status_code} - {resp.text}")
        return f"Weather API error: {resp.status_code}"

    data = resp.json()
    logger.info(f"Weather data for {city}: {data['current']['condition']['text']}")
    return (
        f"Weather in {city}, {data['location']['country']}: "
        f"{data['current']['condition']['text']}, {data['current']['temp_c']}°C"
    )
The require_scopes("mcp:weather_key.read") decorator runs before anything else. If the agent's session token doesn't carry that scope, the tool is hidden from the client's tool list entirely rather than returning an access denied error. Callers without the right scope never know that the tool even exists.
The first thing the tool does inside the function body is establish who is calling it:
user_id = current_user_id()
This user_id (extracted from the validated session token) ties the Descope credential lookup to the correct user.
From there, execution takes one of two paths:
Path 1: credential found. The tool calls fetch_token with the connection ID (weather-api-key) and the user_id. When the user has already added their WeatherAPI key through Descope, the call succeeds and the tool proceeds to hit the WeatherAPI endpoint.
token_resp = descope_client.mgmt.outbound_application.fetch_token(
    app_id="weather-api-key",
    user_id=user_id,
)
api_key = token_resp.get("token", {}).get("accessToken")
Path 2: credential not found. When the WeatherAPI key hasn't been stored yet, fetch_token raises an exception. The tool catches it and returns a Descope connect flow URL. The agent surfaces that link, the user adds their key, and re-running the agent is all it takes to proceed.
except AuthException as e:
    return (
        "Weather API key not available yet. Open this link to add your "
        f"Weather API key: {WEATHER_CONNECT_FLOW_URL}\n\n"
        "Then re-run this request."
    )
Note: To store the Weather API key through a hosted flow, download the Descope Weather API Flow and import it into your Descope project's flows.
The Google Calendar tool
The Google Calendar tool shares the same skeleton as the weather tool. The only difference is in the credential type: instead of a static API key, it works with a per-user OAuth token tied to that user's Google account.
@mcp.tool(auth=require_scopes("mcp:calendar.read"))
async def get_calendar_events(date: str) -> str:
    """Fetch today's events from the authenticated user's Google Calendar.
    Returns a list of upcoming meetings with their titles and start times.

    Args:
        date: The date for which to fetch events (in `YYYY-MM-DD` format).
    """

    ....
The fetch_token call looks the same as before, but the token it returns is scoped to the individual user's Google account. If that token isn't yet available, the tool returns a Google OAuth authorization URL. Once the user completes authorization, Descope stores the token and manages refresh automatically on every subsequent call. The full implementation of get_calendar_events(...) is in mcp_server.py.
The Notion tool
The Notion tool is structurally consistent with the other two, but two things set it apart. The credential behind it was provisioned through DCR rather than a manually configured OAuth app. And while the weather and calendar tools call REST endpoints directly, this tool connects to Notion's MCP server to create documents.
@mcp.tool(auth=require_scopes("mcp:notion.write"))
async def create_notion_page(title: str, content: str) -> str:
    """Create a page in Notion with a given title and content.
    Use this to save a summary or checklist for upcoming meetings.

    Args:
        title: The title of the Notion page.
        content: The body content of the Notion page (in Markdown format).
    """

    ....
Credential handling is identical: calling fetch_token with app_id="notion" and the user_id returns the token when available. When it's not, the tool returns a Descope-generated OAuth authorization URL that walks the user through Notion's consent screen. After that one-time authorization, Descope brokers the token on every future request, and the agent can create Notion pages without ever touching the credential directly. The full implementation of create_notion_page(...) is in mcp_server.py.
Building the agent with LlamaIndex
With Descope Connections configured and the MCP server tools ready, the agent code itself is straightforward. It involves three steps:
Authenticate with Descope and obtain an access token (JWT) for calling the MCP server tools.
Connect to the MCP server, fetch the available tools, and hand them to the agent.
Run the agent with a prompt that directs it to gather weather and calendar data, then write a structured plan to Notion.
The complete implementation lives in run_llama_agent.py:
async def main():
    args = parse_args()
    city_name = args.city

    # Authenticate with Descope and get an access token for calling MCP server tools
    access_token = await get_access_token()
    today: str = datetime.now().strftime("%A, %d %B %Y")

    prompt = (
        f"Help me plan my day for {today}."
        f"First, check the current weather in {city_name}. "
        "If the Weather API key is not available, show an appropriate message with the link to add it, and do NOT proceed further.\n\n"

        "...."
    )   # Long prompt trimmed here for brevity

    # Authorize with MCP server and obtain tools
    mcp_client = BasicMCPClient(
       MCP_SERVER_ENDPOINT_URL,
        headers={"Authorization": f"Bearer {access_token}"}
    )

    mcp_tool_spec = McpToolSpec(client=mcp_client)
    tools = await mcp_tool_spec.to_tool_list_async()
    print(f"Total tools available on the MCP server: {len(tools)}")

    agent_llm = OpenAI(model="gpt-5.4", api_key=os.getenv("OPENAI_API_KEY"))

    agent = ReActAgent(
        name="MH-Llama-Agent",
        llm=agent_llm,
        tools=tools,
        system_prompt="You're a helpful daily planning assistant."
    )
    response = await agent.run(user_msg=prompt)
    print(response)


asyncio.run(main())
The city argument comes from the command line and determines which city's weather feeds into the day plan.
The first thing main does is authenticate with Descope:
access_token = await get_access_token()get_access_token() lives in get_user_token.py and handles the full DCR registration (client name: MH-llama-descope-MCP-client) and PKCE login flow with Descope. The resulting access token carries the user's identity and scopes. It's cached locally after the first run, so the browser-based login only happens once. The corresponding agentic identity for that user is also created in Descope at this point.
With a valid token, the agent connects to the MCP server and obtains the list of tools it exposes:
mcp_client = BasicMCPClient(
    MCP_SERVER_ENDPOINT_URL,
    headers={"Authorization": f"Bearer {access_token}"}
)

mcp_tool_spec = McpToolSpec(client=mcp_client)
tools = await mcp_tool_spec.to_tool_list_async()
Here, LlamaIndex's composability shows up directly in the code. BasicMCPClient connects to the MCP server over HTTP, passing the Descope access token as a Bearer header on every request. McpToolSpec wraps that connection and converts the server's tools into LlamaIndex-compatible tool objects. The agent receives only the tools the MCP server exposes, which are already scope-gated by Descope on the server side.
The agent itself is a ReActAgent, LlamaIndex's implementation of the ReAct (Reason + Act) pattern:
agent_llm = OpenAI(model="gpt-5.4", api_key=os.getenv("OPENAI_API_KEY"))

agent = ReActAgent(
    name="MH-Llama-Agent",
    llm=agent_llm,
    tools=tools,
    system_prompt="You're a helpful daily planner assistant."
)
response = await agent.run(user_msg=prompt)
The LLM powering the agent is configurable, which is one of LlamaIndex's practical advantages: swapping models requires changing a single line. The ReActAgent receives the tool list, reasons over the prompt, decides which tools to call and in what order, and iterates until it can produce a final response.
The prompt orchestrates the entire task. It tells the agent to check the weather first, stopping with an appropriate message if the WeatherAPI key is missing. It then fetches the day's calendar events, skipping anything already in the past. Finally, it combines both into a structured Notion page titled with today's date, covering weather conditions, a meeting timeline, suggested focus blocks, and a priority to-do list. If authorization is incomplete for any tool, the prompt instructs the agent to open the authorization link, complete the flow, and retry rather than throw an error.
Once the Notion page is created, the agent includes the page URL in its final response.
Agent demo: obtaining credentials
For this demo, open two terminal windows inside your Descope-LlamaIndex-Agent project.
Terminal 1 — start the MCP server:
source .venv/bin/activate
python mcp_server.py
You should see the server come up with output like this:
INFO Starting MCP server 'mh-agent-tools' with transport 'http' on http://127.0.0.1:8000/mcpTerminal 2 — run the agent:
source .venv/bin/activate
python run_llama_agent.py --city "Your City"
On the very first run, the agent has no cached credentials, so get_user_token.py kicks off a browser-based PKCE login flow. You need to verify your identity via a one-time passcode sent to your email. A Descope consent screen then asks you to grant the agent access to the scopes defined in your MCP server configuration. Every scope is marked mandatory, so all of them must be approved before the agent can proceed:
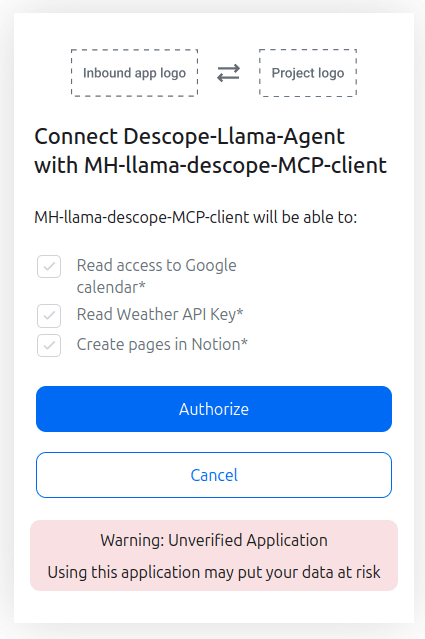
Approval writes tokens to .cache/descope_credentials.json in your project folder. The agent reads from this cache on every subsequent run and refreshes the token silently, so this login step only ever happens once.
At this point, none of the three external services have credentials stored in Descope yet. The next three runs walk through connecting each one.
Weather API key
The agent starts with the weather check. The MCP server calls fetch_token for the weather-api-key connection, finds nothing stored for this user, and logs the outcome:
get_weather: Error fetching token for user <redacted-user-id>: {'status_code': 404, 'error_type': 'server error', 'error_message': '{"errorCode":"E152102","errorDescription":"Outbound app token not found"}'}The weather tool responds gracefully, returning a WEATHER_CONNECT_FLOW_URL that the Llama agent passes along to you:
Agent Response:
----------------

Weather API key not available yet. Open this link to add your Weather API key: [Add Weather API Key](https://api.descope.com/login/{Descope-project-id}?flow=connect-weather-api-key). Then re-run this request.
That link opens a Descope-hosted flow. After a quick email and OTP verification, you're prompted to enter your WeatherAPI key:
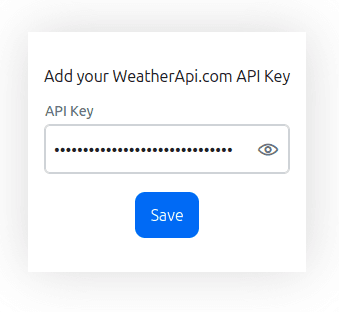
The key is saved into the Descope connection and tied to your specific user identity. Every user who runs this agent stores their own key under their own identity, keeping credentials fully isolated across users regardless of how many people share the same deployment.
Google Calendar
With the WeatherAPI key in place, re-run the agent. Weather resolves successfully this time, and the agent advances to the calendar check. The Google Calendar connection has no token stored yet, so the tool generates a Google OAuth authorization URL through Descope and returns it. Opening it takes you to Google's own consent screen, where you can see exactly what access is being requested:
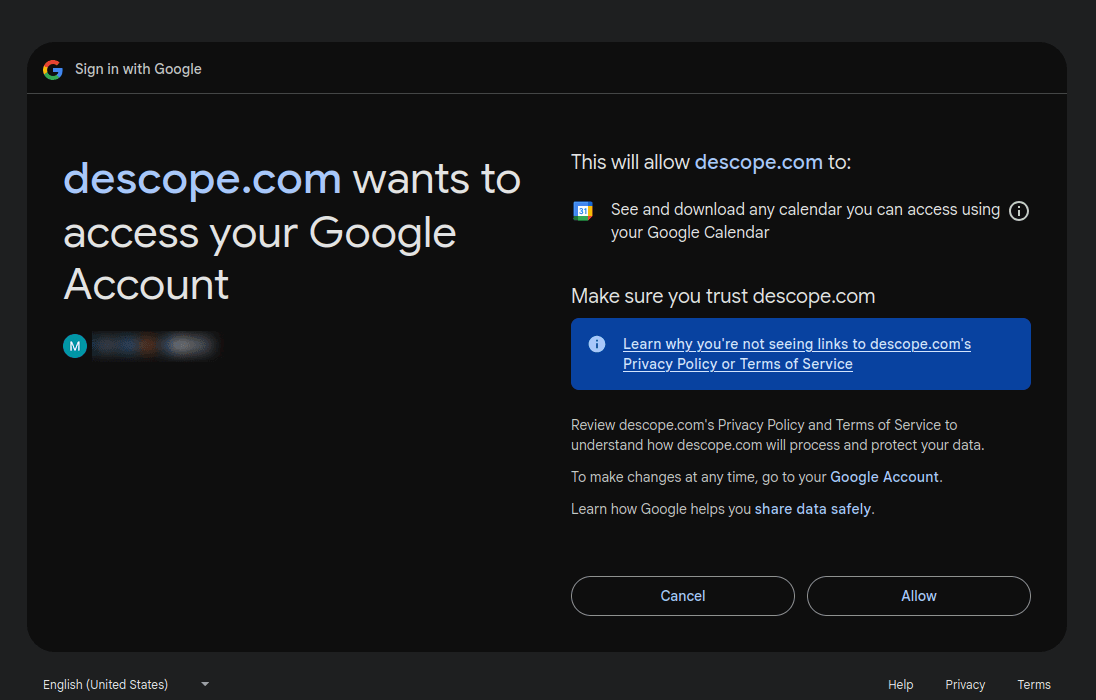
Completing the flow stores a user-scoped OAuth token inside the Google Calendar connection in Descope. All future token refreshes are handled automatically without any intervention on your part.
Notion MCP
Run the agent once more. Weather and Calendar both resolve, and the agent invokes the Notion tool. No Notion token exists yet, so the tool returns a Descope-generated OAuth URL pointing to Notion MCP's consent screen. This screen identifies your workspace and lists the specific permissions being requested on behalf of api.descope.com:
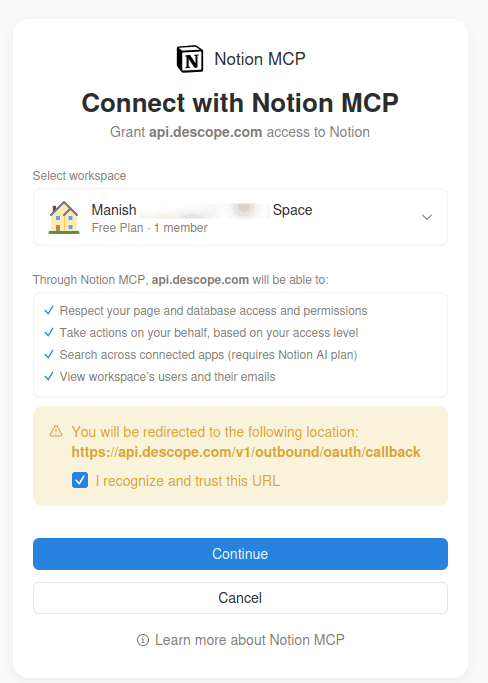
You'll notice the redirect URL: https://api.descope.com/v1/outbound/oauth/callback. Descope uses this same callback pattern across all OAuth-based connections, with the provider swapped out each time. Granting access here stores the Notion token in Descope, and the agent can now create pages in your workspace through Notion MCP, with Descope brokering the credential on every call.
Note: Each of these three connections only needs to be authorized once per user. After that, the MCP server retrieves the right credential automatically on every run, scoped to the correct user identity, and the agent moves straight to the task at hand: pulling together your weather forecast and calendar schedule into a structured daily plan, delivered as a freshly created Notion page.
Agent demo: plan creation
Once all three credentials are in place, it just takes a single agent run to get the finished Notion plan page.
MCP server logs
Watch Terminal 1 as the agent runs. Each tool call produces a log entry showing the credential lookup, the user it belongs to, and the result from the external service:
2026-06-25 20:06:08 [INFO] Inside get_weather...
2026-06-25 20:06:08 [INFO] get_weather: Obtained weather API Key for user U3<redacted>: 7caa6...
2026-06-25 20:06:09 [INFO] Weather data for Pune: Partly Cloudy
INFO:     127.0.0.1:59774 - "POST /mcp HTTP/1.1" 200 OK
2026-06-25 20:06:12 [INFO] Inside get_calendar_events...
2026-06-25 20:06:12 [INFO] get_calendar_events: Obtained access token for user U3<redacted>: ya29.a0...
2026-06-25 20:06:12 [INFO] Getting user's calendar events for: 2026-06-25T00:00:00-00:00
2026-06-25 20:06:13 [INFO] Fetched 1 events for user U3<redacted>.
INFO:     127.0.0.1:59814 - "POST /mcp HTTP/1.1" 200 OK
2026-06-25 20:06:17 [INFO] Inside create_notion_page...
2026-06-25 20:06:19 [INFO] create_notion_page: Obtained access token for user U3<redacted>: 368d872...
2026-06-25 20:06:19 [INFO] Creating Notion page with title: Plan for: Thursday, 25 June 2026
2026-06-25 20:06:23 [INFO] Notion page created: Plan for: Thursday, 25 June 2026 at https://app.notion.com/p/38<redcated>3c
Three tools, three distinct credential types, all resolved against the same user_id, and the whole sequence wraps up in around 15 seconds.
Agent output
Meanwhile, in Terminal 2, the LlamaIndex agent prints its final response once the ReActAgent completes its reasoning loop:
Agent Response:
----------------

Total tools available on the MCP server: 3
Your Notion page has been created successfully.

Page URL: https://app.notion.com/p/38<redcated>3c

Included in the page:
- Weather in Pune: Partly Cloudy, 23.4°C
- Today's schedule: Complete LlamaIndex Demo and article at 8:30 PM
- Suggested focus block: Morning to 8:00 PM
- Priority to-do list for the day
Here's the full picture of what the agent did to produce this output. The LlamaIndex ReActAgent worked through the prompt step by step (using OpenAI's gpt-4.5 model), reasoning over which tool to call next and what to do with each result.
It started with get_weather for Pune (the default city), pulling a stored static API key from Descope and returning a partly cloudy, 23.4°C reading. Next it called get_calendar_events, fetching a user-scoped OAuth token from Descope to retrieve the day's events from Google Calendar. With weather and schedule in hand, it reasoned over the gaps between meetings to propose focus blocks, then called create_notion_page to assemble a weather summary, daily timeline, focus block suggestions, and a prioritized to-do list into a single Notion page.
All three credential types involved (a static API key, a standard OAuth token, and a DCR-provisioned OAuth token) were fetched from Descope at the moment each tool was called, without passing through the agent or appearing anywhere in the codebase.
The resulting Notion page looks like this:
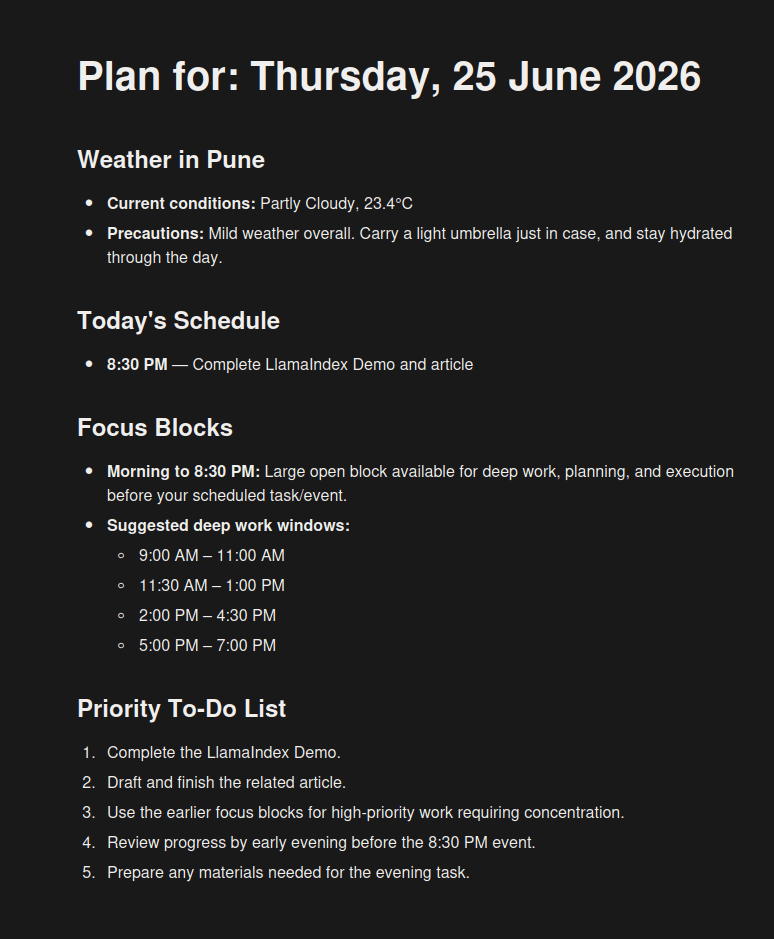
This agent demonstrated one specific scenario with three tools, but the architecture generalizes cleanly. The combination of LlamaIndex's flexible, LLM-agnostic agent framework and Descope's identity-aware credential brokering gives you a solid foundation for building agentic applications that are both capable and secure. What you build on top of that is up to you.
The audit trail
Beyond managing credentials, Descope also provides a complete, queryable record of everything the agent did. Go to Agentic Identity Hub > Agentic Identities in your Descope project to find the identity created for this user when the agent first ran. Navigate to Audit and Troubleshoot to see the full picture: every credential access, every authorization event, each stamped with the identity it belongs to and the exact connection it touched.
Here is how Descope's Audit and Troubleshoot page looks:
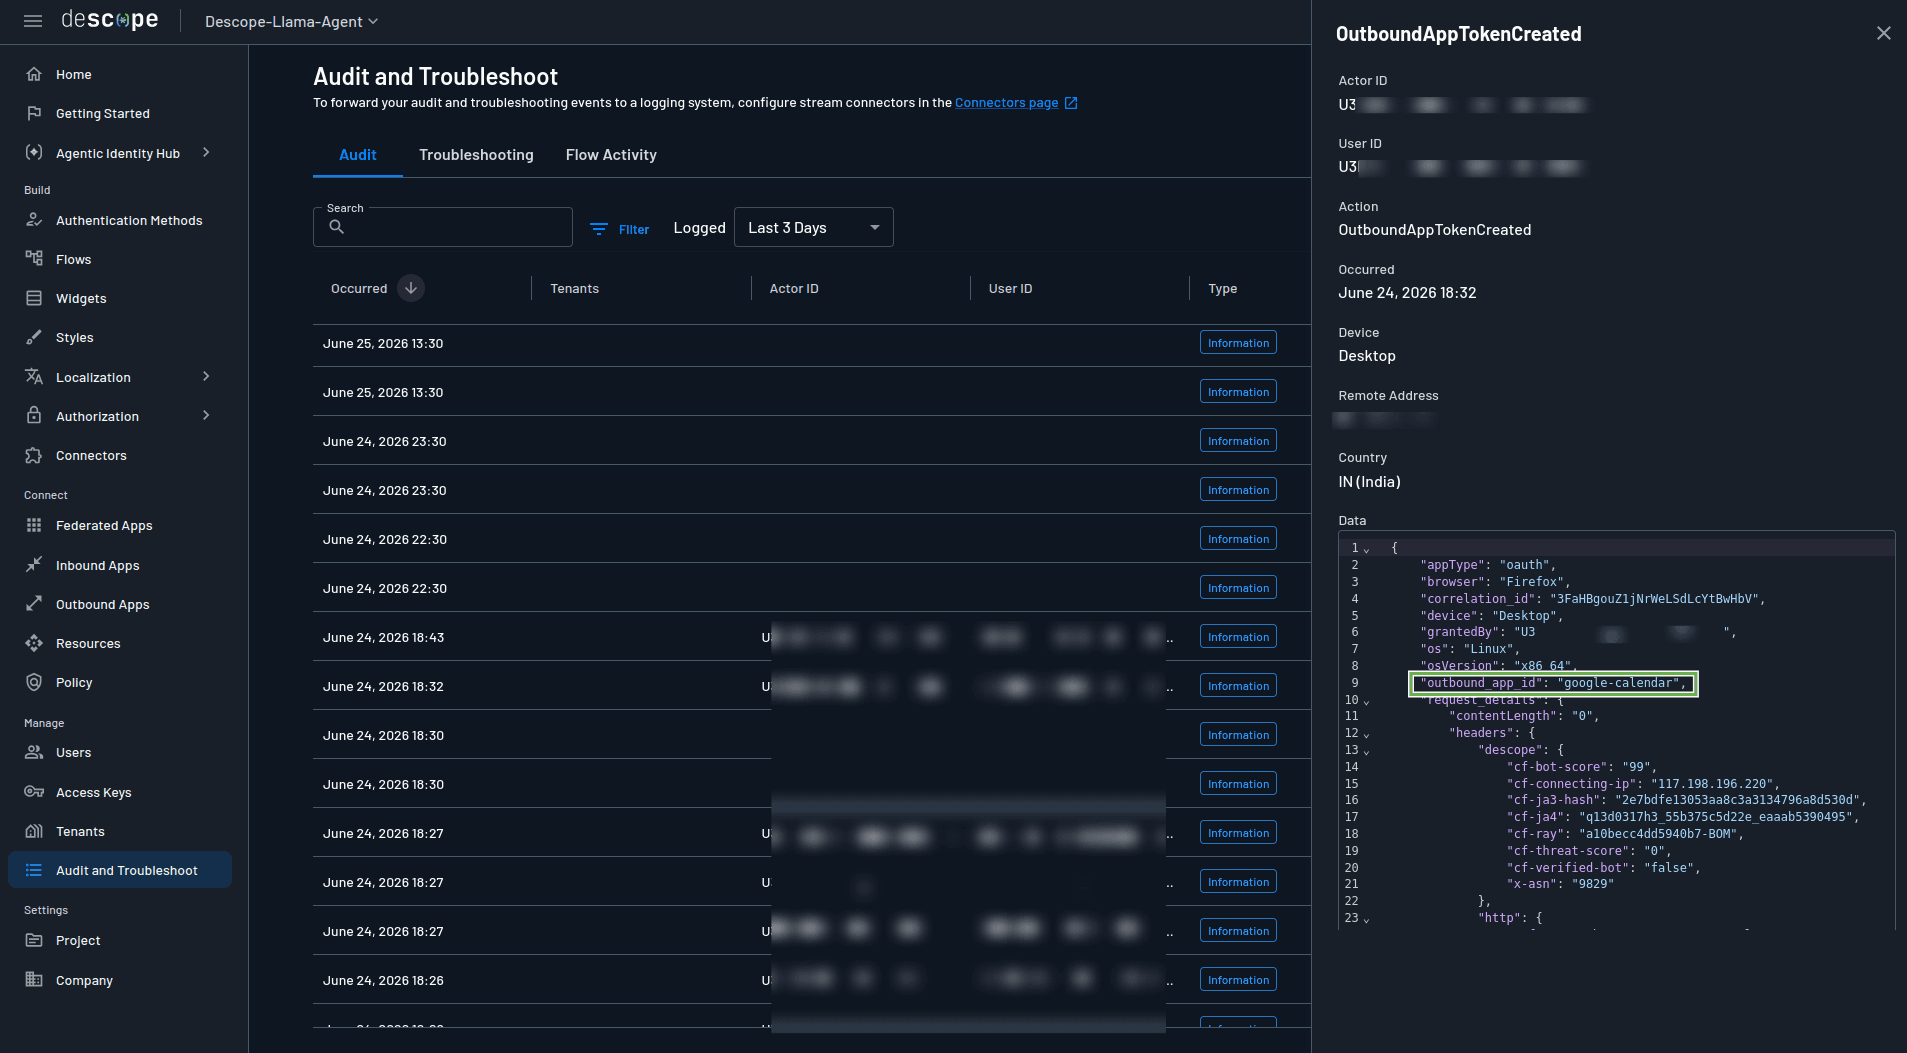
Expanding any entry reveals the underlying detail. The screenshot above shows the 'Google Calendar' authorization entry expanded, with the agent and user ID that triggered it clearly mentioned. No action the agent took is anonymous, no credential access goes unrecorded, and none of this required the agent to hold, log, or even see a single secret.
Wrapping up
Building a capable AI agent is only half the challenge. The other half is making sure it operates with a verified identity, pulls credentials securely at runtime, respects well-defined access boundaries, and leaves a clear record of everything it did. This tutorial covered all of that, with LlamaIndex powering the agent and Descope handling the identity and credential layer underneath.
LlamaIndex's LLM-agnostic design means the agent isn't tied to any single model provider, and its composable tool system made connecting the MCP server tools clean and straightforward. The ReActAgent worked through a multi-step task spanning three external services and three different credential types, without any of that complexity surfacing in the agent code.
Descope took care of everything else: the DCR and PKCE login flow, the Connections vault, scope enforcement on every tool call, and a full audit trail tied to a specific user identity. All of it, from the hosted WeatherAPI key flow to brokered OAuth tokens for Google Calendar and Notion, came together through a single Agentic Identity Hub with no custom secrets infrastructure required. As agents grow more autonomous, this kind of foundation becomes essential. It makes your agentic application trustworthy enough to run in production.
If you're building agents with LlamaIndex, adding Descope to your stack takes minutes. Start for free or explore the Agentic Identity Hub docs.