
Table of Contents
Don't have the time to read the entire post? Our human writers will be sad, but we understand. Summarize the post with your preferred LLM here instead.
This tutorial was written by Manish Hatwalne, a developer with a knack for demystifying complex concepts and translating "geek speak" into everyday language. Visit Manish's website to see more of his work!
AI agents become significantly more useful once they can interact with external systems. When your agent can call APIs, execute shell commands, write files, query databases, or connect to SaaS platforms, it starts behaving less like a chatbot and more like an active software operator. That capability, though, introduces a real security challenge: where do the credentials live, and how do you control what the agent is actually allowed to access?
In many early implementations, the answer is environment variables, local config files, or hardcoded keys with permissions far broader than any single task requires. As agents grow more autonomous, these shortcuts become difficult to manage. Secrets become harder to rotate, access boundaries blur, and auditing agent activity becomes an afterthought.
The Claude Agent SDK gives developers a programmable way to build capable agents, using the same building blocks that power Claude Code: filesystem access, bash execution, MCP connectivity, and subagent orchestration. This tutorial pairs it with Descope’s Agentic Identity Hub, a managed identity and credential layer built specifically for agents. Descope handles the identity side of things: verified session tokens, secure credential storage through Connections, fine-grained tool scopes, and centralized audit logging. By the end, you’ll have a working agent that authenticates with multiple external services using Descope-managed credentials, operates under a verified session identity, and enforces per-tool access boundaries without storing any secrets in your codebase.
Secure agent architecture
The architectural diagram below shows two separate agent flows: how the agent proves its own identity to the tools it calls, and how those tools securely access external services on the user’s behalf using Descope.
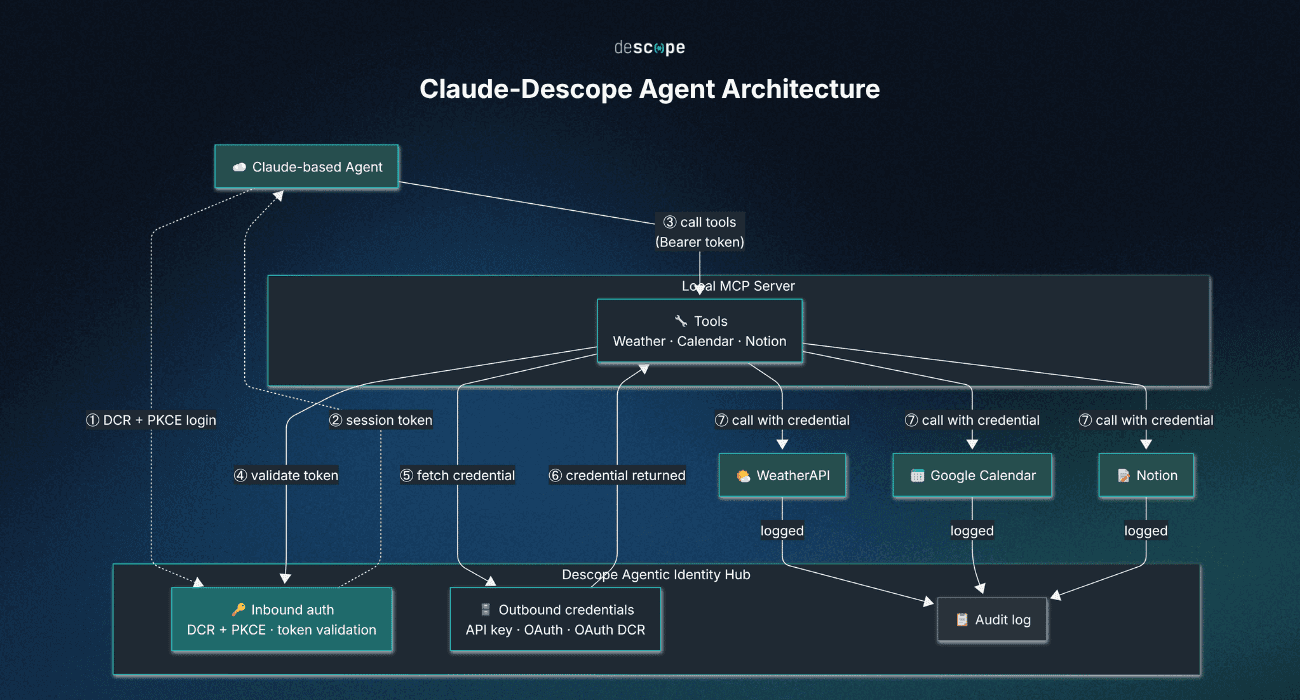
The inbound layer handles how the agent proves its identity to the local MCP server. Before any tools are called, the agent goes through a DCR + PKCE login flow with Descope, which issues a session token. Every subsequent tool call carries that token as a Bearer header, and the MCP server validates it with Descope before doing anything else.
The outbound layer handles how the MCP server reaches third-party services on the user’s behalf. Once a tool call is validated, the server asks Descope for the right credential: a static API key for WeatherAPI, an OAuth token for Google Calendar, and an OAuth token via DCR for Notion. The agent never sees any of these credentials; they flow from Descope to the MCP server at runtime, only when needed.
Note: This separation is crucial. The agent authenticates once at startup and operates under a verified identity throughout. External credentials are brokered on demand, scoped to that identity (a specific user), and never stored in the codebase or passed to the agent itself. If a credential isn’t connected yet, the tool returns an authorization link rather than failing, so the user can connect it and simply re-run the agent. This also means multiple users can run this agent with Descope handling their OAuth tokens securely.
Setup and prerequisites
Your demo agent will connect to three external services, each representing a different type of connection:
WeatherAPI.com: A public weather API secured with a static API key
Google Calendar: Your personal calendar, accessed via OAuth
Notion: A workspace doc created via the Notion MCP server, accessed via Dynamic Client Registration (DCR)
Here is what the demo agent will do:
You ask the agent to plan your day. It checks the weather (static API key), pulls your schedule from Google Calendar (OAuth), and creates a plan page in Notion (DCR) for you.
Once configured, all three sets of credentials live in Descope’s Connections vault, not in your codebase. Your agent fetches them at runtime through Descope, so neither your repo nor your local environment ever holds a sensitive key or token.
What you’ll need
To complete the tutorial you’ll need to have the following:
Python 3.11+ and pip
A Descope account with a project (
Descope-Claude-Agent) created. Sign up here, and keep your Management Key and Project ID handy.An Anthropic API key. Get one here
A Weather API key. Get one here (The free tier is enough).
A Google Cloud project with the Calendar APIs enabled and an OAuth 2.0 client configured.
A Notion account, no OAuth app registration is needed; Notion’s MCP server supports DCR, so the client registers itself automatically at runtime.
Project structure
Download this GitHub repository to get started:
cd Descope-Claude-Agent
python -m venv venv
source venv/bin/activate  # On Windows: venv\Scripts\activate
pip install -r requirements.txt
Your downloaded Descope-Claude-Agent directory structure should look like this:
Descope-Claude-Agent/
├── get_user_token.py     # OAuth flow to authenticate user with Descope MCP app
├── mcp_server.py         # FastMCP server exposing 3 tools
├── run_claude_agent.py   # Claude agent that calls the MCP server
├── settings.py           # Contains different URLs required for this project
├── requirements.txt      # Dependencies
├── .gitignore            # Git ignore file
├── .env.example          # Environment variables (see below)
└── README.md
Add credentials
Rename the .env.example file as an .env file, and add required values there:
# Change it as per your MCP server URL
MCP_SERVER_URL=http://127.0.0.1:8000

# Add relevant credentials below
DESCOPE_PROJECT_ID=your_descope_project_id
DESCOPE_MANAGEMENT_KEY=your_descope_management_key
DESCOPE_MCP_SERVER_CONFIG_URL=your_mcp_server_config_url
You’ll find the DESCOPE_MCP_SERVER_CONFIG_URL value in the "MCP server representation" section below (you can add this later after setting up an MCP server in Descope). Lastly, export the Anthropic key in your terminal:
export ANTHROPIC_API_KEY=your_anthropic_api_keyDescope Connections: The credential vault
Descope Connections is a credential vault for your MCP server. Instead of storing OAuth tokens or API keys in environment variables, your MCP server retrieves credentials from Connections at runtime. These credentials are centrally managed, never hardcoded, and scoped per user (or tenant).
Static API key connection
In your Descope project (Descope-Claude-Agent), go to Agentic Identity Hub > Connections and click + Connection. From the Connections library, select Custom API Key App and give it a name and ID. For this tutorial, use weather-api and weather-api-key. You will need this connection ID in your MCP server.
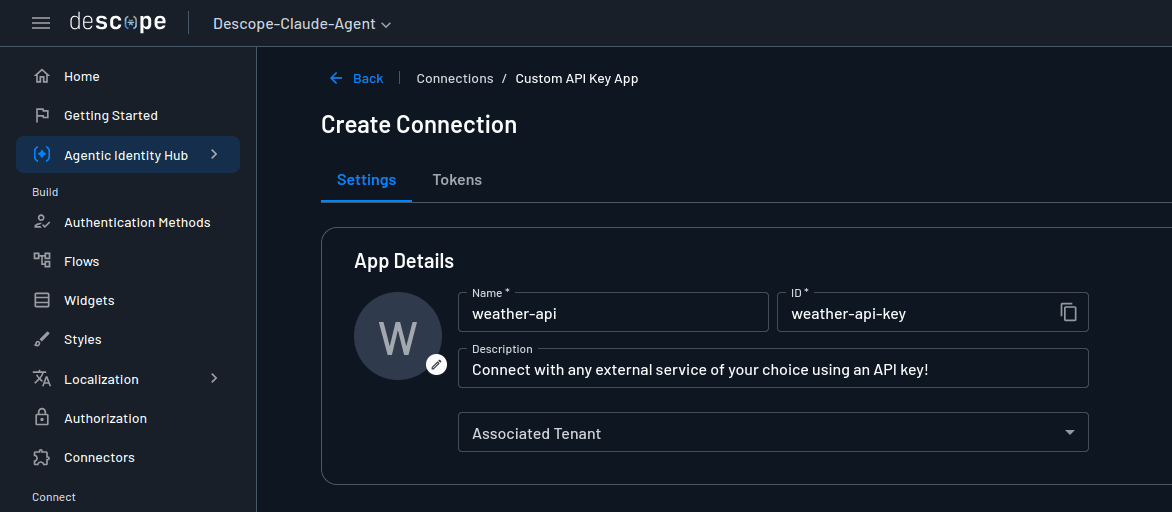
The MCP tool retrieves this stored API key at runtime with this code snippet:
token_resp = descope_client.mgmt.outbound_application.fetch_token(
    app_id="weather-api-key",
    user_id=user_id,
)
api_key = token_resp["token"]["accessToken"]
The app_id identifies the correct Connection, while user_id identifies the user associated with this API key (comes from the bearer JWT). A Descope-hosted Flow is also needed to store this API key value (covered later).
Note: You might wonder why not just store the API key in an environment variable. The short answer is for key isolation. Many APIs are paid services where each user brings their own key (like OpenAI or Claude). A Descope Connection stores those credentials securely on a per-user basis, so each user’s key stays isolated. This becomes even more important for OAuth tokens, which require individual user authorization with the service provider, such as Google or Notion.
Custom OAuth app (Google Calendar)
To connect Google Calendar, you need a Client ID and Client Secret from Google Cloud. You can refer to Google Calendar’s quickstart guide for more details. Here’s what to set up:
Create a Google Cloud project at console.cloud.google.com and enable the Google Calendar API under APIs & Services
Configure an OAuth consent screen with ‘External’ audience and add your email as a test user (keeping the app in Testing mode is fine for this tutorial demo)
Add the scope
https://www.googleapis.com/auth/calendar.readonlyunder Data Access so the agent can only read calendar events (No write access)Create a Web Application OAuth client under Google Auth Platform and add Descope’s callback URL (
https://api.descope.com/v1/outbound/oauth/callback) as an authorised redirect URI.Copy the Client ID and Client Secret. You’ll paste these into Descope’s Connections vault to complete the Google Calendar connection. Without them, Descope cannot broker the OAuth flow on behalf of your users.
Now, in your Descope project, go to Agentic Identity Hub > Connections and click + Connection. Select Google Calendar from the Connections library, choose Manual under connection settings, and paste in your Google Client ID and Client Secret. Under Scopes, add https://www.googleapis.com/auth/calendar.readonly and leave everything else as-is. Create the connection and note its ID (google-calendar).
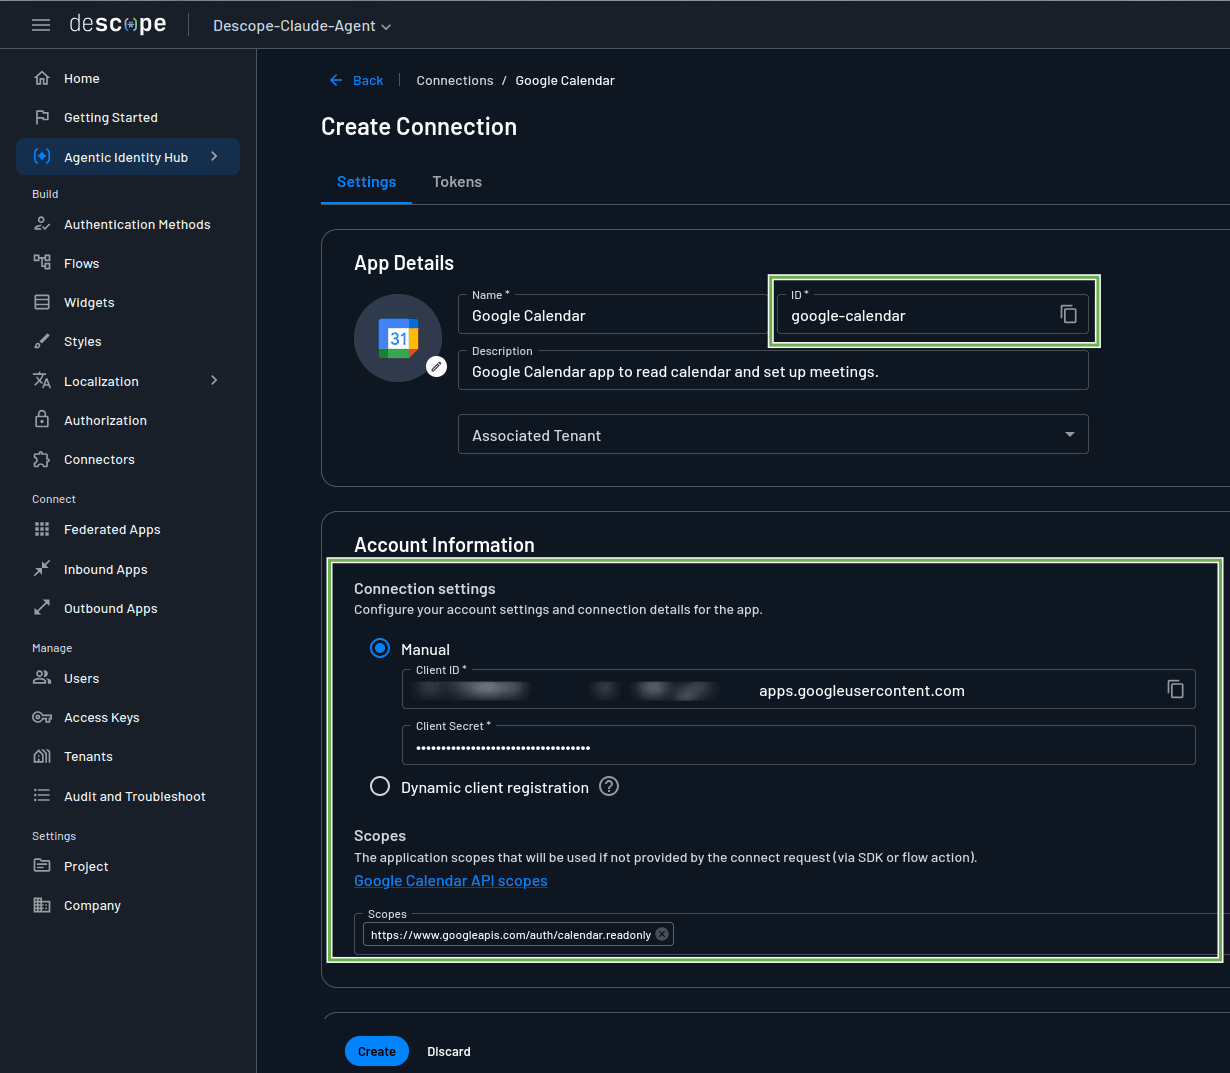
The Tokens tab next to the Connection settings will show stored user tokens once they are in place.
The OAuth token is retrieved for a specific user at runtime using this code snippet:
token_resp = descope_client.mgmt.outbound_application.fetch_token(
    app_id="google-calendar",
    user_id=user_id,
)
access_token = token_resp["token"]["accessToken"]
The user_id comes from the bearer token the agent sends to the MCP server. It identifies which user the agent is currently acting on behalf of. Once stored, Descope handles token refresh automatically.
Note: User-scoped tokens are critical here because the agent is not calling Google Calendar for itself. Instead, the agent is calling it on behalf of a specific user. Using a shared or static token would mean every user sees the same calendar data. Scoping the token to a
user_idensures the agent only accesses what that particular user has authorised, which is the correct and safe pattern for any agent acting on behalf of real people.
DCR-registered third-party MCP server (Notion)
Setting up Notion is similar to Google Calendar, but noticeably simpler thanks to Dynamic Client Registration (DCR). Because Notion’s MCP server supports DCR, you don’t need to create an OAuth app in Notion or copy over any client credentials. You just need to have a Notion account with the same email ID that is used for agent authorization.
Go to Agentic Identity Hub > Connections in your Descope project, and click + Connection. Pick Notion from the connections library and choose Dynamic client registration under connection settings. Descope will automatically populate the MCP or Authorization URL field with https://mcp.notion.com/sse. Leave everything else as-is, click Create and Register, and note the connection ID (notion).
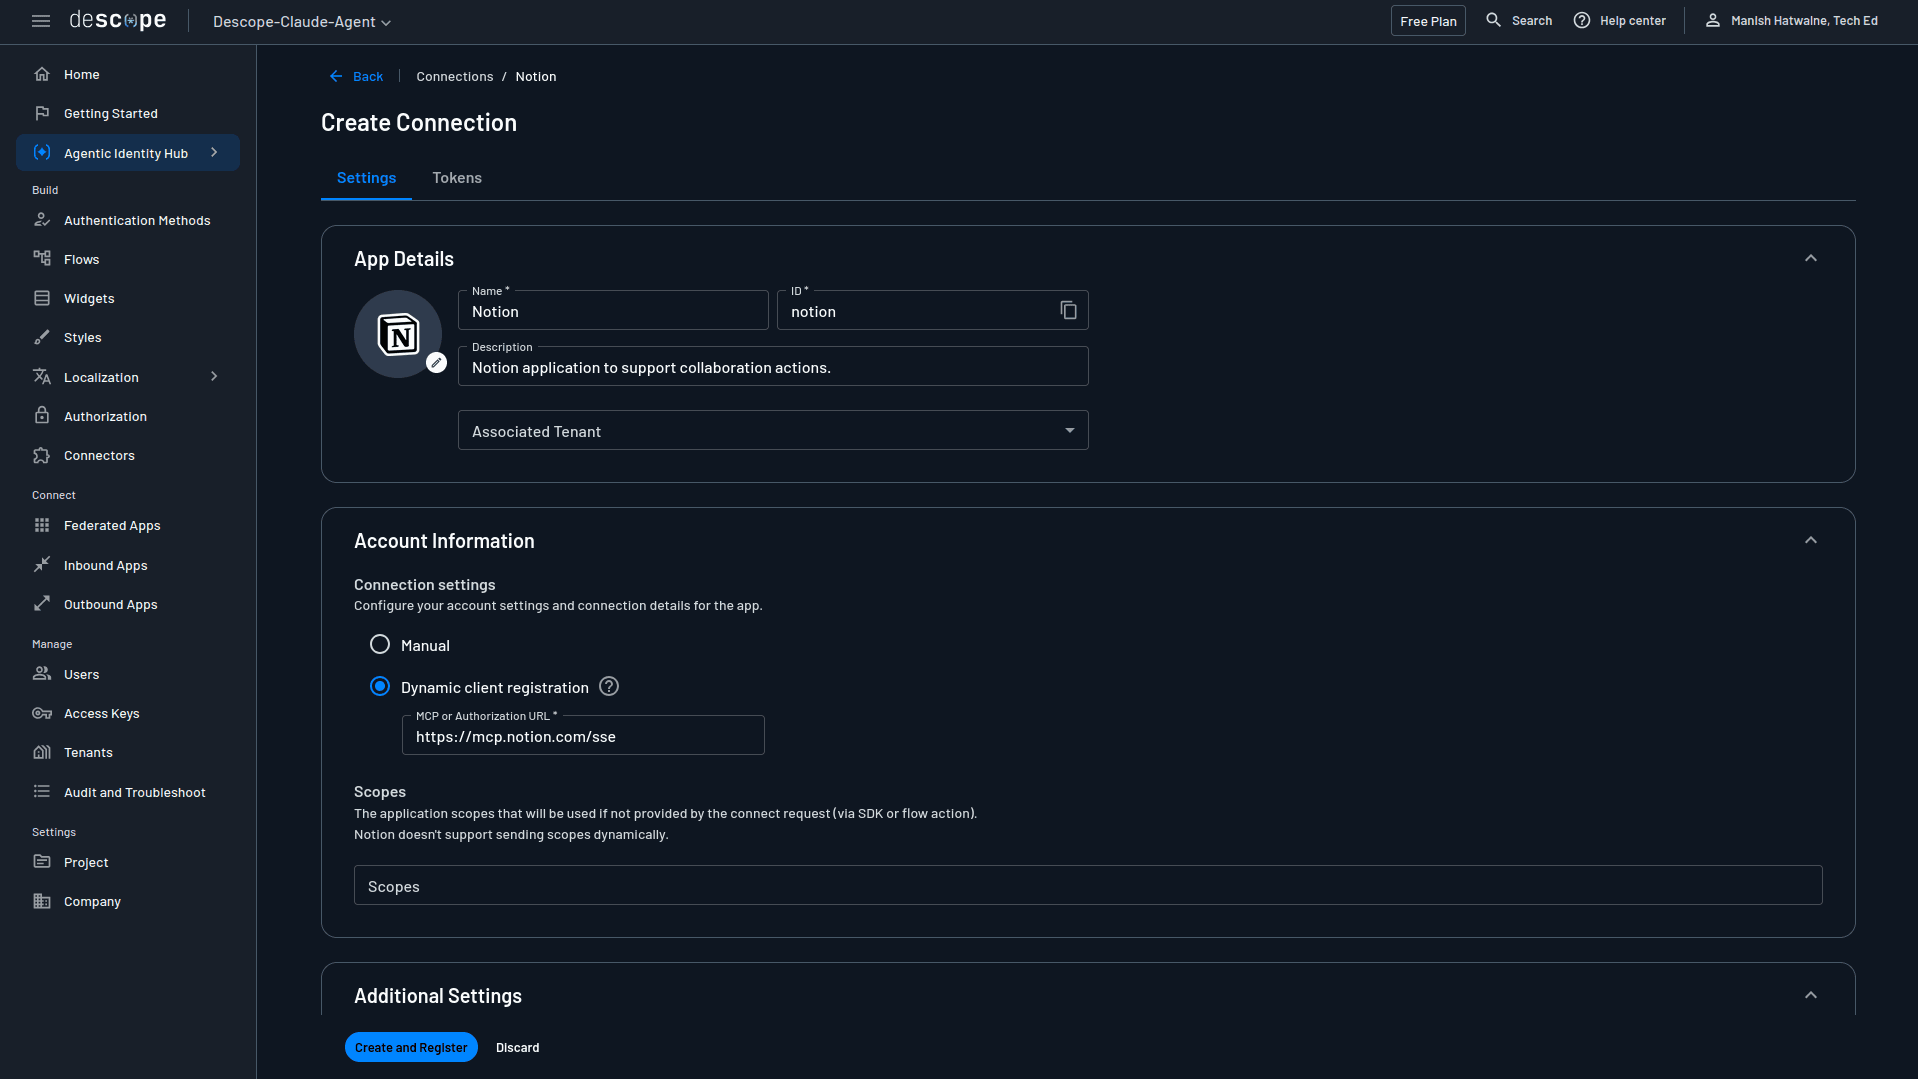
Retrieving the user-specific token at runtime follows the same pattern:
token_resp = descope_client.mgmt.outbound_application.fetch_token(
    app_id="notion",
    user_id=user_id,
)
access_token = token_resp["token"]["accessToken"]
What makes Notion setup with DCR so much easier? With standard OAuth, you’d normally have to manually register a client with the provider, copy over a client ID and secret, and configure redirect URIs before anything works. DCR skips all that. The MCP client (or agent) simply sends a registration request to the MCP server’s registration endpoint at startup, and the server responds with a freshly issued client ID and secret on the spot. From there, the MCP client kicks off a standard OAuth flow, where the user authorizes access to their Notion workspace through a consent screen. Descope then stores that user’s token and brokers it on future requests, so the consent screen only shows up once. For MCP servers that support it, this makes OAuth setup much simpler while still keeping per-user authorization intact.
Configuring the agent’s identity in Descope
Before any agent can authenticate with your MCP server, you need to register that server in Descope, which gives the agent a verifiable identity to operate under.
MCP server representation
In your Descope project, go to Agentic Identity Hub > MCP Servers from the left sidebar and click + MCP Server. Configure it as your mh-agent-tools server:
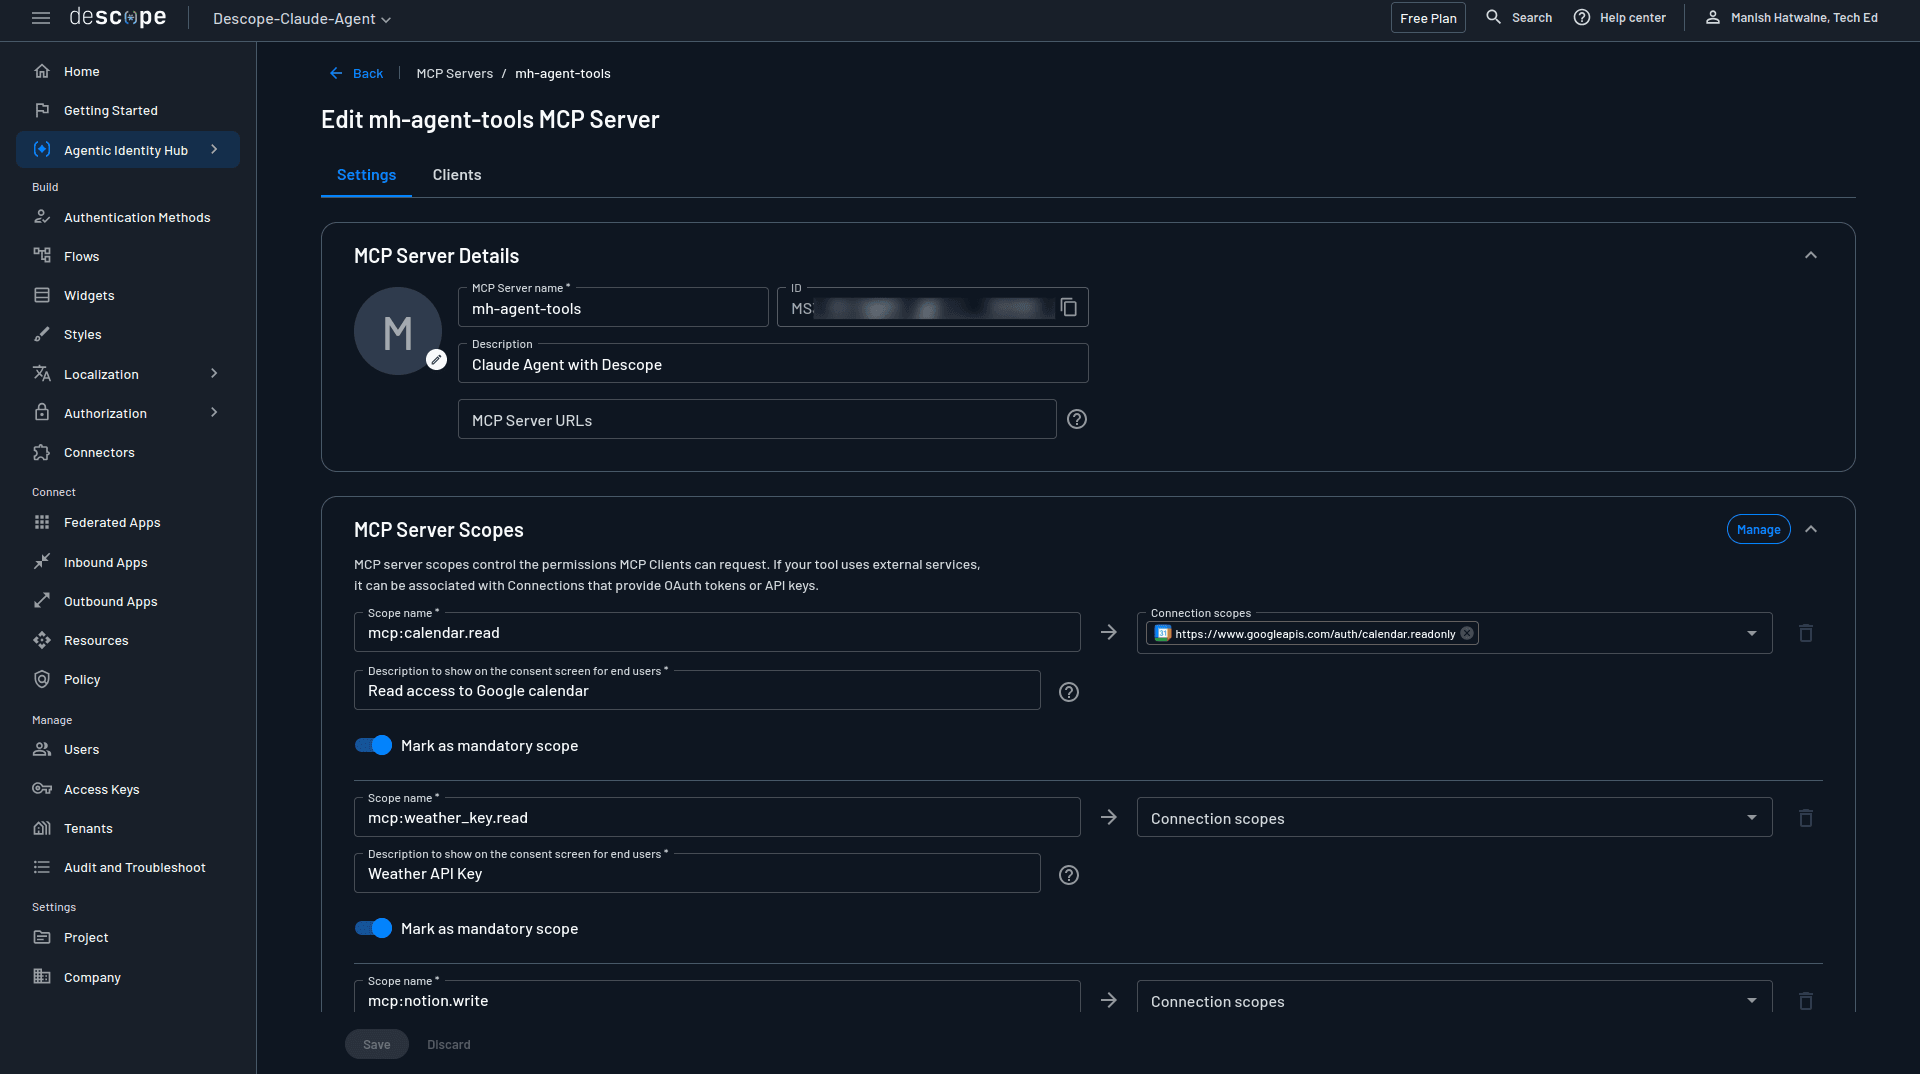
Add the following scopes and mark each as mandatory: mcp:calendar.read (connection scope: https://www.googleapis.com/auth/calendar.readonly), mcp:weather_key.read, and mcp:notion.write. These scopes enforce what each tool is actually allowed to do, and the agent cannot exceed them regardless of what it is asked.
Scroll down to Connection Information and copy the Discovery URL, which follows this format:
https://api.descope.com/v1/apps/agentic/{project_id}/{MCP_server_id}/.well-known/openid-configuration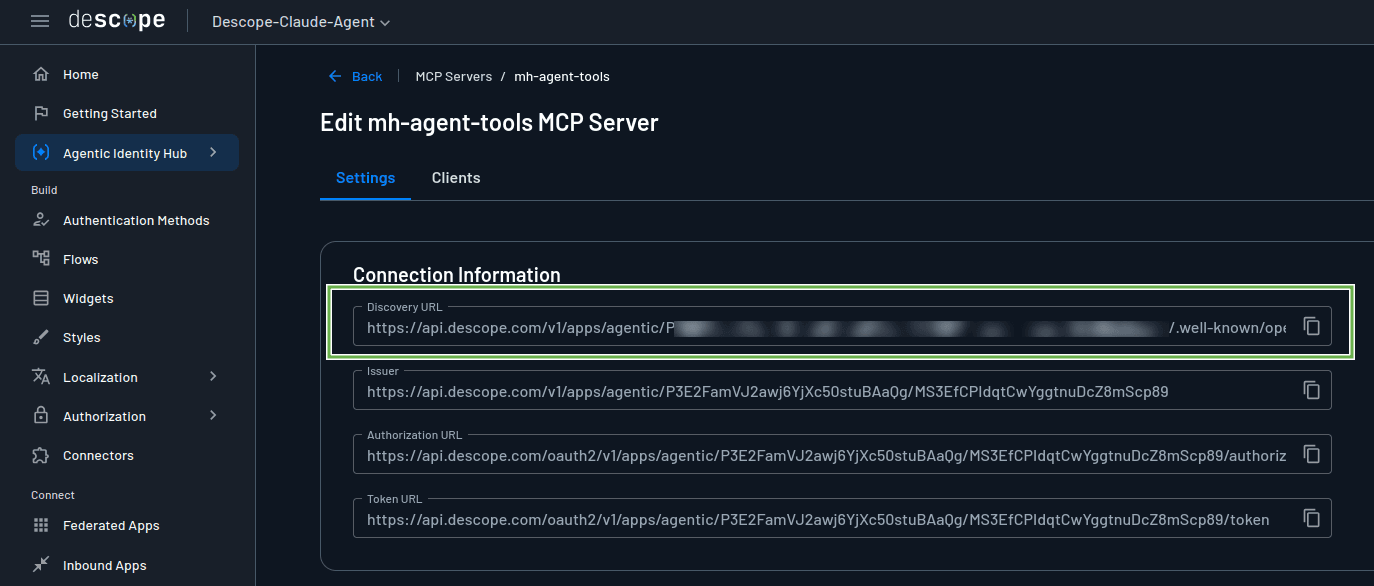
Set this as DESCOPE_MCP_SERVER_CONFIG_URL in your .env file. The agent uses it to dynamically register with Descope at startup and assume an agentic identity on behalf of the authorizing user. Each agent gets its own distinct agentic identity. So if ten users run and authorize the agent, you will see ten entries automatically appear under Agentic Identity Hub > Agentic Identities in your Descope project.
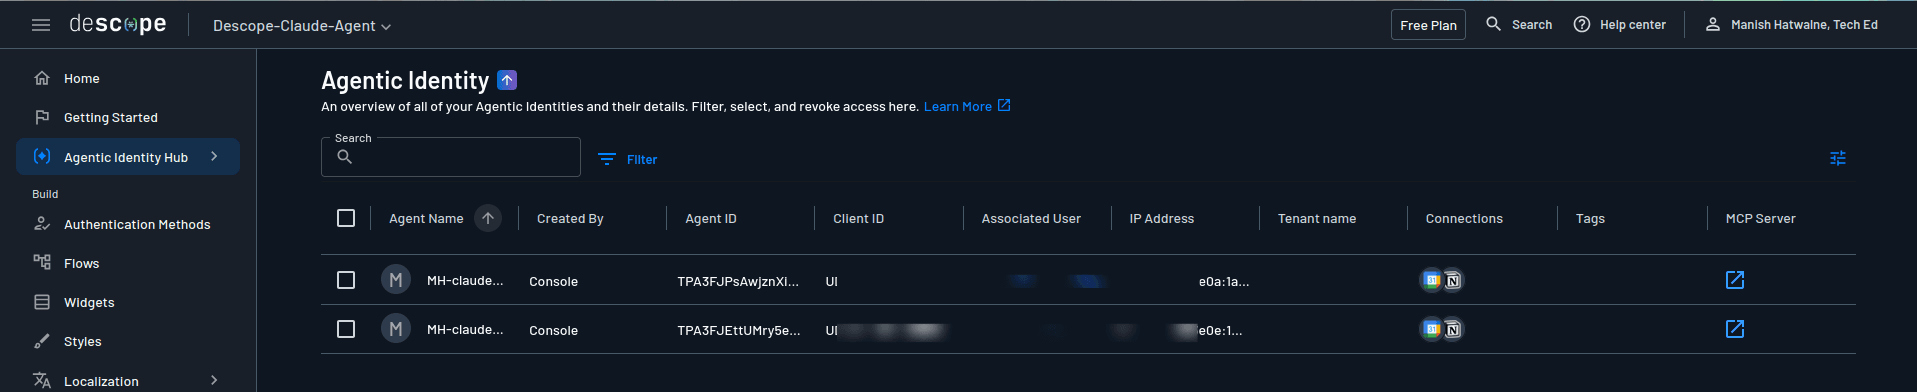
Note: These agentic identities only appear after you have run and authorized the agent for the first time for each user.
Building the MCP server
With the Descope MCP server configuration in place, you can now build the MCP server (mh-agent-tools) that exposes three tools: Weather, Google Calendar, and Notion.
Each tool follows the same structure: validate the caller’s scope, look up the user’s credential from Descope’s Connections vault, and call the external service. If a credential is not stored yet (that is, if the required service is not connected and authorized), the tool does not fail. It returns an authorization link instead, so the user can connect the service and re-run without any changes to the code.
The MCP server itself is built with FastMCP, which has native support for Descope as an auth provider. Wiring it up takes just a few lines:
# Initialize Descope auth provider to validate incoming tokens and identify users
auth_provider = DescopeProvider(
    config_url=DESCOPE_MCP_SERVER_CONFIG_URL,
    base_url=MCP_SERVER_URL,
)

# Create the MCP server instance with the Descope auth provider
mcp = FastMCP("mh-agent-tools", auth=auth_provider)

# .....

mcp.run(transport="http")
This MCP server uses http for transport, so the agent (or any other MCP client) must connect to it over HTTP.
The AI agent (built with the Claude Agent SDK) calls these MCP server tools using a bearer access token (a JWT). This token comes from Descope’s OAuth flow, completed once the user authorizes the agent.
This MCP server logs the key steps during its execution, including credential retrieval (or a missing credential), and the success or failure of the response from the external service. These logs can then be audited to see exactly which user ran which tool.
The weather tool
Let’s take a look at the weather tool implementation:
@mcp.tool(auth=require_scopes("mcp:weather_key.read"))
async def get_weather(city: str) -> str:
    """Get today's weather for a given city using WeatherAPI.com.

    Returns current conditions and temperature.

    Args:
        city: The city to get weather for.
    """
    logger.info(f"Inside get_weather...")
    user_id = current_user_id()

    try:
        token_resp = descope_client.mgmt.outbound_application.fetch_token(
            app_id="weather-api-key",
            user_id=user_id,
        )
        api_key = token_resp["token"]["accessToken"]
        logger.info(f"get_weather: Obtained weather API Key for user {user_id}: {api_key[:5]}...")
    except Exception as e:
        logger.exception(f"get_weather: Error fetching token for user {user_id}: {e}")
        return (
            "Weather API key not available yet. Open this link to add your "
            f"Weather API key: {WEATHER_CONNECT_FLOW_URL}\n\n"
            "Then re-run this request."
        )

    async with httpx.AsyncClient(timeout=CONNECTION_TIMEOUT) as client:
        resp = await client.get(
            "https://api.weatherapi.com/v1/current.json",
            params={"q": city, "key": api_key},
        )

    if resp.status_code != 200:
        logger.error(f"Weather API error for city {city}: {resp.status_code} - {resp.text}")
        return f"Weather API error: {resp.status_code}"

    data = resp.json()
    logger.info(f"Weather data for {city}: {data['current']['condition']['text']}")
    return (
        f"Weather in {city}, {data['location']['country']}: "
        f"{data['current']['condition']['text']}, {data['current']['temp_c']}°C"
    )
At the top of the function, require_scopes("mcp:weather_key.read") enforces that the calling agent’s session token carries the right scope before the tool execution. If the required scope is missing, the tool is hidden from the client’s tool list entirely rather than returning an error, so unauthorized users never even know the tool exists.
The tool obtains the current user’s identity from the validated session token. This user_id ties the credential lookup in Descope to the right user.
user_id = current_user_id()Path 1: credential found. The tool calls Descope’s fetch_token with the connection ID (weather-api-key) and the user_id. If the user has already connected their WeatherAPI key through Descope, this returns it, and the tool proceeds to call the WeatherAPI endpoint directly.
token_resp = descope_client.mgmt.outbound_application.fetch_token(
    app_id="weather-api-key",
    user_id=user_id,
)
api_key = token_resp["token"]["accessToken"]
Path 2: credential not found. If the user has not connected their WeatherAPI key yet, fetch_token raises an exception. Rather than failing with an error, the tool catches it and returns a Descope connect flow URL. The agent surfaces that link, the user opens it, adds their key, and re-runs the agent.
except Exception as e:
    return (
        "Weather API key not available yet. Open this link to add your "
        f"Weather API key: {WEATHER_CONNECT_FLOW_URL}\n\n"
        "Then re-run this request."
    )
Note: For a hosted flow to store the weather API key, download the Descope Weather API Flow, and import it into your Descope project’s flows.
The Google Calendar tool
The Google Calendar tool follows the same structure as the weather tool, with one key difference: instead of a static API key, it works with a user-specific OAuth token.
@mcp.tool(auth=require_scopes("mcp:calendar.read"))
async def get_calendar_events(date: str) -> str:
    """Fetch today's events from the authenticated user's Google Calendar.

    Returns a list of upcoming meetings with their titles and start times.

    Args:
        date: The date for which to fetch events (in `YYYY-MM-DD` format).
    """
    ....
The fetch_token call looks identical, but because Google Calendar requires individual user authorization, the token is scoped to the user’s Google account. If the token is not available yet, the tool returns a Google OAuth authorization URL rather than a hosted Flow link. Once the user completes the OAuth authorization, Descope stores the token and handles refresh automatically on subsequent calls. You can find the full implementation of get_calendar_events(...) in mcp_server.py.
The Notion tool
The Notion tool is structurally identical to the other two, but with two distinctions worth noting. First, the credential behind it was obtained through DCR instead of a manually configured OAuth app. Second, unlike the weather and calendar tools, which call REST endpoints directly, this tool connects to Notion’s MCP server to create documents.
@mcp.tool(auth=require_scopes("mcp:notion.write"))
async def create_notion_page(title: str, content: str) -> str:
    """Create a page in Notion with a given title and content.

    Use this to save a summary or checklist for upcoming meetings.

    Args:
        title: The title of the Notion page.
        content: The body content of the Notion page (in Markdown format).
    """
    ....
From the tool’s perspective, the credential handling looks the same. The fetch_token call with app_id="notion" and the user_id returns the token just like the others. If the token is not available yet, the tool returns a Descope-generated OAuth authorization URL that takes the user through Notion’s consent screen. After authorization, Descope brokers the token on every subsequent request, and the agent can create and update Notion pages without ever handling the credential directly. You can find the full implementation of create_notion_page(...) in mcp_server.py.
Building the agent with Claude Agent SDK
With the Descope Connections and MCP server tools already in place, the agent code itself stays minimal. It comes down to three steps:
Authenticate with Descope and obtain an access token for calling the MCP server’s tools.
Configure the local MCP server and the tools it exposes.
Run the agentic loop with a prompt that has the agent pull together the weather and calendar data and write the plan to Notion.
You can examine the complete code implementation for the Claude-based agent here: run_claude_agent.py
from claude_agent_sdk import ClaudeAgentOptions, ResultMessage, query

async def main():
    args = parse_args()
    city_name = args.city

    # Authenticate with Descope and get an access token for calling MCP server tools
    access_token = await get_access_token()

    today: str = datetime.now().strftime("%A, %d %B %Y")
    prompt = (
        f"Help me plan my day for {today}."
        f"First, check the current weather in {city_name}. "
        "If the Weather API key is not available, show an appropriate message with the link to add it, and do NOT proceed further.\n\n"
        "...."
    )  # Long prompt trimmed here for brevity

    async for message in query(
        prompt=prompt,
        options=ClaudeAgentOptions(
            mcp_servers={
                "mh-agent-tools": {
                    "type": "http",
                    "url": MCP_SERVER_ENDPOINT_URL,
                    "headers": {"Authorization": f"Bearer {access_token}"},
                }
            },
            allowed_tools=["mcp__mh-agent-tools__*"],
        ),
    ):
        if isinstance(message, ResultMessage) and message.subtype == "success":
            print(message.result)

asyncio.run(main())
This main function ties everything together. The city argument comes from the command line and determines which city’s weather gets pulled into the plan.
It starts by authenticating with Descope to get the access token your MCP tools will need:
access_token = await get_access_token()The function get_access_token() comes from get_user_token.py, which handles the full DCR registration (client name: MH-claude-descope-MCP-client) and PKCE login flow with Descope on the agent’s behalf. The access token has the user identity and scopes embedded in it. Once a token is obtained, it is cached locally and silently refreshed on later runs, so the user only has to go through the browser login once rather than on every invocation. The corresponding agentic identity (representing the user) is created in Descope at this point.
The prompt walks the agent through the planning task step by step: check the weather, fetch today’s calendar events, then combine both into a structured Notion page with a weather summary, schedule, focus blocks, and a priority to-do list. The prompt also tells the agent what to do if a credential is missing for any of the three tools: surface the authorization link, wait for the user to complete it, and ask for a re-run. That’s the graceful degradation pattern from the MCP server, reaching all the way up into the agent’s behavior.
The query call is where the agent actually runs. The mcp_servers configuration points the agent at your local MCP server (running at: http://127.0.0.1:8000/mcp) and passes the Descope access token as a Bearer header on every request. This allows the MCP server (using Descope authentication: mcp = FastMCP("mh-agent-tools", auth=auth_provider)) to validate the agent’s identity on each tool call. The allowed_tools block restricts the agent to only the tools exposed by mh-agent-tools, so it cannot reach for anything outside that scope.
mcp_servers={
    "mh-agent-tools": {
        "type": "http",
        "url": MCP_SERVER_ENDPOINT_URL,
        "headers": {"Authorization": f"Bearer {access_token}"},
    }
},
allowed_tools=["mcp__mh-agent-tools__*"],
Finally, the agent runs as an async loop over query, streaming messages as it works. The code only prints output once it receives a ResultMessage with a success subtype, which is the final plan along with the Notion page URL.
Agent demo: Obtaining credentials
You need two terminals open in your project folder (Descope-Claude-Agent): one for the MCP server, one for the agent.
Terminal 1 — start the MCP server
source .venv/bin/activate
python mcp_server.py
This serves the tools over HTTP at http://127.0.0.1:8000/mcp with a message like this:
INFO Starting MCP server 'mh-agent-tools' with transport 'http' on http://127.0.0.1:8000/mcpTerminal 2 — run the agent
source .venv/bin/activate
python run_claude_agent.py --city "Your City"
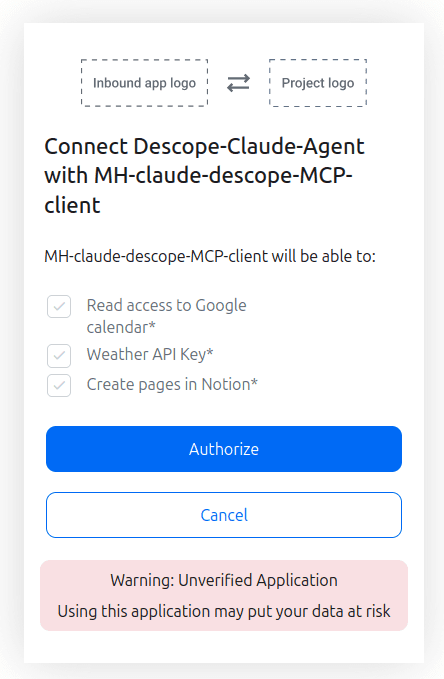
On first launch, get_user_token.py opens your browser for a Descope login using PKCE. You authenticate with an OTP sent to your email, then authorize the agent for the requested scopes (all scopes are marked mandatory in the MCP server configuration, so you cannot skip any). The consent screen looks like this:
Once you authorize and complete the login, the token is cached in .cache/descope_credentials.json, created automatically in your project folder, and silently refreshed on later runs so you do not have to repeat this step.
Weather API key
With the given prompt, the agent attempts to call the weather tool. Since the API key has not been added yet, the MCP server logs the failed lookup:
get_weather: Error fetching token for user <redacted-user-id>: {'status_code': 404, 'error_type': 'server error', 'error_message': '{"errorCode":"E152102","errorDescription":"Outbound app token not found"}'}The weather tool returns WEATHER_CONNECT_FLOW_URL to the agent, which surfaces it to the user as a message like this:
Agent Response:
------------------

The Weather API key is not available yet. Please add your Weather API key first before I can proceed with planning your day.

**Action needed:** Click the link below to add your Weather API key:

[**Add Weather API Key**](https://api.descope.com/login/{Descope-project-id}?flow=connect-weather-api-key)
Open this link in your browser. It takes you to the hosted Descope flow where you authenticate with your email and OTP, then save your API key.
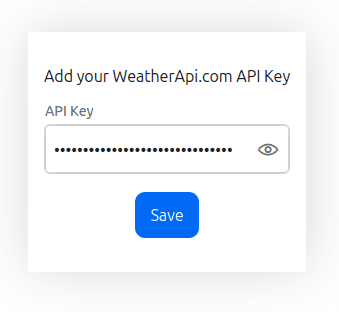
Once saved, you will see a confirmation: API key saved successfully!. This key is stored separately for each user inside the Descope connection, so even for paid services where every user brings their own key, credentials stay isolated and secure without needing separate environments per user.
Google Calendar
With the Weather API key now connected, re-run the agent. This time, it gets past the weather check but stops at Google Calendar, since that connection has not been authorized yet. The agent surfaces a Google OAuth authorization URL, generated by Descope, which takes you through Google’s own consent screen rather than a Descope-hosted flow. The screen clearly shows what the Descope connection is requesting access to.
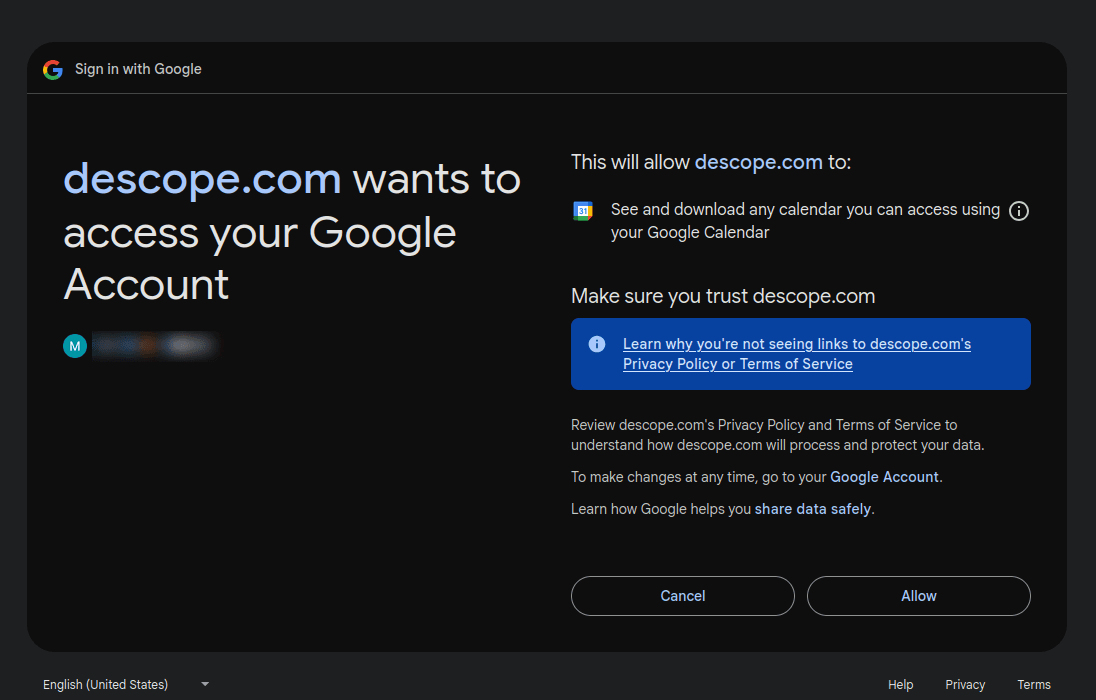
Once you complete the authorization, the OAuth token is stored in the corresponding Descope connection, and Descope handles refreshing it automatically whenever needed.
Notion MCP
Re-run the agent once more. With Weather and Calendar both connected, it now goes past those two checks but pauses at Notion, since that connection has not been authorized yet. Just like with Calendar, the agent surfaces an OAuth authorization URL generated by Descope, this time pointing to Notion MCP’s consent screen. The screen shows which workspace is being connected and exactly what permissions api.descope.com is requesting to take actions on your behalf.
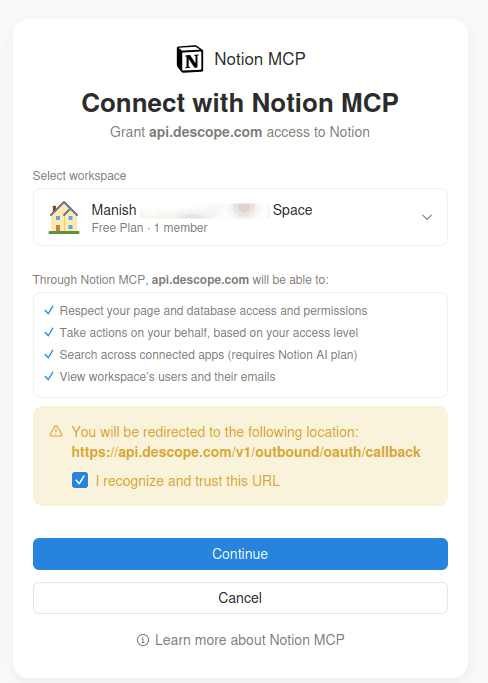
Notice the redirect URL on this screen: https://api.descope.com/v1/outbound/oauth/callback. This is the same Descope-managed callback pattern used for Google Calendar, just scoped to a different provider. Once you confirm and continue, the OAuth token is stored in the Notion Connection in Descope. Unlike the read-only Calendar scope, this authorizes Descope’s Notion MCP integration broadly. The agent can now create and update pages via Notion MCP in your workspace without ever holding that token itself.
Note: Each of these authorizations (Weather, Calendar, and Notion) is a one-time activity for a user. Once a credential is stored in its Descope connection, the MCP server retrieves it automatically on every subsequent run, scoped to the agent’s identity, without prompting you again. From this point on, simply running the agent takes you straight to the end goal: a complete daily plan, pulled together from your weather and calendar data, and written directly to Notion.
Agent demo: Plan creation
With all three credentials connected, a single run of the agent now completes the entire task end to end. Here is what that looks like from both sides.
MCP server logs
The server logs each tool call as it happens, including which user the credential belongs to and the outcome of the external call:
2026-06-19 16:03:11 [INFO] Inside get_weather...
2026-06-19 16:03:11 [INFO] get_weather: Obtained weather API Key for user U3<redacted>Ot: 7ca...
2026-06-19 16:03:12 [INFO] Weather data for Pune: Partly Cloudy
INFO:     127.0.0.1:47780 - "POST /mcp HTTP/1.1" 200 OK
2026-06-19 16:03:14 [INFO] Inside get_calendar_events...
2026-06-19 16:03:14 [INFO] get_calendar_events: Obtained access token for user U3<redacted>Ot: ya29.a0...
2026-06-19 16:03:14 [INFO] Getting user's calendar events for: 2026-06-19T00:00:00-00:00
2026-06-19 16:03:15 [INFO] Fetched 3 events for user U3<redacted>Ot.
INFO:     127.0.0.1:53426 - "POST /mcp HTTP/1.1" 200 OK
2026-06-19 16:03:36 [INFO] Inside create_notion_page...
2026-06-19 16:03:38 [INFO] create_notion_page: Obtained access token for user U3<redacted>Ot: 368d872...
2026-06-19 16:03:38 [INFO] Creating Notion page with title: Plan for: Friday, 19 June 2026
2026-06-19 16:03:46 [INFO] Notion page created: Plan for: Friday, 19 June 2026 at https://app.notion.com/p/38<redcated>d6
Three tool calls, three separate credential lookups, all tied to the same user_id, and all completing in under 40 seconds combined.
Agent output
On the agent side, the same run produces a complete, structured plan:
Agent Response:
------------------

Your day plan is ready! Here's a quick summary:

### Weather in Pune

**Partly Cloudy, 34.5°C** — It's a hot day. Stay hydrated, wear light cotton clothing, use sunscreen, and avoid the midday sun.

### Today's Schedule

- **18:00** — Complete Descope+Claude article
- **18:30** — Email Engineering Director about upcoming work
- **19:00** — Dinner

### Focus Blocks

Your calendar is clear until 18:00 — plenty of room for deep work. Suggested slots: 09:00-11:00, 11:15-12:30, 13:30-15:30, and 15:45-17:45.

### Top Priorities

1. Finish the Descope + Claude article (deadline 18:00)
2. Send the email to the Engineering Director
3. Quick review of next week's priorities
4. Hydrate, take breaks, and unwind by dinner

### Notion Page

Your full plan has been saved here:

**https://app.notion.com/p/38<redcated>d6**

Have a productive Friday!
This is what happened end to end: the agent first called get_weather for Pune, the tool retrieved the stored API key for this user, and got back a partly cloudy, 34.5°C reading. It then called get_calendar_events, this tool fetched the OAuth access token for the same user, and pulled three events for the day. With both pieces of context in hand, Claude reasoned over the gaps in the schedule to suggest focus blocks, then called create_notion_page to write the full plan, complete with weather precautions, the day’s timeline, and a prioritized to-do list, to a new Notion page. Every one of these three calls used a different credential type (a static key, an OAuth token, and a DCR-based OAuth token), fetched from Descope at the moment it was needed, and none of them ever touched agent code or configuration.
Here is the corresponding Notion page that the agent created:
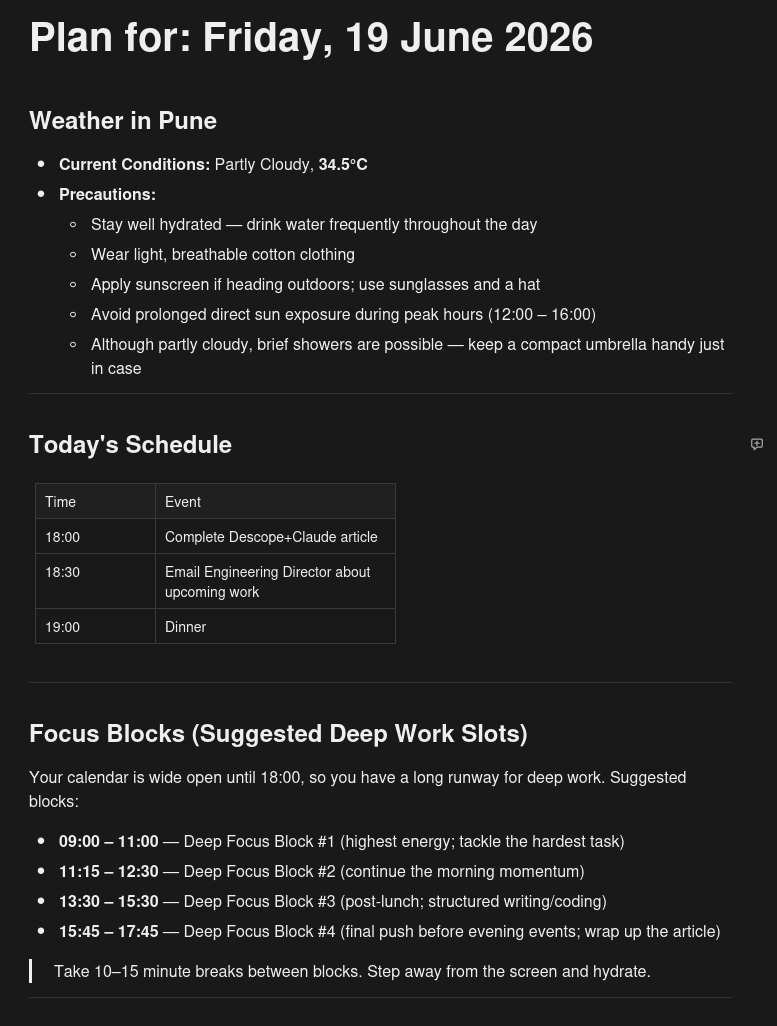
This demo covers just one scenario built around three tools, but the underlying pattern is scalable. Once you have the right tools paired with secure, identity-aware access through Descope’s Agentic Identity Hub, agentic applications you build on top of it are only limited by your imagination.
The audit trail
The real payoff here is not the Notion plan itself, it is the auditability. In Descope, under Agentic Identity Hub > Agentic Identities, you can see the specific identity created for this user. Under Audit and Troubleshoot, you can see every authorization that took place, each tied to that identity and to the exact credential used to make the call. Every action the agent took is traceable to a specific user, every credential access is logged, and at no point did the agent code itself need to know or store a single secret.
Here is how Descope’s Audit and Troubleshoot page looks:
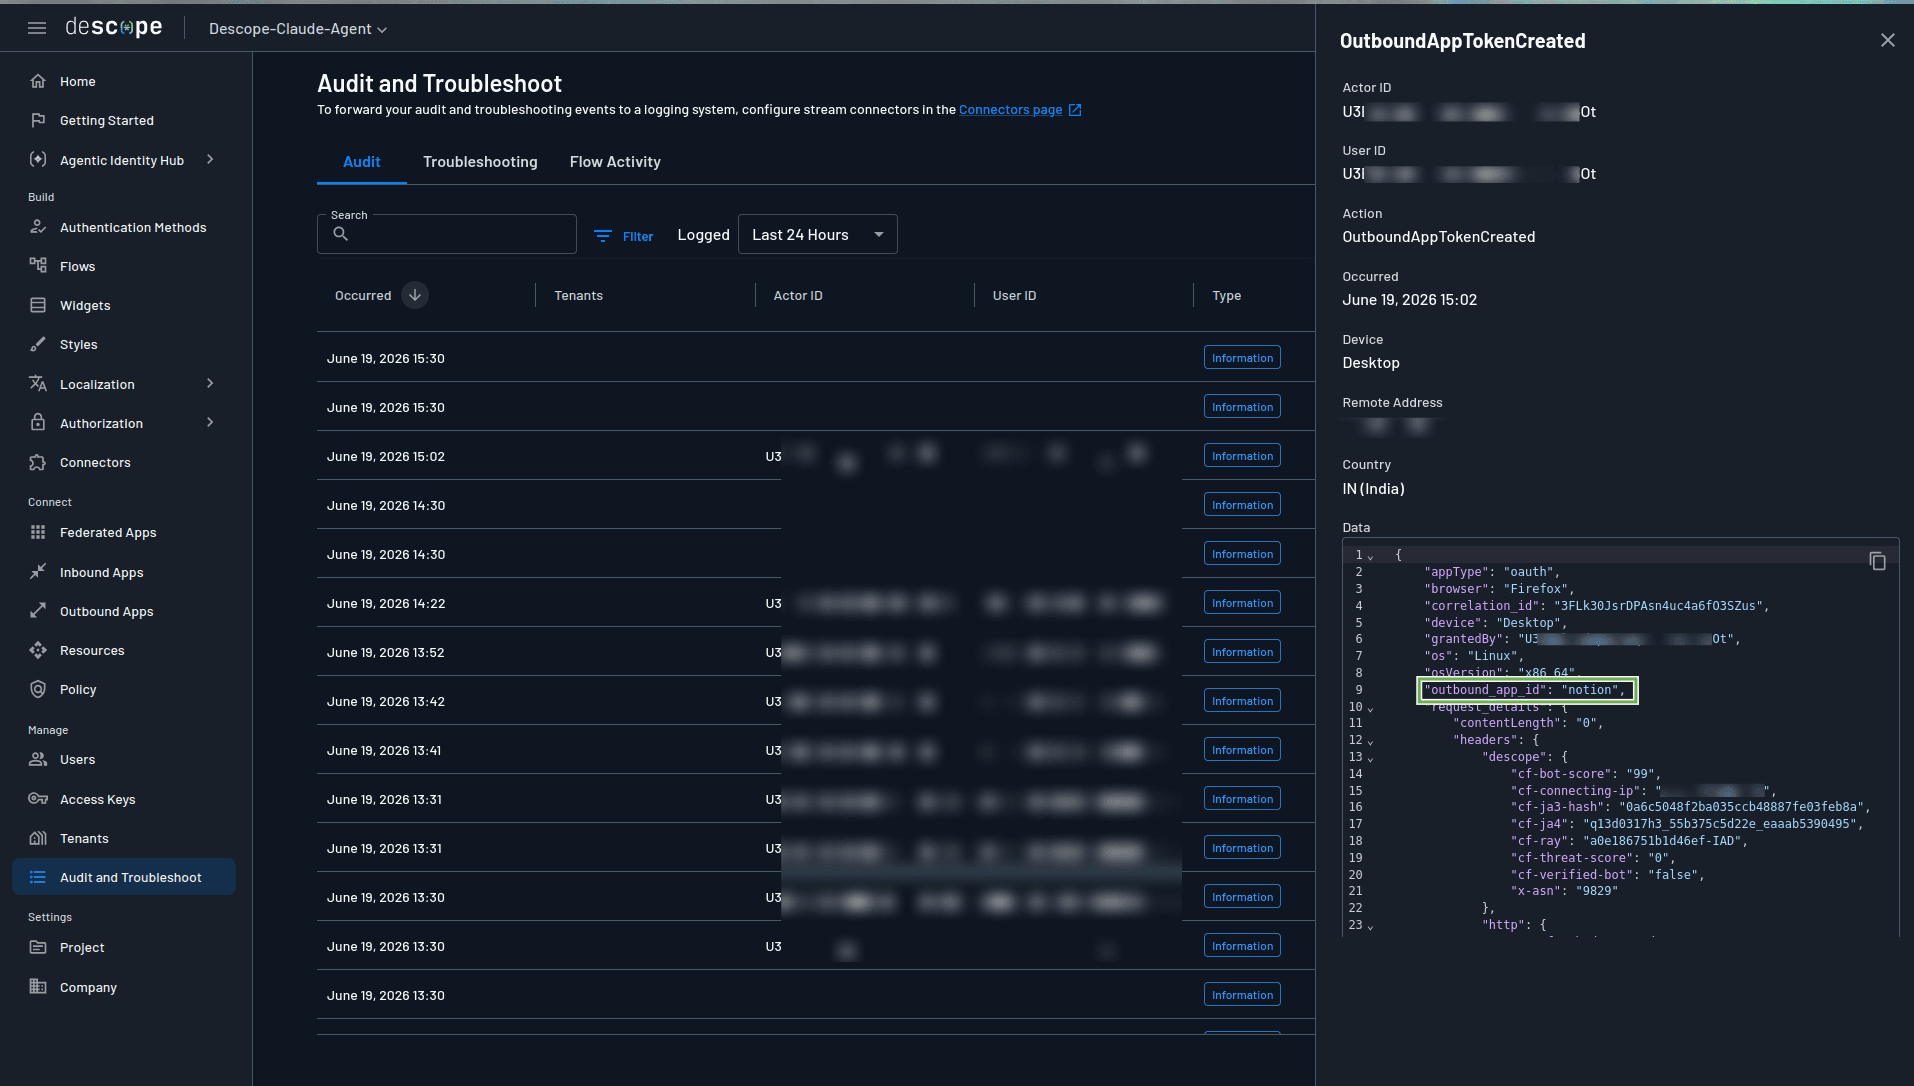
You can expand an individual log entry to examine the details. The screenshot above expands ‘Notion’ authorization, clearly showing the agent and user ID that authorized it.
Wrapping up
In this tutorial, you built a practical demo of a Claude-based AI agent with three tools. The agent operates under a defined identity instead of running anonymously. Secrets live in a vault and get retrieved at runtime instead of being scattered across config files and environment variables. Each tool enforces its own scope, so the agent only ever gets the access a given action needs. Every credential lookup and tool call is logged against a specific user, giving you a full accountability trail. None of this required you to build OAuth infrastructure from scratch or stand up a custom secrets store. Descope handled all of it.
Descope is built for exactly this purpose. It is an identity platform for the agentic era, where the same infrastructure that handles human login through no-code Descope Flows also extends cleanly to machine and agent identities. You set up a connect flow for a static key, brokered OAuth tokens for Google Calendar and Notion, and registered an MCP server’s identity, all from the same Agentic Identity Hub. As AI agents become more autonomous, unified identity and access control move from nice-to-have to non-negotiable. It is the very reason you can trust an agent in production.
If you’re already building with the Claude Agent SDK, add Descope to your agent stack in minutes. Start for free or explore the Agentic Identity Hub docs.