

Table of Contents
AI agents are taking on longer-running, more complex workflows that touch multiple systems and chain several actions to accomplish a single task. For example, consider an agent that can read your inbox, draft responses, and send them on your behalf. These actions look like one request from the user’s perspective, but it’s three distinct operations with different risk profiles.
That complexity can only be managed if your authorization model keeps pace. When inherently unpredictable agents are given overly broad permissions, damaging outcomes are much more likely to occur. An over-permissioned agent could forward a confidential thread, send a draft you hadn't reviewed, or expose data to the wrong recipient.
In this tutorial, we'll build a Claude-powered Gmail agent using Descope's Agentic Identity Hub to handle the auth layers that actually matter in production. Our agent can read and send Gmail emails, but with different layers of authentication and authorization depending on the action:
Authentication via Descope's OAuth 2.0 on-behalf-of flows
Progressive OAuth scoping (permissions requested only when needed)
Tool-level authorization (what the agent can access)
Human-in-the-loop approval for sensitive actions like sending emails
By the end, you'll understand how to build AI agents that are powerful but not unchecked, with security baked into the architecture rather than bolted on after. The source code for this tutorial is available for your reference.
Prerequisites
To get started, ensure you have prepared the prerequisites below.
Required:
Node.js 18+ installed on your machine
Anthropic API key for Claude (get one here)
Descope account (sign up free)
VS Code (or your preferred code editor)
What you'll need to set up:
A Descope project with an MCP server configured
A Gmail Connection configured in Descope (we'll walk through this)
Google Cloud Console OAuth credentials (client ID and secret)
Architecture
It’s important to understand why we’re using MCP at all rather than just defining tools directly in the agent. MCP standardizes how tool calling works across the board, which means any MCP-compatible agent can connect to this server, not just ones built with the Claude Agent SDK. It also creates a clean separation between the agent and the services it talks to, which is what makes the security model here actually work.
At a high level, our agent architecture involves four key components working together:
Claude Agent: The AI that interprets user requests and orchestrates tool calls
MCP Server: Exposes Gmail operations (read, send) as standardized tools
Descope: Handles all authentication, authorization, and on-behalf-of OAuth token management via MCP servers, Connections, and Enchanted Link-based approval
Gmail API: The external service we're integrating with
We’ll walk through the complete flow below, broken down into two main segments: reading emails and sending emails.
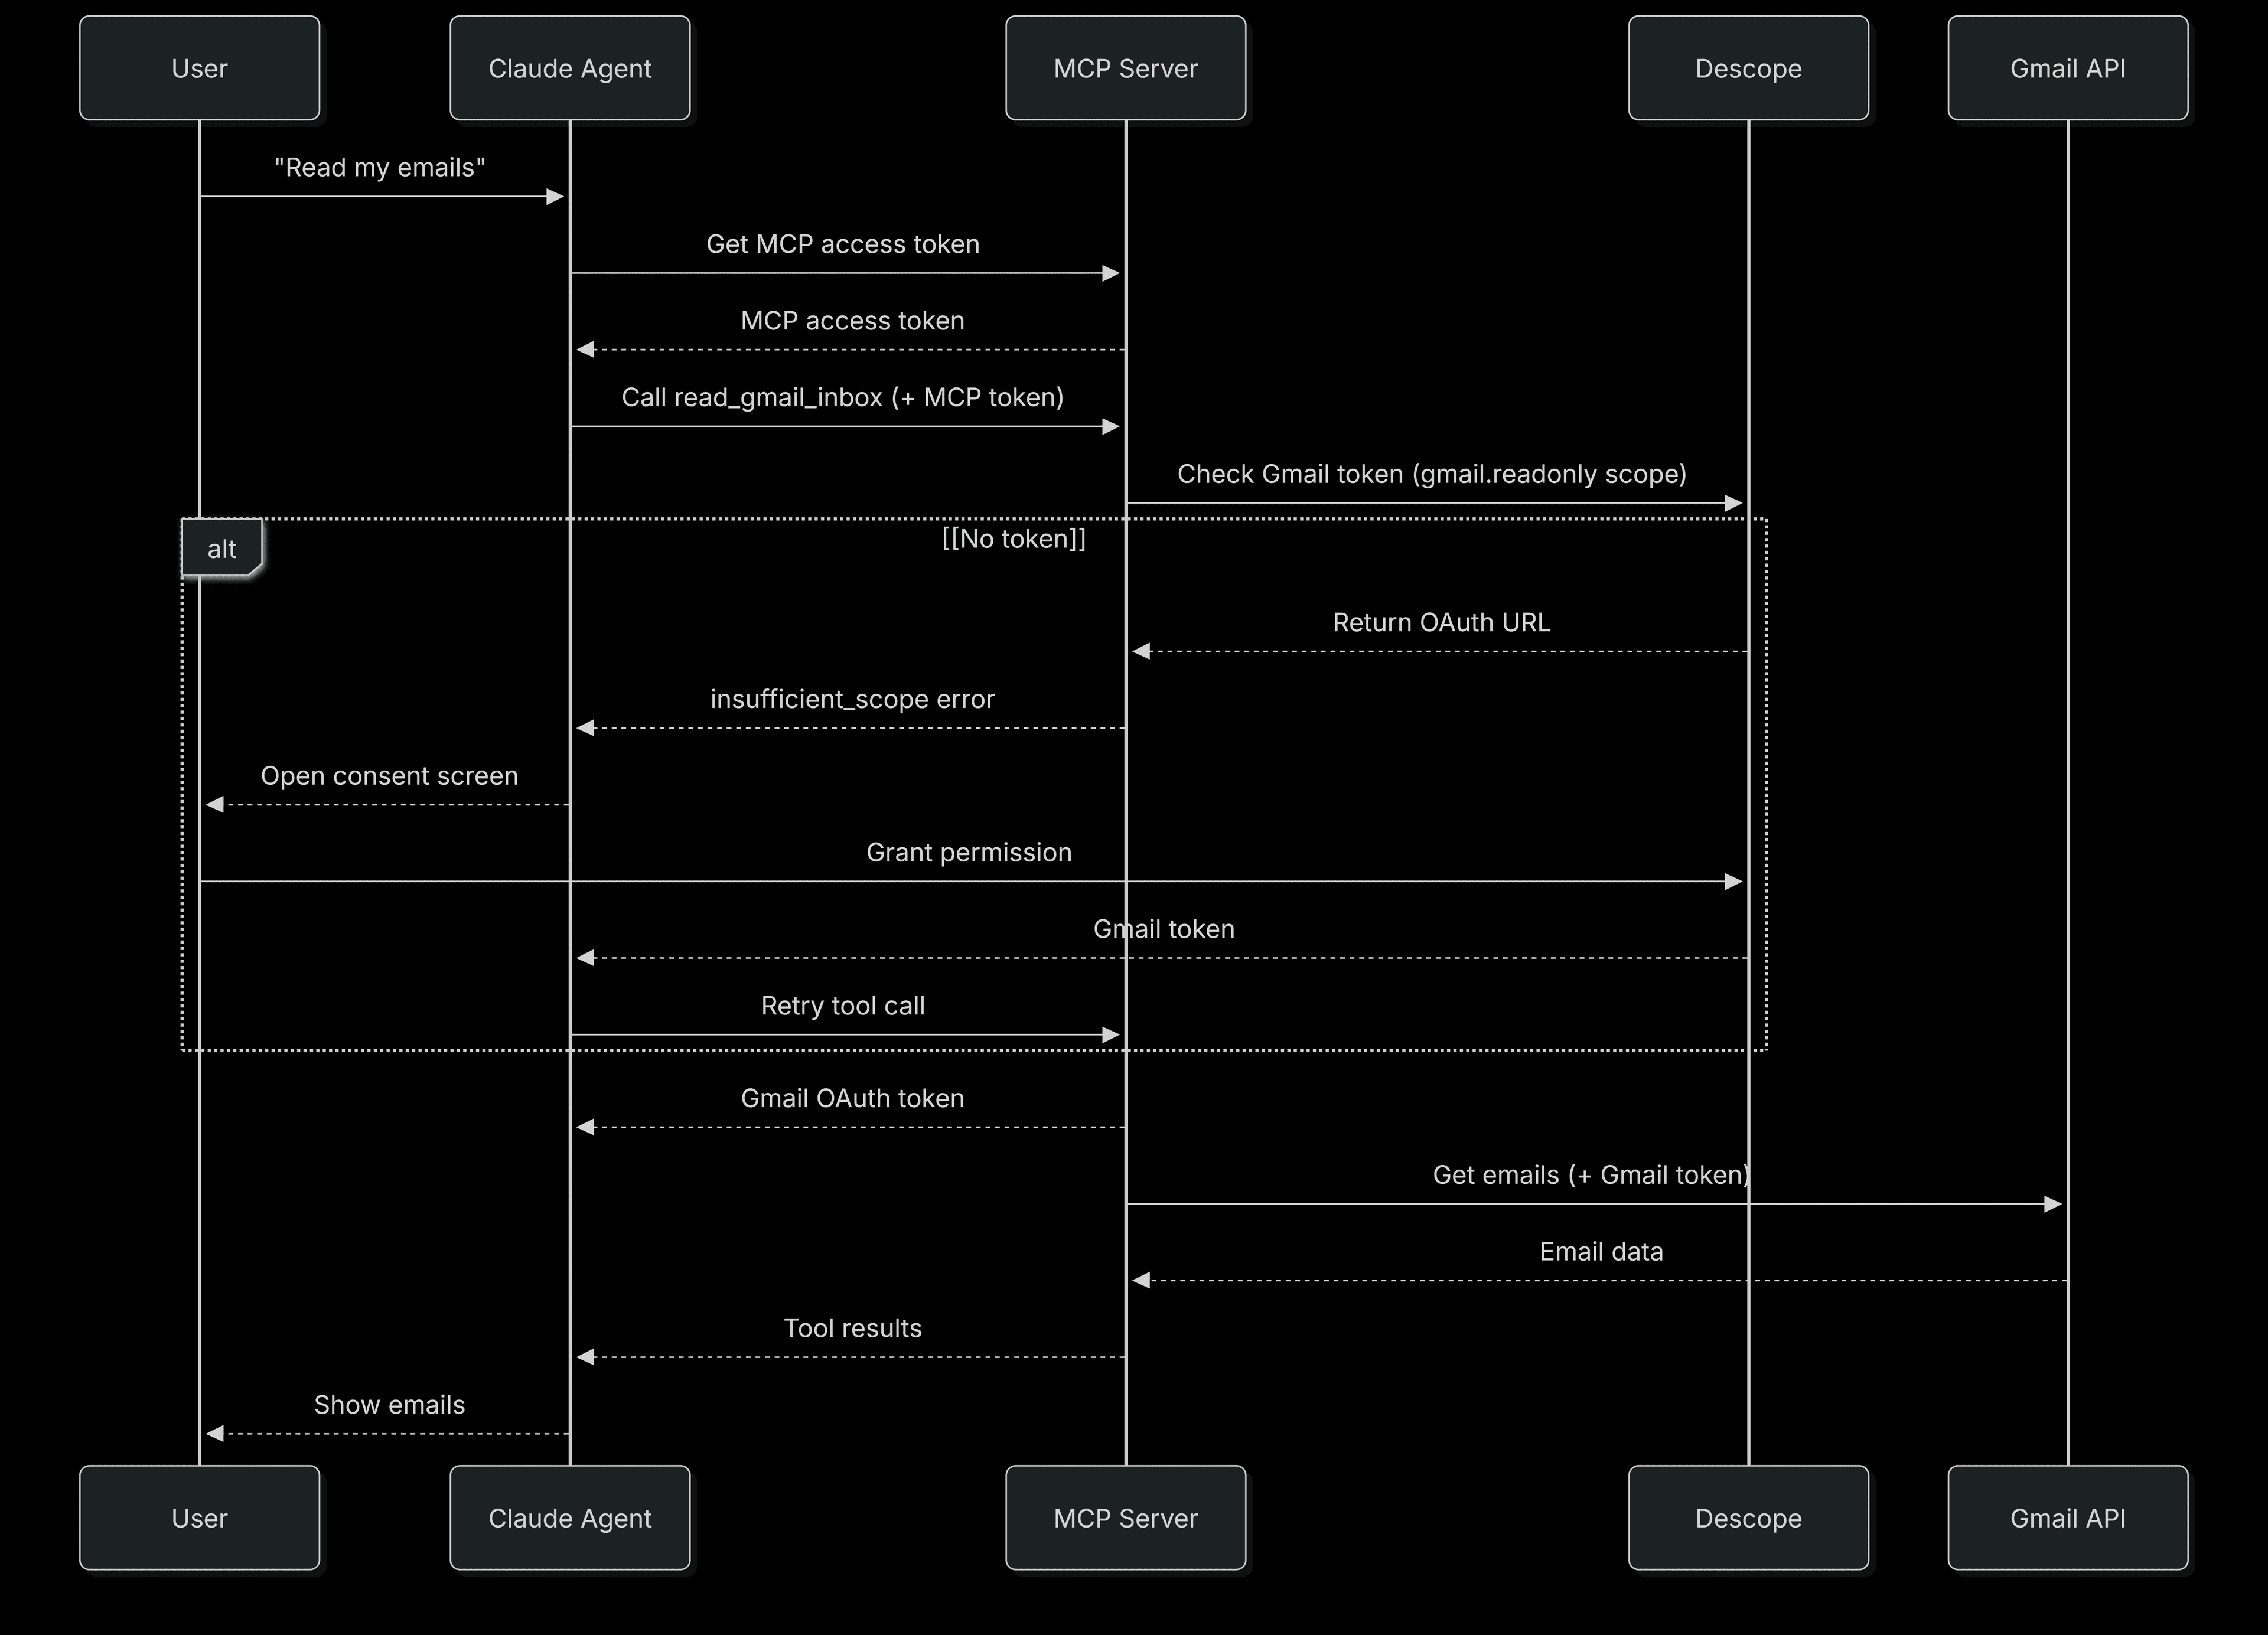
Reading emails:
User authenticates with Descope to get an MCP access token
Agent calls
read_gmail_inboxwith the MCP tokenMCP server performs an on-behalf-of token fetch to check if the user has granted
gmail.readonlyscopeIf no token exists, Descope returns an OAuth URL > user grants permission > agent retries
MCP server fetches the Gmail token from Descope and retrieves emails
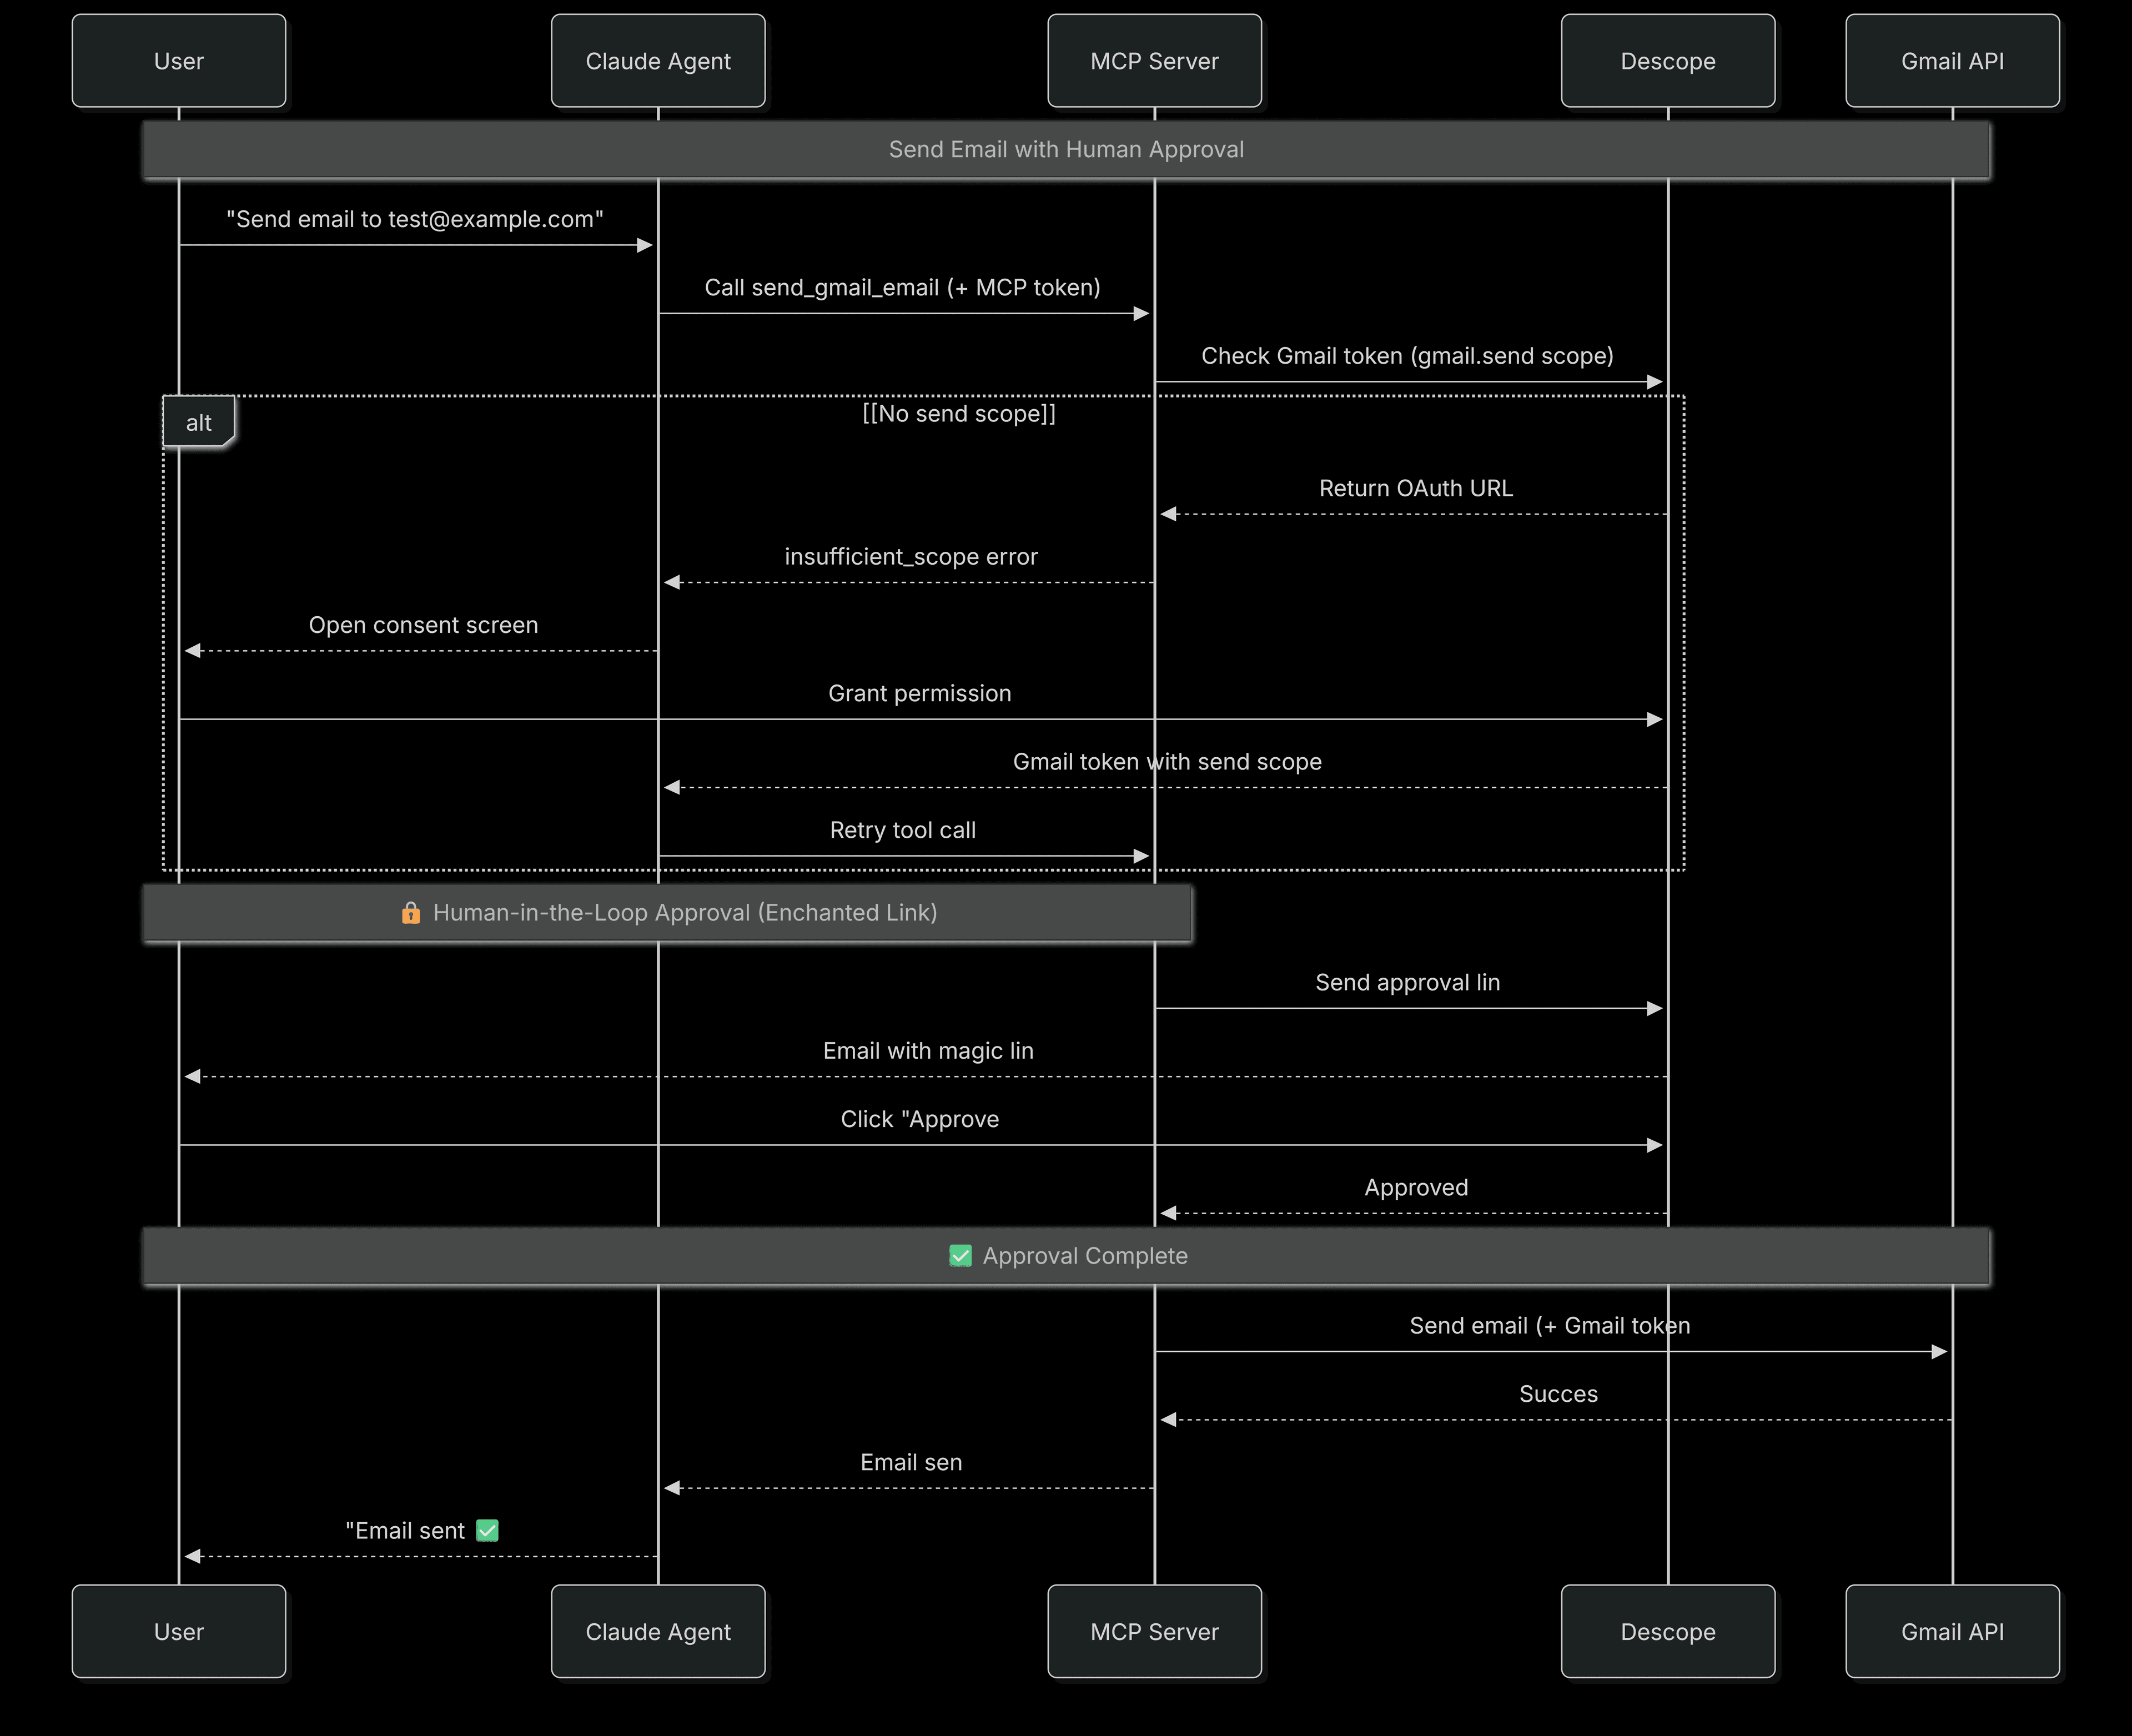
Sending emails:
Agent calls
send_gmail_emailwith the MCP tokenMCP server performs an on-behalf-of token fetch for
gmail.sendscope (same progressive flow if missing)Human-in-the-loop approval kicks in. An Enchanted Link is sent to user's email
User clicks approval link > Descope verifies > email is sent
Why this architecture is secure
This design implements defense-in-depth through multiple security layers:
Token isolation via on-behalf-of flows: The agent never directly handles Gmail OAuth tokens. Instead, the MCP server performs on-behalf-of token requests to Descope, acting on behalf of the authenticated user to retrieve their scoped Gmail credentials. These tokens are used for the API call and never exposed to the agent. This means if your agent logic is compromised, the attacker still doesn't have access to your Gmail credentials.
Progressive OAuth Scoping: Instead of requesting all Google permissions upfront at the start of the session, we request them only when needed. Descope supports URL elicitation as defined in the MCP spec, so the MCP server returns the exact OAuth URL with the right scopes at the moment they're required, not before. Users see exactly what they're granting and why: read permission when they first ask to read emails, send permission when they first try to send one.
Connection-time scope verification: When the agent first connects to the MCP server, the server cryptographically validates the token and checks for the minimum required scope (
google-read) before allowing any tools to be called. This matters because tools that don't call external APIs would never surface a missing permission error on their own. Catching it at connection time ensures every connected client has the permissions the server requires from the start.Human-in-the-loop for sensitive actions: OAuth scopes define what the agent can do, but not what the user wants done specifically. Even after the user has granted
gmail.sendpermission, the agent must get explicit approval for each email via a one-time Enchanted Link. The agent could misinterpret a request or generate incorrect content. This approval step ensures the user sees exactly what's being sent before it goes out.
The key insight is that the MCP server acts as a security boundary between the agent and your sensitive tokens. Each layer has a specific responsibility, and no single point of failure exposes everything.
Configure Descope Console
Before we write any code, let's set up everything we need in the Descope Console. We'll configure two main things in the Agentic Identity Hub: a Connection for Gmail OAuth management, and an MCP Server for agent authentication.
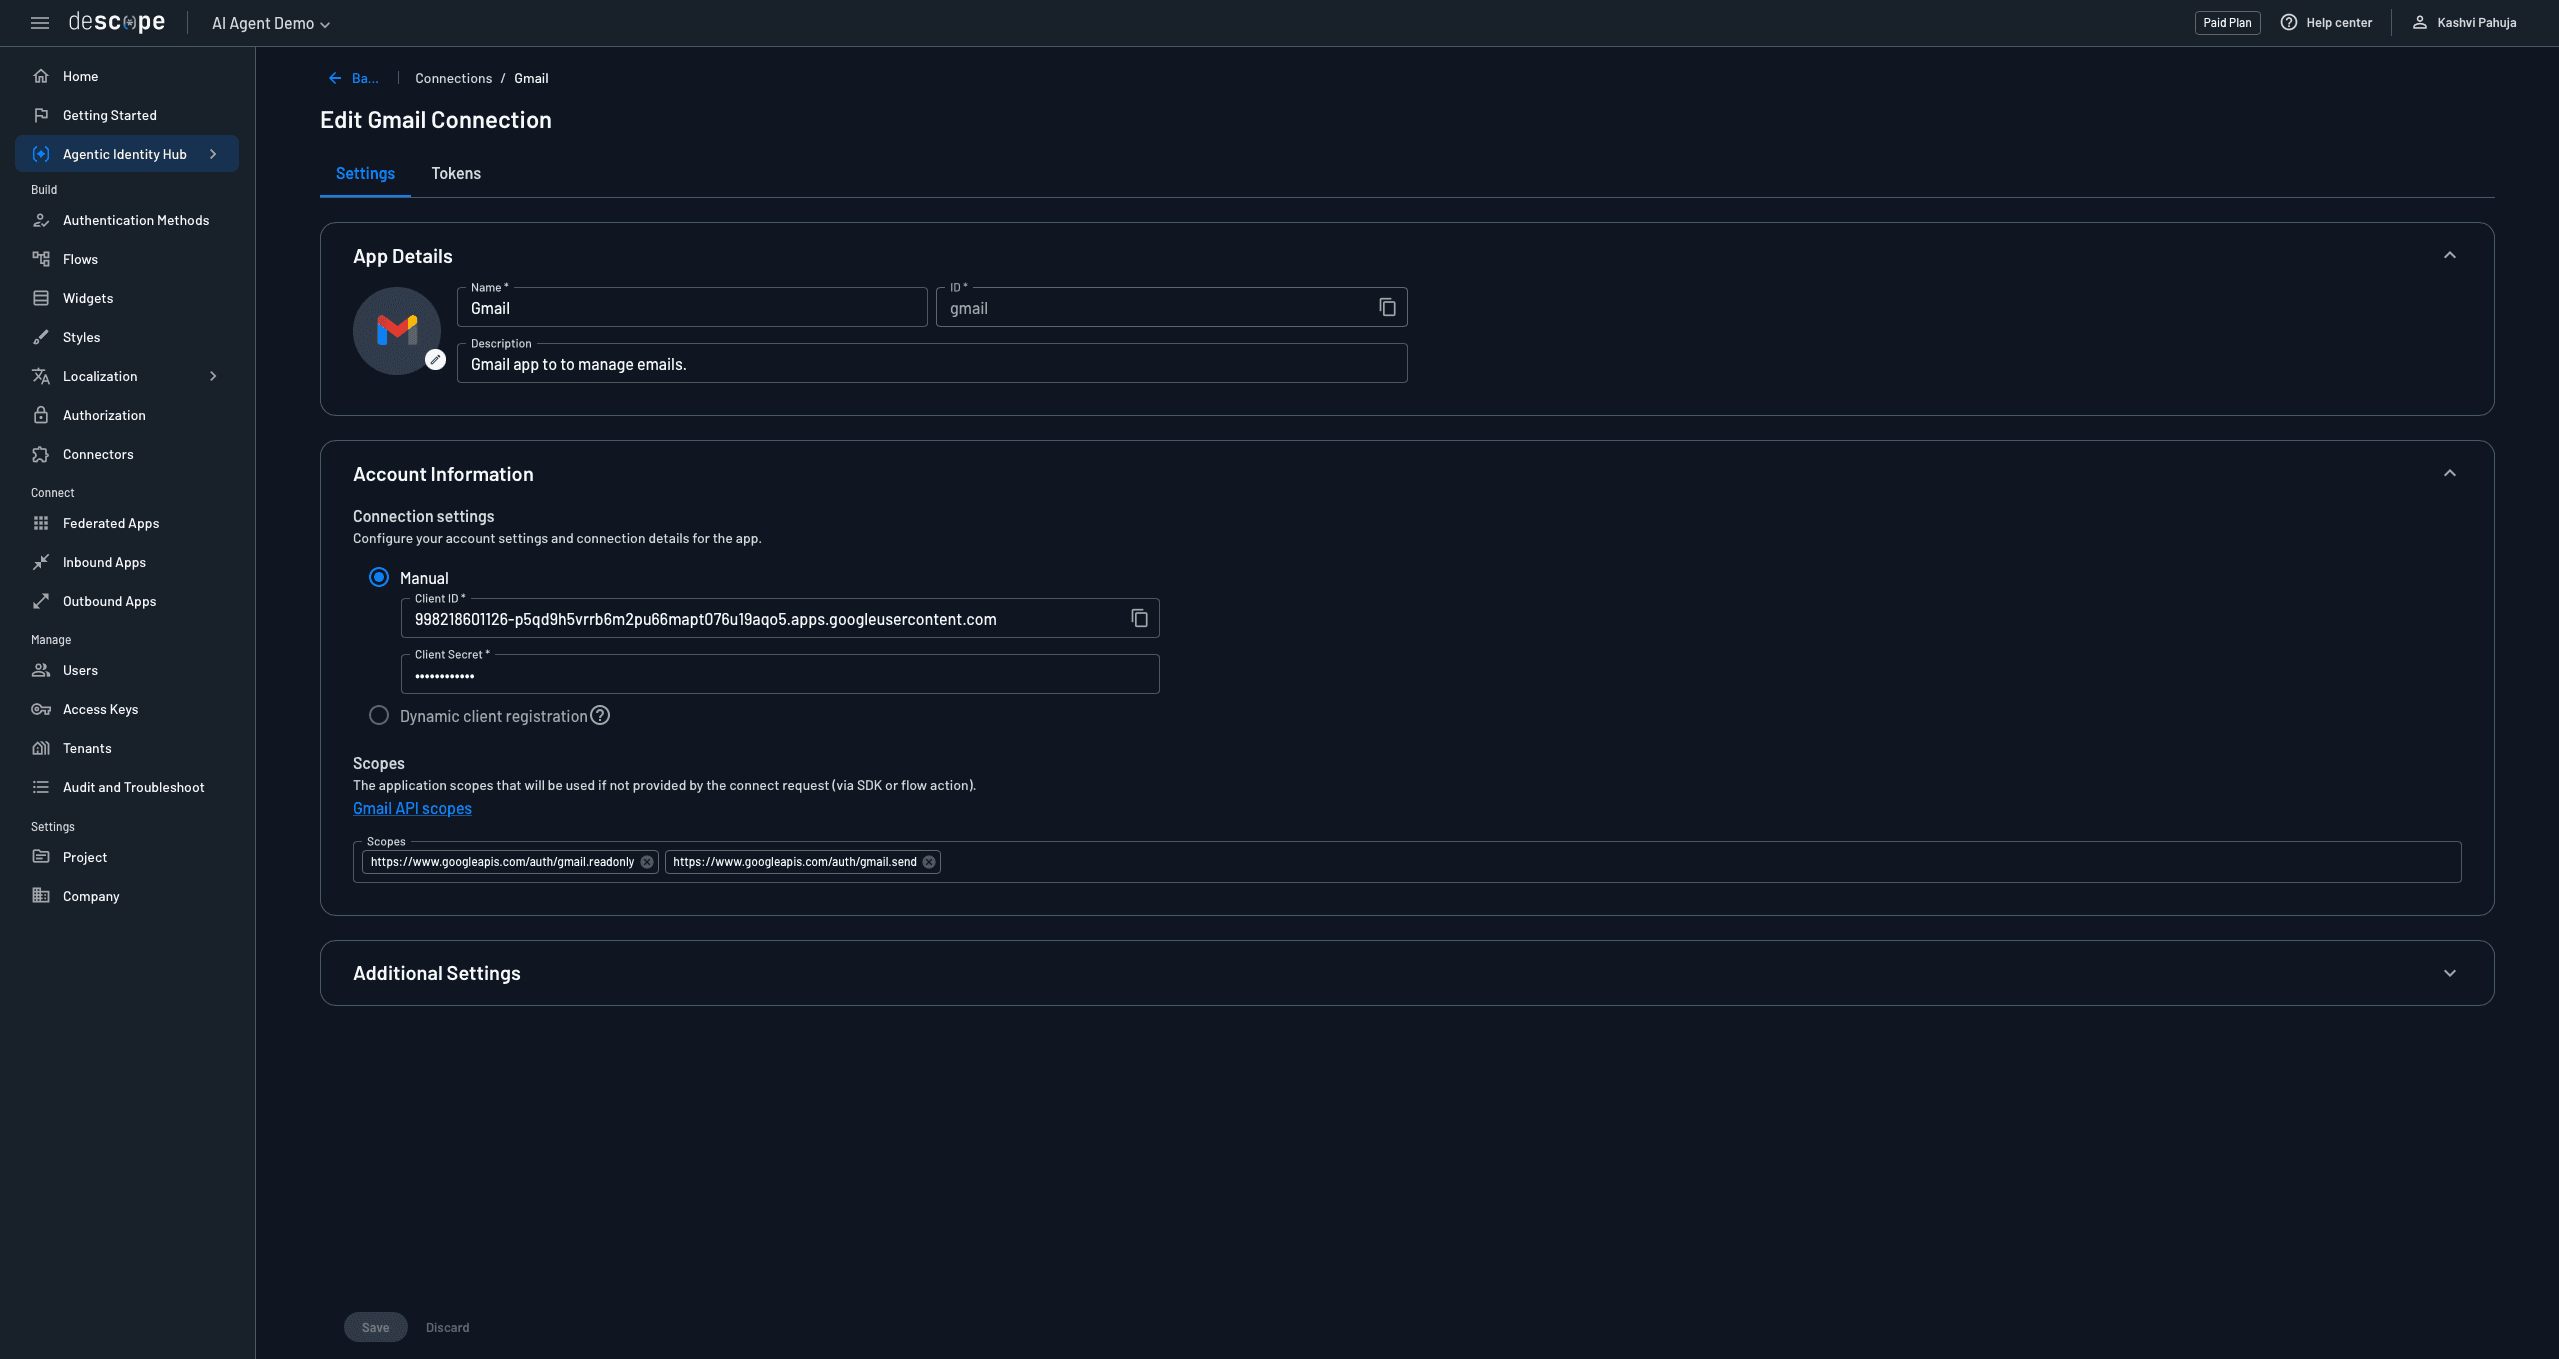
Step 1: Create a Gmail connection
Connections in Descope manage on-behalf-of OAuth tokens for external services. When your MCP server needs a Gmail token with specific scopes, it requests them from this connection. Descope handles storage, refresh, and lifecycle automatically.
In the Descope Console, navigate to Agentic Identity Hub > Connections
Click + Create Connection
Select Gmail from the available integrations
Configure the connection:
Name: Gmail
Connection ID:
gmail(this must match what you'll use in code)Description: "Gmail app to manage emails"
OAuth Scopes: Add both Gmail scopes:
https://www.googleapis.com/auth/gmail.readonlyhttps://www.googleapis.com/auth/gmail.send
Click Save
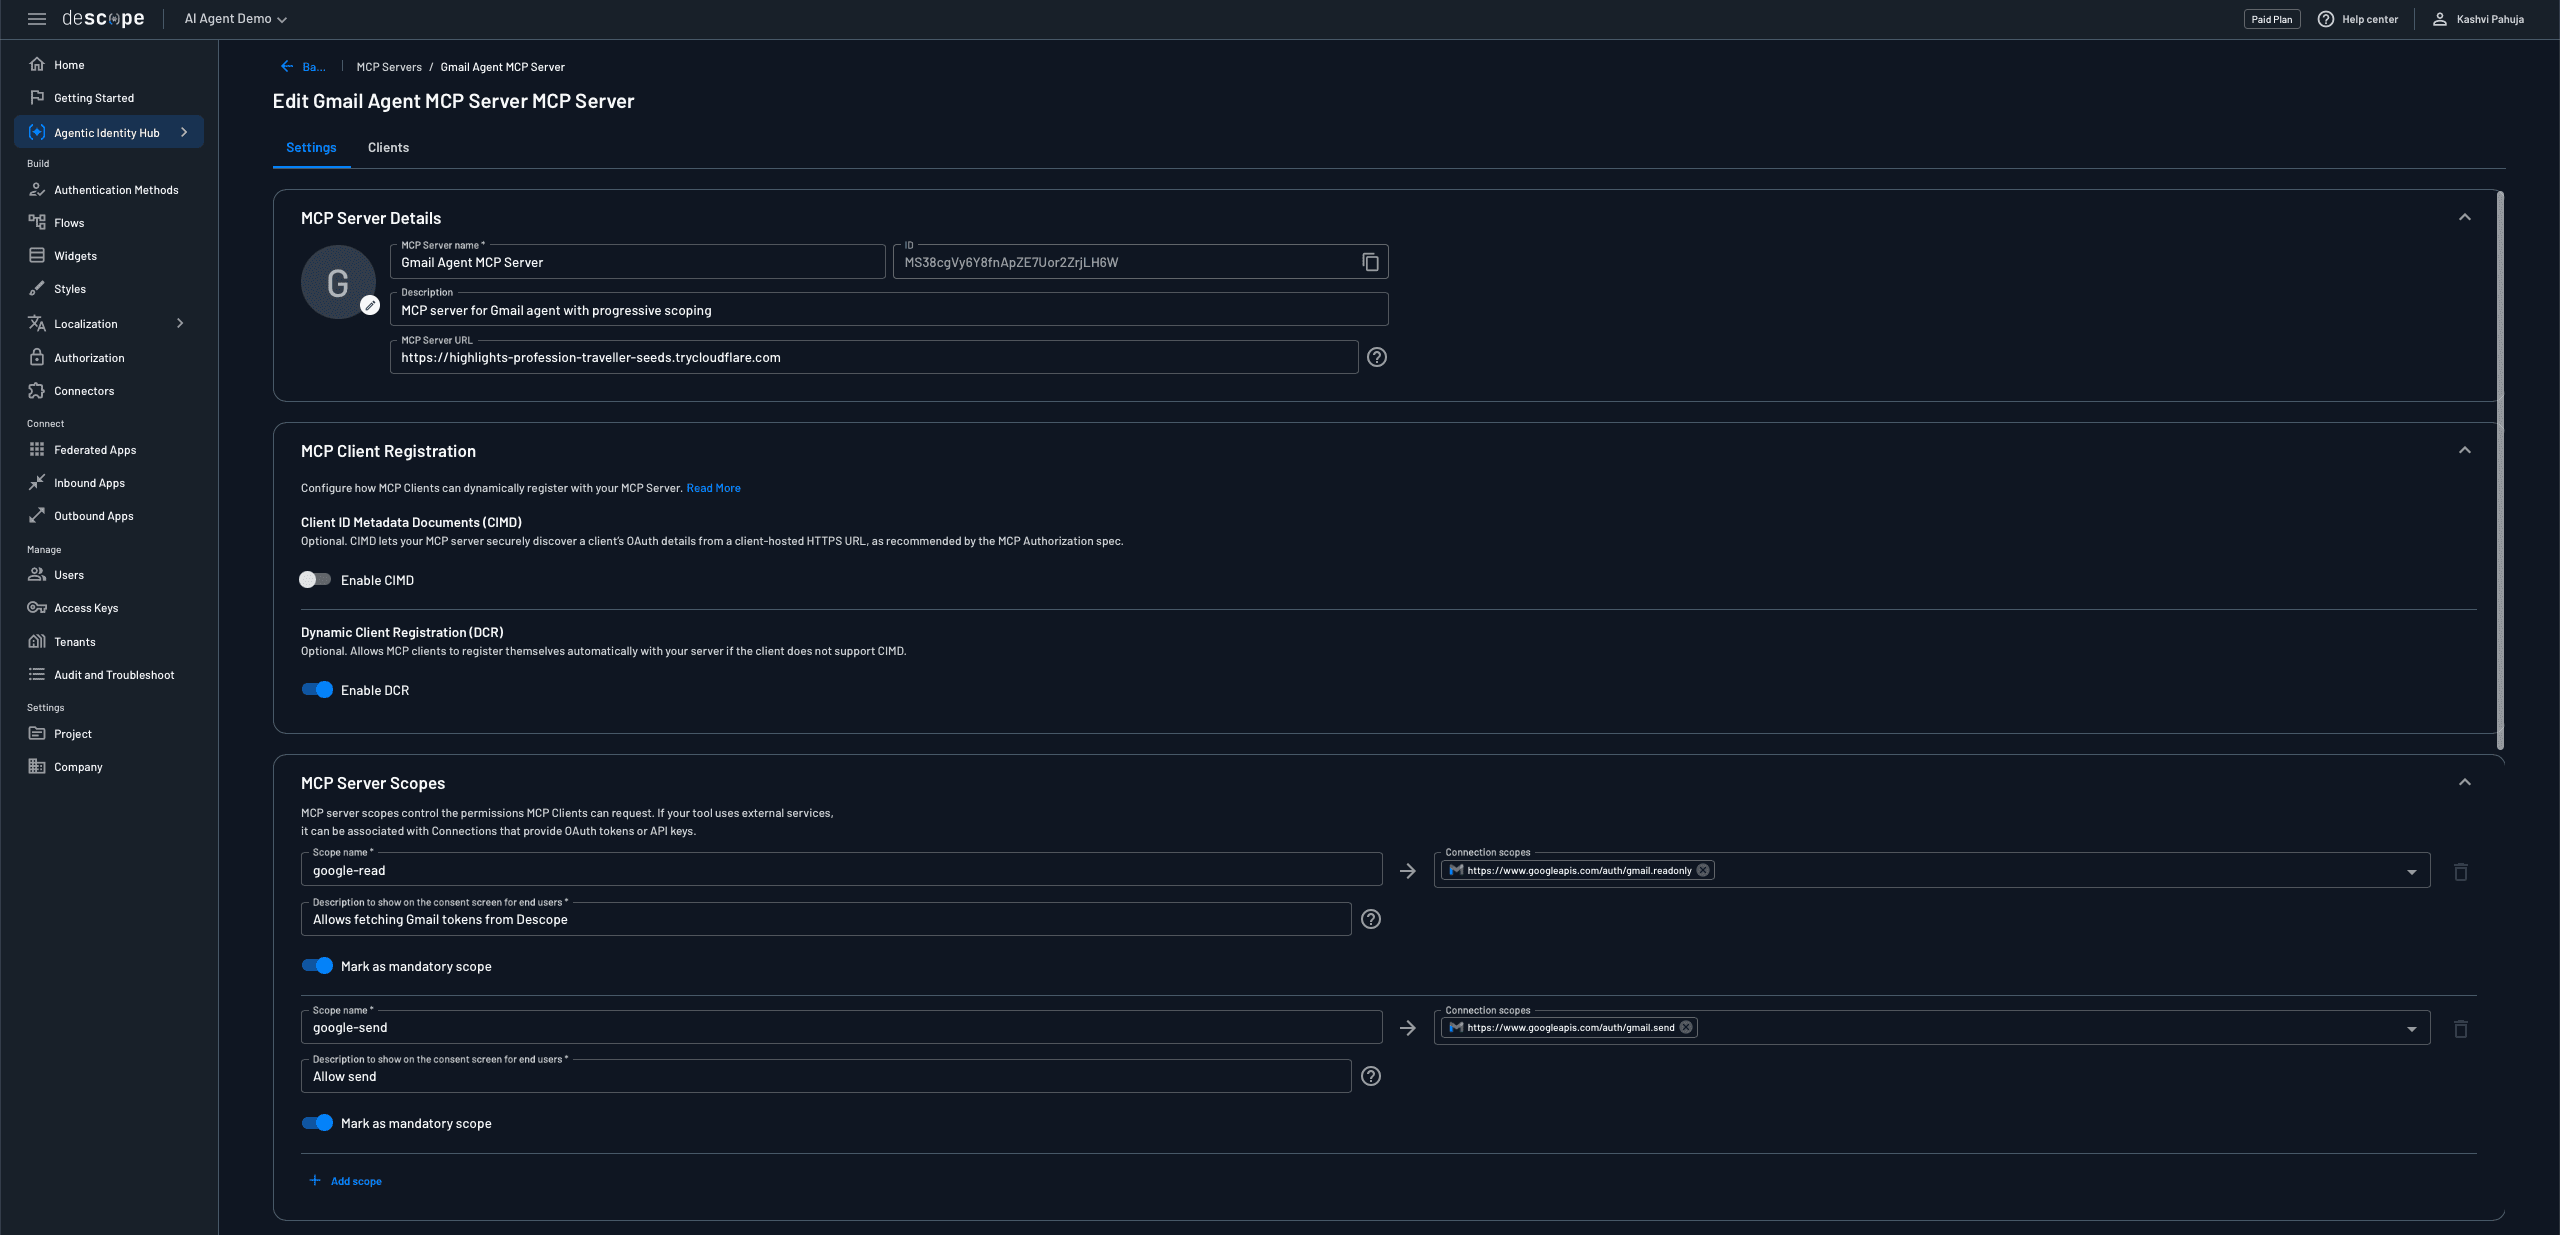
Step 2: Create an MCP server
MCP Servers in Descope handle the OAuth 2.0 authorization layer between your AI agent and the tools it can access. When a user authenticates through the MCP Server's consent flow, they receive an MCP access token, which is what the agent uses to prove its identity when connecting to your remote server.
In Agentic Identity Hub, navigate to MCP Servers
Click + MCP Server
Fill in the MCP Server details and configure client registration
Next, set up your MCP Server Scopes. This is how you map agent-facing scope names to the underlying Google OAuth scopes. When the agent requests google-read, Descope knows to perform an on-behalf-of fetch for a token with gmail.readonly. Configure two scopes:
First scope:
Scope name:
google-readConnection scopes:
https://www.googleapis.com/auth/gmail.readonly
Second scope:
Scope name:
google-sendConnection scopes:
https://www.googleapis.com/auth/gmail.send
Finally, configure the User Consent Flow:
Select Inbound apps - user consent from the dropdown
This flow defines the OAuth consent screen users see when authorizing the agent
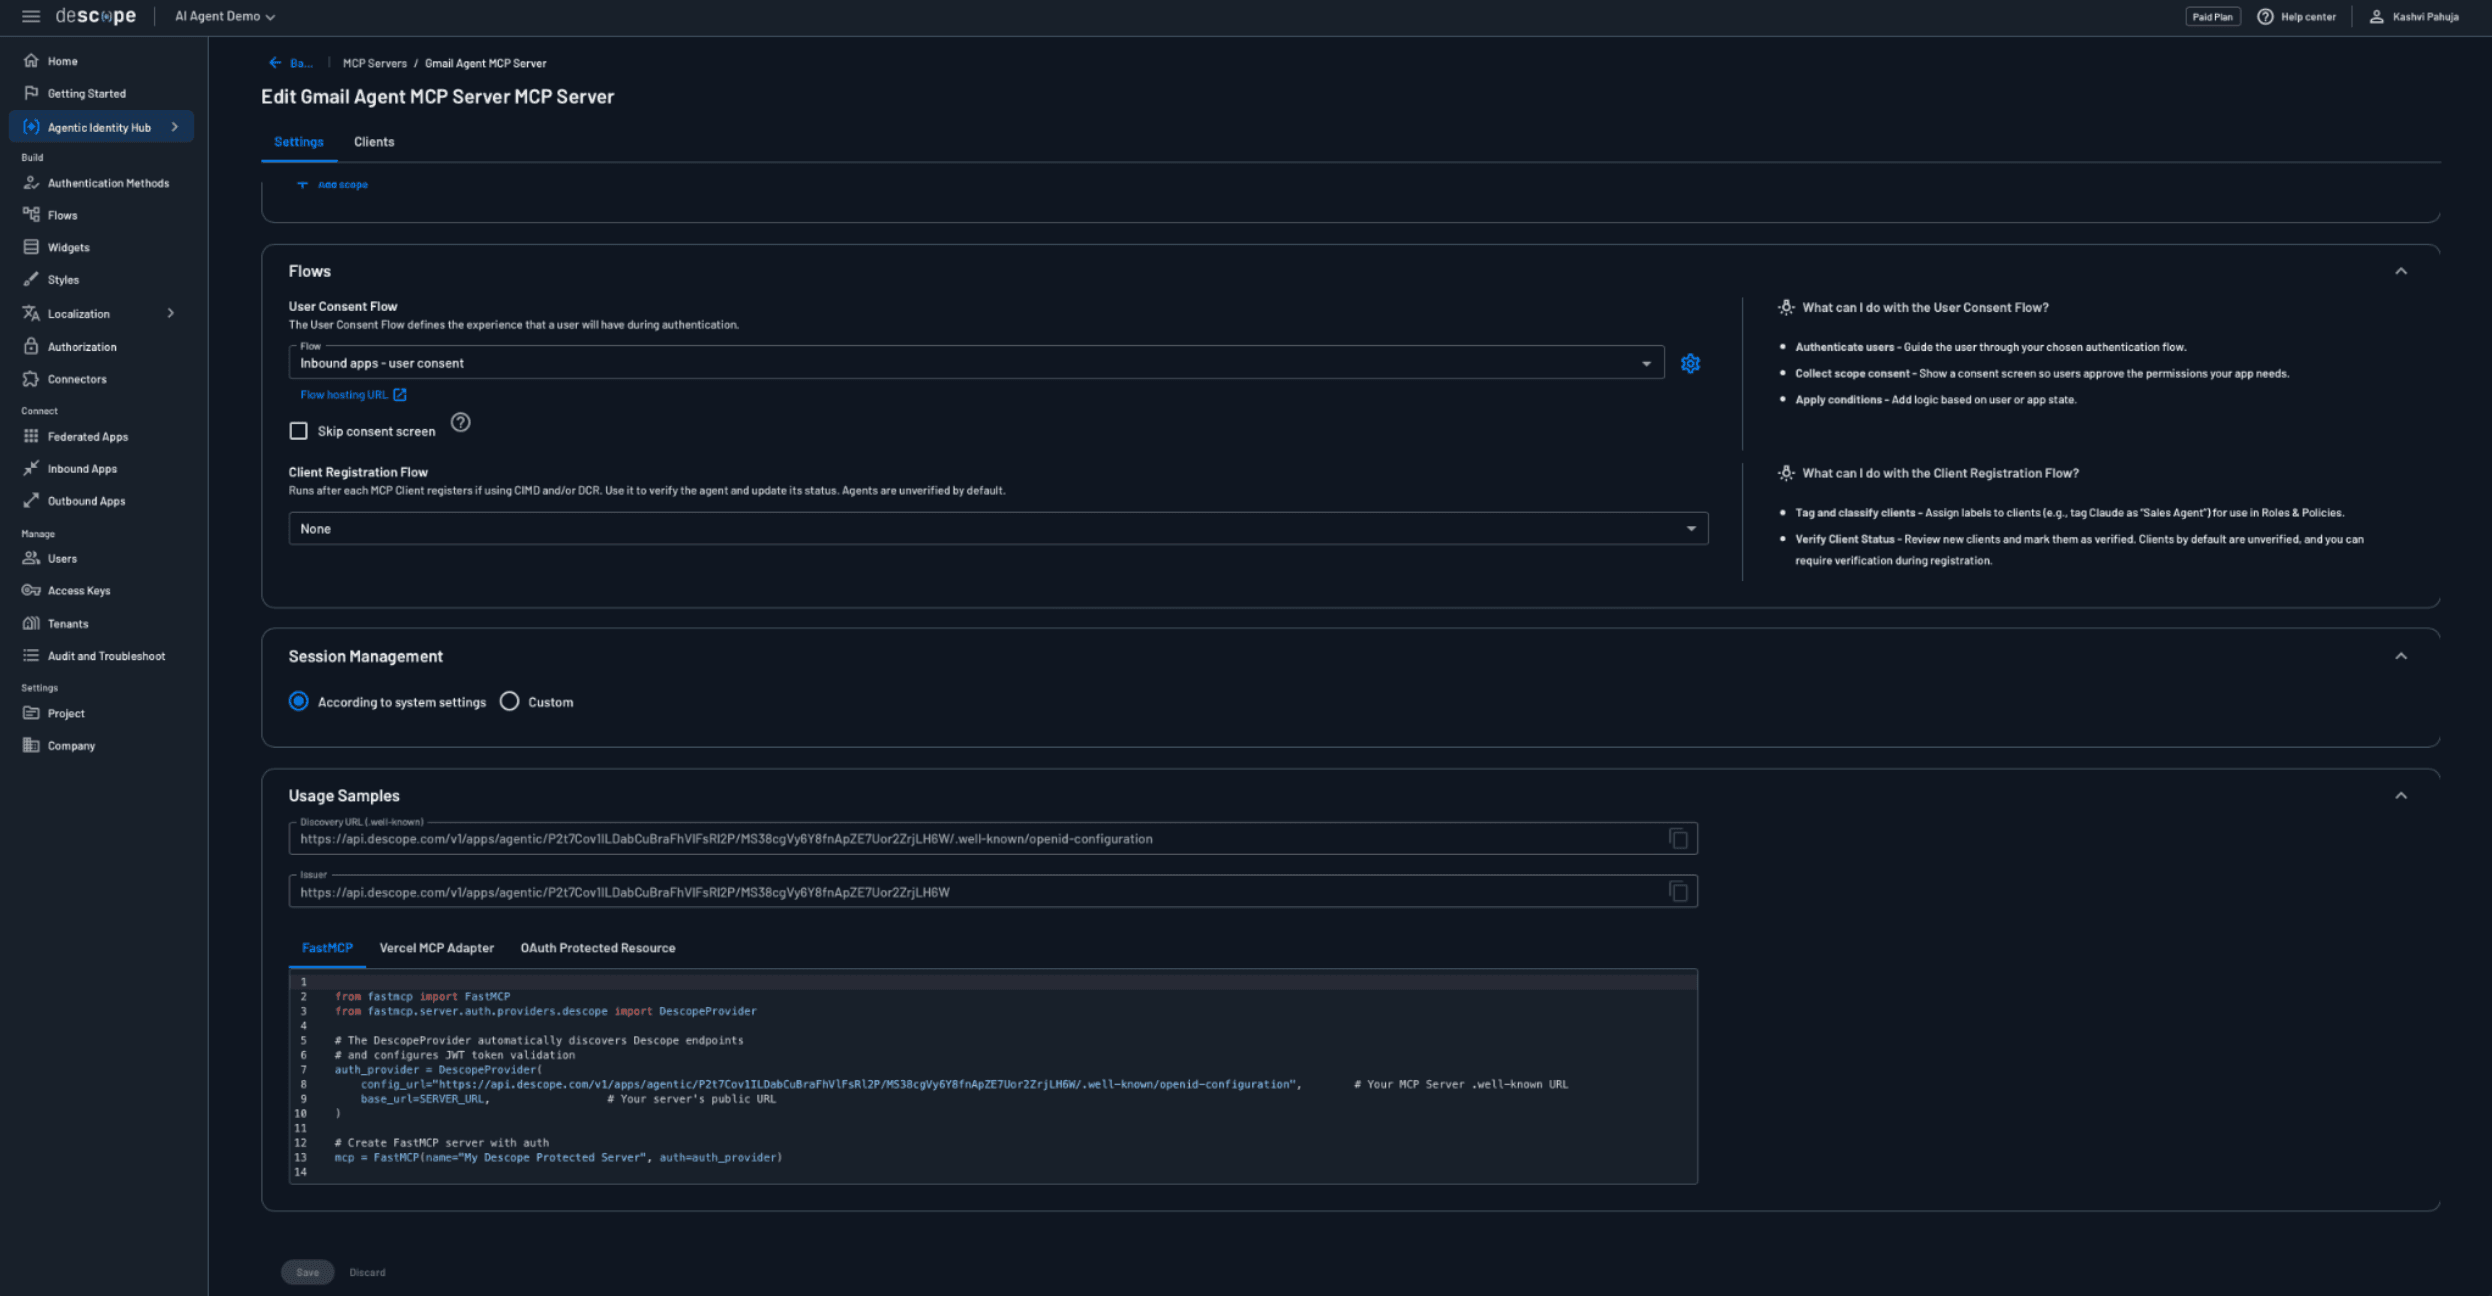
After creation, save your MCP Server ID and the OAuth credentials since you'll need them in your .env file.
Build the MCP server with Gmail tools
Now that Descope is configured, let's build the MCP server deployed remotely on Vercel. This server exposes Gmail operations as standardized tools and handles authentication, on-behalf-of token fetching, and progressive scoping.
Unlike a local MCP server that runs as a child process, this remote server runs as an HTTP endpoint that any agent can connect to via HTTPS. This means anyone can use your MCP server without needing to set it up themselves.
Project setup
We'll use Descope's Vercel MCP template which provides the infrastructure for OAuth-protected remote MCP servers.
Clone the template repository:
git clone https://github.com/descope/mcp-with-next-js-and-descope.git
cd mcp-with-next-js-and-descope
npm install
The template includes:
Next.js app structure with API routes for MCP
OAuth discovery endpoint at
/.well-known/oauth-protected-resourcePre-configured
mcp-handlerlibrary for building MCP serversVercel deployment configuration
Configure environment variables
Create a .env.local file in the project root:
NEXT_PUBLIC_DESCOPE_PROJECT_ID=your_project_id
NEXT_PUBLIC_DESCOPE_BASE_URL=https://api.descope.com
These are the only environment variables needed.
Build the Gmail tools
The main MCP server code lives in app/api/[transport]/route.ts. Start with the core setup:
import { createMcpHandler, withMcpAuth } from "mcp-handler";
import { z } from "zod";
import DescopeClient from "@descope/node-sdk";

const DESCOPE_PROJECT_ID = process.env.NEXT_PUBLIC_DESCOPE_PROJECT_ID;
const DESCOPE_BASE_URL = process.env.NEXT_PUBLIC_DESCOPE_BASE_URL || "https://api.descope.com";
const GMAIL_CONNECTION_ID = "gmail";

const descopeClient = DescopeClient({
  projectId: DESCOPE_PROJECT_ID!,
  baseUrl: DESCOPE_BASE_URL,
});

// Creates a user-scoped Descope client for on-behalf-of token operations.
// The Bearer PROJECT_ID:userToken format tells Descope to perform the
// token fetch on behalf of the authenticated user, not the server itself.
function createDescopeClient(userToken: string) {
  return DescopeClient({
    projectId: DESCOPE_PROJECT_ID!,
    baseUrl: DESCOPE_BASE_URL,
    hooks: {
      beforeRequest: (requestConfig: any) => {
        requestConfig.headers = {
          ...requestConfig.headers,
          Authorization: `Bearer ${DESCOPE_PROJECT_ID}:${userToken}`,
        };
        return requestConfig;
      },
    },
  });
}
The createDescopeClient function is the key pattern here. By injecting Bearer PROJECT_ID:userToken, every outbound token request becomes an on-behalf-of flow, and Descope returns credentials scoped to that specific user, not to the server.
Implement reading emails
When the agent calls read_gmail_inbox, the MCP server performs an on-behalf-of token fetch for the user's Gmail credentials. The key method here is fetchTokenByScopes, which asks Descope whether this user has already granted gmail.readonly access:
const client = createDescopeClient(userToken);
const READ_SCOPES = ["https://www.googleapis.com/auth/gmail.readonly"];

const tokenResult = await client.management.outboundApplication.fetchTokenByScopes(
  GMAIL_CONNECTION_ID,
  userId,
  READ_SCOPES
);
If the user hasn't granted access yet, Descope tells us, and we initiate progressive scoping by calling the connect endpoint to generate an OAuth URL. The agent opens this URL, the user grants permission, and the agent retries the tool call:
if (!tokenResult.ok || !tokenResult.data?.accessToken) {
  const connectResponse = await fetch(
    "https://api.descope.com/v1/mgmt/outbound/app/connect",
    {
      method: "POST",
      headers: {
        Authorization: `Bearer ${DESCOPE_PROJECT_ID}:${userToken}`,
        "Content-Type": "application/json",
      },
      body: JSON.stringify({
        appId: GMAIL_CONNECTION_ID,
        options: {
          redirectUrl: "http://localhost:3000/connection-complete",
          scopes: READ_SCOPES,
        },
      }),
    }
  );
  const connectData = await connectResponse.json();

  return {
    content: [{
      type: "text" as const,
      text: JSON.stringify({
        error: "insufficient_scope",
        authorization_url: connectData.url,
      }),
    }],
    isError: true,
  };
}
If the token exists, we use it to fetch emails directly from the Gmail API. The agent never sees this token, it stays within the MCP server:
const gmailToken = tokenResult.data.accessToken;

const listRes = await fetch(
  "https://gmail.googleapis.com/gmail/v1/users/me/messages?maxResults=5",
  { headers: { Authorization: `Bearer ${gmailToken}` } }
);

// For each message, fetch full details and return from, subject, and preview
// Full implementation in the GitHub repository
The flow works in sequence:
Agent calls the tools with the user’s MCP access token
MCP server performs an on-behalf-of token fetch against Descope
If no token exists, Descope returns an OAuth URL and the server passes it back as an error
The user grants permission in their browser
The agent retries the tool call
MCP server fetches the token again (and this time, it exists) and retrieves the emails
The Gmail token never leaves the MCP server, and the agent never sees it.
Implement sending emails with human approval
Sending adds a second security layer on top of progressive scoping. Even after the user has granted gmail.send, each individual email requires explicit approval via Enchanted Link:
handleSendEmail follows a similar pattern as read, but adds the human approval layer on top. First, the on-behalf-of token fetch. Note that we include gmail.readonly alongside gmail.send to retain the scope the user already granted:
const client = createDescopeClient(userToken);
const SEND_SCOPES = [
  "https://www.googleapis.com/auth/gmail.send",
  "https://www.googleapis.com/auth/gmail.readonly", // retain previously granted scope
];

const tokenResult = await client.management.outboundApplication.fetchTokenByScopes(
  GMAIL_CONNECTION_ID, userId, SEND_SCOPES
);
If the send scope hasn't been granted yet, we return an OAuth URL the same way the read flow does:
if (!tokenResult.ok || !tokenResult.data?.accessToken) {
  const connectResponse = await fetch(
    "https://api.descope.com/v1/mgmt/outbound/app/connect",
    {
      method: "POST",
      headers: {
        Authorization: `Bearer ${DESCOPE_PROJECT_ID}:${userToken}`,
        "Content-Type": "application/json",
      },
      body: JSON.stringify({
        appId: GMAIL_CONNECTION_ID,
        options: {
          redirectUrl: "http://localhost:3000/connection-complete",
          scopes: SEND_SCOPES,
        },
      }),
    }
  );
  const connectData = await connectResponse.json();
  return {
    content: [{ type: "text" as const, text: JSON.stringify({
      error: "insufficient_scope",
      authorization_url: connectData.url,
    })}],
    isError: true,
  };
}
If the scope exists, we don't send the email yet. Instead we trigger an Enchanted Link, which is where OAuth capability meets human intent. The agent returns a NEEDS_APPROVAL signal and waits for the user to click the link before anything is sent:
const pendingId = `email_${Date.now()}_${Math.random().toString(36).substr(2, 9)}`;

const response = await descopeClient.enchantedLink.signIn(
  userEmail,
  `http://localhost:3000/approve?id=${pendingId}`,
  { customClaims: { action: `Send email to ${to} with subject "${subject}"` } }
);

return {
  content: [{
    type: "text" as const,
    text: `NEEDS_APPROVAL:${response.data.pendingRef}:${response.data.linkId}:${pendingId}|||${to}|||${subject}|||${body}`,
  }],
};
Following MCP best practices, we request both the newly required scope (gmail.send) AND any previously granted scopes (gmail.readonly). This prevents the user from losing permissions they already granted and avoids re-authorization.
Register the tools with MCP handler
Register both tools using createMcpHandler. Each tool extracts the user's auth context from _meta before passing it to the handler functions:
const handler = createMcpHandler(
  (server: any) => {
    server.tool(
      "read_gmail_inbox",
      "Read the latest 5 emails from Gmail inbox",
      {},
      async (_args: any, context: any) => {
        const userToken = context?._meta?.userToken;
        const userId = context?._meta?.userId;

        if (!userToken || !userId) {
          return {
            content: [{ type: "text" as const, text: "Missing authentication" }],
            isError: true,
          };
        }

        return await handleReadEmails(userId, userToken);
      }
    );
The send tool follows the same pattern but also pulls userEmail from _meta, since the Enchanted Link approval flow needs the user's actual email address to send the approval link to:
    server.tool(
      "send_gmail_email",
      "Send an email via Gmail",
      {
        to: z.string().describe("Recipient email address"),
        subject: z.string().describe("Email subject"),
        body: z.string().describe("Email body"),
      },
      async (args: any, context: any) => {
        const userToken = context?._meta?.userToken;
        const userId = context?._meta?.userId;
        const userEmail = context?._meta?.userEmail;

        if (!userToken || !userId) {
          return {
            content: [{ type: "text" as const, text: "Missing authentication" }],
            isError: true,
          };
        }

        return await handleSendEmail(
          userId, userToken, args.to, args.subject, args.body, userEmail || userId
        );
      }
    );
  },
  undefined,
  { basePath: "/api", verboseLogs: true, maxDuration: 800 }
);
The context._meta parameter contains authentication data passed by the agent when calling tools. This is how the agent's MCP access token and user info flow to each tool handler, enabling the on-behalf-of token fetches inside handleReadEmails and handleSendEmail.
Add authentication middleware
Finally, wrap the handler with OAuth authentication. The verifyToken function runs on every incoming request including the initial connection. It decodes the JWT and enforces the minimum required scope before any tool can be called, catching clients that lack google-read even if they only call tools that don't interact with external services:
const verifyToken = async (req: Request, bearerToken?: string) => {
  const token = bearerToken ?? new URL(req.url).searchParams.get('token') ?? undefined;
  if (!token) return undefined;

  try {
    const payload = JSON.parse(Buffer.from(token.split('.')[1], 'base64').toString());
    const scopes = (payload.scope || "").split(" ").filter(Boolean);

    if (!scopes.includes("google-read")) {
      console.error(`Connection rejected — missing scope: google-read`);
      return undefined;
    }

    return { token, scopes, clientId: payload.azp || payload.aud, userId: payload.sub };
  } catch { return undefined; }
};
Once verified, wrap the handler with withMcpAuth to enforce authentication on every request:
const authHandler = withMcpAuth(handler, verifyToken, {
  required: true,
  resourceMetadataPath: "/.well-known/oauth-protected-resource",
});

export { authHandler as GET, authHandler as POST };
The GitHub repo includes a more complete version of verifyToken that adds cryptographic JWT signature verification using Descope's JWKS endpoint, along with issuer and expiry checks. For a production deployment, that's worth adding.
Deploy to Vercel
git add .
git commit -m "Add Gmail MCP tools"
git push origin main
Add your environment variables in Vercel dashboard > Settings > Environment Variables. Your MCP server will be live at https://your-app.vercel.app/api/mcp.
For the complete MCP server implementation, see the GitHub repository.
Configure user authentication and build the agent
Now let's build the agent that orchestrates everything. Rather than showing every line of code (you can find the complete implementation in the GitHub repo), we'll focus on the key patterns that make this architecture work.
Create the authentication helper
The agent needs to handle user authentication with Descope. Create src/auth.ts:
import "dotenv/config";
import { exec } from "child_process";

const DESCOPE_PROJECT_ID = process.env.DESCOPE_PROJECT_ID!;
const MCP_SERVER_ID = process.env.MCP_SERVER_ID!;
const DESCOPE_CLIENT_ID = process.env.DESCOPE_CLIENT_ID!;

export function authenticateUser() {
  const scopes = encodeURIComponent("google-read google-send");
  const authUrl = `https://api.descope.com/oauth2/v1/apps/agentic/${DESCOPE_PROJECT_ID}/${MCP_SERVER_ID}/authorize?response_type=code&client_id=${DESCOPE_CLIENT_ID}&redirect_uri=http://localhost:3000/callback&scope=${scopes}&flow=inbound-apps-user-consent`;

  console.log("\nOpening browser for authentication...");
  exec(`open "${authUrl}"`);
}
How the authentication flow works:
authenticateUser()opens the Descope OAuth consent screen in the user's browserUser authenticates and consents to
google-readandgoogle-sendMCP scopesDescope redirects back with an authorization code
Agent exchanges the code for an MCP access token
Agent uses this token to authenticate with the remote MCP server
Important: scope=google-read+google-send refers to the MCP server scopes we configured in Descope, not Gmail OAuth scopes directly. Descope's scope mapping translates these into the appropriate Gmail permissions when the MCP server performs on-behalf-of token fetches later.
Build the agent core
Create the main agent file src/cli-agent.ts. This handles OAuth callbacks, connects to the remote MCP server, and runs the conversation loop.
Key setup:
import Anthropic from "@anthropic-ai/sdk";
import { Client } from "@modelcontextprotocol/sdk/client/index.js";
import { StreamableHTTPClientTransport } from "@modelcontextprotocol/sdk/client/streamableHttp.js";
import { CallToolResultSchema } from "@modelcontextprotocol/sdk/types.js";
import express from "express";
import { authenticateUser, fetchUserEmail } from "./auth.js";
import "dotenv/config";

const anthropic = new Anthropic({ apiKey: process.env.ANTHROPIC_API_KEY });
const DESCOPE_PROJECT_ID = process.env.DESCOPE_PROJECT_ID!;
const MCP_SERVER_ID = process.env.MCP_SERVER_ID!;

let userToken: string;
let userId: string;
let userEmail: string;
const pendingEmails = new Map();
OAuth callback and token exchange:
app.get("/callback", async (req: any, res: any) => {
  const code = req.query.code as string;

  // Exchange the authorization code for MCP access + refresh tokens
  const tokenResponse = await fetch(
    `https://api.descope.com/oauth2/v1/apps/agentic/${DESCOPE_PROJECT_ID}/${MCP_SERVER_ID}/token`,
    {
      method: "POST",
      headers: { "Content-Type": "application/x-www-form-urlencoded" },
      body: new URLSearchParams({
        grant_type: "authorization_code",
        code,
        redirect_uri: "http://localhost:3000/callback",
        client_id: process.env.DESCOPE_CLIENT_ID!,
        client_secret: process.env.DESCOPE_CLIENT_SECRET!,
      }),
    }
  );

  const tokenData = await tokenResponse.json();
  userToken = tokenData.access_token;

  // Extract userId from the JWT payload
  const payload = JSON.parse(
    Buffer.from(userToken.split(".")[1], "base64").toString()
  );
  userId = payload.sub;
  userEmail = await fetchUserEmail(userId, userToken);

  res.send("Authentication Successful! Return to terminal.");
  authResolve({ accessToken: userToken, refreshToken: tokenData.refresh_token, userId, email: userEmail });
});
Connecting to the remote MCP server
After authentication, connect to the remote MCP server via HTTPS:
console.log("\nStep 2: Connecting to remote MCP server...");

const transport = new StreamableHTTPClientTransport(
  new URL("https://your-app.vercel.app/api/mcp"),
  {
    requestInit: {
      headers: { "Authorization": `Bearer ${userToken}` }
    }
  }
);

const mcpClient = new Client(
  { name: "cli-agent", version: "1.0.0" },
  { capabilities: {} }
);

await mcpClient.connect(transport);
console.log("Connected to remote MCP server!");
Instead of StdioClientTransport that spawns a child process for local MCP servers, we use StreamableHTTPClientTransport to connect to the deployed Vercel server via HTTPS. The MCP access token is passed in the Authorization header. This is what verifyToken on the server validates, triggering the connection-time scope check before the chat loop begins.
async function runAgent(userMessage: string, mcpClient: Client): Promise<string> {
  const messages: Anthropic.MessageParam[] = [
    { role: "user", content: userMessage },
  ];

  const toolsResponse = await mcpClient.listTools();
  const anthropicTools = toolsResponse.tools.map((tool: any) => ({
    name: tool.name,
    description: tool.description,
    input_schema: tool.inputSchema,
  }));

  while (true) {
    const response = await anthropic.messages.create({
      model: "claude-sonnet-4-20250514",
      max_tokens: 4096,
      tools: anthropicTools,
      messages,
    });

    const toolUse = response.content.find(
      (block): block is Anthropic.ToolUseBlock => block.type === "tool_use"
    );

    if (toolUse) {
      // Call the MCP tool, passing auth context via _meta so the server
      // knows whose on-behalf-of token to fetch
      const toolResult = await (mcpClient.request as any)({
        method: "tools/call",
        params: {
          name: toolUse.name,
          arguments: toolUse.input,
          _meta: { userToken, userId, userEmail },
        },
      }, CallToolResultSchema);

      // Handle different response types...
    }
  }
}
The _meta field passes authentication to the remote MCP server. This data flows to context._meta in the tool handlers, which is how the server knows whose Gmail token to fetch on behalf of.
Handle progressive scoping
When the MCP server returns an insufficient_scope error, the agent handles the OAuth flow:
if (resultContent.includes("insufficient_scope")) {
  const errorData = JSON.parse(resultContent);
  const authUrl = errorData.authorization_url;

  console.log(`\n Gmail permission required. Opening browser...`);
  exec(`open "${authUrl}"`);
  console.log(" Waiting for you to grant permission...");

  // Poll Descope every 3 seconds to check if the token is now available
  let tokenAvailable = false;
  let attempts = 0;

  while (attempts < 20 && !tokenAvailable) {
    await new Promise(resolve => setTimeout(resolve, 3000));
    attempts++;

    const checkResponse = await fetch(
      "https://api.descope.com/v1/mgmt/outbound/app/user/token/latest",
      {
        method: "POST",
        headers: {
          Authorization: `Bearer ${DESCOPE_PROJECT_ID}:${userToken}`,
          "Content-Type": "application/json",
        },
        body: JSON.stringify({ appId: "gmail", loginId: userId }),
      }
    );

    if (checkResponse.ok) {
      console.log(`\n✅ Permission granted! Continuing...\n`);
      tokenAvailable = true;
    }
  }

  // Tell Claude to retry the tool call
  messages.push({
    role: "user",
    content: [{
      type: "tool_result",
      tool_use_id: toolUse.id,
      content: tokenAvailable ? "Permission granted. Retrying..." : "Permission timeout",
      is_error: !tokenAvailable,
    }],
  });
}
How it works:
MCP server returns
insufficient_scopewith an OAuth URLAgent opens the URL in the browser and the user grants permission
Agent polls Descope every 3 seconds to check if the token now exists
Once available, tells Claude "permission granted, retry"
Claude automatically retries the tool call, which now succeeds
Handle human approval
When sending emails, the MCP server returns NEEDS_APPROVAL. This is the human-in-the-loop layer. Even though the user has already granted gmail.send permission via OAuth, the agent still can't send an email without explicit per-message approval.
The agent parses the approval request and stores the pending email details while it waits for the user to respond:
if (resultContent.startsWith("NEEDS_APPROVAL:")) {
  const [header, ...emailParts] = resultContent.split("|||");
  const parts = header.replace("NEEDS_APPROVAL:", "").split(":");
  const pendingRef = parts[0];
  const linkId = parts[1];
  const pendingId = parts[2];

  // Store email details so /approve can send it after the user clicks the link
  pendingEmails.set(pendingId, {
    to: emailParts[0],
    subject: emailParts[1],
    body: emailParts[2],
    userId,
    userToken,
    pendingRef,
  });

  console.log(`\nApproval required!`);
  console.log(`Check your email (${userEmail}) for the approval link`);
  console.log(`Link ID: ${linkId}\n`);

  const { waitForApproval } = await import("./approval.js");
  const approved = await waitForApproval(pendingRef);

  messages.push({
    role: "user",
    content: [{
      type: "tool_result",
      tool_use_id: toolUse.id,
      content: approved ? "Approval received. Email sent." : "Approval timeout.",
      is_error: !approved,
    }],
  });
}
While the agent waits, the user receives an Enchanted Link in their inbox. Clicking it hits the /approve endpoint, which verifies the link, performs a final on-behalf-of token fetch from Descope, and sends the email. The /connection-complete endpoint handles the Gmail OAuth redirect that fires earlier in the flow when the user first grants read or send permissions:
// Gmail OAuth completion callback
app.get("/connection-complete", (req: any, res: any) => {
  res.send("Gmail connection successful! Return to terminal.");
});

// Enchanted Link approval callback
app.get("/approve", async (req: any, res: any) => {
  const token = req.query.t as string;
  const pendingId = req.query.id as string;

  const { verifyApproval } = await import("./approval.js");
  const verified = await verifyApproval(token);

  if (!verified) {
    res.send("Invalid or expired approval link");
    return;
  }

  const emailDetails = pendingEmails.get(pendingId);
  if (!emailDetails) {
    res.send("Email not found");
    return;
  }

  // Final on-behalf-of token fetch to retrieve the Gmail credential from Descope
  const tokenResp = await fetch(
    "https://api.descope.com/v1/mgmt/outbound/app/user/token/latest",
    {
      method: "POST",
      headers: {
        Authorization: `Bearer ${DESCOPE_PROJECT_ID}:${emailDetails.userToken}`,
        "Content-Type": "application/json",
      },
      body: JSON.stringify({ appId: "gmail", loginId: emailDetails.userId }),
    }
  );

  const tokenData = await tokenResp.json();
  const gmailToken = tokenData.token.accessToken;

  const raw = Buffer.from(
    `To: ${emailDetails.to}\r\nSubject: ${emailDetails.subject}\r\n\r\n${emailDetails.body}`
  ).toString("base64").replace(/\+/g, "-").replace(/\//g, "_").replace(/=+$/, "");

  await fetch("https://gmail.googleapis.com/gmail/v1/users/me/messages/send", {
    method: "POST",
    headers: { Authorization: `Bearer ${gmailToken}`, "Content-Type": "application/json" },
    body: JSON.stringify({ raw }),
  });

  pendingEmails.delete(pendingId);
  res.send("Email Approved and Sent!");
});
How the approval flow works:
MCP server sends an Enchanted Link email to the user
User clicks the link, redirecting to
/approve?t=TOKEN&id=PENDING_IDAgent verifies the Enchanted Link token is valid
Agent performs a final on-behalf-of token fetch to retrieve the Gmail credential from Descope
Agent sends the email via Gmail API and deletes the pending record
The Enchanted Link is one-time use and time-limited, so it can't be replayed or reused after verification.
For the complete agent implementation including the conversation loop and all helper functions, see the GitHub repository.
Building secure agents with Descope
You now have a complete blueprint for building AI agents that are powerful but not unchecked. Everything we've covered gives you both capability and control, and the complete source code is available on GitHub for your reference.
To build this yourself, create a free Descope account and configure your first MCP server in the Agentic Identity Hub. For more background on the protocols and patterns used here, explore Descope’s resources on agentic identity and join our dev community, AuthTown.