
Table of Contents
Don't have the time to read the entire post? Our human writers will be sad, but we understand. Summarize the post with your preferred LLM here instead.
This tutorial was written by Manish Hatwalne, a developer with a knack for demystifying complex concepts and translating "geek speak" into everyday language. Visit Manish's website to see more of his work!
Say your support team already runs on Amazon Cognito: a hosted UI handles logins, app clients connect your apps to the pool, and two groups split leads from the agents who report to them. Now you want Claude Code to open and close tickets on a user's behalf through a Model Context Protocol (MCP) server. An AI agent's access needs to stay narrow, tied to one client, and revocable on demand, which Cognito's app client model wasn't built to express.
Descope's Bring Your Own Auth for MCP fills that gap without moving a single user. Descope sits in front of your MCP server as its OAuth authorization server and federates every login back to your Cognito user pool. Every user, group, app client, and Lambda trigger stays exactly as it is today, and the only change on the Cognito side is one new app client.
In this tutorial, you'll build a Python MCP server, federate Descope to a Cognito user pool over OpenID Connect (OIDC), map Cognito groups to tool-level scopes, connect Claude Code, and decode the access token where it reaches your server, then revoke one agent's access and trace its activity in the audit trail.
At a glance
Descope's Bring Your Own Auth for MCP lets an Amazon Cognito user pool keep authenticating users while Descope acts as the OAuth authorization server for an MCP server.
The only change on the Cognito side is one new app client for Descope, and existing users, groups, app clients, hosted UI settings, and Lambda triggers stay as they are.
MCP clients such as Claude Code register themselves with Descope on first contact, which Cognito's admin-provisioned app client model doesn't support.
Cognito user pool groups arrive in the ID token Descope receives, map to Descope roles, and decide through Descope access policies which tool-level scopes an agent can be granted.
The MCP server validates Descope-issued tokens by issuer and audience, while API Gateway authorizers on other APIs keep validating Cognito-issued tokens.
An admin can revoke one agent's access in Descope without touching the user's Cognito record.
What the MCP spec expects from your authorization server
The July 2026 revision of the MCP authorization spec expects a remote MCP server to sit behind an OAuth 2.1 authorization server that requires Proof Key for Code Exchange (PKCE), publishes protected resource metadata, and binds every token to one resource through resource indicators. It also expects clients like Claude Code or Cursor to register themselves, preferably through a Client ID Metadata Document (CIMD), with Dynamic Client Registration (DCR) kept for backward compatibility.
Cognito's app client model predates all of that. An admin provisions each client by hand in the console, and the hosted UI has no consent screen listing individual tools a user can grant or decline. Building that layer on top of Cognito yourself is a project on its own, and moving an existing user pool to a different identity provider (IdP) just to ship one MCP server makes little sense.
Putting Descope in front of the MCP server suits teams exposing an existing Cognito-backed product to an MCP client (an IDE, an agent, a chatbot) without standing up a second user directory, teams already enforcing access by Cognito group in an API Gateway authorizer who want those same groups to decide what an agent can do, and teams wanting tool-level consent on top of a login system they have no plan to touch. Descope's Bring Your Own Auth walkthrough video shows the same setup end to end, if you'd like to see it before building. This is one part of a series, with companion guides for Okta, Auth0, and Microsoft Entra ID.
How the pieces fit together
Four parties sit in this chain. Claude Code (or any other compatible MCP client) acts on a user's behalf and calls the tools. Your MCP server exposes those tools over HTTP. Descope issues and verifies every access token. Cognito authenticates the person signing in and reports which groups they belong to.
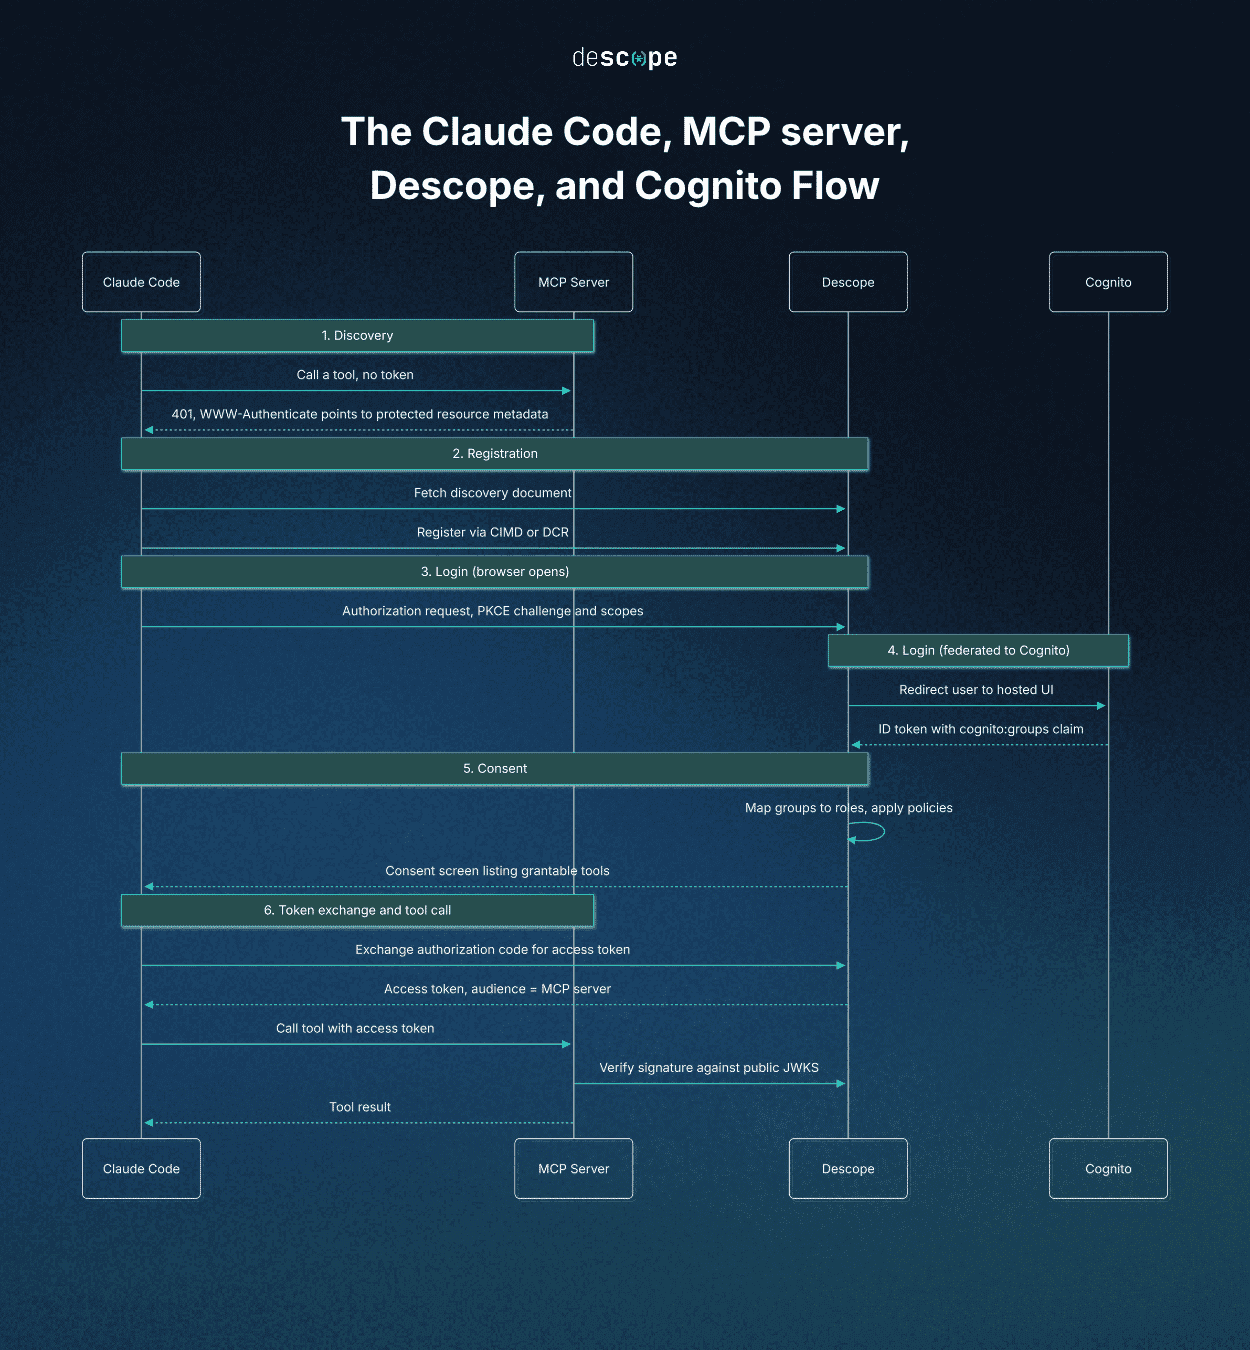
A first connection runs the entire chain: discovery, registration, a PKCE-protected login that bounces through Cognito's hosted UI, consent, and a token exchange. Your MCP server calls only Descope's public key endpoint, and Cognito's ID token never leaves Descope.
Prerequisites
To follow along, you'll need:
Python 3.10 or later
A Descope account (the Free Forever plan covers this tutorial)
An Amazon Cognito user pool with admin access, plus two user pool groups named
SupportLeadsandSupportAgents(Cognito rejects spaces in group names), each with a test user added under the group's Users tabClaude Code installed locally
An HTTPS URL for your server, such as a Cloudflare Tunnel pointing at your machine
Building a remote MCP server
The demo server fronts a small support desk called Acme Tickets, exposing two tools of different sensitivity: get_ticket reads a ticket and carries little risk, while close_ticket changes data and belongs to a smaller group of people. The full code, including the .env.example the server expects, is in the acme-tickets-mcp repo.
Install FastMCP and python-dotenv:
pip install "fastmcp>=4" python-dotenv
Create server.py. It starts by loading your configuration and deriving Descope's project-level issuer from your project ID:
import logging
import os

from dotenv import load_dotenv
from fastmcp import FastMCP
from fastmcp.server.auth import require_scopes
from fastmcp.server.auth.providers.descope import DescopeProvider
from fastmcp.server.auth.providers.jwt import JWTVerifier
from fastmcp.server.dependencies import get_access_token

load_dotenv()
logging.basicConfig(level=logging.INFO)
logger = logging.getLogger("acme-tickets")

PROJECT_ID = os.environ["DESCOPE_PROJECT_ID"]
MCP_SERVER_URL = os.environ["MCP_SERVER_URL"]  # e.g. https://tickets.example.com/mcp
ISSUER = f"https://api.descope.com/v1/apps/{PROJECT_ID}"
Next, set up token validation and attach it to the server:
# Accept only tokens that Descope minted for this MCP server
verifier = JWTVerifier(
    jwks_uri=f"https://api.descope.com/{PROJECT_ID}/.well-known/jwks.json",
    issuer=ISSUER,
    audience=MCP_SERVER_URL,
    algorithm="RS256",
)

auth = DescopeProvider(
    config_url=f"{ISSUER}/.well-known/openid-configuration",
    base_url=os.environ["BASE_URL"],
    scopes_supported=["tickets:read", "tickets:write"],
    token_verifier=verifier,
)

mcp = FastMCP(name="Acme Tickets", auth=auth)
FastMCP's Descope integration handles the protocol details. DescopeProvider answers any request without a valid bearer token with a 401 and publishes the server's protected resource metadata, the one piece of OAuth discovery your server owns, so an MCP client learns that Descope protects the resource. The custom JWTVerifier adds one more requirement: the token's audience must carry this exact server's URL. Descope's issuer is shared across every MCP server in the same project, so a token minted for a different server there would still pass the issuer check. The audience check is what actually catches it and gets it rejected.
Finally, add the two tools over a small in-memory ticket store, plus the entry point. Each require_scopes decorator ties a tool to exactly one scope, which matters once a Cognito group starts deciding who gets that scope. close_ticket also logs the caller's sub (the user ID claim) and granted scopes, which the audit section relies on later:
TICKETS = {
    4821: {"title": "CSV export fails on large files", "status": "open", "fixed_in": "v2.14.1"},
    4822: {"title": "SSO login loops on Safari", "status": "open", "fixed_in": None},
}

@mcp.tool(auth=require_scopes("tickets:read"))
def get_ticket(ticket_id: int) -> dict:
    """Fetch a support ticket by ID."""
    ticket = TICKETS.get(ticket_id)
    if ticket is None:
        raise ValueError(f"Ticket {ticket_id} not found")
    return {"id": ticket_id, **ticket}

@mcp.tool(auth=require_scopes("tickets:write"))
def close_ticket(ticket_id: int, resolution: str) -> dict:
    """Close a support ticket with a resolution note."""
    ticket = TICKETS.get(ticket_id)
    if ticket is None:
        raise ValueError(f"Ticket {ticket_id} not found")
    ticket["status"] = "closed"
    claims = get_access_token().claims
    logger.info("close_ticket id=%s user=%s scopes=%s", ticket_id, claims["sub"], claims.get("scope"))
    return {"id": ticket_id, "status": "closed", "resolution": resolution}

if __name__ == "__main__":
    mcp.run(transport="http", host="0.0.0.0", port=8000)
If you're using the official MCP Python SDK, Descope's Python MCP SDK (descope-mcp) provides the same checks through validate_token() and require_scopes(). For Node.js stacks, Descope's tutorials on adding auth to a remote MCP server and MCP auth in Next.js cover the same server-side checks.
Add your values to a .env file, replacing tickets.example.com with your own tunnel's hostname everywhere it appears for the rest of this tutorial:
DESCOPE_PROJECT_ID=P2abc...
MCP_SERVER_URL=https://tickets.example.com/mcp
BASE_URL=https://tickets.example.com
Start the server with python server.py, point your tunnel at port 8000, and confirm discovery works:
curl -i -X POST https://tickets.example.com/mcp
# HTTP/2 401
# www-authenticate: Bearer resource_metadata="https://tickets.example.com/.well-known/oauth-protected-resource/mcp"

curl https://tickets.example.com/.well-known/oauth-protected-resource/mcp
The second command returns the server's metadata document:
{
  "resource": "https://tickets.example.com/mcp",
  "authorization_servers": ["https://api.descope.com/v1/apps/P2abc..."],
  "scopes_supported": ["tickets:read", "tickets:write"],
  "bearer_methods_supported": ["header"]
}
The authorization_servers entry is what sends an MCP client to Descope after the 401, rather than to Cognito's token endpoint.
Registering the MCP server in Descope
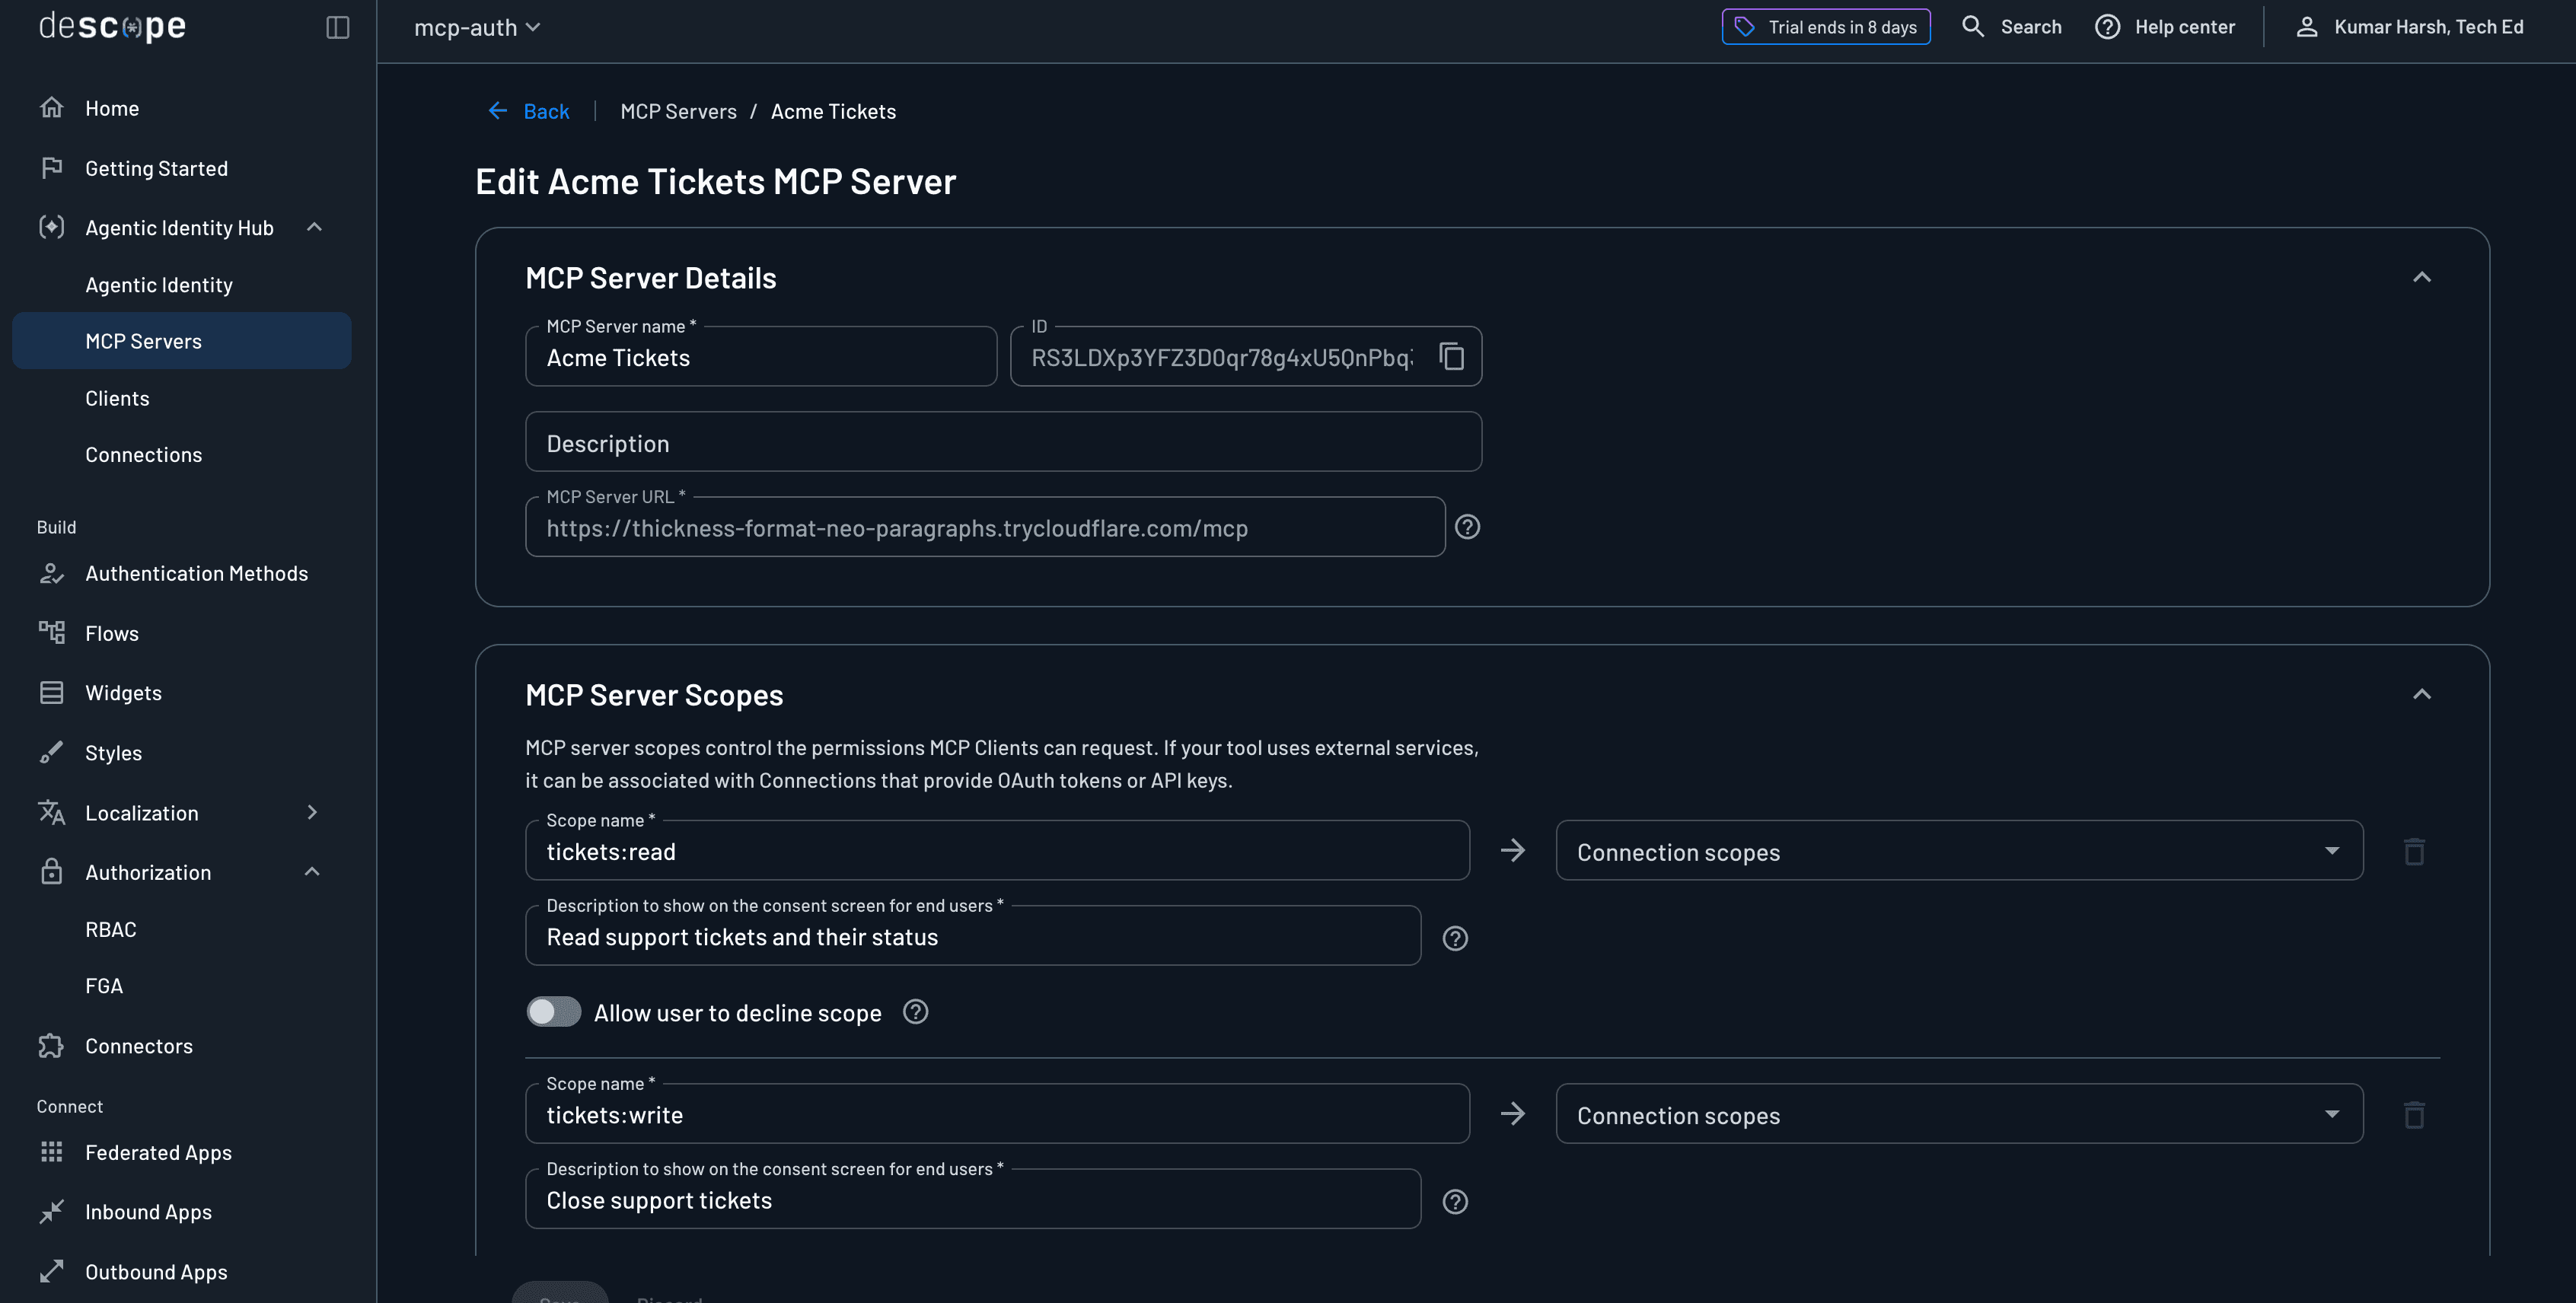
In the Descope Console, open Agentic Identity Hub > MCP Servers and create a server named Acme Tickets. Set the MCP Server URL to https://tickets.example.com/mcp, matching MCP_SERVER_URL exactly, since Descope writes this value into the aud (audience) claim of every token it issues for the server. Cognito authenticates the user, but Descope owns the discovery document and the consent screen a client has to pass through, so it mints the tokens scoped to this server.
Under MCP Server Scopes, add one scope per tool:
Scope name | Consent description | Allow user to decline scope |
|---|---|---|
tickets:read | Read support tickets and their status | Off |
tickets:write | Close support tickets | On |
MCP servers on the project issuer, which is the issuer this tutorial's server validates against, take their client registration settings from the project. Under Project Settings > OIDC, turn on CIMD and keep DCR enabled, so Claude Code, Cursor, and other clients register on first contact without an admin creating a Cognito app client by hand for each one. The server's MCP Client Registration section shows that status and links back to the project settings. The July 2026 spec revision prefers CIMD and keeps DCR for backward compatibility (Descope's breakdown of the MCP authorization spec walks through the change), and Descope's comparison of DCR and CIMD and registration methods guide cover when to prefer each.
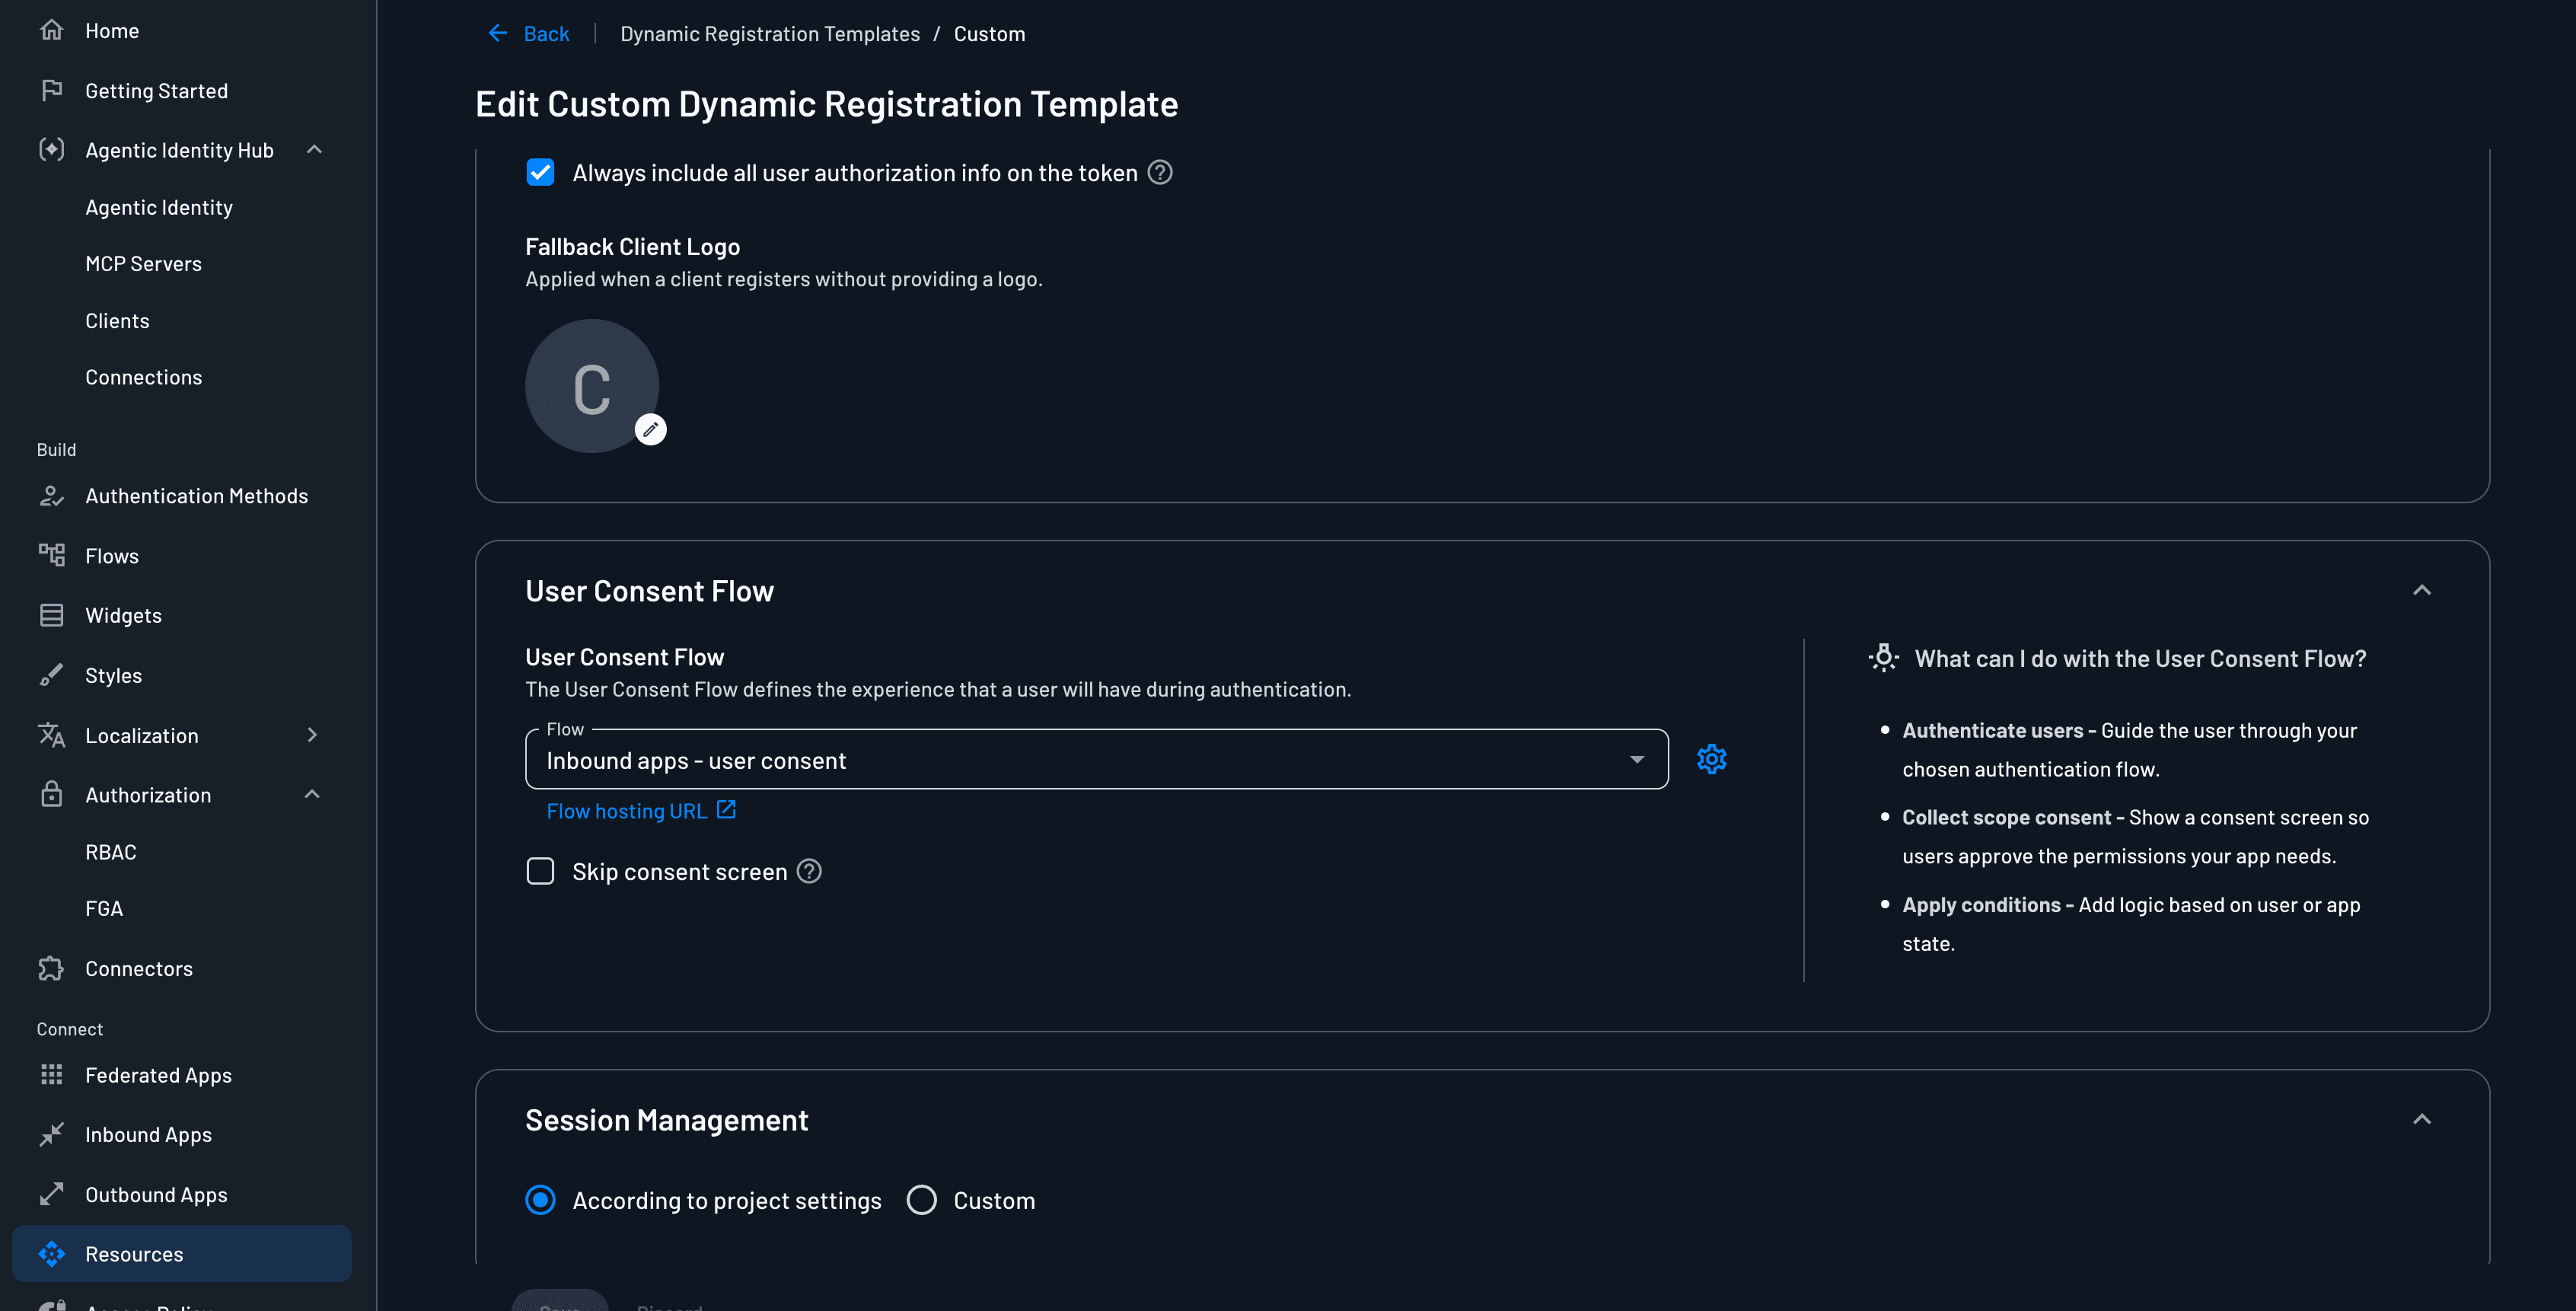
Next, give Acme Tickets its own consent flow. Under Resources > Dynamic Registration Templates, create a new dynamic registration template and check its Always include all user authorization info on the token box, so the access token carries the user's tenants and roles, including the role the Cognito group mapping produces later. Then, back in the MCP server's MCP Client Registration section, turn on Override project settings and select the new template. You'll attach the consent flow to the template in the next section.
Copy your Descope project ID (click the project name in the top nav, then Copy ID) into your .env file as DESCOPE_PROJECT_ID. Token validation only checks the project-level issuer and signature plus the aud claim set above, so no separate MCP server ID is needed.
Federating Descope to your Cognito user pool over OIDC
Cognito's hosted UI (now called managed login in the Cognito console) already implements OAuth 2.0 and OIDC for first-party sign-in, so your user pool can act as a generic OIDC provider to a third party like Descope without any special federation feature on Cognito's side. The one thing it needs is an app client Descope can use.
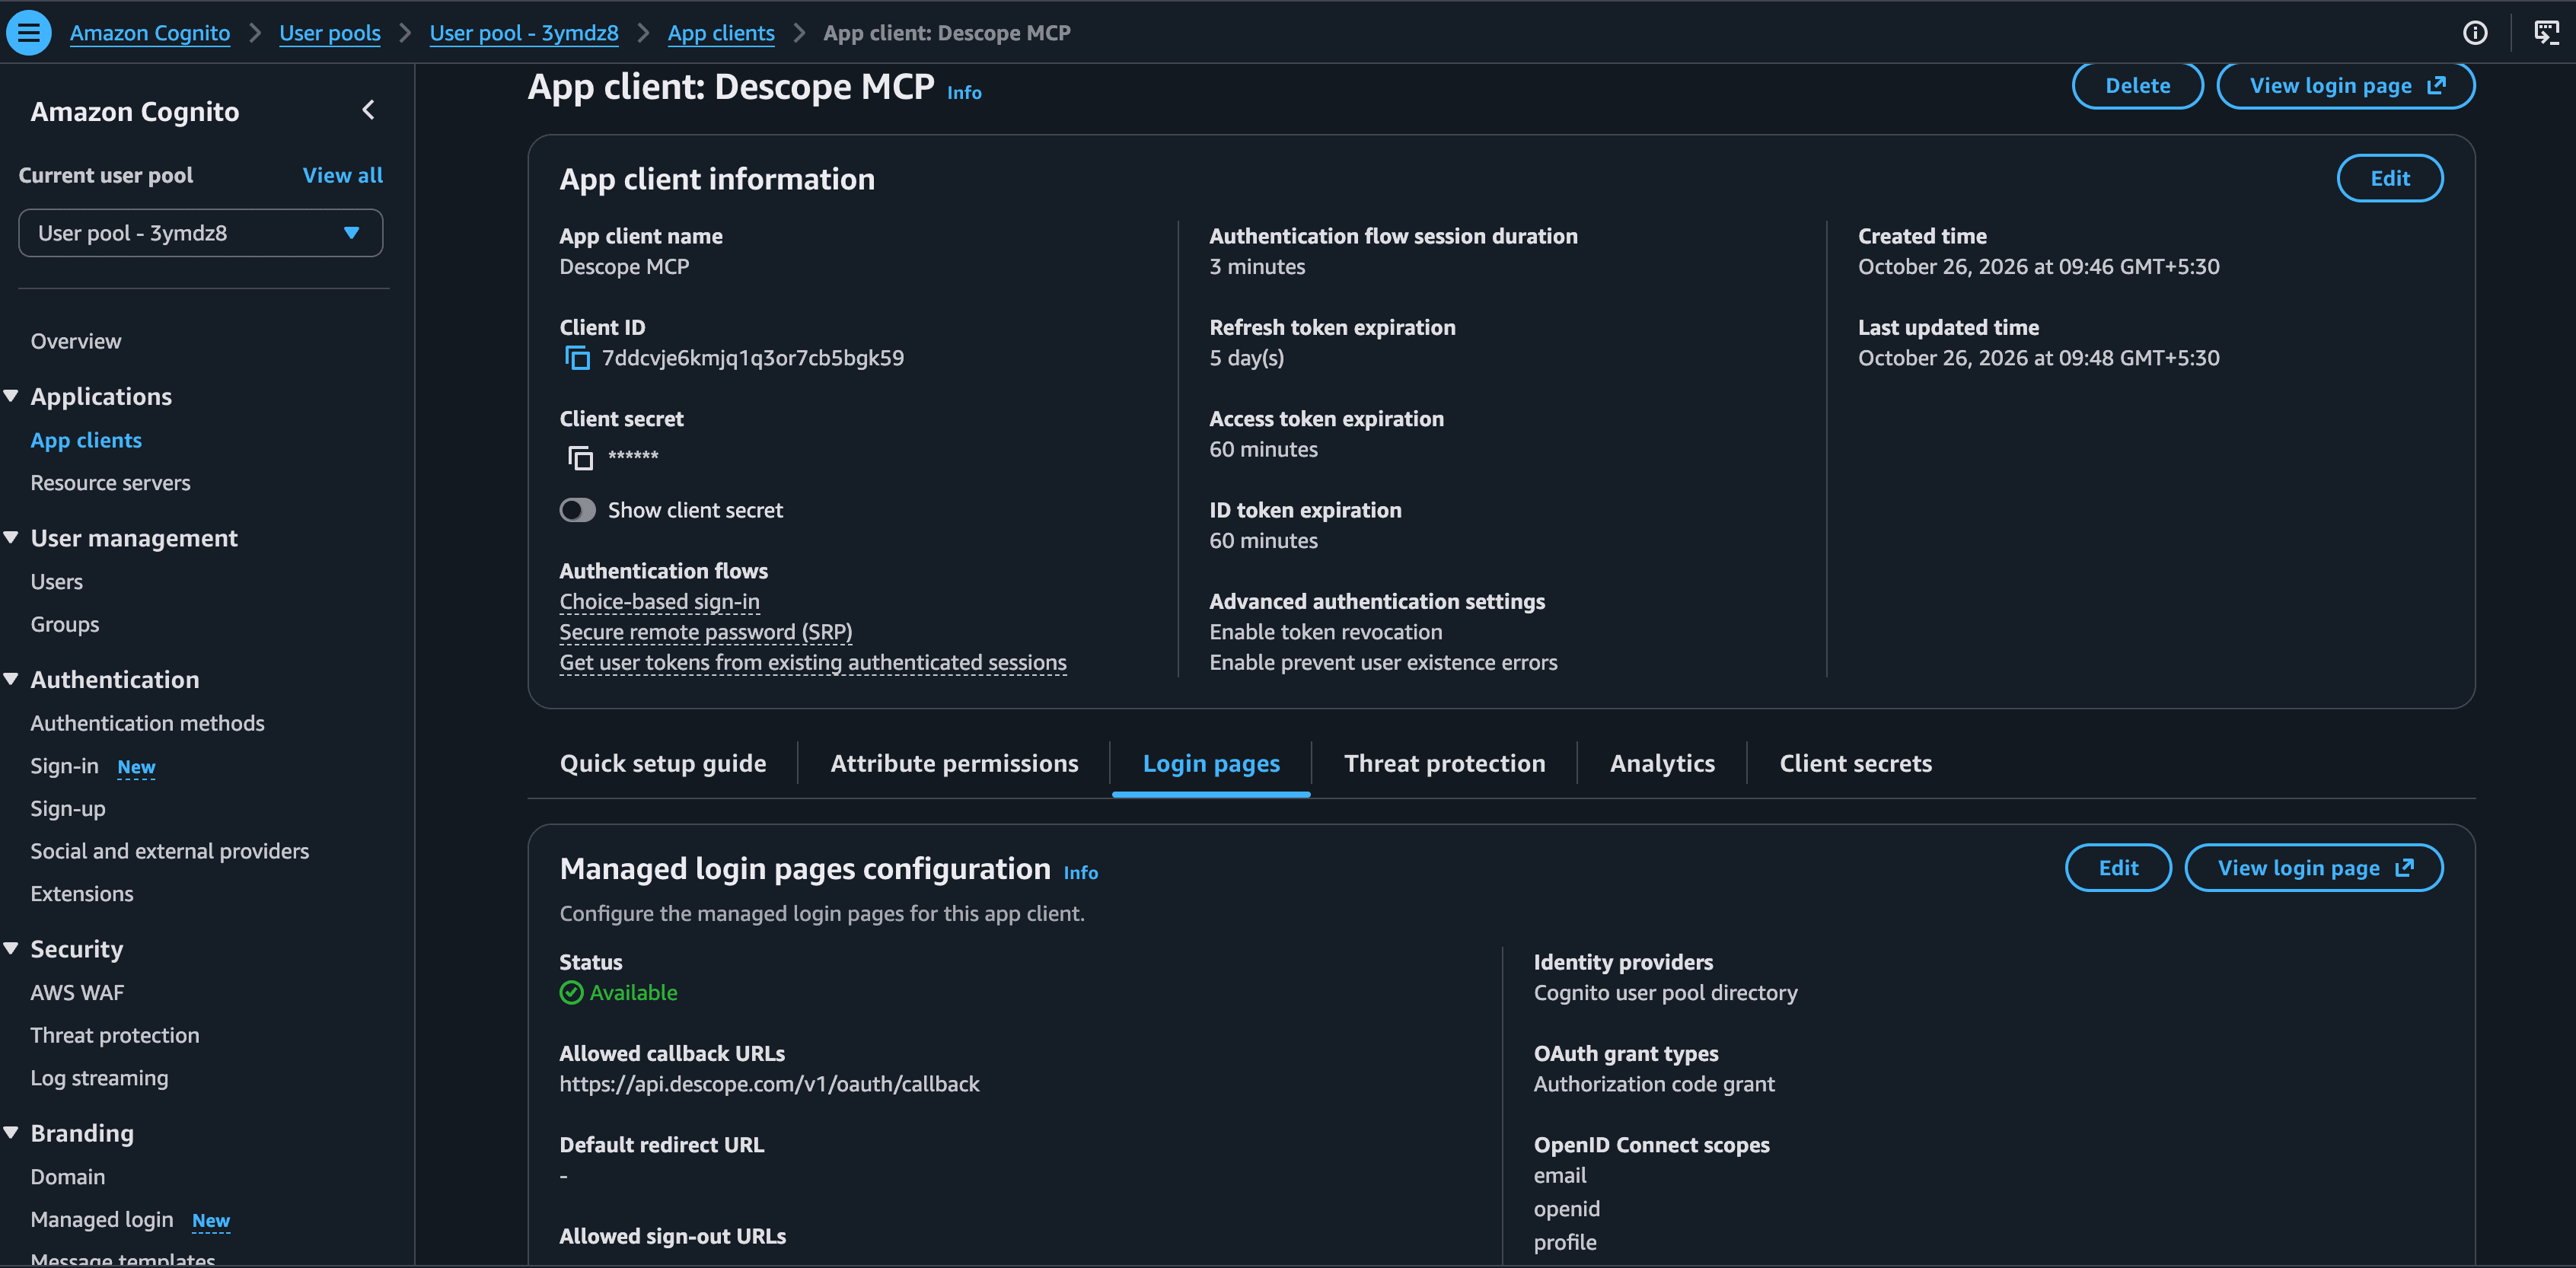
In the Cognito console, open your user pool. If no Cognito domain is set under Branding > Domain, create one, since the hosted UI's OAuth endpoints only exist once a domain is attached. Then, under Applications > App clients, create a new app client named "Descope MCP" alongside whatever app clients your product already uses, and choose Traditional web application as its type so Cognito generates a client secret. Descope redeems the authorization code by calling Cognito's token endpoint from its own servers, and it authenticates that call with the client secret.
On the app client's Login pages tab, edit the login pages configuration. Set Allowed callback URLs to Descope's OAuth callback, https://api.descope.com/v1/oauth/callback (Descope projects on a custom domain use that domain's equivalent), keep Cognito user pool directory as the identity provider, choose the Authorization code grant, and select the openid, email, and profile scopes. Save, then copy the Client ID and Client secret from the app client's details page.
In Descope, open Tenants, create a tenant named Acme, and add your company email domain (for example, acme.com) as its single sign-on (SSO) domain. In the tenant's Authentication Methods > SSO, choose OIDC, fill in the provider name, client ID, client secret, and the scopes openid profile email. Then paste your user pool's discovery URL, https://cognito-idp.<region>.amazonaws.com/<user-pool-id>/.well-known/openid-configuration, into Discovery URL and click Fetch. Descope reads the document and fills in the authorization, token, user info, and JSON Web Key Set (JWKS) endpoints for you. It also pulls in every scope Cognito advertises, including phone, so trim the scopes list back down to openid, profile, and email. Set the SSO domain again in the SSO config's own domain field, since Descope checks it there separately.
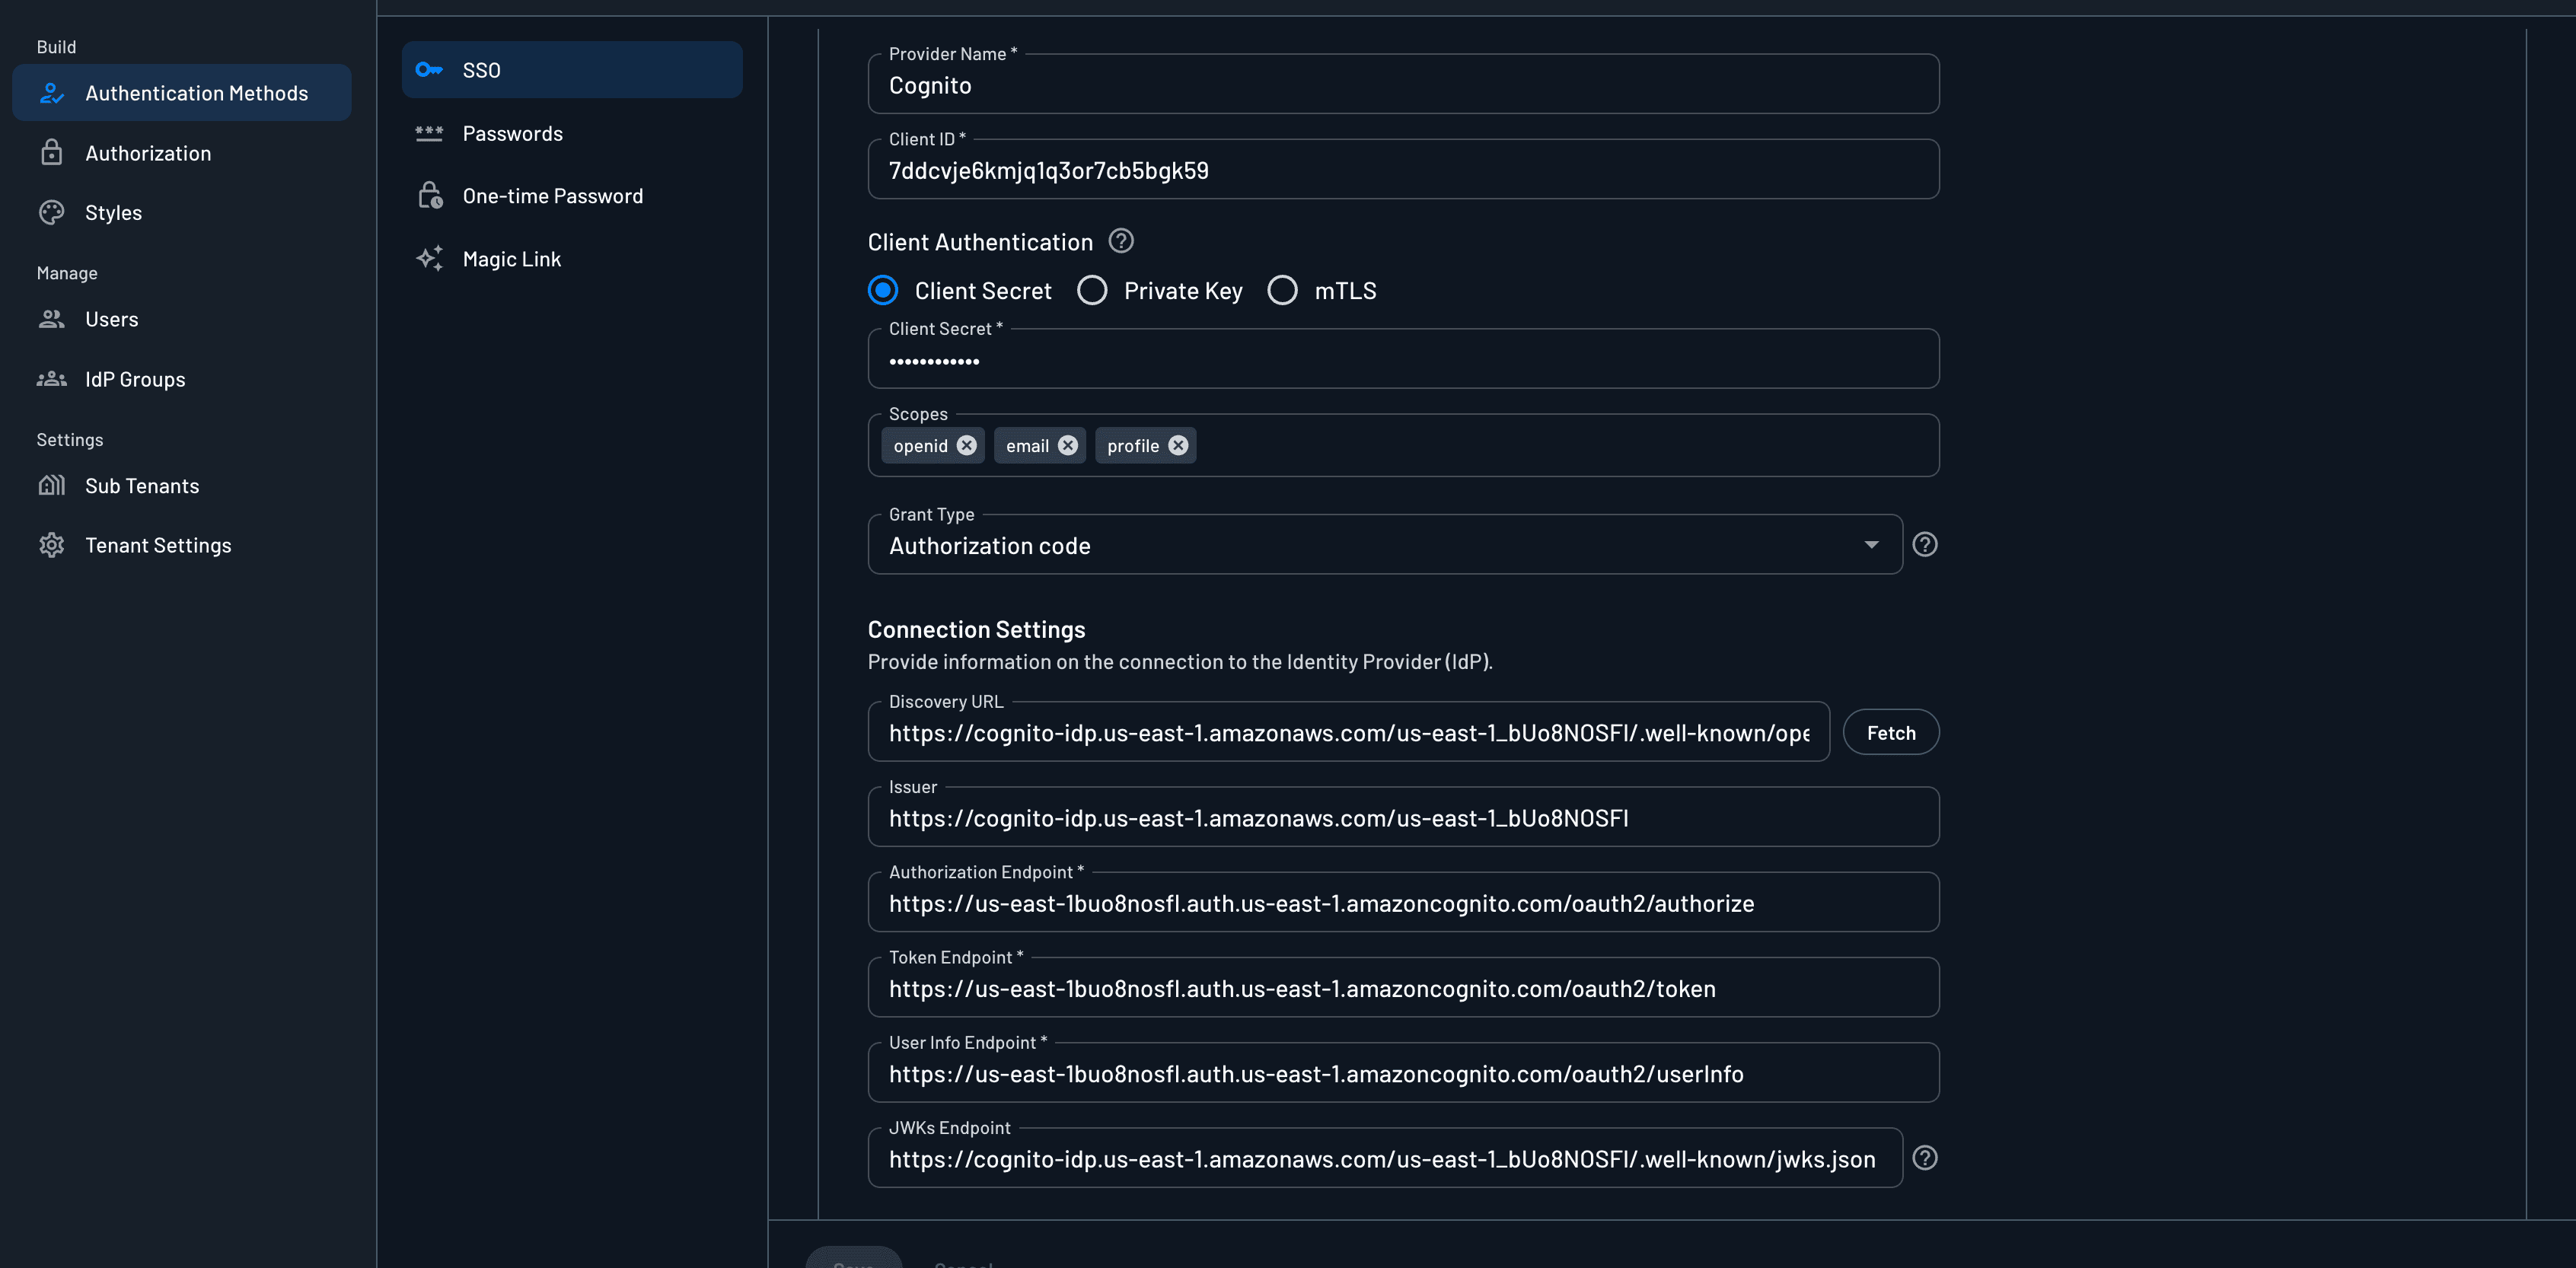
In the SSO configuration's group settings, set Groups attribute name to cognito:groups (the claim where Cognito lists a user's groups). Cognito includes this claim automatically in the ID token for any user assigned to a user pool group, as a plain list of group names, with no Lambda trigger required.
Now wire Cognito into the consent flow. Open the Inbound apps - user consent flow (inbound-apps-user-consent) in Flows, and add a button on the Welcome Screen for SSO sign-in.
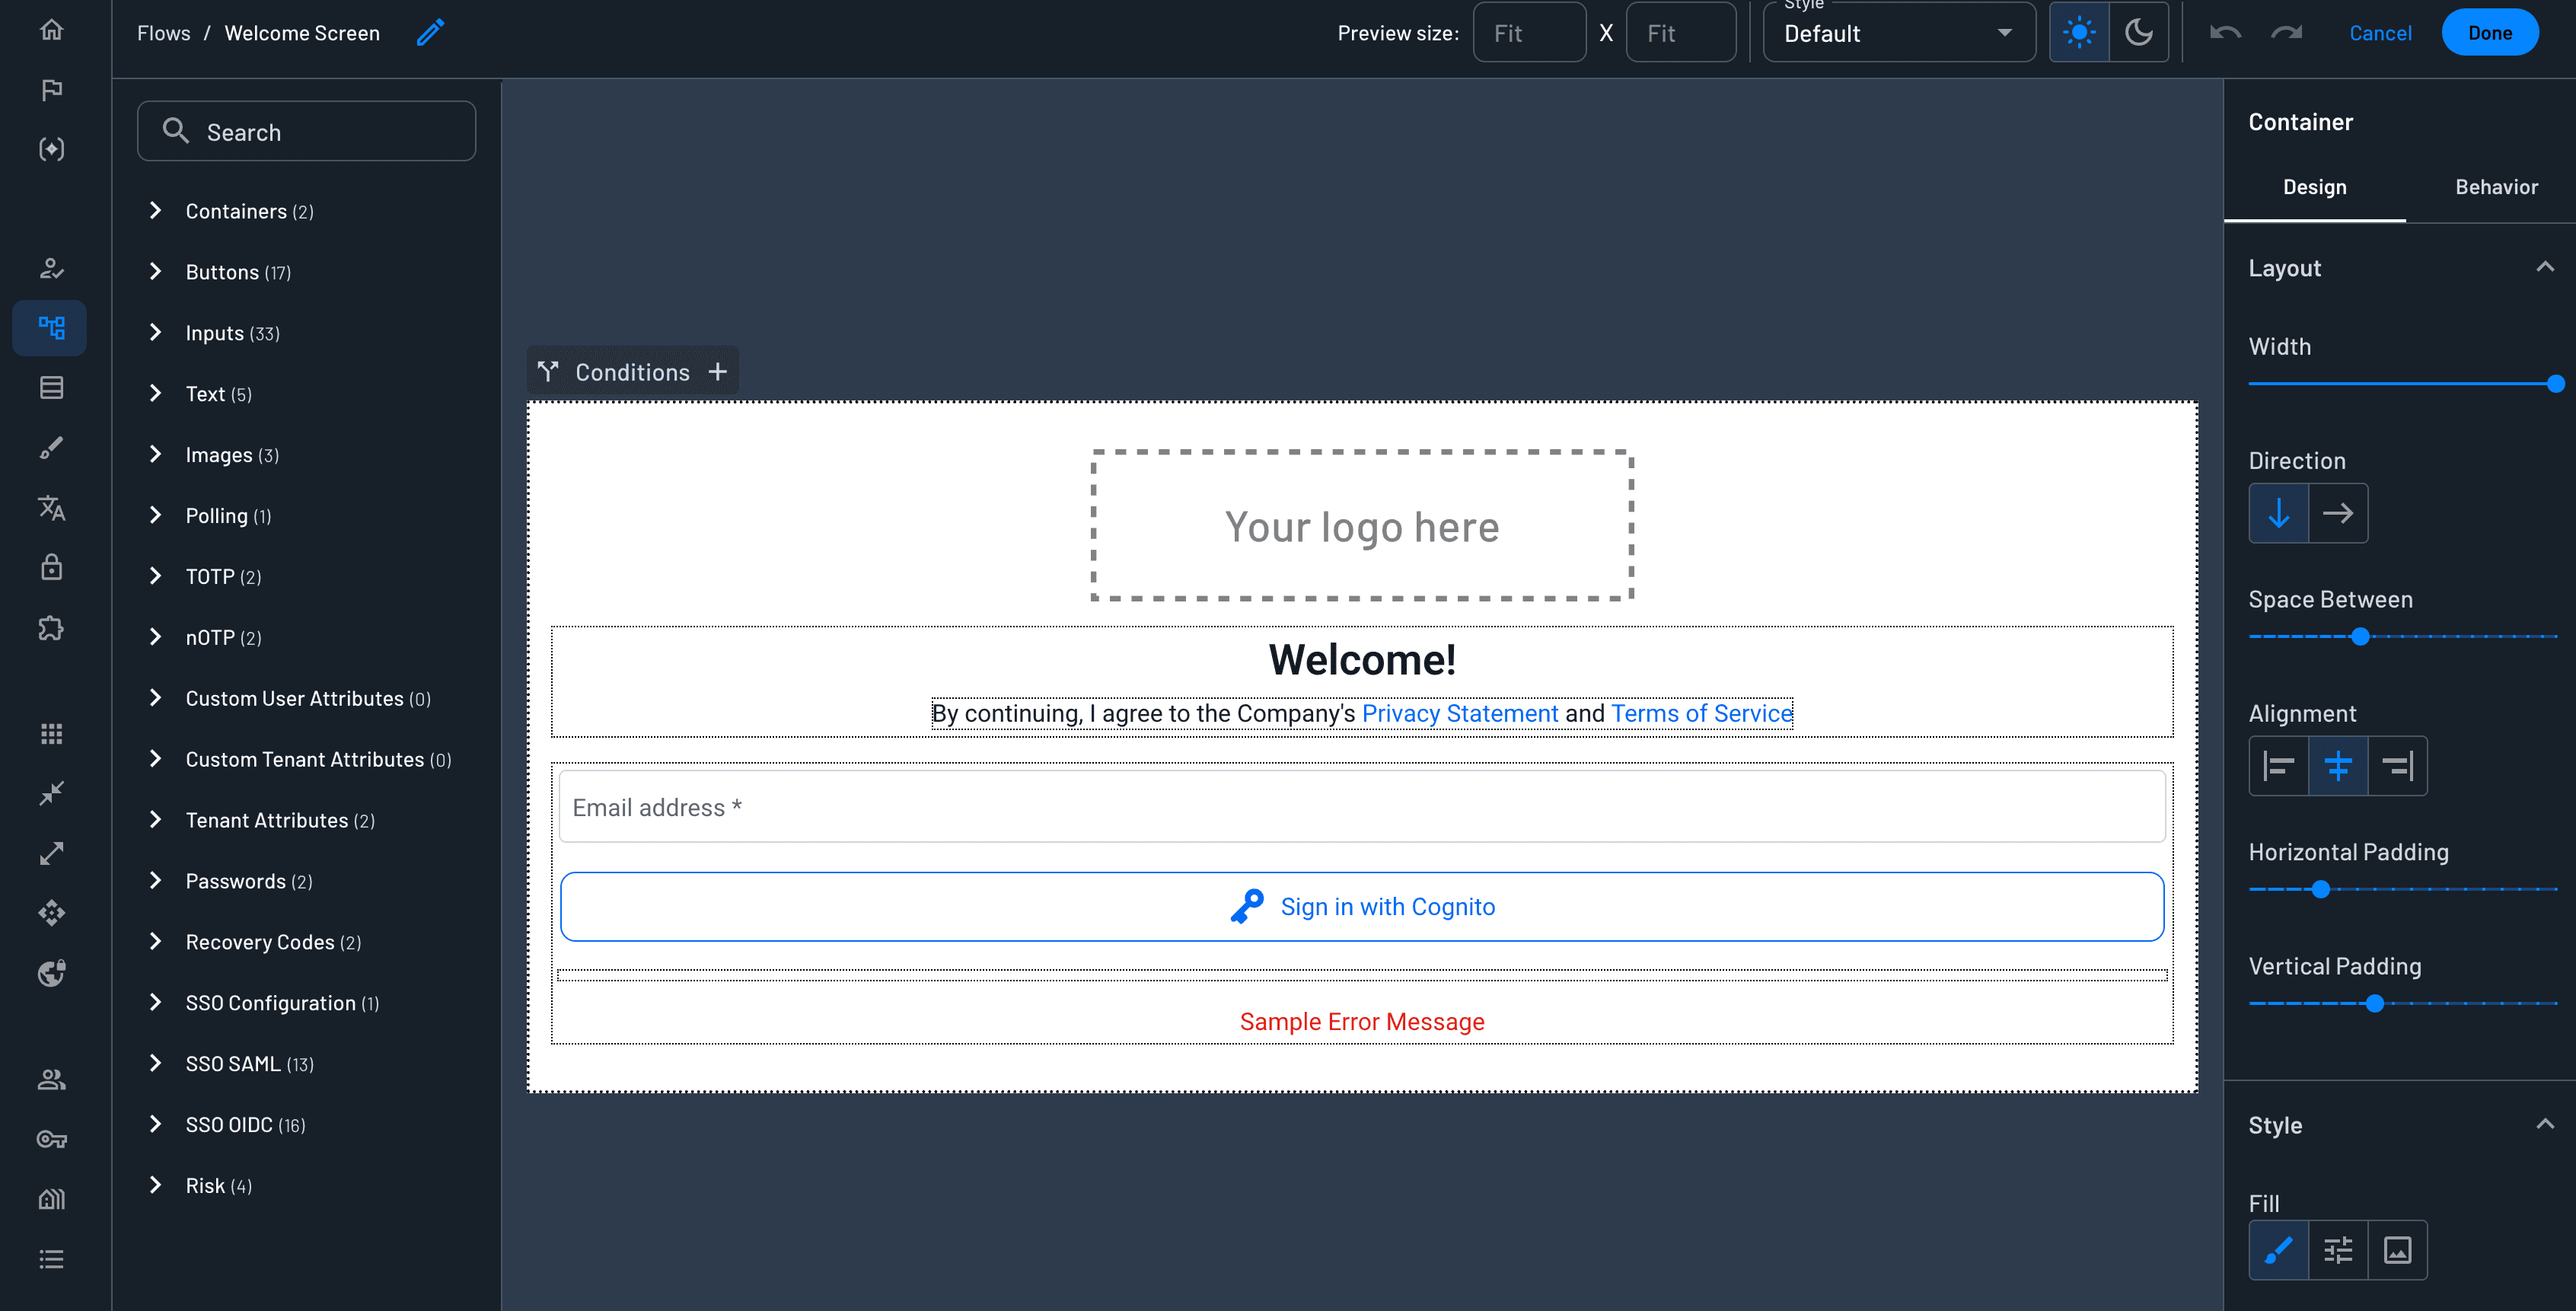
Connect it to a new SSO sign-in action feeding into the flow's existing auth check step. Back in the dynamic registration template you created, select this flow from the User Consent Flow dropdown.
Cognito's hosted UI still authenticates the user at this point, and any pre token generation Lambda trigger (a function Cognito runs right before issuing tokens, commonly used to add or override claims) already attached to the pool still runs and still shapes the ID token the same way it always has. Descope redeems the authorization code at Cognito's token endpoint directly and mints its own access token, carrying its own issuer and your MCP server's audience, for Claude Code to use.
If your pool's trigger adds custom claims beyond cognito:groups, those claims arrive in the same ID token Descope reads, but Descope doesn't copy them onto the access token by itself. Map each one to a custom user attribute in the tenant's SSO attribute mapping, then add it to the token with a Custom Claims action in the consent flow, the same way the next section adds the Cognito groups. The claim reaches your server with the value Cognito's trigger produced, under whatever key you give it.
Mapping Cognito groups to MCP scopes
Create two roles under Authorization > RBAC in Descope, support-lead and support-agent, then open the Acme tenant's Authentication Methods > Roles & Groups and map SupportLeads to support-lead and SupportAgents to support-agent. Descope applies these mappings on every SSO login, reading the group names straight out of the cognito:groups claim.
To record exactly what Cognito reported, separate from the Descope role the mapping produces, add a Custom Claims action right after the SSO action in the consent flow. Set Key to cognito_groups, switch Value to the dynamic type, and set it to idpGroups, the flow context key Descope populates from the groups attribute you named in the SSO configuration.
Access policies decide what the mapped role is allowed to do. Open the Access Policy page in the Descope Console (on its Resources & Connections tab, if your project splits the page into tabs) and create two allow rules targeting Acme Tickets. The block below summarizes each rule's console settings; it isn't a file you paste anywhere:
Rule name: Acme Tickets - Read and write for leads on trusted agents
Conditions:
user.roles CONTAINS "support-lead"
client.tags CONTAINS "trusted-agent"
Allowed Resource: Acme Tickets
Allowed Scopes:
* tickets:read
* tickets:write

Rule name: Acme Tickets - Read for support staff
Conditions:
user.tenantIds IN ["<Acme tenant ID>"]
Allowed Resource: Acme Tickets
Allowed Scopes:
* tickets:read
Descope evaluates rules from top to bottom, and the first enabled rule that matches decides which scopes the token can carry. That's why the lead rule grants both scopes and has to sit above the tenant-wide rule. New rules land at the bottom of the list, so drag it to the top if you created it second. A support lead connecting through a client tagged trusted-agent matches the first rule and can consent to both tools, while everyone else in the Acme tenant, including a lead on an untagged client, falls through to the second rule and gets tickets:read only. The Default rule at the bottom of the list starts as Block All, so a request that matches neither rule gets nothing.
You assign the trusted-agent tag under Agentic Identity Hub > Clients after reviewing a client. Teams running an API Gateway authorizer that already checks Cognito group membership on existing REST or HTTP APIs keep that authorizer exactly as it is, validating Cognito-issued tokens against those same groups. It's only the MCP server that now validates a Descope-issued token instead, so Cognito groups stay the one source of truth both systems read from.
Designing scopes at the tool level
A single blanket scope like tickets:all would undo that design. One grant would unlock both tools at once, and the two rules you just built would hand out the same thing, since both would be gating the same scope. Scoping each tool separately keeps those rules meaningful and gives the user a specific, per-tool choice on the consent screen.
tickets:read and tickets:write map to the get_ticket and close_ticket tools respectively, and the require_scopes decorators hold the server to that mapping. FastMCP also filters the tool list itself through its authorization checks, so a client with only tickets:read never even sees close_ticket in its list. Calling it directly fails with an unknown-tool error, since it was never in the list to call. The consent screen reflects the same split. A support lead can uncheck Close support tickets and keep just the read scope. A support agent never sees that option at all, since the policy stripped it out before the screen rendered.
End-to-end walkthrough: client registration to token at the server
Start the server and your tunnel, then add it to Claude Code:
python server.py
claude mcp add --transport http acme-tickets https://tickets.example.com/mcp
Open Claude Code and run /mcp. Acme Tickets shows as needing authentication, and selecting Authenticate opens the browser.
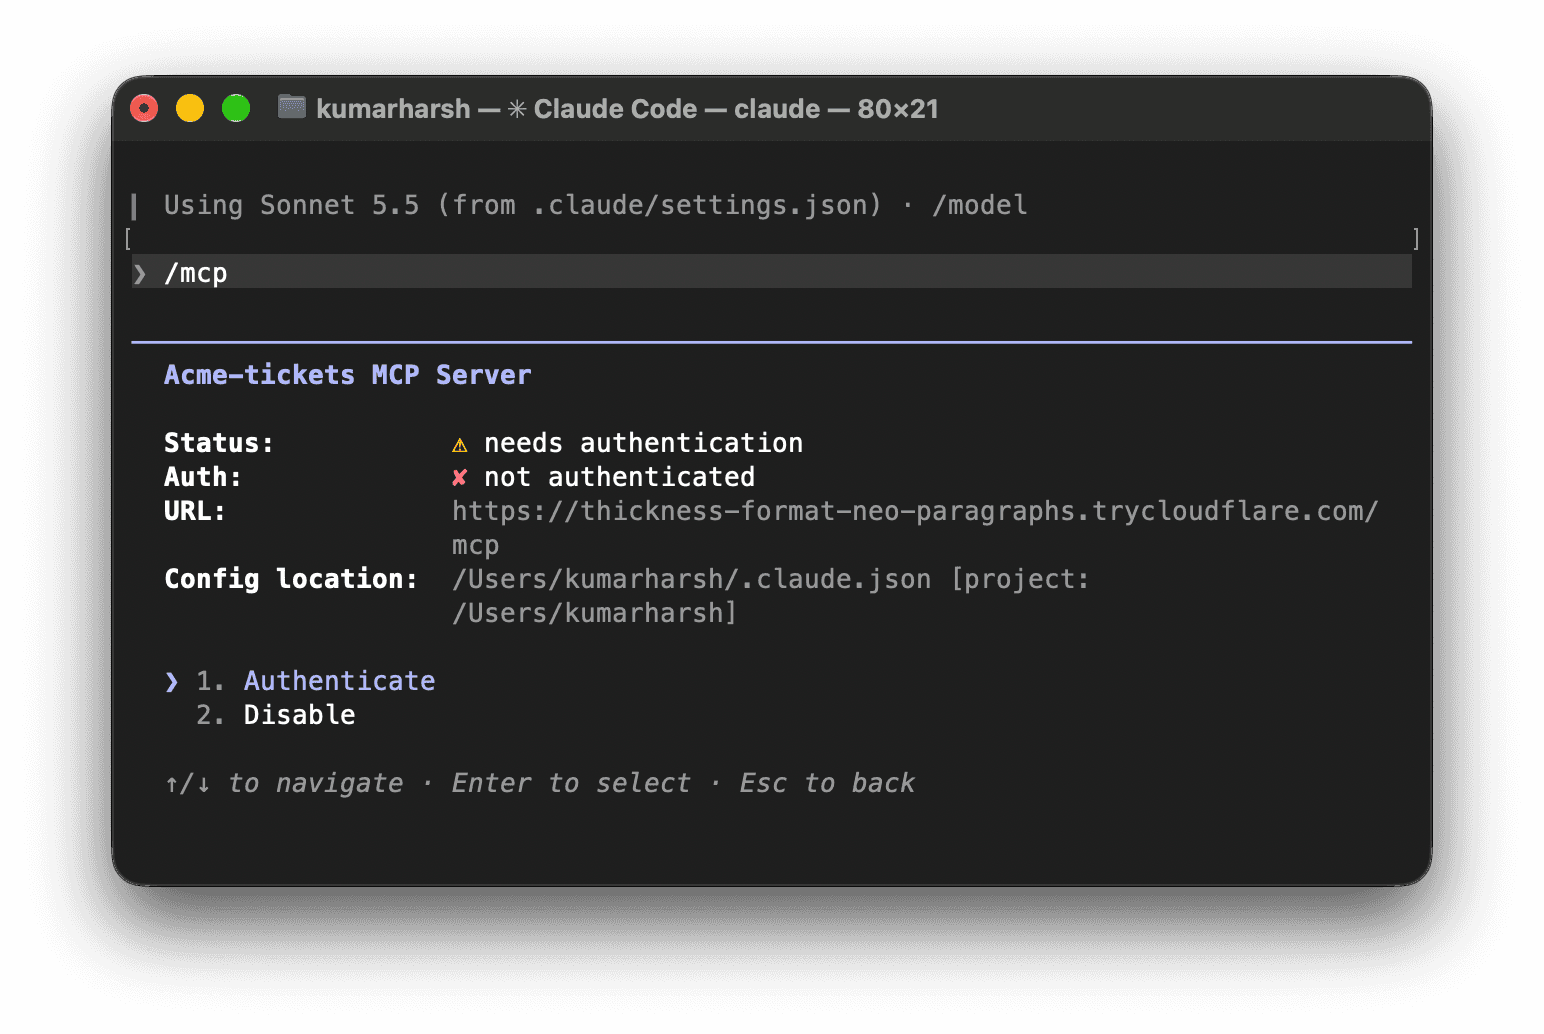
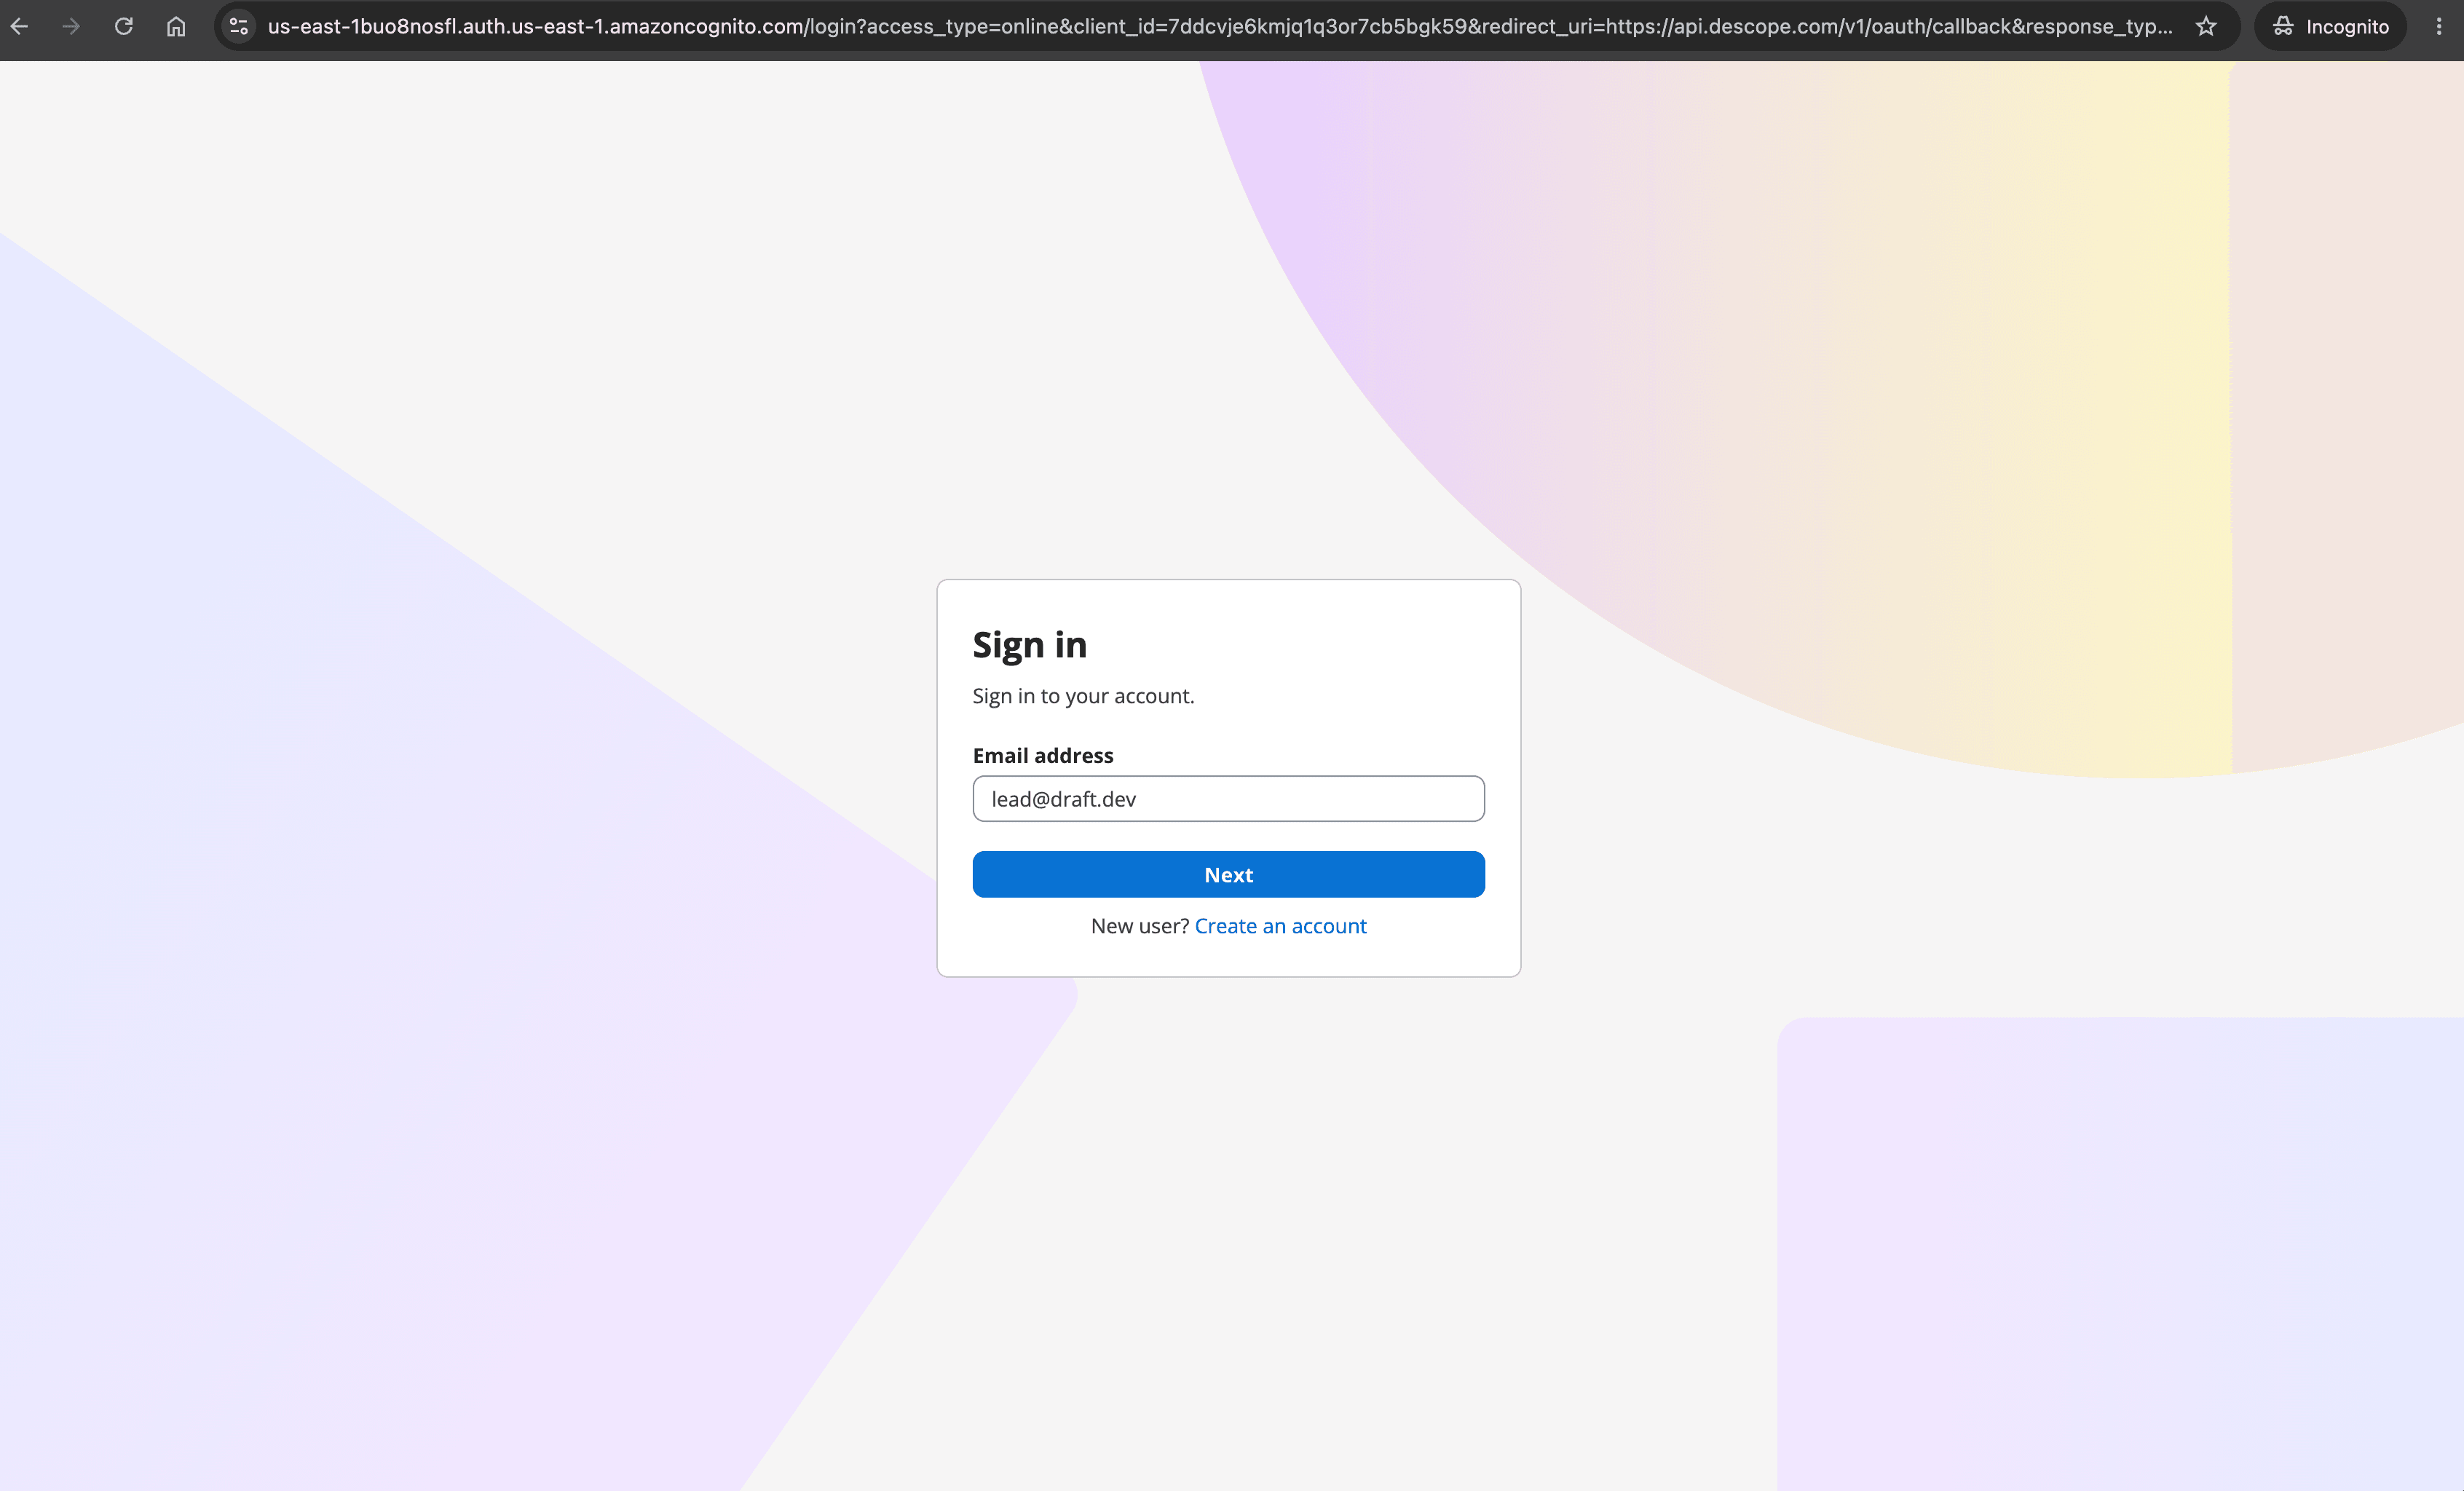
The first URL it opens is Descope's authorization endpoint, and its query string shows the spec at work: Claude Code's client_id, a code_challenge with code_challenge_method=S256, the requested scope, and a resource parameter naming your MCP server. Entering your email and clicking Sign in with Cognito redirects the browser to Cognito for authentication.
Once you're authenticated, you see the consent screen with only the permissions available to your role.
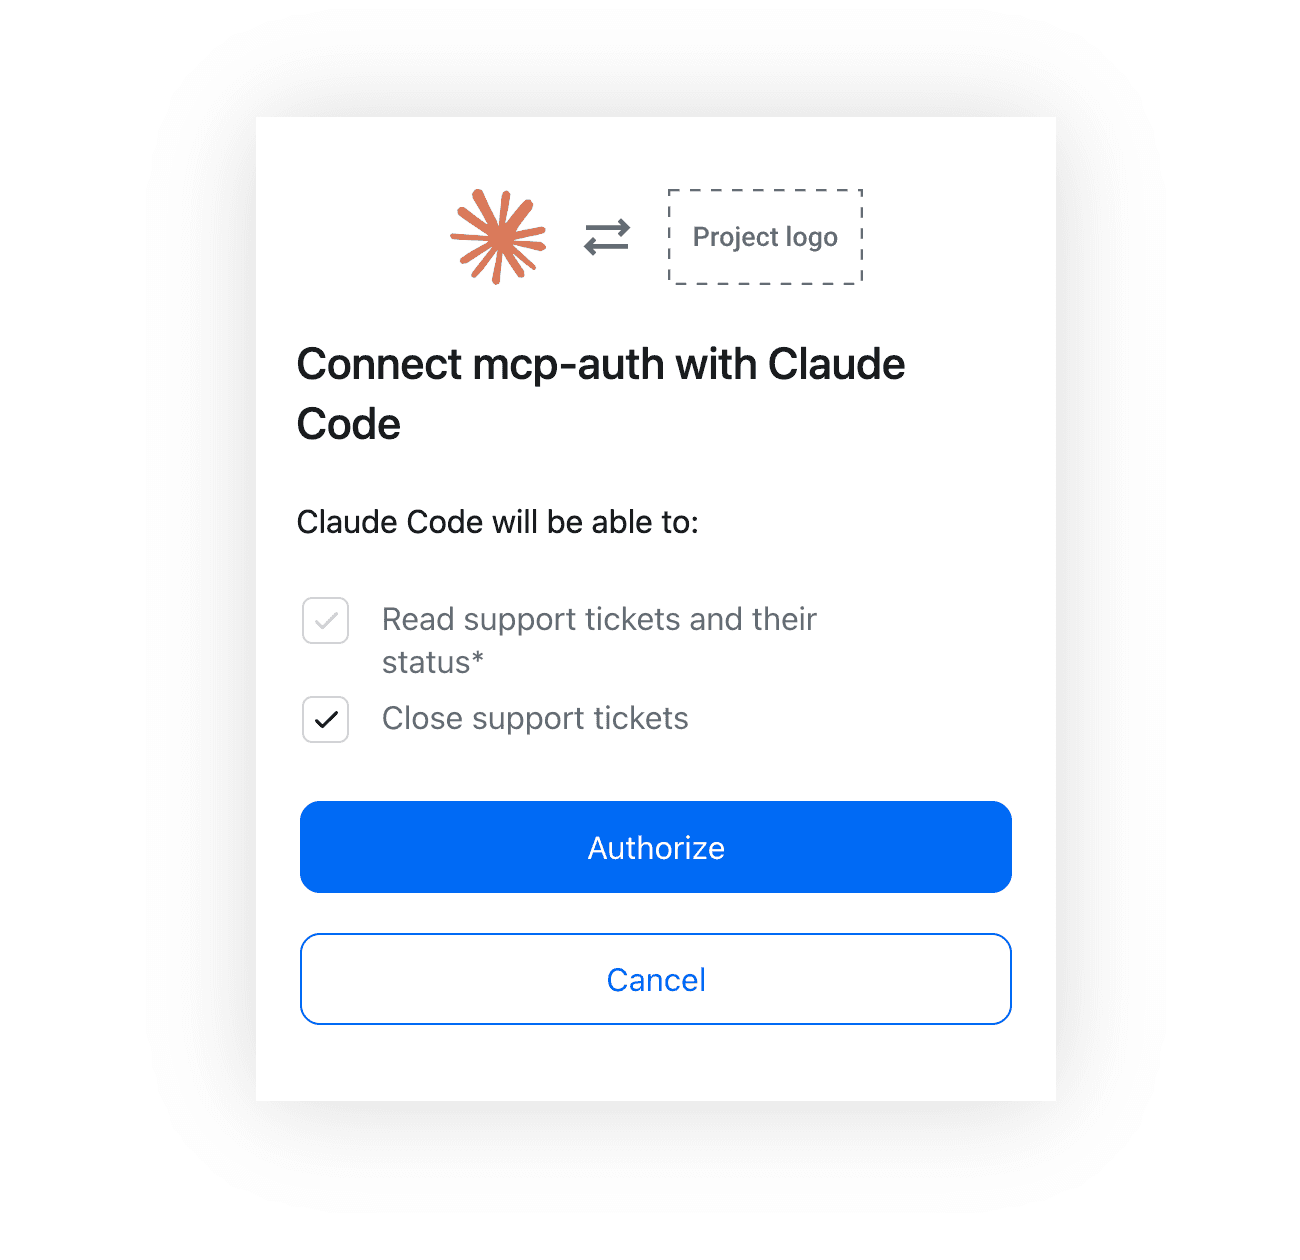
Authorizing hands the authorization code to Claude Code's local callback, which redeems it with the PKCE verifier.
To inspect the token at your server, temporarily log the raw bearer token in get_ticket:
logger.info("raw token: %s", get_access_token().token) # remove after testingAsk Claude Code to "summarize ticket 4821," copy the logged token, and paste it into JWT Guru, Descope's JSON Web Token (JWT) decoder, which decodes tokens in your browser without sending them to a server. The support lead's token decodes to claims along these lines:
{
  "iss": "https://api.descope.com/v1/apps/P2abc...",
  "sub": "U2lead...",
  "aud": ["https://tickets.example.com/mcp"],
  "scope": "tickets:read tickets:write",
  "cognito_groups": ["SupportLeads"],
  "tenants": {
    "T2acme...": { "roles": ["support-lead"], "permissions": [] }
  },
  "iat": 1791378000,
  "exp": 1791378600
}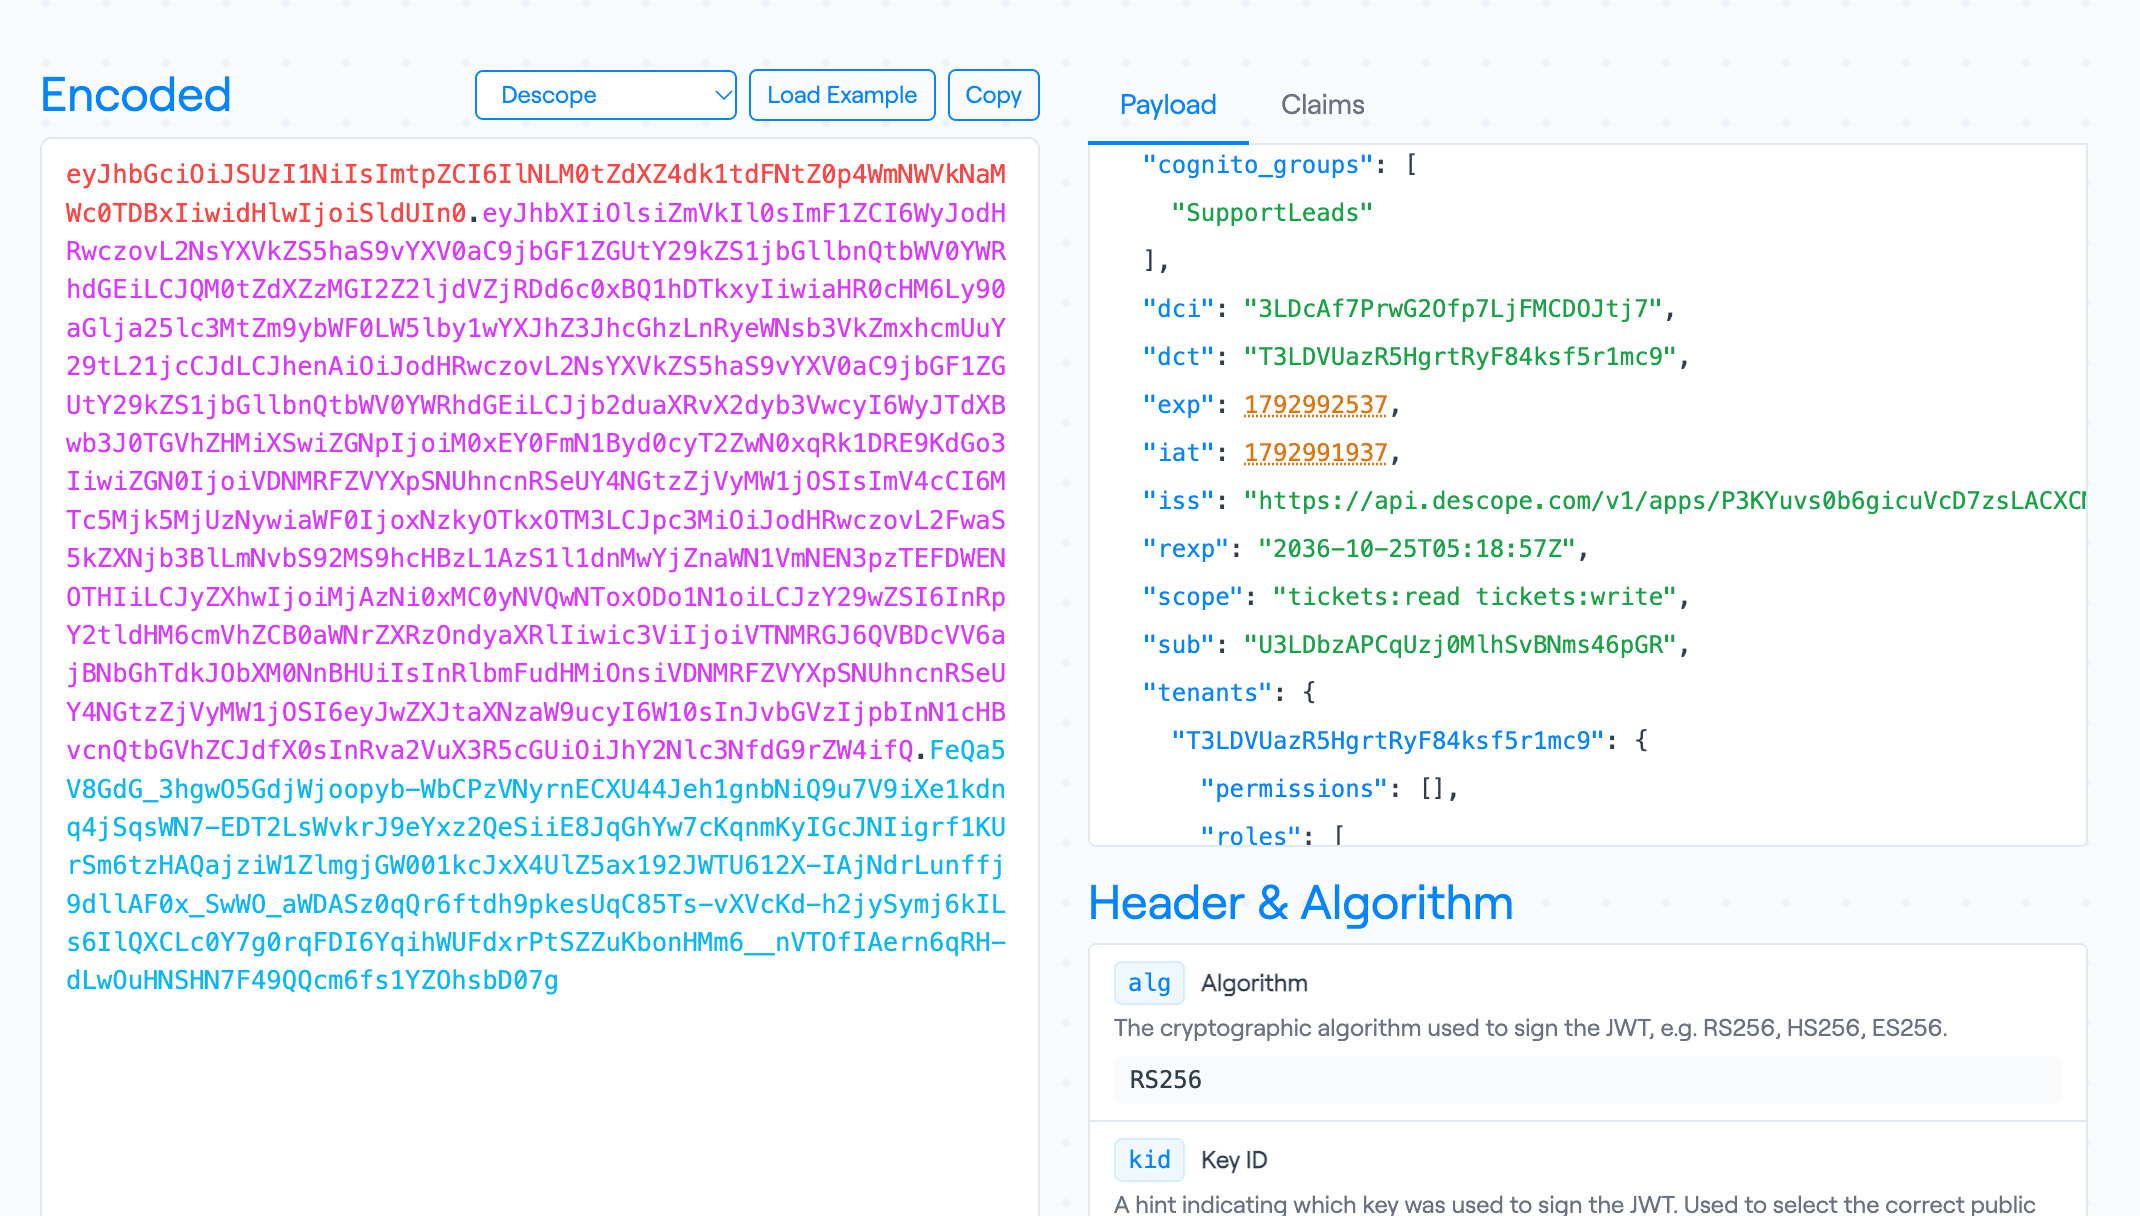
The token illustrates the whole chain. The iss claim names Descope as the issuer, confirming Descope minted this token itself. cognito_groups is taken from the hosted UI login, the support-lead role under tenants is what the Roles & Groups mapping produced from it, and that role combined with the trusted-agent client tag is what put tickets:write into scope. A support agent's token decodes to the same shape with "scope": "tickets:read" and "cognito_groups": ["SupportAgents"]. Remove the logging line once you've captured what you need, since a logged bearer token is a live credential until it expires.
Audit and revocation
Every consent creates an agentic identity in Descope, one per user per client. Agentic Identity Hub > Agentic Identity lists them with the associated user, client, MCP server, granted scopes, and when the consent was created and last modified. Selecting a row and choosing Revoke Access invalidates the consent and ends the agent's sessions, and Claude Code shows Acme Tickets as needing authentication again on its next refresh. The support lead's Cognito user record, their other applications, and the Claude Code client registration all stay intact.
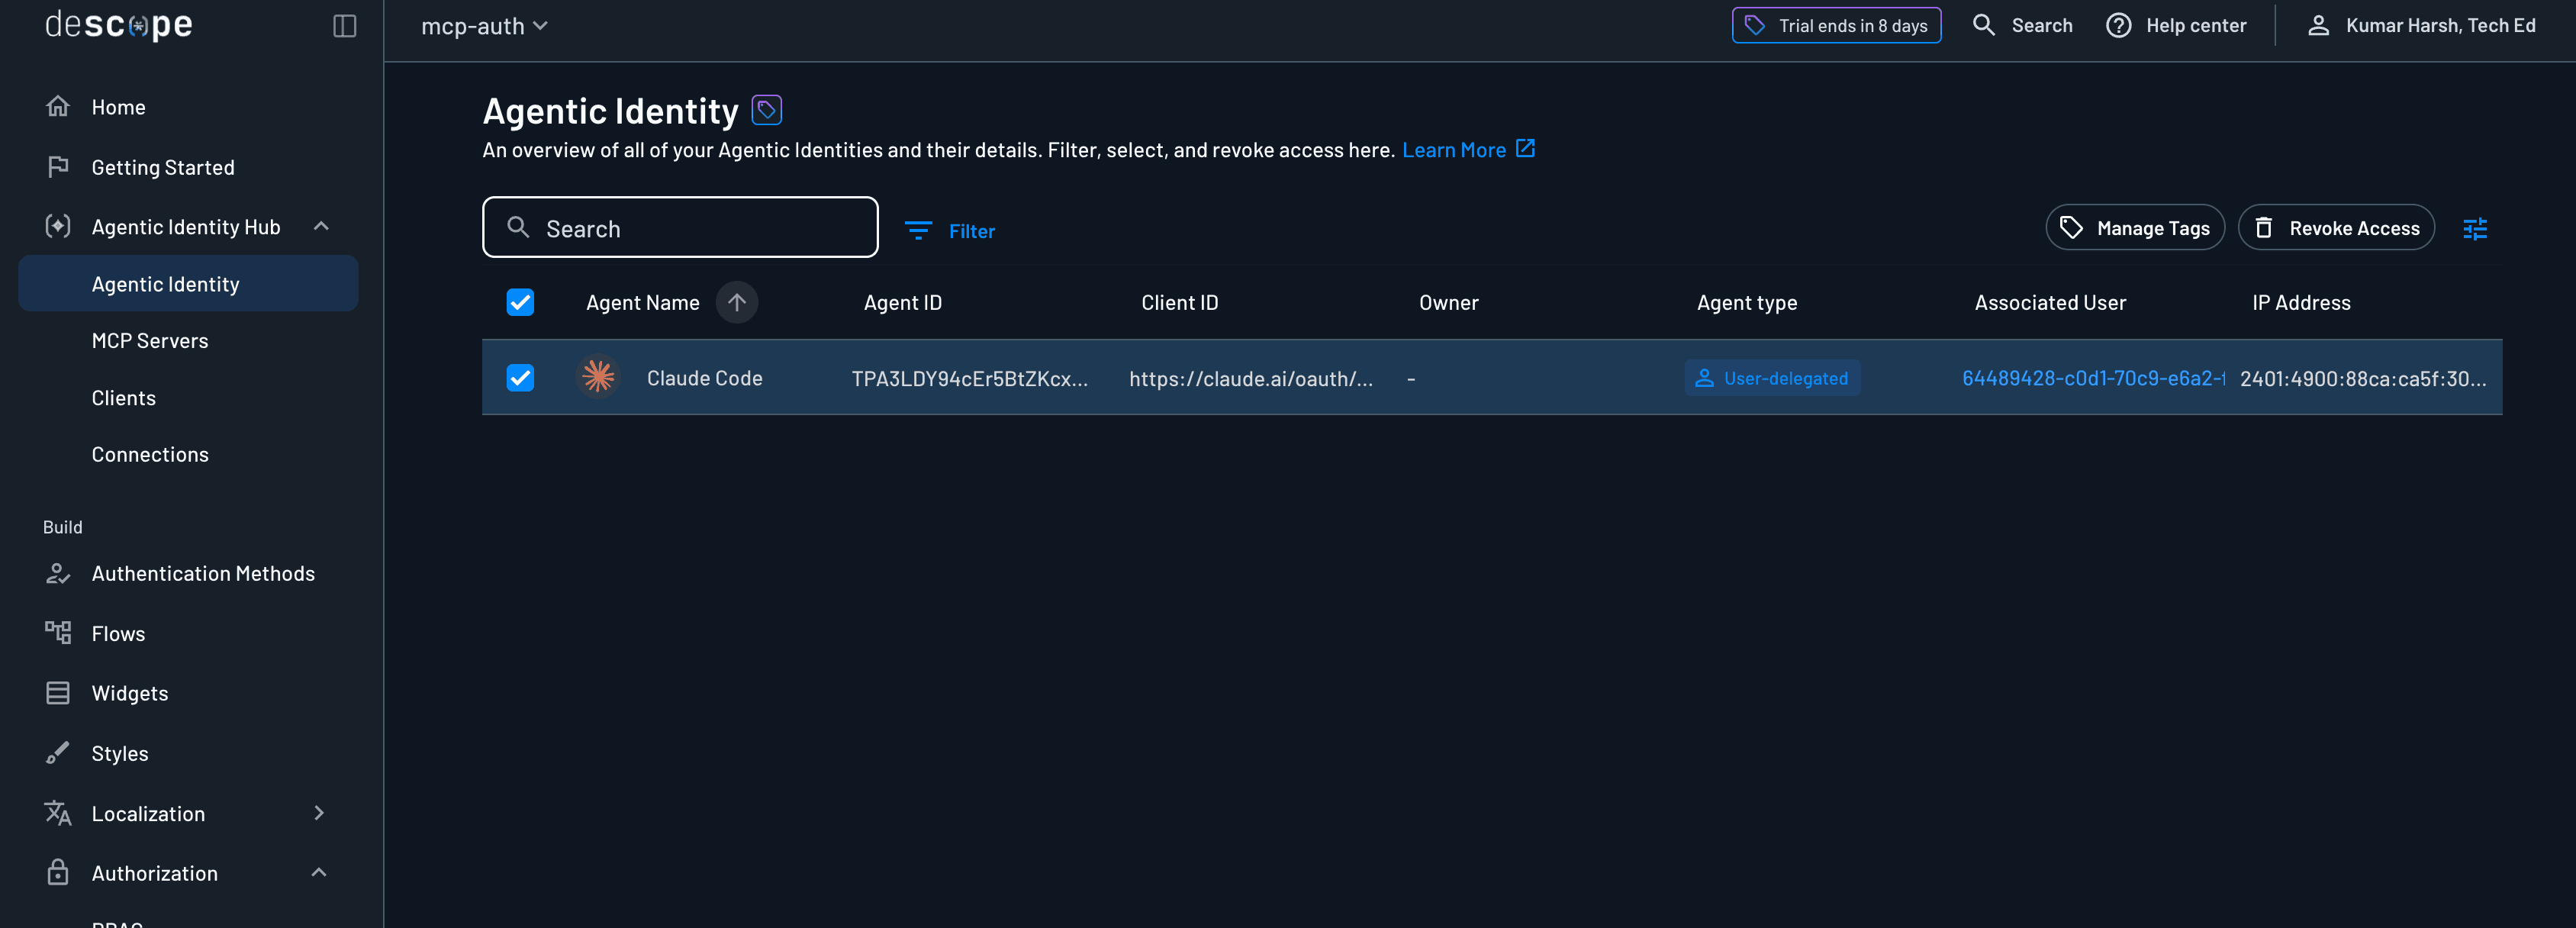
Because your server validates token signatures locally against a cached JWKS, set a short access token lifetime to keep the window between revocation and token expiry small. With a dynamic registration template attached, that setting lives in the template's Session Management section rather than the MCP server's.
On the Descope side, the audit trail records the login through Cognito, the consent and its scopes, each token issuance, the revocation, and any policy violation where a client requested a scope outside its policies. Every event is stamped with the agent ID, which pins it to a single user and a single client. Descope doesn't see the tool calls, though, since those execute on your server, which is why close_ticket logs sub and the granted scopes. Match the two sources on user ID and you can reconstruct what an agent did and which Cognito identity it was acting as, without querying the user pool.
Group changes in Cognito don't reach agents that are already connected. Descope only reads cognito:groups when the user signs in through SSO, so if you take someone out of SupportLeads, their agents keep the access they were granted until that user signs in again. Even then, Descope adds mapped roles to the user's existing tenant roles by default instead of replacing them, so turn on Override roles in the project-level SSO settings if leaving a Cognito group should also remove the Descope role. Revoking the agent in Descope cuts it off right away.
What stays in Cognito and what Descope adds
You've now added MCP authorization to a Cognito-backed app without changing how your users sign in. Descope sits in front of your MCP server, sends every login to your Cognito user pool, and turns the SupportLeads and SupportAgents groups into tool-level scopes. You connected Claude Code, traced a real token from your server's logs back to the group that shaped it, and revoked an agent without touching the user pool. Cognito is still where identities and group memberships live, while Descope MCP Auth handles what MCP adds on top, including client registration, consent, and token issuance. The only change on the Cognito side is one new confidential app client for Descope. Your hosted UI, existing app clients, and Lambda triggers work as they did, and any API Gateway authorizers that check Cognito groups on your other APIs keep validating Cognito-issued tokens with no changes.
To run this against your own user pool, sign up for a Free Forever Descope account and work through the Bring Your Own Auth for MCP guide. Have questions along the way? Join AuthTown, our open user community for developers, or book time with our auth experts.
The full server from this tutorial is in the acme-tickets-mcp repo, and other parts of this series apply the same pattern to Okta, Auth0, and Microsoft Entra ID. If your agents run on AWS, Descope's guide to building identity-aware agents with Amazon AgentCore covers the runtime side of the stack. If your next MCP server needs a SAML IdP or an in-house login system instead, the same consent flow can pull it in through external authentication.